


GBC RDX1619, RSX128, GDM10, RDX1413, RDS1819 User Manual
...RDS1713
RDX1413
GDM10
GDHS7
RDS1819
RDX1619
Instruction Manual
Manual de instrucciones
Manuel d’utilisation
To register this product go to www.gbc.com. Pour enregistrer ce roduct allez sur www.gbc.com. Para registrar este producto vais en www.gbc.com
Specifications
|
Models |
RSX128 |
RDS1713 |
RDX1413 |
|
||||
|
|
||||||||
|
|
|
|
|
|
|
|
|
|
|
Sheet Capacity - |
|
|
|
|
12 sheets |
17 sheets |
14 sheets |
|
|
|
|
|
|
|
||||
|
|
|
|
|
|||||
|
|
|
|
|
|
|
|
|
|
|
Duty Cycle - |
|
|
|
|
4 min on / 30 min off |
10 min on / 20 min off |
10 min on / 20 min off |
|
|
|
|
|
|
|
||||
|
|
|
|
|
|
|
|
|
|
|
Duty Cycle - |
|
|
|
2 min on / 10 min off |
3 min on / 20 min off |
3 min on / 20 min off |
|
|
|
|
||||||||
|
|
|
|
|
|
|
|
|
|
|
Duty Cycle - |
|
|
|
2 min on / 20 min off |
3 min on / 20 min off |
3 min on / 20 min off |
|
|
|
|
|
|||||||
|
|
|
|
|
|||||
|
|
|
|
|
|
|
|
|
|
|
Volts / Hz - |
120V AC / 60Hz |
120V AC / 60Hz |
120V AC / 60Hz |
|
||||
|
|
|
|
|
|
|
|
|
|
|
Amperage |
5.0A |
8.0A |
8.0A |
|
||||
|
|
|
|
|
|
|
|
|
|
|
|
|
|
|
|
||||
|
Models |
GDM10 |
GDHS7 |
RDS1819 |
RDX1619 |
||||
|
|
|
|
|
|
||||
|
Sheet Capacity - |
|
|
10 sheets |
7 sheets |
18 sheets |
16 sheets |
||
|
|
|
|
||||||
|
|
|
|
|
|||||
|
|
|
|
|
|
|
|
|
|
|
|
|
|
|
|
||||
|
Duty Cycle - |
|
|
|
|
10 min on / 20 off |
10 min on / 20 off |
5 min on / 20 min off |
10 min on / 20 min off |
|
|
|
|
|
|||||
|
|
|
|
|
|
|
|
|
|
|
Duty Cycle - |
|
|
N/A |
N/A |
3 min on / 20 min off |
3 min on / 20 min off |
||
|
|
||||||||
|
|
|
|
|
|
||||
|
Duty Cycle - |
|
|
N/A |
N/A |
3 min on / 20 min off |
3 min on / 20 min off |
||
|
|
||||||||
|
|
|
|
|
|||||
|
|
|
|
|
|
||||
|
Volts / Hz - 120V AC/60Hz |
120V AC / 60Hz |
120V AC / 60Hz |
120V AC / 60Hz |
120V AC / 60Hz |
||||
|
|
|
|
|
|
||||
|
Amperage |
9.0A |
9.0A |
9.0A |
9.0A |
||||
|
|
|
|
|
|
|
|
|
|
IMPORTANT: ONLY INSERT ONE CD OR ONE CREDIT CARD AT A TIME.
Models GDM10 and GDHS7 can not shred CDs, Credit Cards, paper clips or staples
English |
4 |
Français |
8 |
Español |
12 |

|
|
|
|
|
|
g |
a |
|
a |
d |
g |
|
|
||||
|
|
|
|||
|
|
|
|
||
|
|
d |
f |
|
|
|
|
|
|
e |
|
|
|
|
e |
|
f
b |
|
b |
c |
|
|
|
|
c |
|
|
|
Models: RSX128 |
|
Models: RDS1713, RDX1413, GDM10, GDHS7, |
|
|
RDS1819, RDX1619 |
|
|
|
1 |
2 |
3 |
4 |
5 |
6 |
7 |
Illuminated Panel
Lights and Icons Explained
|
|
|
1 |
2 |
3 |
4 |
5 |
6 |
7 |
|
Illumination |
Power |
Happy |
Sad |
Anti- |
Door |
Cool |
Bin |
|
|
|
|
on |
face |
face |
jam |
open |
down |
full |
Color |
Green |
Red |
Amber |
Green |
Red |
Red |
Red |
Amber |
Red |
Power on button pushed / no fault |
|
|
light |
|
|
|
|
|
|
Door open |
|
|
light |
|
light |
|
flash |
|
|
Bin full |
|
|
light |
|
light |
|
|
|
flash |
Motor overheat |
|
|
light |
|
light |
|
|
flash |
|
Auto button pushed / shredding |
light |
|
light |
light |
|
|
|
|
|
Anti-jam at Measure mode |
|
light |
light |
|
light |
flash |
|
|
|
Anti-jam at Running mode |
|
light |
light |
|
light |
flash |
|
|
|
Forward jammed |
|
light |
light |
|
light |
|
|
|
|
Reverse jammed |
|
light |
light |
|
light |
|
|
|
|
Reverse button pushed |
|
light |
light |
|
|
|
|
|
|
Auto mode |
light |
|
light |
light |
|
|
|
|
|
Introduction
Thank you for choosing this shredder from Rexel. We are sure it will serve you well, but please take a little time to study these instructions to ensure you get the best out of your machine.
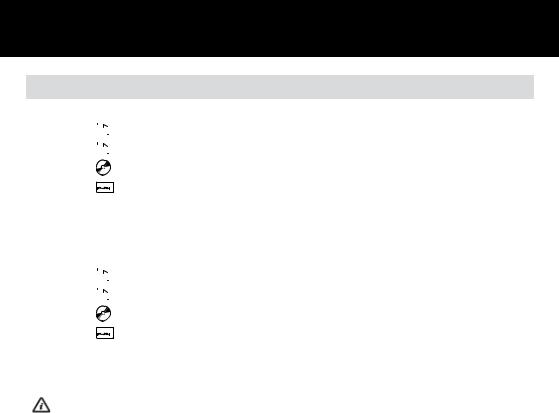
aIndicator Panel
bRSX128: Pull Out Drawer
RDS1713, RDX1413, GDM10, GDHS7, RDS1819, RDX1619: Door for Bin
cWheels
dPower On Button
eAuto Feed Button
fReverse Button
gCD Guide (not fitted on GDM10 and GDHS7)
g CD Guide (not fitted on GDM10 and GDHS7)
Safety First
Shredders are safe to use as long as you take a few safety precautions.
•Ensure the machine is plugged into an easily accessible power outlet, and ensure the cable is not likely to trip up a passer by.
•Any attempt to repair this unit by unqualified personnel will invalidate the warranty. Please return to supplier.
•Unplug your shredder before moving it or when it is not in use for an extended period of time.
•Do not operate with a damaged power supply cord or plug, after it malfunctions, or after it has been damaged in any manner.
•Do not overload electrical outlets beyond capacity as this can result in fire or electrical shock.
1Power On (Amber Light)
2Shredder OK (Green Light)
3Shredder not OK (Red Light)
4Anti Jam. Too many sheets (Red Light)
5Door Open (Red Light)
6Cool Down (Amber Light)
7Bin Full (Red Light)
m
•The socket-outlet should be installed near the equipment and shall be easily accessible.
•Do not alter the attachment plug.The plug is configured for the appropriate electrical supply.
•Do not use near water.
•Do not use aerosol dusters or cleaners.
•Do NOT Spray anything into the shredder.
Although this shredder has been designed to be child safe, it is not advised to operate the machine near children.
4
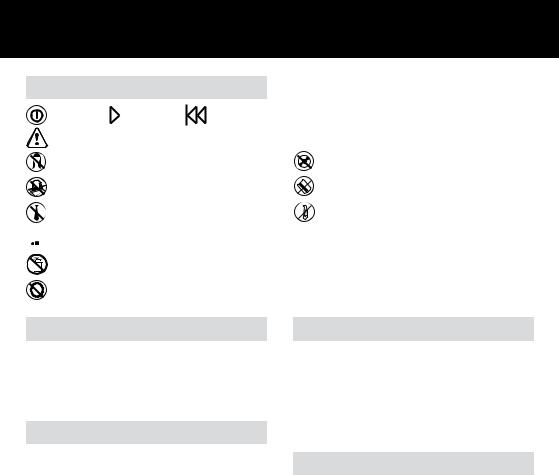
Shredder Control Panel
On/Off |
Forward |
Reverse |
Safety |
First |
|
This means you should be careful because long hair can become entangled in the cutting head. This could hurt you.
This means don’t reach into the feed opening of the cutting head. This could hurt you.
This means be careful of ties and other loose clothing which could become entangled in the cutting head. This could hurt you.
 This means keep children away from shredder.
This means do not use aerosol sprays anywhere near the unit.
This means be careful of loose jewelry which could become entangeld in the cutting head.
RDM1050 and RDSM750 only.
This means do not shred CD’s.
This means do not shred credit cards.
This means do not shred paper clips.
 This means do not shred staples.
Door Open Safety Function
If the door is opened during shredding as a safety precaution the shredder will instantly stop, and the door open symbol on the indicator panel will flash red. The green  will go off and the red
  will illuminate. To resume shredding, shut the door and press the auto button.
Jam Free™ Technology
Jam Free Shredders will only shred stacks of paper that are within the shredders sheet capacity.
Sensors in the paper feed area measure the thickness of paper about to be shredded. The ability to shred or not is communicated through red and green lighting. Green means that the stack of paper is within the shredders sheet capacity and OK to shred. Red means that you have too much paper, remove some sheets in order to shred.
Given that you are unable to shred more sheets of paper than the shredder is capable of shredding, paper jams are prevented.
This prevents time wasted through reversing paper and unblocking jams not to mention the mess it can create.
Rare Occasions of Jamming
In the unlikely event of the shredder jamming, use the reverse function to unblock the shredder. (see Reverse function section)
Alternating between the reverse function and the forward run (Hold Auto start for 2 seconds) will help unblock the feed area.
Once the jam is clear, press the right hand auto button once to revert back to auto mode. You can now resume shredding as normal.
Over Heating
If the shredder is used continuously for long periods of time the shredder may overheat. If this occurs the thermometer symbol on the indicator panel will flash amber, the green  will go off and you will see the red
  .
.
When the shredder is ready to be used again the thermometer symbol will stop flashing and the green  will show once again. To resume shredding press the auto button.
5
Operation
1After unpacking the product, pull out the shredder bin and remove the CD shard tray,which sits on top of the bin. Store this tray somewhere safe and use when you shred CD’s or credit cards to separate waste for recycling. (not applicable for GDM10 and GDHS7 models)
2 Connect shredder to mains supply.
3Press the central power on button (d). This will switch the power on and all the LED warning symbols on the indicator panel (a) will flash in sequence.The shredder will now be in standby mode and the “Power-on” symbol on the indicator panel will be illuminated amber.
4To start shredding, press the right hand auto feed button (e)
this will illuminate the feed area green and illuminate the  symbol green.
This sets the shredder into auto mode and initiates the Jam Free mechanism. You are now able to shred.
5Insert paper to be shredded into the feed area. The Jam Free mechanism will sense the thickness of the paper being shredded.
If the paper thickness is within the shredder’s capacity, the motor will start and your documents will be shredded. Cutters will stop once the shredding process is complete.
If the paper thickness is greater than the shredders sheet capacity the area around the feed slot will turn from green to red and the motor will not run. In this situation the Jam Free Icon on the indicator panel will flash red, the green  will go off, instead the
  will be illuminated red.
6If this happens, remove some of the sheets from the paper stack and re-try until the feed area reverts back to green, the shredder will then automatically start and allow the paper to be shredded.
If the shredder is left in auto mode for more than 10 minutes without being used, the shredder will automatically turn back to standby mode in order to save power.
Reverse Function
1Should you wish to reverse the shredding direction while shredding a document, a reverse button (f) has been fitted for your convenience.
2By pressing the reverse button the shredding cutters will change direction allowing the retrieval of the document being shredded. The feed area will turn to red.
3The reverse function will only run while the button is being pressed. When the reverse button has been released the shredder will revert to stand by mode.
4To turn back to auto mode simply press the right hand auto feed button again (e).
CD and Credit Card Shredding
Models GDM10 and GDHS7 can not shred CD’s or credit cards therefore this section is not applicable to these two models. All other Jam Free models can shred CD’s and credit cards as follows:
1A separate CD tray is provided to collect the shredded
CD shards. Ensure that this is correctly mounted onto the standard shredder bin before shredding CD’s or credit cards. CD and credit card shards should be disposed of separately to paper.
2Pull up the orange CD guide (g) located in the center of the feed area and flip it into position over the shredder mouth.
3For credit card shredding, switch the shredder to auto mode and insert the card into the center slot. Only shred 1 credit card at a time.
4For CD shredding, extend the sides of the orange CD guide, switch the shredder to auto mode and place the CD into the center of the CD slot. Only shred 1 CD at a time.
5 Empty the CD tray after 8 credit cards or CD’s to avoid waste spilling over into the paper waste bin. Remove the CD tray before recommencing to shred paper.
6
 Loading...