


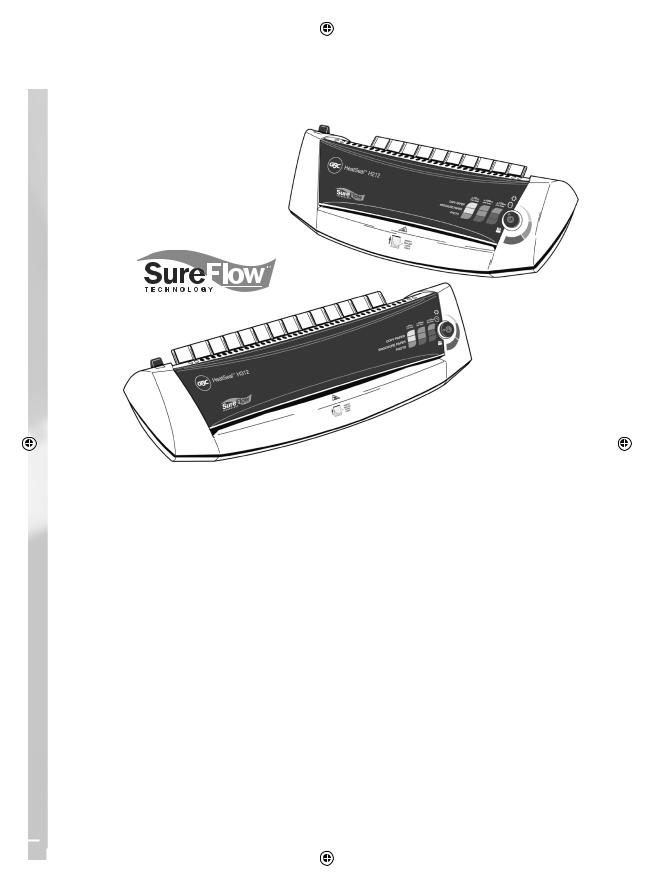
HeatSeal
H212/H312
SureFlow™ Technology
G Instruction Manual F Manuel d’utilisation D Bedienungsanleitung I Manuale d’istruzioni O Gebruiksaanwijzing
E Manual de instrucciones
P Manual de Instruções
T Kullanım Kılavuzu K Οδηγίες
c Brugsvejledning oFI Käyttöopas
oNO Bruksanvisning
S Bruksanvisning
Q Instrukcja obsługi oCZ Návod k obsluze H Használati útmutató
oRUS Руководствo по
зкcплyатации
|
|
|
|
|
|
|
|
|
|
|
|
|
|
|
|
|
|
|
|
|
|
|
|
|
|
|
|
|
|
|
|
|
|
|
|
|
|
|
|
|
|
|
|
|
|
|
|
|
|
|
|
|
|
|
|
|
|
|
|
|
|
|
|
|
|
|
|
English |
4 |
|
|
|
|
|
|
|
|
||
|
|
|
|
|
|
|
|
|
|
|
|
|
|
|
|
||||
|
|
|
|
|
|
|
|
|
|
|
|
|
|
|
|
||||
|
|
|
|
|
|
|
|
|
|
|
|
|
|
|
|
||||
|
|
|
|
|
|
|
|
Français |
6 |
|
|
|
|
|
|
|
|
||
|
|
|
|
|
|
|
|
Deutsch |
8 |
|
|
|
|
|
|
|
|
||
|
|
|
|
|
|
|
|
Italiano |
10 |
|
|
|
|
|
|
|
|
||
|
|
|
|
|
|
|
|
Nederlands |
12 |
|
|
|
|
|
|
|
|
||
|
|
|
|
|
|
|
|
Español |
14 |
|
|
|
|
|
|
|
|
||
|
|
|
|
|
|
|
|
Português |
16 |
|
|
|
|
|
|
|
|
||
|
|
|
|
|
|
|
|
Türkçe |
18 |
|
|
|
|
|
|
|
|
||
|
|
|
|
|
|
|
|
Ελληνικά |
20 |
|
|
|
|
|
|
|
|
||
|
|
|
|
|
|
|
|
Dansk |
22 |
|
|
|
|
|
|
|
|
||
|
|
|
|
|
|
|
|
Suomi |
24 |
|
|
|
|
|
|
|
|
||
|
|
|
|
|
|
|
|
Norsk |
26 |
|
|
|
|
|
|
|
|
||
|
|
|
|
|
|
|
|
Svenska |
28 |
|
|
|
|
|
|
|
|
||
|
|
|
|
|
|
|
|
Polski |
30 |
|
|
|
|
|
|
|
|
||
|
|
|
|
|
|
|
|
Česky |
32 |
|
|
|
|
|
|
|
|
||
|
|
|
|
|
|
|
|
Magyar |
34 |
|
|
|
|
|
|
|
|
||
|
|
|
|
|
|
|
|
Pyccкий |
36 |
|
|
|
|
|
|
|
|
||
|
|
|
|
|
|
|
|
|
|
|
|
|
|
|
|
|
|
|
|
|
|
|
|
|
|
|
|
|
|
|
|
|
|
|
|
|
|
|
|
|
|
|
|
|
|
|
|
|
|
|
|
|
|
|
|
|
|
|
|
|
|
|
|
|
|
|
|
|
|
|
|
|
|
|
|
|
|
|
|
|
|
|
|
|
|
|
|
|
|
|
|
|
|
|
|
|
|
|
|

1
2 |
4
6 |
3 |
5 |
7 |
|
|
|
|
|
|
|
|
|
|
|
|
|
|
|
|
|
|
|
|
|
|
|
|
|
|
|
|
|
|
|
|
|
|
|
|
|
|
|
|
|
|
|
|
|
|
|
|
|
|
|
|
|
|
|
|
|
|
|
|
|
|
Safety instructions |
m |
YOUR SAFETY AS WELL AS THE SAFETY OF OTHERS IS IMPORTANT
TO ACCO BRANDS EUROPE. IN THIS INSTRUCTION MANUAL AND ON
THE PRODUCT ARE IMPORTANT SAFETY MESSAGES. READ THESE
MESSAGES CAREFULLY.
mTHE SAFETY ALERT SYMBOL PRECEDES EACH SAFETY MESSAGE IN THIS INSTRUCTION MANUAL.
THIS SYMBOL INDICATES A POTENTIAL PERSONAL SAFETY HAZARD THAT COULD HURT YOU OR OTHERS, AS WELL AS CAUSE PRODUCT DAMAGE OR PROPERTY DAMAGE.
THIS WARNING IS FOUND ON THE PRODUCT.
cmWARNING
Electrical shock hazard. Do not open. No user servicable parts inside. Refer servicing to qualified service personnel.
This safety message means that you could be seriously hurt or killed if you open the product and expose yourself to hazardous voltage.
The following ISO and IEC symbols appear on this product, and their meanings are as follows:
On / Off |
|
Cold |
Release |
|
Heat |
|
|
|
Special notice
Thank you, for your recent purchase of a GBC Pouch Laminator. Your new laminator may emit a slight odour during the initial stage of operation. It is normal and will diminish after several hours of operation.
Cleaning
mCaution: Unplug this product before cleaning.
•Wipe exterior only with a damp cloth. Do not use detergents or solvents.
•Do not use aerosol dusters or cleaners.
•Do not spray anything into the machine.
Important safeguards |
m |
mWARNING: FOR YOUR PROTECTION DO NOT CONNECT THE POUCH LAMINATOR TO ELECTRICAL POWER UNTIL YOU READ THESE INSTRUCTIONS COMPLETELY. KEEP THESE INSTRUCTIONS IN A CONVENIENT LOCATION FOR FUTURE REFERENCE. TO GUARD AGAINST INJURY, THE FOLLOWING BASIC SAFETY PRECAUTIONS MUST BE OBSERVED IN THE SET-UP AND USE OF THIS PRODUCT.
General safeguards
•Use the unit only for its intended purposes of laminating documents.
•Do not place anything in the throat opening of the laminator other than pouches/documents.
•Place unit on a secure, stable work area to prevent the unit from falling and possibly causing personal injury and damage to the unit.
•Follow all warnings and instructions marked on the unit.
•The socket outlet shall be installed near the equipment and shall be easily accessible.
•Do not attempt single side lamination, this will destroy the laminator.
•Do not block the vent slots, this will cause the laminator to overheat.
Electrical safeguards
•The unit must be connected to a supply voltage corresponding to the electrical rating shown on the unit.
•Unplug the unit before moving it, or when it is not in use for an extended period of time.
•Do not operate with a damaged supply cord or plug. Do not alter the attachment plug. The plug is configured for the appropriate electrical supply.
•Do not overload electrical outlets beyond their capacity; fire or electrical shock could result.
•The unit is intended for indoor use only.
•Never push objects through the cabinet slots. Do not spill liquid of any kind on this product.
•Close supervision is required when this product is used near children.
Service
•Do not attempt to service or repair the pouch laminator yourself. Unplug the unit and contact an authorised ACCO Brands Europe service representative for any required repairs.
Specifications
|
GBC HeatSeal H212 |
GBC HeatSeal H312 |
|
|
|
||
|
|
|
|
Electrical |
230V / 50hZ / 2.2Amps / 500W |
230V / 50Hz / 2.2Amps / 500W |
|
|
|
|
|
Machine Dimensions |
400 x 173 x 117.5mm |
476x173x117mm |
|
Machine Weight |
3.1kg |
3.9kg |
|
|
|
|
|
Maximum Pouch Width |
241mm |
317mm |
|
|
|
|
|
Maximum Pouch Thickness |
2 x 125 mic (Total 250) |
2 x 125 mic (Total 250) |
|
|
|
|
|
Maximum Thru-put Thickness |
0.8mm |
0.8mm |
|
Warm-Up Time (2 x 75 mic) |
5 minutes |
6 minutes |
|

G
Important: Before operating your new laminator, lift up the exit tray located at the rear of the machine and lock it in place (fig. 1).
Operation, hot lamination
1 Connect power cord to appropriate power source.
2Push the power button to turn the power “ON” (fig. 2). The indicator will glow red.
3Using the lamination guidelines (fig. 3), select the appropriate temperature setting for the pouch gauge thickness and material you are laminating.
•If the laminated item appears to be cloudy, it means that the laminator temperature is not hot enough. Allow the laminator to heat for a few more minutes then run the pouch through again.
•If the laminated item is wavy, the TEMPERATURE is too hot. Verify temperature selector is set at the appropriate temperature.
•Always allow sufficient time for the laminator to adjust to changes in temperature setting.
Operation, cold lamination
1 Connect power cord to appropriate power source.
2 Rotate the temperature dial to the “cold” position (fig. 2).
3Push the power button to turn the power “ON” (fig. 2), the indicator light will glow red.
4A series of four beeps will be heard when laminator reaches operating temperature.
5Position the document to be laminated into a GBC laminating pouch, so that the document is aligned to the folded sealed edge and the right and left borders are equal (fig. 4).
6Insert the pouch and its contents straight into the machine, leading with the folded edge.
7The laminated item will automatically exit the rear of the machine. After the pouch has stopped moving, immediately place it on a flat surface to cool for one minute before handling (fig. 5).
8If you have finished laminating, push the switch to turn “OFF” the machine.
DO NOT LAMINATE AN EMPTY POUCH
4A series of four beeps will be heard when the laminator is ready to use.
5Use and laminate your GBC cold pouch.
(Pressure sensitive—non-thermal laminating pouch)
Release lever
How to use the release lever.
1 If pouch jams or is fed improperly, turn off the laminator immediately.
2Press the release lever down to release the motor from the rollers (fig. 6).
3Pull your document back out of the laminator while pressing the release lever down (fig. 7).
4Clean the rollers by running the cleaning sheet supplied with the laminator through the machine 2 or 3 times in the hot operation mode (red zone on temperature dial). If you do not have this sheet, use a similar cardboard sheet that fits the width of the laminator.
5 Continue laminating.
Helpful lamination hints
1Temperature setting Guidelines:
When laminating thin paper with light ink coverage, set the temperature dial at the low end of the range. Thick paper and heavy ink coverage require higher settings. Temperature settings will vary due to the finish, chemistry and heat absorption properties of the material being laminated.
2Before laminating important or unique documents always run a test pouch through the laminator using a similar type document.
3Do not attempt to do single sided lamination. This will destroy the laminator.
4As soon as the lamination is completed, remove from the rear of the machine and place on a cool flat surface for cooling to prevent the pouch from curling.
5 Do not block the vent slots, this will cause the laminator to overheat.
Guarantee
Operation of this machine is guaranteed for two years from date of purchase, subject to normal use. Within the guarantee period, ACCO Brands Europe will at its own discretion either repair or replace the defective machine free of charge. Defects due to misuse or use for inappropriate purposes are not covered under the guarantee. Proof of date of purchase will be required. Repairs or alterations made by
Register this product online at www.accoeurope.com
persons not authorised by ACCO Brands Europe will invalidate the guarantee. It is our aim to ensure that our products perform to the specifications stated. This guarantee does not affect the legal rights which consumers have under applicable national legislation governing the sale of goods.
Consignes de sécurité |
m |
ACCO BRANDS EUROPE SE SOUCIE DE VOTRE SÉCURITÉ AINSI QUE DE CELLE DES AUTRES. DES MESSAGES DE SÉCURITÉ IMPORTANTS SONT DONNÉS DANS CE MANUEL D’INSTRUCTION ET SUR LE PRODUIT. VEUILLEZ LES LIRE ATTENTIVEMENT.
mCE SYMBOLE D’AVERTISSEMENT PRÉCÈDE CHAQUE MESSAGE DE SÉCURITÉ DONNÉ DANS CE MANUEL.
IL INDIQUE UN DANGER POTENTIEL SUSCEPTIBLE DE PROVOQUER DES BLESSURES PERSONNELLES AINSI QUE DES DOMMAGES AU PRODUIT OU À D’AUTRES BIENS MATÉRIELS.
L’AVERTISSEMENT SUIVANT SE TROUVE SUR LE PRODUIT.
cmAVERTISSEMENT
Risque de choc électrique. Ne pas ouvrir. Aucune des pièces se trouvant
àl’intérieur ne peut être réparée par l’utilisateur. En cas de panne, s’adresser
àdu personnel de dépannage qualifié.
Ce message d’avertissement signifie que vous risquez de vous blesser sérieusement ou de vous tuer si vous ouvrez le produit et vous exposez à une tension dangereuse.
Les symboles ISO et CEI suivants apparaissent sur l’appareil et ont la signification suivante :
Marche/Arrêt |
|
À froid |
Éjection |
|
À chaud |
|
|
|
Note spéciale
Nous vous remercions d’avoir acheté une plastifieuse à pochettes GBC. Il est possible qu’elle émette au début une légère odeur, qui s’atténuera après quelques heures de fonctionnement.
Nettoyage
mPrécaution : Débranchez cet appareil avant de le nettoyer.
•Essuyez l’extérieur uniquement avec un linge humide. N’utilisez ni détergents, ni dissolvants.
•N’utilisez pas de bombe aérosol dépoussiérante ou nettoyante.
•Ne pulvérisez aucun produit dans l’appareil.
Consignes de sécurité |
m |
importantes |
mAVERTISSEMENT : POUR VOTRE PROTECTION, NE BRANCHEZ PAS LA PLASTIFIEUSE À UNE PRISE ÉLECTRIQUE AVANT D’AVOIR LU L’INTÉGRALITÉ DES INSTRUCTIONS CI-APRÈS. CONSERVEZ CES INSTRUCTIONS DANS UN ENDROIT FACILE D’ACCÈS POUR TOUTE RÉFÉRENCE ULTÉRIEURE. POUR ÉVITER TOUT ACCIDENT, IL EST INDISPENSABLE DE RESPECTER RIGOUREUSEMENT
LES CONSIGNES DE SÉCURITÉ DE BASE SUIVANTES LORS DE L’INSTALLATION ET DE L’UTILISATION DE CE PRODUIT.
Consignes de sécurité générales
•Utilisez cet appareil uniquement pour plastifier des documents.
•Ne placez aucun objet dans la fente d’entrée de l’appareil à part les pochettes/ documents à plastifier.
•Placez l’appareil sur une surface de travail stable et sûre afin qu’il ne puisse pas tomber, ni s’endommager, ni provoquer des blessures personnelles.
•Respectez tous les avertissements et instructions indiqués sur l’appareil.
•L’appareil doit être installé à proximité d’une prise de courant facilement accessible.
•N’essayez pas d’effectuer une plastification sur une seule face car vous endommageriez irréparablement la plastifieuse.
•N’obstruez pas les fentes d’aération, au risque de faire surchauffer la plastifieuse.
Consignes de sécurité électrique
•L’appareil doit être branché à une prise de courant correspondant à la tension précisée sur l’appareil.
•Débranchez l’appareil avant de le déplacer ou en cas d’inutilisation pendant longtemps.
•N’utilisez pas l’appareil si le cordon d’alimentation ou la fiche est endommagée. Ne modifiez pas la fiche du cordon d’alimentation. La fiche est configurée pour une alimentation électrique spécifique.
•Ne surchargez pas les prises électriques au-delà de leur capacité, au risque de causer un incendie ou de subir un choc électrique.
•Cet appareil est destiné uniquement à un usage intérieur.
•N’insérez jamais d’objets à travers les fentes de la carrosserie de l’appareil. Ne répandez aucun liquide sur cet appareil.
•Une surveillance étroite est nécessaire en cas d’utilisation à proximité d’enfants.
Dépannage
•N’essayez pas d’entretenir ou de réparer vous-même cette plastifieuse. Débranchez l’appareil et contactez un représentant ACCO Brands Europe agréé pour toute réparation requise.
Spécifications
|
GBC HeatSeal H212 |
GBC HeatSeal H312 |
|
|
|
||
|
|
|
|
Alimentation électrique |
230 V / 50 Hz / 2,2 A / 500 W |
230 V / 50 Hz / 2,2 A / 500 W |
|
|
|
|
|
Dimensions de l’appareil |
400 x 173 x 117,5 mm |
476 x 173 x 117 mm |
|
Poids de l’appareil |
3,1 kg |
3,9 kg |
|
|
|
|
|
Largeur de pochette maximale |
241 mm |
317 mm |
|
|
|
|
|
Épaisseur de pochette maximale |
2 x 125 microns (total 250) |
2 x 125 microns (total 250) |
|
|
|
|
|
Épaisseur maximale pochette et document |
0,8 mm |
0,8 mm |
|
Durée de préchauffage (2 x 75 microns) |
5 minutes |
6 minutes |
|

F
Important ! Avant d’utiliser votre nouvelle plastifieuse, soulevez le plateau de réception situé à l’arrière de l’appareil et enclenchez-le (fig. 1).
Plastification à chaud
1 Branchez le cordon d’alimentation à une prise secteur appropriée.
2Appuyez sur le bouton de mise en marche pour mettre l’appareil sous tension (fig. 2). Le voyant lumineux devient rouge.
3Sélectionnez le réglage de température adapté à l’épaisseur de la pochette et au papier à plastifier en consultant les indications données (fig. 3).
•Si la pochette plastifiée n’est pas complètement transparente, c’est que la température de plastification n’est pas assez élevée. Laissez l’appareil chauffer pendant quelques minutes supplémentaires, puis repassez-y le document.
•Si le document plastifié est ondulé, c’est que la TEMPÉRATURE est trop chaude. Vérifiez que le sélecteur de température est réglé sur la température appropriée.
•Attendez toujours un temps suffisant pour que la plastifieuse s’adapte au changement de réglage de température.
4L’appareil émet une série de quatre bips sonores lorsqu’il atteint la température voulue.
5Placez votre document dans une pochette à plastifier GBC en veillant à ce que le document soit bien aligné contre le bord collé de la pochette et en centrant parfaitement le document sur la largeur (fig. 4).
6Insérez la pochette et son contenu dans la plastifieuse, le bord collé en premier.
7Le document plastifié sort automatiquement à l’arrière de l’appareil. Dès que la pochette s’immobilise, placez-la sur une surface plate pour la laisser refroidir pendant une minute avant toute manipulation (fig. 5).
8Lorsque vous avez fini la plastification, éteignez l’appareil à l’aide du bouton d’arrêt.
NE PAS INSERER DE POCHETTE VIDE DANS LA MACHINE.
Plastification à froid
1 Branchez le cordon d’alimentation à une prise secteur appropriée. 2 Réglez le sélecteur de température sur la position à froid (fig. 2).
3Appuyez sur le bouton de mise en marche pour mettre l’appareil sous tension (fig. 2) ; le voyant lumineux devient rouge.
4 L’appareil émet une série de quatre bips sonores lorsqu’il est prêt à l’emploi.
5Utilisez une pochette à froid GBC
(pochette sensible à la pression, permettant la plastification sans chaleur)
Levier d’éjection
Comment utiliser le levier d’éjection.
1En cas de bourrage ou de mauvaise insertion de la pochette, éteignez immédiatement la plastifieuse.
2 Abaissez le levier d’éjection pour que le moteur se sépare des rouleaux (fig. 6).
3Retirez le document de la plastifieuse, tout en appuyant sur le levier d’éjection (fig. 7).
4Nettoyez les rouleaux en faisant passer dans la plastifieuse, 2 ou 3 fois, la feuille de nettoyage fournie avec l’appareil, en mode de plastification à chaud (zone rouge du sélecteur de température). En l’absence de feuille de nettoyage, utilisez une feuille cartonnée similaire adaptée à la largeur de la plastifieuse.
5 Reprenez la plastification.
Conseils utiles de plastification
1Instructions de réglage de température :
En cas de plastification de papier fin peu encré, sélectionnez une température basse. Un papier épais fortement encré requiert une température plus élevée. Le réglage de température dépend de la finition, de la composition chimique et des propriétés d’absorption de chaleur du support à plastifier.
2Avant la plastification de documents importants ou uniques, effectuez toujours un essai à l’aide d’un type de document similaire.
3N’essayez pas de plastifier une seule face. Cela entraînerait la destruction de la plastifieuse.
4Dès la fin de la plastification, retirez le document plastifié à l’arrière de l’appareil et laissez-le refroidir sur une surface plate et froide afin d’empêcher la pochette de se recourber.
5N’obstruez pas les fentes d’aération, au risque de faire surchauffer la plastifieuse.
Garantie
Le fonctionnement de cet appareil est garanti pendant deux ans à partir de la date d’achat, sous réserve d’un usage normal. Pendant la période de garantie, ACCO Brands Europe décidera, à son gré, de réparer ou de remplacer gratuitement l’appareil défectueux. Les défauts dus à un usage abusif ou un usage à des fins non appropriées ne sont pas couverts par cette garantie. Une preuve de la date d’achat sera exigée. Les réparations ou modifications effectuées par des personnes
Enregistrez ce produit en ligne à www.accoeurope.com
non autorisées par ACCO Brands Europe annuleront la garantie. Notre objectif est d’assurer le bon fonctionnement de nos produits conformément aux spécifications précisées. Cette garantie ne compromet pas les droits légaux des consommateurs au titre de la législation nationale en vigueur régissant la vente des biens de consommation.
Sicherheitsanweisungen m
IHRE SICHERHEIT SOWIE DIE SICHERHEIT ANDERER IST ACCO BRANDS EUROPE EIN WICHTIGES ANLIEGEN. IN DIESER ANLEITUNG UND AUF DEM PRODUKT FINDEN SIE WICHTIGE SICHERHEITSHINWEISE. LESEN SIE DIESE HINWEISE SORGFÄLTIG.
mIN DIESER ANLEITUNG STEHT DAS SICHERHEITS-WARNSYMBOL VOR JEDEM SICHERHEITSHINWEIS.
DIESES SYMBOL KENNZEICHNET SOWOHL HINWEISE, BEI DEREN NICHTBEACHTUNG VERLETZUNGSGEFAHR BESTEHT, ALS AUCH SOLCHE, DIE AUF POTENZIELLE PRODUKTUND SACHBESCHÄDIGUNG AUFMERKSAM MACHEN.
DIE FOLGENDE WARNUNG BEFINDET SICH AUF DEM PRODUKT.
Wichtige Sicherheitsvorkehrungen m
mACHTUNG: ZU IHRER EIGENEN SICHERHEIT SOLLTEN SIE DAS LAMINIERGERÄT ERST NACH DEM VOLLSTÄNDIGEN
DURCHLESEN DIESER ANWEISUNGEN AN EINE STROMQUELLE ANSCHLIESSEN. BEWAHREN SIE DIESE ANWEISUNGEN ZUM SPÄTEREN NACHSCHLAGEN IN DER NÄHE DES GERÄTS AUF. ALS VORSICHTSMASSNAHME SIND DIE FOLGENDEN GRUNDLEGENDEN SICHERHEITSVORKEHRUNGEN BEIM AUFSTELLEN UND VERWENDEN DIESES PRODUKTS EINZUHALTEN.
Allgemeine Vorsichtsmaßnahmen
cmACHTUNG
Nicht öffnen - Stromschlaggefahr! Es befinden sich keine Teile im Geräteinnern, die vom Benutzer gewartet werden können. Lassen Sie das Gerät nur von qualifiziertem Wartungspersonal warten.
Dieser Hinweis bedeutet, dass bei Öffnen des Geräts Stromschlagund damit die Gefahr schwerer Verletzungen oder sogar Todesgefahr besteht.
Auf diesem Produkt sind ISOund IEC-Symbole zu finden. Sie bedeuten Folgendes:
Ein/Aus |
|
Kalt |
Entriegelungshebel |
|
Heiß |
|
|
|
Besonderer Hinweis
Vielen Dank für den Kauf dieses GBC-Taschenlaminiergeräts. Während der ersten Betriebsphase Ihres neuen Laminiergeräts werden Sie eventuell einen leichten Geruch bemerken. Dieser ist unbedenklich und verliert sich nach mehreren Betriebsstunden wieder.
Reinigung
mAchtung: Der Stecker des Geräts muss vor dem Reinigen aus der Steckdose gezogen werden.
•Das Gerät lediglich außen mit einem feuchten Tuch abwischen. Keine Reinigungsoder Lösungsmittel verwenden.
•Keine Sprühreiniger oder Druckluftsprays verwenden.
•Verwenden Sie das Gerät lediglich für den vorgesehenen Zweck, also zum Laminieren von Dokumenten.
•Führen Sie nie etwas anderes als Laminiertaschen/Dokumente in die Einführöffnung des Geräts ein.
•Stellen Sie das Gerät auf einer sicheren, stabilen Arbeitsfläche auf, um ein Herunterfallen des Geräts und Verletzungen sowie eine Beschädigung des Geräts auszuschließen.
•Befolgen Sie alle auf dem Gerät angegebenen Warnungen und Anweisungen.
•Das Gerät sollte in der Nähe der Steckdose aufgestellt werden, und die Steckdose stets gut zugänglich sein.
•Versuchen Sie nie, nur eine Seite eines Dokuments zu laminieren. Dies verursacht eine Beschädigung des Geräts.
•Die Lüftungsschlitze dürfen nicht blockiert werden, damit das Gerät nicht überhitzt.
Elektrische Sicherheit
•Das Gerät muss an eine geeignete Stromquelle (s. Hinweis auf dem Gerät) angeschlossen werden.
•Der Stecker des Geräts muss aus der Steckdose abgezogen werden, bevor das Gerät umgestellt wird, oder wenn es längere Zeit nicht verwendet wird.
•Das Gerät darf nicht mit einem beschädigten Kabel oder Stecker betrieben werden. Der Stecker des Geräts darf nicht verändert werden. Der Stecker ist auf die jeweilige Stromversorgung ausgelegt.
•Steckdosen nicht über ihre Kapazität hinaus belasten, da dies einen Brand oder elektrischen Schlag auslösen könnte.
•Das Gerät ist lediglich für den Betrieb in Innenräumen vorgesehen.
•Schieben Sie nie Gegenstände in die Schlitze des Gehäuses. Es dürfen keine Flüssigkeiten auf dem Gerät verschüttet werden.
•Bei Verwendung des Geräts in der Nähe von Kindern ist eine sorgfältige Beaufsichtigung erforderlich.
• Nichts in das Gerät hineinsprühen.
Wartung
•Versuchen Sie nicht, das Laminiergerät selbst zu warten oder instandzusetzen. Ist eine Reparatur erforderlich, ziehen Sie den Gerätestecker aus der Steckdose, und wenden Sie sich an einen autorisierten ACCO Brands Europe-Kundendienst.
Technische Daten
|
GBC HeatSeal H212 |
GBC HeatSeal H312 |
Netzanschluss |
230 V / 50 Hz / 2,2 A / 500 W |
230 V / 50 Hz / 2,2 A / 500 W |
Geräteabmessungen |
400 x 173 x 117,5 mm |
476 x 173 x 117 mm |
|
|
|
Gerätegewicht |
3,1 kg |
3,9 kg |
|
|
|
Maximale Laminiertaschenbreite |
241 mm |
317 mm |
Maximale Laminiertaschenstärke |
2 x 125 μm (insgesamt 250) |
2 x 125 μm (insgesamt 250) |
|
|
|
Maximale Stärke von Laminiertasche und Dokument |
0,8 mm |
0,8 mm |
|
|
|
Aufwärmzeit (2 x 75 μm) |
5 Minuten |
6 Minuten |

D
Wichtiger Hinweis: Bevor Sie zu laminieren beginnen, heben Sie die Auffangschale an der Rückseite des Geräts an und lassen Sie sie in der waagrechten Position einrasten (Abb. 1).
Betrieb - Heißlaminieren
1 Schließen Sie das Netzkabel an eine geeignete Stromquelle an.
2Drücken Sie die Netztaste, um das Gerät einzuschalten (Abb. 2). Die Anzeige leuchtet rot.
3Wählen Sie anhand der Laminierleitlinien (Abb. 3) die richtige Temperatureinstellung für die Laminiertaschenstärke und das zu laminierende Material.
•Falls das laminierte Dokument trüb aussieht, bedeutet dies, dass die Temperatur des Laminiergeräts nicht hoch genug ist. Lassen Sie das Gerät einige Minuten aufwärmen und lassen Sie die Laminiertasche erneut durchlaufen.
•Falls das laminierte Dokument wellig aussieht, ist die Temperatur zu hoch. Stellen Sie den Temperaturwähler auf eine angemessene Temperatur ein.
•Warten Sie bei einer Einstellungsänderung immer ab, bis die neue Temperatur erreicht ist.
4Das Erreichen der Betriebstemperatur wird durch vier Töne hintereinander angezeigt.
5Legen Sie das Dokument, das Sie laminieren möchten, so in eine GBCLaminiertasche, dass das Dokument an der versiegelten Kante anliegt und mit dieser ausgerichtet ist und der rechte und linke Rand gleich groß sind (Abb. 4).
6Führen Sie Laminiertasche und Inhalt mit der versiegelten Kante nach vorn gerade in das Gerät ein.
7Der fertig laminierte Artikel wird automatisch an der Rückseite des Geräts ausgegeben. Sobald die Laminiertasche sich nicht mehr bewegt, muss sie sofort zum Abkühlen eine Minute lang auf einer ebenen Fläche abgelegt werden, bevor sie weiter verwendet wird (Abb. 5).
8Nach Abschluss des Laminiervorgangs drücken Sie die Taste wieder, um das Gerät auszuschalten.
FÜHREN SIE KEINE LEERE LAMINIERTASCHE IN DAS GERÄT EIN.
Betrieb - Kaltlaminieren
1 Schließen Sie das Netzkabel an eine geeignete Stromquelle an.
2 Drehen Sie den Temperaturwähler, um auf „Kalt“ einzustellen (Abb. 2).
3Drücken Sie die Netztaste, um das Gerät einzuschalten (Abb. 2). Die Anzeige leuchtet rot.
4 Vier Töne hintereinander zeigen an, dass das Laminiergerät betriebsbereit ist.
5Verwenden Sie eine GBC-Kaltlaminiertasche zum Laminieren (druckempfindlich
– nicht zum Heißlaminieren geeignet).
Entriegelungshebel
Verwenden des Entriegelungshebels
1Bei einem Stau oder wenn die Laminiertasche nicht richtig eingeführt wurde, schalten Sie das Laminiergerät sofort aus.
2Drücken Sie den Entriegelungshebel nach unten, um den Motor von den Rollen zu entkoppeln (Abb. 6).
3Ziehen Sie das Dokument aus dem Laminiergerät heraus, während Sie den Entriegelungshebel nach unten gedrückt halten (Abb. 7).
Tipps zum Laminieren
1Leitlinien für die Temperatureinstellung:
Beim Laminieren von dünnem Papier mit einem geringen Tintenanteil stellen Sie den Temperaturwähler auf den unteren Bereich ein. Bei dickem Papier und einem hohen Tintenanteil ist eine höhere Temperatureinstellung erforderlich. Die Temperatureinstellung richtet sich jeweils nach der Beschichtung, der chemischen Zusammensetzung und den Wärmeabsorptionseigenschaften des laminierten Materials.
2Vor dem Laminieren von wichtigen Dokumenten oder Unikaten sollten Sie stets eine Testlaminiertasche mit einem ähnlichen Dokumenttyp durch das Gerät laufen lassen.
Gewährleistung
Der Betrieb des Geräts ist bei normaler Verwendung für 2 Jahre ab Kaufdatum gewährleistet. Innerhalb des Gewährleistungszeitraums wird ACCO Brands Europe nach eigenem Ermessen das defekte Gerät entweder kostenlos instandsetzen oder ersetzen. Die Gewährleistung deckt keine Mängel ab, die aufgrund missbräuchlicher Verwendung oder Verwendung für unangemessene Zwecke entstanden sind.
Ein Nachweis des Kaufdatums muss vorgelegt werden. Instandsetzungen oder Registrieren Sie dieses Produkt online bei www.accoeurope.com
4Reinigen Sie die Rollen, indem Sie den mit dem Laminiergerät gelieferten Reinigungskarton zweioder dreimal im Heißlaminiermodus (rote Zone des Temperaturwählers) durch das Gerät laufen lassen. Falls Sie diesen Karton nicht haben, verwenden Sie einen ähnlichen Karton, der so breit ist wie das Laminiergerät.
5 Setzen Sie den Laminiervorgang fort.
3Versuchen Sie nie, nur eine Seite eines Dokuments zu laminieren. Dabei wird das Laminiergerät beschädigt.
4Sobald der Laminiervorgang beendet ist, legen Sie das laminierte Dokument zum Abkühlen auf einer kühlen, ebenen Fläche ab, um zu verhindern, dass sich die Laminiertasche wellt.
5Die Lüftungsschlitze dürfen nicht blockiert werden, damit das Gerät nicht überhitzt.
Änderungen, die durch nicht von ACCO Brands Europe autorisierten Personen vorgenommen werden, setzen die Gewährleistung außer Kraft. Es ist unser Ziel, sicherzustellen, dass die Leistung unserer Produkte den angegebenen technischen Daten entspricht. Diese Gewährleistung stellt keine Einschränkung der nach dem geltenden Kaufvertragsrecht gültigen Rechte des Verbrauchers dar.
Istruzioni per la sicurezza |
m |
PER ACCO BRANDS EUROPE LA VOSTRA SICUREZZA E QUELLA DEGLI ALTRI È IMPORTANTE. ALCUNI IMPORTANTI MESSAGGI RELATIVI ALLA SICUREZZA SONO RIPORTATI IN QUESTO MANUALE DI ISTRUZIONI E SULLA MACCHINA. LEGGETELI CON ATTENZIONE.
mQUESTO SIMBOLO PRECEDE OGNI MESSAGGIO RELATIVO ALLA SALVAGURDIA DELLA VOSTRA INCOLUMITÀ.
ESSO INDICA UN RISCHIO POTENZIALE PER L’OPERATORE O PER TERZI, O UN DANNO POTENZIALE ALLA MACCHINA O AD ALTRI OGGETTI.
IL SEGUENTE MESSAGGIO SI TROVA SULLA MACCHINA.
cmATTENZIONE
Pericolo di scarica elettrica. Non aprire. Non vi è alcun componente riparabile da parte dell’utente all’interno della macchina. Per operazioni di manutenzione o riparazione rivolgersi a personale qualificato.
Questo messaggio di sicurezza significa che potreste rimanere feriti gravemente o uccisi se aprite la macchina con conseguente esposizione accidentale ad alto voltaggio.
Sul prodotto compaiono i seguenti simboli ISO e IEC che significano:
Acceso/Spento |
|
Freddo |
Rimuovere |
|
Caldo |
documento |
|
|
|
|
Avvertenza
Grazie per aver acquistato una plastificatrice a pouch GBC. La vostra nuova plastificatrice potrebbe emettere un leggero odore durante la fase iniziale del lavoro. Ciò è assolutamente normale e dovrebbe diminuire dopo alcune ore dall’inizio dell’operazione di plastificazione.
Pulizia
mPericolo – Staccare sempre la spina dalla presa della corrente prima di procedere con la pulizia.
•Pulire la superficie esterna solo con un panno umido. Non utilizzare detergenti o solventi.
•Non usare toglipolvere o detergenti spray.
•Non spruzzare nessuna sostanza all’interno della macchina.
Precauzioni importanti |
m |
mATTENZIONE – PER MOTIVI DI SICUREZZA, NON COLLEGARE LA PLASTIFICATRICE ALL’ALIMENTAZIONE ELETTRICA PRIMA DI AVER LETTO COMPLETAMENTE LE ISTRUZIONI. CONSERVARE QUESTE ISTRUZIONI IN UN LUOGO ACCESSIBILE PER OGNI RIFERIMENTO FUTURO. PER PREVENIRE IL PERICOLO DI INCIDENTI, È NECESSARIO OSSERVARE LE
PRECAUZIONI RIPORTATE NEI SEGUENTI PARAGRAFI RELATIVI ALL’INSTALLAZIONE ED USO DEL PRODOTTO.
Precauzioni generali
•Utilizzare la macchina esclusivamente per le funzioni per cui è stata progettata, ossia per la plastificazione dei documenti.
•Non inserire alcun oggetto diverso dalle pouches o dai documenti nell’imboccatura della plastificatrice.
•Porre la macchina sopra un piano stabile e sicuro onde evitare cadute accidentali che possano causare danni alla persona o alla macchina.
•Osservare tutte le precauzioni ed istruzioni riportate sulla macchina.
•Posizionare la macchina nelle vicinanze di una presa elettrica.
•Non cercare di eseguire plastificazioni su di un solo lato poiché la plastificatrice verrà immediatamente danneggiata.
•Non ostruire le fessure di aerazione della plastificatrice in quanto questo può causare il surriscaldamento della macchina.
Precauzioni relative all’alimentazione elettrica
•L’unità deve essere collegata ad una tensione di alimentazione corrispondente alle specifiche elettriche riportate sulla macchina.
•Staccare la spina dalla presa di alimentazione prima di spostare la macchina o quando non se ne prevede l’uso per un periodo di tempo prolungato.
•Non utilizzare la macchina se la spina o il cavo di alimentazione è danneggiato. Non modificare la spina di collegamento in quanto è configurata per la sorgente di alimentazione appropriata.
•Non sovraccaricare le prese della corrente oltre la propria capacità poiché questo può causare incendi o pericolo di folgorazione.
•La macchina è stata progettata solamente per l’uso in locali al chiuso.
•Non inserire oggetti nelle fessure della macchina e non versare liquido di alcun tipo su questo prodotto.
•Fare molta attenzione se il prodotto viene utilizzato in presenza di bambini.
Assistenza
•Si prega di non tentare di effettuare interventi di manutenzione o riparazione da soli. Staccare la macchina dalla presa della corrente e rivolgersi per le riparazioni a un rivenditore o distributore ACCO Brands Europe.
Caratteristiche tecniche
|
GBC HeatSeal H212 |
GBC HeatSeal H312 |
Voltaggio |
230V / 50Hz / 2,2 Amps / 500W |
230V / 50Hz / 2,2 Amps / 500W |
|
|
|
Dimensioni |
400x173x117,5 mm |
476x173x117 mm |
|
|
|
Peso |
3,1 kg |
3,9 kg |
Larghezza massima della pouch |
241 mm |
317 mm |
|
|
|
Spessore massimo della pouch |
2 x 125 mic (totale 250) |
2 x 125 mic (totale 250) |
|
|
|
Massimo spessore di plastificazione |
0,8 mm |
0,8 mm |
(documento + pouch) |
|
|
Tempo di pre-riscaldamento (2 x 75 mic) |
5 min. |
6 min. |
10
I
Importante – Prima di iniziare ad utilizzare la plastificatrice, sollevare il vassoio di raccolta collocato nella parte posteriore della macchina e posizionarlo in modo corretto fissandolo (Fig. 1).
Funzionamento plastificazione a caldo
1 Collegare il cavo di alimentazione ad una fonte appropriata.
2Premere il pulsante per l’accensione (Fig. 2). La spia si illuminerà di rosso.
3Utilizzando le linee guida (Fig. 3), selezionare la temperatura appropriata in base allo spessore della pouch e del materiale da plastificare.
•Se il documento plastificato presenta degli aloni, la temperatura utilizzata durante il processo di plastificazione non è sufficientemente alta. Attendere qualche minuto e ripetere l’operazione di plastificazione
•In caso di effetti a ‘onda’, la TEMPERATURA utilizzata è troppo elevata. Impostare la temperatura appropriata e ripetere l’operazione.
•Lasciare alla macchina il tempo sufficiente per regolare le modifiche apportate nell’impostazione della temperatura.
4Al raggiungimento della temperatura necessaria per la plastificazione, la macchina emetterà quattro beep.
5Inserire il documento da plastificare in una pouch GBC in modo che sia in linea con il lato chiuso della pouch ed equidistante da entrambi i margini della pouch (Fig. 4).
6Inserire la pouch con il documento da plastificare nell’imboccatura della macchina, dal lato presigillato.
7Il documento plastificato fuoriuscirà automaticamente dalla parte posteriore della plastificatrice. Quando il documento è fuoriuscito completamente dalla macchina, collocarlo su di una superficie piana e lasciarlo raffreddare per un minuto prima di toccarlo (Fig. 5).
8Al termine dell’operazione di plastificazione, posizionare l’interruttore sulla posizione “OFF” (spento).
NON INSERIRE POUCHES VUOTE NELLA MACCHINA.
Funzionamento plastificazione a freddo
1 |
Collegare il cavo di alimentazione ad una fonte appropriata. |
4 |
La macchina emetterà quattro beep quando sarà pronta per essere |
2 |
Impostare la temperatura su “freddo” (Fig. 2). |
|
utilizzata. |
|
|
||
3 |
Premere il pulsante per l’accensione (Fig. 2). La spia si illuminerà di |
5 |
Utilizzare per la plastificazione le pouches a freddo GBC. |
|
(Pouch a freddo – sensibile alla pressione) |
||
|
rosso. |
|
|
|
|
|
Funzione anti-inceppamento
Come utilizzare la leva anti-inceppamento |
4 |
Pulire i rulli facendo passare tra di essi per due o tre volte il ‘Cleaning Sheet’ |
||
1 |
Se la pouch non fuoriesce dalla macchina oppure è stata inserita in modo |
|
in dotazione con la plastificatrice mentre è attiva la funzione a caldo (area |
|
|
rossa sul selettore temperatura). Se non si possiede questo foglio, utilizzare |
|||
|
sbagliato, spegnere immediatamente la plastificatrice. |
|
||
|
|
un cartoncino di dimensioni adattabili alla larghezza della plastificatrice. |
||
2 |
Premere verso il basso la leva anti-inceppamento per disconnettere il |
|
||
5 |
Procedere nell’operazione di plastificazione. |
|||
|
motore dai rulli (Fig. 6). |
|||
|
|
|
||
3Estrarre il documento dalla plastificatrice mentre si mantiene premuta verso il basso la leva anti-inceppamento (Fig. 7).
Suggerimenti utili per la plastificazione
1 Linee guida per l’impostazione della temperatura |
3 Non cercare di eseguire plastificazioni su di un solo lato poiché la |
||
Per la plastificazione di carta uso mano con inchiostro leggero, impostare |
|
plastificatrice verrà immediatamente danneggiata. |
|
la temperatura sul livello più basso. Carta patinata ed inchiostro pesante |
4 |
Al termine dell’operazione di plastificazione, rimuovere la pouch dalla parte |
|
richiedono impostazioni su un livello più alto. L’impostazione della |
|||
|
posteriore della plastificatrice e collocarla su di una superficie fredda e |
||
temperatura varia secondo le caratteristiche chimiche, di assorbimento e di |
|
||
|
piatta per farla raffreddare onde evitare eventuali arricciature. |
||
finitura del materiale da plastificare. |
|
||
5 |
Non ostruire le fessure di aerazione della plastificatrice in quanto questo può |
||
2 Prima di plastificare documenti importanti o in copia unica, fare sempre una |
|||
|
causare il surriscaldamento della macchina |
||
prova inserendo una pouch con un documento simile. |
|
||
|
|
||
Garanzia
Il funzionamento di questa macchina è garantito per due anni dalla data di acquisto, subordinatamente ad uso normale. Durante il periodo di garanzia, ACCO Brands Europe provvederà, a propria discrezione, a riparare o sostituire gratuitamente la macchina difettosa. Difetti provocati da un uso errato o un uso improprio non sono coperti dalla garanzia. Sarà richiesta la prova della data
di acquisto. Riparazioni o modifiche effettuate da persone non autorizzate da Registrare il prodotto online su www.accoeurope.com
ACCO Brands Europe rendono nulla la garanzia. È nostro obiettivo assicurare il funzionamento dei prodotti secondo le specifiche dichiarate. La presente garanzia non pregiudica alcun diritto riconosciuto ai consumatori dalle leggi nazionali applicabili che regolano la vendita di beni.
11
Veiligheidsinstructies m
ZOWEL UW VEILIGHEID ALS DIE VAN ANDEREN IS BELANGRIJK VOOR ACCO BRANDS EUROPE. IN DEZE GEBRUIKSAANWIJZING EN OP HET PRODUCT BEVINDEN ZICH BELANGRIJKE VEILIGHEIDSBERICHTEN. LEES DEZE BERICHTEN GOED DOOR.
mHET WAARSCHUWINGSSYSMBOOL STAAT VOOR IEDER VEILIGHEIDSBERICHT IN DEZE GEBRUIKSAANWIJZING.
DIT SYMBOOL DUIDT OP EEN POTENTIEEL VEILIGHEIDSRISICO WAARBIJ U OF ANDEREN LETSEL KUNNEN OPLOPEN EN ER SCHADE AAN HET PRODUCT OF AAN EIGENDOMMEN KAN ONTSTAAN.
DE VOLGENDE WAARSCHUWING IS TE VINDEN OP HET PRODUCT.
cmWAARSCHUWING
Kans op elektrische schok. Niet openen. Geen onderhoud door gebruiker vereist. Laat het onderhoud over aan bevoegd onderhoudspersoneel.
Dit veiligheidsbericht houdt in dat u ernstig of fataal gewond kunt raken als u het product opent, omdat u zich blootstelt aan gevaarlijke elektrische spanning.
De volgende ISO en IEC symbolen komen voor op dit product. Ze betekenen het volgende:
Aan/uit |
|
Koud |
Ontgrendeling |
|
Warm |
|
|
|
Speciale mededeling
U bent de gelukkige eigenaar van een GBC lamineermachine. Het is mogelijk dat u bij deze nieuwe lamineermachine aan het begin een vreemde lucht ruikt. Dit is normaal en zal verdwijnen wanneer de machine enkele uren heeft gefunctioneerd.
Reinigen
mOppassen: Haal de stekker uit het stopcontact voordat u de machine reinigt.
•Veeg de buitenkant met een vochtige doek schoon. Geen oplosof schoonmaakmiddelen gebruiken.
•Geen spuitbussen gebruiken.
•Nooit iets in de machine spuiten.
Belangrijke voorzorgsmaatregelen m
mWAARSCHUWING: LEES VOOR UW EIGEN BESCHERMING DEZE INSTRUCTIES EERST GOED DOOR, VOORDAT U DE LAMINEERMACHINE OP DE NETSPANNING AANSLUIT.
BEWAAR DEZE GEBRUIKSAANWIJZING OP EEN HANDIGE PLAATS ZODAT U DEZE LATER SNEL KUNT RAADPLEGEN. OM UW VEILIGHEID TE GARANDEREN, DIENT U DE VOLGENDE VOORZORGSMAATREGELEN IN ACHT TE NEMEN BIJ HET INSTELLEN EN GEBRUIK VAN HET PRODUCT.
Algemene veiligheidsmaatregelen
•Gebruik de machine alleen voor het beoogde doel: het lamineren van documenten.
•Plaats geen andere voorwerpen dan lamineertassen en documenten in de invoeropening van de machine.
•Plaats de machine op een veilig en stabiel oppervlak om te voorkomen dat door een val persoonlijk letsel wordt veroorzaakt of de machine beschadigd raakt.
•Volg alle waarschuwingen en instructies aangegeven op de machine.
•Plaats de machine in de buurt van een stopcontact dat goed bereikbaar is.
•Probeer de documenten niet enkelzijdig te lamineren. Daardoor raakt de lamineermachine defect.
•Zorg dat de ventilatieopeningen vrij blijven, anders wordt de lamineermachine te warm.
Elektrische voorzorgsmaatregelen
•De machine moet worden aangesloten op een netspanning die overeenkomt met de nominale spanningswaarde die op de machine staat aangegeven.
•Haal de stekker uit het stopcontact voordat u de machine verplaatst of wanneer deze langere tijd niet wordt gebruikt.
•Gebruik de machine niet met een beschadigd snoer of een defecte stekker. Probeer de stekker nooit te wijzigen. De stekker is samengesteld voor de juiste netvoeding.
•Belast de stopcontacten niet boven de toegestane capaciteit; dit kan namelijk brand of een elektrische schok veroorzaken.
•De machine is alleen bedoeld voor gebruik binnenshuis.
•Duw geen voorwerpen door de gleuven in de behuizing. Mors geen vloeistof op de machine.
•Scherp toezicht is vereist wanneer dit product in de buurt van kinderen wordt gebruikt.
Onderhoud
•Probeer niet zelf onderhoud of reparaties aan de lamineermachine uit te voeren. Haal het netsnoer los en neem contact op met een erkende ACCO Brands Europe-reparateur voor alle benodigde reparaties.
Specificaties
|
GBC HeatSeal H212 |
GBC HeatSeal H312 |
Elektrisch |
230 V / 50 Hz / 2,2 A / 500 W |
230 V / 50 Hz / 2,2 A / 500 W |
Afmetingen |
400 x 173 x 117,5 mm |
476 x 173 x 117 mm |
|
|
|
Gewicht |
3,1 kg |
3,9 kg |
|
|
|
Maximumbreedte lamineertas |
241 mm |
317 mm |
Maximumdikte lamineertas |
2 x 125 mic (in totaal 250) |
2 x 125 mic (in totaal 250) |
|
|
|
Maximumdikte lamineertas plus document |
0,8 mm |
0,8 mm |
|
|
|
Opwarmtijd (2 x 75 mic) |
5 minuten |
6 minuten |
12
 Loading...