


 Loading...
Gateway CX210, M285, MX3100, MX3210, MX3220 Owner's Manual
...USER GUIDE
Gateway Computer

Contents
Chapter 1: Getting Help . . . . . . . . . . . . . . . . . . . . . . . . . . . . . . . . . . . . . . . . . . . . . . . . . . . . . .1
Thank you for purchasing our notebook! . . . . . . . . . . . . . . . . . . . . . . . . . . . . . . . . 2 Gateway Web site . . . . . . . . . . . . . . . . . . . . . . . . . . . . . . . . . . . . . . . . . . . . . . . . . . . . . . . 2 Using Support . . . . . . . . . . . . . . . . . . . . . . . . . . . . . . . . . . . . . . . . . . . . . . . . . . . . . . . 3 Help and Support . . . . . . . . . . . . . . . . . . . . . . . . . . . . . . . . . . . . . . . . . . . . . . . . . . . . . . . 4 Searching for a topic . . . . . . . . . . . . . . . . . . . . . . . . . . . . . . . . . . . . . . . . . . . . . . . . . 4 Getting help in Media Center . . . . . . . . . . . . . . . . . . . . . . . . . . . . . . . . . . . . . . . . 5 BigFix . . . . . . . . . . . . . . . . . . . . . . . . . . . . . . . . . . . . . . . . . . . . . . . . . . . . . . . . . . . . . . . . . . . 6 Online help . . . . . . . . . . . . . . . . . . . . . . . . . . . . . . . . . . . . . . . . . . . . . . . . . . . . . . . . . . . . . 6
Chapter 2: Using Windows XP. . . . . . . . . . . . . . . . . . . . . . . . . . . . . . . . . . . . . . . . . . . . . . . . .7
About the Windows desktop . . . . . . . . . . . . . . . . . . . . . . . . . . . . . . . . . . . . . . . . . . . . 8 Using the Start menu . . . . . . . . . . . . . . . . . . . . . . . . . . . . . . . . . . . . . . . . . . . . . . . . 9 Adding icons to the desktop . . . . . . . . . . . . . . . . . . . . . . . . . . . . . . . . . . . . . . . . . 9 Identifying window items . . . . . . . . . . . . . . . . . . . . . . . . . . . . . . . . . . . . . . . . . . . . . . 10 Using Windows XP Tablet PC 2005 . . . . . . . . . . . . . . . . . . . . . . . . . . . . . . . . . . . . . . 11 Using Tablet PC extensions . . . . . . . . . . . . . . . . . . . . . . . . . . . . . . . . . . . . . . . . . 11 Working with files and folders . . . . . . . . . . . . . . . . . . . . . . . . . . . . . . . . . . . . . . . . . . 14 Viewing drives . . . . . . . . . . . . . . . . . . . . . . . . . . . . . . . . . . . . . . . . . . . . . . . . . . . . . . 14 Creating folders . . . . . . . . . . . . . . . . . . . . . . . . . . . . . . . . . . . . . . . . . . . . . . . . . . . . 15 Copying and moving files and folders . . . . . . . . . . . . . . . . . . . . . . . . . . . . . . . 16 Deleting files and folders . . . . . . . . . . . . . . . . . . . . . . . . . . . . . . . . . . . . . . . . . . . 17 Browsing for files and folders . . . . . . . . . . . . . . . . . . . . . . . . . . . . . . . . . . . . . . . 18 Searching for files . . . . . . . . . . . . . . . . . . . . . . . . . . . . . . . . . . . . . . . . . . . . . . . . . . . . . . 19 Using the Windows Search utility . . . . . . . . . . . . . . . . . . . . . . . . . . . . . . . . . . . 19 Working with documents . . . . . . . . . . . . . . . . . . . . . . . . . . . . . . . . . . . . . . . . . . . . . . . 21 Creating a new document . . . . . . . . . . . . . . . . . . . . . . . . . . . . . . . . . . . . . . . . . . 21 Saving a document . . . . . . . . . . . . . . . . . . . . . . . . . . . . . . . . . . . . . . . . . . . . . . . . . 22 Opening a document . . . . . . . . . . . . . . . . . . . . . . . . . . . . . . . . . . . . . . . . . . . . . . . 23 Printing a document . . . . . . . . . . . . . . . . . . . . . . . . . . . . . . . . . . . . . . . . . . . . . . . . 23 Shortcuts . . . . . . . . . . . . . . . . . . . . . . . . . . . . . . . . . . . . . . . . . . . . . . . . . . . . . . . . . . . . . . . 24
Chapter 3: Recovering Your System . . . . . . . . . . . . . . . . . . . . . . . . . . . . . . . . . . . . . . . . . 25
System recovery options . . . . . . . . . . . . . . . . . . . . . . . . . . . . . . . . . . . . . . . . . . . . . . . 26 Drivers and applications recovery . . . . . . . . . . . . . . . . . . . . . . . . . . . . . . . . . . . . . . . 26 Creating drivers and applications recovery discs . . . . . . . . . . . . . . . . . . . . . 27 Copying drivers and applications recovery files to a network . . . . . . . . 28 Creating discs from recovery files on a network . . . . . . . . . . . . . . . . . . . . . 29 Recovering your system . . . . . . . . . . . . . . . . . . . . . . . . . . . . . . . . . . . . . . . . . . . . . . . . 30 Recovering specific files and software . . . . . . . . . . . . . . . . . . . . . . . . . . . . . . . 31 Recovering your system using Microsoft System Restore . . . . . . . . . . . . 32 Recovering your system from the hard drive . . . . . . . . . . . . . . . . . . . . . . . . 33
i
Contents |
www.gateway.com |
Chapter 4: Using the Internet. . . . . . . . . . . . . . . . . . . . . . . . . . . . . . . . . . . . . . . . . . . . . . . .35
Learning about the Internet . . . . . . . . . . . . . . . . . . . . . . . . . . . . . . . . . . . . . . . . . . . . .36 Setting up an Internet account . . . . . . . . . . . . . . . . . . . . . . . . . . . . . . . . . . . . . . . . . .37 Accessing your Internet account . . . . . . . . . . . . . . . . . . . . . . . . . . . . . . . . . . . . .37 Using the World Wide Web . . . . . . . . . . . . . . . . . . . . . . . . . . . . . . . . . . . . . . . . . . . . . .37 Connecting to a Web site . . . . . . . . . . . . . . . . . . . . . . . . . . . . . . . . . . . . . . . . . . . .38 Downloading files . . . . . . . . . . . . . . . . . . . . . . . . . . . . . . . . . . . . . . . . . . . . . . . . . . .39 Using e-mail . . . . . . . . . . . . . . . . . . . . . . . . . . . . . . . . . . . . . . . . . . . . . . . . . . . . . . . . . . . .39 Sending e-mail . . . . . . . . . . . . . . . . . . . . . . . . . . . . . . . . . . . . . . . . . . . . . . . . . . . . . .40 Checking your e-mail . . . . . . . . . . . . . . . . . . . . . . . . . . . . . . . . . . . . . . . . . . . . . . . .40
Chapter 5: Protecting your notebook . . . . . . . . . . . . . . . . . . . . . . . . . . . . . . . . . . . . . . . .41
Hardware security . . . . . . . . . . . . . . . . . . . . . . . . . . . . . . . . . . . . . . . . . . . . . . . . . . . . . . .42 Kensington lock slot . . . . . . . . . . . . . . . . . . . . . . . . . . . . . . . . . . . . . . . . . . . . . . . . .42 CompuTrace . . . . . . . . . . . . . . . . . . . . . . . . . . . . . . . . . . . . . . . . . . . . . . . . . . . . . . . .42 Data security . . . . . . . . . . . . . . . . . . . . . . . . . . . . . . . . . . . . . . . . . . . . . . . . . . . . . . . . . . . .43 Trusted Platform Module (TPM) . . . . . . . . . . . . . . . . . . . . . . . . . . . . . . . . . . . . . .43 Computrace . . . . . . . . . . . . . . . . . . . . . . . . . . . . . . . . . . . . . . . . . . . . . . . . . . . . . . . . .43 Notebook startup and hard drive password . . . . . . . . . . . . . . . . . . . . . . . . . .43 Windows XP user accounts . . . . . . . . . . . . . . . . . . . . . . . . . . . . . . . . . . . . . . . . . .43 Protecting your notebook from viruses . . . . . . . . . . . . . . . . . . . . . . . . . . . . . .44 Using McAfee SecurityCenter . . . . . . . . . . . . . . . . . . . . . . . . . . . . . . . . . . . . . . . .45 Using Windows XP Security Center . . . . . . . . . . . . . . . . . . . . . . . . . . . . . . . . . .48 Security updates . . . . . . . . . . . . . . . . . . . . . . . . . . . . . . . . . . . . . . . . . . . . . . . . . . . . . . . .49 Windows Update . . . . . . . . . . . . . . . . . . . . . . . . . . . . . . . . . . . . . . . . . . . . . . . . . . . .49 BigFix . . . . . . . . . . . . . . . . . . . . . . . . . . . . . . . . . . . . . . . . . . . . . . . . . . . . . . . . . . . . . . .51 Traveling securely . . . . . . . . . . . . . . . . . . . . . . . . . . . . . . . . . . . . . . . . . . . . . . . . . . . . . . .51
Chapter 6: Connecting Devices . . . . . . . . . . . . . . . . . . . . . . . . . . . . . . . . . . . . . . . . . . . . . .53
Installing a printer, scanner, digital camera, or other peripheral device . . .54 Viewing the display on a projector or monitor . . . . . . . . . . . . . . . . . . . . . . . . . . .55 Viewing the display on a television . . . . . . . . . . . . . . . . . . . . . . . . . . . . . . . . . . . . . .56 Modifying television settings . . . . . . . . . . . . . . . . . . . . . . . . . . . . . . . . . . . . . . . .58 Connecting a video camera to your notebook . . . . . . . . . . . . . . . . . . . . . . . . . . .58 Using an optional port replicator . . . . . . . . . . . . . . . . . . . . . . . . . . . . . . . . . . . . . . . .59
Chapter 7: Using Multimedia . . . . . . . . . . . . . . . . . . . . . . . . . . . . . . . . . . . . . . . . . . . . . . . .61
Adjusting the volume . . . . . . . . . . . . . . . . . . . . . . . . . . . . . . . . . . . . . . . . . . . . . . . . . . .62 Playing music and movies . . . . . . . . . . . . . . . . . . . . . . . . . . . . . . . . . . . . . . . . . . . . . . .64 Playing WAV audio files . . . . . . . . . . . . . . . . . . . . . . . . . . . . . . . . . . . . . . . . . . . . .64 Playing audio and video files . . . . . . . . . . . . . . . . . . . . . . . . . . . . . . . . . . . . . . . .65 Playing CDs or DVDs . . . . . . . . . . . . . . . . . . . . . . . . . . . . . . . . . . . . . . . . . . . . . . . .66 Creating audio files and music libraries . . . . . . . . . . . . . . . . . . . . . . . . . . . . . . . . . .69 Creating music files . . . . . . . . . . . . . . . . . . . . . . . . . . . . . . . . . . . . . . . . . . . . . . . . .69 Building a music library . . . . . . . . . . . . . . . . . . . . . . . . . . . . . . . . . . . . . . . . . . . . . .71
ii
www.gateway.com |
Contents |
Editing track information . . . . . . . . . . . . . . . . . . . . . . . . . . . . . . . . . . . . . . . . . . . 71 Creating and editing videos . . . . . . . . . . . . . . . . . . . . . . . . . . . . . . . . . . . . . . . . . . . . 72 Editing videos . . . . . . . . . . . . . . . . . . . . . . . . . . . . . . . . . . . . . . . . . . . . . . . . . . . . . . 72 Transferring your video to your notebook . . . . . . . . . . . . . . . . . . . . . . . . . . . 73 Editing your video . . . . . . . . . . . . . . . . . . . . . . . . . . . . . . . . . . . . . . . . . . . . . . . . . . 74 Saving your video . . . . . . . . . . . . . . . . . . . . . . . . . . . . . . . . . . . . . . . . . . . . . . . . . . 74 Creating music CDs and video DVDs . . . . . . . . . . . . . . . . . . . . . . . . . . . . . . . . . . . . 75 Creating a music CD . . . . . . . . . . . . . . . . . . . . . . . . . . . . . . . . . . . . . . . . . . . . . . . . 75 Creating a video DVD . . . . . . . . . . . . . . . . . . . . . . . . . . . . . . . . . . . . . . . . . . . . . . . 78 Creating and copying data CDs and DVDs . . . . . . . . . . . . . . . . . . . . . . . . . . . . . . 82 Creating a data CD or DVD . . . . . . . . . . . . . . . . . . . . . . . . . . . . . . . . . . . . . . . . . . 82 Copying a CD or DVD . . . . . . . . . . . . . . . . . . . . . . . . . . . . . . . . . . . . . . . . . . . . . . . 85 Advanced multimedia software features . . . . . . . . . . . . . . . . . . . . . . . . . . . . . . . . 87 Windows Media Player advanced features . . . . . . . . . . . . . . . . . . . . . . . . . . . 87 CyberLink Power2Go advanced features . . . . . . . . . . . . . . . . . . . . . . . . . . . . 87
Chapter 8: Managing Power . . . . . . . . . . . . . . . . . . . . . . . . . . . . . . . . . . . . . . . . . . . . . . . . 89
Monitoring the battery charge . . . . . . . . . . . . . . . . . . . . . . . . . . . . . . . . . . . . . . . . . . 90 Recharging the battery . . . . . . . . . . . . . . . . . . . . . . . . . . . . . . . . . . . . . . . . . . . . . . . . . 90 Extending battery life . . . . . . . . . . . . . . . . . . . . . . . . . . . . . . . . . . . . . . . . . . . . . . . . . . 90 Conserving battery power . . . . . . . . . . . . . . . . . . . . . . . . . . . . . . . . . . . . . . . . . . 90 Using alternate power sources . . . . . . . . . . . . . . . . . . . . . . . . . . . . . . . . . . . . . . 91 Changing power modes . . . . . . . . . . . . . . . . . . . . . . . . . . . . . . . . . . . . . . . . . . . . 91 Changing notebook power settings . . . . . . . . . . . . . . . . . . . . . . . . . . . . . . . . . . . . 92 Changing the power scheme . . . . . . . . . . . . . . . . . . . . . . . . . . . . . . . . . . . . . . . 92 Changing alarm options . . . . . . . . . . . . . . . . . . . . . . . . . . . . . . . . . . . . . . . . . . . . 93 Changing advanced settings . . . . . . . . . . . . . . . . . . . . . . . . . . . . . . . . . . . . . . . . 94 Activating and using Hibernate mode . . . . . . . . . . . . . . . . . . . . . . . . . . . . . . . 95
Chapter 9: Wireless Networking . . . . . . . . . . . . . . . . . . . . . . . . . . . . . . . . . . . . . . . . . . . . 97
Wireless networking . . . . . . . . . . . . . . . . . . . . . . . . . . . . . . . . . . . . . . . . . . . . . . . . . . . . 98 Buying wireless equipment . . . . . . . . . . . . . . . . . . . . . . . . . . . . . . . . . . . . . . . . . 98 Setting up your wireless network . . . . . . . . . . . . . . . . . . . . . . . . . . . . . . . . . . . . . . . 99 Making sure your broadband connection works . . . . . . . . . . . . . . . . . . . . . 99 Setting up your access point . . . . . . . . . . . . . . . . . . . . . . . . . . . . . . . . . . . . . . . . 99 Setting up your notebook . . . . . . . . . . . . . . . . . . . . . . . . . . . . . . . . . . . . . . . . . 100 Testing your network . . . . . . . . . . . . . . . . . . . . . . . . . . . . . . . . . . . . . . . . . . . . . . . . . . 102 Sharing resources . . . . . . . . . . . . . . . . . . . . . . . . . . . . . . . . . . . . . . . . . . . . . . . . . . . . . 102 Sharing drives and printers . . . . . . . . . . . . . . . . . . . . . . . . . . . . . . . . . . . . . . . . 102 Using the network . . . . . . . . . . . . . . . . . . . . . . . . . . . . . . . . . . . . . . . . . . . . . . . . . . . . 105 Viewing shared drives and folders . . . . . . . . . . . . . . . . . . . . . . . . . . . . . . . . . . 105 Mapping a network drive . . . . . . . . . . . . . . . . . . . . . . . . . . . . . . . . . . . . . . . . . . 105 Opening files across the network . . . . . . . . . . . . . . . . . . . . . . . . . . . . . . . . . . 106 Copying files across the network . . . . . . . . . . . . . . . . . . . . . . . . . . . . . . . . . . . 106 Printing files across the network . . . . . . . . . . . . . . . . . . . . . . . . . . . . . . . . . . . 106 Connecting to hotspots . . . . . . . . . . . . . . . . . . . . . . . . . . . . . . . . . . . . . . . . . . . . . . . 107
iii
Contents |
www.gateway.com |
Adding devices to your network . . . . . . . . . . . . . . . . . . . . . . . . . . . . . . . . . . . . . . 107
Adding a desktop computer to your network . . . . . . . . . . . . . . . . . . . . . . 107
Adding a printer to your network . . . . . . . . . . . . . . . . . . . . . . . . . . . . . . . . . . 107
Chapter 10: Sending and Receiving Faxes . . . . . . . . . . . . . . . . . . . . . . . . . . . . . . . . . . 109
Installing and configuring Fax . . . . . . . . . . . . . . . . . . . . . . . . . . . . . . . . . . . . . . . . . 110 Installing Fax . . . . . . . . . . . . . . . . . . . . . . . . . . . . . . . . . . . . . . . . . . . . . . . . . . . . . . 110 Configuring Fax . . . . . . . . . . . . . . . . . . . . . . . . . . . . . . . . . . . . . . . . . . . . . . . . . . . 111 Sending a simple fax . . . . . . . . . . . . . . . . . . . . . . . . . . . . . . . . . . . . . . . . . . . . . . . . . . 113 Setting up your cover page template . . . . . . . . . . . . . . . . . . . . . . . . . . . . . . . . . . 114 Faxing from programs . . . . . . . . . . . . . . . . . . . . . . . . . . . . . . . . . . . . . . . . . . . . . . . . 114 Faxing a scanned document . . . . . . . . . . . . . . . . . . . . . . . . . . . . . . . . . . . . . . . . . . 115 Receiving and viewing a fax . . . . . . . . . . . . . . . . . . . . . . . . . . . . . . . . . . . . . . . . . . . 115 Canceling a fax . . . . . . . . . . . . . . . . . . . . . . . . . . . . . . . . . . . . . . . . . . . . . . . . . . . . . . . 115 Automatically retry sending a fax . . . . . . . . . . . . . . . . . . . . . . . . . . . . . . . . . . . . . 116 Automatically canceling a fax . . . . . . . . . . . . . . . . . . . . . . . . . . . . . . . . . . . . . . . . . 116
Chapter 11: Customizing Your notebook . . . . . . . . . . . . . . . . . . . . . . . . . . . . . . . . . . . 117
Adjusting the screen and desktop settings . . . . . . . . . . . . . . . . . . . . . . . . . . . . 118 Adjusting the color depth . . . . . . . . . . . . . . . . . . . . . . . . . . . . . . . . . . . . . . . . . 118 Adjusting the screen resolution . . . . . . . . . . . . . . . . . . . . . . . . . . . . . . . . . . . . 119 Changing the colors on your Windows desktop . . . . . . . . . . . . . . . . . . . . 120 Changing the desktop background . . . . . . . . . . . . . . . . . . . . . . . . . . . . . . . . 121 Selecting a screen saver . . . . . . . . . . . . . . . . . . . . . . . . . . . . . . . . . . . . . . . . . . . 122 Using an extended desktop . . . . . . . . . . . . . . . . . . . . . . . . . . . . . . . . . . . . . . . 123
Changing the mouse, touchpad, or pointing device settings . . . . . . . . . . . 124 Changing mouse settings . . . . . . . . . . . . . . . . . . . . . . . . . . . . . . . . . . . . . . . . . 124 Changing touchpad or pointing device settings . . . . . . . . . . . . . . . . . . . 125 Adjusting tablet and pen settings . . . . . . . . . . . . . . . . . . . . . . . . . . . . . . . . . . . . . 126 Programming the buttons . . . . . . . . . . . . . . . . . . . . . . . . . . . . . . . . . . . . . . . . . 127 Adjusting the Tablet PC Input Panel Settings . . . . . . . . . . . . . . . . . . . . . . 127 Adding and modifying user accounts . . . . . . . . . . . . . . . . . . . . . . . . . . . . . . . . . 128 Modifying security settings . . . . . . . . . . . . . . . . . . . . . . . . . . . . . . . . . . . . . . . . . . . . 129
Chapter 12: Maintaining Your Notebook . . . . . . . . . . . . . . . . . . . . . . . . . . . . . . . . . . . 131
Caring for your notebook . . . . . . . . . . . . . . . . . . . . . . . . . . . . . . . . . . . . . . . . . . . . . 132 Cleaning your notebook . . . . . . . . . . . . . . . . . . . . . . . . . . . . . . . . . . . . . . . . . . . 132 Protecting your notebook from viruses . . . . . . . . . . . . . . . . . . . . . . . . . . . . . . . . 133 Updating Windows . . . . . . . . . . . . . . . . . . . . . . . . . . . . . . . . . . . . . . . . . . . . . . . . . . . 134 Using BigFix . . . . . . . . . . . . . . . . . . . . . . . . . . . . . . . . . . . . . . . . . . . . . . . . . . . . . . . . . . 134 Managing hard drive space . . . . . . . . . . . . . . . . . . . . . . . . . . . . . . . . . . . . . . . . . . . 135 Checking hard drive space . . . . . . . . . . . . . . . . . . . . . . . . . . . . . . . . . . . . . . . . 135 Deleting unnecessary files . . . . . . . . . . . . . . . . . . . . . . . . . . . . . . . . . . . . . . . . . 136 Checking the hard drive for errors . . . . . . . . . . . . . . . . . . . . . . . . . . . . . . . . . 136 Defragmenting the hard drive . . . . . . . . . . . . . . . . . . . . . . . . . . . . . . . . . . . . . 137 Backing up files . . . . . . . . . . . . . . . . . . . . . . . . . . . . . . . . . . . . . . . . . . . . . . . . . . . 138
iv
www.gateway.com |
Contents |
Scheduling maintenance tasks . . . . . . . . . . . . . . . . . . . . . . . . . . . . . . . . . . . . . 139 Moving from Your Old Computer . . . . . . . . . . . . . . . . . . . . . . . . . . . . . . . . . . . . . . 139 Using the Files and Settings Transfer Wizard . . . . . . . . . . . . . . . . . . . . . . . 139 Transferring files . . . . . . . . . . . . . . . . . . . . . . . . . . . . . . . . . . . . . . . . . . . . . . . . . . . 140 Transferring Internet settings . . . . . . . . . . . . . . . . . . . . . . . . . . . . . . . . . . . . . . 141 Installing your old printer or scanner . . . . . . . . . . . . . . . . . . . . . . . . . . . . . . . 142 Installing your old programs . . . . . . . . . . . . . . . . . . . . . . . . . . . . . . . . . . . . . . . 142
Chapter 13: Traveling with Your Notebook . . . . . . . . . . . . . . . . . . . . . . . . . . . . . . . . . 143
Packing your notebook . . . . . . . . . . . . . . . . . . . . . . . . . . . . . . . . . . . . . . . . . . . . . . . . 144 Traveling by air . . . . . . . . . . . . . . . . . . . . . . . . . . . . . . . . . . . . . . . . . . . . . . . . . . . . . . . . 144 Dial-up modem . . . . . . . . . . . . . . . . . . . . . . . . . . . . . . . . . . . . . . . . . . . . . . . . . . . . . . . 144 Radio frequency wireless connections . . . . . . . . . . . . . . . . . . . . . . . . . . . . . . . . . 144 Files . . . . . . . . . . . . . . . . . . . . . . . . . . . . . . . . . . . . . . . . . . . . . . . . . . . . . . . . . . . . . . . . . . . 145 Security . . . . . . . . . . . . . . . . . . . . . . . . . . . . . . . . . . . . . . . . . . . . . . . . . . . . . . . . . . . . . . . 145 Power . . . . . . . . . . . . . . . . . . . . . . . . . . . . . . . . . . . . . . . . . . . . . . . . . . . . . . . . . . . . . . . . . 145 Additional tips . . . . . . . . . . . . . . . . . . . . . . . . . . . . . . . . . . . . . . . . . . . . . . . . . . . . . . . . 146
Chapter 14: Troubleshooting . . . . . . . . . . . . . . . . . . . . . . . . . . . . . . . . . . . . . . . . . . . . . . 147
Safety guidelines . . . . . . . . . . . . . . . . . . . . . . . . . . . . . . . . . . . . . . . . . . . . . . . . . . . . . . 148 First steps . . . . . . . . . . . . . . . . . . . . . . . . . . . . . . . . . . . . . . . . . . . . . . . . . . . . . . . . . . . . . 148 Troubleshooting . . . . . . . . . . . . . . . . . . . . . . . . . . . . . . . . . . . . . . . . . . . . . . . . . . . . . . 148 Audio . . . . . . . . . . . . . . . . . . . . . . . . . . . . . . . . . . . . . . . . . . . . . . . . . . . . . . . . . . . . . 148 Battery . . . . . . . . . . . . . . . . . . . . . . . . . . . . . . . . . . . . . . . . . . . . . . . . . . . . . . . . . . . . 148 CD drives . . . . . . . . . . . . . . . . . . . . . . . . . . . . . . . . . . . . . . . . . . . . . . . . . . . . . . . . . . 148 Device installation . . . . . . . . . . . . . . . . . . . . . . . . . . . . . . . . . . . . . . . . . . . . . . . . . 149 Diskette drive . . . . . . . . . . . . . . . . . . . . . . . . . . . . . . . . . . . . . . . . . . . . . . . . . . . . . . 149 Display . . . . . . . . . . . . . . . . . . . . . . . . . . . . . . . . . . . . . . . . . . . . . . . . . . . . . . . . . . . . 150 DVD drives . . . . . . . . . . . . . . . . . . . . . . . . . . . . . . . . . . . . . . . . . . . . . . . . . . . . . . . . 151 File management . . . . . . . . . . . . . . . . . . . . . . . . . . . . . . . . . . . . . . . . . . . . . . . . . . 152 Hard drive . . . . . . . . . . . . . . . . . . . . . . . . . . . . . . . . . . . . . . . . . . . . . . . . . . . . . . . . . 153 Internet . . . . . . . . . . . . . . . . . . . . . . . . . . . . . . . . . . . . . . . . . . . . . . . . . . . . . . . . . . . 153 Keyboard . . . . . . . . . . . . . . . . . . . . . . . . . . . . . . . . . . . . . . . . . . . . . . . . . . . . . . . . . . 154 Media Center . . . . . . . . . . . . . . . . . . . . . . . . . . . . . . . . . . . . . . . . . . . . . . . . . . . . . . 155 Memory . . . . . . . . . . . . . . . . . . . . . . . . . . . . . . . . . . . . . . . . . . . . . . . . . . . . . . . . . . . 157 Memory card reader . . . . . . . . . . . . . . . . . . . . . . . . . . . . . . . . . . . . . . . . . . . . . . . 157 Modem (cable or DSL) . . . . . . . . . . . . . . . . . . . . . . . . . . . . . . . . . . . . . . . . . . . . . 157 Modem (dial-up) . . . . . . . . . . . . . . . . . . . . . . . . . . . . . . . . . . . . . . . . . . . . . . . . . . . 157 Mouse . . . . . . . . . . . . . . . . . . . . . . . . . . . . . . . . . . . . . . . . . . . . . . . . . . . . . . . . . . . . . 160 Networks (wired) . . . . . . . . . . . . . . . . . . . . . . . . . . . . . . . . . . . . . . . . . . . . . . . . . . 160 Networks (wireless) . . . . . . . . . . . . . . . . . . . . . . . . . . . . . . . . . . . . . . . . . . . . . . . . 161 Passwords . . . . . . . . . . . . . . . . . . . . . . . . . . . . . . . . . . . . . . . . . . . . . . . . . . . . . . . . . 163 PC Cards . . . . . . . . . . . . . . . . . . . . . . . . . . . . . . . . . . . . . . . . . . . . . . . . . . . . . . . . . . . 163 Pen (tablet PC) . . . . . . . . . . . . . . . . . . . . . . . . . . . . . . . . . . . . . . . . . . . . . . . . . . . . . 163 Pointing device . . . . . . . . . . . . . . . . . . . . . . . . . . . . . . . . . . . . . . . . . . . . . . . . . . . . 163 Power . . . . . . . . . . . . . . . . . . . . . . . . . . . . . . . . . . . . . . . . . . . . . . . . . . . . . . . . . . . . . 164
v
Contents |
www.gateway.com |
Printer . . . . . . . . . . . . . . . . . . . . . . . . . . . . . . . . . . . . . . . . . . . . . . . . . . . . . . . . . . . . 164
Sound . . . . . . . . . . . . . . . . . . . . . . . . . . . . . . . . . . . . . . . . . . . . . . . . . . . . . . . . . . . . . 165
Status indicators . . . . . . . . . . . . . . . . . . . . . . . . . . . . . . . . . . . . . . . . . . . . . . . . . . 165
Touchpad or optional pointing device . . . . . . . . . . . . . . . . . . . . . . . . . . . . . 166
Video . . . . . . . . . . . . . . . . . . . . . . . . . . . . . . . . . . . . . . . . . . . . . . . . . . . . . . . . . . . . . 166
Telephone support . . . . . . . . . . . . . . . . . . . . . . . . . . . . . . . . . . . . . . . . . . . . . . . . . . . 167
Before calling Gateway Customer Care . . . . . . . . . . . . . . . . . . . . . . . . . . . . . 167
Telephone numbers . . . . . . . . . . . . . . . . . . . . . . . . . . . . . . . . . . . . . . . . . . . . . . . 167
Self-help . . . . . . . . . . . . . . . . . . . . . . . . . . . . . . . . . . . . . . . . . . . . . . . . . . . . . . . . . . 168
Tutoring . . . . . . . . . . . . . . . . . . . . . . . . . . . . . . . . . . . . . . . . . . . . . . . . . . . . . . . . . . 168
Training . . . . . . . . . . . . . . . . . . . . . . . . . . . . . . . . . . . . . . . . . . . . . . . . . . . . . . . . . . . 168
Appendix A: Safety and Legal Information . . . . . . . . . . . . . . . . . . . . . . . . . . . . . . . . . 169
Index . . . . . . . . . . . . . . . . . . . . . . . . . . . . . . . . . . . . . . . . . . . . . . . . . . . . . . . . . . . . . . . . . . . . 173
vi

CHAPTER 1
Getting Help
•Gateway Web site
•Help and Support
•BigFix
•Online help
1

CHAPTER 1: Getting Help |
www.gateway.com |
Thank you for purchasing our notebook!
You have made an excellent decision choosing Gateway. We are sure that you will be pleased with the outstanding quality, reliability, and performance of your new notebook. Each and every Gateway notebook uses the latest technology and passes through the most stringent quality control tests to ensure that you are provided with the best product possible.
Your new Gateway notebook is designed to provide an exceptional balance of performance and portability. Your notebook uses the latest chipset and mobile processor technologies to manage the processor speed and power consumption for a greater battery life experience. This design provides you with maximum performance when plugged into AC power balanced with optimized battery life when on battery power.
Please read this manual carefully to familiarize yourself with our range of services and support. We have highlighted some basic care and safety information to help you keep your notebook in good operating condition.
Gateway stands behind our value proposition to our customers — to provide best-of-class service and support in addition to high-quality, brand-name components at affordable prices. If you ever have a problem, our knowledgeable, dedicated customer service department will provide you with fast, considerate service.
We sincerely hope that you will receive the utmost satisfaction and enjoyment from your new Gateway notebook for years to come.
Thank you again, from all of us at Gateway.
Gateway Web site
Gateway's online support is available 24 hours per day, 7 days per week and provides the most current drivers, product specifications, tutorials, and personalized information about your notebook. Visit the Gateway Support Web site at support.gateway.com.
2
www.gateway.com
Using Support
Gateway Web site
The Support site is divided into seven major areas:
■Support Home
■Product Support
■Downloads
■Customer Service
■Upgrade Center
■Resources
■Contact Us
Support Home
Click Support Home, then click Notebooks. To view support documents for your notebook, type your serial number in the Serial Number box, then click
Submit.
Click the arrow button to open the Select Your Computer Product box, then click Notebook Computers to access product documentation, specifications, and guides for all Gateway notebooks.
Product Support
Click Product Support to view a list of all the products that Gateway supports.
Downloads
Click Downloads to get the latest software updates for BIOS and driver upgrades. By entering your serial number you get drivers specific to your notebook. Click Browse All Downloads to walk through a step-by-step wizard to locate your drivers.
Customer Service
Click Customer Service to view information about your account and general information about warranties and special offers.
Upgrade Center
Click Upgrade Center to view and purchase upgrades for your notebook.
Resources
Click Resources to access utilities to help you manage your notebook.
Contact Us
Click Contact Us to access links to customer care with a live technician, including chat and e-mail. Click Call Us to get a list of Gateway telephone numbers for both sales and support. For more information, see “Telephone support” on page 167.
3
CHAPTER 1: Getting Help |
www.gateway.com |
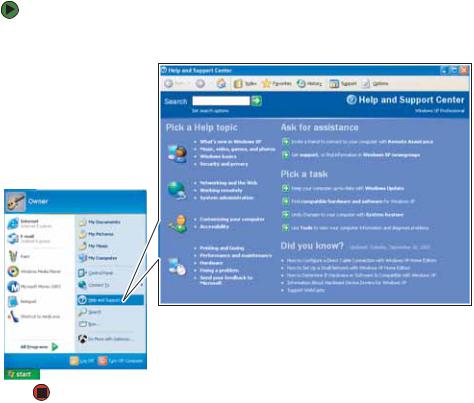
Help and Support
Your notebook includes Help and Support, an easily accessible collection of help information, troubleshooters, and automated support. Use Help and Support to answer questions about Windows and to help you quickly discover and use the many features of your Gateway notebook.
To start Help and Support:
■ Click Start, then click Help and Support. Help and Support opens.
You can find help information by clicking a link, performing a search, or browsing the index.
Searching for a topic
To search for a topic in Help and Support, type a word or phrase (keyword) in the Search box located at the top of any Help and Support screen, then click the arrow  button.
For each search, you receive the following search result types:
■Suggested Topics - These topics are located in Help and Support and are relevant to your search topic.
■Full-text Search Matches - These topics are located in Help and Support and contain the words you entered in the Search box.
■Microsoft Knowledge Base - These topics are located on the Microsoft Web site and contain the words you entered in the Search box. You must be connected to the Internet to search for and access these topics.
4
www.gateway.com |
Help and Support |
|
To view a list of your search results, click the results header for the type of results |
|
you want to view. |
|
To view a topic, click the topic name in the Search Results list. |
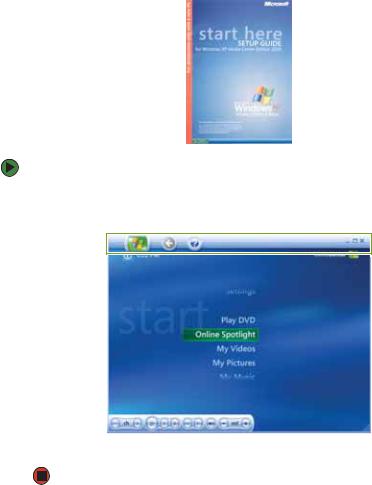
Getting help in Media Center
If your notebook has Windows XP Media Center Edition, you can access online help or refer to the printed Windows XP Media Center Edition Guide.
To access Media Center help:
1In the Media Center window, move the mouse to activate the Media Center tool bar. The tool bar appears at the top of the window.
2 Click the Help  icon in the tool bar.
5

CHAPTER 1: Getting Help |
www.gateway.com |
BigFix
Your notebook may include BigFix. BigFix monitors your notebook for problems and conflicts. It automatically gathers information about the latest bugs, security alerts, and updates from BigFix sites on the Internet. Whenever BigFix detects a problem, it alerts you by flashing the blue taskbar icon. To fix the problem, click on that icon to open BigFix.
To start BigFix:
■ Click Start, All Programs, Accessories, System Tools, then click BigFix.
To learn more about using BigFix:
■ From the BigFix program, click Help, then click Tutorial.
Online help
Many programs provide information online so you can research a topic or learn how to perform a task while you are using the program. You can access most online help information by selecting a topic from a Help menu or by clicking a Help button.
You can search for information by viewing the help contents, checking the index, searching for a topic or keyword, or browsing through the online help.
6

CHAPTER 2
Using Windows XP
•About the Windows desktop
•Identifying window items
•Using Windows XP Tablet PC 2005
•Working with files and folders
•Searching for files
•Working with documents
•Shortcuts
7
CHAPTER 2: Using Windows XP |
www.gateway.com |
About the Windows desktop
 Help and Support
For more information about the Windows desktop, click Start, then click Help and Support. Type the keyword
Windows desktop in the Search box, then click the arrow.
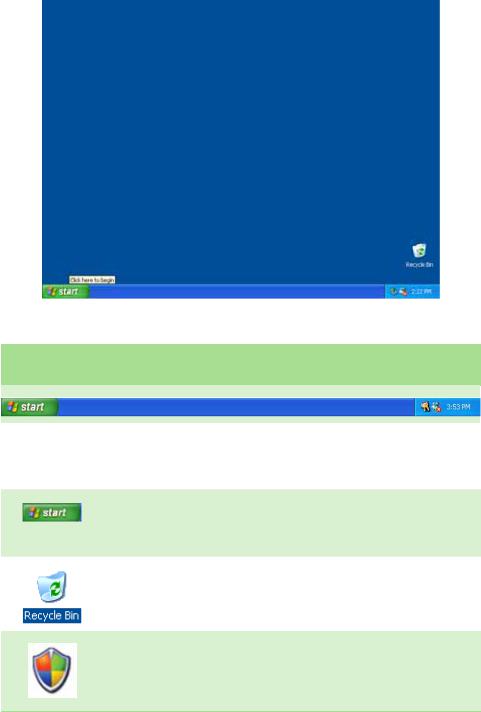
After your notebook starts, the first screen you see is the Windows desktop. The desktop is like the top of a real desk. Think of the desktop as your personalized work space where you open programs and perform other tasks.
Your desktop may be different from this example, depending on how your notebook is set up.
The desktop contains the taskbar, the Start button, and the Recycle Bin icon.
Desktop Description elements
The taskbar is the bar at the bottom of the notebook display containing the Start button on the left and a clock on the right. Other buttons on the taskbar represent programs that
are running.
Click a program’s button on the taskbar to open the program’s window.
The Start button provides access to programs, files, help for Windows and other programs, and computer tools and utilities.
Click the Start button, then open a file or program by clicking an item on the menu that opens.
The Recycle Bin is where files, folders, and programs that you discarded are stored. You must empty the Recycle Bin to permanently delete them from your notebook. For instructions on how to use the Recycle Bin, see “Deleting files and folders” on page 17.
The Windows Security Center icon may appear on the taskbar near the clock. The icon changes appearance to notify you when the security settings on your notebook are set below the recommended value or when updates are available. Double-click this icon to open the Windows Security Center. For more information, see “Modifying security settings” on page 129.
8
www.gateway.com
Using the Start menu
 Help and Support
For more information about the Windows Start menu, click Start, then click Help and Support. Type the keyword Windows Start menu in the
Search box, then click the arrow.
About the Windows desktop
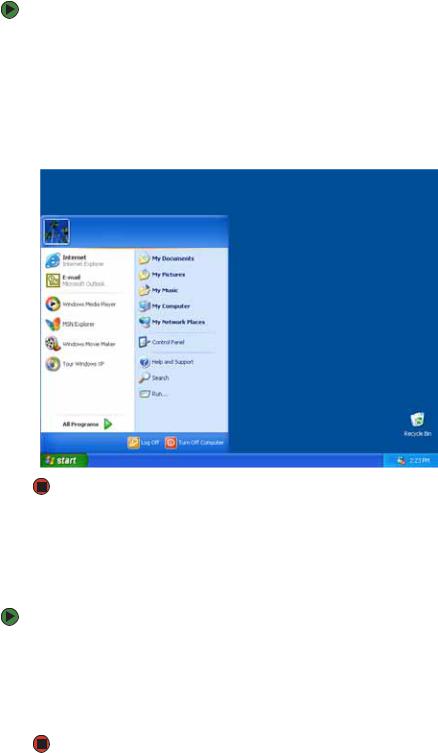
You can start programs, open files, customize your system, get help, search for files and folders, and more using the Start menu.
To use the Start menu:
1Click the Start button on the lower left of the Windows desktop. The Start menu opens showing you the first level of menu items.
2Click All Programs to see all programs and files in the Start menu. When you move the mouse pointer over any menu item that has an arrow next to it, another menu, called a submenu, opens and reveals related files, programs, or commands.
3 Click a file or program to open it.
Adding icons to the desktop
 Help and Support
For more information about desktop icons, click Start, then click Help and Support. Type the keyword desktop icons in the Search box, then click the arrow.
You may want to add an icon (shortcut) to the desktop for a program that you use frequently.
To add icons to the desktop:
1 Click Start, then click All Programs.
2Right-click (press the right mouse or touchpad button) the program that you want to add to the desktop.
3Click Send To, then click Desktop (create shortcut). A shortcut icon for that program appears on the desktop.
9
CHAPTER 2: Using Windows XP |
www.gateway.com |
Identifying window items
 Help and Support
For more information about windows, click Start, then click Help and Support. Type the keyword window in the Search box, then click the arrow.
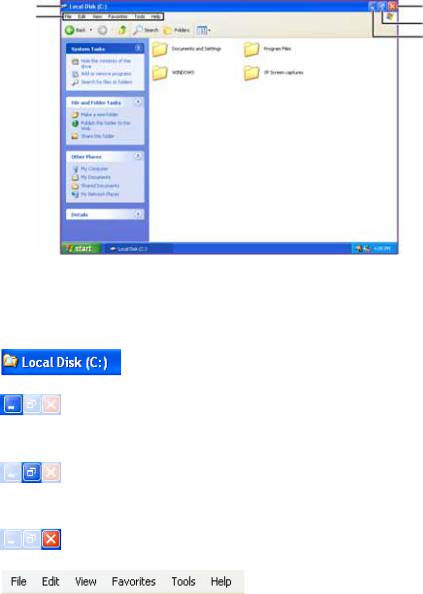
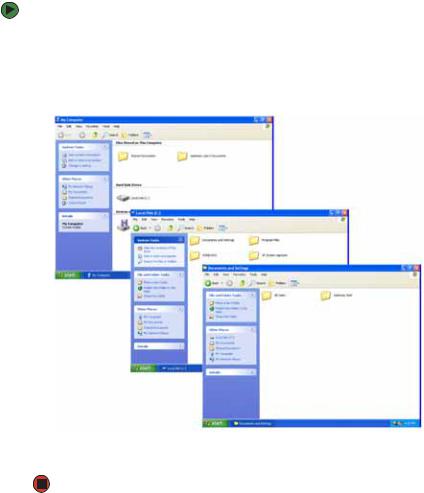
When you double-click the icon for a drive, folder, file, or program, a window opens on the desktop. This example shows the Local Disk (C:) window, which opens after you double-click the Local Disk (C:) icon in the My Computer window.
Title bar |
Close |
|
Menu |
||
Maximize |
||
bar |
Minimize |
|
|
Every program window looks a little different because each has its own menus, icons, and controls. Most windows include these items:
Window item |
|
Description |
||
|
|
|
|
|
|
|
|
|
The title bar is the horizontal bar at the top of a |
|
|
|
||
|
|
|
|
window that shows the window title. |
|
|
|
|
|
|
|
|
|
|
|
|
|
|
Clicking the minimize button reduces the active |
|
|
|
|
window to a button on the taskbar. Clicking the |
|
|
|
|
program button in the taskbar opens the window |
|
|
|
|
again. |
|
|
|
|
|
|
|
|
|
Clicking the maximize button expands the active |
|
|
|
||
|
|
|
|
window to fit the entire notebook display. Clicking |
|
|
|
|
the maximize button again restores the window to |
|
|
|
|
its former size. |
|
|
|
|
|
|
|
|
|
Clicking the close button closes the active window |
|
|
|
|
or program. |
|
|
|
|
|
|
|
|
|
Clicking an item on the menu bar starts an action |
|
|
|
|
|
|
|
|
|
such as Print or Save. |
|
|
|
|
|
|
|
|
|
|
10

www.gateway.com |
Using Windows XP Tablet PC 2005 |
Using Windows XP Tablet PC 2005
Your notebook may have Windows XP Tablet PC 2005 installed. The Microsoft
Windows XP Tablet PC 2005 operating system is a fully functioning version of
Windows XP Professional with added pen-based computing features:
■Tablet and Pen Settings — set properties for the pen, tablet buttons, and display screen
■Tablet PC Input Panel (TIP) — use its writing pad, soft keyboard, and voice recognition for entering data
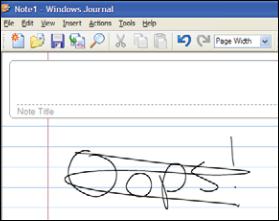
■Windows® Journal — hand-write documents, then turn them into text or image files
■Sticky Notes — make a quick note with your pen or voice and drop it into another program
■Document annotation — insert handwritten notes into Word documents and other programs
■Enhanced speech and voice recognition — say what you are thinking, and your tablet will understand
■
■
Inkball — practice and master pen input with this game of strategy
MicroSoft OneNote — capture, organize, and reuse your notes on notebook computers, desktop computers, or tablet PCs.
The What’s New in Windows XP link in the Help and Support Center and the Windows XP Start Here booklet that shipped with your tablet PC can help you learn more about using Windows XP Tablet PC 2005.
Using Tablet PC extensions
Calibration
The first time you use your tablet PC, you should calibrate your pen for both portrait and landscape orientations. Calibration ensures the accuracy of the pen and adjusts the screen’s performance for different users.
If the on-screen pointer does not seem to line up with the tip of the pen—for example, because someone else has used your tablet PC and adjusted it for their own use—recalibrate it to your tapping patterns.
Recalibrate if you write with the opposite hand from the previous user—right-handed writer to left-handed writer.
To open the calibration program:
■Double-tap or double-click  (Tablet and Pen Settings) in the taskbar. Tap or click Properties, then tap or click Calibrate. Follow the on-screen instructions.
11
CHAPTER 2: Using Windows XP |
www.gateway.com |
Gestures
A gesture is a shape you draw with your tablet PC pen to send a command to your tablet PC Input Panel. You can also use gestures to control the insertion point in the active program. When you use these gestures, you get the same result as pressing the corresponding key on a standard keyboard.
■Open the Tablet Input Panel by waving the pen back and forth over the screen.
■
■
Backspace by drawing a right-to-left line on the display surface.
In most text input programs, you can erase text by scratching it out. Windows interprets a scratchout as a delete command.
■ To erase, draw a short, wide “Z.”
■You will find more information about gestures and gesture symbols, as well as handwriting tips, in the TIP help. For more information, see “Tablet Input Panel (TIP)” on page 13.
Pen button
The pen button serves the same function as the right button on a mouse. Press it and tap (button-tap) to open right-click menus when they are available.
Tips
■Hold the pen the same way you hold a writing pen, and steady your writing hand by resting it on the display surface.
■Line up the pointer before you tap, in cases where the pointer and pen point are out of alignment. The screen reads the position of the pointer, not the tap.
■Store the pen in the tablet PC’s pen holder. Store extra pens in a drawer to avoid prolonged pressure on the pen tip.
■The pen has internal electronics, so keep it dry and avoid contact with liquids.
12
www.gateway.com |
Using Windows XP Tablet PC 2005 |
Tablet Input Panel (TIP)
Tap the Keyboard icon  near the Start button to open the Tablet Input Panel (TIP). Use the TIP to enter data by hand, soft keyboard, or voice into a word processing program or a text-entry form.
■Access the TIP keyboard and writing pad by tapping or clicking the tabs near the bottom of the window.
Tools and Options
Help
■ To set up speech options, tap or click the Tools and Options icon |
, |
then tap or click Speech. |
|
TIP tips
■Open a program for your input (for example, a word processing program or a Web form) before using the writing pad or soft keyboard.
■To adjust writing pad and keyboard settings, tap or click the Tools and Options icon  , then tap or click Options.
■For security and accuracy when entering masked text (such as passwords), use your tablet PC Input Panel’s soft keyboard instead of the writing pad.
13
CHAPTER 2: Using Windows XP |
www.gateway.com |
Using speech recognition
The tablet PC is designed to accept and interpret the human voice, both for dictation (speech recognition) and for keyboard-equivalent voice commands.
■Set up speech recognition through your tablet PC Input Panel’s Tools menu.
■Learn more about voice commands in the Accessibility section of the Help and Support Center.
■
■
Use the built-in microphone or an external microphone.
To modify the speech recognition function, see “Adjusting the Tablet PC Input Panel Settings” on page 127.
Working with files and folders
Viewing drives
 Help and Support
For more information about files and folders, click Start, then click Help and Support. Type the keyword files and folders in the Search box, then click the arrow.
You can organize your files and programs to suit your preferences much like you would store information in a file cabinet. You can store these files in folders and copy, move, and delete the information just as you would reorganize and throw away information in a file cabinet.
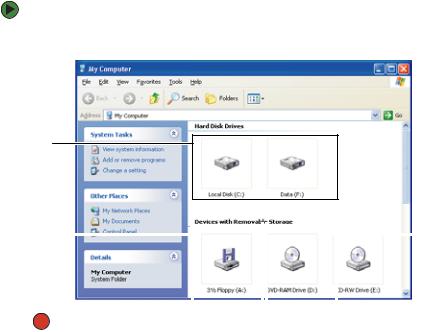
Drives are like file cabinets because they hold files and folders. A notebook almost always has more than one drive. Each drive has a letter, usually Local Disk (C:) for the hard drive and 3½ Floppy (A:) for the diskette drive. You may also have more drives such as a CD or DVD drive.
To view the drives on your notebook:
■ Click Start, then click My Computer on the Start menu.
Hard drives
Diskette |
|
|
|
|
|
|
Disc |
||
|
|
|
|||||||
drive |
|
|
|
|
|
|
drive |
||
|
|
||||||||
|
|
|
|
|
|
|
|
|
|
|
|
|
|
|
|
|
|
|
|
|
|
|
|
|
|
|
|
|
|
14
www.gateway.com |
Working with files and folders |
Creating folders
 Help and Support
For more information about creating files and folders, click Start, then click Help and Support. Type the keyword creating files and folders in the
Search box, then click the arrow.
To see the files and folders on a drive:
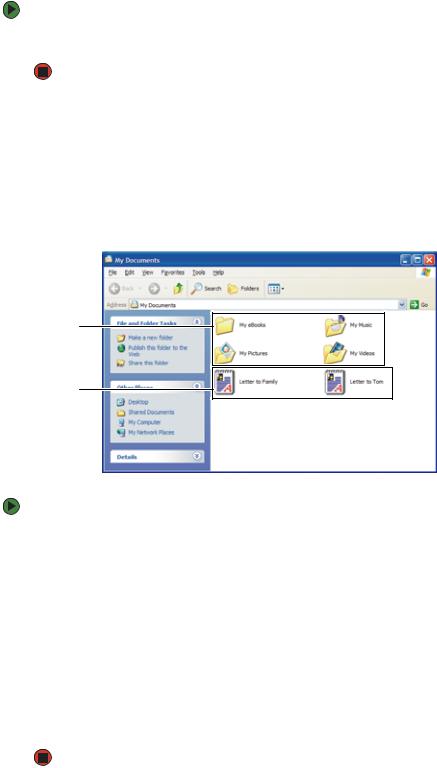
■Double-click the drive icon. If you do not see the contents of a drive after you double-click its icon, click Show the contents of this drive.
Folders are much like the folders in a file cabinet. They can contain files and other folders.
Files are much like paper documents—letters, spreadsheets, and pictures—that you keep on your notebook. In fact, all information on a notebook is stored in files.
Folders
Files
To create a folder:
1 Click Start, then click My Computer on the Start menu.
2Double-click the drive where you want to put the new folder. Typically, Local Disk (C:) is your hard drive and 3½ Floppy (A:) is your diskette drive. If you do not see the contents of the drive, click Show the contents of this drive.
3If you want to create a new folder inside an existing folder, double-click the existing folder. If you do not see the contents of the drive or folder, click Show the contents of this drive or Show the contents of this folder.
4 Click File, New, then click Folder. The new folder is created.
5Type a name for the folder, then press ENTER. The new folder name appears by the folder icon.
For information about renaming folders, see “Shortcuts” on page 24.
15

CHAPTER 2: Using Windows XP |
www.gateway.com |
Copying and moving files and folders
 Important
The clipboard stores whatever you cut or copy until you cut or copy again. Then the clipboard contains the new information only. Therefore, you can paste copies of a file or folder into more than one place, but as soon as you copy or cut a different file or folder, the original file or folder is deleted from the clipboard.
 Help and Support
For more information about copying files and folders or moving files and folders, click Start, then click Help and Support. Type the keyword copying files and folders or moving files and folders in the Search box, then click the arrow.
The skills you need to copy and move files are called copying, cutting, and pasting.
When you copy and paste a file or folder, you place a copy of the file or folder on the Windows clipboard, which temporarily stores it. Then, when you decide what folder you want the copy to go in (the destination folder), you paste it there.
When you cut and paste a file or folder, you remove the file or folder from its original location and place the file or folder on the Windows clipboard. When you decide where you want the file or folder to go, you paste it there.
To copy a file or folder to another folder:
1Locate the file or folder you want to copy. For more information, see “Viewing drives” on page 14 and “Searching for files” on page 19.
2Right-click (press the right mouse or touchpad button) the file or folder that you want to copy. A pop-up menu opens on the desktop.
3 Click Copy on the pop-up menu.
4 Open the destination folder.
5 With the pointer inside the destination folder, right-click.
6 Click Paste. A copy of the file or folder appears in the new location.
To move a file or folder to another folder:
1Locate the file or folder you want to move. For more information, see “Viewing drives” on page 14 and “Searching for files” on page 19.
2Right-click (press the right mouse or touchpad button) the file or folder that you want to move. A pop-up menu opens on the desktop.
3 Click Cut on the pop-up menu.
4 Open the destination folder.
5 With the pointer inside the destination folder, right-click.
6Click Paste. The file or folder you moved appears in its new location and is removed from its old location.
16

www.gateway.com
Deleting files and folders
 Help and Support
For more information about deleting files and folders, click Start, then click Help and Support. Type the keyword deleting files and folders in the
Search box, then click the arrow.
Working with files and folders
When you throw away paper files and folders, you take them from the file cabinet and put them in a trash can. Eventually the trash can is emptied.
In Windows, you throw away files and folders by first moving them to the Windows trash can, called the Recycle Bin, where they remain until you decide to empty the bin.
You can recover any file in the Recycle Bin as long as the bin has not been emptied.
To delete files or folders:
1In My Computer or Windows Explorer, click the files or folders that you want to delete. For instructions on how to select multiple files and folders, see “Shortcuts” on page 24.
If you cannot find the file you want to delete, see “Searching for files” on page 19.
2Click File, then click Delete. Windows moves the files and folders to the Recycle Bin.
To recover files or folders from the Recycle Bin:
1Double-click the Recycle Bin icon. The Recycle Bin window opens and lists the files and folders you have thrown away since you last emptied it.
2Click the files or folders that you want to restore. For instructions on how to select multiple files and folders, see “Shortcuts” on page 24.
3Click File, then click Restore. Windows returns the deleted files or folders to their original locations.
 Caution
Emptying the Recycle Bin permanently erases any files or folders in the bin. These files cannot be restored.
 Help and Support
For more information about emptying the Recycle Bin, click Start, then click Help and Support. Type the keyword emptying the Recycle Bin in the
Search box, then click the arrow.
To empty the Recycle Bin:
1Double-click the Recycle Bin icon on the desktop. The Recycle Bin window opens.
2Click File, then click Empty Recycle Bin. Windows asks you if you are sure that you want to empty the bin.
3 Click Yes. Windows permanently deletes all files in the Recycle Bin.
17
CHAPTER 2: Using Windows XP |
www.gateway.com |
Browsing for files and folders
 Help and Support
For more information about browsing for files and folders, click Start, then click Help and Support. Type the keyword files and folders in the Search box, then click the arrow.
A file or folder that you need is rarely right on top of your Windows desktop. It is usually on a drive inside a folder that may be inside yet another folder, and so on.
Windows drives, folders, and files are organized in the same way as a real file cabinet in that they may have many levels (usually many more levels than a file cabinet, in fact). So you usually will have to search through levels of folders to find the file or folder that you need. This is called browsing.
To browse for a file:
1 Click Start, then click MY COMPUTER. The My Computer window opens.
2Double-click the drive or folder that you think contains the file or folder that you want to find. If you do not see the contents of a folder, click Show the contents of this drive or Show the contents of this folder.
3Continue double-clicking folders and their subfolders until you find the file or folder you want.
18

www.gateway.com |
Searching for files |
Searching for files
If you are looking for a particular file or folder or a set of files or folders that have characteristics in common, but you do not remember where they are stored on your hard drive, you can use the Search utility to search by:
■Name or part of a name
■Creation date
■Modification date
■File type
■Text contained in the file
■Time period in which it was created or modified
You can also combine search criteria to refine searches.
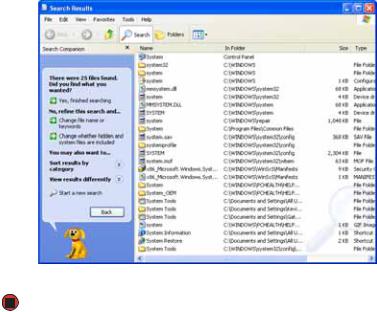
Files and folders found using this utility can be opened, copied, cut, renamed, or deleted directly from the list in the results window.
Using the Windows Search utility
 Help and Support
For more information about searching for files and folders, click Start, then click Help and Support. Type the keyword searching in the Search box, then click the arrow.
To find files and folders using the Search utility:
1Click Start, then click Search. The Search Results window opens. Click All files and folders.
2If you want to search by file or folder name, type in all or part of the file or folder name in the name box in the left pane of the window.
■If you type all of the name, Search will list all files and folders of that name.
■If you type part of the name, Search will list all of the file and folder names containing the letters you typed.
19
CHAPTER 2: Using Windows XP |
www.gateway.com |
3Click Search. When the search is completed, Windows lists the files and folders whose names contain the text that you searched for.
4 Open a file, folder, or program by double-clicking the name in the list.
Using advanced search options
Search can find files meeting more criteria than file name. You can narrow your search by selecting the search options that you want. You can search by the:
■Date the file was created or modified.
■Size of the file.
■Type of file, such as a program or a text document.
20
www.gateway.com |
Working with documents |
Working with documents
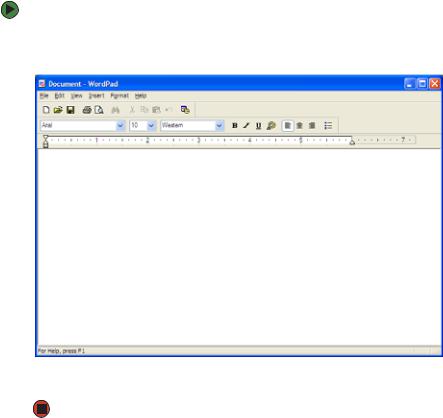
Computer documents include word processing files, spreadsheet files, or other similar files. The basic methods of creating, saving, opening, and printing a document apply to most of these types of files.
The following examples show how to create, save, open, and print a document using Microsoft® WordPad. Similar procedures apply to other programs such as WordPerfect, Microsoft Word, and Microsoft Excel.
For more information about using a program, click Help on its menu bar.
Creating a new document
To create a new document:
1Click Start, All Programs, Accessories, then click WordPad. Microsoft WordPad starts and a blank document opens.
2Begin composing your document. Use the menus and toolbar buttons at the top of the window to format the document.
21

CHAPTER 2: Using Windows XP |
www.gateway.com |
Saving a document
 Help and Support After you create a document, you need to save it if you want to use it later.
For more information about saving
documents, click Start, then click Help
and Support. Type the keyword saving To save a document:
in the Search box, then click the arrow.
1 Click File, then click Save. The Save As dialog box opens.
Save in
list
File name
2Click the arrow button to open the Save in list, then click the folder where you want to save the file. If you do not see the folder you want, browse through the folders listed below the Save in list.
3 Type a new file name in the File name box.
4 Click Save.
22
Loading...