


 Loading...
Gateway ML6227, ML6230, ML6710, ML6720, ML6730 Quick Reference Guide
...NOTEBOOK
REFERENCEGUIDE
®
Contents
Chapter 1: About This Reference . . . . . . . . . . . 1
About this guide . . . . . . . . . . . . . . . . . . . . . . . . . . . . . . . . . . . . . . . . 2 Accessing your online User Guide . . . . . . . . . . . . . . . . . . . . . . . . 2 Gateway contact information . . . . . . . . . . . . . . . . . . . . . . . . . . . . 2 Gateway model and serial number . . . . . . . . . . . . . . . . . . . . 3 Microsoft Certificate of Authenticity . . . . . . . . . . . . . . . . . . . . . . 3 For more information . . . . . . . . . . . . . . . . . . . . . . . . . . . . . . . . . . . 3
Chapter 2: Checking Out Your Notebook . . . . . 5
Front . . . . . . . . . . . . . . . . . . . . . . . . . . . . . . . . . . . . . . . . . . . . . . . . . . 6 Left . . . . . . . . . . . . . . . . . . . . . . . . . . . . . . . . . . . . . . . . . . . . . . . . . . . 7 Right . . . . . . . . . . . . . . . . . . . . . . . . . . . . . . . . . . . . . . . . . . . . . . . . . . 8 Back . . . . . . . . . . . . . . . . . . . . . . . . . . . . . . . . . . . . . . . . . . . . . . . . . . . 9 Bottom . . . . . . . . . . . . . . . . . . . . . . . . . . . . . . . . . . . . . . . . . . . . . . .10 Keyboard area . . . . . . . . . . . . . . . . . . . . . . . . . . . . . . . . . . . . . . . .11 LCD panel . . . . . . . . . . . . . . . . . . . . . . . . . . . . . . . . . . . . . . . . . . . . .12
Chapter 3: Setting Up and Getting Started . . 13
Working safely and comfortably . . . . . . . . . . . . . . . . . . . . . . . .14 Reducing eye strain . . . . . . . . . . . . . . . . . . . . . . . . . . . . . . . .14 Setting up your computer desk and chair . . . . . . . . . . . . .15 Sitting at your notebook . . . . . . . . . . . . . . . . . . . . . . . . . . . .15 Avoiding discomfort and injury from repetitive strain . .15
Connecting the AC adapter . . . . . . . . . . . . . . . . . . . . . . . . . . . . .16 Protecting from power source problems . . . . . . . . . . . . .18 Connecting the dial-up modem . . . . . . . . . . . . . . . . . . . . . . . . .18 Connecting to a broadband modem or network . . . . . . . . . .19 Starting your notebook . . . . . . . . . . . . . . . . . . . . . . . . . . . . . . . .20 Waking up your notebook . . . . . . . . . . . . . . . . . . . . . . . . . .21 Turning off your notebook . . . . . . . . . . . . . . . . . . . . . . . . . . . . .21 Restarting (rebooting) your notebook . . . . . . . . . . . . . . . . . . .22 Using the status indicators . . . . . . . . . . . . . . . . . . . . . . . . . . . . .23 Using the keyboard . . . . . . . . . . . . . . . . . . . . . . . . . . . . . . . . . . . .24 Key types . . . . . . . . . . . . . . . . . . . . . . . . . . . . . . . . . . . . . . . . .24
i
Contents
System key combinations . . . . . . . . . . . . . . . . . . . . . . . . . . 26 Using the EZ Pad touchpad . . . . . . . . . . . . . . . . . . . . . . . . . . . . . 28 Using the optional multimedia panel . . . . . . . . . . . . . . . . . . . . 31 Using the optional webcam . . . . . . . . . . . . . . . . . . . . . . . . . . . . 32 Adjusting the brightness . . . . . . . . . . . . . . . . . . . . . . . . . . . . . . . 35 Adjusting the volume . . . . . . . . . . . . . . . . . . . . . . . . . . . . . . . . . 36 Turning your wireless radio on or off . . . . . . . . . . . . . . . . . . . 38
IEEE 802.11 wireless network radio . . . . . . . . . . . . . . . . . . 38 Bluetooth radio . . . . . . . . . . . . . . . . . . . . . . . . . . . . . . . . . . . . 39
Chapter 4: Using Drives and Accessories . . . . 41
Using the CD or DVD drive . . . . . . . . . . . . . . . . . . . . . . . . . . . . . 42 Identifying drive types . . . . . . . . . . . . . . . . . . . . . . . . . . . . . 42 Using a CD or DVD drive . . . . . . . . . . . . . . . . . . . . . . . . . . . . 43 Using the memory card reader . . . . . . . . . . . . . . . . . . . . . . . . . 44 Memory card types . . . . . . . . . . . . . . . . . . . . . . . . . . . . . . . . 44 Inserting a memory card . . . . . . . . . . . . . . . . . . . . . . . . . . . 44 Using a memory card . . . . . . . . . . . . . . . . . . . . . . . . . . . . . . 45 Removing a memory card . . . . . . . . . . . . . . . . . . . . . . . . . . 45 Adding and removing a PC Card or Express Card . . . . . . . . . 45 Installing a printer or other peripheral device . . . . . . . . . . . . 48 Connecting a USB device . . . . . . . . . . . . . . . . . . . . . . . . . . . 48 Connecting an IEEE 1394 device . . . . . . . . . . . . . . . . . . . . . 49 Viewing the display on a projector or monitor . . . . . . . . . . . 50 Adjusting the display properties . . . . . . . . . . . . . . . . . . . . 51 Using the projector or monitor for a presentation . . . . 53 Viewing the display on a television . . . . . . . . . . . . . . . . . . . . . 54 Adjusting the television display settings . . . . . . . . . . . . . 55 Ordering accessories . . . . . . . . . . . . . . . . . . . . . . . . . . . . . . . . . . 56
Chapter 5: Managing Power . . . . . . . . . . . . . . 59
Monitoring the battery charge . . . . . . . . . . . . . . . . . . . . . . . . . 60 Recharging the battery . . . . . . . . . . . . . . . . . . . . . . . . . . . . . . . . 60 Changing the battery . . . . . . . . . . . . . . . . . . . . . . . . . . . . . . . . . . 61 Recalibrating the battery . . . . . . . . . . . . . . . . . . . . . . . . . . . . . . 62 Extending battery life . . . . . . . . . . . . . . . . . . . . . . . . . . . . . . . . . 63
Maximizing battery performance . . . . . . . . . . . . . . . . . . . 63
ii
www.gateway.com
Conserving battery power . . . . . . . . . . . . . . . . . . . . . . . . . .63 Using alternate power sources . . . . . . . . . . . . . . . . . . . . . .64 Changing power modes . . . . . . . . . . . . . . . . . . . . . . . . . . . . .64 Changing notebook power settings . . . . . . . . . . . . . . . . . . . . .66 Changing the power plan . . . . . . . . . . . . . . . . . . . . . . . . . . .66 Changing advanced settings . . . . . . . . . . . . . . . . . . . . . . . .67
Chapter 6: Traveling with Your Notebook . . . 69
Packing your notebook . . . . . . . . . . . . . . . . . . . . . . . . . . . . . . . . .70 Traveling by air . . . . . . . . . . . . . . . . . . . . . . . . . . . . . . . . . . . . . . .70 Dial-up modem . . . . . . . . . . . . . . . . . . . . . . . . . . . . . . . . . . . . . . . .70 Radio frequency wireless connections . . . . . . . . . . . . . . . . . . .71 Files . . . . . . . . . . . . . . . . . . . . . . . . . . . . . . . . . . . . . . . . . . . . . . . . . .71 Security . . . . . . . . . . . . . . . . . . . . . . . . . . . . . . . . . . . . . . . . . . . . . .72 Power . . . . . . . . . . . . . . . . . . . . . . . . . . . . . . . . . . . . . . . . . . . . . . . .73 Additional tips . . . . . . . . . . . . . . . . . . . . . . . . . . . . . . . . . . . . . . . . .73
Chapter 7: Maintaining Your Notebook . . . . . 75
Caring for your notebook . . . . . . . . . . . . . . . . . . . . . . . . . . . . . .76 Cleaning your notebook . . . . . . . . . . . . . . . . . . . . . . . . . . . . . . . .76 Cleaning the exterior . . . . . . . . . . . . . . . . . . . . . . . . . . . . . . .77 Cleaning the keyboard . . . . . . . . . . . . . . . . . . . . . . . . . . . . . .77 Cleaning the notebook screen . . . . . . . . . . . . . . . . . . . . . . .77 Maintaining the battery . . . . . . . . . . . . . . . . . . . . . . . . . . . . . . . .78 Storing batteries . . . . . . . . . . . . . . . . . . . . . . . . . . . . . . . . . . .78 Cleaning CDs or DVDs . . . . . . . . . . . . . . . . . . . . . . . . . . . . . . . . . .79 Recovering your system . . . . . . . . . . . . . . . . . . . . . . . . . . . . . . . .79 Recovering pre-installed software and drivers . . . . . . . .80 Using Microsoft System Restore . . . . . . . . . . . . . . . . . . . . .86 Recovering your system to its factory condition . . . . . . .89 Recovering your system using the Windows DVD . . . . . .90
Chapter 8: Upgrading Your Notebook . . . . . . 93
Preventing static electricity discharge . . . . . . . . . . . . . . . . . . .94 Adding or replacing memory modules . . . . . . . . . . . . . . . . . . .95 Replacing the hard drive kit . . . . . . . . . . . . . . . . . . . . . . . . . . .100
iii
Contents
Chapter 9: Troubleshooting . . . . . . . . . . . . . . 103
Safety guidelines . . . . . . . . . . . . . . . . . . . . . . . . . . . . . . . . . . . . 104 First steps . . . . . . . . . . . . . . . . . . . . . . . . . . . . . . . . . . . . . . . . . . . 104 Troubleshooting . . . . . . . . . . . . . . . . . . . . . . . . . . . . . . . . . . . . . 105 Audio . . . . . . . . . . . . . . . . . . . . . . . . . . . . . . . . . . . . . . . . . . . . 105 Battery . . . . . . . . . . . . . . . . . . . . . . . . . . . . . . . . . . . . . . . . . . 105 CD drives . . . . . . . . . . . . . . . . . . . . . . . . . . . . . . . . . . . . . . . . 105 Diskette drive (external) . . . . . . . . . . . . . . . . . . . . . . . . . . . 105 Display . . . . . . . . . . . . . . . . . . . . . . . . . . . . . . . . . . . . . . . . . . 106 DVD drives . . . . . . . . . . . . . . . . . . . . . . . . . . . . . . . . . . . . . . . 107 Ethernet . . . . . . . . . . . . . . . . . . . . . . . . . . . . . . . . . . . . . . . . . 109 Express Cards . . . . . . . . . . . . . . . . . . . . . . . . . . . . . . . . . . . . 109 File management . . . . . . . . . . . . . . . . . . . . . . . . . . . . . . . . . 110 Hard drive . . . . . . . . . . . . . . . . . . . . . . . . . . . . . . . . . . . . . . . 110 Internet . . . . . . . . . . . . . . . . . . . . . . . . . . . . . . . . . . . . . . . . . . 111 Keyboard . . . . . . . . . . . . . . . . . . . . . . . . . . . . . . . . . . . . . . . . 112 Media Center . . . . . . . . . . . . . . . . . . . . . . . . . . . . . . . . . . . . . 113 Memory . . . . . . . . . . . . . . . . . . . . . . . . . . . . . . . . . . . . . . . . . 116 Memory card reader . . . . . . . . . . . . . . . . . . . . . . . . . . . . . . 116 Modem (cable or DSL) . . . . . . . . . . . . . . . . . . . . . . . . . . . . . 116 Modem (dial-up) . . . . . . . . . . . . . . . . . . . . . . . . . . . . . . . . . . 117 Mouse . . . . . . . . . . . . . . . . . . . . . . . . . . . . . . . . . . . . . . . . . . . 120 Networks (wired) . . . . . . . . . . . . . . . . . . . . . . . . . . . . . . . . . 121 Networks (wireless) . . . . . . . . . . . . . . . . . . . . . . . . . . . . . . . 122 Passwords . . . . . . . . . . . . . . . . . . . . . . . . . . . . . . . . . . . . . . . 124 PC Cards . . . . . . . . . . . . . . . . . . . . . . . . . . . . . . . . . . . . . . . . . 124 Power . . . . . . . . . . . . . . . . . . . . . . . . . . . . . . . . . . . . . . . . . . . 125 Printer . . . . . . . . . . . . . . . . . . . . . . . . . . . . . . . . . . . . . . . . . . . 125 Sound . . . . . . . . . . . . . . . . . . . . . . . . . . . . . . . . . . . . . . . . . . . 127 Status indicators . . . . . . . . . . . . . . . . . . . . . . . . . . . . . . . . . . 127 Touchpad . . . . . . . . . . . . . . . . . . . . . . . . . . . . . . . . . . . . . . . . 127 Video . . . . . . . . . . . . . . . . . . . . . . . . . . . . . . . . . . . . . . . . . . . . 128 Telephone support . . . . . . . . . . . . . . . . . . . . . . . . . . . . . . . . . . . 128 Before calling Gateway Customer Care . . . . . . . . . . . . . 128
Appendix A: Legal Information . . . . . . . . . . 131
Index . . . . . . . . . . . . . . . . . . . . . . . . . . . . . . . 141
iv

CHAPTER1
About This Reference
•About this guide
•Accessing your online User Guide
•Gateway contact information
•Microsoft Certificate of Authenticity
•For more information
1

CHAPTER 1: About This Reference
About this guide
This guide includes information and maintenance instructions that are specific to your model of Gateway notebook. For all other notebook information, see your online User Guide.
Accessing your online User Guide
In addition to this guide, your online User Guide has been included on your hard drive. Your User Guide is an in-depth, easy-to-read manual that includes information on the following topics:
•Help and technical support
•Using and customizing Windows and other software
•Using the Internet
•Protecting your files
•Playing and recording media
•Networking
 To access your online User Guide:
•Click  (Start), All Programs, then click Gateway Documentation.
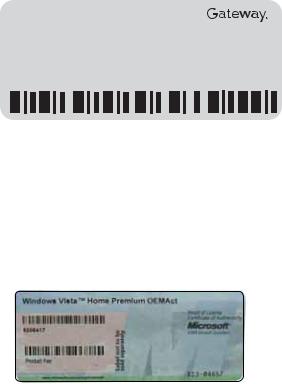
Gateway contact information
Important
The labels shown in this section are for informational purposes only. Label information varies by model, features ordered, and location.
2
www.gateway.com
Gateway model and serial number
The label on the bottom of your notebook contains information that identifies your notebook model and its features. Gateway Customer Care will need this information if you call for assistance.
Online Support:
Tech Support Phone:
Hours:
Model:
S/No:
Microsoft Certificate of
Authenticity
The Microsoft Certificate of Authenticity label found on the bottom of your notebook includes the product key code for your operating system.
For more information
For more information about your notebook, visit Gateway’s Support page at www.gateway.com or the Web address shown on your notebook’s label. The Support page also has links to additional Gateway documentation and detailed specifications.
3
CHAPTER 1: About This Reference
4
CHAPTER2
Checking Out Your Notebook
•Front
•Left
•Right
•Back
•Bottom
•Keyboard area
•LCD panel
5
CHAPTER 2: Checking Out Your Notebook
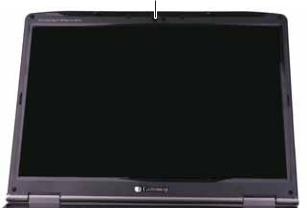
Front
LCD panel release latch
|
|
|
|
|
|
|
|
|
|
|
|
|
|
|
|
|
|
|
|
|
|
|
|
|
|
|
|
|
|
|
|
|
|
|
|
|
|
|
|
|
|
|
|
|
|
|
|
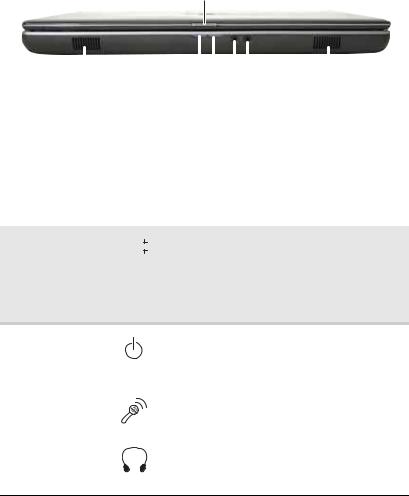
Speaker |
|
|
Battery charge indicator |
|
Headphone jack |
Speaker |
|||||||||
|
|
|
|
|
|
|
|
|
|
|
|
|
|
|
|
|
|
|
|
|
|
|
|
Power indicator |
|
Microphone jack |
|
|
|||
|
|
|
|
|
|
|
|
|
|
|
|
|
|||
|
|
|
|
|
|
|
|
|
|
|
|
|
|
|
|
Component |
Icon |
Description |
|
|
|
|
|||||||||
|
|
|
|
|
|
|
|
|
|
|
|
|
|
|
|
LCD panel release |
|
|
|
|
|
|
Slide to open the LCD panel. |
|
|
||||||
latch |
|
|
|
|
|
|
|
|
|
|
|
|
|
|
|
Speakers |
|
|
|
|
|
|
Provide audio output when headphones or |
||||||||
|
|
|
|
|
|
|
|
amplified speakers are not plugged in. |
|||||||
|
|
|
|
|
|
|
|
|
|
|
|
|
|
|
|
Battery charge |
|
|
|
|
|
|
■ |
LED blue - Battery is fully charged. |
|||||||
indicator |
|
|
|
|
|
|
■ |
LED purple - Battery is charging. |
|||||||
|
|
|
|
|
|
|
|||||||||
■LED blinking red - Battery charge is very low.
■LED solid red - Battery is malfunctioning. Important: This LED only lights up when your notebook is connected to AC power or the battery charge is very low.
Power indicator |
|
■ |
LED on - Notebook is on. |
|
|
■ |
LED blinking - Notebook is in Sleep or Hybrid |
|
|
|
Sleep mode. |
|
|
■ |
LED off - Notebook is off. |
|
|
|
|
Microphone jack |
|
Plug a microphone into this jack. The optional |
|
|
|||
|
|
built-in microphone is turned off while an |
|
|
|
external microphone is connected. |
|
|
|
||
Headphone jack |
|
Plug amplified speakers or headphones into this |
|
|
|
jack. The built-in speakers are turned off when |
|
speakers or headphones are plugged into this jack.
6

www.gateway.com
Left
|
|
|
|
|
|
|
|
|
|
|
|
|
|
|
|
|
|
|
|
S-Video out |
Ventilation fan |
CD or DVD drive |
||||
Kensington lock |
jack |
|
|
|
|
|||
slot |
|
|
|
|
|
|
|
|
|
|
|
|
|
|
|
|
|
Component |
|
Icon |
|
Description |
|
|
||
|
|
|
|
|
|
|
|
|
Kensington™ |
|
|
|
|
Secure your notebook to an object by |
|||
|
|
|
|
|||||
lock slot |
|
|
|
|
connecting a Kensington cable lock to this slot. |
|||
|
|
|
|
|
|
|
||
|
|
|
|
|
|
|
|
|
S-Video out jack |
|
Plug an S-Video device, such as a television, into |
||||||
(optional) |
|
|
|
|
this optional jack. For more information, see |
|||
|
|
|
|
|
|
“Viewing the display on a television” on page 54. |
||
|
|
|
|
|
|
|
|
|
Ventilation fan |
|
|
|
|
Helps cool internal components. |
|||
|
|
|
|
|
|
Warning: Do not work with the notebook |
||
|
|
|
|
|
|
resting on your lap. If the air vents are blocked, |
||
|
|
|
|
|
|
the notebook may become hot enough to harm |
||
|
|
|
|
|
|
your skin. |
|
|
|
|
|
|
|
|
Caution: Do not block or insert objects into |
||
|
|
|
|
|
|
these slots. If these slots are blocked, your |
||
|
|
|
|
|
|
notebook may overheat resulting in unexpected |
||
|
|
|
|
|
|
shutdown or permanent damage to the |
||
|
|
|
|
|
|
notebook. |
|
|
|
|
|
|
|
|
Caution: Provide adequate space around your |
||
|
|
|
|
|
|
notebook so air vents are not obstructed. Do not |
||
|
|
|
|
|
|
use the notebook on a bed, sofa, rug, or other |
||
|
|
|
|
|
|
similar surface. |
|
|
CD or DVD drive |
|
|
|
|
Insert CDs or DVDs into this drive. For more |
|||
|
|
|
|
|
|
information, see “Using the CD or DVD drive” on |
||
|
|
|
|
|
|
page 42. To determine the type of drive in your |
||
|
|
|
|
|
|
notebook, examine the drive tray’s plastic cover |
||
|
|
|
|
|
|
and compare the logo to those listed in |
||
|
|
|
|
|
|
“Identifying drive types” on page 42. |
||
|
|
|
|
|
|
|
|
|
7

CHAPTER 2: Checking Out Your Notebook
Right
Important
Port or jack location may vary by notebook model.
USB ports |
|
|
USB ports |
|||
|
|
|
|
|
|
|
|
|
|
|
|
|
|
|
|
|
|
|
|
|
|
|
|
|
|
|
|
|
|
|
|
|
|
|
PC Card or |
IEEE 1394 |
Memory card reader |
Modem jack |
Express Card slot |
port |
|
Ethernet jack |
Component |
Icon |
Description |
|||
|
|
|
|
|
|
USB ports |
|
|
|
|
Plug USB devices (such as a diskette drive, flash |
|
|
|
|
||
|
|
|
|
|
drive, printer, scanner, camera, keyboard, or |
|
|
|
|
|
|
|
|
|
|
|
mouse) into these ports. |
|
|
|
|
|
|
PC Card or |
|
|
|
|
Insert one Type II PC Card or Type 54 |
Express Card slot |
|
|
|
|
Express Card into this slot. For more information, |
|
|
|
|
||
|
|
|
|
|
see “Adding and removing a PC Card or |
|
|
|
|
|
Express Card” on page 45. |
|
|
|
|
|
|
IEEE 1394 port |
|
|
|
|
Plug an IEEE 1394 (also known as Firewire® or |
|
|
|
|
||
(optional) |
|
|
|
|
i.Link®) device (such as a digital camcorder or |
|
|
|
|
|
MP3 player) into this optional 4-pin IEEE 1394 |
|
|
|
|
|
|
|
|
|
|
|
port. |
|
|
|
|
|
|
Memory card |
|
|
|
|
Insert a memory card from a digital camera, |
reader |
|
|
|
|
MP3 player, PDA, or cellular telephone into the |
|
|
|
|
|
memory card reader. For more information, see |
|
|
|
|
|
“Using the memory card reader” on page 44. |
|
|
|
|
|
The memory card reader supports Memory |
|
|
|
|
|
Stick®, Memory Stick Pro®, Mini Secure Digital®, |
|
|
|
|
|
MultiMediaCard™, RS-MultiMediaCard™, and |
|
|
|
|
|
Secure Digital™ cards. |
|
|
|
|
|
|
Ethernet jack |
|
|
|
|
Plug an Ethernet network cable into this jack. |
|
|
|
|
|
The other end of the cable can be plugged into |
|
|
|
|
|
|
|
|
|
|
|
a cable modem, DSL modem, or an Ethernet |
|
|
|
|
|
|
|
|
|
|
|
|
|
|
|
|
|
network jack. For more information, see |
|
|
|
|
|
“Connecting to a broadband modem or |
|
|
|
|
|
network” on page 19. |
Modem jack |
|
|
|
|
Plug a dial-up modem cable into this jack. For |
|
|
|
|
|
more information, see “Connecting the dial-up |
|
|
|
|
|
modem” on page 18. |
|
|
|
|
|
|
8

www.gateway.com
Back
Power connector Monitor port
Component |
Icon |
Description |
|||||
|
|
|
|
|
|
|
|
Power connector |
|
|
|
|
|
|
Plug the AC adapter cable into this connector. |
|
|
|
|
|
|
||
|
|
|
|
|
|
|
|
Monitor port |
|
|
|
|
|
|
Plug an analog VGA monitor or projector into this |
|
|
|
|
|
|
|
port. For more information, see “Viewing the |
|
|
|
|
|
|
|
display on a projector or monitor” on page 50. |
|
|
|
|
|
|
|
|
9
CHAPTER 2: Checking Out Your Notebook
Bottom
Battery latch
Customer care label
Hard drive bay
Battery |
Battery lock |
|
Memory bay
Online Support:
Tech Support Phone:
Hours:
Model:
S/No:
Component |
Icon |
|
Description |
|||||
|
|
|
|
|
|
|
|
|
Hard drive |
|
|
|
|
|
|
|
The hard drive is located in this bay. For more |
|
|
|
|
|
|
|||
bay |
|
|
|
|
|
|
|
information, see “Replacing the hard drive kit” on |
|
|
|
|
|
|
|
|
page 100. |
|
|
|
|
|
|
|
||
Customer |
|
|
|
|
|
|
|
Includes the Customer Care contact information. For |
Care label |
|
|
|
|
|
|
|
more information, see “Gateway contact information” |
|
|
|
|
|
|
|
|
on page 2. |
|
|
|
|
|
|
|
|
|
Memory bay |
|
|
|
|
|
|
|
Memory modules are located in this bay. For more |
|
|
|
|
|
|
|
|
information, see “Adding or replacing memory |
|
|
|
|
|
|
|
|
modules” on page 95. |
|
|
|
|
|
|
|
|
|
Battery latch |
|
|
|
|
|
|
|
Slide to release the battery. For more information, see |
|
|
|
|
|
|
|
|
“Changing the battery” on page 61. |
|
|
|
|
|
|
|
|
|
|
|
|
|
|
|
|
|
|
Battery |
|
|
|
|
|
|
|
Provides power when the notebook is not plugged into |
|
|
|
|
|
|
|
|
AC power. |
Battery lock |
|
|
|
|
|
|
|
Slide to unlock the battery. For more information, see |
|
|
|
|
|
|
|
|
“Changing the battery” on page 61. |
|
|
|
|
|
|
|
|
|
10
www.gateway.com
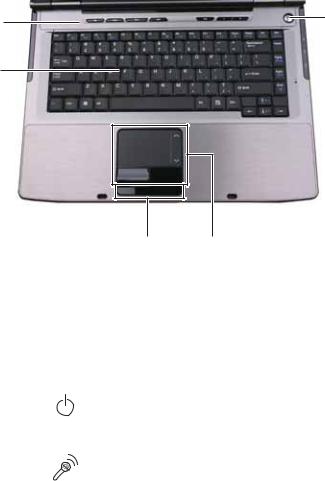
Keyboard area
Power Multimedia button
panel
Keyboard
 Microphone
|
|
|
Status indicators |
Touchpad |
|
|
|
|
|
Component |
Icon |
Description |
|
|
|
|
|
|
|
Keyboard |
|
|
Provides all the features of a full-sized, computer |
|
|
|
|
keyboard. For more information, see “Using the |
|
|
|
|
keyboard” on page 24. |
|
Multimedia |
|
|
Use to control playback of CDs and DVDs. The panel |
|
panel |
|
|
includes volume control buttons. For more information, |
|
(optional) |
|
|
see “Using the optional multimedia panel” on page 31. |
|
|
|
|
|
|
Power button |
|
|
Press to turn the power on or off. You can also configure |
|
|
|
|||
|
|
|
the power button for Sleep/Resume mode. For more |
|
|
|
|
information on configuring the power button mode, |
|
|
|
|
||
|
|
|
see “Changing advanced settings” on page 67. |
|
|
|
|
|
|
Microphone |
|
|
Record audio through this microphone or use it to talk |
|
(optional) |
|
|
through when making Voice over Internet Protocol |
|
|
|
|
(VoIP) calls. The built-in microphone is turned off while |
|
|
|
|
an external microphone is connected. For the location |
|
|
|
|
of your microphone jack, see “Front” on page 6. |
|
|
|
|
|
|
Touchpad |
|
|
Provides all the functionality of a mouse. For more |
|
|
|
|
information, see “Using the EZ Pad touchpad” on |
|
|
|
|
page 28. |
|
Status |
|
|
Inform you when a drive is in use or when a button has |
|
indicators |
|
|
been pressed that affects how the keyboard is used. For |
|
|
|
|
more information, see “Using the status indicators” on |
|
|
|
|
page 23. |
|
|
|
|
|
|
11
CHAPTER 2: Checking Out Your Notebook
LCD panel
Webcam
Component |
Icon Description |
|
|
Webcam |
Use to let others see who they are communicating with |
(optional) |
when making VoIP calls. The Webcam status indicator |
|
turns on when the Webcam is turned on. For more |
|
information, see “Using the optional webcam” on |
|
page 32. |
|
|
12

CHAPTER3
Setting Up and Getting Started
•Working safely and comfortably
•Connecting the AC adapter
•Connecting the dial-up modem
•Connecting to a broadband modem or network
•Starting your notebook
•Turning off your notebook
•Restarting (rebooting) your notebook
•Using the status indicators
•Using the keyboard
•Using the EZ Pad touchpad
•Using the optional multimedia panel
•Using the optional webcam
•Adjusting the brightness
•Adjusting the volume
•Turning your wireless radio on or off
13

CHAPTER 3: Setting Up and Getting Started
Working safely and comfortably
Before using your notebook, follow these general guidelines for setting up a safe and comfortable work area and avoiding discomfort and strain:
•Keep hands and arms parallel to the floor.
•Adjust the screen so it is perpendicular to your line of sight.
•Place your feet flat on the floor or on a footrest.
•Although notebooks are sometimes called “laptops,” do not use your notebook while it rests on your unprotected lap. Notebook operating temperatures can become quite high, increasing the risk of burns to your legs. Instead, use a laptop desk to protect your legs.
•Do not use the notebook on any soft, conforming surface, such as your lap, a blanket, carpet, or a sofa. Soft surfaces can block your notebook’s ventilation openings, leading to overheating, permanent damage to your notebook, and fire danger. Instead, place your notebook on a rigid, hard surface, and make sure that you keep the ventilation openings on the sides clear.
Warning
Do not use your notebook on a soft surface, such as your lap, a blanket, carpet, or a sofa. You must keep your notebook’s ventilation openings clear of obstructions, or your notebook may overheat, increasing the risk of fire and personal injury.
Reducing eye strain
Sunlight or bright indoor lighting should not reflect on the screen or shine directly into your eyes.
•Position the computer desk and screen so you can avoid glare on your screen and light shining directly into your eyes. Reduce glare by installing shades or curtains on windows, and by installing a glare screen filter.
•Use soft, indirect lighting in your work area. Do not use your notebook in a dark room.
•Avoid focusing your eyes on your screen for long periods of time. Every 10 or 15 minutes, look around the room, and try to focus on distant objects.
•Where feasible, keep your head vertical while looking at the screen. If you use an external keyboard, raise the notebook so the top of its screen is no higher than eye level.
14
www.gateway.com
Setting up your computer desk and chair
When you are setting up your computer desk and chair, make sure that the desk is the appropriate height and the chair helps you maintain good posture.
•Select a flat surface for your computer desk.
•Adjust the height of the computer desk so your hands and arms are positioned parallel to the floor when you use the keyboard and touchpad. If the desk is not adjustable or is too tall, consider using an adjustable chair to control your arm’s height above the keyboard.
•Use an adjustable chair that is comfortable, distributes your weight evenly, and keeps your body relaxed.
•Position your chair so the keyboard is at or slightly below the level of your elbow. This position lets your shoulders relax while you type.
•Adjust the chair height, adjust the forward tilt of the seat, or use a footrest to distribute your weight evenly on the chair and relieve pressure on the back of your thighs.
•Adjust the back of the chair so it supports the lower curve of your spine. You can use a pillow or cushion to provide extra back support.
Sitting at your notebook
•Avoid bending, arching, or angling your wrists. Make sure that they are in a relaxed position when you type.
•Do not slouch forward or lean far back. Sit with your back straight so your knees, hips, and elbows form right angles when you work.
•Take breaks to stand and stretch your legs.
•Avoid twisting your torso or neck.
Avoiding discomfort and injury from repetitive strain
•Vary your activities to avoid excessive repetition.
•Take breaks to change your position, stretch your muscles, and relieve your eyes.
•Find ways to break up the work day, and schedule a variety of tasks.
15
CHAPTER 3: Setting Up and Getting Started
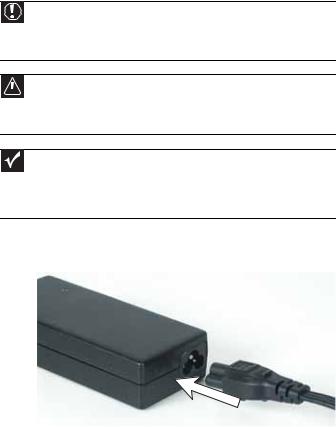
Connecting the AC adapter
You can run your notebook using an AC adapter or your notebook’s battery. The battery was shipped to you partially charged. You should use the AC adapter right away to fully charge the battery. Allow three hours for the battery to fully charge.
Warning
Do not attempt to disassemble the AC adapter. The AC adapter has no user-replaceable or user-serviceable parts inside. The AC adapter has dangerous voltages that can cause serious injury or death. Contact Gateway about returning defective AC adapters.
Caution
 Make sure that you use the AC adapter that came with your notebook or one of the same type purchased from Gateway. Replace the power cord if it becomes damaged. The replacement cord must be of the same type and voltage rating as the original cord or your notebook may be damaged.
Important
If the battery is not fully charged before you use your notebook on battery power for the first time, the battery life may be much shorter than you expect. If the battery life seems short even after being charged for three hours, the battery may need to be recalibrated. For information on recalibrating the battery, see “Recalibrating the battery” on page 62.
 To connect the AC adapter:
1 Connect the power cord to the AC adapter.
16

www.gateway.com
2Connect the AC adapter to your notebook’s power connector.
3Plug the power cord into a wall outlet. The battery charge indicator turns on (see “Front” on page 6 for the location of the battery charge indicator). If the battery charge indicator does not turn on, complete the following steps until it turns on:
•Unplug the adapter from your notebook, then plug it back in.
•Press FN+F1 to toggle the status lights on and off.
•Make sure the power cord is firmly attached to the AC adapter.
•Plug the power cord into a different wall outlet.
4When you finish using your notebook for the first time, turn off your notebook and leave your notebook connected to AC power until the battery charge indicator turns blue.
Important
If the battery charge indicator does not turn blue after three hours, contact Gateway Customer Care at the location shown on the Customer Care label. For more information, see “Gateway contact information” on page 2.
17

CHAPTER 3: Setting Up and Getting Started
Protecting from power source problems
During a power surge, the voltage level of electricity coming into your notebook can increase to levels far above normal levels and cause data loss or system damage. Protect your notebook and peripheral devices by connecting them to a surge protector, which absorbs voltage surges and prevents them from reaching your notebook.
Warning
High voltages can enter your notebook through both the power cord and the modem connection. To protect your notebook and avoid electrical shock, use a surge protector. If you have a telephone modem, use a surge protector that has a modem jack. If you have a cable modem, use a surge protector that has an antenna/cable TV jack. During an electrical storm, unplug both the surge protector and the modem.
Connecting the dial-up modem
Your notebook has a built-in 56K modem that you can use to connect to a standard telephone line.
Warning
To reduce the risk of fire, use only No. 26 AWG or larger (for example, No. 24 AWG) UL-listed or CSA-certified telecommunication line cord for your dial-up modem connection.
 To connect the modem:
1Insert one end of the modem cable into the modem jack 


 on your notebook.
18
www.gateway.com
2Insert the other end of the modem cable into a telephone wall jack.
Important
The modem will not work with digital or PBX telephone lines.
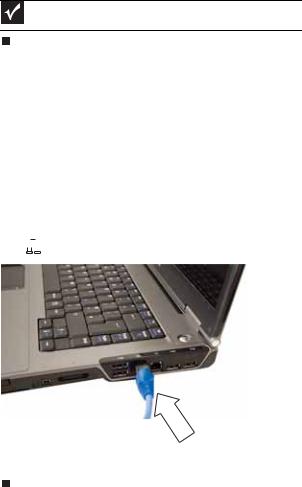
Connecting to a broadband modem or network
Your notebook has a network jack that you can use to connect to a cable or DSL modem or to a wired Ethernet network.
 To connect to a cable or DSL modem or to a wired
Ethernet network:
1Insert one end of the network cable into the network jack  on your notebook.
2Insert the other end of the network cable into a cable modem, DSL modem, or Ethernet network jack.
19

CHAPTER 3: Setting Up and Getting Started
Starting your notebook
Warning
Do not work with the notebook resting on your lap. If the air vents are blocked, the notebook may become hot enough to harm your skin.
Caution
 Provide adequate space around your notebook so air vents are not obstructed. Do not use the notebook on a bed, sofa, rug, or other similar surface.
 To start your notebook:
1Slide the latch on the front of your notebook, then lift the LCD panel.
2Press the power button located above the keyboard.
Tip
 For more information about changing the power button mode, see “Changing advanced settings” on page 67.
3If you are starting your notebook for the first time, follow the on-screen instructions to select the language and time zone and to create your first user account.
4Attach and turn on any peripheral devices, such as printers, scanners, and speakers.
 Tip
Tip
For more information about connecting peripheral devices, see “Installing a printer or other peripheral device” on page 48.
Tip
 See the documentation that came with each device for its setup instructions.
20
www.gateway.com
5To open the main menu, click  (Start). From that menu, you can run programs and search for files. For more information on using Windows, see “Using Windows” and “Customizing Windows” in your online
User Guide.
Waking up your notebook
When you have not used your notebook for several minutes or if you close the LCD panel without turning off your notebook, it may enter a power-saving mode called Sleep. While in Sleep mode, the power indicator flashes. If your notebook is in Sleep mode, press the power button to “wake” it up.
Tip
 For more information about Sleep mode, see “Changing power modes” on page 64.
Turning off your notebook
Putting your notebook into Sleep mode is the easiest way to power down your notebook. Although it does not turn your notebook completely off, it turns off or slows down most system operations to save power. Sleep mode saves your desktop layout so the next time you restore power, the programs are laid out just as you left them. Waking your notebook from a Sleep state is much faster than turning on your notebook after it has been turned completely off.
Hibernate mode is an alternative to Sleep mode. In Hibernate mode, your notebook is turned completely off. When you wake your notebook from Hibernate mode, however, the programs that were running when your notebook entered Hibernate mode are running just as you left them.
 To put your notebook to sleep:
•Click  (Start), then click
  (power). The notebook saves your session and partially shuts down to save power.
-OR-
Press FN+F3.
Tip
 You can change the Sleep mode from the standard Sleep mode (default) to Hybrid Sleep. For more information about Sleep mode, see “Changing power modes” on page 64.
21

CHAPTER 3: Setting Up and Getting Started
 To put your notebook into hibernation:
•Click  (Start), click the arrow next to the lock icon, then click Hibernate. The notebook saves your session and shuts down to save power.
 To turn off your notebook:
•Click  (Start), click the arrow next to the lock icon, then click Shut Down. The notebook turns off.
Important
If for some reason you cannot use the Shut Down option in Windows to turn off your notebook, press and hold the power button for about five seconds, then release it.
Restarting (rebooting) your notebook
If your notebook does not respond to keyboard, touchpad, or mouse input, you may have to close programs that are not responding. If closing unresponsive programs does not restore your notebook to normal operation, you may have to restart (reboot) your notebook.
 To close unresponsive programs on your notebook:
1Press CTRL+ALT+DEL.
2Click Start Task Manager. The Windows Task Manager dialog box opens.
3Click the program that is not responding.
4Click End Task.
5Click X in the top-right corner of the Windows Task Manager dialog box.
 To restart your notebook:
•Click  (Start), click the arrow next to the lock icon, then click Restart. The notebook turns off, then turns on again.
Important
If your notebook does not turn off immediately, complete the following steps until the notebook turns off:
1.Press and hold the power button for about five seconds, then release it.
2.Unplug the power cord and remove the battery for more than 10 seconds.
22
www.gateway.com
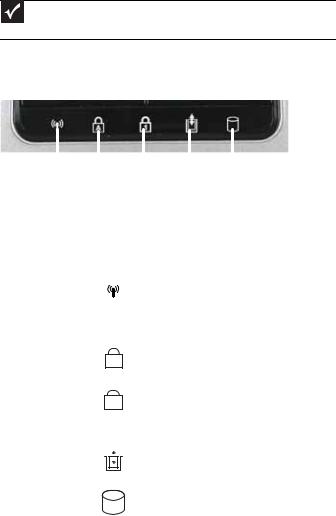
Using the status indicators
Important
If none of the indicators are on, you may need to press FN+F1 to toggle the status indicators on.
Status indicators inform you when a drive is being used or when a button has been pressed that affects how the keyboard is used. The status indicators are located below the touchpad.
|
|
|
|
|
|
|
|
|
Wireless |
|
|
|
|
|
Hard |
drive |
|
network |
Caps |
lock |
|
|
|
|
|
|
|
|
Disc drive |
||||||
|
|
|
|
|
|
|||
|
|
|
|
Num |
|
lock |
||
|
|
|
|
|
||||
Indicator |
Icon |
Description |
|||
|
|
|
|
|
|
Wireless |
|
|
|
■ |
LED on - Optional wireless IEEE |
|
|
|
|||
network |
|
|
|
|
802.11 radio is turned on. |
|
|
|
|
||
|
|
|
|
■ |
LED off - Optional wireless IEEE |
|
|
|
|
|
802.11 radio is turned off. |
Caps lock |
|
|
|
■ |
LED on - Caps lock is turned on. |
|
|
A |
■ |
LED off - Caps lock is turned off. |
|
|
|
|
|
|
|
Num lock |
|
|
|
■ |
LED on - Numeric keypad is turned |
|
|
|
|||
|
|
1 |
|
on. |
|
|
|
|
|
■ |
LED off - Numeric keypad is turned |
|
|
|
|
||
|
|
|
|
|
off. |
|
|
|
|
|
|
Disc drive |
|
|
|
■ |
LED on - Drive is in use. |
|
|
|
|
■ |
LED off - Drive is not in use. |
|
|
|
|
||
|
|
|
|
|
|
Hard drive |
|
|
|
■ |
LED blinking - Hard drive is being |
|
|
|
|||
|
|
|
|
|
accessed. |
|
|
|
|
■ |
LED off - Hard drive is not being |
|
|
|
|
|
accessed. |
|
|
|
|
|
|
23
CHAPTER 3: Setting Up and Getting Started
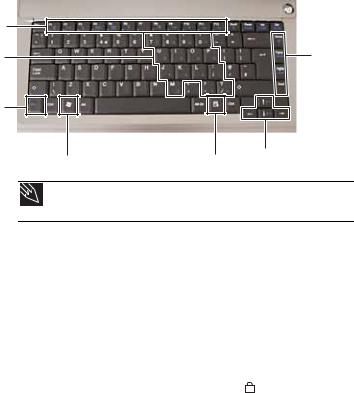
Using the keyboard
Function keys/ System keys
Numeric
keypad
FN key
Your notebook features a full-size keyboard that functions the same as a desktop computer keyboard. Many of the keys have been assigned alternate functions, including shortcut keys for Windows, function keys for specific system operations, and the Num Lock keys for the numeric keypad.
Navigation keys
|
Arrow keys |
Windows key |
Application key |
Tip
 You can attach an external keyboard to the notebook using a USB port. You do not need to shut down the notebook to connect a USB keyboard.
Key types
The keyboard has several different types of keys. Some keys perform specific actions when pressed alone and other actions when pressed in combination with another key.
Key type |
Icon |
Description |
|
|
|
Numeric keypad |
|
Use these keys to type numbers |
|
|
when the numeric keypad is turned |
|
|
on. Press FN+ 1 to turn on the |
|
|
numeric keypad. |
Function keys |
|
Press these keys labeled F1 to F12 |
|
|
to perform actions in programs. For |
|
|
example, pressing F1 may open |
|
|
help. |
|
|
Each program uses different |
|
|
function keys for different |
|
|
purposes. See the program |
|
|
documentation to find out more |
|
|
about the function key actions. |
|
|
|
24
Loading...