


 Loading...
Gateway DX420, GM5259e, GM5259h, GM5260, GM5266e Quick Reference Guide
...HARDWARE REFERENCE
Gateway Computer
www.gateway.com |
Contents |
Contents
Chapter 1: About This Reference . . . . . . . . . . . . . . . . . . . . . . . . . . . . . . . . . . . . . . . . . . . . . .1
About this guide . . . . . . . . . . . . . . . . . . . . . . . . . . . . . . . . . . . . . . . . . . . . . . . . . . . . . . . . 2 Accessing the User Guide . . . . . . . . . . . . . . . . . . . . . . . . . . . . . . . . . . . . . . . . . . . . . . . . 2 Gateway contact information . . . . . . . . . . . . . . . . . . . . . . . . . . . . . . . . . . . . . . . . . . . . 3 Microsoft Certificate of Authenticity . . . . . . . . . . . . . . . . . . . . . . . . . . . . . . . . . . . . . 3
Chapter 2: Hardware Features . . . . . . . . . . . . . . . . . . . . . . . . . . . . . . . . . . . . . . . . . . . . . . . .5
Front . . . . . . . . . . . . . . . . . . . . . . . . . . . . . . . . . . . . . . . . . . . . . . . . . . . . . . . . . . . . . . . . . . . . 6
Back . . . . . . . . . . . . . . . . . . . . . . . . . . . . . . . . . . . . . . . . . . . . . . . . . . . . . . . . . . . . . . . . . . . . 8
Chapter 3: Maintenance Basics. . . . . . . . . . . . . . . . . . . . . . . . . . . . . . . . . . . . . . . . . . . . . . 13
Preventing static electricity discharge . . . . . . . . . . . . . . . . . . . . . . . . . . . . . . . . . . . 14 Opening the case . . . . . . . . . . . . . . . . . . . . . . . . . . . . . . . . . . . . . . . . . . . . . . . . . . . . . . 14 Removing the side panel . . . . . . . . . . . . . . . . . . . . . . . . . . . . . . . . . . . . . . . . . . . 14 Removing the front bezel . . . . . . . . . . . . . . . . . . . . . . . . . . . . . . . . . . . . . . . . . . . 15 Closing the case . . . . . . . . . . . . . . . . . . . . . . . . . . . . . . . . . . . . . . . . . . . . . . . . . . . . . . . . 16 Replacing the front bezel . . . . . . . . . . . . . . . . . . . . . . . . . . . . . . . . . . . . . . . . . . . 16 Replacing the side panel . . . . . . . . . . . . . . . . . . . . . . . . . . . . . . . . . . . . . . . . . . . . 16 Installing memory . . . . . . . . . . . . . . . . . . . . . . . . . . . . . . . . . . . . . . . . . . . . . . . . . . . . . . 17 Replacing the system battery . . . . . . . . . . . . . . . . . . . . . . . . . . . . . . . . . . . . . . . . . . . 18 Adding or replacing a CD or DVD drive . . . . . . . . . . . . . . . . . . . . . . . . . . . . . . . . . 19 Replacing the memory card reader . . . . . . . . . . . . . . . . . . . . . . . . . . . . . . . . . . . . . 20 Adding or replacing a hard drive . . . . . . . . . . . . . . . . . . . . . . . . . . . . . . . . . . . . . . . 21 Replacing the front fan . . . . . . . . . . . . . . . . . . . . . . . . . . . . . . . . . . . . . . . . . . . . . . . . . 25 Replacing the rear fan . . . . . . . . . . . . . . . . . . . . . . . . . . . . . . . . . . . . . . . . . . . . . . . . . . 26 Replacing the power supply . . . . . . . . . . . . . . . . . . . . . . . . . . . . . . . . . . . . . . . . . . . . 27 Replacing the heat sink and processor . . . . . . . . . . . . . . . . . . . . . . . . . . . . . . . . . . 28 Replacing the I/O board . . . . . . . . . . . . . . . . . . . . . . . . . . . . . . . . . . . . . . . . . . . . . . . . 30 Adding or replacing an expansion card . . . . . . . . . . . . . . . . . . . . . . . . . . . . . . . . . 31 Replacing the system board . . . . . . . . . . . . . . . . . . . . . . . . . . . . . . . . . . . . . . . . . . . . 32
Chapter 4: Configuring Drives for RAID . . . . . . . . . . . . . . . . . . . . . . . . . . . . . . . . . . . . . 37
About RAID . . . . . . . . . . . . . . . . . . . . . . . . . . . . . . . . . . . . . . . . . . . . . . . . . . . . . . . . . . . . 38 RAID for performance . . . . . . . . . . . . . . . . . . . . . . . . . . . . . . . . . . . . . . . . . . . . . . . 38 RAID for security . . . . . . . . . . . . . . . . . . . . . . . . . . . . . . . . . . . . . . . . . . . . . . . . . . . . 39 RAID for both: performance and security . . . . . . . . . . . . . . . . . . . . . . . . . . . . 39 Configuring RAID . . . . . . . . . . . . . . . . . . . . . . . . . . . . . . . . . . . . . . . . . . . . . . . . . . . . . . . 40 Enabling RAID . . . . . . . . . . . . . . . . . . . . . . . . . . . . . . . . . . . . . . . . . . . . . . . . . . . . . . 40 Creating a RAID volume . . . . . . . . . . . . . . . . . . . . . . . . . . . . . . . . . . . . . . . . . . . . 40 Deleting a RAID volume . . . . . . . . . . . . . . . . . . . . . . . . . . . . . . . . . . . . . . . . . . . . 42 Resetting drives to non-RAID status . . . . . . . . . . . . . . . . . . . . . . . . . . . . . . . . . 42 Getting help . . . . . . . . . . . . . . . . . . . . . . . . . . . . . . . . . . . . . . . . . . . . . . . . . . . . . . . . . . . 43
Index. . . . . . . . . . . . . . . . . . . . . . . . . . . . . . . . . . . . . . . . . . . . . . . . . . . . . . . . . . . . . . . . . . . . . . 45
i
Contents |
www.gateway.com |
ii

CHAPTER 1
About This Reference
•Accessing the User Guide
•Gateway contact information
•Microsoft Certificate of Authenticity
1

CHAPTER 1: About This Reference |
www.gateway.com |
About this guide
This guide includes information and maintenance instructions that are specific to your model of Gateway computer. For all other computer information, see your online User Guide.
Accessing the User Guide
In addition to this guide, the User Guide has been included on your hard drive. The User Guide is an in-depth, easy-to-read manual that includes information on the following topics:
■
■
■
■
■
■
■
■
■
■
Help and technical support
Setting up and starting your computer
Using and customizing Windows and other software Controlling audio and video settings
Using the Internet Protecting your files
Playing and recording media Networking
Maintenance and troubleshooting Legal notices
To access the User Guide:
■ Click Start, All Programs, then click Gateway Documentation.
2
www.gateway.com |
Gateway contact information |
Gateway contact information
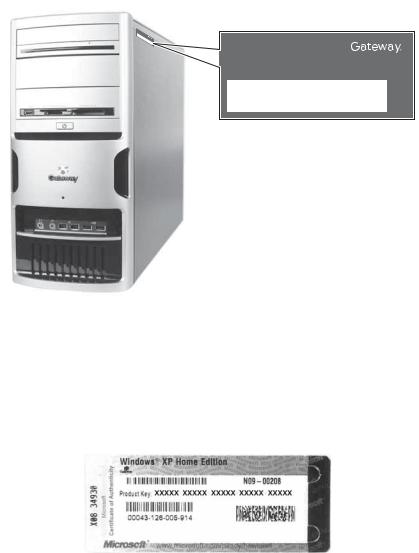
The label on the side of your computer case contains information that identifies your computer model and serial number. Gateway Customer Care will need this information if you call for assistance.
Online support:
Tech Support Phone: (U.S.) (Canada)
Tech Support Hours:
9004394
Microsoft Certificate of Authenticity
The Microsoft Certificate of Authenticity label found on the back or side of your computer includes the product key code for your operating system. If you ever reinstall Windows from the installation CD or DVD, you will need to enter these numbers to activate Windows.
3
CHAPTER 1: About This Reference |
www.gateway.com |
4

CHAPTER 2
Hardware Features
•Front
•Back
5
CHAPTER 2: Hardware Features
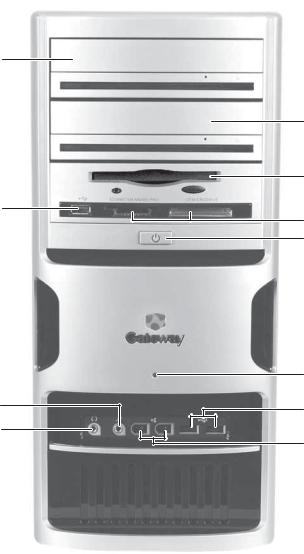
Front
 Important
Your computer hardware options and port locations may vary from the illustration below.
DVD/CD drive
USB port (optional)
Microphone jack
Headphone jack
www.gateway.com
DVD/CD drive (optional)
Diskette drive (optional)
Memory card reader (optional)
Power button/ power indicator
Hard drive indicator
USB ports (optional)
IEEE 1394 ports (optional)
6
www.gateway.com |
Front |
Component |
Icon |
|
Description |
|
|
|
|
|
|
DVD/CD drive |
|
|
|
Use this drive to listen to audio CDs, install games and programs, |
|
|
|
|
watch DVDs, and store large files onto recordable discs (depending |
|
|
|
|
on drive type). |
|
|
|
|
This drive may be a CD, recordable CD, DVD, or recordable DVD drive. |
|
|
|
|
To identify your drive type and for more information about your drive, see |
|
|
|
|
your user guide. |
|
|
|
|
|
USB ports (optional) |
|
|
|
Plug a USB (Universal Serial Bus) device (such as a USB printer, |
|
|
|
|
scanner, camera, keyboard, or mouse) into one of these ports. For more |
|
|
|
|
information, see your user guide. |
|
|
|
|
|
Diskette drive |
|
|
|
Insert a standard 3.5-inch diskette into the optional diskette drive. |
(optional) |
|
|
|
|
|
|
|
|
|
Memory card reader |
|
|
|
Insert a memory card from a digital camera, MP3 player, PDA, cellular |
(optional) |
|
|
|
telephone, or other devices into the memory card reader. |
|
|
|
|
|
Power button and |
|
|
|
Press this button to turn the power on or off. You can also configure |
power indicator |
|
|
|
the power button to operate in Standby/Resume mode or Hibernate |
|
|
|||
|
|
|
|
mode. The power indicator lights when the computer is turned on. |
|
|
|
|
|
Hard drive indicator |
|
|
|
Lights when the hard drive is in use. |
|
|
|
|
|
IEEE 1394 ports |
|
|
|
Plug IEEE 1394 (also known as Firewire® or i.Link®) devices (such as a |
(optional) |
|
|
|
digital camcorder) into these 6-pin IEEE 1394 ports. For more |
|
|
|
|
information, see your user guide. |
|
|
|
|
|
|
|
|
|
|
|
|
|
|
|
Headphone jack |
|
|
|
Plug powered, analog front speakers, an external amplifier, or |
|
|
|
|
headphones into this jack. This jack is color-coded orange. |
|
|
|
|
|
Microphone jack |
|
|
|
Plug a microphone into this jack. This jack is color-coded red or pink. |
|
|
|
|
|
7
CHAPTER 2: Hardware Features |
www.gateway.com |
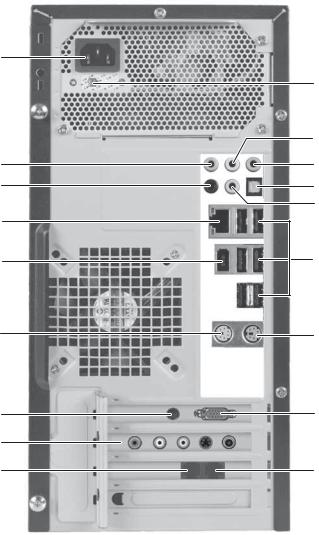
Back
Your computer matches one of the two following illustrations, and includes the components listed.
 Important
Your computer hardware options and port locations may vary from the illustrations below.
Power connector
Case cover thumbscrew 
Audio in/side speaker jack
Surround left/right speaker jack
Ethernet (network) jack
IEEE 1394/FireWire™/ i.Link™ port
PS/2 mouse port
S-Video out jack (optional)
TV tuner (optional)
Telephone jack
Voltage switch
Headphone/front speaker jack
Microphone jack
S/PDIF jack (optional)
Center/subwoofer jack
USB ports
PS/2 keyboard port
Monitor port
Modem (line) jack
Case cover thumbscrew 
8

www.gateway.com
Power connector
Case cover thumbscrew 
Audio in/side speaker jack
Surround left/right speaker jack
Ethernet (network) jack
IEEE 1394/FireWire™/ i.Link™ port
Parallel port
PS/2 mouse port
S-Video out jack (optional)
TV tuner (optional)
Telephone jack
Case cover thumbscrew 
Back
Voltage switch
Headphone/front speaker jack
Microphone jack
S/PDIF jack (optional)
Center/subwoofer jack
USB ports
Monitor port
Serial port
PS/2 keyboard port
Monitor port (optional)
Modem jack
9

CHAPTER 2: Hardware Features |
www.gateway.com |
Available ports may vary, depending on your model.
Component |
Icon |
Description |
|
|
|
|
|
Power connector |
|
|
Plug the power cord into this connector. |
|
|
|
|
Case cover |
|
|
Remove these screws before opening the case. |
thumbscrews |
|
|
|
|
|
|
|
Audio input (Line |
|
|
This jack is user configurable for one of the following: |
in) jack (blue plug) |
|
|
Stereo in: Plug an external audio input source (such as a stereo) into |
-OR- |
|
|
this jack so you can record sound on your computer (Default). |
Side speaker jack |
|
|
Stereo out: Plug your side left and right speakers into this jack. |
|
|
|
For information on configuring this jack, see your user guide. |
|
|
|
|
Center/subwoofer |
|
|
Plug your center speaker and subwoofer into this jack. |
jack (orange plug) |
|
|
For information on configuring this jack, see your user guide. |
|
|
|
|
Ethernet |
|
|
Plug an Ethernet network cable or a device (such as a DSL or cable |
(network) jack |
|
|
modem for a broadband Internet connection) into this jack. |
|
|
|
For more information, see “Learning about the Internet” in your User |
|
|
|
Guide which has been included on your hard drive. To access this guide, |
|
|
|
click Start, All Programs, then click Gateway Documentation. |
|
|
|
|
IEEE 1394 ports |
|
|
Plug IEEE 1394 (also known as Firewire® or i.Link®) devices (such as a |
|
|
|
digital camcorder) into these 6-pin IEEE 1394 ports. For more |
|
|
|
information, see your user guide. |
|
|
|
|
|
|
|
|
|
|
|
|
Parallel port |
|
|
Plug a parallel device (such as a printer) into this port. For more |
|
|
|
information, see your user guide. |
|
|
|
|
PS/2 mouse port |
|
|
Plug a PS/2 mouse into this port. |
|
|
|
|
S-Video (TV) out |
|
|
Plug a standard S-Video device (such as a television) into this optional |
jack |
|
|
jack. Plug the other end of the cable into an S-Video jack on a television. |
(optional) |
|
|
|
|
|
|
|
Telephone |
|
|
Plug a telephone’s cable into this jack after connecting the modem |
(PHONE) jack |
|
|
(LINE) jack. For more information on modems, see your user guide. |
|
|
|
|
Voltage switch |
|
|
Before turning on your computer, make sure that this switch is in the |
|
|
|
correct position for the correct power available. The switch is preset at |
|
|
|
the factory with the correct voltage for your area. |
|
|
|
In the United States, the utility power is supplied at a nominal 115 volts |
|
|
|
at 60 Hz. The power supply should always be set to this when your |
|
|
|
computer is operating in the United States. In other areas of the world, |
|
|
|
such as Europe, the utility power is supplied at 230 volts at 50 Hz. If your |
|
|
|
computer is operating in an environment such as this, the voltage |
|
|
|
switch should be moved to 230. |
|
|
|
|
Headphone/ |
|
|
This jack is user configurable for one of the following: |
analog speakers |
|
|
Headphone: Plug headphones or amplified speakers into this jack |
jack (green plug) |
|
|
(Default). |
-OR- |
|
|
Stereo out: Plug your front left and right speakers into this jack. |
Front speakers |
|
|
For information on configuring this jack, see your user guide. |
jack |
|
|
|
|
|
|
|
Microphone jack |
|
|
Plug a microphone into this jack. |
(pink plug) |
|
|
|
10

www.gateway.com |
Back |
Component |
Icon |
Description |
|
|
|
|
|
S/PDIF optical |
|
|
Plug an S/PDIF optical audio connection to this jack. |
audio jack |
|
|
|
|
|
|
|
Rear speaker jack |
|
|
Plug your right rear and left rear speakers into this jack. |
(black plug) |
|
|
For information on configuring this jack, see your user guide. |
|
|
|
|
USB ports |
|
|
Plug USB (Universal Serial Bus) devices (such as a USB Iomega™ Zip™ |
|
|
|
drive, printer, scanner, camera, keyboard, or mouse) into these ports. |
|
|
|
For more information, see your user guide. |
|
|
|
|
Monitor port |
|
|
Plug a monitor into this port. |
|
|
|
|
Serial port |
|
|
Plug a serial device into this port. |
|
|
|
|
PS/2 keyboard |
|
|
Plug a PS/2 keyboard into this port. |
port |
|
|
|
|
|
|
|
Modem (LINE) jack |
|
|
Plug a modem cable into this jack. For more information on modems, |
|
|
|
see your user guide. |
|
|
|
|
11
CHAPTER 2: Hardware Features |
www.gateway.com |
12
Loading...