


 Loading...
Gateway 7110, 7210, 7300, 7320, 7330 Owner's Manual
...Gateway Notebook
User Guide
1 Getting Help . . . . . . . . . . . . . . . . . . . . . . . . . . . . . . . . . . . . . . . . . . . . . . . 1
Gateway Web site . . . . . . . . . . . . . . . . . . . . . . . . . . . . . . . . . . . . . . . . . . . . 3 Using eSupport . . . . . . . . . . . . . . . . . . . . . . . . . . . . . . . . . . . . . . . . . . . 4 Help and Support . . . . . . . . . . . . . . . . . . . . . . . . . . . . . . . . . . . . . . . . . . . . . 5 Searching for a topic . . . . . . . . . . . . . . . . . . . . . . . . . . . . . . . . . . . . . . . 6 Using Your Computer guide . . . . . . . . . . . . . . . . . . . . . . . . . . . . . . . . . . . . . 6 Online help . . . . . . . . . . . . . . . . . . . . . . . . . . . . . . . . . . . . . . . . . . . . . . . . . . 7
2 Checking Out Your Gateway Notebook. . . . . . . . . . . . . . . . . . . . 9
Front . . . . . . . . . . . . . . . . . . . . . . . . . . . . . . . . . . . . . . . . . . . . . . . . . . . . . . 10 Left side . . . . . . . . . . . . . . . . . . . . . . . . . . . . . . . . . . . . . . . . . . . . . . . . . . . 11 Right side . . . . . . . . . . . . . . . . . . . . . . . . . . . . . . . . . . . . . . . . . . . . . . . . . . 12 Back . . . . . . . . . . . . . . . . . . . . . . . . . . . . . . . . . . . . . . . . . . . . . . . . . . . . . . 13 Bottom . . . . . . . . . . . . . . . . . . . . . . . . . . . . . . . . . . . . . . . . . . . . . . . . . . . . 15 Keyboard area . . . . . . . . . . . . . . . . . . . . . . . . . . . . . . . . . . . . . . . . . . . . . . 16 Identifying your model . . . . . . . . . . . . . . . . . . . . . . . . . . . . . . . . . . . . . . . . 17
Gateway model and serial number . . . . . . . . . . . . . . . . . . . . . . . . . . . 17 Microsoft Certificate of Authenticity . . . . . . . . . . . . . . . . . . . . . . . . . . . 17 Finding your specifications . . . . . . . . . . . . . . . . . . . . . . . . . . . . . . . . . . . . . 18 Accessories . . . . . . . . . . . . . . . . . . . . . . . . . . . . . . . . . . . . . . . . . . . . . . . . 19
3 Getting Started . . . . . . . . . . . . . . . . . . . . . . . . . . . . . . . . . . . . . . . . . . . 21
Installing the battery . . . . . . . . . . . . . . . . . . . . . . . . . . . . . . . . . . . . . . . . . . 22 Connecting the AC adapter . . . . . . . . . . . . . . . . . . . . . . . . . . . . . . . . . . . . 23 Protecting from power source problems . . . . . . . . . . . . . . . . . . . . . . . 25 Starting your notebook . . . . . . . . . . . . . . . . . . . . . . . . . . . . . . . . . . . . . . . . 26 Waking up your notebook . . . . . . . . . . . . . . . . . . . . . . . . . . . . . . . . . . 27 Turning off your notebook . . . . . . . . . . . . . . . . . . . . . . . . . . . . . . . . . . . . . 28 Restarting (rebooting) your notebook . . . . . . . . . . . . . . . . . . . . . . . . . . . . 29 Status indicators . . . . . . . . . . . . . . . . . . . . . . . . . . . . . . . . . . . . . . . . . . . . . 30 Using the keyboard . . . . . . . . . . . . . . . . . . . . . . . . . . . . . . . . . . . . . . . . . . 31 Key types . . . . . . . . . . . . . . . . . . . . . . . . . . . . . . . . . . . . . . . . . . . . . . . 32 System key combinations . . . . . . . . . . . . . . . . . . . . . . . . . . . . . . . . . . 33 Multi-function buttons . . . . . . . . . . . . . . . . . . . . . . . . . . . . . . . . . . . . . . . . . 35 Using the EZ Pad touchpad . . . . . . . . . . . . . . . . . . . . . . . . . . . . . . . . . . . . 37 Using the touchpad . . . . . . . . . . . . . . . . . . . . . . . . . . . . . . . . . . . . . . . 38 Adjusting the volume . . . . . . . . . . . . . . . . . . . . . . . . . . . . . . . . . . . . . . . . . 40
www.gateway.com |
i |
4 Using Drives and Ports . . . . . . . . . . . . . . . . . . . . . . . . . . . . . . . . . . . |
41 |
Using the DVD drive . . . . . . . . . . . . . . . . . . . . . . . . . . . . . . . . . . . . . . . . . . |
42 |
Identifying drive types . . . . . . . . . . . . . . . . . . . . . . . . . . . . . . . . . . . . . . |
42 |
Inserting a CD or DVD . . . . . . . . . . . . . . . . . . . . . . . . . . . . . . . . . . . . . |
43 |
Playing a CD . . . . . . . . . . . . . . . . . . . . . . . . . . . . . . . . . . . . . . . . . . . . . |
44 |
Playing a DVD . . . . . . . . . . . . . . . . . . . . . . . . . . . . . . . . . . . . . . . . . . . . |
44 |
Creating CDs and DVDs . . . . . . . . . . . . . . . . . . . . . . . . . . . . . . . . . . . . |
44 |
Using the memory card reader . . . . . . . . . . . . . . . . . . . . . . . . . . . . . . . . . . |
45 |
Memory card types . . . . . . . . . . . . . . . . . . . . . . . . . . . . . . . . . . . . . . . . |
45 |
Inserting a memory card . . . . . . . . . . . . . . . . . . . . . . . . . . . . . . . . . . . . |
46 |
Adding and removing a PC Card . . . . . . . . . . . . . . . . . . . . . . . . . . . . . . . . |
47 |
Viewing the display on a projector or monitor . . . . . . . . . . . . . . . . . . . . . . |
49 |
Viewing the display on a television . . . . . . . . . . . . . . . . . . . . . . . . . . . . . . . |
51 |
5 Managing Power . . . . . . . . . . . . . . . . . . . . . . . . . . . . . . . . . . . . . . . . . . |
55 |
Monitoring the battery charge . . . . . . . . . . . . . . . . . . . . . . . . . . . . . . . . . . .56 Recharging the battery . . . . . . . . . . . . . . . . . . . . . . . . . . . . . . . . . . . . . . . .57 Recalibrating the battery . . . . . . . . . . . . . . . . . . . . . . . . . . . . . . . . . . . . . . .57 Changing batteries . . . . . . . . . . . . . . . . . . . . . . . . . . . . . . . . . . . . . . . . . . . .59 Replacing the battery . . . . . . . . . . . . . . . . . . . . . . . . . . . . . . . . . . . . . .59 Extending battery life . . . . . . . . . . . . . . . . . . . . . . . . . . . . . . . . . . . . . . . . . .61 Conserving battery power . . . . . . . . . . . . . . . . . . . . . . . . . . . . . . . . . . .61 Using alternate power sources . . . . . . . . . . . . . . . . . . . . . . . . . . . . . . .62 Changing power modes . . . . . . . . . . . . . . . . . . . . . . . . . . . . . . . . . . . .62
6 |
Upgrading Your Notebook . . . . . . . . . . . . . . . . . . . . . . . . . . . . . . . . |
65 |
|
Preventing static electricity discharge . . . . . . . . . . . . . . . . . . . . . . . . . . . . . |
66 |
|
Adding or replacing memory . . . . . . . . . . . . . . . . . . . . . . . . . . . . . . . . . . . . |
67 |
|
Replacing the hard drive kit . . . . . . . . . . . . . . . . . . . . . . . . . . . . . . . . . . . . |
70 |
7 |
Maintaining Your Notebook . . . . . . . . . . . . . . . . . . . . . . . . . . . . . . . |
73 |
|
Caring for your notebook . . . . . . . . . . . . . . . . . . . . . . . . . . . . . . . . . . . . . . . |
74 |
|
Cleaning your notebook . . . . . . . . . . . . . . . . . . . . . . . . . . . . . . . . . . . . . . . . |
75 |
|
Cleaning the exterior . . . . . . . . . . . . . . . . . . . . . . . . . . . . . . . . . . . . . . . |
75 |
|
Cleaning the keyboard . . . . . . . . . . . . . . . . . . . . . . . . . . . . . . . . . . . . . |
76 |
|
Cleaning the notebook screen . . . . . . . . . . . . . . . . . . . . . . . . . . . . . . . |
76 |
|
Cleaning CDs or DVDs . . . . . . . . . . . . . . . . . . . . . . . . . . . . . . . . . . . . . |
76 |
|
Protecting your computer from viruses . . . . . . . . . . . . . . . . . . . . . . . . . . . . |
77 |
|
Updating Windows . . . . . . . . . . . . . . . . . . . . . . . . . . . . . . . . . . . . . . . . . . . . |
80 |
|
Restoring your system . . . . . . . . . . . . . . . . . . . . . . . . . . . . . . . . . . . . . . . . . |
80 |
ii |
www.gateway.com |
8 Troubleshooting . . . . . . . . . . . . . . . . . . . . . . . . . . . . . . . . . . . . . . . . . . 81
Safety guidelines . . . . . . . . . . . . . . . . . . . . . . . . . . . . . . . . . . . . . . . . . . . . 82 First steps . . . . . . . . . . . . . . . . . . . . . . . . . . . . . . . . . . . . . . . . . . . . . . . . . . 83 Troubleshooting . . . . . . . . . . . . . . . . . . . . . . . . . . . . . . . . . . . . . . . . . . . . . 84 Audio . . . . . . . . . . . . . . . . . . . . . . . . . . . . . . . . . . . . . . . . . . . . . . . . . . 84 Battery . . . . . . . . . . . . . . . . . . . . . . . . . . . . . . . . . . . . . . . . . . . . . . . . . 84 CD drives . . . . . . . . . . . . . . . . . . . . . . . . . . . . . . . . . . . . . . . . . . . . . . . 84 Device installation . . . . . . . . . . . . . . . . . . . . . . . . . . . . . . . . . . . . . . . . 84 Display . . . . . . . . . . . . . . . . . . . . . . . . . . . . . . . . . . . . . . . . . . . . . . . . . 85 DVD drives . . . . . . . . . . . . . . . . . . . . . . . . . . . . . . . . . . . . . . . . . . . . . . 86 File management . . . . . . . . . . . . . . . . . . . . . . . . . . . . . . . . . . . . . . . . . 88 Hard drive . . . . . . . . . . . . . . . . . . . . . . . . . . . . . . . . . . . . . . . . . . . . . . 89 Internet . . . . . . . . . . . . . . . . . . . . . . . . . . . . . . . . . . . . . . . . . . . . . . . . . 90 Keyboard . . . . . . . . . . . . . . . . . . . . . . . . . . . . . . . . . . . . . . . . . . . . . . . 91 Memory . . . . . . . . . . . . . . . . . . . . . . . . . . . . . . . . . . . . . . . . . . . . . . . . 92 Memory card reader . . . . . . . . . . . . . . . . . . . . . . . . . . . . . . . . . . . . . . 92 Modem (dial-up) . . . . . . . . . . . . . . . . . . . . . . . . . . . . . . . . . . . . . . . . . . 93 Mouse . . . . . . . . . . . . . . . . . . . . . . . . . . . . . . . . . . . . . . . . . . . . . . . . . . 97 Networks . . . . . . . . . . . . . . . . . . . . . . . . . . . . . . . . . . . . . . . . . . . . . . . 97 Passwords . . . . . . . . . . . . . . . . . . . . . . . . . . . . . . . . . . . . . . . . . . . . . . 97 PC Cards . . . . . . . . . . . . . . . . . . . . . . . . . . . . . . . . . . . . . . . . . . . . . . . 98 Power . . . . . . . . . . . . . . . . . . . . . . . . . . . . . . . . . . . . . . . . . . . . . . . . . . 98 Printer . . . . . . . . . . . . . . . . . . . . . . . . . . . . . . . . . . . . . . . . . . . . . . . . . . 99 Sound . . . . . . . . . . . . . . . . . . . . . . . . . . . . . . . . . . . . . . . . . . . . . . . . . 100 Status indicators . . . . . . . . . . . . . . . . . . . . . . . . . . . . . . . . . . . . . . . . 101 Video . . . . . . . . . . . . . . . . . . . . . . . . . . . . . . . . . . . . . . . . . . . . . . . . . 101 Telephone support . . . . . . . . . . . . . . . . . . . . . . . . . . . . . . . . . . . . . . . . . . 102 Before calling Gateway Customer Care . . . . . . . . . . . . . . . . . . . . . . 102 Telephone numbers . . . . . . . . . . . . . . . . . . . . . . . . . . . . . . . . . . . . . . 103
A Safety, Regulatory, and Legal Information . . . . . . . . . . . . . . 105
Index . . . . . . . . . . . . . . . . . . . . . . . . . . . . . . . . . . . . . . . . . . . . . . . . . . . . . . . 117
www.gateway.com |
iii |
iv |
www.gateway.com |
•Using the Gateway Web site
•Using Help and Support
•Using Your Computer guide
•Using online help
1
Chapter 1: Getting Help
!
"
# "
$
% % %
% &
'
2 |
www.gateway.com |

Gateway Web site
( )* +
" ,
-
www.gateway.com |
3 |
Chapter 1: Getting Help
-' .
■-/
■#-
■0
■! 1
■#!
!Support Home All Support Documents
!Support Home General Tutorials
% !0
!Product Support
!Downloads My Downloads
2&3-2
!All Downloads
% % "
!Contact Us
% !Call Us
4
5 6 78)
!PC Tools
4 |
www.gateway.com |
Help and Support
1 /
-
To start Help and Support:
■!Start Help and Support/-
www.gateway.com |
5 |

Chapter 1: Getting Help
/-9 :
Search/-

4 .
■-% /-
■4 %-; % /
- Search
■; < 2 % ;
Search
&
Search Results
&
&
%
To access the Using Your Computer guide:
!Start All Programs Gateway Documentation
6 |
|
www.gateway.com |
|
Online help
;
Help
Help
www.gateway.com |
7 |
Chapter 1: Getting Help
8 |
www.gateway.com |

•Identifying features
•Locating your notebook’s model and serial number
•Locating the Microsoft Certificate of Authenticity
•Locating the specifications for your notebook
•Purchasing accessories
9

Chapter 2: Checking Out Your Gateway Notebook
Speaker |
Power |
LCD panel |
Battery |
Speaker |
|
indicator |
release |
charge |
|
|
|
latch |
indicator |
|
Component |
Description |
|
|
|
|
Speakers |
Provide audio output when headphones or amplified speakers are |
|
|
not plugged in. |
|
|
|
|
Power indicator |
■ LED on - notebook is on. |
|
|
■ LED blinking - notebook is in Standby mode. |
|
|
■ LED off - notebook is off. |
|
|
|
|
LCD panel release |
Open the LCD panel by sliding the release latch. |
|
latch |
|
|
|
|
|
Battery charge |
■ LED on - battery is charging. |
|
indicator |
■ |
LED blinking - battery charge is very low. |
|
■ |
LED off - battery is fully charged. |
|
|
|
10 |
www.gateway.com |
Left side
!
|
|
|
|
|
|
|
|
|
|
|
|
|
|
|
|
|
|
|
|
|
|
|
|
|
|
|
|
|
|
|
|
|
|
|
|
|
|
|
|
|
|
|
|
|
|
|
|
|
|
|
|
|
|
|
|
|
|
|
|
|
|
|
|
Memory |
Ventilation |
IEEE 1394 |
|
|
PC Card |
PC Card |
Memory |
||||||||
|
card |
|
fan |
port |
|
|
eject button |
slot |
card |
||||||
reader |
|
|
|
|
|
USB |
|
|
|
reader |
|||||
|
|
|
|
|
|
|
ports |
|
|
|
|
|
|||
Component |
Icon |
Description |
|
|
|
Memory card |
|
Insert a memory card from a digital camera, MP3 player, PDA, |
reader |
|
or cellular telephone into the optional memory card reader. |
(optional) |
|
For more information, see “Using the memory card reader” |
|
|
on page 45. The memory card reader supports |
|
|
CompactFlash®, IBM Microdrive™, Memory Stick®, |
|
|
MultiMediaCard™, and Secure Digital™ cards. |
|
|
|
Ventilation fan |
|
Helps cool internal components. |
|
|
Caution: Do not block or insert objects into these slots. If |
|
|
these slots are blocked, your notebook may overheat |
|
|
resulting in unexpected shutdown or permanent damage to |
|
|
the notebook. |
|
|
|
IEEE 1394 port |
|
Plug an IEEE 1394 (also known as Firewire® or i.Link®) |
(optional) |
|
device (such as a digital camcorder) into this optional 4-pin |
|
|
IEEE 1394 port. |
|
|
|
USB ports |
|
Plug USB devices (such as a diskette drive, flash drive, |
|
|
printer, scanner, camera, keyboard, or mouse) into these |
|
|
ports. |
|
|
|
www.gateway.com |
11 |
Chapter 2: Checking Out Your Gateway Notebook
Component |
Icon |
Description |
|
|
|
PC Card eject |
|
Press the eject button to remove a PC Card from the PC Card |
button |
|
slot. For more information, see “Adding and removing a |
|
|
PC Card” on page 47. |
|
|
|
PC Card slot |
|
Insert one Type II PC Card into this slot. For more information, |
|
|
see “Adding and removing a PC Card” on page 47. |
|
|
|
"
DVD/CD-RW or recordable DVD drive
Component Description
DVD/CD-RW or recordable DVD drive
Insert CDs or DVDs into this drive. For more information, see “Using the DVD drive” on page 42.
This drive may be a combination DVD/CD-RW or recordable DVD drive. To determine the type of drive in the notebook, examine the drive tray’s plastic cover and compare the logo to those listed in “Identifying drive types” on page 42.
12 |
www.gateway.com |
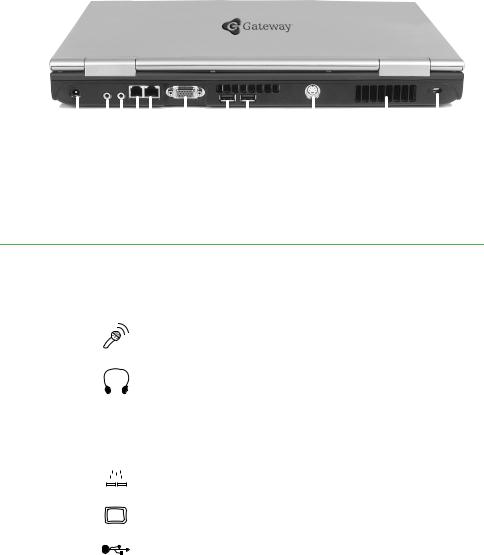
Back
#
|
|
|
|
|
|
|
|
|
|
|
|
|
|
|
|
|
|
|
|
|
|
|
|
|
|
|
|
|
|
|
|
|
|
|
|
|
|
|
|
|
|
|
|
|
|
|
|
Power connector |
|
|
|
Monitor |
USB |
S-Video |
Ventilation |
Kensington |
|||||||
|
|
|
|
|
port |
ports |
out jack |
fan |
lock slot |
||||||
Microphone jack |
|
|
|||||||||||||
|
|
|
|
|
|
|
|
|
|
|
|
|
|||
|
|
|
|
|
|
|
|
|
|
|
|
|
|
|
|
Headphone jack |
Ethernet jack |
|
|
|
|
|
|
|
|
|
|||||
|
|
|
|
|
|
|
|
|
|
|
|
|
|
|
|
|
Modem jack |
|
|
|
|
|
|
|
|
|
|||||
Component |
Icon |
|
|
Description |
||||||
|
|
|
|
|
|
|
|
|
|
|
Power |
|
|
|
|
|
|
|
|
|
Plug the AC adapter cable into this connector. |
|
|
|
|
|
|
|
|
|
||
connector |
|
|
|
|
|
|
|
|
|
|
|
|
|
|
|
|
|
|
|
|
|
Microphone |
|
|
|
|
|
|
|
|
|
Plug a microphone into this jack. |
jack |
|
|
|
|
|
|
|
|
|
|
|
|
|
|
|
|
|
|
|
|
|
Headphone |
|
|
|
|
|
|
|
|
|
Plug amplified speakers or headphones into this jack. The |
jack |
|
|
|
|
|
|
|
|
|
built-in speakers are turned off when speakers or headphones |
|
|
|
|
|
|
|
|
|
|
are plugged into this jack. |
|
|
|
|
|
|
|
|
|
|
|
Modem jack |
|
|
|
|
|
|
|
|
|
Plug a modem cable into this jack. |
|
|
|
|
|
|
|
|
|
||
|
|
|
|
|
|
|
|
|
|
|
|
|
|
|
|
|
|
|
|
|
|
Ethernet jack |
|
|
|
|
|
|
|
|
|
Plug a 10/100 Ethernet network cable into this jack. |
|
|
|
|
|
|
|
|
|
|
|
|
|
|
|
|
|
|
|
|
|
|
|
|
|
|
|
|
|
|
|
|
|
Monitor port |
|
|
|
|
|
|
|
|
|
Plug an analog VGA monitor into this port. |
|
|
|
|
|
|
|
|
|
|
|
USB ports |
|
|
|
|
|
|
|
|
|
Plug USB devices (such as a diskette drive, flash drive, printer, |
|
|
|
|
|
|
|
|
|
|
scanner, camera, keyboard, or mouse) into these ports. |
|
|
|
|
|
|
|
|
|
|
|
www.gateway.com |
13 |

Chapter 2: Checking Out Your Gateway Notebook
Component |
Icon |
Description |
|
|
|
S-Video out |
|
Plug a standard S-Video cable into this jack. For more |
jack (optional) |
|
information, see “Viewing the display on a television” on |
|
|
page 51. |
|
|
|
Ventilation fan |
|
Helps cool internal components. |
|
|
Caution: Do not block or insert objects into these slots. If these |
|
|
slots are blocked, your notebook may overheat resulting in |
|
|
unexpected shutdown or permanent damage to the notebook. |
|
|
|
Kensington™ |
|
Secure your notebook to an object by connecting a Kensington |
lock slot |
|
cable lock to this slot. |
|
|
|
14 |
www.gateway.com |
Bottom
#
System label
Memory bay
Battery
lock
Battery 
latch
|
Hard drive bay |
|
|
Component |
Description |
|
|
Battery lock |
Slide to unlock the battery. For more information, see “Changing |
|
batteries” on page 59. |
|
|
Battery latch |
Slide to release the battery. For more information, see “Changing |
|
batteries” on page 59. |
|
|
Hard drive bay |
The hard drive is located in this bay. For more information, see |
|
“Replacing the hard drive kit” on page 70. |
|
|
Memory bay |
Install a memory module into this bay. For more information, see |
|
“Adding or replacing memory” on page 67. |
|
|
System label |
Includes the product model number. For more information, see |
|
“Identifying your model” on page 17. |
|
|
www.gateway.com |
15 |
Chapter 2: Checking Out Your Gateway Notebook
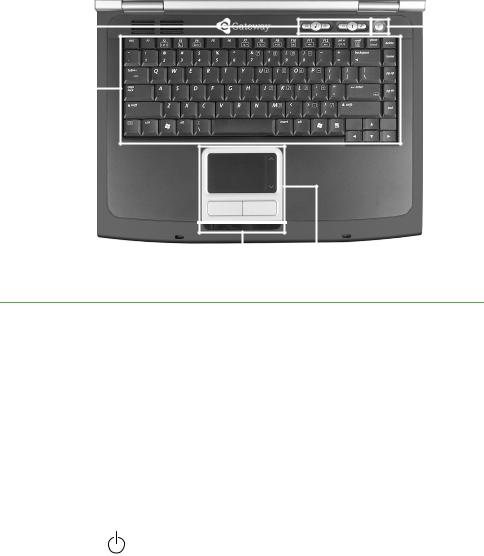
$
Multi-function |
|
|
|
|
|
|
|
|
Power |
||
buttons |
|
|
|
|
|
|
|
|
|
|
button |
|
|
|
|
|
|
|
|
||||
Keyboard |
|
|
|
|
|
|
|
|
|
|
|
|
|
|
|
|
|
|
|
|
|
|
|
|
|
|
|
|
|
|
|
|
|
|
|
|
|
|
|
|
|
|
|
|
|
|
|
|
|
|
|
|
|
|
|
|
|
|
|
|
|
|
|
|
|
|
|
|
|
|
|
|
|
|
|
|
|
|
|
|
|
|
|
|
|
|
|
|
|
|
|
|
|
|
|
Status indicators Touchpad
Component |
Icon |
Description |
|
|
|
Multi-function |
|
Press these buttons to open programs assigned to them or |
buttons |
|
control the volume. For more information, see “Multi-function |
|
|
buttons” on page 35. |
|
|
|
Keyboard |
|
Provides all the features of a full-sized, 86-key keyboard. For |
|
|
more information, see “Using the keyboard” on page 31. |
|
|
|
Status |
|
Inform you when a drive is in use or when a button has been |
indicators |
|
pressed that affects how the keyboard is used. For more |
|
|
information, see “Status indicators” on page 30. |
|
|
|
Touchpad |
|
Provides all the functionality of a mouse. For more information, |
|
|
see “Using the EZ Pad touchpad” on page 37. |
|
|
|
Power button |
|
Press to turn the power on or off. You can also configure the |
|
|
power button for Standby/Resume mode. For more |
|
|
information on configuring the power button mode, see |
|
|
“Changing Power-saving Settings” in Using Your Computer |
|
|
which has been included on your hard drive. To access this |
|
|
guide, click Start, All Programs, then click Gateway |
|
|
Documentation. |
|
|
|
16 |
www.gateway.com |
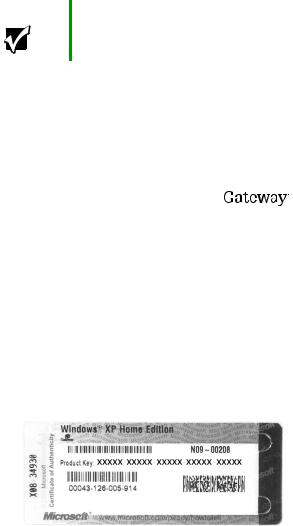
Identifying your model
%
Important The labels shown in this section are for informational purposes only. Label information varies by model, features ordered, and location.
! !
Website: |
|
|
www.gateway.com |
||||||||||||||||||||||||||||||||||||||
Online Support: |
|
|
www.gateway.com/support |
||||||||||||||||||||||||||||||||||||||
Tech Support Phone: |
|
|
|
|
|
|
|
|
|
|
|
|
|
|
|
|
|
|
|
|
|
|
|
|
|
|
|
|
|||||||||||||
Hours: |
|
|
|
|
|
|
|
|
|
|
|
|
|
|
|
|
|
|
|
|
|
|
|
|
|
|
|
|
|||||||||||||
Model: |
|
|
|
|
|
|
|
|
|
|
|
|
|
|
|
|
|
|
|
|
|
|
|
|
|
|
|
|
|||||||||||||
S/No: |
|
|
|
|
|
|
|
|
|
|
|
|
|
|
|
|
|
|
|
|
|
|
|
|
|
|
|
|
|||||||||||||
|
|
|
|
|
|
|
|
|
|
|
|
|
|
|
|
|
|
|
|
|
|
|
|
|
|
|
|
|
|
|
|
|
|
|
|
|
|
|
|
|
|
|
|
|
|
|
|
|
|
|
|
|
|
|
|
|
|
|
|
|
|
|
|
|
|
|
|
|
|
|
|
|
|
|
|
|
|
|
|
|
|
|
|
|
|
|
|
|
|
|
|
|
|
|
|
|
|
|
|
|
|
|
|
|
|
|
|
|
|
|
|
|
|
|
|
|
|
|
|
|
|
|
|
|
|
; !
www.gateway.com |
17 |
Chapter 2: Checking Out Your Gateway Notebook
4 "
" =
4
51-6 *
18 |
www.gateway.com |
Accessories
&
-
&
- 5! 6 >?
@
%
%
A
&
- 5
6 B+
'
& '
1 '
A
' A '
1 1-2
www.gateway.com |
19 |
Chapter 2: Checking Out Your Gateway Notebook
20 |
www.gateway.com |

•Installing the battery
•Connecting the AC adapter
•Turning your notebook on and off
•Using the status indicators, keyboard, and the EZ Pad touchpad
•Adjusting the volume
21
Chapter 3: Getting Started
%
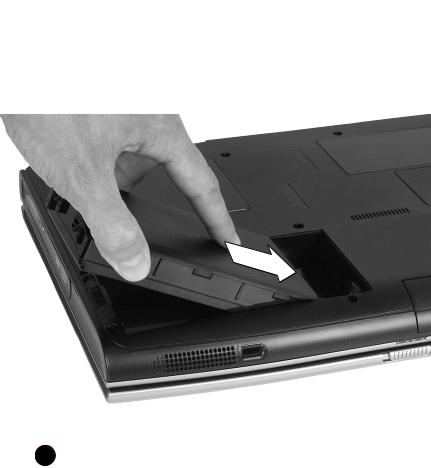
 To install the battery:
1
2
3
! A!0
/ %
4 -
22 |
|
www.gateway.com |
|
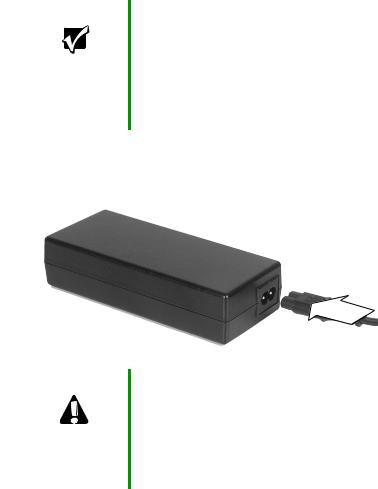
Connecting the AC adapter
&
! =
!
Important If the battery is not fully charged before you use your notebook on battery power for the first time, the battery life may be much shorter than you expect. If the battery life seems short even after being charged for three hours, the battery may need to be recalibrated. For information on recalibrating the battery, see “Recalibrating the battery” on page 57.
 To connect the AC adapter:
1 ! !
Caution Make sure that you use the AC adapter that came with your notebook or one of the same type purchased from Gateway.
Replace the power cord if it becomes damaged. The replacement cord must be of the same type and voltage rating as the original cord or your notebook may be damaged.
www.gateway.com |
23 |

Chapter 3: Getting Started
2 ! ! =
3 #
954 6 78
:
&
.
a 1
b # C
4
!
Warning Do not attempt to disassemble the AC adapter. The AC adapter has no user-replaceable or user-serviceable parts inside. The AC adapter has dangerous voltages that can cause serious injury or death. Contact Gateway about returning defective AC adapters.
Important If the battery charge indicator does not turn off after three hours, contact Gateway Customer Care at support.gateway.com.
24 |
|
www.gateway.com |
|
Loading...