


 Loading...
Rino® 750/755t
Owner’s Manual
© 2016 Garmin Ltd. or its subsidiaries
All rights reserved. Under the copyright laws, this manual may not be copied, in whole or in part, without the written consent of Garmin. Garmin reserves the right to change or improve its products and to make changes in the content of this manual without obligation to notify any person or organization of such changes or improvements. Go to www.garmin.com for current updates and supplemental information concerning the use of this product.
Garmin®, the Garmin logo, ANT+®, Rino®, and TracBack® are trademarks of Garmin Ltd. or its subsidiaries, registered in the USA and other countries. Connect IQ™, Garmin Connect™, and Garmin Express™ are trademarks of Garmin Ltd. or its subsidiaries. These trademarks may not be used without the express permission of Garmin.
The Bluetooth® word mark and logos are owned by the Bluetooth SIG, Inc. and any use of such marks by Garmin is under license. Mac® is a trademark of Apple Inc., registered in the U.S. and other countries. microSD® and the microSDHC logo are trademarks of SD-3C, LLC. Windows® is a registered trademark of Microsoft Corporation in the United States and other countries. Other trademarks and trade names are those of their respective owners.
Table of Contents |
|
Introduction..................................................................... |
1 |
Device Overview ......................................................................... |
1 |
Battery Information ................................................................. |
1 |
Installing the Lithium-ion Battery ............................................ |
1 |
Installing AA Batteries ............................................................ |
2 |
Turning On the Device ................................................................ |
2 |
Device Operation ........................................................................ |
2 |
Opening the App Drawer ....................................................... |
2 |
Locking the Touchscreen ....................................................... |
2 |
Acquiring GPS Signals ............................................................... |
2 |
Radio............................................................................... |
3 |
Transmitting ................................................................................ |
3 |
The Radio App ............................................................................ |
3 |
Opening the Radio App ......................................................... |
3 |
Adjusting the Radio Volume ................................................... |
3 |
Adjusting the Squelch Level .................................................. |
3 |
Channels and Codes .................................................................. |
3 |
Selecting a Channel ............................................................... |
3 |
Selecting a Squelch Code ..................................................... |
3 |
Monitoring a Channel for Activity ........................................... |
3 |
Scanning Channels ................................................................ |
4 |
Repeater Channels ................................................................ |
4 |
Peer-to-Peer Positioning ............................................................. |
4 |
Polling Other Rino Users ....................................................... |
4 |
Editing Your Contact Info ....................................................... |
4 |
Contacts ...................................................................................... |
4 |
Saving a New Contact ........................................................... |
4 |
Viewing Contacts on the Map ................................................ |
4 |
Navigating to a Contact .......................................................... |
4 |
Notes .......................................................................................... |
4 |
Creating, Saving, and Sending Notes .................................... |
4 |
Emergency Alerts ....................................................................... |
4 |
Sending an Emergency Alert ................................................. |
4 |
Responding to an Emergency Alert ....................................... |
4 |
Radio App Settings ..................................................................... |
4 |
Radio Setup ........................................................................... |
5 |
Connected Features....................................................... |
5 |
Pairing Your Smartphone ........................................................... |
5 |
Viewing Widgets ......................................................................... |
5 |
Connect IQ Features .................................................................. |
5 |
Downloading Connect IQ Features ........................................ |
5 |
Weather........................................................................... |
5 |
Monitoring SAME Weather Alerts ............................................... |
5 |
Opening the Weather App .......................................................... |
6 |
Viewing Weather Conditions and Forecasts .......................... |
6 |
Viewing SAME Weather Alerts on the Map ........................... |
6 |
Geocaches...................................................................... |
6 |
Registering Your Device at Geocaching.com ............................. |
6 |
Connecting to Geocaching.com ............................................. |
6 |
Searching for a Geocache .......................................................... |
6 |
Navigating to a Geocache .......................................................... |
6 |
Using Hints and Clues to find a Geocache ............................ |
6 |
Logging the Attempt .................................................................... |
6 |
Filtering the Geocache List ......................................................... |
7 |
Saving a Custom Geocache Filter ......................................... |
7 |
Editing a Custom Geocache Filter ......................................... |
7 |
Applying a Custom Filter to a Geocache List ......................... |
7 |
Downloading Geocaches Using a Computer .............................. |
7 |
chirp ............................................................................................ |
7 |
Enabling chirp Searching ....................................................... |
7 |
Finding a Geocache with a chirp ............................................ |
7 |
Removing Live Geocache Data from the Device ........................ |
7 |
Removing Your Device Registration From Geocaching.com ..... |
7 |
Activities......................................................................... |
7 |
Recording an Activity .................................................................. |
7 |
Creating a New Activity ............................................................... |
8 |
Editing an Activity Name ........................................................ |
8 |
Editing an Activity Icon ........................................................... |
8 |
Deleting an Activity ..................................................................... |
8 |
Customizing Your Activity Log .................................................... |
8 |
Pausing an Activity ..................................................................... |
8 |
Saving the Current Activity ......................................................... |
8 |
Clearing the Current Activity ....................................................... |
8 |
Deleting an Activity History ......................................................... |
8 |
Viewing Activity Information ........................................................ |
8 |
Viewing the Elevation Plot of an Activity ..................................... |
8 |
Saving a Location on an Activity ................................................. |
8 |
Opening Track Manager ............................................................. |
8 |
Navigation....................................................................... |
9 |
Navigating to a Destination ......................................................... |
9 |
Finding a Location Near Another Location ............................ |
9 |
Stopping Navigation ............................................................... |
9 |
Navigating with the Map ............................................................. |
9 |
Navigating Using TracBack® ...................................................... |
9 |
Optional Maps ............................................................................. |
9 |
Finding an Address ................................................................ |
9 |
Navigating with the Compass ..................................................... |
9 |
Calibrating the Compass ........................................................ |
9 |
Course Pointer ....................................................................... |
9 |
Navigating with Sight 'N Go ........................................................ |
9 |
Elevation Plot ............................................................................ |
10 |
Navigating to a Point on the Elevation Plot .......................... |
10 |
Changing the Plot Type ....................................................... |
10 |
Resetting the Elevation Plot ................................................. |
10 |
Calibrating the Barometric Altimeter .................................... |
10 |
Waypoints..................................................................... |
10 |
Marking Your Current Location as a Waypoint ......................... |
10 |
Finding a Waypoint ................................................................... |
10 |
Editing a Waypoint .................................................................... |
10 |
Deleting a Waypoint .................................................................. |
10 |
Increasing the Accuracy of a Waypoint Location ...................... |
10 |
Projecting a Waypoint ............................................................... |
10 |
Routes........................................................................... |
10 |
Creating a Route Using Route Planner .................................... |
10 |
Creating a Route Using the Map .............................................. |
11 |
Editing the Name of a Route .................................................... |
11 |
Editing a Route ......................................................................... |
11 |
Viewing a Route on the Map .................................................... |
11 |
Deleting a Route ....................................................................... |
11 |
Viewing the Active Route .......................................................... |
11 |
Reversing a Route .................................................................... |
11 |
Viewing the Elevation Plot of a Route ...................................... |
11 |
Garmin Adventures...................................................... |
11 |
Sending Files to BaseCamp ..................................................... |
11 |
Creating an Adventure .............................................................. |
11 |
Starting an Adventure ............................................................... |
11 |
Camera and Photos...................................................... |
12 |
Taking a Photo .......................................................................... |
12 |
Applications.................................................................. |
12 |
Sending and Receiving Data Wirelessly ................................... |
12 |
Setting a Proximity Alarm ......................................................... |
12 |
Calculating the Size of an Area ................................................ |
12 |
Viewing the Calendar and Almanacs ........................................ |
12 |
Setting an Alarm ....................................................................... |
12 |
Starting the Countdown Timer .................................................. |
12 |
Opening the Stopwatch ............................................................ |
12 |
Satellite Page ............................................................................ |
12 |
Table of Contents |
i |
Changing the Satellite View ................................................. |
12 |
Turning Off GPS .................................................................. |
12 |
Simulating a Location ........................................................... |
12 |
Controlling a VIRB® Action Camera ......................................... |
12 |
Phone Notifications ................................................................... |
13 |
Hiding Notifications .............................................................. |
13 |
Fitness........................................................................... |
13 |
History ....................................................................................... |
13 |
Viewing an Activity History ................................................... |
13 |
Deleting an Activity from Your History ................................. |
13 |
Using Garmin Connect ......................................................... |
13 |
Optional Fitness Accessories ............................................... |
13 |
About Heart Rate Zones ........................................................... |
13 |
Fitness Goals ....................................................................... |
13 |
Setting Your Heart Rate Zones ............................................ |
13 |
Customizing the Device............................................... |
13 |
Adjusting the Backlight Brightness ........................................... |
13 |
Customizing the Keys ............................................................... |
14 |
Customizing the Main Menu ..................................................... |
14 |
Changing Items on the Main Menu ...................................... |
14 |
Customizing the Dashboard on the Main Menu ................... |
14 |
Customizing the App Drawer .................................................... |
14 |
Adding a Shortcut to the Main Menu ........................................ |
14 |
Creating a Shortcut .............................................................. |
14 |
Custom Data Fields and Dashboards ....................................... |
14 |
Enabling the Map Data Fields .............................................. |
14 |
Customizing the Data Fields ................................................ |
14 |
Customizing Dashboards ..................................................... |
14 |
Setting the Touchscreen Sensitivity ......................................... |
14 |
Display Settings ........................................................................ |
14 |
Configuring the Maps ................................................................ |
15 |
Map Settings ........................................................................ |
15 |
Advanced Map Settings ....................................................... |
15 |
System Settings ........................................................................ |
15 |
Satellite Settings .................................................................. |
15 |
GPS and GLONASS ............................................................ |
15 |
Appearance Settings ................................................................ |
15 |
Setting the Device Tones .......................................................... |
15 |
Routing Settings ....................................................................... |
15 |
Heading Settings ...................................................................... |
15 |
Altimeter Settings ...................................................................... |
16 |
Position Format Settings ........................................................... |
16 |
Changing the Units of Measure ................................................ |
16 |
Time Settings ............................................................................ |
16 |
Geocaching Settings ................................................................. |
16 |
ANT+ Sensor Settings .............................................................. |
16 |
Fitness Settings ........................................................................ |
16 |
Setting Your Fitness User Profile ......................................... |
16 |
Marking Laps by Distance .................................................... |
16 |
Marine Settings ......................................................................... |
16 |
Setting Up Marine Alarms .................................................... |
16 |
Resetting Data and Settings ..................................................... |
17 |
Restoring Default Values for Specific Settings .................... |
17 |
Restoring Default Values for Specific Page Settings ........... |
17 |
Restoring All Default Settings .............................................. |
17 |
Device Information....................................................... |
17 |
Attaching the Carabiner Clip ..................................................... |
17 |
Headsets and Microphones ...................................................... |
17 |
Support and Updates ................................................................ |
17 |
Device Care .............................................................................. |
17 |
Cleaning the Device ............................................................. |
17 |
Cleaning the Touchscreen ................................................... |
17 |
Water Immersion .................................................................. |
17 |
Data Management .................................................................... |
17 |
File Types ............................................................................ |
17 |
Installing a Memory Card ..................................................... |
18 |
Connecting the Device to Your Computer ........................... |
18 |
Transferring Files to Your Device ........................................ |
18 |
Deleting Files ....................................................................... |
18 |
Disconnecting the USB Cable .............................................. |
18 |
Specifications ............................................................................ |
18 |
Radio Frequency Charts ...................................................... |
18 |
FCC Licensing Information ....................................................... |
20 |
Viewing Device Information ...................................................... |
20 |
Troubleshooting........................................................... |
21 |
My handheld device is not responding ..................................... |
21 |
My device does not turn on ...................................................... |
21 |
The battery gauge does not seem accurate ............................. |
21 |
My phone will not connect to the device ................................... |
21 |
My device is not acquiring satellite signals ............................... |
21 |
My device does not go into mass storage mode |
|
automatically ............................................................................. |
21 |
I need to reset all settings back to factory default values ......... |
21 |
Appendix....................................................................... |
21 |
tempe™ .................................................................................... |
21 |
Data Fields ................................................................................ |
21 |
Heart Rate Zone Calculations ................................................... |
23 |
Index.............................................................................. |
24 |
ii |
Table of Contents |

Introduction
 WARNING
See the Important Safety and Product Information guide in the product box for product warnings and other important information.
Device Overview
À |
FRS/GMRS antenna |
Á |
GPS antenna |
|
|
 |
Camera lens and flash (not available on all models) |
|
|
à |
Mini-USB port (under weather cap) |
|
2.5 mm headset jack (under weather cap) |
|
|
Ä |
Battery cover D-ring |
|
|
Å |
microSD® card slot (under battery door) |
|
|
Battery Information
 WARNING
The temperature rating for the device may exceed the usable range of some batteries. Alkaline batteries can rupture at high temperatures.
Do not use a sharp object to remove batteries.
 CAUTION
Contact your local waste disposal department to properly recycle the batteries.
NOTICE
Alkaline batteries lose a significant amount of their capacity as the temperature decreases. Use lithium batteries when operating the device in below freezing conditions.
Maximizing the Battery Life
You can do several things to extend the life of the batteries.
•Reduce the backlight brightness (Adjusting the Backlight Brightness, page 13).
•Reduce the backlight timeout (Display Settings, page 14).
•Use battery save mode (Turning On Battery Save Mode, page 1).
•Decrease the map drawing speed (Configuring the Maps, page 15).
Turning On Battery Save Mode
You can use battery save mode to prolong the battery life.
From the app drawer, select Setup > Display > Battery Save > On.
In battery save mode, the screen shuts off when the backlight times out. You can select  to turn on the screen.
Long-Term Storage
When you do not plan to use the device for several months, remove the batteries. Stored data is not lost when batteries are removed.
Installing the Lithium-ion Battery
1Locate the Lithium-ion battery pack included in the product box.
2Align the metal contacts on the battery pack with the metal contacts on the back of the device.
3 Press and hold the battery pack in place.
4Turn the D-ring clockwise to secure the battery pack onto the device.
Charging the Battery Pack
NOTICE
To prevent corrosion, thoroughly dry the USB port, the weather cap, and the surrounding area before charging or connecting to a computer.
Do not attempt to use the device to charge a battery that was not provided by Garmin®. Attempting to charge a battery that was not provided by Garmin can damage the device and void the warranty.
Before you can connect the straight connector of the USB cable to your device, you may need to remove optional mount accessories.
NOTE: The device does not charge when outside the approved temperature range (Specifications, page 18).
You can charge the battery using a standard wall outlet or a USB port on your computer.
1 Pull up the weather cap from the mini-USB port .
ÀÁ
2 Plug the small end of the USB cable into the mini-USB port.
3Plug the USB end of the cable into an AC adapter or a computer USB port.
4 If necessary, plug the AC adapter into a standard wall outlet.
When you connect the device to a power source, the device turns on.
5 Charge the battery completely.
Introduction |
1 |
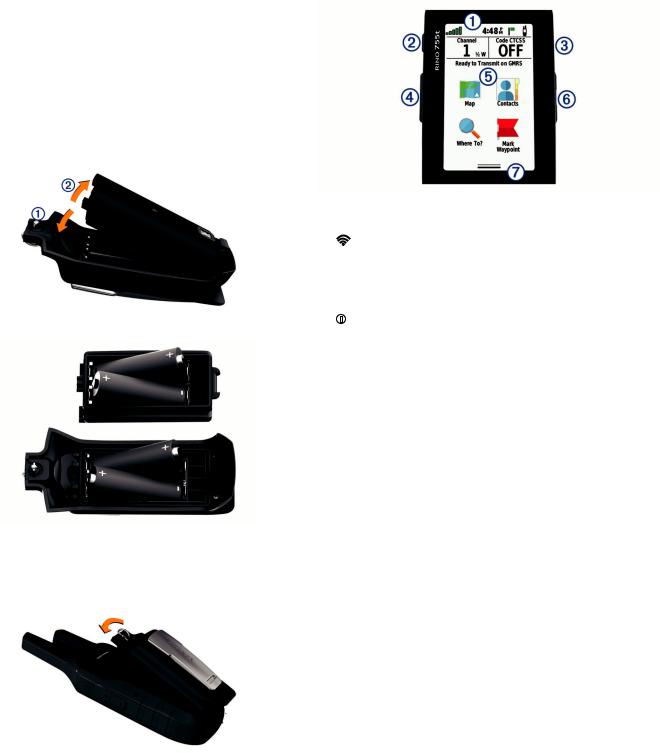
Installing AA Batteries
Instead of the Lithium-Ion battery pack (Installing the Lithium-ion Battery, page 1), you can use four alkaline, NiMH, or lithium AA batteries with an optional AA battery pack (not included). This is useful when you are on the trail and cannot charge the LithiumIon battery pack. Use NiMH or lithium batteries for best results.
The AA battery pack contains two parts.
1If necessary, turn the D-ring counter-clockwise, and pull up to remove the battery pack from the device.
2 Push down on the lever inside the AA battery pack to
À
separate the two parts .
Á
3 Insert four AA batteries, observing polarity.
4Starting at the bottom, connect the two parts of the battery pack together and press until the top locks into place.
5Align the metal contacts on the battery pack with the metal contacts on the back of the device.
6 Press and hold the battery pack in place.
7Turn the D-ring clockwise to secure the battery pack onto the device.
Turning On the Device
Hold  .
.
Device Operation
You can operate this device using a combination of hardware key and touchscreen actions.
À |
Widgets |
Swipe down to view widgets (Viewing Widgets, |
||||
|
|
|
|
|
page 5). |
|
|
|
|
|
|
|
|
Á |
|
|
|
|
Select to transmit an attention tone on the current |
|
|
|
(Call key) |
channel. |
|||
|
|
|
|
|
Hold to send an emergency alert (Emergency Alerts, |
|
|
|
|
|
|
page 4). |
|
|
|
|
|
|
You can customize the function of this key |
|
|
|
|
|
|
(Customizing the Keys, page 14). |
|
 |
|
|
|
|
Select to adjust the backlight. |
|
|
|
|||||
|
|
(Power key) |
Hold to turn the device on or off. |
|||
|
|
|
||||
à |
PTT |
Hold to transmit on the current radio channel |
||||
|
|
(Push-to-talk) |
(Transmitting, page 3). |
|||
|
|
|
||||
Ä |
Main menu |
Select the radio dashboard at the top of the main |
||||
|
|
|
|
|
menu to launch the radio app. |
|
|
|
|
|
|
You can customize the dashboard on the main menu |
|
|
|
|
|
|
(Customizing the Dashboard on the Main Menu, |
|
|
|
|
|
|
page 14). |
|
|
|
|
|
|
Select the shortcuts to launch applications. |
|
|
|
|
|
|
You can customize the shortcuts on the main menu |
|
|
|
|
|
|
(Customizing the Main Menu, page 14). |
|
Å |
Volume keys |
Select to adjust the volume. |
||||
|
|
|
|
|
|
|
Æ |
|
|
|
|
Swipe up to open apps and Connect IQ™ apps. |
|
|
|
|
||||
(App drawer) |
||||||
|
|
|
||||
|
|
|
|
|
|
|
Opening the App Drawer
The app drawer contains all of the applications used to operate this device.
1From the main menu, swipe up from the bottom of the screen.
2Swipe down from the top of the screen to return to the main menu without launching an application (optional).
Locking the Touchscreen
You can lock the screen to prevent inadvertent screen touches. Select  >
>  .
.
Acquiring GPS Signals
When you turn on your navigation device, the GPS receiver must collect satellite data and establish the current location. The time required to acquire satellite signals varies based on several factors, including how far you are from the location where you last used your navigation device, whether you have a clear view of the sky, and how long it has been since you last used your navigation device. The first time you turn on your navigation device, it may take several minutes to acquire satellite signals.
1 Turn on the device.
2 Wait while the device locates satellites.
3If necessary, go to an open area, away from tall buildings and trees.


 in the status bar indicates the satellite signal strength. When at least half the bars are filled, the device is ready for navigation.
2 |
Introduction |

Radio
In the United States and Canada, this device uses Family Radio Service (FRS) and General Mobile Radio Service (GMRS) for two-way communication with other compatible radio devices.
In Australia, this device uses UHF Citizen Band Radio Service (UHF CBRS), and in New Zealand, this device uses UHF Personal Radio Service (PRS) for two-way communication with other compatible radio devices.
When communicating with other Garmin Rino devices, additional features are available.
Transmitting
To communicate with other Rino and FRS/GMRS or UHF CBRS/PRS radio users, you must be on the same channel and code (Channels and Codes, page 3).
1 Hold PTT.
2 Speak into the front of the device.
3After you are finished speaking, release PTT.
After you release PTT, the radio transmits your position information, and you cannot hear incoming transmissions until your transmission is complete . A roger tone sounds on your radio and on the radios receiving your transmission to confirm that the transmission is complete.
NOTE: You can change or disable the roger tone (Setting the Device Tones, page 15).
The Radio App
Using the radio app, you can view information about the radio, control the radio channel and squelch codes, and customize the radio features.
Icons along the top of the radio page provide useful information about the radio.


 : Indicates the activity status of the radio. When an arrow is pointing at the radio, the radio is receiving a transmission. When an arrow is pointing away from the radio, the radio is transmitting.
 : The radio is ready to transmit position information (Peer-to- Peer Positioning, page 4).
 : Weather alerts are enabled (Radio App Settings, page 4).
 : The radio is muted (Adjusting the Radio Volume, page 3).
Opening the Radio App
You can manage your channel, code, and other radio settings in the radio app.
From the app drawer, select Radio.
TIP: You can also select the radio dashboard at the top of the main menu to open the radio app.
Adjusting the Radio Volume
1From any screen, select the volume keys to change the radio volume.
The volume screen appears.
2 Select 

 to mute or restore the radio volume (optional).
Adjusting the Squelch Level
You can adjust the sensitivity level of the squelch to filter out background noise. When you adjust the squelch level higher, fewer weak background signals are heard.
1When you hear unwanted background noise, from any screen, select the volume keys.
The volume screen appears.
2Select  under the Squelch bar.
You should increase the squelch level until you no longer hear the unwanted background noise.
Channels and Codes
To communicate with other Rino and FRS/GMRS or UHF CBRS/PRS radio users, you must be on the same channel.
Rino devices are compatible with third-party FRS/GMRS or UHF CBRS/PRS radios as long as the radios use standard FRS/ GMRS or CBRS/PRS frequencies. A list of all frequencies used by this device is available in the product specifications (Radio Frequency Charts, page 18).
NOTE: GMRS frequencies are regulated by the FCC in the United States. To transmit on GMRS frequencies, you must obtain a license from the FCC (FCC Licensing Information, page 20).
US and Canada Channel Number |
Channel Type |
1 through 7 |
GMRS and FRS channels |
|
|
8 through 14 |
FRS channels |
|
|
15 through 22 |
GMRS channels |
|
|
15R through 22R |
Repeater channels |
|
|
Australia and New Zealand Channel |
Channel Type |
Number |
|
1 through 40 |
UHF CBRS/PRS channels |
|
|
1R through 8R |
CBRS/PRS repeater channels |
|
|
Squelch codes allow you to filter calls from other users on the same channel, so you hear only the radios you want to hear. The device has two different squelch modes, Continuous Tone Controlled Squelch System (CTCSS) and Digital-Coded Squelch (DCS). Calls on the channel that are not using the same squelch code in the same squelch mode are ignored.
NOTE: Squelch codes do not make your conversation private. Anyone on the same channel can hear your conversation.
Squelch Tone |
Squelch Codes |
Mode |
|
CTCSS |
1 through 38 |
DCS |
Listed in the product specifications (Radio |
|
Frequency Charts, page 18) |
Selecting a Channel
1 From the radio app, select Channel.
2 Select  or
or  to change the channel.
3 Select  .
.
Selecting a Squelch Code
1 From the radio app, select Code CTCSS or Code DCS. 2 Select  or
or  to change the code.
NOTE: Selecting Off allows you to hear everything on the channel.
3 Select  .
.
NOTE: If you cannot hear calls on the same channel with the same code, make sure all the radios are using the same squelch tone mode (Changing the Squelch Tone Mode, page 3).
Changing the Squelch Tone Mode
This device can use two types of squelch tone modes, CTCSS and DCS. If you cannot hear calls on the same channel with the same code, make sure all the radios are using the same squelch tone mode.
1From the radio app, select  > Radio Setup > Squelch Tone Mode.
2 Select a squelch tone mode.
Monitoring a Channel for Activity
You can monitor a single channel for any activity, including static and weak voice signals. This is helpful if a signal is going out of range.
1 From the radio app, select the channel you want to monitor.
Radio |
3 |

2 Select Monitor.
Scanning Channels
You can scan the channels for voice activity. This can help you find a channel with light activity for your group to use, or to find other radio users in the area.
From the radio app, select Scan.
Configuring the Scan List
By default, all available channels are included when scanning. You can configure the scan list to include only specific channels and squelch codes. Selecting specific channels and codes reduces the scan time and may help prevent a missed transmission.
1 From the radio app, select  > Scanlist Setup.
2 Select one or more channels to remove from the list.
3To restrict the scan to the current squelch code, select  >
>
Scan Current Codes (optional).
4 Select  .
.
Repeater Channels
This device can use GMRS repeater channels in the US, and CBRS/PRS repeater channels in Australia and New Zealand. GMRS repeater channels are not available in Canada.
Repeater channels use repeaters, when available, to enable communication around obstacles or increase transmission distance. Position reporting is not allowed by the FCC on GMRS repeater channels.
Peer-to-Peer Positioning
You can send your location information to other Rino users using peer-to-peer positioning. Through peer-to-peer positioning, you can also track the movement of other Rino users and navigate to their locations.
Peer-to-peer positioning is enabled by default, and your position information is sent when you press the PTT key (push-to-talk) or the  key (call).
NOTE: You can send location information only once every 30 seconds, due to FCC restrictions.
After you send location information, the  icon changes to a countdown timer so you know when location information can be sent again.
Polling Other Rino Users
You can request position updates for other Rino users who are in your saved contacts (Saving a New Contact, page 4).
1 From the contacts app, select a saved contact.
2Select Poll Location.
The location of the contact is updated on the map.
Editing Your Contact Info
From the radio app, you can change the symbol and name transmitted to other Rino users through peer-to-peer positioning.
•To change your name, select the name field.
•To change your symbol, select the symbol.
Contacts
You can save information about another Rino user as a contact. You can view location information and navigate to the location of users in your contacts list.
Saving a New Contact
The first time the device receives a peer-to-peer positioning signal from another Rino user, the new contact page appears. To save the contact details or navigate to the contact in the future, you must save the new contact in your contacts list.
From the new contact page, select OK.
The new contact is saved in your contacts list.
Viewing Contacts on the Map
1From the main menu, select Contacts.
TIP: To open the contacts app from the radio app, select  .
.
2 Select a contact.
3 Select View Map.
Navigating to a Contact
1From the app drawer, select Contacts.
TIP: To open the contacts app from the radio app, select  .
.
2 Select a contact.
3 Select View Map > Go.
4 Follow  to the contact's location.
Notes
You can send short notes to other Rino users on your current channel and code. You can review previously received notes from your contacts. You can edit and save favorite notes to quickly send them later.
NOTE: Notes transmit to all users on your current channel and code, not just to your saved contacts.
Creating, Saving, and Sending Notes
1From the app drawer, select Notes.
TIP: To open the notes app from the radio app, select  .
.
2 Select Send Note > New Note.
3 Enter the note text.
Due to FCC regulations, you can enter a maximum of 13 characters in a note.
4 Select  .
.
5Select an option:
•To send the note without saving it, select Send Note.
•To save the note without sending it, select Save.
•To save the note and send it, select Send and Save.
Emergency Alerts
You can send an emergency alert to all Rino users on the current channel and code. Users can respond to an emergency alert to immediately begin navigating to your position.
Sending an Emergency Alert
To send emergency alerts to other Rino and FRS/GMRS or UHF CBRS/PRS radio users, you must be on the same channel.
1 Hold  .
.
2Select Yes.
The device sends an emergency alert every 60 seconds until another Rino user responds to the alert or you cancel the alert.
Responding to an Emergency Alert
To receive emergency alerts from other Rino and FRS/GMRS or UHF CBRS/PRS radio users, you must be on the same channel.
1 When you receive an emergency alert, select Help.
The device sends a response to the alert sender, and begins navigation to the sender's location automatically.
2 Follow  to the sender's location.
Radio App Settings
From the radio app, select  .
.
Turn Radio Off: Turns off the radio functionality. You cannot make or receive transmissions when the radio functionality is turned off.
4 |
Radio |

Enable Weather Alert: Enables weather alert tones on the current channel or on all channels (Advanced Radio Setup, page 5).
Radio Setup
From the radio app, select  > Radio Setup.
Send Location: Enables sending position information when you transmit to other Rino users.
Allow Polling: Allows polling requests from other Rino users.
Power Level: Sets the power level used to transmit using GMRS channels in the US and Canada, and UHF CBRS/PRS channels in Australia and New Zealand. FRS channels in the US and Canada can transmit using only 1/2 W power. If the battery level is too low to support transmissions using higher power levels, the value of this setting decreases automatically.
Squelch Tone Mode: Sets the squelch mode (Changing the Squelch Tone Mode, page 3).
Repeater Channel: Enables the GMRS repeater channels in the US, and the CBRS/PRS repeater channels in Australia and New Zealand. GMRS repeater channels are not available in Canada (Repeater Channels, page 4).
Advanced Radio Setup
From the radio app, select  > Radio Setup > Advanced Setup.
Headset Type: Sets the type of accessory headset or microphone you are using with the device (Headsets and Microphones, page 17).
VOX Level: Sets the sensitivity of a connected Voice Operated Transmission (VOX) accessory. A lower VOX setting is recommended for quiet environments, and a higher VOX setting is recommended for noisy environments.
Weather Alert: Sets the channels that are monitored for weather alerts when weather alerts are enabled.
Connected Features
Connected features are available for your Rino 750/755t device when you connect the device to a compatible smartphone using Bluetooth® wireless technology. Some features require you to install the Garmin Connect™ Mobile app on the connected smartphone. Go to www.garmin.com/apps for more information.
Phone notifications: Displays phone notifications and messages on your Rino 750/755t device.
Activity uploads to Garmin Connect: Automatically sends your activity to your Garmin Connect account as soon as you finish recording the activity.
Connect IQ: Allows you to extend your device features with widgets, data fields, and apps.
Software Updates: Allows you to update your device software.
EPO Downloads: Allows you to download an extended prediction orbit file to quickly locate GPS satellites and reduce the time it takes to calculate your position.
Live Geocache Data: Provides free and subscription-based services to view live geocache data from www.geocaching.com.
Weather: Allows you to view current weather conditions and weather forecasts. You can also view weather radar on the map.
Pairing Your Smartphone
1Go to garmin.com/apps, and download the Garmin Connect Mobile app to your smartphone.
2 Bring your smartphone within 10 m (33 ft.) of your device.
3On your device, from the app drawer, select Setup > Bluetooth, and follow the on-screen instructions.
4From your smartphone, open the Garmin Connect Mobile app, and follow the on-screen instructions to connect a device.
The instructions are provided during the initial setup, or can be found in the Garmin Connect Mobile app help.
Phone notifications require a compatible smartphone equipped with Bluetooth Smart wireless technology. Go to garmin.com/ble for compatibility information.
Viewing Widgets
Your device is preloaded with a widget that displays the status of your connections and other information. Additional widgets can be added from the Connect IQ app (Connect IQ Features, page 5).
1 Swipe down from the top of the screen.
2 Swipe left or right to view more widgets.
3 Select  to return to the previous screen.
Connect IQ Features
You can add Connect IQ features to your device from Garmin and other providers using the Garmin Connect Mobile app. You can customize your device with data fields, widgets, and apps.
Data Fields: Allow you to download new data fields that present sensor, activity, and history data in new ways. You can add Connect IQ data fields to built-in features and pages.
Widgets: Provide information at a glance, including sensor data and notifications.
Apps: Add interactive features to your watch, such as new outdoor and fitness activity types.
Downloading Connect IQ Features
Before you can download Connect IQ features from the Garmin Connect Mobile app, you must pair your Rino device with your smartphone.
1From the settings in the Garmin Connect Mobile app, select
Connect IQ Store.
2 If necessary, select your device.
3 Select a Connect IQ feature.
4 Follow the on-screen instructions.
Weather
The weather app preloaded on this device provides weather information from two sources.
•When connected to a smartphone, the device provides current weather conditions, forecasts, and weather-radar information from the Internet.
•When set to monitor for weather broadcasts, the device can receive radio-transmitted Specific Area Message Encoding (SAME) county weather alerts.
Monitoring SAME Weather Alerts
SAME weather alerts allow you to receive radio-transmitted county weather alerts on your device.
NOTE: SAME weather alerts are available in the US only. 1 From the radio app, select Weather.
2Select a channel.
You can receive weather alerts only on the selected weather channel.
When you receive a weather alert on the selected channel, a message appears containing the alert information.
The weather radio must remain on to receive weather alerts.
Connected Features |
5 |
Loading...