


 Loading...
rino® 600 series
owner’s manual
© 2011–2013 Garmin Ltd. or its subsidiaries
All rights reserved. Under the copyright laws, this manual may not be copied, in whole or in part, without the written consent of Garmin. Garmin reserves the right to change or improve its products and to make changes in the content of this manual without obligation to notify any person or organization of such changes or improvements. Go to www.garmin.com for current updates and supplemental information concerning the use of this product.
Garmin®, the Garmin logo, Rino®, BlueChart®, and City Navigator® are trademarks of Garmin Ltd. or its subsidiaries, registered in the USAand other countries. HomePort™, BaseCamp™, chirp™, andANT+™ are trademarks of Garmin Ltd. or its subsidiaries.These trademarks may not be used without the express permission of Garmin.
Windows® is a registered trademark of Microsoft Corporation in the United States and/or other countries. Mac® is a registered trademarks ofApple Computer, Inc. microSD™ and the microSDHC logo are trademarks of SD-3C, LLC. Other trademarks and trade names are those of their respective owners.

Table of Contents
Getting Started 3
Keys 3
Manual Conventions 4
Battery Information 4
Acquiring Satellite Signals 6
Registering Your Device 6
Turning On the Backlight 6
Locking the Screen 7
Radio 8
About the Radio 8
Choosing a Channel 8
Radio Settings 9
About Contacts 10
Notes 10
About Peer-to-Peer Positioning 11
Using SAME Weather Alerts 12
Radio Page Status Indicators 13
Table of Contents
Waypoints and Tracks 15
Waypoints 15 About Sharing Data 16 Tracks 16 Navigating a Saved Track 17
Navigation 18
Navigating to a Destination 18 Map 19 Compass 19 Navigating to a Contact 21 Geocaches 21 Routes 21 Using Sight ‘N Go 23
Camera and Photos 24
Taking a Photo 24 Viewing Photos 24
Customizing Your Device 26
Customizing the Data Fields 26 Customizing the Home Screen 26 Creating a Custom Profile 26 Customizing Specific Pages 27
Rino 600 Series Owner’s Manual |
1 |

Table of Contents
System Settings 28
Display Settings 29
Setting the Device Tones 29
Map Settings 29
Tracks Settings 30
Changing the Units of Measure 31
Time Settings 31
Position Format Settings 32
Heading Settings 32
Altimeter Settings 33
Geocache Settings 34
Routing Settings 34
Marine Map Settings 35
Fitness 36
Resetting Data 36
Tools 37
Trip Computer 37
Elevation Plot 37
Viewing the Calendar and
Almanacs 37
Calculating the Size of an Area 37
Setting an Alarm 38
Opening the Stopwatch 38
Device Information 39
Updating the Software 39 Viewing Device Information 39 Specifications 39 About the Batteries 40 Caring for the Device 41 Data Management 42 Additional Maps 45 Optional Accessories 45 Data Field Options 46 Troubleshooting 51 FCC Licensing Information 53
Index 54
2 |
Rino 600 Series Owner’s Manual |

Getting Started
warning
See the Important Safety and Product Information guide in the product box for product warnings and other important information.
When using your device the first time, you should complete the following tasks to set up the device and get to know the basic features.
1.Install the batteries (page 4).
2.Register the device (page 6).
3.Acquire satellites (page 6).
4.Set up the radio (page 9).
5.Mark a waypoint (page 15).
6.Record a track (page 17).
7.Navigate to a destination (page 18).
8.Calibrate the compass (page 19).
Getting Started
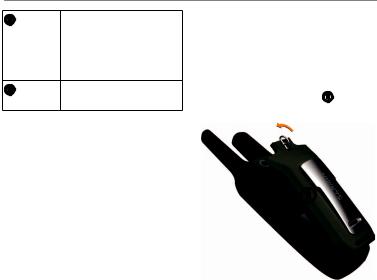
Keys
Key Description
Select to send out a call tone. If enabled
(page 11), the call key sends your position when released.
Rino 600 Series Owner’s Manual |
3 |
Getting Started
Hold to turn on or off the device. Select to adjust backlight, volume, squelch level, and to lock or unlock the screen.
Hold to talk. PTT stands for push-to-talk.
Manual Conventions
All the pages are found on the home screen. Use  or
or  to scroll through the pages.The small arrows (>) used in the text indicate that you should select a series of items in order, for example, “Select Delete > Yes.”
Battery Information
The device operates on the included lithium-ion battery pack or fourAA batteries.
For tips on maximizing battery life and other battery information, see page 40.
Installing the Lithium-ion Battery
note:The lithium-ion battery pack can be used only with the Rino® 650 and 655t.
1.Locate the battery pack that came in the product box.
2.Align the metal contacts on the battery pack with the metal contacts on the back of the device.
3.Gently press the battery pack into place.
4 |
Rino 600 Series Owner’s Manual |
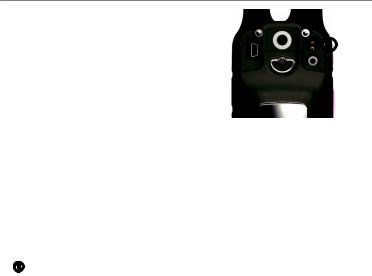
4. Turn the D-ring clockwise.
Charging the Lithium-ion Battery
Before you use the device the first time, charge the battery.
Charging a fully depleted battery takes 6 hours.The device will not charge when outside the temperature range from 32°F to 113°F (from 0°C to 45°C).
1.Plug theAC charger into a standard wall outlet.
2.Lift weather cap.
3.Plug the small end of theAC charger into the two-pin connector
.
Getting Started
4. Charge the device completely.
Afully charged battery can run for up to 14 hours before it must be recharged.
Installing AA Batteries
Instead of the lithium-ion battery pack, you can use alkaline, NiMH, or lithium batteries.This is especially handy when you are on the trail and cannot charge the lithium-ion battery pack. Use NiMH or lithium batteries for best results.
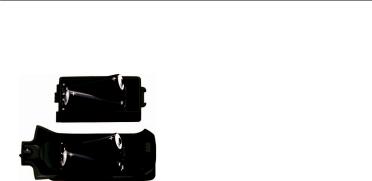
1.Turn the D-ring counter-clockwise, and remove the cover.
Rino 600 Series Owner’s Manual |
5 |
Getting Started
2.Lift the latch on the cover to separate the battery compartment.
3.Insert fourAAbatteries, observing polarity.
4.Replace the battery cover, and turn the D-ring clockwise.
5.Update the battery type in the system settings (page 40).
Acquiring Satellite Signals
It may take 30 to 60 seconds to acquire signals.
1.Go outdoors to an open area.
2.Turn on the device.
3.Wait while the device searches for satellites.
Aquestion mark flashes while the device determines your location.
The GPS bars indicate satellite strength.When the bars are green, the device has acquired satellite signals.
Registering Your Device
•Go to http://my.garmin.com.
•Keep the original sales receipt, or a photocopy, in a safe place.
Turning On the Backlight
The backlight will turn off after a period of inactivity.To change the backlight timeout, see page 29.
•Select .
.
•Touch the screen.
Alerts and messages also activate the backlight.
6 |
Rino 600 Series Owner’s Manual |

Getting Started
Adjusting the Backlight Brightness
The backlight levels vary for the different power sources. For example, the highest backlight setting while running onAAbatteries is lower than the highest while running on the lithium-ion battery.This is to extend theAAbattery life.
1.While the device is on, select .
.
2.Use + and - to adjust the brightness level.
Locking the Screen
note:This action does not lock the keys.
1.Select .
.
2.Select Lock Screen.
Rino 600 Series Owner’s Manual |
7 |

Radio
Radio
The radio page provides the user interface for Family Radio Service (FRS) and General Mobile Radio Service (GMRS) radio operations.
About the Radio
The Rino has a total of 30 channels and 121 squelch codes.
Channel |
Frequency |
1-7 |
GMRS and FRS |
|
channels. |
8-14 |
FRS channels. |
15-22 |
GMRS channels. |
15R-22R |
Repeater channels |
|
(page 9). |
GMRS frequencies are regulated by the FCC. In order to transmit on GMRS frequencies, you must obtain a license from the FCC (page 53).
Muting the Radio
1.Select .
.
2.Select Volume.
Choosing a Channel
1.Select Radio > Channel.
2.Use + or - to select a channel.
Scanning Channels
You can scan the channels for voice activity.
Select Radio > Scan.
Setting Up a Scan List
You can pick which channels and codes to scan. Selecting specific channels and codes reduces the scan time and helps prevent missing a transmission.
1.Select  > Setup Scanlist.
2.Select a channel to add.
3.Select  .
.
8 |
Rino 600 Series Owner’s Manual |
Monitoring for Activity
You can monitor a single channel for any activity, including static and weak voice signals.This is helpful if a signal is going out of range.
Select Radio > Monitor.
Radio Settings
Select  > Setup Radio.
•Send Location—enables you to send your current location after each transmission (page 11).
•Allow Polling—enables polling. Polling allows another Rino user to get your location by sending a poll request.
•Power Level—adjusts power level on GMRS frequencies.
•WeatherAlert—allows you to search for weather alerts on the current channel or all available channels.
Radio
•Squelch Tone Mode:
◦◦CTCSS—ContinuousTone Controlled Squelch System allows you to ignore unwanted calls from persons using the same channel.
◦◦DCS—Digital-Coded Squelch allows you to ignore unwanted calls from persons using the same channel.
•Repeater Channel—enables the GMRS repeater channels 15R-22R. GMRS repeater channels are
not available on devices sold in Canada. Position reporting is not allowed by the FCC on repeater channels.
•Headset Type—allows you to select the type of headset you are using.To purchase accessories, go to http://buy.garmin.com or contact your Garmin dealer.
Rino 600 Series Owner’s Manual |
9 |

Radio
•Vox Level—Voice operated transmission controls the sensitivity level of anyVox accessory.
About Contacts
The first time a signal is received from another Rino user, the new contact page appears. From that page, you can show their location on the map, navigate to their location (page 21), or add them to your contacts list.
Adding a New Contact
When a new contact signal is received, the new contact page appears.
Select OK to save the contact.
Editing Contacts
1.Select Contacts.
2.Select a contact.
3.Select an item.
4.Select  .
.
Viewing Contacts on the Map
1.Select Contacts.
2.Select a contact.
3.Select View Map.
Notes
note: Notes transmit to all users on your current channel and code.
You can send notes to other Rino users on your current channel and code.You can review previously received notes from your contacts.You can edit and save favorite notes to quickly send them later.
Creating a Note
1.Select Notes > <Send Note> <New Note>.
2.Write the note.
The maximum character limit is 13.
3.Select  .
.
4.Select an option:
10 |
Rino 600 Series Owner’s Manual |

•Select Send Note to send without saving.
•Select Save.
•Select Send and Save.
Sending a Favorite Note
1.Select Notes > <Send Note>.
2.Select a note to send.
3.Select Send Note.
About Peer-to-Peer Positioning
note: Locations may only be sent once every 30 seconds, due to FCC restrictions.
You can send your location to another Rino using peer-to-peer positioning. You can also track the movement of other Rino users and navigate to their locations.
Radio
Enabling Peer-to-Peer Positioning
Select Setup > Radio > Send Location > On.
Sending a Location
Before you can send a location, you must enable peer-to-peer positioning (page 11).
1.Select Share Wirelessly > Send.
2.Select Use FRS/GMRS.
3.Select a category.
4.Select an item.
5.Select Send.
Rino 600 Series Owner’s Manual |
11 |

Radio
Using SAME Weather Alerts
note: SAME weather alerts are available in the US only on the Rino 650 and 655t.
SAME (SpecificArea Message Encoding) weather alerts allow you to receive county weather alerts on your device.
1.From the radio page, select
Weather.
2.Select a channel.
note:You can receive SAME weather alerts only on the current weather channel.
The weather radio must remain on until alerts are received.
Viewing SAME Weather Alerts on the Map
When you receive a SAME weather alert, a message appears containing the alert information.The device shows your county map with color-coded watches and warnings.
Select Weather Map to view the weather alert on the map.
You can scan over a county warning on the map and select the information button to see more detailed information.
12 |
Rino 600 Series Owner’s Manual |

Radio Page Status
Indicators
Message |
Description |
Activity on |
A signal is being |
channel |
received, but does |
|
not match the current |
|
code. |
Radio Off |
The 2-way radio is |
|
turned off. |
Ready to |
FRS channel is |
transmit of |
selected and the |
FRS |
device can transmit. |
Ready to |
GMRS channel is |
transmit on |
selected and the |
GMRS |
device can transmit. |
Receiving |
The device |
transmission |
is receiving a |
|
transmission on the |
|
selected channel. |
Ready to |
The device is set to |
receive |
a weather channel |
weather |
and waiting to receive |
|
weather broadcast. |
|
|
Radio |
|
|
|
Receiving |
|
The device is |
weather |
|
receiving a weather |
|
|
broadcast. |
|
|
|
Radio Status |
Description |
|
Radio -- |
Radio feature is off. |
|
Radio 1/2W |
Transmit power at |
|
|
1/2 watts. FRS |
|
|
channels transmit on |
|
|
this level only. |
|
Radio 1W |
Transmit power at |
|
|
1 watts. |
|
Radio 2W |
Transmit power at |
|
|
2 watts. |
|
Radio 5W |
Transmit power at |
|
|
5 watts. |
|
note: If your device battery is too low, the power level is decreased automatically.The transmit power is limited to 2 watts in Canada.The maximum output power of the Rino 610 is 1Watt.
Rino 600 Series Owner’s Manual |
13 |
Radio
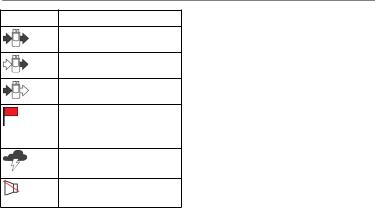
Status Bar Description
The radio is on.
The radio is receiving.
The radio is transmitting.
Peer-to-peer is enabled and is ready to transmit the position.
Weather alert is turned on.
The radio is muted (page 8).
14 |
Rino 600 Series Owner’s Manual |

Waypoints and Tracks
Waypoints
Waypoints are locations you record and store in the device.
Creating a Waypoint
You can save your current location as a waypoint.
Select Mark Waypoint.
Finding a Waypoint
1.Select Where To? > Waypoints.
2.Select a waypoint.
Editing a Waypoint
Before you can edit a waypoint, you must create a waypoint.
1.Select Waypoint Manager.
2.Select a waypoint.
3.Select an item to edit.
4.Enter the new information.
Waypoints and Tracks
5. Select  .
.
Deleting a Waypoint
1.Select Waypoint Manager.
2.Select a waypoint.
3.Select Delete Waypoint.
Increasing the Accuracy of a Waypoint Location
Waypoint averaging allows you to increase the accuracy of a waypoint location by collecting multiple samples of the waypoint location.
1.Select WaypointAveraging.
2.Select a waypoint.
3.Move to the location.
4.Select Start.
5.When the sample confidence status bar reaches 100%, select Save.
For best results, collect four to eight samples for the waypoint, waiting at least 90 minutes between samples.
Rino 600 Series Owner’s Manual |
15 |

Waypoints and Tracks
About Sharing Data
Your device can send or receive data when connected to another compatible device.You can share waypoints, geocaches, routes, and tracks.
Sending and Receiving Data Wirelessly
Before you can share data wirelessly usingANT+™ wireless technology, you must be within 10 feet (3 m) of the compatible Garmin device.
1.Select Share Wirelessly.
2.Follow the on-screen instructions.
Tracks
Atrack is a recording of your path. The track log contains information about points along the recorded path, including time, location, and elevation for each point.
Managing Track Log Recording
1.Select Setup > Tracks > Track Log.
2.Select Record, Do Not Show or Record, Show On Map.
If you select Record, Show On Map, a line on the map indicates your track.
3.Select Record Method.
4.Select an option:
•To record tracks at a variable rate that creates an optimum representation of your tracks, select Auto.
•To record tracks at a specified distance, select Distance.
•To record tracks at a specified time, select Time.
5.Select Recording Interval.
6.Select an option to record tracks more or less often.
16 |
Rino 600 Series Owner’s Manual |
Loading...