


 GARDENA®
HE 32 |
Art. 4002 |
HE 36 |
Art. 4000 |
HE 40 |
Art. 4001 |
MulchCut HE 36 |
Art. 4008 |
MulchCut HE 40 |
Art. 4009 |
DGebrauchsanweisung
Hattrick
GB Operating Instructions
Hattrick
FMode d’emploi
Tondeuse Hattrick
NL Gebruiksaanwijzing
Hattrick
SBruksanvisning
Hattrick Gräsklippare
IIstruzioni per l’uso
Hattrick
EManual de instrucciones
Hattrick
PInstruções de utilização
Hattrick
D
Bitte lesen Sie diese Gebrauchs- |
6. |
Conseils pour tondre et aérer |
|
4. |
Montaggio |
48 |
anweisung vor Montage und |
|
correctement |
26 |
5. |
Messa in uso |
49 |
Inbetriebnahme Ihres Gerätes |
7. |
Entretien et rangement |
28 |
6. |
Modalità funzionali |
50 |
sorgfältig. |
8. |
Incidents de fonctionnement |
29 |
7. |
Manutenzione |
52 |
Beim Lesen der Gebrauchs- |
9. |
Conseils de sécurité et |
|
8. |
Anomalie di funzionamento |
53 |
anweisung bitte die Umschlag- |
|
précautions d’emploi |
30 |
9. |
Norme d’uso e di sicurezza |
54 |
seiten herausklappen. |
|
Garantie |
72 |
Garanzia |
|
73 |
||||
Inhaltsverzeichnis |
Seite |
N |
|
E |
|
|
||||
1. |
Technische Daten |
7 |
|
|
|
|||||
2. |
Hinweise zur |
|
Lees deze gebruiksaanwijzing |
Lea detenidamente estas instruc- |
|
|||||
|
Gebrauchsanweisung |
7 |
voor de montage en ingebruikname |
ciones de este montaje y de la |
|
|||||
3. |
Ordnungsgemäßer Gebrauch |
7 |
van het apparaat zorgvuldig door. |
puesta en marcha del aparato. |
|
|||||
4. |
Montage |
7 |
Bij het lezen van de gebruiksaan- |
Durante la lectura, rogamos des- |
|
|||||
5. |
Inbetriebnahme |
8 |
wijzing de pagina’s met de afbeel- |
doble la portada. |
|
|
||||
6. |
Richtiges Mähen und Lüften |
9 |
dingen openslaan. |
|
Indice |
Página |
||||
7. |
Wartung, Pflege und |
|
Inhoudsopgave |
|
||||||
|
Pagina |
1. |
Datos técnicos |
|
56 |
|||||
|
Aufbewahrung |
11 |
|
|||||||
|
1. |
Technische gegevens |
32 |
2. |
Indicaciones al manual |
|
|
|||
8. |
Behebung von Störungen |
12 |
|
|
||||||
2. |
Aanwijzing bij de gebruiks- |
|
|
de instrucciones |
|
56 |
||||
9. |
Hinweise zur ordnungs- |
|
|
|
|
|||||
|
|
aanwijzingen |
32 |
3. |
Uso correcto |
|
56 |
|||
|
gemäßen Benutzung, |
|
|
|
||||||
|
|
3. |
Juiste gebruik |
32 |
4. |
Montaje |
|
56 |
||
|
Sicherheitshinweise |
13 |
|
|||||||
|
4. |
Montage |
32 |
5. |
Puesta en servicio |
|
57 |
|||
Garantie |
72 |
|
||||||||
5. |
Ingebruikname |
33 |
6. |
Cortar y airear correctamente |
58 |
|||||
G |
|
|||||||||
|
6. |
Juiste manier van maaien |
|
7. |
Mantenimiento y conservación |
59 |
||||
|
|
en verticuteren |
34 |
8. |
Solucionar averías |
|
61 |
|||
Please read these operating |
|
7. |
Verzorging, onderhoud |
|
9. |
Indicaciones para un correcto |
|
|||
instructions carefully before as- |
|
en opslag |
36 |
|
uso / indicaciones de seguridad |
62 |
||||
sembling and using your lawn |
|
8. |
Opheffen van storingen |
37 |
Garantía |
|
73 |
|||
mower. |
|
9. |
Aanwijzing voor het juiste |
|
P |
|
|
|||
Unfold inside cover pages to read |
|
gebruik, veiligheidstips |
38 |
|
|
|||||
the operating instructions. |
|
Garantie |
72 |
|
|
|||||
|
|
|
S |
|
Leia atentamente estas instruções |
|||||
Contents |
Page |
|
antes de montar ou utilizar esta |
|
||||||
1. |
Technical data |
16 |
|
máquina de cortar relva Hattrick. |
|
|||||
2. |
Operating instructions |
|
Läs omsorgsfullt igenom bruks- |
Para ler este manual de utilização, |
||||||
|
information |
16 |
anvisningen och säkerhetsföre- |
desdobre a capa. |
|
|
||||
3. |
Product use |
16 |
skrifterna innan Du tar Hattrick |
Indice |
Página |
|||||
4. |
Assembly |
16 |
i bruk. |
|
||||||
|
1. |
Dados técnicos |
|
64 |
||||||
5. |
Using the product |
17 |
Ha omslaget utvikt när Du läser |
|
||||||
2. |
Informação sobre as |
|
|
|||||||
6. |
Information concerning correct |
|
bruksanvisningen. |
|
|
|
||||
|
|
|
instruções de manejo |
|
64 |
|||||
|
mowing and aerating |
18 |
Innehållsförteckning |
|
|
|
||||
|
Sida |
3. |
Finalidade do produto |
|
64 |
|||||
7. |
Maintenance, service, storage |
19 |
|
|||||||
1. |
Tekniska data |
40 |
4. |
Montagem |
|
64 |
||||
8. |
Trouble-shooting |
21 |
|
|||||||
2. |
Viktig information |
40 |
5. |
Utilização do produto |
|
65 |
||||
9. |
Advice for proper use / |
|
|
|||||||
|
3. |
Avsedd användning |
40 |
6. |
Informações sobre a forma |
|
|
|||
|
safety instructions |
22 |
|
|
||||||
|
4. |
Montering |
40 |
|
correcta de cortar e aerificar |
|
|
|||
Guarantee |
72 |
|
|
|
||||||
5. |
Drift |
41 |
|
áreas relvadas |
|
66 |
||||
F |
|
|
|
|||||||
|
6. |
Rätt klippning och luftning |
42 |
7. |
Manutenção, serviço, |
|
|
|||
|
7. |
Underhåll, skötsel och |
|
|
armazenamento |
|
68 |
|||
Nous vous remercions de bien |
|
|
förvaring |
43 |
8. |
Guia de avarias |
|
69 |
||
vouloir lire attentivement ce mode |
8. Felsökning |
45 |
9. |
Conselhos para uma utilização |
|
|||||
d’emploi avant le montage et l’utili- |
9. Säkerhetsföreskrifter |
46 |
|
correcta / instruções de |
|
|
||||
sation de votre tondeuse Hattrick. |
Garanti |
73 |
|
segurança |
|
70 |
||||
Dépliez le 2ème volet de la couver- |
I |
|
Garantia |
|
73 |
|||||
ture pour avoir les illustrations |
|
|
|
|
|
|
||||
sous les yeux pendant la lecture |
|
|
|
|
|
|||||
du mode d’emploi. |
|
Prima di montare e mettere in |
|
|
|
|
||||
|
uso l’attrezzo, leggere attentamente |
|
|
|
|
|||||
|
|
|
|
|
|
|
||||
Contenu |
Page |
le istruzioni tenendo aperto il |
|
|
|
|
|
|||
1. |
Caractéristiques techniques |
24 |
pieghevole per avere sott’occhio |
|
|
|
|
|||
2. |
Informations sur le mode |
|
i disegni esplicativi. |
|
|
|
|
|
||
|
d’emploi |
24 |
Indice |
Pagina |
|
|
|
|
||
3. |
Domaine d’utilisation |
24 |
|
|
|
|
||||
1. |
Dati tecnici |
48 |
|
|
|
|
||||
4. |
Montage |
24 |
|
|
|
|
||||
2. |
Avvertenze |
48 |
|
|
|
|
||||
5. |
Mise en marche |
25 |
|
|
|
|
||||
3. |
Uso corretto |
48 |
|
|
|
|
||||
|
|
|
|
|
|
|
||||
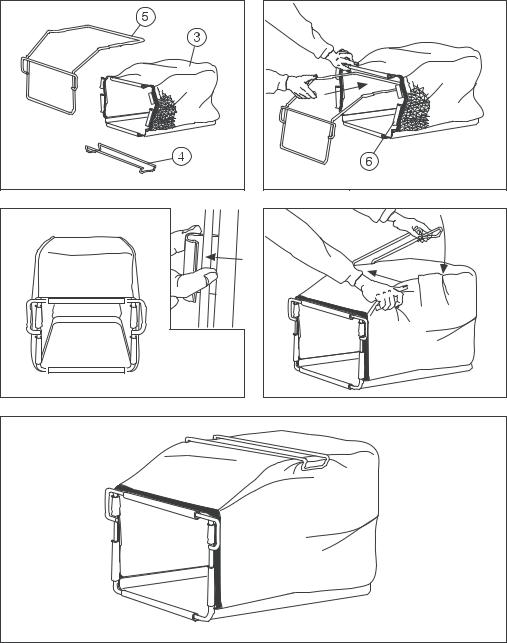
Montage des Grasfangsackes |
S Montering av grässamlarsäcken |
Mounting the grass catcher |
I Montaggio del sacco raccoglierba |
Montage du sac de ramassage |
E Montaje del saco de recogida |
Montage van de grasvangzak |
P Montagem do cesto aparador de relva |
1 |
3 |
2 |
4 |
5

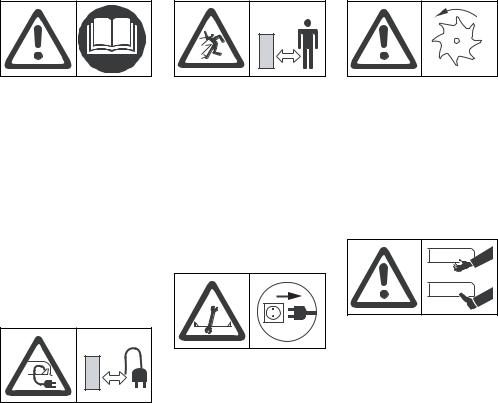
Beachten Sie die Sicherheitshinweise auf dem Gerät:
Please adhere to the following safety instructions on the casing: Veuillez respecter les consignes de sécurité figurant sur l’appareil : Houdt rekening met de de veiligheidsaanwijzingen op het apparaat: Följ bruksanvisningen noga:
Attenzione ai simboli di sicurezza riportati sull’attrezzo: Observen las indicaciones de seguridad en el aparato:
Por favor siga atentamente as instruções de segurança fornecidas no aparelho:
Achtung! Vor Inbetriebnahme Gebrauchsanweisung lesen! Warning!
Read instruction handbook! Attention ! Merci de lire attentivement le mode d’emploi avant d’utiliser cet appareil !
Let op! Voor ingebruikname gebruiksaanwijzing doorlezen! Varning! Läs igenom bruksanvisningen före användning. Attenzione! Prima di mettere in uso l’attrezzo, leggere attentamente le istruzioni!
¡Atención! Antes de la puesta en marcha, lea el manual de instrucciones.
Atenção! Leia atentamente este manual de instruções antes de usar o aparelho.
Anschlusskabel von den Schneidwerkzeugen fernhalten! Keep cord away from tools! Tenez le câble d’alimentation éloigné du système de coupe ! Aansluitkabel buiten het snijbereik houden!
Håll kabeln borta från skärverktyget.
Tenere il cavo di alimentazione fuori dalla portata delle lame! Mantenga el cable fuera del alcance de las cuchillas. Mantenha o cabo de alimentação afastado das lâminas!
Dritte aus dem Gefahrenbereich fernhalten!
Keep bystanders away! Maintenez tout tiers hors de la zone de travail !
Zorg ervoor dat derden buiten de gevarenzone blijven!
Tillse att inga obehöriga vistas i området!
Tenere lontano i terzi dalla zona di lavoro!
¡Mantener alejados a terceros del área de trabajo!
Mantenha terceiros fora da área de perigo!
Vor Arbeiten am Schneidwerkzeug Netzstecker ziehen!
Before maintenance, disconnect the plug from the mains! Débranchez l’appareil avant toute intervention sur le système de coupe !
Voor werkzaamheden aan de maaier, de stekker uit het stopcontact halen!
Dra ur kabeln före underhåll och service.
Prima di qualsiasi intervento di manutenzione, staccare la spina dalla corrente!
Para ejecutar trabajos de limpieza, control o de mantenimiento desenchufe el aparato.
Antes de qualquer operação de reparação desligue a ficha da tomada.
Achtung, Gefahr! Umlaufende Schneidwerkzeuge! Warning! Rotating tools!
Attention ! Danger ! Le système de coupe continue de tourner.
Let op! Gevaar! Roterend maaimes! Varning roterande skärverktyg. Attenzione! Pericolo!
Lame in rotazione! ¡Atención! ¡Peligro! Cuchillas rotativas.
Atenção! Lâminas rotativas.
Achtung! Verletzungsgefahr durch scharfes Schneidwerkzeug – Finger und Füße entfernt halten! Warning! Risk of injury. Keep fingers and feet away from sharp cutting tool!
Attention ! Risque de blessures par le cylindre de coupe – ne mettez
ni mains ni pieds à proximité ! Let op! Verwondingsgevaar door scherp snijgereedschap – vingers en voeten weghouden!
Varning! Risk för skada p.g.a. skärverktyg med skarp egg – Håll fingrar och fötter borta!
Attenzione! Tenere sempre mani e piedi a distanza di sicurezza dalle lame. Pericolo di lesioni! ¡Atención! ¡Peligro de lesiones
con las cuchillas de corte afiladas! ¡Mantenga alejados los dedos y los pies!
Atenção! Perigo de danos pessoais devido a ferramentas de corte afiadas – manter afastados os dedos e pés!
6

GARDENA Hattrick HE 32 / HE 36 / HE 40 |
|
G |
||
|
|
|||
1. Technical data |
HE 32 |
HE 36 / MulchCut |
HE 40 / MulchCut |
|
Motor |
|
electric engine with brake |
|
|
Power consumption |
1300 W |
1400 W |
|
1600 W |
Voltage |
230 V |
230 V |
|
230 V |
Frequency |
50 Hz |
50 Hz |
|
50 Hz |
Casing |
plastic |
plastic |
|
plastic |
Cutting width |
32 cm |
36 cm |
|
40 cm |
Cutting height |
25 - 55 mm |
30 - 70 mm |
|
30 - 80 mm |
Weight |
15.5 kg |
20.6 kg |
|
27.5 kg |
Grassbox / grass catcher capacity |
32 l |
36 l |
|
55 l |
Wheels |
plain bearing |
plain bearing |
|
ball bearing |
Working area related emission |
|
|
|
|
characteristic value LPA 1) |
74 dB (A) |
74 dB (A) |
|
78 dB (A) |
Noise level LWA 2) |
85 dB (A) |
87 dB (A) / 89 dB (A) |
88 dB (A) / 90 dB (A) |
|
Vibrations avhw 1) |
< 2.5 ms-2 |
< 2.5 ms-2 |
|
< 2.5 ms-2 |
Measuring method 1) according to EN 836 |
2) according to 84/538/EC |
|
|
|
|
|
|
||
2. Operating instructions information |
|
|
||
Please read and follow these |
For safety reasons chil- |
Please keep these instructions |
||
operating instructions carefully. |
Adren under the age of |
in a safe place. |
||
Familiarise yourself with the unit’s |
16 or people not familiar with |
|
|
|
features, its proper use and the |
these operating instructions |
|
|
|
safety instructions included. |
must not use this electric |
|
|
|
|
Hattric lawn mower. |
|
|
|
3. Product use
The GARDENA Hattrick HE 32 / HE 36 / HE 40 lawn mowers are designed for cutting and aerating lawns in and around the garden.
They are not designed for use in public facilities, parks, sporting grounds, on roads, in agriculture or forestry.
It is essential to observe the manufacturer’s operating instructions to ensure the unit’s proper functioning. The operating instructions also contain advice for service, maintenance and repair.
Attention! To prevent in- Ajury, the electric Hattrick lawn mower must not be used
for trimming bushes, hedges, shrubs, for cutting and pruning of climbers or grass on roofs or in balcony boxes. In addition, the electric Hattrick lawn mower must not be used for chopping up branches, twigs or for levelling irregularities
in the soil.
4. Assembly
4.1 Assembling the
Hattrick HE 32
Parts list check
The packaging of the HE 32 should include the following parts:
.Electric Hattrick lawn mower HE 32
.Grassbox |
Mounting the guide handle |
|
.1 handlebar frame upper |
(ill. I) |
|
section (handle with switch) |
1. |
Slide the lower sections of the |
.2 lower handlebar frame |
|
frame into the recesses so that |
sections |
|
the flat sides point outwards. |
.Fasteners for handlebar frame |
2. |
Screw the frame in place using |
.Operating instructions |
|
the wing screws (25) supplied. |
.TORX®-screwdriver for |
3. |
Place the guide handle (1) into |
changing blades |
|
the hollow grooves and attach |
|
|
it to the lower handlebar frame |
using the screws (24) and wing nuts (23) supplied.
Note: The cable should always pass along the outside of the frame (ill. I) and should never be pinched or crimped.
4.To tighten the cable, put the clamp (2) from outside onto the lower part of the frame
(ill. I, detail).
4.2 Assembling the
Hattrick HE 36 / HE 40
Parts list check
The packaging of the HE 36 /
HE 40 should include the following parts:
.Electric Hattrick lawn mower
.Grass catcher (disassembled)
.Top of guide handle
.Fastening elements for guide handle
.Operating instructions with warranty card
.TORX®-screwdriver for changing blades
Mounting the guide handle
(ill. A)
1.Swivel the folded bottom part of the guide handle (A1) into the working position and allow it to engage. Tighten well with the lower linkage locking handles (2).
2.Put the top of the guide handle
(A2) onto the bottom part of the guide handle (A1) and secure using the fastening bits (screw and plastic wing nut).
3.Insert the connection cable into the cable guide on the wing screw (A 3).
Note: Only mount the screw with the cable guide on the cable guiding side of the handle.
Mounting the grass catcher
(illustration sequences 1-5) The grass catcher is supplied loose (3 component parts).
G
The carrying handle (4) is below the protective cover (15).
1.Unfold the grass catcher (3) and insert the supporting frame
(5) through the opening of the grass catcher (3) so that the plastic base is on the bottom.
2.Then bend up the fastening flaps (6) by hand according to illustration 2 and use them to fix the grass catcher (3) to the supporting frame (5) according to illustration 3.
3.Fasten the carrying handle (4) by pressing the supporting frame (5) according to illustration 4. The assembled grass catcher is shown in illustration
5.
Note: The supporting frame (5) is bent for fixing the carrying handle (4).
5. Using the product
5.1 Connecting the unit
– cable lock / extension cable Hattrick HE 32 (see ill. L/M) Hattrick HE 36 / HE 40 (see ill. B) First plug the extension cable (7) from below into the base socket of the combination switch/plug
(8). Loop the extension cable (7) and insert it into the cable lock
(9) on the guide handle, allow the lead to the socket to sag a little.
The cable lock prevents unintentional disconnection of the electricity.
Lay out the surplus cable in loose loops at the side of the cutting lane and at the centre of the lane length.
Note: Connect the extension cable to the mains so that it always feeds from the cut side.
5.2 Starting the Hattrick lawn mower
Hattrick HE 32 (see ill. L)
Hattrick HE 36 / HE 40
(see ill. B/C)
Place your electric Hattrick lawn mower on an even area of the lawn.
To start the mower depress the release button (10) on the combination switch/plug (8) and simultaneously pull the safety handle (11) to the guide handle with the other hand. As soon as the motor starts you can release the release button (10).
If you release the safety handle
(11) the motor switches off.
A built-in motor brake still the cutting blades within three seconds.
Hattrick HE 32
If the aerator cylinder or the cutting blades are blocked by a foreign body or if the motor is overloaded release the safety
handle (11) and disconnect the mains plug! Remove the foreign body if necessary.
Hattrick HE 36 / HE 40
If the aerator cylinder or the cutting blades are blocked by a foreign body or if the motor is overloaded the motor switches off automatically within 20 to 35 seconds due to the built-in overload protection. In that case release the safety handle (11). Disconnect the mains plug! Remove the foreign body if necessary.
Note: In long, wet grass, to start your electric Hattrick easily, slightly raise one side of the mower.
The switches installed Aby the manufacturer must not be removed or be bridged eg: by taping down the safety handle to the guide handle. This will prevent the mower switching off automatically, and could cause fatal injury.
Attention! Cutting blades continue to run for three seconds after the motor is switched off.
16 |
17 |
 Loading...