


UFO DEFENSE
PLAYER’S HANDBOOK
®
Game Design and Program Copyright ©1994 Mythos Games Ltd Documentation, Packaging and Logo Copyright ©1994 MicroProse Ltd

TECHNICAL SUPPLEMENT
FOR IBM PC COMPATIBLES
REQUIRED EQUIPMENT
• Computer
X-COM UFO Defense requires an IBM PC AT or a computer 100% compatible with this model.
The computer must have a hard disk.
X-COM UFO Defense requires at least an 80386 processor and a minimum of 4MB RAM.
• Controls
You will require a Mouse and Keyboard to play X-COM UFO Defense.
• Display
X-COM UFO Defense requires a color monitor with a VGA graphics system. If you are using a compatible graphics card/monitor, it must be 100% compatible with VGA systems.
• Disk Drives
X-COM UFO Defense must be installed onto a hard disk.
• DOS
You must have IBM PC-DOS or Microsoft MS-DOS version 5.0 or higher.
SOUND
X-COM UFO Defense supports the PC internal speaker, AdLib compatible cards, SoundBlaster compatible cards and the Roland LAPC-1.
PAGE 1

X-COM TECHNICAL SUPPLEMENT
GAME ENHANCEMENTS AND OTHER
INFORMATION
1. THE BATTLESCAPE OPTIONS SCREEN
The Battlescape Options screen (section 3.2.3.11 of the Player’s Handbook) consists of the following:
Scroll Speed
Click on any of the numbered buttons to change the speed at which the view window moves, from 1 (slowest) to 5 (quickest).
Scroll Type
Click on either of the numbered buttons to change the Scroll Type between Trigger Scroll (press the Left Mouse Button when the Mouse Pointer is at the edge of the screen) or Auto-Scroll (the view window moves automatically when the Mouse Pointer is moved to the edge of the screen).
Fire Speed
Click on any of the numbered buttons to change the speed at which weapon shots move, from 1 (slowest) to 6 (quickest).
X-COM Movement Speed
Click on any of the numbered buttons to change the speed at which your soldiers move, from 1 (slowest) to 6 (quickest).
PAGE 2
X-COM TECHNICAL SUPPLEMENT
Alien Movement Speed
Click on any of the numbered buttons to change the speed at which the aliens move, from 1 (slowest) to 6 (quickest).
Click on the OK button to return to the Battlescape.
Click on the Save Game button to save your current game. You will be taken to the Select Save Position screen. See section 7.2 of the separate Player’s Handbook for full details of saving games.
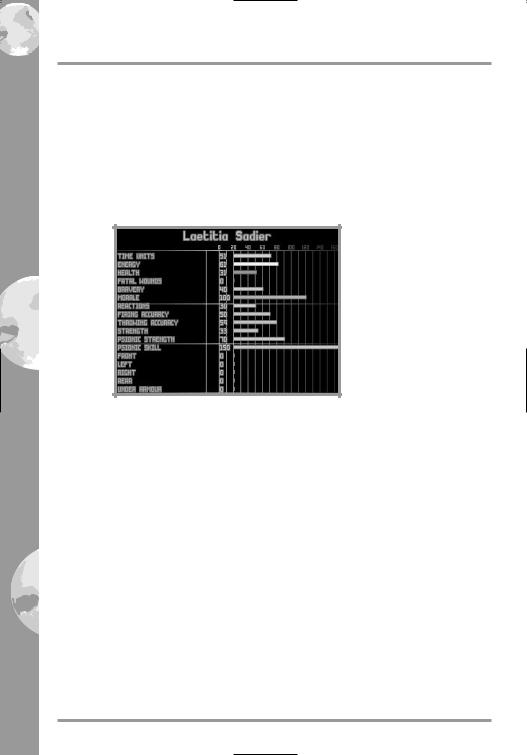
2. THE BATTLESCAPE SOLDIER DATA SCREEN
The Soldier Data screen (section 3.2.3.16 of the Player’s Handbook) contains the following information:
Time Units - the soldier’s remaining Time Units. These are required to carry out everything from walking to firing weapons.
Energy - the soldier’s current Energy level. This will decrease as the soldier carries out energy-consuming actions such as walking through thick grass. The total energy available will be lowered if the soldier receives fatal wounds to the torso.
Health - the soldier’s current Health. If the soldier has received Fatal Wounds, each wound decreases Health by one point per turn. If Health reaches zero, the soldier dies from the wounds incurred.
Fatal Wounds - the number of Fatal Wounds received by the soldier. The Medi-Kit can be used to heal Fatal Wounds.
Bravery - the soldier’s Bravery. This determines the likelihood of the soldier’s Morale decreasing.
Morale - the soldier’s Morale. A soldier will lose Morale if the battle starts to swing in the alien’s favor. If the Morale falls below 50, the soldier could panic.
PAGE 3
X-COM TECHNICAL SUPPLEMENT
Reactions - the soldier’s Reactions. This determines how effective the soldier is at opportunity fire - taking a shot during the alien’s turn (see section 3.2.6 of the Player’s Handbook for full details).
Firing Accuracy - the soldier’s accuracy at firing weapons. This will increase as the soldier gains battle experience.
Throwing Accuracy - the soldier’s accuracy at throwing objects. This will increase as the soldier becomes more experienced.
Strength - the soldier’s Strength. This affects the distance which the soldier can throw objects.
Psionic Strength - the soldier’s Psionic Strength. This is a measure of the soldier’s natural ability to defend against an alien psionic attack.
Psionic Skill - the soldier’s Psionic Skill. This is the soldier’s ability to use the Psi Amp in mental combat.
Armor - the soldier’s armor status, divided into sections for Front, Left, Right, Rear and Under. This will rise as the soldier is equipped with armor manufactured by your engineers.
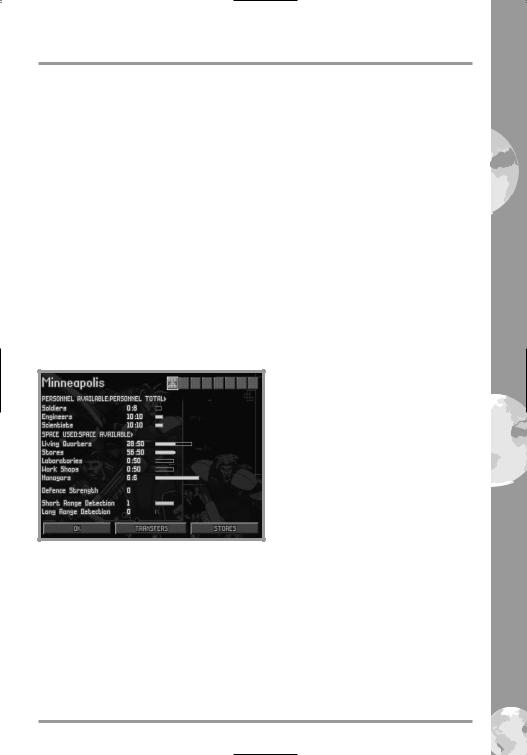
3. THE BASE INFORMATION SCREEN
The Base Information screen (section 4.2.2 of the Player’s Handbook) contains some extra features:
The Base Icons
In the top-right of the screen, there are eight Base Icons which allow you to change the currently selected base. These function in exactly the same way as the Base Icons in the Bases screen.
PAGE 4

X-COM TECHNICAL SUPPLEMENT
The Base Name
Click on the base name in the top-right of the Base Information screen to change the base name. A flashing * cursor will appear. Use the Backspace Key to erase the previous name, type in the name of your choice using the Keyboard and press the Return Key.
Short-Range Detection
This is a display of the short-range detection ability of the base. Short range detection systems have a range of 300 nautical miles.
Long-Range Detection
This is a display of the long-range detection ability of the base. Long range detection systems have a range of 450 nautical miles.
Note: X-COM radar systems, while very long ranged, rotate very slowly - once every 10 minutes. This means that your base will detect UFOs more effectively if more than one radar system is in place.
The Stores Button
Click on the Stores button to view a list of the items currently in the stores.
The Maintenance Button
Click on the Maintenance button to view a list of your monthly expenses. These are made up of the following:-
Craft - X-COM do not own Skyrangers or Interceptors, they are leased from their owners for a monthly fee.
Personnel - your personnel are paid monthly, according to standard world pay scales.
Base Facilities - base facilities are re-equipped monthly. See the UFOpaedia for details of the maintenance cost of each base facility.
PAGE 5

X-COM TECHNICAL SUPPLEMENT
4. SOLDIERS
The Soldiers screen (section 4.2.10 of the Player’s Handbook) contains some extra features:
Click on the Soldiers button in the Bases screen to access the Soldier List. This displays all the soldiers at the currently selected base, regardless of which craft they are assigned to.
Use the Mouse to highlight and select a soldier. You will be taken to the Soldier Data screen.
The Soldier Data screen
The selected soldier’s rank badge is in the top-left of this screen.
The soldier’s name is next to the rank badge. Click on this to change the soldier’s name. A flashing * cursor will appear. Use the Backspace Key to erase the previous name, type in the name of your choice using the Keyboard and press the Return Key.
PAGE 6

X-COM TECHNICAL SUPPLEMENT
Click on the Armor button to change the armor worn by the soldier. The Select Armor window will appear, listing the types of armor available and the number of each in storage.
Click on an armor button. The soldier will now be equipped with the selected armor - its name appears next to the Armor button.
Below the buttons is a display of the following:
Rank - the soldier’s X-COM rank.
Missions - the number of missions which the soldier has taken part in.
Kills - the number of aliens the soldier has killed.
Craft - the craft which the soldier is currently assigned to.
Wound Recovery - the number of days before the soldier recovers to full health.
In the bottom two-thirds of the screen, there is a display of the soldier’s physical statistics. These are identical to those in the Battlescape Soldier Data screen (see the Battlescape Soldier Data Screen section of this Technical Supplement for full details).
Click on the FFEE buttons to view data for the next/previous soldier at the base.
Click on the OK button to return to the Soldier List screen.
Click on the OK button in the bottom of the Soldier List screen to return to the Bases screen.
PAGE 7

X-COM TECHNICAL SUPPLEMENT
OPERATING DIFFICULTIES AND
LOADING PROBLEMS
Q. Why won’t my game load?
Check all memory requirements listed in this Technical Supplement. You will need 560 K of Conventional Memory and 1 Mb of Extended Memory (XMS) or Expanded Memory (EMS).
Conventional Memory
To check how much Conventional Memory is available, type MEM/C from the C:\> prompt and press the Return key. Look for the Largest Executable Program details. If there is insufficient Conventional Memory, you may need a Boot Disk.
Q. What is a Boot Disk?
This is a Start Up disk for your computer which contains alternative start up files to those on your hard disk. The Boot Disk will allow more Conventional Memory to be available.
Making a Boot Disk
Instructions for making an MS-DOS Boot Disk (also known as a System Disk) will be found in your Microsoft manual.
Using a Boot Disk
Insert the Boot Disk into your floppy disk drive A and then switch on the computer. You should leave the disk in the floppy drive during play.
Slow Running
If you are not running from a boot disk, please ensure that you have SMARTDRV.SYS or SMARTDRV.EXE loaded into your CONFIG.SYS or AUTOEXEC.BAT.
If you are using MS-DOS 5.0, make sure you have the following line in your CONFIG.SYS file:
devicehigh=c:\dos\smartdrv.sys
If you are using MS-DOS 6.0 or 6.2, make sure the following line is in your AUTOEXEC.BAT file:
loadhigh c:\dos\smartdrv.exe
However, this line may need removing if memory problems occur.
PAGE 8

X-COM TECHNICAL SUPPLEMENT
Q. Can I run my game through Windows?
No, this is not recommended, it is likely that you will have insufficient memory to do so.
Q.Does my game run with DR DOS, Novell DOS 7 or
OS/2?
Success is not guaranteed. MicroProse games are currently designed to run with MS-DOS 5.0 or 100% compatible DOS.
Q.What is Base Memory?
This is the original 1Mb (1024K) in your machine. It is divided up into Conventional Memory (640K), where MS-DOS and all PC programs load and Upper Memory (384K), where system programs reside.
In MS-DOS 5.0 the bulk of the operating system and associated drivers (such as the mouse driver) are normally loaded into Upper Memory. Other drivers held in the area of Conventional Memory will reduce your 640K available for the program.
It is important to have as much Conventional Memory as possible free.
Q. What is Extended Memory (XMS)?
Further memory, beyond the 1Mb of Base Memory on your PC is called Extended Memory. XMS can be used to free more Conventional Memory so that bigger games can be run. XMS can also be used to simulate Expanded Memory.
Q. What is Expanded Memory (EMS)?
EMS was originally designed to give the PC more memory to run programs. It has been around far longer than XMS so most programs take advantage of it. Most MicroProse games take advantage of EMS. The DOS command EMM386.EXE can be used to turn XMS into EMS and should be in your CONFIG.SYS.
Remember that hard disk space is also measured in Megabytes (Mb). Don’t confuse this with memory - the two are completely different!
Memory Managers
If the program is occasionally freezing or crashing to DOS, you may have a conflict with your current memory manager. MicroProse recommend only the drivers which come with MS-DOS (i.e. HIMEM.SYS and EMM386.EXE). Try using the memory managers which come with MS-DOS 5.0, Windows 3.1, MS-DOS 6.0 or MS-DOS 6.2, in that order.
PAGE 9
X-COM TECHNICAL SUPPLEMENT
Mouse Drivers
Another common cause of the program freezing or crashing is due to a conflict with your current Mouse Driver. MicroProse recommend the Microsoft driver, MOUSE.COM or MOUSE.SYS v8.20 or higher. See the MS-DOS manual for full details. To check which Mouse Driver you are using, run the MSD program which comes with Windows 3.1 and MSDOS 6.0/6.2.
The Read Me File
The latest notes regarding this program, additions, revisions etc. can be found in a file named README.TXT in the UFO directory. These notes may be read by using either standard DOS commands or the DOS 5.0 text editor (type EDIT README.TXT).
PAGE 10

|
CREDITS |
Game Design and Programming |
Mythos Games Limited |
|
Julian Gollop |
|
Nick Gollop |
Graphics and Animation |
Julian Gollop |
|
John Reitze |
|
Martin Smillie |
Music |
John Broomhall |
Sound Effects |
Andrew Parton |
Quality Assurance |
Pete Woods |
|
Andrew Luckett |
|
Richard Bakewell |
|
Darren Kirby |
|
Phil McDonnell |
|
Jason Sampson |
Manual Author |
Kristian Ramsay-Jones |
Managing Editor |
Alkis Alkiviades |
Packaging and Manual Design |
John Emory |
|
Joe Morel |
|
Cesar Novoa |
|
Sarah Warburton |
Producer |
Tim Roberts |
Publishers |
Paul Hibbard |
|
Pete Moreland |
PAGE 11

INTRODUCTION
BACKGROUND
It is the year 1999. Unidentified Flying Objects (UFOs) have started appearing with disturbing regularity in the night skies. Reports of violent human abductions and horrific experimentation has struck terror into the hearts of millions. Mass public hysteria has only served
to expose Earth’s impotence against a vastly superior technology.
Many countries have attempted to deal independently with the aliens. In August 1998, Japan established an anti-alien combat force; the Kiryu-Kai. Equipped with Japanese-made fighter aircraft, the Kiryu-Kai certainly looked like a powerful force. However, after 5 months of expensive operations they had yet to intercept their first UFO. The lesson was clear: this was a worldwide problem which could not be dealt with by individual countries.
On December 11, 1998, representatives from the world’s most economically powerful countries gathered secretly in Geneva. After much debate, the decision was made to establish a covert independent body to combat, investigate and defeat the alien threat. This organization would be equipped with the world’s finest pilots, soldiers, scientists and engineers, working together as one multi-national force.
This organization was named the Extraterrestrial Combat Unit.
PAGE 12

INTRODUCTION
THE GAME
X-COM UFO Defense puts you in command of X-COM, with the finest Earth technology at your disposal to defend the Earth from alien invasion. Shooting down UFOs is just the beginning. You will then control a squad of heavily-armed soldiers, edging cautiously through the local terrain, battling aliens and recovering UFO
technology.
When you command a ground assault, you will use the 3-D isometric ‘Battlescape’ display. This shows terrain, buildings, X-COM craft and UFOs, but will only display what your soldiers can see - so beware of danger lurking around corners or down dark corridors!
Successful ground assault missions mean that X-COM scientists can research alien technology. Engineers can then reproduce their superior weapons and spacecraft. Soon you will be fighting the aliens with their own technology.
As the game progresses, you will use the on-line ‘UFOpaedia’ to learn the latest details from your research teams about alien technology, life forms and their real objectives. Above all, you must watch the world political situation. Look out for governments which may be forced to make secret pacts with the aliens and make sure you defend the countries who fund X-COM heavily.
X-COM UFO Defense. Command Earth’s forces against the alien terror!
PAGE 13

INTRODUCTION
THIS MANUAL
This Manual is split into two main sections:
Section 1: The Gameplay Tutorials are designed to get you playing X-COM UFO Defense as quickly as possible. You are recommended to follow each tutorial before you start to play the game on your own.
Section 2: The Reference Guide is intended for the player who is familiar with how to play X-COM UFO Defense and needs to learn more about particular game features.
The Controls
You will require a mouse to play X-COM UFO Defense. This manual will refer to ‘clicking’ on buttons, icons or highlighted text. To do this, simply move the cursor over the option and press the Left Mouse Button (LMB).
PAGE 14
SECTION 1
THE GAMEPLAY TUTORIALS

THE GAMEPLAY TUTORIALS
BEFORE WE BEGIN...
Welcome to X-COM UFO Defense. These tutorials are designed to help you start playing with the minimum of trouble. The three main sections of the game are covered here; the Geoscape, the
Battlescape and the Bases Screen.
For extra information on particular game features, see the Reference Guide section of this manual.
First of all, we will start a new game.
Starting a New Game
1.Install and Load X-COM UFO Defense.
2.After the animated introduction, you will be taken to the game options screen.
PAGE 16
SECTION 1
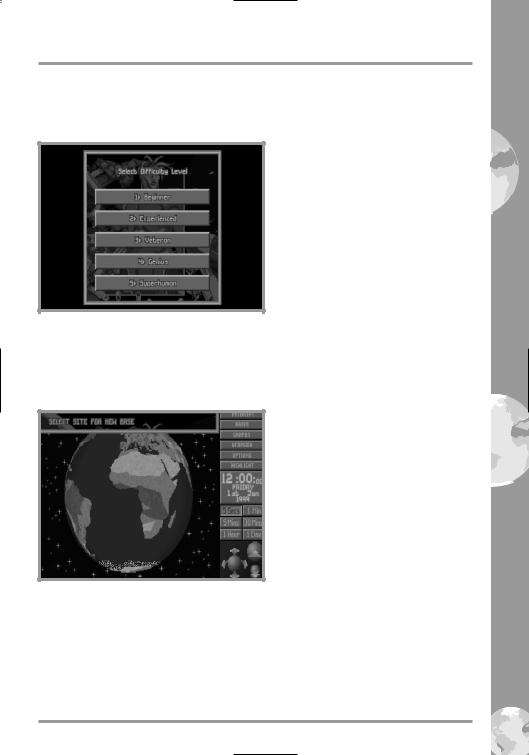
3. Move the mouse pointer over the New Game option and click on the Left Mouse Button (LMB) to select. You will now be taken to the Select Difficulty Level screen.
4. Move the mouse pointer over the Beginner option and click on the LMB to select. You will now be taken into the main game screen, the Geoscape. The first thing you must do is to position your first X- COM base on the surface of the Earth.
PAGE 17

SECTION 1
Setting-Up a New X-COM Base
5. The message Select Site for New Base will appear in the top of the screen.
In the bottom-right hand side of the screen, you will see three green spheres surrounded by arrows. These are the View Controls which allow you to rotate and magnify the display of the Earth.
• Click on the 

 icon. The Earth display will be magnified, some borders around countries will appear.
6 • Click again on the 

 icon. The Earth display will be magnified again, some country names will now appear.
7.• Click twice on the 

 icon. The Earth display will return to its minimum magnification.
8.The 

 icon allows you to rotate the Earth display up, down, left or right.
• Click a few times on the up arrow, the Earth display will tilt towards you.
9.• Click a few times on the left arrow, the Earth display will rotate.
10.• Position the mouse pointer over the Earth and click on the Right Mouse Button to center the Geoscape on that location.
By using a combination of these controls, you can manipulate the Earth display to show any part of the Earth in detail.
11. • Click on any part of the Earth’s surface (except the sea) to position your first base.
Note: It is a good idea to position your base in the middle of a large land mass such as North or South America, Russia or Europe. This will give you a better chance of defending that area from UFO raids.
12. A window containing the prompt Base Name? will appear. Type in a name using the Keyboard and press the Return Key. You have now set up a new X-COM base and you are ready to start playing X-COM UFO Defense.
PAGE 18

SECTION 1
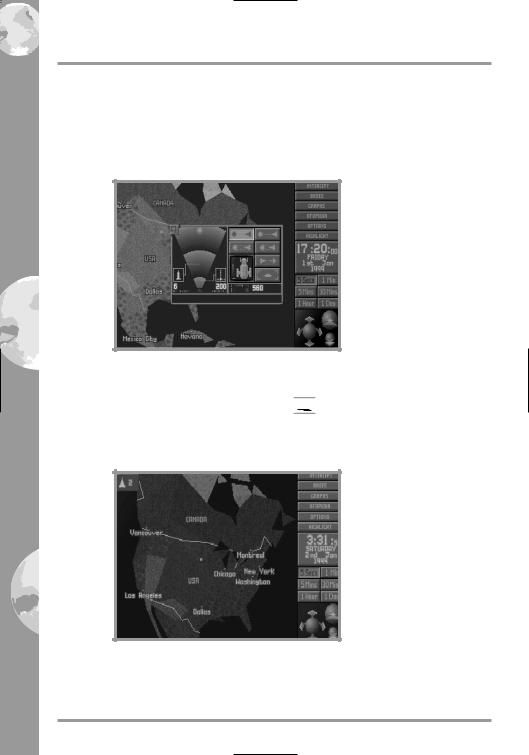
TUTORIAL 1: THE GEOSCAPE
 Menu Options
Game Time
Time Controls
View Controls
Tutorial 1 guides you through the Geoscape’s basic controls and the process of intercepting UFOs.
1. The Geoscape is the main screen for playing X-COM UFO Defense. You will see your base on the 3-D view of the Earth, represented as a hollow blue square.
On the right-hand side of the screen, there is a list of Menu Options, a display of the Game Time, the Time Controls and the View Controls.
The Time Controls are very important to the game, and it is these which we will go through next.
Note: If you wish to pause time at any stage during the game, simply click on any of the Menu Options.
3994 - 9668 |
PAGE 19 |
SECTION 1
The Time Controls
2. Look at the Game Time. You will see that it is passing by with five second jumps. The Time Controls, below the Game Time, allow you to control the rate at which this time passes.
• Click on the 5 Mins button. The button will depress and time will pass at an increased rate. You will see the Game Time (above the Time Controls) change rapidly and night and day will be visible on the Earth, slowly changing.
You should use the Time Controls to advance the game through any time-consuming section of the game (e.g. waiting for craft to arrive at their destinations or waiting for UFOs to be detected).
Detecting UFOs
3. We will now advance time to the point when X-COM detect their first UFO (if this has not already happened).
• Click on the 1 Day button in the Time Controls. The button will depress and time will pass at the maximum rate.
4. Eventually, a window will appear over the Geoscape with the message UFO-1 Detected. Data regarding the UFO is shown in this window.
• Click on the button marked Center on UFO-Time=5 Secs. This will center the Earth display on the UFO and reduce the passage of time to 5 seconds. The UFO will appear as a red cross in the center of the Geoscape, moving slowly.
PAGE 20
SECTION 1
Intercepting UFOs
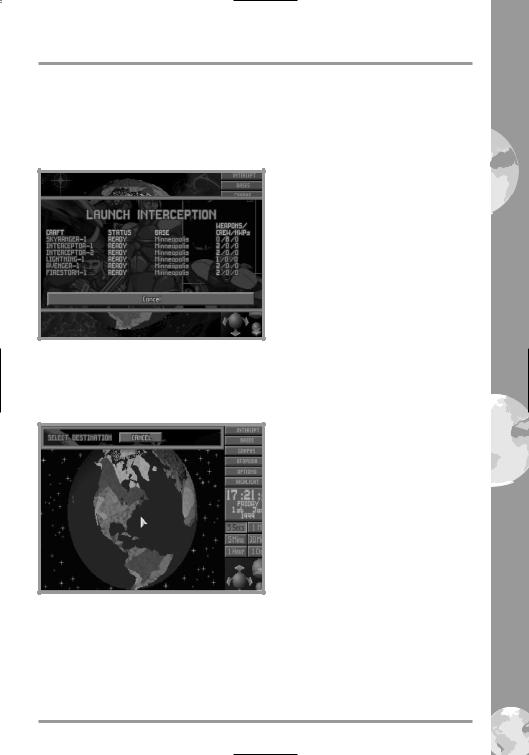
5. • Position the mouse pointer on your base and click on the LMB. A window will appear with the title Launch Interception and a list of the available craft at that base.
6.• Move the mouse pointer to highlight Interceptor-2 and click on the LMB.
7.The message Select Destination appears in the top of the screen.
• Click on the UFO (represented as a red cross) to select this as the
Interceptor’s target.
2557 - 8872 |
PAGE 21 |
SECTION 1
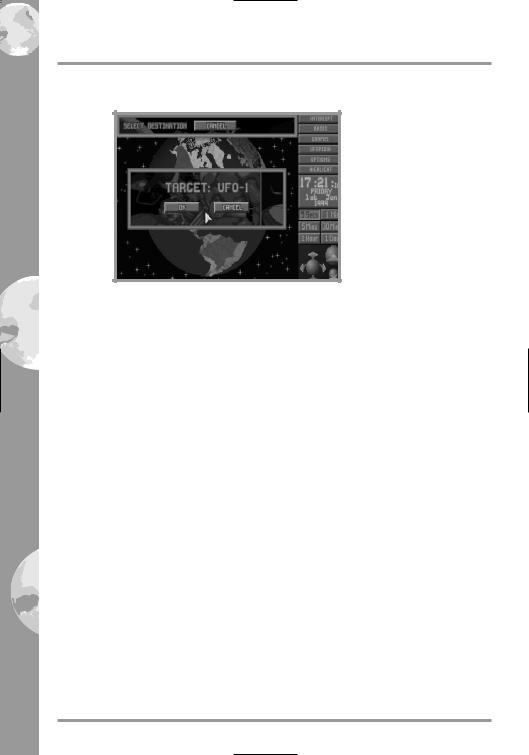
8. The confirmation message Target: UFO-1 will appear.
• Click on the OK button.
9. The Interceptor (represented by a yellow cross) will launch from its underground base and attempt to intercept the UFO.
Note: Remember, if you need to pause the game, click on any of the Geoscape Menu Options.
If the UFO lands, it will appear as a green cross. Interceptors cannot carry out ground attacks; so you will have to wait until the UFO lifts off - click on the 5 Mins Time Control button to accelerate the passage of time.
10. At this point, one of two things could happen:
A. If your Interceptor catches the UFO, the Air-to-Air Combat window will appear. Skip the rest of this section and go to step 19 of this tutorial.
PAGE 22
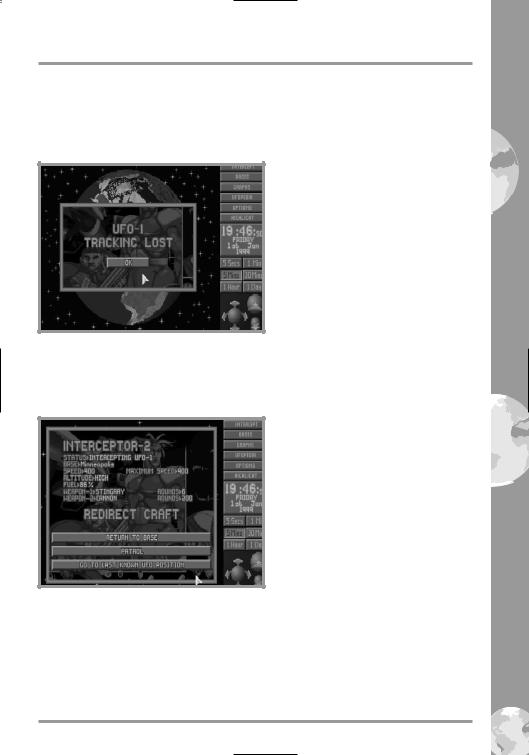
SECTION 1
B. If your Interceptor loses contact with the UFO, the window UFO-1 Tracking Lost will appear. This may happen several times before you actually get into combat; most UFOs can out-perform your
Interceptors.
• Click on the OK button. Continue to the next step of this tutorial.
11. • The Craft Status window will now appear, allowing you to redirect the Interceptor.
12.• Click on the Go To Last Known UFO Position button.
13.While the Interceptor is on its way to the last known UFO position, it uses its on-board radar to scan for the UFO.
If the UFO-1 Detected window re-appears, go straight to step 14 of this tutorial.
3123 - 8465 |
PAGE 23 |

SECTION 1
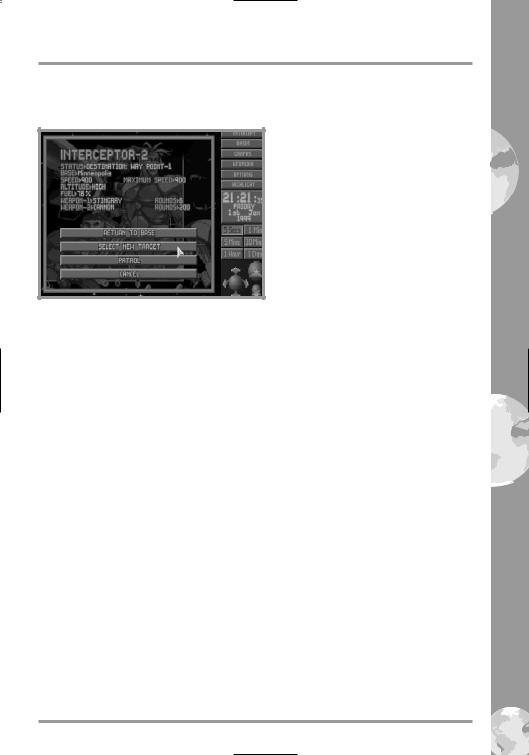
If the Interceptor reaches the Last Known UFO Position without reacquiring the UFO, the following window will appear:
If this happens, the UFO has disappeared from all X-COM tracking devices. The interception mission has failed.
• Click on the Redirect Craft button. The Craft Status window will reappear. Click on Return to Base. The Interceptor will return to its base.
Go back to step 3 of this tutorial.
14.• Click on the Center on UFO-Time=5 Secs button in the
UFO-1 Detected window.
15.At the moment, the Interceptor is still heading for the last reported position of the UFO. Now we’ll reassign the UFO as the Interceptor’s target.
PAGE 24
SECTION 1
• Click on the Interceptor. This will bring up the Craft Status window.
16.• Click on the Select New Target button.
17.The message Select Destination appears in the top of the screen.
•Click on the UFO to re-select it as the target. 18. The message Target: UFO-1 will reappear.
•Click on the OK button.
Go back to step 10 of this tutorial.
1410 - 1221 |
PAGE 25 |
SECTION 1
Air-to-Air Combat
19. If the Interceptor gets within range of the UFO, the Geoscape will automatically increase in magnification and the Air-to-Air Combat window will appear over the center of the Geoscape.
20. UFOs should not be shot down over water because you will not be able to examine the wreckage.
• Click on the minimize window 
 icon in the top-left of the Air-to- Air Combat window. The craft icon will appear in the top-left of the screen.
 Craft Icon
Check that the UFO is over dry land. If it is over the sea, you can use the 1 Min Time Control to accelerate the passage of time.
PAGE 26

SECTION 1
21.• Click on the craft icon when the UFO is over the land. This will bring back the Air-to-Air Combat window, ready for you to attack the UFO.
22.• Click on the 
 icon to carry out a Standard Attack on the UFO. You will see the progress of the attack on the radar screen in
the left-hand side of the Air-to-Air Combat window. The message box in the bottom of the window relays the pilot’s messages to you.
If the UFO out-runs the Interceptor, return to step 10 of this tutorial.
If the Interceptor destroys the UFO, you have failed in your objectives; there is no useful debris to investigate. Return to step 3 of this tutorial.
If the UFO crash lands, you have succeeded in your objectives; the crash site is marked with a white cross. The UFO is now vulnerable to a ground assault, allowing you to recover the wreckage.
0922 - 6142 |
PAGE 27 |
SECTION 1
Saving the Game
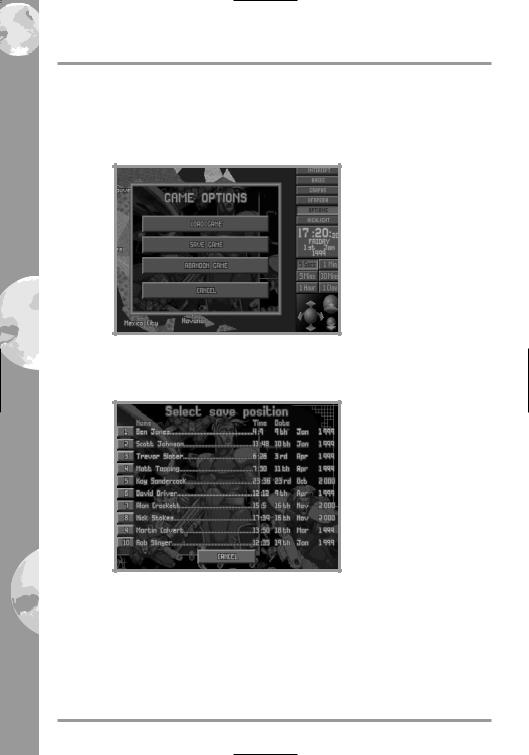
23. Now would be a good time to save your current game.
• Click on the Options button.
24.• Click on the Save Game button.
25.The Select Save Position screen will appear.
• Click on any of the ten numbered buttons to select the slot into which your current game will be saved.
26. • Type in a name for your saved game using the Keyboard and press the Return Key.
When the game has saved, you will be returned to the Geoscape.
PAGE 28
SECTION 1
Investigating the Crash Site
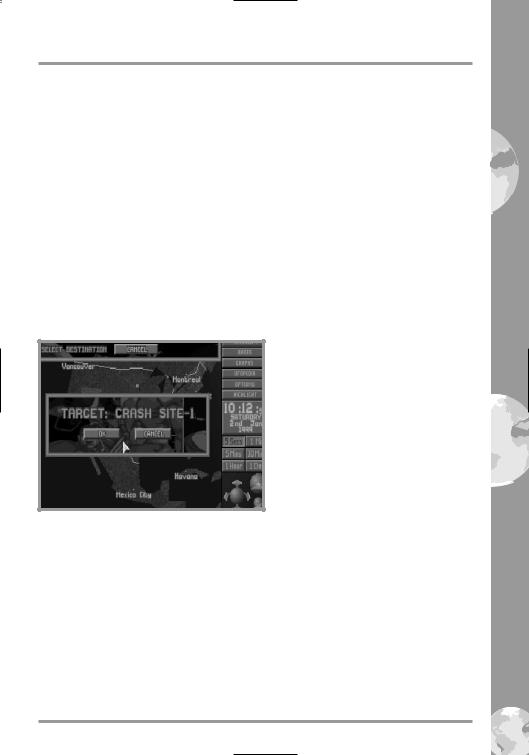
27. You will need to assign a Skyranger transport to take a squad of soldiers from your base to the Crash Site.
• Find your base (you may need to rotate the Geoscape to bring it into view). Click on your base: the Launch Interception window will appear.
28.• Move the mouse pointer to highlight Skyranger-1 and click.
29.The message Select Destination appears in the top of the screen.
30.• Click on the UFO Crash Site (the white cross) to select this as the
Skyranger’s target.
31.The message Target: Crash Site-1 will appear.
• Click on the OK button.
32. The Skyranger (represented by a yellow cross) will launch and make its way to the UFO Crash Site.
• Click on the 5 Mins button if you want to increase the passage of time.
33. When the Skyranger arrives at the Crash Site, the UFO Crash Recovery screen will appear. Read the instructions on this screen.
• Click on the OK button to enter the next section of X-COM UFO Defense; the Battlescape.
3107 - 6669 |
PAGE 29 |
 Loading...