


TABLE OF |
|
CONTENTS |
|
I. Installing the Game ..................................... |
5 |
1. System requirements ......................................... |
5 |
2. Installing Total Annihilation ............................... |
5 |
Standard Installation ......................................... |
5 |
Installation without Autoplay ............................ |
6 |
Multiplayer Spawn Installation .......................... |
6 |
Installing Direct X .............................................. |
6 |
DirectX Troubleshooting .................................... |
7 |
Uninstalling Total Annihilation ........................... |
7 |
3. Improving Game Performance ........................... |
7 |
Adjusting Your System ....................................... |
8 |
Adjusting Game Options ................................... |
8 |
Installation Troubleshooter ................................ |
9 |
II. Starting a New Game ............................... |
10 |
1. The Galactic War ............................................. |
10 |
2. Game Overview .............................................. |
11 |
3. New Game Options ........................................ |
11 |
4. Starting a New Single Player Game ................. |
12 |
New Campaign ............................................... |
13 |
Skirmish .......................................................... |
13 |
Game Options ................................................. |
14 |
5. Starting a New Multiplayer Game ................... |
25 |
Choosing the Right Connection Method .......... |
25 |
Serial Games ................................................... |
25 |
Modem Games ............................................... |
25 |
Network (LAN) Games .................................... |
26 |
Playing on the Internet .................................... |
26 |
Selecting a Multiplayer Game .......................... |
27 |
Creating a New Multiplayer Game .................. |
28 |
The Battle Room ............................................. |
28 |
Customizing Multiplayer Games ...................... |
29 |
I . I N S T A L L I N G T O T A L A N N I A L A T I O N
3

I . I N S T A L L I N G T O T A L A N N I A L A T I O N
III. Playing the Game .................................... |
31 |
1. Game Components ......................................... |
31 |
Metal .............................................................. |
31 |
Energy ............................................................ |
31 |
Structures ....................................................... |
32 |
Units ............................................................... |
32 |
2. Game Interface ............................................... |
33 |
Choosing the mouse interface ......................... |
33 |
Main Battle Screen .......................................... |
33 |
Battle Map ...................................................... |
34 |
Mini-map ........................................................ |
34 |
Resource status bar ......................................... |
35 |
Unit status bar ................................................ |
35 |
3. The Build and Orders Menus ........................... |
36 |
The Build Menu ............................................... |
36 |
Building Structures .......................................... |
37 |
Building Units ................................................. |
37 |
The Orders Menu ............................................ |
37 |
Firing Orders ................................................... |
38 |
Movement Orders ........................................... |
38 |
Immediate Orders ........................................... |
38 |
Commander’s Handbook .............................. |
40 |
IV. Structures and Units ................................ |
42 |
Common Units and Structures ......................... |
42 |
ARM Units ...................................................... |
48 |
CORE Units ..................................................... |
57 |
IV. Customer Services |
|
Technical Support Information .............. |
67 |
Technical Support (U.S. & Canada) .................. |
70 |
Technical Support (Europe) .............................. |
71 |
Ordering Our Products .................................... |
72 |
4
I. INSTALLING THE GAME
SYSTEM REQUIREMENTS
Minimum
Single Play
Pentium 100 (133 Recommended) with 16 MB RAM (24 Mb recommended), Microsoft or fully compatible mouse, 4X CD ROM drive, Windows 95, 35 MB hard drive space, 100% SoundBlaster compatible sound card, VGA 256 color or better video.
Multiplayer
Up to 4 Players: Pentium 133, 24 MB RAM
Up to 8 Players: Pentium 133, 32 MB RAM
Up to 10 Players: Pentium 166, 48 MB RAM
INSTALLING
TOTAL ANNIHILATION
Standard Installation
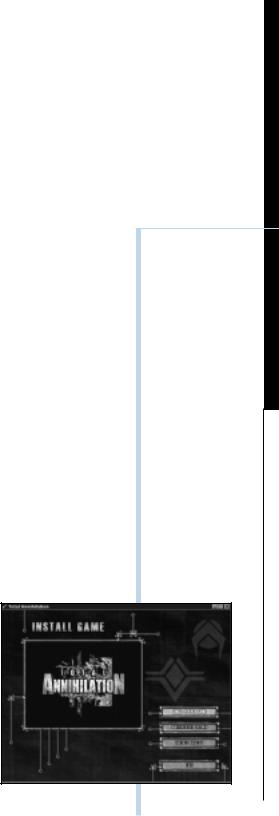
1.Place the Total Annihilation CD 1 in your CD-ROM drive.
2.Wait for the installation menu to appear. When it does, click the Regular Install button, then follow the on-screen instructions.
NOTE
It’s good practice to have some free space on your hard drive at all timespreferably at least 10% of your hard drive capacity.
I . I N S T A L L I N G T O T A L A N N I A L A T I O N
5

I . I N S T A L L I N G T O T A L A N N I A L A T I O N
6
NOTE
Make sure to check out the README file for the latest information about the game. You’ll see its icon in the Total Annihilation folder/ shortcut menu.
NOTE
Almost all video and sound cards on the market support DirectX. However, if you have an older video or sound card, this may not be the case. Contact your video/audio card manufacturer to obtain updated drivers compatible with DirectX.
3.Insert Total Annihilation CD 1 to start a single player game.
Installation without AutoPlay
If you do not see the installation screen appear automatically after inserting CD 1 into your CD ROM drive, follow these steps:
1.After inserting Total Annihilation CD 1 into your CD ROM drive, double-click the My Computer icon on your desktop.
2.Double-click the CD ROM icon.
3.Double-click the SETUP.EXE icon. This launches the installation program.
Multiplayer Spawn Installation
This installation program installs Total Annihilation for multiplayer games only. It enables you to play Total Annihilation against human opponents without having the game CD (Total Annihilation CD 1) in your CD ROM drive if you’re not hosting the game. You will need: One disc 1 for ≤3, two disc 1’s for ≤6 and three disk 1’s for ≤10.
Installing DirectX 5
Total Annihilation has been designed to take advantage of Microsoft’s DirectX 5 video and audio drivers. You need to install DirectX 5 for optimum game performance.
To install DirectX 5 and/or to check whether you have DirectX 5 already on your system, click on the Install DirectX button in the installation menu. The DirectX 5 installation program will check your system for earlier DirectX versions and report what it finds.
•If no DirectX components are found, the installation program will automatically install DirectX 5 on your system.

•If earlier versions of DirectX are found, you’ll see them listed with the version numbers. Click on the Re-Install DirectX button to update your DirectX drivers to version 5.
DirectX Troubleshooting
If you run into any video/audio problems following the installation of DirectX 5, but have earlier versions of DirectX installed which work fine, you may restore your original DirectX drivers by following these steps:
1.Double-click on the My Computer icon on your desktop.
2.Double-click the Add/Remove Programs icon. You’ll see a list of programs that are present on your system, including DirectX.
3.Click on the DirectX entry, and then on the Add/Remove button in the lower right hand corner. You’ll see a list of DirectX components on your system.
4.Click on the Restore Drivers button. This will restore your previous DirectX drivers.
Uninstalling Total Annihilation
If you ever want to remove Total Annihilation from your system, use the Uninstall program included with the game. You’ll see the Uninstall icon (a bone) below the game icon in the Windows 95 shortcut menu.
Do not uninstall the game simply by dragging the Total Annihilation folder to the Recycling Bin. This will leave some of the game’s components still installed on your system.
Improving Game Performance
Large numbers of units and structures can considerably slow down the game. You can try to improve performance by common-sense adjustments to your system, or by adjusting the game options.
NOTE
The Uninstall program does not remove DirectX 5 from your system. To remove DirectX or restore your previous version of DirectX, refer to the DirectX Troubleshooting section in this manual.
I . I N S T A L L I N G T O T A L A N N I A L A T I O N
7

I I . S T A R T I N G A N E W G A M E
Adjusting Your System
1.Close all other applications.
2.Check your system for programs running in the background (for example, virus detection programs). These can not only slow the game down, but also result in lockups.
3.Change the resolution to 640 x 480. The higher the resolution, the slower the game.
4.Run Scandisk and Disk Defragmenter (provided within Windows 95).
5.Check the Startup menu for applications loading automatically whenever you boot up your system.
Adjusting Game Options
You can improve game performance by adjusting the following options:
1.Turning off CD music in the Game Options screen.
2.Turning off or reducing unit sounds and chat through the Sound and Interface buttons in the Game Options screen.
3.Turning off shading, anti-aliasing, and shadows through the Visuals button in the Game Options screen. This will result in less impressive graphics.
4.Slowing down the game speed with the slider available through the Interface button in the Game Options screen.
In addition, in Skirmish and Multiplayer games, you can do the following to improve performance:
1.Reduce the number of computer opponents (Skirmish mode).
2.Select a smaller map (both Skirmish and Multiplayer).
3.Choose Permanent LoS (Line of Sight; both Skirmish and Multiplayer).
4.Restrict the number of units that can be built (Multiplayer only).
5.Disable Cheat Codes (Multiplayer only).
8

INSTALLATION
TROUBLESHOOTER
Game doesn’t install
Check whether you have enough space on your hard drive, and whether the CD ROM drive is working properly.
Game won’t run
Check whether you have any free space left on your hard drive, and whether the CD ROM is working properly. Check for programs running in the background. Ensure you have DirectX installed. Try choosing the lowest resolution possible (640 x 480), and set the display to 256 colors.
I I . S T A R T I N G A N E W G A M E
9

I I . S T A R T I N G A N E W G A M E
II. STARTING A
NEW GAME
THE GALACTIC WAR
Long ago, the galaxy was a paradise of peace and tranquility. A galactic governing body known as CORE ruled this paradise with the quest for scientific advancement as its governing philosophy.
Paradoxically, the troubles started when science won the biggest victory of them all-a victory over death itself. The invention of a process called ‘patterning’ allowed the transfer of human consciousness, of the human mind, into machines. This electronic duplication of brain matrices was made mandatory for all the citizens of the galaxy. Effectively, it meant immortality; but there were many who were unwilling to toss their bodies aside so casually, and others that regarded patterning as a straightforward atrocity.
The rebels fled from the rule of CORE and hid in the outer edges of the galaxy. With time, they formed an organization known as ARM. A murderous war began. ARM developed high-powered combat suits for its soldiers; CORE transferred the minds of its finest soldiers into deadly machines, duplicating its best fighters thousands of times over. ARM countered this by using cloning. The war raged on, consuming the resources of the entire galaxy, and leaving most of it a scorched wasteland.
After four thousand years of fighting, both sides came to stalemate. Their vast military complexes were smashed; their economies were ruined. The once-mighty armies of CORE and ARM were reduced to a few scattered survivors. But they continued to battle on ravaged worlds, their mutual hatred as strong as ever.
For each side, the only acceptable outcome was the total annihilation of the other.
10
GAME OVERVIEW
Total Annihilation is a real-time strategy game. You win by making the right strategic choices in structure and unit management, and you play in real time, without taking turns.
You must not only make all the right moves; you must make them fast. Even a not so good move made promptly is better than a brilliant one made too late.
Total Annihilation is a blast, but it is also a complex game. If you are new to real-time strategy games, make sure you know the structures and units at your disposal. It’s a very good idea to have some knowledge of the units and structures at your enemy’s disposal, too. It’s worth your while to take the trouble to learn the structure and unit hierarchy. Section IV of this manual provides hierarchy charts for ARM and CORE structures and units.
Total Annihilation features 3D terrain. Treat it as you do terrain in the real world, because that’s how it affects your units. If you choose True Line of Sight in the Game Options, terrain features will affect what your units can see and what they can’t.
Finally, Total Annihilation is a game in which both winning and losing are fun. Don’t worry about winning too much when you’re fresh to the game. Just play, and have fun!
NEW GAME OPTIONS
The Main Menu screen presents you with four options.
I I . S T A R T I N G A N E W G A M E
11
I I . S T A R T I N G A N E W G A M E
12
*SINGLE starts a new single player game.
*MULTI starts a new multiplayer game.
*INTRO replays the opening movie, showing an intense battle between ARM and CORE.
*EXIT takes you back to the desktop.
NOTE
There is no clear-cut advantage to either ARM or CORE. The two armies have corresponding units in each unit class: every unit has an enemy equivalent. However, there are subtle differences between the corresponding units on both sides. Part of the fun in the game consists of discovering these differences, and putting them to good use.
One general comment: on the whole CORE units are slightly more heavily armored, but slower than their ARM counterparts.
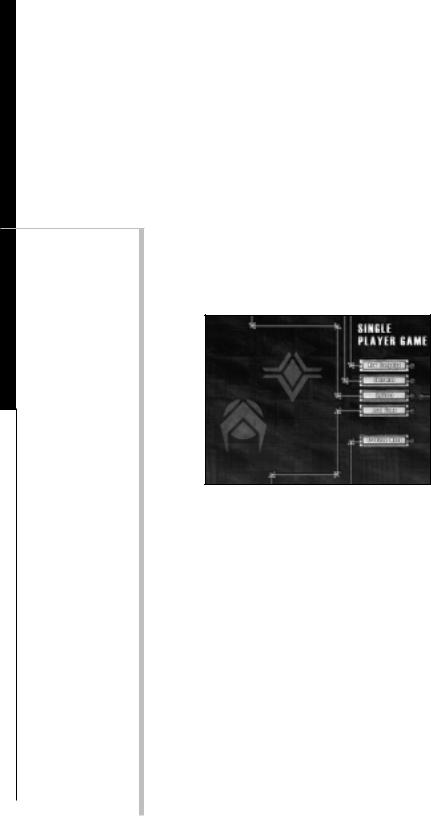
STARTING A NEW SINGLE PLAYER GAME
Choosing SINGLE from the New Game screen gives you a new set of options.
•NEW CAMPAIGN will start a new campaign game.
•SKIRMISH will set up a battle between you and up to three computer opponents on the multiplayer map of your choice.
•OPTIONS takes you to the Game Options screen. This presents you with a set of choices, discussed in a separate section.
•LOAD GAME loads a previously saved game.
New Campaign
If you are new to real-time strategy gaming, it will be to your advantage to begin with the ARM campaign and try the SKIRMISH mode only after you’ve played a few missions. There is also a tutorial walk through in this manual. Using the tutorial will give you a clear indication how to gather and manager your metal and energy resources.
Selecting New Campaign takes you to the Campaign Screen. Once there, you’ll choose:
•Which side to play, ARM or CORE;
•The difficulty level: Easy, Medium, or Hard. This varies the starting forces available to you and your opponent. Players new to real-time strategy should choose Easy; players new to TA should choose Medium; really tough guys should choose Hard.
Skirmish
Play the SKIRMISH mode after you have played enough missions to feel comfortable with the game. Selecting SKIRMISH will launch a game in which you play against up to three computer opponents.
Traditionally, this is good training ground for later multiplayer games, but you’ll probably fight a better Campaign game, too. The Skirmish mode gives you instant access to the game’s most sophisticated units, whereas the Campaign is arranged in a learning curve.
The Skirmish screen also gives you an opportunity to customize your game. The panel on the left lets you set starting conditions for yourself and up to three computer opponents. You can adjust the number of players, type of army under each command, army color, and starting amounts of metal and energy. Higher amounts of metal and energy result in sophisticated weapons appearing within a shorter time frame.
I I . S T A R T I N G A N E W G A M E
13

I I . S T A R T I N G A N E W G A M E
GAME OPTIONS
The Game Options screen accessed through the OPTIONS button presents a wide variety of choices. Many of these affect game performance.
The Game Options screen can also be accessed during the game with the F2 key.
•SOUND opens a menu with Sound Options. Turning Unit Sounds off or down improves game performance.
•MUSIC opens a menu with Music Options. Turning CD music off improves game performance.
•INTERFACE leads to a menu with Interface Options. Slowing the game speed, reducing the number of text lines, and turning off or reducing Unit Text all improve performance. The Interface button within the Interface Options menu lets you choose between left and right-click mouse interface. This choice is discussed in Section III-please see Table of Contents.
•VISUALS opens a menu with Graphic Options. The Gamma slider regulates the brightness of the screen, and the Screen Size sliderthe resolution. Turning Shading, Anti-Aliasing, and Shadows off improves game performance.
14

ARM MISSION 1: A HERO RETURNS
THE OBJECTIVE:
The objective of this mission is to secure your Galactic Gate from a Core threat. To do this you must regain control of your Galactic Gate.
THE MAP:
You start in the middle bottom of the map. The Galactic Gate is located in the upper section of the map in a big caldera. Core units are scattered across the map to stop you from gaining control of the Gate.
THE STRATEGY:
Select all units and use them as one. You can do this by clicking and dragging the box over all of your units on the screen or by using the Ctrl-A keys. By using all your units to attack one unit you mass their firepower and can take out enemy units faster with less damage incurred to your own units (very important since you have no capabilities to repair units in this level). Keep an eye on your radar screen (upper left hand corner) this will show your units in blue dots, a green exposed area that you can see as green, uncovered territory as black, explored territory that is out of sight as gray and enemy units as red dots.
Click on the upper left-hand corner of your game line-of-site screen. All of your units will start moving up and to the left. Your units will start moving across the terrain at different rates. If you are trying to mass your firepower onto enemy units, it’s important to keep all of your units together, so keep an eye on them and don’t let them get too spread out.
I I . S T A R T I N G A N E W G A M E
15

I I . S T A R T I N G A N E W G A M E
Enemy units should be popping up very quickly. Now click on one of the Core K-bots that have come into sight. All of your units will start to converge and attack that unit. That unit shouldn’t last long and will explode. Now click on the next enemy unit to attack on the screen, again all your units turn to attack that one targeted Core aggressor. Continue doing this until there are no more enemy units to be seen.
Now, look up on the radar-scope (upper left) and you might see some red dots, those are enemy units. Move your massed units in their direction and attack. If you don’t see any units, continue moving up the map to the left. You should encounter more enemy units, attack them as you come across them. When you reach the top of the screen move along to the right. You will skirt the top of the caldera that contains the Galactic Gate. Once you reach the upper right-hand corner start moving back down to where you started.
You should have taken out all the Core units, for this mission, it’s time to reclaim your Galactic Gate. Move all your units up and into the caldera containing the Galactic Gate. This will end the mission.
16

ARM MISSION 2: CORE K-BOT BASE, DESTROY IT
THE OBJECTIVE:
Establish a base by building metal extractors, solar collectors, defensive systems and a K-Bot manufacturing facility and then destroy all Core units or just the Core K-Bot lab.
THE MAP:
The map is comprised of two land masses separated by a river with two crossing points. The Core side has the larger L shaped portion of the map from the mid-left, around the lower left to the lower right. The Arm units start in the middle of the upper right-hand section of the map. The two crossing points are towards the left and the bottom right of where you start. Just to your right is a small cliff where some Core units will attack from in the beginning of the mission. If you travel to the upper right side of the screen you will see a canyon opening where patrolling Core units will come out of, be prepared if you go there. The Core K-Bot facility is located almost directly down from your starting position.
THE STRATEGY:
You have started this mission with a new unit, your Commander! He’s a very powerful asset and you only have one of them. Protect him at all costs! Don’t worry, you have plenty of time before you get attacked and your Commander is in danger, but be aware.
First, you need to build resource generators. Select your Commander and then pick the Solar Generator Plant from the Build Menu, on the left-hand side of the screen. Your cursor will change into a green square when you move it back onto your line-of-site screen if it
I I . S T A R T I N G A N E W G A M E
17

I I . S T A R T I N G A N E W G A M E
is over a suitable spot to build one. Select a spot and left-click. Your Commander will start building. If you look to the top of the screen you will see two bars, one is your Metal and the other is your Energy, they will start to go down from 1000 as you build the Solar Generator. If you move the cursor over unit being built and look at the bottom of the screen, you will be able to track the progress of the construction.
Once you have built the Solar Generator, build a Metal extractor. You can build Metal Extractors anywhere, but on top of a silver metal deposit is best, there are three to choose from, pick the one closest to the top of the screen. Once it’s built, order your Commander to build another Solar Generator. Next, have him build a Metal Extractor on the ore patch furthest right. As soon as this is completed have him build a laser tower next to the Metal Extractor you just built. Doing this will help to protect you from patrolling Core AK’s that might wander into your camp from the Canyon. Continue to build a Solar Generator . While the Solar Generator is being built, select another Metal Extractor to be built from the left-hand menu. Now, move your cursor over the line-of-site map, hold down the “Shift” key and left click the green build box over the last metal deposit. There should now be a green box over the metal deposit. If this is done right, as soon as your Commander finishes building the Solar Generator, he should start building a Metal Extractor. Select a K-Bot lab from the left-hand menu and move the cursor over a patch of land that you can build it on and again, holding down the “shift” key left click. Another green box should appear, larger then the first.
Since you have your base being built, it’s time to start attacking the enemy. Select all of your K-Bots. You can either, click and drag a box over them or hold down the “shift” key and select each unit individually with the left mouse button. As you select them a green box should appear around the unit. Once all the units have been selected, a green box should be around all of your K-Bots, not including your Commander (You don’t
18

want to use him in battle yet). With all of your K-Bots selected press the CTRL-”1" key. When you have the unit health bars on (toggled by the “~” key) a number “1” should now appear under all selected units, they now been grouped together and call all be reselected by using ALT-”1". Move them to the top of the screen. When they have reached the top of the screen order them to move to the right. You will see a green area at the mouth of a Canyon and encounter enemy units there. As with the previous mission attack in strength, mass your firepower against one Core unit at a time. Stop the units at the mouth of the Canyon, they will finish up any Core units that try to come through there.
Your commander should be finished building the K- Bot Lab by now, if not then fill out your registration card while you wait for him to complete the project. Once he has finished move him to the center of the base to build another Solar Generator and select the K-Bot lab. Once you select the K-Bot lab you notice a new build menu appears with K-Bots on it. Move your cursor over the units you can build (ones you can’t are grayed out) and look at the bottom title bar. As you do so you will see the cost of metal and energy to manufacture the unit. Click on the Jethro 4 times. You should see a +4 superimposed over the Jethro icon. This means your K- Bot lab will build 4 Jethro’s before stopping production. We don’t want to stop there, click 4 times each on a Hammer, Rocko and PeeWee. This should start the building of a small assault force. As units nanolathe they walk off the platform, move them to a clear patch of land to wait until all the other units have been produced. If you didn’t have time to fill out the registration card before, you do now.
Once all the units have been manufactured highlight/select the whole group of 16 K-Bots by either “Shift”-click or click/drag and do a CTRL-”2" too set them as ALT-”2" group. Move them down to the right, you might encounter some Core units on your side of the water. Frag them as you go. Hold your units on your side of the River. You should be able to see the shallow crossing point in the river from there. Once all
I I . S T A R T I N G A N E W G A M E
19

I I . S T A R T I N G A N E W G A M E
of your units have gathered at the banks of the river click on the other side. They should start fording the river. As your first unit reaches the other side it should start taking fire from a laser on the top of the ridge in front of you. Click your units towards that laser tower. As soon as you can see the ridge crest, click on it. You can click on the laser tower to attack as soon as you see it, but it’s on higher ground and your fire will not be as effective. Run your units to the ridge top and then attack the laser. It shouldn’t take long.
You will start encountering more enemy units once you have reached the top of the ridge. Attack them in force as you’ve been doing. You will start to see structures a Radar Tower, an Energy Storage Unit and a Solar Generator (all Core). Destroy them, but keep attacking the Core units attacking you as soon as you see them. None of those structures can kill you but the K-Bots can! Once you have destroyed all the buildings and aren’t being attacked by roving Core units move just a little bit up to the left. You should be able to see the Core K-Bot lab. Attack and destroy it. That will end the level.
20

MISSION 3: SPIDER TECHNOLOGY
OBJECTIVE:
Save at least one Spider by returning it to your base.
MAP:
The map consists of three land masses separated by a “Y” in a river. Your commander and units start at the lower right side of the “Y”. The spiders are located at the very top center of the map at the summit of a steep hill.
STRATEGY:
The key to this mission is time. Build up your base with a some energy generators, a metal extractor and a couple laser towers for defense (Placed on the outside of the Dragon Teeth). If you start running low on resources, use your Commander to reclaim trees for energy and rocks for metal. Build a manufacturing plant of some sort and start cranking out units. Slowly advance up the map to the Spiders. If you stay on your side of the river it’s easier. Once you’ve cleaned out a path for the Spiders to get to your base, select them and walk them on down. You might have to walk them around the base a little to complete the mission.
I I I . P L A Y I N G T H E G A M E
21

I I . S T A R T I N G A N E W G A M E
MISSION 4: CORE CONTAMINATION SPREADS...
OBJECTIVE:
Eliminate all core units and structures from this map.
MAP:
For this map you start the mission in the lower right hand corner. The enemy base is located in the center left side of the map. There is a hill in the left center of the map that is very heavily defended by Core units and laser towers, beware.
Strategy:
Units in the beginning of this map are few, conserve them, don't send them off to attack everything. Build your base as normal, balancing your energy and metal extraction. Use a couple laser towers to bolster your defensive parameter. Slowly expand gaining metal resources and space to build while protecting structures with laser towers. A Radar Tower will give you early warning if enemy units are approaching, even if you haven't explored the territory.
As your units start to see action they will become damaged. You can repair them with your Commander, or any construction vehicle, by selecting the "Repair" button from the orders menu or by selecting your Commander, pressing the "R" key and then select the unit you want to repair. The Commander will move over to him and start repairing him. If you have a lot of damaged units you can select the unit you want to do the repairing and then select Patrol ( the "P" key) and click
22

a point in the that makes the unit walk around the damaged units. As the Commander or Construction Vehicle moves around on patrol and they encounter damaged units they will stop and repair them, then continue patrolling for more damaged units.
Keep your eye out for enemy units attacking from the top along the right hand side of the map and from the lower left.
I I . S T A R T I N G A N E W G A M E
23
 Loading...