


Table Of Contents
INSTALLATION .................................. |
2 |
SYSTEM REQUIREMENTS ..................... |
2 |
STORYLINE ................................................... |
3 |
MISSION STATEMENT ............................. |
3 |
GAME PLAY ................................................. |
3 |
Main Menu ................................................ |
4 |
Mission ....................................................... |
4 |
Career ......................................................... |
4 |
Multi-Player .............................................. |
5 |
Over & Out ................................................. |
5 |
Options - SWAT Eagle ........................... |
5 |
Mission Mode ............................................ |
10 |
Standard Mission Mode ..................... |
10 |
Custom Mission Mode ........................ |
15 |
Career Mode .............................................. |
22 |
Creating A New Career ...................... |
22 |
Restoring A Career .............................. |
26 |
Metropolitan Division .......................... |
26 |
IN-GAME FEATURES .............................. |
37 |
Performance ........................................... |
37 |
Movement ................................................ |
37 |
Weapons / Tactics ................................ |
38 |
Communications ................................... |
43 |
View Ports ................................................ |
52 |
Weapon Status ....................................... |
53 |
Briefing Summary ................................. |
54 |
Debrief ...................................................... |
54 |
MULTI-PLAYER MODE .......................... |
59 |
Multi-Player Menu Options .................. |
59 |
Officer Screen ............................................ |
62 |
Call Up .......................................................... |
62 |
Multi-Player Game Types .................. |
63 |
Main / HQ ................................................ |
64 |
Career ....................................................... |
64 |
Join ............................................................. |
65 |
Create ........................................................ |
65 |
Officer ....................................................... |
65 |
Info ............................................................. |
65 |
Operations ................................................... |
66 |
Ops Screen .............................................. |
67 |
Mission Screen ...................................... |
69 |
Gear Screen ............................................ |
70 |
Chat Screen ............................................ |
72 |
Go! Go! Go! .............................................. |
73 |
Multi-Player Gameplay Features ........ |
73 |
General Multi-Player Features ......... |
73 |
Co-Operative Play Features .............. |
75 |
Deathmatch Player Features ............ |
83 |
SINGLE-PLAYER MISSION |
|
WALKTHROUGH ...................................... |
85 |
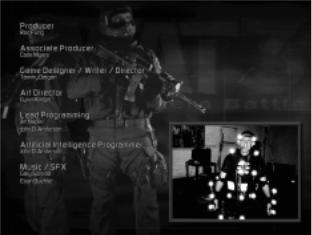
GAME CREDITS ........................................ |
89 |
CONTACTING SIERRA ........................... |
92 |
Customer Service, |
|
Support, and Sales ............................... |
92 |
On-Line Sales ........................................ |
93 |
Disk and or Manual Replacement: 93 |
|
Technical Support ................................. |
94 |
SIERRA WARRANTY & LEGAL |
|
INFORMATION .......................................... |
95 |
1
INSTALLATION
Insert the game CD into your CD-ROM drive. If your CD-ROM drive has AutoPlay enabled, click the “Install” tab and follow the on screen instructions.
If AutoPlay is not enabled, double-click on the “My Computer” icon located on your desktop. Double-click on the CD-ROM drive icon. Follow the on screen instructions.
SYSTEM REQUIREMENTS
Minimum System Requirements
Windows 95, Windows 98, Windows ME, Windows 2000 Pentium II 266 MHz
64 MB RAM
550 MB HD space CD ROM: 4X or better Mouse and Keyboard
800 x 600 SVGA high color display (16 bit) 8MB Video Card
DirectX8a (included on CD) Windows compatible sound device Mouse and Keyboard
Recommended System Requirements
Pentium II 300+ MHz 64 MB RAM
3D accelerator card (DirectX Compatible)
Internet/Multi-Player System Requirements
32-bit Internet Service Provider with
28.8+ Modem or (LAN) Local Area Network
2
STORYLINE
Los Angeles, 2005.
In the next seven days, representatives from every nation around the world will converge on Los Angeles to witness the signing of the United Nations Nuclear Abolishment Treaty (resolution S-112/8). The protection of these dignitaries falls on the shoulders of LAPD SWAT.
As a tactical leader within SWAT, your assignment for the next 24 / 7 will be to lead your team against the global forces that would prevent the City from hosting the treaty ceremony and joining the world in celebrating Global Peace Day 2005.
MISSION STATEMENT
As an officer of D Platoon SWAT you must have a deep and abiding reverence for human life and a firm resolve that all possible tactical alternatives be exhausted before employing deadly force.
You must be committed to the concept of team work, and recognize that the overall success of each mission is a direct result of individual team members acting in concert with one another.
It is important that you have a conviction that intensive training is paramount to continued success in all operational aspects of the team.
You must recognize that we, the members of SWAT, are part of a larger organization, the Department. Our level of success is dependent, in large measure, on the support of the Department.
As an LAPD SWAT officer, know that your fundamental mission is to make Los Angeles a safe haven for all law abiding citizens, while keeping the men under your command free from harm.
GAME PLAY
SWAT3: Tactical Game Of The Year Edition is a first-person tactical simulation where you play either the element leader of a five-man entry team, or a team assaulter. SWAT3 can be played in mission mode, career mode, or multi-player mode.
In mission mode, each mission is a stand-alone experience. Mission results are not tallied and do not effect an overall score.
In career mode your up-front decisions have long lasting effects, as the squad you choose will last your entire career. The sequence of missions within a career is predicated on outcomes from previous missions. In career mode your leadership score and the medals awarded you are tracked.
Multi-player mode allows you to play SWAT3 missions or careers on-line, over a LAN or the Internet. Selection of mission, career, or multi-player mode occurs at the game’s main menu.
3
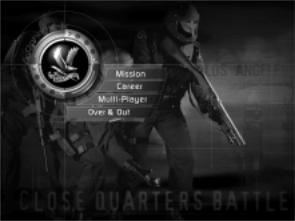
Main Menu
The main menu appears after the opening sequence. From the main menu you can play a mission, begin or restore a career, play a multi-player game of SWAT3, set your options, or quit out to Windows. Passing your cursor over any of the main menu option tabs causes them to highlight. Click on a highlighted option tab to select.
Mission
Clicking on the Mission tab exposes two mission modes: Standard and Custom. Passing your cursor over either of these tabs will cause them to highlight. Click on a highlighted tab to select.
Standard
Clicking on the Standard tab will bring you directly to the mission mode game environment, where you play as the element leader of a five-man entry team in any of the SWAT3 missions.
Custom
Clicking the Custom tab will take you to the custom mission mode game environment and allow you to select a mission and gameplay type.
Career
Clicking on the Career tab exposes two career options: New and Restore. Passing your cursor over either of these tabs will cause them to highlight. Click on a highlighted tab to select.
4
New
Clicking the New tab will bring you to the career selection screen and allow you to select the career you wish to begin.
Restore
Clicking the Restore tab will bring you to the restore career screen and allow you to select a saved career that you wish to restore.
Multi-Player
Clicking on the Multi-Player tab will allow you to access multi-player mode. For more information, see the Multi-Player Mode section of this manual.
Over & Out
Clicking on the Over & Out tab quits the game and returns you to Windows.
Options - SWAT eagle
Clicking on the SWAT eagle will take you to the Main Options Screen and, subsequently, to the Keyboard Mapping Screen and Custom Chat Screen. From these screens you can customize your keyboard and mouse configurations, set your audio and music levels, select video card support or software, adjust your screen modes and settings, and perform a host of other options described below. The Main Options Screen can be accessed anywhere within the Metropolitan environment by clicking on the SWAT eagle.
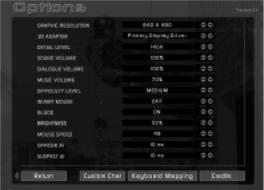
Main Options Screen
5
Here you can change various settings to improve game performance or enjoyment. Each of the categories mentioned below has a default setting. To change the default setting click on the arrows to the right of the category.
Additional options are located on two separate screens, accessible by clicking on either the Custom Chat tab or the Keyboard Mapping tab, both located at the bottom of the screen. Additionally, you may view the game credits by clicking on the Credits tab located at the bottom of the screen.
To return to the previous screen, you may click the Return tab at the lower left corner of the screen.
Graphics Resolution
The default setting is 640 x 480. The available resolutions will vary depending on the capabilities of your system.
3D Adapter
If you have a 3D adapter it will be listed here. If not, the word “Software” will appear. If you are running the game under Software you will not experience the game to it’s fullest. You will be missing many of the game’s lighting effects, such as the flashlight, shadows, and lightsticks.
Detail Level
If you notice that the game is running sluggishly, lower your detail level. Lowering your detail level will speed up the game; however, you will notice a slight reduction in art quality. There are three detail settings: low, medium and high. The higher the detail setting, the more processing power your computer should have.
Sound Volume
Increase or decrease the volume of your sound effects.
Dialogue Volume
Increase or decrease the volume of the game dialogue.
Music Volume
Increase or decrease the volume of the game music.
Difficulty Level
If you find that the AI characters are just too darn hard to beat, lower this setting. As you become better trained and better versed in tactics, go ahead and increase the difficulty level. After all, they’re just AI characters...
Invert Mouse
It’s like flying a plane! Move your mouse forward and your cursor points down. Move your mouse back and your cursor moves up.
6
Blood
On or off; nothing in between. Not even a drop.
Brightness
Increase this setting to enhance the brightness in the game, if your surroundings seem too dark. Decrease this setting if things seem washed-out.
Mouse Speed
You can adjust your mouse sensitivity using this control. The higher the number, the more sensitive the mouse.
Officer AI
Increase this setting to make your officers more “intelligent”. Note that increasing your officer’s intelligence is at the cost of computing power. Consequently, depending on your system, the smarter your officers the more sluggish the game may play.
Suspect AI
Increase this setting to make the suspects more “intelligent”. Note that increasing the suspect’s intelligence is at the cost of computing power. Consequently, depending on your system, the smarter the suspects the more sluggish the game may play.
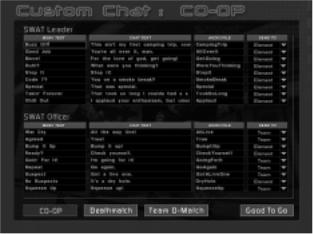
Custom Chat
7
Selecting the Custom Chat tab causes the Options screen to be replaced by the Custom Chat screen. The Custom Chat screen allows you to create personal custom chat messages and specify their recipients for multi-player game play.
There are three separate Custom Chat screens: Co-Operative, Deathmatch, and Team Deathmatch. To move between these three screens, highlight and click on one of the three tabs (Co-Op, Deathmatch, or Team D-Match) located at the bottom of the screen.
The Co-Operative screen, Co-Op, is broken into two sections: one for SWAT leader messages and the other for SWAT officer messages. Creating custom messages for both team positions prepares you for the potential of assuming the position of SWAT leader in the event the original SWAT leader is neutralized in cooperative play.
The Deathmatch custom chat screen contains a single section with nine configurable messages.
The Team Deathmatch custom chat screen is arranged similarly to the Co-Operative screen; there is a section for team Leader, and a section for team Assaulter. As in Co-Op play, you may end up assuming the role of leader in the event that the original leader is neutralized, so prepare your custom messages accordingly.
The Custom Chat sections have four configurable fields of information, they are: Menu Text, Chat Text, Audio File and Send To.
Menu Text
The nine lines of text that appear in this column are displayed for your reference on screen as message headings in the Messaging Menu, under Custom Chat. As with all message headings in the Messaging Menu, these nine messages are bound to number keys; the topmost heading is bound to the “1” key, the next lowest bound to the “2” key, and so on.
To edit any of the headings, pass your cursor over the text to highlight and click to select. Once selected, use the keyboard to type in a new text heading.
Chat Text
This is the on screen text that is displayed to other players when you send a custom message.
To edit any of the text messages, pass your cursor over the text to highlight and click to select. Once selected, use the keyboard to type in a new text message.
Audio File
Every custom chat message can have an accompanying audio file. To edit, pass your cursor over the current audio file name to highlight and click to select. Once selected, use the keyboard to type in a new audio file name (without extension). The audio file must be a 16 bit, 22KHz, mono .wav file.
Note: Place the actual audio file in your SWAT3 root directory.
8
Send To
This column contains a drop down menu with optional recipients. To select a recipient, click on the arrow to reveal the drop down menu. Scroll to highlight a recipient. Click on the highlighted recipient to select.
Recipients vary depending on game type and position. For Co-Op / SWAT Leader and Team Deathmatch / Leader, the recipients include: Element, Red and Blue. Designating Element as a recipient results in the message being heard by everyone in the element. Designating Red or Blue as the recipient results in the message being heard by the specified team only.
For Co-Op / SWAT Officer and Team Deathmatch / Assaulter, the recipients include: Element, Leader and Team. Designating Element as a recipient results in the message being heard by everyone in the element. Designating Leader as the recipient results in the message being heard only by the leader. Designating Team as the recipient results in the message being heard only by your teammate.
In Deathmatch there are two available recipients: All and Side. Designating All as the recipient results in the message being heard by anyone in the game. Designating Side as the recipient results in the message being heard only by people on your team, or side.
Click the Good to Go tab located at the bottom of the screen to save your changes.
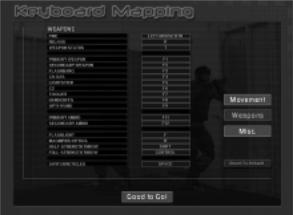
Keyboard Mapping
Selecting the Keyboard Mapping tab replaces the Options Screen with the Keyboard Mapping Screen.
The Keyboard Mapping screen allows you to customize your in-game controls. To do so, pass your cursor over the list of controls on the right side of the screen to
9
highlight. Click to select. There are three separate keyboard mapping screens, divided by the category in which they are used. They are: Movement, Weapons, and Misc. (Miscellaneous). Highlight and click these tabs to change screens.
To bind a control to a specific key, highlight and click the control, and then press the key you want mapped to that control. If the key you request is already in use, your new key will be bound, and you will be notified which command had previously been bound to that key.
To accept your changes, highlight and click on the Good To Go tab located at the bottom of the screen. To return the controls to their default settings, highlight and click the Reset to Default tab.
Credits
OK, so we’re proud of what we do. Pass your cursor over to highlight, and click to
select. And then do it again, and again, and again...
Mission Mode
Standard Mission Mode
Standard mission mode has been designed to get you into a mission as quickly and seamlessly as possible. Consequently, entering the game in standard mission mode takes you directly to Metro.
10
Metro
In Metro, the selections of your character, team, weapons, and mission are handled by four tabs along the bottom of the screen. From left to right the tabs are Mission, Element, Gear, and Active Duty. Pass your cursor over the tabs to highlight. Click on a highlighted tab to select. The highlighted tab will change from blue to gold and the screen will change to your selection.
Located on the bottom right of the screen is the SWAT eagle surrounded by three options: Education, Metro and Main. Pass your cursor over the SWAT eagle and the tabs to highlight. Click on the highlighted SWAT eagle or a highlighted tab to select. Clicking on the SWAT eagle switches the game to the Main Options Menu. Clicking on the Education tab accesses tactics information. Clicking on the Metro tab accesses mission information. Clicking on the Main tab switches to the Main Menu.
Mission
Clicking on the Mission tab at the bottom of the screen accesses the Mission Map. Located on the map are blue pin dots representing all of the different game missions. Pass your cursor over the pin dots to highlight and learn the nature of each mission. Click on a highlighted pin dot to select. The pin dot will change color from blue to red and the selected mission information will appear to the right of the map. To deselect a particular mission, merely click on a different blue pin dot.
Also located on the mission map is one green pin dot representing SWAT’s Shooting House. The Shooting House is a training environment where you can hone your individual skills or your team tactics. Pass your cursor over the green pin dot to highlight. Click on the highlighted pin dot to select. The pin dot will change color
11
from green to red and the shooting house information will appear to the right of the map. To deselect, merely click on a different pin dot.
As a default in standard mission mode, the Mission Map is selected when entering the game.
Entry Point – Mode Of Entry
Located to the right of the map, above the mission information, are two arrows. Clicking on the highlighted arrow pointing to the right will allow you to choose your entry point and tactical mode of entry. Clicking the highlighted arrow pointing to the left will bring you back to the mission information. If you do not choose an entry point or a tactical mode of entry, defaults will be provided for you.
Element
Clicking on the Element tab on the bottom of the screen accesses the Element Selection Screen. The Element Selection Screen is where you choose the Element Leader you wish to play and the team you want to command.
There are twelve Element Leaders and forty-eight officers to choose from. The fortyeight officers are broken into six groups of eight. Each group of eight officers are associated with two specific Element Leaders.
As a default, an Element Leader and four officers within his element are assigned to team positions when the Element Selection Screen appears.
Located across the top of the Element Selection Screen are five specific team positions, each filled with an officer. From left to right the positions are: Element Leader, Red “1”, Red “2”, Blue “1”, Blue “2”.
12
To change the officer in the Element Leader position click on the arrow to the right of the Element Leader’s image. As you do so, notice the information contained in the box at the bottom of the screen changes: this is the Element Leader’s biography.
Also notice that every second click the eight officers in the center of the screen change.
Once you have determined which Element Leader you want to play, leave his image in the Element Leader slot on the top row. The eight officers who appear in the center of the screen can now be assigned to specific team positions.
Assigning officers to specific team positions is easy. Pass your cursor over the top row of team positions. As your cursor passes over the different team positions, the images of the pre-assigned officers highlight.
Click on a highlighted image to select. A red or blue border now outlines your selection, indicating that the team position is ready for re-assignment. Notice that the officer assigned to that particular team position is highlighted with a red or blue border in the center of the screen, and that his biography appears in the box at the bottom of the screen.
To re-assign the selected team position, pass your cursor over the eight officers located in the center of the screen. As your cursor passes over the officers they highlight. Click to select. Continue re-assigning team positions until you’re satisfied with your line up.
Remember, you are creating a four-man team that can be split into two groups. It’s important that the officer’s assigned to a particular team compliment one another and that both teams work in tandem. This will become even more important when you are assigning them weapons.
If you skip through this selection process prior to entering a mission, not to worry; random defaults are set.
Gear
13
Clicking on the Gear tab on the bottom of the screen accesses the Gear Selection Screen. Notice that when switching between Element Selection and Gear Selection screens the officers located along the top of the screen do not change or disappear. Located vertically in the center of the screen are four tabs representing categories of weapons and gear, they are: Primary, Secondary, Tactical Aid, and Gear. Passing your cursor over these tabs causes them to highlight. Click on a highlighted tab to select. Once a category is selected arrows appear to the right of the tab. Click on the arrows to browse through the category.
Primary and secondary refers to the weapons an officer will carry. To select a specific weapon for a mission, leave it displayed on screen.
All weapons require ammunition. Next to the onscreen ammunition information there are arrows. Click on the arrows to increase or decrease the number of magazines you wish an officer to carry. There is a maximum number of magazines assigned to each weapon, so increasing one type of ammunition will decrease the other.
Tactical Aid and Gear refer to everything an officer needs beyond his weapons. Some items in these categories can be assigned; others are standard issue. Arrows appear next to items which can be assigned a quantity, such as CS Gas, flashbangs and C2.
Click on the arrows to increase or decrease the amount assigned to an officer. Note that an officer can carry a set number of canisters. Consequently, increasing the number of CS Gas canisters will decrease the number of flashbangs, (and visa versa).
It is important to note that when assigning weapons and gear, you are assigning it to a particular team position, not to a specific officer. Consequently, if you change officers after you’ve assigned weapons you do not need to re-assign weapons. All clear? Good.
You may click the Assign to All tab to assign the configuration of weaponry, ammunition, and tactical aids shown on-screen to all assaulters, including the Element Leader.
If you do not configure your team prior to entering a mission, don’t sweat it. Each position has a default weapons setting for each mission. It might not be the configuration you wanted, but hey, you had your chance.
Active Duty
Clicking on the Active tab on the bottom of the screen takes you to Active Duty... it’s mission time! There’s no turning back.
Remember, you can choose Active Duty without selecting an Element Leader, or choosing your assaulters, or configuring your team’s weapons. Defaults are set, and you’ll arrive on scene with the team, the weapons and tactical aids the Department deems appropriate.
14
Custom Mission Mode
In addition to the original SWAT3 mission mode, accessible through the main menu by clicking on the Mission tab, and then the Standard tab, you may play any of the SWAT3 missions, including those created by mod builders, with an extended set of options and up to ten assaulters split between up to two entry teams, by selecting Custom from the Mission tab in the main menu.
Custom missions give you access to additional weapons, assaulter types, camos, and an extra entry team for the mission if you so choose. Any MODs you have activated with the MOD Selector will be active here.
If this is your first time playing SWAT3 in custom mission mode, you will be asked to create a SWAT officer persona to represent you in the game. You may specify the names and traits for your new officer or leave them set to defaults. To create your own persona name, click on the supplied name, and then type using the keyboard. You’ll want to enter a last name, first name, and nickname. After that’s finished, you can use the arrows to the sides of the Years in Swat and Race selection to scroll through those fields to pick the traits that you’d like. If you are satisfied with your changes, click the Accept tab. If you do not wish to save your changes, click the Cancel tab.
If you are returning to custom mission mode, you will not be asked to create another persona.
Mission Selection
Once you have clicked the Mission tab and then the Custom tab on the Main menu and have a persona, you will be taken to the Mission Selection menu. The selection is defaulted to a randomly chosen mission. Click on the arrows at the bottom-right hand side of the menu to change the currently selected mission. A graphic of the mission appears to the left of the arrows for your reference, and the name of the mission will appear at the upper-left.
Game Type
When you have selected the mission that you would like to play, you may also select the game type you would like. You may choose to play Co-Operative (as in the original SWAT3 missions), or any of the new competitive game types: Deathmatch, Team Deathmatch, or Last Man Standing. Click on the arrow to the right of the box marked Game Type and select from the list. See the Multi-player section of this manual for information on the multi-player game types.
Once you have your mission choices the way you want them, move your cursor over the tab marked O.K. and click. You will be taken to Operations where you can configure your team, your gear, and your entry points for the upcoming mission.
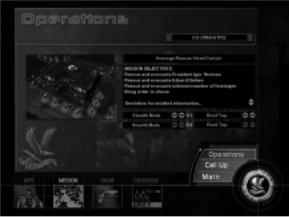
Operations
To ready yourself and your team for a custom mission, or a mission in a custom career, you will be taken to Operations. This set of menus allows you to make
15
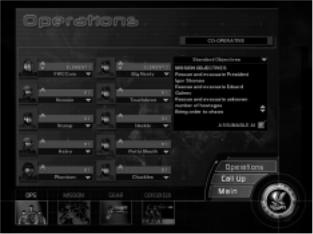
choices about how you want your team to be structured, equipped, and outfitted, and where you want your team to insert into the mission area. You may also choose gameplay augmentations and custom scenarios from these screens.
Operations is divided into three screens: Ops, Mission, and Gear. In single-player mode, the screen defaults to the Ops menu.
Located at the bottom right of the Operations screen is the SWAT eagle surrounded by three option tabs; Operations, Call Up, and Main. Pass your cursor over the SWAT eagle and the tabs to highlight. Click on the highlighted SWAT eagle or a highlighted tab to select. Clicking on the SWAT eagle brings up the Options Menu. Clicking on the Call Up tab returns you to the mission selection screen. Clicking on the Main tab takes you back to SWAT3’s Main Menu.
The SWAT eagle and associated options are persistent between Ops, Mission and Gear.
Ops
In Ops, you configure the structure of the teams and choose what positions you want filled by AI, and what position you yourself wish to have on the team. You may choose to be element leader, or a team assaulter. Augmentations and scenarios are also chosen here, and the mission briefing is displayed.
Co-Operative
In Co-Operative mode, the first step is to determine if you wish to play the mission’s standard scenario, or a custom MOD scenario. This option is only available in mission mode, as the missions are pre-set in career mode. At the top-right hand
16
corner of the Ops screen is a box that contains the current mission briefing and objectives list. You may scroll through the briefing by clicking the arrows to the right of the briefing box.
Above the box is the name of the current scenario and an arrow. Click this arrow to open a list of available scenarios; click to select the scenario of your choice. If the “Random Objectives” scenario is chosen, fields will appear that represent the number of hostages, suspects, and civilians that will be placed in the mission area when the game begins. Use the arrows located to the right of each field to increase or decrease the number in the field, or click the Random button to the far right of the field to set the field to a random value.
Deathmatch
In any of the Deathmatch variations, the scenario briefing is replaced by several fields that represent the game parameters: Max Score, Suspects, Civilians, Timer, and Lives. Each field has two arrows directly to the right which are used to change the value in the field, and, depending on the field, a Random button which will set the value randomly at game start.
Max Score can be set to a value or can be left blank. If blank, there is no maximum score, and thus, the game cannot end based on score. If it is set to a value, the game will end when one player reaches the maximum score.
The Suspects and Civilians fields can be set to a value, including zero or a random value. These fields designate how many suspects and civilians will be placed in the mission area when the game begins.
The Timer can be set to designate a certain amount of game duration. If the timer is left blank, the game cannot end based on time elapsed. If the timer is set to a value, that value represents the number of minutes that will pass during the game before the game ends.
The Lives field indicates the number of times that each player will be able to reenter the mission area after being neutralized. You may leave it blank or click the None button to the right of the field to give each player indefinite lives, or set it to a value to limit their number of lives.
Augmentations
Below the briefing box is a space for check boxes that toggle gameplay augmentations. These vary from game mode to game mode.
Co-Operative Mode Augmentations
Co-operative mode contains the Assumable AI augmentation. If you choose to turn this feature on, you may assume control of the next AI officer on your team should you be neutralized. During the game, if you are neutralized, press the ESCAPE key to bring up the in-game menu. Click the Assum. AI tab to immediately assume control of the next AI officer on your team.
17
Deathmatch Mode Augmentations
Deathmatch mode contains several augmentations, including Paintball mode which can be activated in any deathmatch game type and is explained on the following page, as well as augmentations that are unique to the game type that you have selected.
For Standard and Team Deathmatch modes, the Respawn AI augmentation is available. Activating the Respawn AI augmentation box will cause all AI characters removed from the map, by neutralization or evacuation, to return to the game in a random location.
For Team Deathmatch, the Base Camp augmentation is available, selectable from the Mission screen. This augmentation is located in the Mission screen, explained below. If activated, this augmentation will designate the starting locations of each team in the game to be their “Base Camp”. Once a player has been neutralized, they will respawn at their team’s base camp. If this option is deactivated, players will respawn in random locations on the map if they are neutralized.
For Last Man Standing, the Life Support augmentation is available. This augmentation, if active, will give each player a “life meter” that will slowly drain away as the game progresses. If it falls to zero, the player is neutralized. To recharge these meters, players must wound or neutralize suspects or other players. This discourages the practice of “camping”.
Paintball Mode
Paintball Mode is a unique way to play SWAT3 deathmatch. The color of the boxes that contain the names of the players in the current game represent the color of paint each player has for their weapon.
Paintball has its own set of rules and changes:
All players now shoot paintballs, rather than bullets, from their weapons. Each player’s paintball color is determined automatically before the mission begins. Suspects, however, will always fire orange paintballs.
If you are hit with a paintball, your screen will flash the color of the paintball you were hit with.
The effects of body armor are negated; every player, suspect, and hostage is equally vulnerable to a paintball hit. However, damage is relative; a direct hit to the head with a paintball does not deal as much “damage” as a hit to the hand.
Paintballs are fired at much lower velocities than bullets; in paintball mode, your shots will not penetrate any surfaces, nor will they pass through any other characters. Paintballs will leave a visible “splat” of paint on any surface or character they hit.
Team Setup
The next step is to determine the structure of the teams you want in the mission. In the center of the screen, you will see two columns of five boxes each. Each column represents a five-man entry team. The left column is team one, in which four AI assaulters have been assigned, and to which you are assigned the role of element leader, and the right column is team two, which is initially empty. To assign an AI
18
assaulter to any one of these slots, click on the arrow to the right of the slot name, and choose from the available options in the drop-down list. You may select “AI” to fill the slot with a new AI assaulter. You may also select the name of a previously placed AI assaulter to move him to the new slot, you may select your own name to move yourself to that spot, and you may select “Boot” to empty the slot of any assaulter currently placed in it.
In Co-Operative mode, these two teams work in tandem to accomplish mission objectives. In Team Deathmatch, they compete head-to-head for points. In Last Man Standing and Deathmatch play, each player fights against all of the others for supremacy.
Note that in Co-Operative and Team Deathmatch, the game cannot start if either team has assaulters but no leader. If a team has assaulters, it must have a leader for the game to begin.
Mission
The Mission tab, available in Co-Operative and Team Deathmatch modes provides you with information about the mission area you will be entering and allows you to set entry points for your team(s). On the right hand side of the screen is the current briefing for the upcoming mission. You can scroll through the briefing by clicking the arrows to the right of the briefing text.
To the left of the briefing box is a shot of the current mission location, for your reference. Below the briefing box are your entry point / mode of entry selectors. Two sets of boxes, one for each team, identify the team’s entry point and tactical mode of entry: stealth or dynamic, for the mission. Click the arrows to the left and right of each box to change the entry point and tactical mode of entry for your team(s). When you are satisfied with your choices, simply leave them displayed onscreen, and they will be applied when the mission begins.
19
In Team Deathmatch, the option for activating the “Base Camp” augmentation will appear. For more information on gameplay augmentations, see above.
In Standard Deathmatch and Last Man Standing modes, the Mission screen is unavailable.
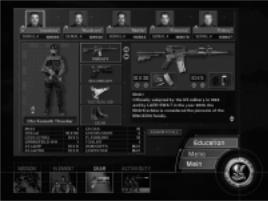
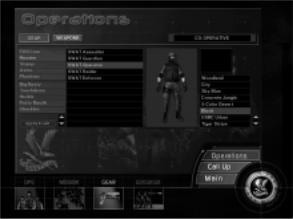
Gear
The Gear tab allows you to access weapons and equipment for yourself and the other assaulters. The Gear screen is separated into two menus, the Gear menu and the Weapons menu. By default, the Gear menu is shown. To move between the two menus, click either the Gear or the Weapons tabs located at the top-left hand corner of the screen.
Gear
In the Gear menu, you can configure the character types for each assaulter and choose a team camouflage configuration. On the left hand side of the screen is a list of the assaulters that are assigned to the mission. To select an assaulter to equip, click on their name. Directly to the right of the assaulter list is a list of character types. You may scroll through this list by clicking on the arrows to the lower left of the list. To choose a character type for the selected assaulter, click the name of the character type you want to assign from the list. If you are satisfied with the character type, leave it selected on-screen.
Character types have certain attributes that affect their mobility and protection. A heavy assaulter may have more protection from bullets than a light assaulter, but cannot move as quickly.
If you find that a particular character type is appropriate for the entire squad of
20
assaulters, you may click the Assign To All button located at the lower-left hand side of the menu to apply the currently selected character attributes to all assaulters. You may also choose a camouflage style for your team. On the right side of the screen is a list of available camo styles, with a swatch of the currently selected camo above the list for your reference. Scroll through the list by clicking on the arrows to the right of the box, and select a camo by clicking on its name. When you are satisfied with your choice, leave the camo selected on-screen.
Weapons
In the Weapons screen, you may choose the primary and secondary weapon configurations for yourself and your assaulters, as well as your tactical aids. Weapons and tactical aids are chosen from three separate lists, accessible by the named tabs above the center list: Primary, Secondary, and Tactical Aid. Clicking on one of the tabs will switch the list contents to that category and display the currently selected assaulter’s weapon if Primary or Secondary is selected.
The list of assaulters is shown on the left hand side of the screen. Select the assaulter you wish to outfit by clicking on their name. If you are currently in Primary or Secondary weapon selection mode, the current assaulter’s weapon selection will be highlighted in the weapon list, shown to the right of the assaulter list. This list is scrollable; you may click the arrows to the left of the list to scroll the contents. To choose a weapon for the currently selected officer, click the name of the weapon. A graphic of the currently selected weapon will be shown to the right of the weapon list, along with two fields below the graphic representing the amounts of primary and secondary ammo that are currently assigned to the current assaulter for the selected weapon. If you would like to change the amounts of a specific ammunition type carried, you may click the arrow to the left of the field to decrease the amount, and click the arrow to the right of the field to increase the amount. Note that the
21
assaulter only has a limited amount of space available; increasing the amount of one ammunition type may decrease the amount of the other type.
In choosing tactical aids, you may select the quantities of each type of tactical aid for the current assaulter. To do so, enter tactical aid selection mode by clicking the “Tactical Aid” button above the central list, and then select a tactical aid from the list by clicking on its name. Below the graphic of the tactical aid is a field in which is displayed the quantity of the selected tactical aid carried by the current assaulter. To increase or decrease the amount, click the arrows on either side of the field. Note that the assaulter has limited space, and so increasing the amount of one tactical aid may decrease the amount of the others.
Finally, should you find that a certain combination of weapons, ammunition, and tactical aids is suitable for all assaulters on your team, you may click the “Assign to All” button located to the lower left of the central list, after selecting the weapons, ammunition, and tactical aids for the current assaulter that you wish each assaulter to carry. The selection will be immediately applied.
Go! Go! Go!
When you have made your team, gear, and mission selections, click the “Go! Go! Go!” button to begin the mission.
Career Mode
Welcome to D Platoon, officer. As an Element Leader, every decision you make from here on out, from the largest to the smallest, will affect the outcome of your career, and consequently, the lives of the citizens you’re charged to protect.
Creating A New Career
To begin your career, the Department needs to know what career path you’ll be entering, and an update on your vitals: name, race, a brief personality description, a confirmation on your years in SWAT, and oh yeah... your nickname. Next you’ll need to accept a squad assignment. Who you choose to team up with is important; you’ll be working with the same eight officers for the duration of your career. Once you’re in, you can report to active duty or spend some time honing up on tactics and the current political climate in LA. Either way, you’re an LAPD SWAT officer and that means something...Like get to work!
Career Selection
Upon entering the Career Selection screen, you will be presented with a list of available SWAT careers. You may choose to play the original SWAT3 Career (Standard Career), shown at the top of the list, or you may choose from the available careers made by MOD builders (Custom Career). You may pass your cursor over the name of the career you wish to start and click to highlight it. You may click on the arrows next to the list to scroll through the contents should the number of careers
22
available exceed the space allotted. When you are satisfied with your choice, you may click the Select button to start your new career. If you wish to return to the Main Menu, you may click the Cancel button.
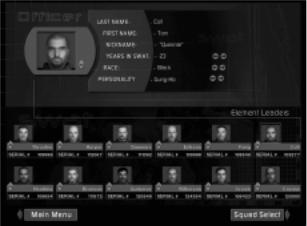
Officer Information
Please sign in. At the top of the screen there is a space for your last name, first name, and yes, nickname. Using your keyboard, type the information in the space provided. If you choose not to provide the information, the Department will provide it for you based on its records.
Also required is a confirmation of your years in SWAT, your race and a brief personality description. Use the arrows to the right of these categories to scroll through your options. Once again, if you fail to provide the information, the Department will fill in the blanks.
Below the information section of the screen are pictures of your fellow Element Leaders. As you can see, there are only twelve of you in D Platoon. It’s a coveted position. But you’re in a more advantageous position than that; you get to choose your squad, a rare occurrence. So once you’re done updating your vitals move on to squad selection. To do so, click on the Squad Select tab at the bottom of the screen.
23
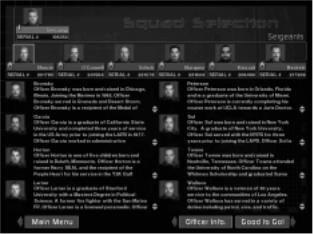
Squad Selection
The org chart of LAPD SWAT. At the top is Lieutenant Seecamp, the commander of SWAT and referred to as 10-David. Reporting to the Lieutenant are six sergeants, 20David through 70-David. Each sergeant has a squad of ten officers: two element leaders and eight crossed-trained assaulters. As mentioned earlier, you’re in the rare position to choose your squad - and doing so is easy. The challenge is making the right choice.
Pass your cursor over the row of sergeants to highlight. Click on a highlighted sergeant to select. Selecting a sergeant causes the assaulters in his squad to appear in the center of the screen. Read each assaulter’s biography carefully, you’re about to spend your entire career with these guys.
To make your squad selection known, just leave your choice displayed on screen and click on the Good to Go! tab at the bottom of the screen.
If for some reason you feel it necessary to return to the officer information screen you can do so by clicking on the Officer Info tab at the bottom of the screen.
24
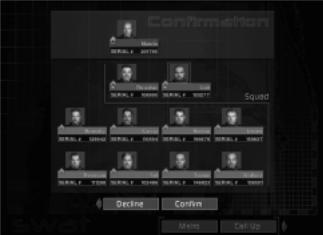
Confirmation
It’s the last chance to change your mind. If you’re sure about your squad selection click on the Confirm tab located underneath your squad. But before you do, think about this: for each mission, your team will be randomly comprised of four out of the eight assaulters in your squad. The exact make-up of your team will be predicated on rotation and current health status for each officer, (Injured Reserve or Active Duty). The decision is the Department’s, not yours.
So, if there’s an assaulter in the squad you’ve selected that you wouldn’t trust with your life, it’s best to make that call now. To change your squad selection, click on the Decline tab. You will return to the Squad Selection Screen.
Confirmed
OK, you’ve selected your squad and clicked on the Confirm tab. Now you have just one more decision to make. Do you immediately respond to a call-up or do you head to Metro and brush up on tactics? It’s up to you.
Pass your cursor over the Metro and Call Up tabs to highlight. Click on a highlighted tab to select.
25

Restoring A Career
From the Restore Career screen you may select any saved career and re-enter the game from the last mission played.
To select a saved career, pass your cursor over the list of saved careers. As you do so they will highlight. To select, click on the saved game you wish to restore, and click the Restore tab. The game will load and return you to the point in which your career was saved. All of your stats will be reinstated, from your leadership score to the medals awarded you.
Metropolitan Division
Welcome to Metropolitan Division. When you’re not on a call up, you’re here. There are two sections within the Division, Metro and Education. The Metro section deals with everything relating to missions, from the status of your squad, to the incident map of LA. The Education section deals with everything else, from the history of D Platoon to tactical considerations.
Located at the bottom right of the screen is the SWAT eagle surrounded by four option tabs: Education, Metro, Main, and Save. Pass your cursor over the SWAT eagle and the tabs to highlight. Click on the highlighted SWAT eagle or a highlighted tab to select. The SWAT eagle and associated options are persistent between Metro and Education.
Clicking on the SWAT eagle brings up the Options Menu. Clicking on the Education tab accesses the education section of Metro. Clicking on the Metro tab accesses mission information. Clicking Main switches to the Main Menu. Clicking on the Save tab allows you to save your career in progress.
26
Save
Clicking this tab switches to the Save Career screen. Type in a name for your career, and click the Save tab. Your career path and all related information, such as medals and mission outcomes, will be saved. You may restore this saved career through the Career Restore screen, accessible through the Career tab in the Main Menu. If you do not wish to save, click the Cancel tab.
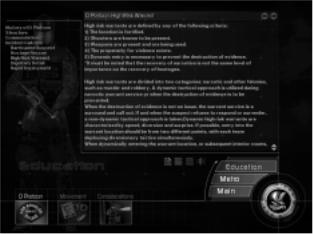
Education
Located on the bottom of the Education Screen are three tabs: D Platoon, Movement, and Considerations. Pass your cursor over the tabs to highlight. Click on the highlighted tab to select.
Each education tab controls a set of menus located on the left hand side of the screen. Pass your cursor over the menus to highlight. Click on a highlighted menu topic to access. Clicking on a menu topic changes the information contained in the center of the screen.
Located underneath the education information section are four icons. These icons represent the presence of Text, Sound, Movies, and Slides. Anytime a menu topic has accompanying media, such as a movie, the icon will be highlighted. Click on the highlighted icon to select.
Metro
As mentioned above, Metro deals with everything mission related. To that end, there are three tabs along the bottom of the screen that access mission specific information. The tabs are Mission, Element, and Pre-Assault.
27

Mission
The mission map of Los Angeles shows crime incidents broken down by division. As incidents occur and are resolved, they appear on the map. Checking the map periodically is a good way to refresh your memory on the resolution of an incident. Crime incidents are represented by a blue pin dot. Pass your cursor over the pin dots to highlight a brief incident description. Click on a highlighted pin dot to select and get the full roundup on the incident. The incident information will appear to the right of the map. To deselect an incident, merely click on a different blue pin dot.
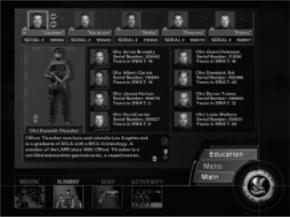
Element
28
Clicking on the Element tab on the bottom of the screen accesses the Element Screen. The Element Screen is divided into two sections. The top section is devoted to your career. The bottom section is devoted to the careers of your eight assaulters.
Your Career
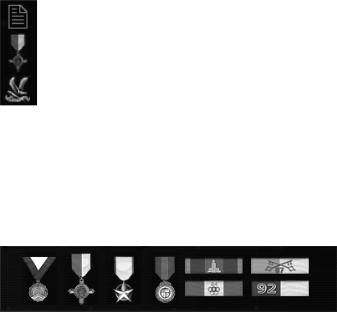
To review your career progress, use the three icons located to the far right of the top section of the screen. These icons represent your biography, awarded medals and your leadership score. Click on an icon to select.
Biography
Your biography was written for you based on your brief personality description, compliments of the Department. Betcha didn’t know you looked so good on paper.
Medals
Medals are hard to come by in LAPD. Sure, your life is on the line everyday, but that’s the job. It’s the lives you save, and the way in which you save them that earns the respect of the Department and the conferral of a medal.
Leadership Score
Your leadership score says a lot about you. The higher your score, the more respect your team has for you. The more respect your team has for you, the more they’re willing to follow you into battle and do as commanded. The lower the score...well, think about it. Would you follow the commands of a leader you didn’t respect? Well, your team won’t either.
The leadership score is broken into five categories: Officer survival, proper use of deadly force, respect level, rescue rate and mission success rate.
29
 Loading...