


™
www.summoner-thegame.com |
www.thq.com |
CONTENTS
Installation |
2 |
The Controls |
3 |
Main Menu |
5 |
Options |
5 |
Playing the Game |
7 |
Game Screen and hud |
7 |
Dialogue |
9 |
Combat |
10 |
Interface Screens |
13 |
Switching Characters |
18 |
Levels and Experience |
18 |
Spells Menu |
19 |
Skills Menu |
21 |
Traveling to Other Cities and Locations |
22 |
Summoning |
22 |
Items |
24 |
The World of Summoner |
25 |
The Mark of the Summoner |
27 |
The Characters |
28 |
Saving and Loading |
31 |
Multiplayer |
32 |
Hints/Tips |
34 |
Credits |
36 |
Technical Customer Support |
38 |
1

Installation
Insert CD 1 into your computer’s CD-ROM drive. After a few seconds the Install Program will begin automatically. If you have autoplay disabled you will need to double-click on the “My Computer” icon and then on your CD-ROM icon. Once the CD-ROM window has opened, double-click on the setup icon to begin installation.
Follow the on-screen instructions that appear after the Install Program begins.
When the game has finished installing, the Main Menu will appear. Please consult page 5 of the manual for instructions on beginning a new game.
If you experience problems installing Summoner™ on your PC, please consult the README.TXT located on Disc 1 or check out the support page at www.thq.com/support.
At the time of printing, all material and content contained herein was and is current. However, some elements of instruction and gameplay may have since changed slightly. We strongly recommend that you view the README.txt file located on Disc 1 to accommodate the possible changes.
Minimum Specs
Windows 95/98/ME compatible computer system with DirectX 8 Pentium II or K6-2 400 MHz Processor
3D Graphics Accelerator Card with 4MB of RAM (such as a Voodoo 2) or better 64 MB RAM
4x CD-ROM
800 MB of Free Hard Disc Space DirectX certified sound card
100% Microsoft compatible mouse and keyboard
Recommended Specs
Pentium III or K6-2 500 MHz Processor Voodoo3 or TNT2 Graphics Accelerator Card 128 MB RAM
EAX compatible sound card
Supports
Internet or LAN multiplay via TCP/IP
2

THE CONTROLS
In Game Controls
Mouse: |
Move the cursor on screen |
|
(both in-game and on menus) |
|
to highlight available options |
|
and move a character or party |
|
to a desired location. |
Note: To move your party or a single character using the mouse, you may move the cursor to an available spot on the ground and simply click or hold the mouse button down. If you point and click, the character will travel to that spot and stop. If you hold the mouse button down, the character will follow the cursor continually.
Note: Moving the cursor to the extreme left edge of the screen will rotate the camera counter-clockwise. Similarly, moving the cursor to the extreme right edge of the screen will rotate the camera clockwise.
Left Mouse
Button: Activate highlighted option/Confirm/Select
Right Mouse
Button: Initiate Chain Attack (see page 11 for more information)
Q:Toggle on/off Quest Journal menu
R:Toggle on/off Character Status menu
I:Toggle on/off Character Inventory menu
S:Toggle on/off Skills menu
Enter: |
Enter/Leave combat mode |
C:Toggle on/off Spells menu
M:Toggle on/off Map Screen
H:Toggle on/off Solo Mode
Space Bar: |
Pause/Unpause gameplay |
Tab: |
Cycle through available |
|
characters |
3

Print Screen: |
Take a .jpeg screen shot of |
|
the current gameplay frame |
|
that is stored in the Summoner |
|
root directory |
ESC: |
Toggle In-Game Menu (see page |
|
13 for more information) |
Left Arrow Key: |
Rotate camera clockwise |
Right Arrow Key: |
Rotate camera counter-clockwise |
Up Arrow Key: |
Zoom in camera |
Down Arrow Key: |
Zoom out camera |
F12: |
Toggle High/Low/Auto Camera |
Note: Selecting the “Inverse Camera” option in the Options menu will cause the camera commands to work inversely. Selecting this option will only affect the keyboard commands.
Menu Controls
Mouse: |
Move cursor to select |
|
available options |
Left Mouse |
|
Button: |
Scroll between/change available |
|
options and/or menu screens |
Right Mouse |
|
Button: |
View inventory item options |
|
(not always available) |
4
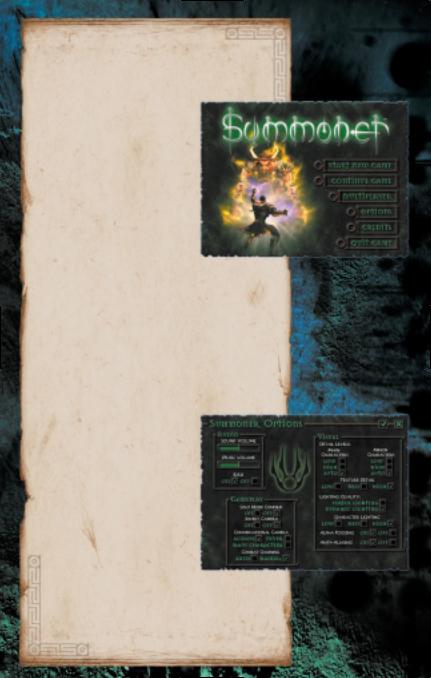
MAIN MENU
From the Main Menu, you can choose to start a new game, continue a saved
game, play a multiplayer game, view the options menu, view the list of credits, or quit. Use the mouse to highlight an option and click on it.
Start New Game—Begin a new game of Summoner.™
Continue Game—Load a previously saved game . You must have at least one saved game to see this option.
See saving and loading on page 31 for more information.
Multiplayer—Begin a multiplayer game of Summoner.™
Options—Adjust the game settings.
Credits—Display the credits.
Quit Game—Quit the game.
OPTIONS MENU
Customise your gameplay experience with the Options Menu. Use the mouse to highlight an available option and
click to toggle the settings.
AUDIO
Use the mouse to increase or decrease the audio settings.
Sound Volume—Increase or decrease the volume of the sound effects.
Music Volume—Increase or decrease the volume of the music.
EAX—Toggle EAX on or off.
VISUAL
Detail Levels—Choose the level of detail (low, high, auto) you desire for characters.
5

Texture Detail—Choose the level of detail (low, high) you desire for the in-game textures.
Lighting Quality—Choose between Vertex or Dynamic lighting.
Fogging Plane—Choose the fogging distance (low, medium, high).
Character Lighting—Choose the amount of ambient lighting on your character (low, medium, high).
Anti-Aliasing—Toggle on or off (This option is available only when used with a video card that supports an anti-aliasing feature.)
Note: Unless you are using a high-end computer, it is recommended that you do not choose the highest settings for all available options as some slowing in gameplay could occur.
GAMEPLAY
Solo Mode Confirm—Select ON to activate a pop-up window each time you choose to enter solo mode. To enter solo mode without a pop-up window, select OFF. See page 18 for more information on solo mode.
Invert Camera—Toggle the camera controls as either regular or inverted.
Conversational Camera—Choose to toggle different options for the conversational camera. The available options are: 1) Never zoom the camera in during conversation with npcs, 2) Always zoom the camera in during conversation with npcs, and 3) Only zoom the camera in during conversation with important npcs.
See controls on page 3 for more details on the game camera and camera control.
Combat Chaining—Choose to select either manual or auto for Chain Attacks. You control Chain Attacks
when the manual setting is selected. The computer will control Chain Attacks when the auto setting is selected. See page 11 for more detail on chain attacks.
6
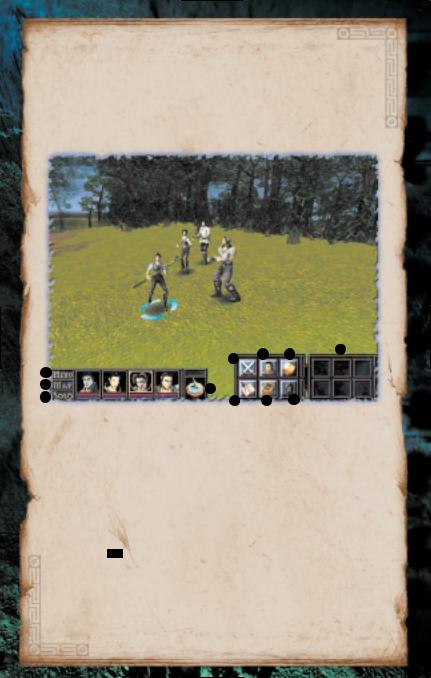
PLAYING THE GAME
Joseph begins his adventure in the farming village of Masad. When beginning a new game, a tutorial is available to help you become accustomed to the game controls and explain how to talk to other characters, how to find items, and how to engage the enemy in battle.
It is highly recommended to use the tutorial to learn how to play Summoner.™
|
5 |
6 |
7 |
|
|
|
|
||
2 |
|
|
|
|
3 |
4 |
|
|
|
8 |
9 |
10 |
||
|
||||
1. MAP Button |
5. Swords Icon |
|
9. Chest Icon |
|
2. MENU Button |
6. Profile Icon |
|
10. Figure Icon |
|
3. SOLO Button |
7. Spell Icon |
|
11. Programmable |
|
4. Sun Dial |
8. Journal Icon |
|
Hot Keys |
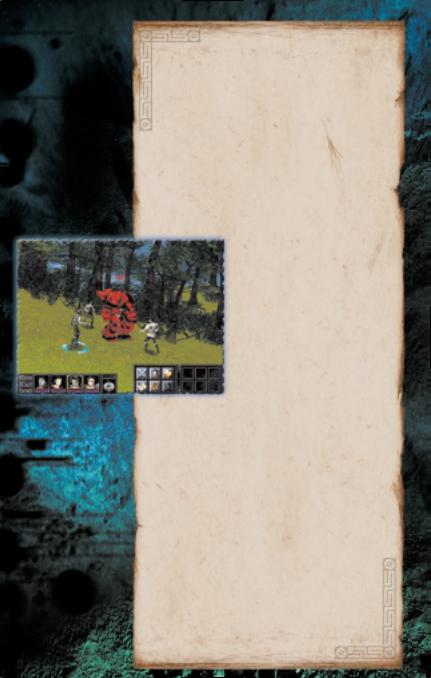
The Game Screen And HUD
The game screen provides important information for each character in your party. You will also be able to view the surrounding environment containing NonPlayer Characters (npcs) to talk with, enemies to battle, and items to find.
Player Characters
Along the bottom of the screen are pictures of each character in your party. Press the tab key to scroll through party members. You control the character that is highlighted.
Health Points Bar (hp)
Below each character’s portrait is a red Health Points Bar. This shows how much health (hp) a character has left. Watch this meter closely when in combat and heal characters that have low hp. When the red bar disappears, the character is incapacitated.
7

Action Points Bar (AP)
Beneath the character’s hp Bar is a blue Action Points Bar. This displays how many Action Points (ap) a character has remaining. Action Points are spent
to cast spells, attempt chain attacks, and use active skills. When a character has spent all of his ap, he is unable to cast spells, attempt chain attacks, or use active skills available to him. ap will slowly regenerate over time.
The Heads Up Display (hud) contains the following elements:
1. MAP Button
Click here to bring up the Map menu. For more information on the map, see page 17
2. MENU Button
Click here to bring up the in-game menu
3. SOLO Button
Click to toggle Solo Mode. For more information on Solo Mode, see page 18
4. Sun Dial
Click here to pause the game
5. Swords Icon
Click to toggle on/off combat-ready mode
6. Profile Icon
Click to bring up the Character Status Menu
7. Spell Icon
Click on the book to bring up the Spells Menu Screen
8. Journal Icon
Click to bring up the Quest Journal Menu Screen
9. Chest Icon
Click to bring up the Inventory Menu Screen
10. Figure Icon
Click to bring up the Skills Menu
11. Programmable Hot Keys
The empty boxes immediately next to the icons are reserved for customisable hot keys. You may choose to drag spells, skills, or a combination of both spells and skills from the in-game menus into the boxes. The boxes have been pre-assigned numbers 1 through 6 left to right, top to bottom. Pressing the corresponding numerical key on the keyboard activates the spell or skill assigned to that box. The spell or skill can also be activated by simply clicking on the icon.
8
Dialogue
While traveling through the villages, towns, and castles of Medeva and Orenia, you can talk to any of the characters you meet.
Approach a character and select them by highlighting them with the cursor. Click on the highlighted character to begin the dialogue.
If a character has something important to say, the dialogue bubble shows two exclamation marks (!!). These characters often possess critical information regarding Joseph’s quest, or they might offer optional adventures to embark on. Some characters may need to be visited more than once before they give you critical information.
Note: Joseph will also come across characters talking to each other.
When Joseph can hear the conversation, you will see a smaller text box above the two npcs. The character with an asterisk above his head (*) is the npc currently talking in the conversation.
The dialogue window contains two areas. The top half of the window displays what the npc is saying. The bottom half lists the available questions or responses. When the npc’s speech is too long for the dialogue window, the word more will be displayed. Use the cursor and click to scroll through the rest of the text.
Sometimes Joseph has many questions to ask a character or has multiple responses to their questions. When more than one question or response is displayed, use the cursor to select an available phrase and click on it to talk to the npc. When the discussion for that topic has been completed, it is removed from the Topic List. New topics will be added to the list as more information is revealed.
To exit the dialogue at any time, click the X at the
top right corner of the dialogue box. Otherwise, select farewell to end the discussion. Important conversations cannot be aborted.
9
Combat
Joseph will encounter many hostile characters and monsters while traveling through the lands of
Medeva and Orenia. Even as the adventure begins, Orenian soldiers have destroyed Masad, Joseph’s village, and they are searching the area for survivors.
Learn to use the combat techniques below to save yourself and your party members from the enemies and monsters that roam the world of Summoner™.
The Combat System
A hybrid system of real-time and turn-based combat is used for all battles in Summoner.™ In battle, opponents take turns attacking each other. Combat begins when either character takes the first action.
The Chain Attack system enables you to extend your turn. Every time a new attack is added to the chain, you gain one additional attack. When you finally fail to add an attack to the chain, your turn is over. See page 11 for more information on chain attacks.
This turn-based system occurs in real time, which means you do not have to wait for the enemy’s attack before moving or targeting a new opponent. You can move the party members around the battlefield at any time,
gaining a height advantage on higher ground if available. You can also use the cursor to target a new enemy, or you can run away from combat if your hp is too low.
Initiating Combat
Try to surprise an enemy by approaching it from behind or out of view. This will give you an advantage on your first attack. If more than one enemy is within range, choose your target with the mouse and cursor. The red cursor points to the currently selected enemy, with a red bar above each enemy’s head. The red bar represents their hp. Click on the selected enemy to attack.
Once a foe is selected, Joseph engages in combat, continuing to fight until you give him another command or until he or his opponent runs out of hp. You can reposition Joseph by using the mouse and cursor, or you can run away from the battle if your hp is low.
Enemies always fight to the death. If you run away from combat, your opponents will pursue.
10
Note: You can exit/leave the combat-ready mode at any time by clicking on the sword icon located on the on-screen hud or by pressing the enter key.
Damage
During combat, numbers appear above each character’s head. The numbers represent how much health has been subtracted from a character’s hp. White numbers indicate the damage done to enemies, while yellow numbers show how much damage Joseph and
his friends have sustained.
Combat Advantages
In addition to receiving a bonus for a surprise attack, Joseph and his party can gain positive or negative combat modifiers. The numbers in blue show the percentage modifiers (if any) for a character’s attack. Attacking from higher ground adds a bonus, while attacking from lower ground results in a penalty. These combat modifiers affect the damage inflicted against opponents as well as the damage sustained from enemy attacks. You may also receive a bonus by attacking a creature from behind.
Note: Highlight an enemy with the cursor at any time
to view the creature’s health bar.
Chain Attacks
During combat, Joseph has the ability to perform a chain of special attacks against the enemy. While attacking the creature, a chain symbol appears over Joseph’s head.
When the symbol appears over Joseph’s head, click the right mouse button to begin the Chain Attack. For each additional attack, click the right mouse button until you are unable to continue. For each successful Chain Attack, you get the chance to perform another one. With each successive Chain Attack, your timing needs to be more precise in order to continue the chain. As long as you continue the Chain Attack, your opponent cannot strike. When the chain is broken, your opponent’s turn begins.
If you click the right mouse button too quickly or are unable to press it in time, the Chain Attack fails and the text too fast or too slow is displayed on the screen. Try to adjust your timing to master the Chain Attack.
Each party member has a different combination of Chain Attacks.
11

Joseph’s Chain Attacks
•Added Blow—Standard secondary attack. •Desperation—Does damage with the amount of damage taken.
•Confusion—Removes APs from enemy.
•Revitalise—Party regains HP.
•Burn Hands—Does fire-based damage.
•Push—A successful push will increase the chance for the next attack.
•Mind Drain—Target loses AP, while Joseph recovers AP.
•Life Leech—Does damage and recovers HP.
Flece’s Chain Attacks
•Added Blow—Standard secondary attack.
•Kick—Increases chance to hit with blunt melee attack.
•Mug—Steals gold and inflicts medium damage.
•Leg Swipe—Slows target and does medium damage.
•Arm Slice—Cripples target and inflicts medium damage.
•Blind Stab—Blinds target and causes little damage.
•Desperation—Does damage with the amount of damage taken.
•StaminaAtk—Does damage with the amount of AP left.
•Silence—Target cannot cast spells.
Rosalind’s Chain Attacks
•Added Blow—Standard secondary attack.
•Shock GRSP—Does energy-based damage.
•Bless—Party takes less physical damage.
•Confusion—Removes APs from enemy.
Jekhar’s Chain Attacks
•Added Blow—Standard secondary attack.
•Kick—Increases chance to hit with blunt melee attack.
•Axespin—Damages all nearby targets with axe only.
•Earthshaker—Knock down nearby targets with blunt weapon only.
•Mend—Recovers small amount of HP.
•Desperation—Does damage with the amount of damage taken.
•Sacrifice—Does double damage, but you lose your own HP.
•Life Leech—Does damage and recovers HP.
By performing Chain Attacks frequently, your characters can gain new Chain Attacks to add to their arsenal. These can be assigned to specific keys by using the Skills Menu. See page 15 for more information.
Note: Chain Attacks are only available during melee combat and cost Ability Points to perform. Use faster weapons to perform longer Chain Attacks.
12
 Loading...