


1 CONTENTS
2 INTRODUCTION . . . . . . . . . . . . . . . . . . . . . . . . . . . . . . . . . . . . . . . . . . . . . . . . . . . .5 3 INSTALLATION . . . . . . . . . . . . . . . . . . . . . . . . . . . . . . . . . . . . . . . . . . . . . . . . . . . . .6
4 MAIN MENU . . . . . . . . . . . . . . . . . . . . . . . . . . . . . . . . . . . . . . . . . . . . . . . . . . . . . . . 6
4.1 New Game . . . . . . . . . . . . . . . . . . . . . . . . . . . . . . . . . . . . . . . . . . . . . . . . . . . . . . . .6
4.2 Scenarios . . . . . . . . . . . . . . . . . . . . . . . . . . . . . . . . . . . . . . . . . . . . . . . . . . . . . . . . . 6
4.3 Loading . . . . . . . . . . . . . . . . . . . . . . . . . . . . . . . . . . . . . . . . . . . . . . . . . . . . . . . . . . 6
4.4 Options . . . . . . . . . . . . . . . . . . . . . . . . . . . . . . . . . . . . . . . . . . . . . . . . . . . . . . . . . . .6
5 GAME CONTROLS . . . . . . . . . . . . . . . . . . . . . . . . . . . . . . . . . . . . . . . . . . . . . . . . . 7
5.1 General Information . . . . . . . . . . . . . . . . . . . . . . . . . . . . . . . . . . . . . . . . . . . . . . . .7
5.2 Town View . . . . . . . . . . . . . . . . . . . . . . . . . . . . . . . . . . . . . . . . . . . . . . . . . . . . . . . .7
Town Center . . . . . . . . . . . . . . . . . . . . . . . . . . . . . . . . . . . . . . . . . . . . . . . . . . . . . . . . . . 8
Area Outside the Town . . . . . . . . . . . . . . . . . . . . . . . . . . . . . . . . . . . . . . . . . . . . . . . . . . 8
Harbor . . . . . . . . . . . . . . . . . . . . . . . . . . . . . . . . . . . . . . . . . . . . . . . . . . . . . . . . . . . . . . 8
Mini Map . . . . . . . . . . . . . . . . . . . . . . . . . . . . . . . . . . . . . . . . . . . . . . . . . . . . . . . . . . . . 9
5.3 Sea Chart . . . . . . . . . . . . . . . . . . . . . . . . . . . . . . . . . . . . . . . . . . . . . . . . . . . . . . . . . 9
Towns . . . . . . . . . . . . . . . . . . . . . . . . . . . . . . . . . . . . . . . . . . . . . . . . . . . . . . . . . . . . . . . 10
Convoys . . . . . . . . . . . . . . . . . . . . . . . . . . . . . . . . . . . . . . . . . . . . . . . . . . . . . . . . . . . . . 12
Floating Objects . . . . . . . . . . . . . . . . . . . . . . . . . . . . . . . . . . . . . . . . . . . . . . . . . . . . . . . 13
Mini Map . . . . . . . . . . . . . . . . . . . . . . . . . . . . . . . . . . . . . . . . . . . . . . . . . . . . . . . . . . . . 13
5.4 Sea Battles . . . . . . . . . . . . . . . . . . . . . . . . . . . . . . . . . . . . . . . . . . . . . . . . . . . . . . . .14
Encounter . . . . . . . . . . . . . . . . . . . . . . . . . . . . . . . . . . . . . . . . . . . . . . . . . . . . . . . . . . . .14
Evading . . . . . . . . . . . . . . . . . . . . . . . . . . . . . . . . . . . . . . . . . . . . . . . . . . . . . . . . . . . . . 14
Sea Battle View . . . . . . . . . . . . . . . . . . . . . . . . . . . . . . . . . . . . . . . . . . . . . . . . . . . . . . . 15
Battle Sequence . . . . . . . . . . . . . . . . . . . . . . . . . . . . . . . . . . . . . . . . . . . . . . . . . . . . . . . 16
Maneuvering . . . . . . . . . . . . . . . . . . . . . . . . . . . . . . . . . . . . . . . . . . . . . . . . . . . . . . . . . 16
Centering . . . . . . . . . . . . . . . . . . . . . . . . . . . . . . . . . . . . . . . . . . . . . . . . . . . . . . . . . . . . 16
Switching Ships . . . . . . . . . . . . . . . . . . . . . . . . . . . . . . . . . . . . . . . . . . . . . . . . . . . . . . . 16
Open Fire! . . . . . . . . . . . . . . . . . . . . . . . . . . . . . . . . . . . . . . . . . . . . . . . . . . . . . . . . . . . 16
Reloading . . . . . . . . . . . . . . . . . . . . . . . . . . . . . . . . . . . . . . . . . . . . . . . . . . . . . . . . . . . .17
Selecting Ammunition and Boarding . . . . . . . . . . . . . . . . . . . . . . . . . . . . . . . . . . . . . . . . 17
Fleeing . . . . . . . . . . . . . . . . . . . . . . . . . . . . . . . . . . . . . . . . . . . . . . . . . . . . . . . . . . . . . . 17
5.5 Attacking a Town . . . . . . . . . . . . . . . . . . . . . . . . . . . . . . . . . . . . . . . . . . . . . . . . . . 17
5.6 Land Battles . . . . . . . . . . . . . . . . . . . . . . . . . . . . . . . . . . . . . . . . . . . . . . . . . . . . . . 18
Land Attack Sequence . . . . . . . . . . . . . . . . . . . . . . . . . . . . . . . . . . . . . . . . . . . . . . . . . . 19
Tied Units . . . . . . . . . . . . . . . . . . . . . . . . . . . . . . . . . . . . . . . . . . . . . . . . . . . . . . . . . . . 20
Surprise Attacks . . . . . . . . . . . . . . . . . . . . . . . . . . . . . . . . . . . . . . . . . . . . . . . . . . . . . . . 20
Supporting Your Units . . . . . . . . . . . . . . . . . . . . . . . . . . . . . . . . . . . . . . . . . . . . . . . . . . 20
5.7 Duels . . . . . . . . . . . . . . . . . . . . . . . . . . . . . . . . . . . . . . . . . . . . . . . . . . . . . . . . . . . . 21
Controlling the Duel . . . . . . . . . . . . . . . . . . . . . . . . . . . . . . . . . . . . . . . . . . . . . . . . . . . 21
Special Attacks . . . . . . . . . . . . . . . . . . . . . . . . . . . . . . . . . . . . . . . . . . . . . . . . . . . . . . . .22
The End of the Fight . . . . . . . . . . . . . . . . . . . . . . . . . . . . . . . . . . . . . . . . . . . . . . . . . . . . 22
Taking Hostages . . . . . . . . . . . . . . . . . . . . . . . . . . . . . . . . . . . . . . . . . . . . . . . . . . . . . . . 22
1

5.8 The Chronicle . . . . . . . . . . . . . . . . . . . . . . . . . . . . . . . . . . . . . . . . . . . . . . . . . . . . . 22
5.9 The Log . . . . . . . . . . . . . . . . . . . . . . . . . . . . . . . . . . . . . . . . . . . . . . . . . . . . . . . . . . 23
5.10 Game Speed . . . . . . . . . . . . . . . . . . . . . . . . . . . . . . . . . . . . . . . . . . . . . . . . . . . . . 23
6 TOWNS . . . . . . . . . . . . . . . . . . . . . . . . . . . . . . . . . . . . . . . . . . . . . . . . . . . . . . . . . . . 24
6.1 Governor Towns . . . . . . . . . . . . . . . . . . . . . . . . . . . . . . . . . . . . . . . . . . . . . . . . . . . 24
6.2 Colonial Towns . . . . . . . . . . . . . . . . . . . . . . . . . . . . . . . . . . . . . . . . . . . . . . . . . . . . 24
6.3 Seats of the Viceroys . . . . . . . . . . . . . . . . . . . . . . . . . . . . . . . . . . . . . . . . . . . . . . . . 24
6.4 Town Population . . . . . . . . . . . . . . . . . . . . . . . . . . . . . . . . . . . . . . . . . . . . . . . . . . . 24
Settlers . . . . . . . . . . . . . . . . . . . . . . . . . . . . . . . . . . . . . . . . . . . . . . . . . . . . . . . . . . . . . . 24
Workers and Citizens . . . . . . . . . . . . . . . . . . . . . . . . . . . . . . . . . . . . . . . . . . . . . . . . . . . .25
Soldiers . . . . . . . . . . . . . . . . . . . . . . . . . . . . . . . . . . . . . . . . . . . . . . . . . . . . . . . . . . . . . 25
6.5 The Status of a Town . . . . . . . . . . . . . . . . . . . . . . . . . . . . . . . . . . . . . . . . . . . . . . . 25
6.6 Traders . . . . . . . . . . . . . . . . . . . . . . . . . . . . . . . . . . . . . . . . . . . . . . . . . . . . . . . . . . 26
6.7 Your Own Town . . . . . . . . . . . . . . . . . . . . . . . . . . . . . . . . . . . . . . . . . . . . . . . . . . . 26
7 ACTION BUILDINGS . . . . . . . . . . . . . . . . . . . . . . . . . . . . . . . . . . . . . . . . . . . . . . . . 27
7.1 The Warehouse . . . . . . . . . . . . . . . . . . . . . . . . . . . . . . . . . . . . . . . . . . . . . . . . . . . . 27
Overview . . . . . . . . . . . . . . . . . . . . . . . . . . . . . . . . . . . . . . . . . . . . . . . . . . . . . . . . . . . . 27
Stock . . . . . . . . . . . . . . . . . . . . . . . . . . . . . . . . . . . . . . . . . . . . . . . . . . . . . . . . . . . . . . . 28
Buying Goods . . . . . . . . . . . . . . . . . . . . . . . . . . . . . . . . . . . . . . . . . . . . . . . . . . . . . . . . 28
Selling Goods . . . . . . . . . . . . . . . . . . . . . . . . . . . . . . . . . . . . . . . . . . . . . . . . . . . . . . . . .28
7.2 The Docks . . . . . . . . . . . . . . . . . . . . . . . . . . . . . . . . . . . . . . . . . . . . . . . . . . . . . . . . 29
Transfer Between Convoy and Warehouse & Cargo Trade . . . . . . . . . . . . . . . . . . . . . . . 29
7.3 Shipyards . . . . . . . . . . . . . . . . . . . . . . . . . . . . . . . . . . . . . . . . . . . . . . . . . . . . . . . . 29
7.4 The Inn . . . . . . . . . . . . . . . . . . . . . . . . . . . . . . . . . . . . . . . . . . . . . . . . . . . . . . . . . . 30
Hiring Pirates . . . . . . . . . . . . . . . . . . . . . . . . . . . . . . . . . . . . . . . . . . . . . . . . . . . . . . . . . 30
7.5 The Council Building . . . . . . . . . . . . . . . . . . . . . . . . . . . . . . . . . . . . . . . . . . . . . . . 30
The General . . . . . . . . . . . . . . . . . . . . . . . . . . . . . . . . . . . . . . . . . . . . . . . . . . . . . . . . . . .30
The Treasurer . . . . . . . . . . . . . . . . . . . . . . . . . . . . . . . . . . . . . . . . . . . . . . . . . . . . . . . . . 30
The Governor . . . . . . . . . . . . . . . . . . . . . . . . . . . . . . . . . . . . . . . . . . . . . . . . . . . . . . . . . 31
The Governor’s Daughter/Your Wife . . . . . . . . . . . . . . . . . . . . . . . . . . . . . . . . . . . . . . . 31
The Viceroy . . . . . . . . . . . . . . . . . . . . . . . . . . . . . . . . . . . . . . . . . . . . . . . . . . . . . . . . . . 31
7.6 The Master Builder’s . . . . . . . . . . . . . . . . . . . . . . . . . . . . . . . . . . . . . . . . . . . . . . . .31
7.7 The Church . . . . . . . . . . . . . . . . . . . . . . . . . . . . . . . . . . . . . . . . . . . . . . . . . . . . . . . 31
7.8 The Market . . . . . . . . . . . . . . . . . . . . . . . . . . . . . . . . . . . . . . . . . . . . . . . . . . . . . . . 31
8 SHIPS AND CONVOYS . . . . . . . . . . . . . . . . . . . . . . . . . . . . . . . . . . . . . . . . . . . . . . . 32
8.1 Ships . . . . . . . . . . . . . . . . . . . . . . . . . . . . . . . . . . . . . . . . . . . . . . . . . . . . . . . . . . . . 32
Ships in the Harbor . . . . . . . . . . . . . . . . . . . . . . . . . . . . . . . . . . . . . . . . . . . . . . . . . . . . .32
Basic Costs . . . . . . . . . . . . . . . . . . . . . . . . . . . . . . . . . . . . . . . . . . . . . . . . . . . . . . . . . . .32
Ship Types . . . . . . . . . . . . . . . . . . . . . . . . . . . . . . . . . . . . . . . . . . . . . . . . . . . . . . . . . . . 32
2

8.2 Convoys . . . . . . . . . . . . . . . . . . . . . . . . . . . . . . . . . . . . . . . . . . . . . . . . . . . . . . . . . .37
Assembling a New Convoy . . . . . . . . . . . . . . . . . . . . . . . . . . . . . . . . . . . . . . . . . . . . . . 37 Choosing a Convoy and Goods List . . . . . . . . . . . . . . . . . . . . . . . . . . . . . . . . . . . . . . . . 37 Ships List, Overview and Costs . . . . . . . . . . . . . . . . . . . . . . . . . . . . . . . . . . . . . . . . . . . 38 Attack Mode . . . . . . . . . . . . . . . . . . . . . . . . . . . . . . . . . . . . . . . . . . . . . . . . . . . . . . . . . . 38 Transfer Between Convoys and Harbors . . . . . . . . . . . . . . . . . . . . . . . . . . . . . . . . . . . . . 39 Transfer Between Two Convoys . . . . . . . . . . . . . . . . . . . . . . . . . . . . . . . . . . . . . . . . . . . 39 Escort Ships . . . . . . . . . . . . . . . . . . . . . . . . . . . . . . . . . . . . . . . . . . . . . . . . . . . . . . . . . . 39 Docking Unnoticed . . . . . . . . . . . . . . . . . . . . . . . . . . . . . . . . . . . . . . . . . . . . . . . . . . . . 39 Wear and Tear on Ships . . . . . . . . . . . . . . . . . . . . . . . . . . . . . . . . . . . . . . . . . . . . . . . . . . 40
8.3 Captains . . . . . . . . . . . . . . . . . . . . . . . . . . . . . . . . . . . . . . . . . . . . . . . . . . . . . . . . . 40
Navigational Experience . . . . . . . . . . . . . . . . . . . . . . . . . . . . . . . . . . . . . . . . . . . . . . . . .40 Trading Experience . . . . . . . . . . . . . . . . . . . . . . . . . . . . . . . . . . . . . . . . . . . . . . . . . . . . 40 Combat Experience . . . . . . . . . . . . . . . . . . . . . . . . . . . . . . . . . . . . . . . . . . . . . . . . . . . . 40
8.4 Crew . . . . . . . . . . . . . . . . . . . . . . . . . . . . . . . . . . . . . . . . . . . . . . . . . . . . . . . . . . . . 41
Boarding Crew . . . . . . . . . . . . . . . . . . . . . . . . . . . . . . . . . . . . . . . . . . . . . . . . . . . . . . . . 41 Morale . . . . . . . . . . . . . . . . . . . . . . . . . . . . . . . . . . . . . . . . . . . . . . . . . . . . . . . . . . . . . . 41
9 TRADING GOODS . . . . . . . . . . . . . . . . . . . . . . . . . . . . . . . . . . . . . . . . . . . . . . . . . . . 41 Pricing . . . . . . . . . . . . . . . . . . . . . . . . . . . . . . . . . . . . . . . . . . . . . . . . . . . . . . . . . . . . . . 41 How to Trade . . . . . . . . . . . . . . . . . . . . . . . . . . . . . . . . . . . . . . . . . . . . . . . . . . . . . . . . . 42 Scarce Goods . . . . . . . . . . . . . . . . . . . . . . . . . . . . . . . . . . . . . . . . . . . . . . . . . . . . . . . . . 43 Types of Goods . . . . . . . . . . . . . . . . . . . . . . . . . . . . . . . . . . . . . . . . . . . . . . . . . . . . . . . 43 Imports and Exports . . . . . . . . . . . . . . . . . . . . . . . . . . . . . . . . . . . . . . . . . . . . . . . . . . . . 44 Balance of Goods . . . . . . . . . . . . . . . . . . . . . . . . . . . . . . . . . . . . . . . . . . . . . . . . . . . . . . 44 Trading Tips . . . . . . . . . . . . . . . . . . . . . . . . . . . . . . . . . . . . . . . . . . . . . . . . . . . . . . . . . . 44
10 CONSTRUCTION AND PRODUCTION . . . . . . . . . . . . . . . . . . . . . . . . . . . . . . . . . 45
10.1 Buying a Building Permit . . . . . . . . . . . . . . . . . . . . . . . . . . . . . . . . . . . . . . . . . . . 45 10.2 What You Can Build . . . . . . . . . . . . . . . . . . . . . . . . . . . . . . . . . . . . . . . . . . . . . . .45
Buildings . . . . . . . . . . . . . . . . . . . . . . . . . . . . . . . . . . . . . . . . . . . . . . . . . . . . . . . . . . . . 47 Businesses . . . . . . . . . . . . . . . . . . . . . . . . . . . . . . . . . . . . . . . . . . . . . . . . . . . . . . . . . . . 48 Community Buildings . . . . . . . . . . . . . . . . . . . . . . . . . . . . . . . . . . . . . . . . . . . . . . . . . . 51
10.3 Maintaining Buildings . . . . . . . . . . . . . . . . . . . . . . . . . . . . . . . . . . . . . . . . . . . . . 51 10.4 Workers and Production . . . . . . . . . . . . . . . . . . . . . . . . . . . . . . . . . . . . . . . . . . . 51
Where do new workers come from? . . . . . . . . . . . . . . . . . . . . . . . . . . . . . . . . . . . . . . . . 51 Boom and Recession . . . . . . . . . . . . . . . . . . . . . . . . . . . . . . . . . . . . . . . . . . . . . . . . . . . 52 Goods and Raw Materials . . . . . . . . . . . . . . . . . . . . . . . . . . . . . . . . . . . . . . . . . . . . . . . .52 Production Problems . . . . . . . . . . . . . . . . . . . . . . . . . . . . . . . . . . . . . . . . . . . . . . . . . . . 52 10.5 Competition . . . . . . . . . . . . . . . . . . . . . . . . . . . . . . . . . . . . . . . . . . . . . . . . . . . . . .53 Buying up Businesses . . . . . . . . . . . . . . . . . . . . . . . . . . . . . . . . . . . . . . . . . . . . . . . . . . .53 Ruining Businesses . . . . . . . . . . . . . . . . . . . . . . . . . . . . . . . . . . . . . . . . . . . . . . . . . . . . .53
3
11 TRADE ROUTES . . . . . . . . . . . . . . . . . . . . . . . . . . . . . . . . . . . . . . . . . . . . . . . . . . . 53
11.1 Leave it to the Captain! . . . . . . . . . . . . . . . . . . . . . . . . . . . . . . . . . . . . . . . . . . . . . 53 11.2 A Little More Control . . . . . . . . . . . . . . . . . . . . . . . . . . . . . . . . . . . . . . . . . . . . . . 55 11.3 Specific Instructions . . . . . . . . . . . . . . . . . . . . . . . . . . . . . . . . . . . . . . . . . . . . . . . 55 11.4 Using Your Warehouse for Trading . . . . . . . . . . . . . . . . . . . . . . . . . . . . . . . . . . . 56
Distributing Produced Goods . . . . . . . . . . . . . . . . . . . . . . . . . . . . . . . . . . . . . . . . . . . . . 56 Finding Raw Materials . . . . . . . . . . . . . . . . . . . . . . . . . . . . . . . . . . . . . . . . . . . . . . . . . . 57
11.5 Attacks . . . . . . . . . . . . . . . . . . . . . . . . . . . . . . . . . . . . . . . . . . . . . . . . . . . . . . . . . .57 11.6 Maintenance and Repairs . . . . . . . . . . . . . . . . . . . . . . . . . . . . . . . . . . . . . . . . . . . 58 11.7 Trade Route Overview in the Log . . . . . . . . . . . . . . . . . . . . . . . . . . . . . . . . . . . . 58
12 POLITICS AMONG THE NATIONS . . . . . . . . . . . . . . . . . . . . . . . . . . . . . . . . . . . . 59
12.1 War and Peace . . . . . . . . . . . . . . . . . . . . . . . . . . . . . . . . . . . . . . . . . . . . . . . . . . . 59 12.2 A Nation’s Strength . . . . . . . . . . . . . . . . . . . . . . . . . . . . . . . . . . . . . . . . . . . . . . . .59 12.3 Viceroys and Capturing Towns . . . . . . . . . . . . . . . . . . . . . . . . . . . . . . . . . . . . . . 59 12.4 Letters of Marque . . . . . . . . . . . . . . . . . . . . . . . . . . . . . . . . . . . . . . . . . . . . . . . . 60 12.5 Buccaneers . . . . . . . . . . . . . . . . . . . . . . . . . . . . . . . . . . . . . . . . . . . . . . . . . . . . . . 60 12.6 Pirates . . . . . . . . . . . . . . . . . . . . . . . . . . . . . . . . . . . . . . . . . . . . . . . . . . . . . . . . . . 61
Active Pirates . . . . . . . . . . . . . . . . . . . . . . . . . . . . . . . . . . . . . . . . . . . . . . . . . . . . . . . . . 61 Pirate Hideouts . . . . . . . . . . . . . . . . . . . . . . . . . . . . . . . . . . . . . . . . . . . . . . . . . . . . . . . .61 Hunting for Pirates . . . . . . . . . . . . . . . . . . . . . . . . . . . . . . . . . . . . . . . . . . . . . . . . . . . . . 61 Destroying a Pirate Gang . . . . . . . . . . . . . . . . . . . . . . . . . . . . . . . . . . . . . . . . . . . . . . . . 62
13 REPUTATION AND RANK . . . . . . . . . . . . . . . . . . . . . . . . . . . . . . . . . . . . . . . . . . . 62
13.1 Your Reputation with the Nations . . . . . . . . . . . . . . . . . . . . . . . . . . . . . . . . . . . . 62
Rising Reputation . . . . . . . . . . . . . . . . . . . . . . . . . . . . . . . . . . . . . . . . . . . . . . . . . . . . . . 62 Falling Reputation . . . . . . . . . . . . . . . . . . . . . . . . . . . . . . . . . . . . . . . . . . . . . . . . . . . . . 62 Nothing Lasts Forever . . . . . . . . . . . . . . . . . . . . . . . . . . . . . . . . . . . . . . . . . . . . . . . . . . 63
13.2 Rank . . . . . . . . . . . . . . . . . . . . . . . . . . . . . . . . . . . . . . . . . . . . . . . . . . . . . . . . . . . 63
14 USING YOUR OWN LOGOS . . . . . . . . . . . . . . . . . . . . . . . . . . . . . . . . . . . . . . . . . 64 15 SERVICE AND SUPPORT . . . . . . . . . . . . . . . . . . . . . . . . . . . . . . . . . . . . . . . . . . . . 64 16 CREDITS . . . . . . . . . . . . . . . . . . . . . . . . . . . . . . . . . . . . . . . . . . . . . . . . . . . . . . . . . 66 ENGLISH - CONTROLS AND KEYBOARD CONFIGURATION . . . . . . . . . . . . . . . . .67 
 DANISH - QUICKSTART . . . . . . . . . . . . . . . . . . . . . . . . . . . . . . . . . . . . . . . . . . . 68
 FINNISH - QUICKSTART . . . . . . . . . . . . . . . . . . . . . . . . . . . . . . . . . . . . . . . . . . . 69
 NORWEGIAN - QUICKSTART . . . . . . . . . . . . . . . . . . . . . . . . . . . . . . . . . . . . . . . 70
 SWEDISH - QUICKSTART . . . . . . . . . . . . . . . . . . . . . . . . . . . . . . . . . . . . . . . . . . 71
4

2 INTRODUCTION
Welcome to Port Royale 2, the trade simulation game set in the Caribbean during the 17th century.
The game takes you back to the beginning of the 17th century, when the great colonial powers were competing for control of the Caribbean and when towns could rapidly expand (and collapse again) over a short period of time.
You take on the role of a young adventurer who, with bravery and skill, aims to establish a large trading enterprise of great economic and military power.
You can trade goods between towns, set up your own production facilities, accept all kinds of tasks and missions and set off on voyages to capture enemy ships and loot towns.
In contrast to the first version of Port Royale, there are no longer any limits to the expansion of your enterprise. You can command an unlimited number of convoys and set up production facilities in all towns.
And that’s not all: If you have the money, you can also buy businesses from local producers and create a monopoly in a town. Alternatively, you can take control of all the businesses producing a particular product in various towns, which would then enable you to create a monopoly for that product throughout the entire Caribbean region.
If you want to follow a more militant route, you can take possession of a town. By attacking and capturing the towns belonging to enemy nations for a viceroy (that is, taking possession of the towns on behalf of a viceroy), you can expect to be generously rewarded with plots of land. Bit by bit, each viceroy presents you with a town that you can then set up and develop yourself. You can also capture all the towns for a particular nation so that peace is finally brought about. We in the Port Royale 2 team have taken great pleasure in preparing this game and we are particularly proud to present you with an exciting trade simulation, giving you free reign to shape and develop an historic world.
However, don’t be too ambitious at the start. First take a look at the available scenarios. There, you are sure to find a topic of interest to introduce you to the world of Port Royale 2.
We wish you good luck and many happy hours exploring the Caribbean. Daniel Dumont and the Port Royale 2 Team.
5

3 INSTALLATION
Insert the Port Royale 2 CD into the CD drive of your computer.
If the AutoStart option is activated, the AutoStart menu opens automatically. Then click on “Install” to install Port Royale 2.
If the AutoStart menu does not start automatically, you can start it yourself by doubleclicking on the “Autorun” or “AutoRun.exe” file.
To carry out the installation, follow the instructions on the screen.
It is essential that you refer to the readme.html file in the installation directory of the game, as this file contains important technical information as well as the latest changes.
The latest news covering all aspects of Port Royale 2 is available on the Internet homepage www.ascaron.com.
4 MAIN MENU
After starting the game, you reach the main menu.
If you are playing the game for the first time, you should take a closer look at the “Scenarios” section. This section contains special introductory games covering various topics in the game.
4.1 New Game
You can start a new game here. Choose a town (and therefore the nation) in which you want to start the game. The most important thing to remember about the town where you start the game is that you already have a warehouse and a permit to build businesses and residential buildings there.
Choose a nation carefully, because the smaller the nation, the harder it will be for you when you pick a fight with the enemies of that nation. However, you needn’t worry, as you can still turn to another nation during the game.
4.2 Scenarios
Port Royale 2 offers great depth of play. For this reason, we have included scenarios that deal with the different areas of the game, such as trade, sea battles or construction. If you are playing Port Royale 2 for the first time, you will find it easier if you choose one of the introductory scenarios. On the other hand, if you are looking for a challenge, you can choose one of the more advanced scenarios.
4.3 Loading a Game
Load a previously saved game.
4.4 Options
You can set the graphics and sound here. You can also change the assignment of game functions to the various keys or change the gameplay settings (under “Gameplay”).
6
5 GAME CONTROLS
5.1 General Information
Note the following:
•To select a convoy or a building, left-click on the object.
•To send a convoy, select it and then right-click on a town or a position at sea.
•You can use the mouse to do everything, but there are also several keys on your keyboard that make it easier for you to play the game.
•During the game, you can press “F1” to display a summary of the game controls.
•Use the arrow keys on the keyboard to move the area of the screen displayed.
•Press the fast forward key (the space bar) to accelerate the gameplay. You can use this function if you do not want to wait until a convoy has reached another town, for example.
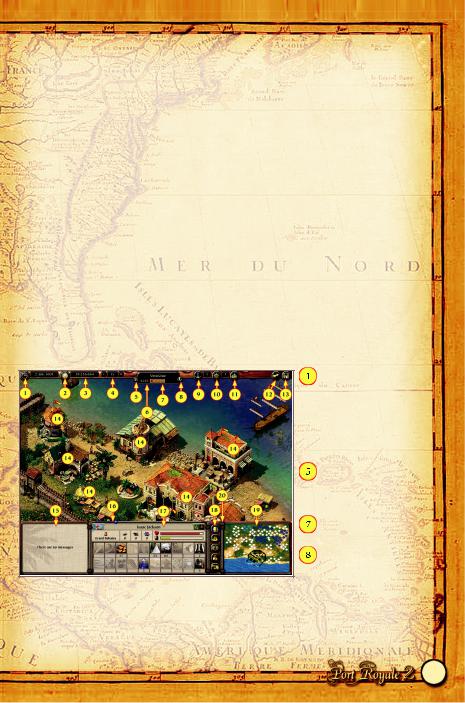
5.2 Town View
After you start a game, you reach the town view of the town where you start the game. Each of the 60 towns in Port Royale 2 has one of these views, in which you can carry out specific actions.
The town view displays the town’s buildings and the ships docked in the harbor. Every town has a harbor, a town center, as well as residential areas and businesses located outside the town.
From the sea chart, you can enter every town in which you have constructed buildings or in which a convoy is anchored.
Chronicle, see section 5.8
 Log, see section 5.9
 Your cash
 Game speed
Inhabitants’ consumption of goods
 Population
Your reputation with the nation of the town
Highlight your own buildings
 Switch convoys with no mission
 Scroll convoys with mission
 List your convoys
7
 Leave town (display sea chart)
 Options menu
 Action buildings (important buildings that you can enter to carry out actions)
 Event window
 Rank display, section 13.2
 Selection window (this window displays the object (ship, convoy or building) that you have just selected).
 Selection buttons
 Mini Map of the town
 Toggle map
Only part of the town is displayed on the screen. You can use the arrow keys on the keyboard to move the area of the screen displayed.
Alternatively, you can do this by moving the mouse pointer at the edge of the screen, holding down the middle mouse button and moving the section, or by left-clicking on the Mini Map.
You can also zoom into the section of the screen by pressing the Page Up or Page Down keys or by turning your mouse wheel.
Town Center
The town center is always surrounded by the town walls, which protect the town from attack by land. The important action buildings (see section 7: Action Buildings) in which you can meet various people are always situated in the town center. Simply click on one of these building to enter it.
Area Outside the Town
You or a local producer in the town can only construct a business or a residential building outside the town walls. Section 10: Construction and Production describes which buildings can be constructed in a town and the construction process involved. To display information about a residential building or a business, left-click on it. You can also implement settings in some businesses.
Harbor
The harbor contains all the convoys and ships that are anchored in a town. A convoy is a group of ships under the command of a single captain. If a convoy consists of several ships, only the largest ship in the convoy is displayed in the harbor, so as to give you a clearer overview.
To display information about a ship or a convoy, simply left-click on it. You can also implement settings in some convoys.
8

Mini Map
The Mini Map displays the entire town and surrounding area in the bottom right of the game view. Different colors are used to indicate the buildings and convoys in the town.
 Your anchored ships and convoys
 Ships belonging to other traders
 Area of the screen displayed
 Harbor
 Town center with action buildings
 Areas outside of the town
 Your businesses and residential buildings
 Buildings belonging to local traders Your warehouses
5.3 Sea Chart
The sea chart is always displayed when you leave a town. You can use the sea chart view to follow the movements of your convoys.
It also displays all the towns that you have discovered so far. You only have to approach a town to discover it.
To send convoys, select a convoy and then right-click on a town or a position at sea.
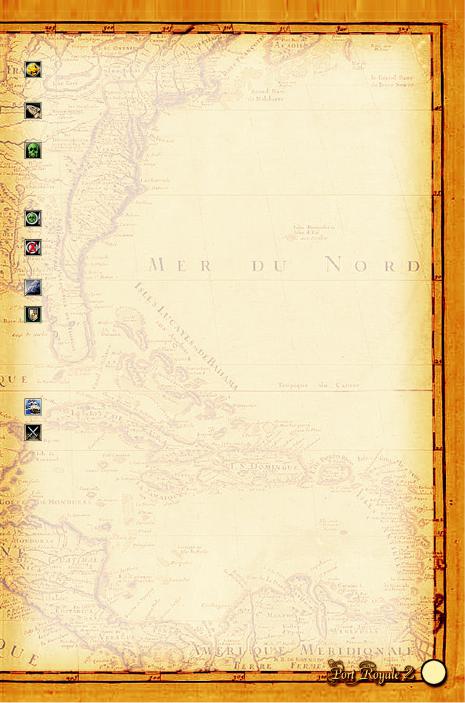
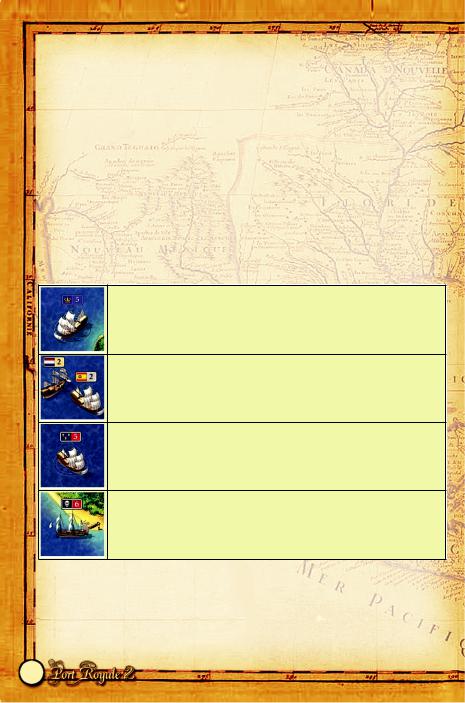
 Pirate convoy
Pirate hideout discovered
 Display political overview map
 Military convoy or buccaneer of a particular nation
Trading convoy
Your convoy at sea Town symbol
9
Town name and nation
Town icons representing scarcity of goods, surplus of settlers and events in the town
 Your convoys anchored in the town Mini Map of the game world
As with the town view, the sea chart view only displays a part of the sea. You can use the arrow keys to move the area of the screen displayed. Alternatively, you can also do this by moving the mouse pointer at the edge of the screen, holding down the middle mouse button and moving the section, or by left-clicking on the Mini Map.
Towns
Town symbol. Left-click to enter the town (you can only do this if you have a convoy or buildings in the town).
If you have selected your docked convoy: Right-click to trade with your convoy.
If no convoy is selected but you have a warehouse in the town: Right-click to trade with your warehouse.
Click on the town name to display the town information.
Click on your convoys docked in the town to scroll through convoys.
A symbol depicting a product indicates that there is a shortage of this product in the town.
 The settler symbol indicates that there is either a surplus or a lack of settlers in the town.
 Various event symbols indicate the occurrence of a particular event in the town.
10
Possible events in towns
|
|
Gold discovered |
A gold mine has been discovered near the town. The |
|
|
|
|
|
|||
|
|
quality of life has risen as a result and the consumption |
|
||
|
|
|
|
||
|
|
|
of luxury goods is twice as high for one month. |
|
|
|
|
Plague of rats |
There is a plague of rats in the town. The consumption |
|
|
|
|
|
|||
|
|
of wheat, fruit, corn and meat is twice as high for one |
|
||
|
|
|
|
||
|
|
|
month. |
|
|
|
|
Plague |
A plague has broken out in the town. The quality of life |
|
|
|
|
has worsened and the demand for garments is twice as |
|
||
|
|
|
|
||
|
|
|
|
||
|
|
|
high for one month. While the plague lasts, the town’s |
|
|
|
|
|
citizens perish daily and traders are reluctant to sail to |
|
|
|
|
|
the town. |
|
|
|
|
Food supplies contaminated |
Food supplies in the town have been contaminated (this |
|
|
|
|
|
has the same effect as a famine). |
|
|
|
|
|
|
||
|
|
Famine |
A famine has broken out. While the famine rages, the |
|
|
|
|
|
|||
|
|
price of wheat, fruit, corn and meat will rise. |
|
||
|
|
|
|
||
|
|
|
|
||
|
|
|
|
|
|
|
|
Storm |
A storm is raging over the town. Production on crop |
|
|
|
|
farms is halved. |
|
||
|
|
|
|
||
|
|
|
|
||
|
|
Attack by military convoy, |
The town was recently attacked from the land or from |
|
|
|
|
the sea. The status of the town has fallen. |
|
||
|
|
pirates or natives |
|
||
|
|
Effects: |
|
|
|
|
|
|
|
|
|
|
|
|
• |
Military convoy: Many goods looted |
|
|
|
|
• |
Pirates: Finished goods looted |
|
|
|
|
• |
Natives: Luxury goods looted and number of |
|
|
|
|
|
workers/citizens reduced |
|
|
|
Treasure fleet in the town |
The Spanish treasure fleet has anchored in the town. |
|
|
|
|
|
|||
|
|
|
|
|
|
|
|
|
|
|
|
|
|
|
|
|
|
|
|
Sabotage by buccaneers |
This symbol is displayed to indicate various acts of |
|
|
|
|
sabotage carried out by buccaneers. Buccaneers are only |
|
||
|
|
|
|
||
|
|
|
activated in times of war. |
|
|
Overview of acts of sabotage carried out by buccaneers |
|
||||
|
|
|
|||
Stocks destroyed |
A buccaneer sneaked into the town and destroyed large |
|
|||
|
|
|
stocks of goods belonging to various traders. The town |
|
|
|
|
|
council refuses to accept liability. |
|
|
Town’s goods stocks destroyed |
A buccaneer sneaked into the town and destroyed large |
|
|||
|
|
|
stocks of goods belonging to the town market. |
|
|
Settlers poached |
A buccaneer has poached many workers and their |
|
|||
|
|
|
families. Many businesses in the town are now no longer |
|
|
|
|
|
operating at full capacity. |
|
|
Goods bought up |
Today, a buccaneer posing as a trader docked in the |
|
|||
|
|
|
harbor of the town under a false flag. By doing this, he |
|
|
|
|
|
was able to buy up stocks in the town. Many goods are |
|
|
|
|
|
now unavailable or very scarce. |
|
|
11
Traders intimidated |
A buccaneer sneaked into the town harbor and threatened |
|
arriving traders. For at least four weeks, traders from other |
|
towns will only very reluctantly call at the town. |
Workers on strike |
A buccaneer entered the town under a false name and caused |
|
a great deal of unrest among the workers. All workers cease |
|
working for two weeks. |
Food supplies contaminated |
A buccaneer contaminated large amounts of food in the |
|
town. A famine has broken out as a result. |
Crops destroyed |
A buccaneer sneaked into the town and destroyed all the crop |
|
farms along with their harvest. You cannot harvest again for |
|
approximately 2 weeks. |
|
|
Convoys
All convoys belonging to you are displayed on the sea chart. Any other convoys that come into their field of vision are also displayed. For each convoy displayed, the sea chart also displays the number of ships in the convoy and the nation to which the convoy belongs. There are various types of convoys, which can be identified by the different symbols that they carry:
Your OWN CONVOYS fly a flag displaying a logo that you can choose in the Options menu (also see section 14 Using Your Own Logos).
This symbol is used by TRADING CONVOYS and TRANSPORT CONVOYS.TRANSPORT CONVOYS supply the Caribbean with goods from Europe (see section 9 Imports and Exports). The Spanish treasure fleet is a special type of TRANSPORT CONVOY. It travels from Europe and collects gold from the Spanish colonies.
MILITARY CONVOYS carry a red warning symbol, patrol the waters belonging to their nation and also become militarily active in times of war (see section 12.2 A Nation’s Strength). Buccaneers represent a special type of MILITARY CONVOY that attacks towns in times of war and carries out particular actions (see section 12.5 Buccaneers).
PIRATE CONVOYS carry the pirate symbol (see section 12.6 Pirates).
You can left-click on each convoy to select it and to display information about the convoy. For example, this allows you to determine the type and number of escort and trading ships in a convoy. In the case of pirate convoys, you can see which pirate gang owns the convoy.
By right-clicking on a town or a position on the sea chart, you can send your own convoys there. To attack another convoy, right-click on the target convoy.
12
Floating Objects
Your convoys may also spot floating objects. You can take these objects on board by right clicking on them to send your convoy over to them.
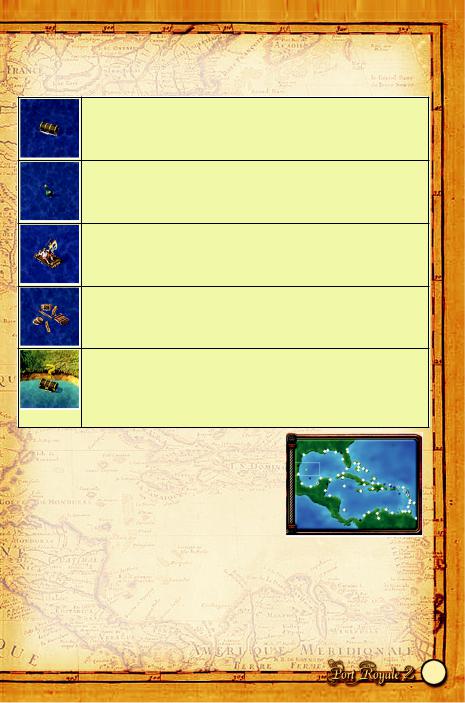
It is always worth making a detour to pick up a floating treasure chest.
A message in a bottle turns out to be parts of a treasure map. You can use the “Treasure Map” option in the log to view parts of a treasure map that you have found.
You can pick up one or more castaways.
Your convoys can pick up flotsam
This object indicates a mission object:
Sometimes you receive a mission to search for a missing object. This symbol is also used to indicate objects that are very rare and particularly difficult to find. These objects are always located near to the shore. If you are married to the daughter of a governor, she will give you more information as soon as you find one of these objects.
Mini Map
The Mini Map displays the entire game world in the sea chart view.
Towns and convoys have particular colors:
White diamonds |
Towns |
|
|
Diamonds with a blue center |
Towns in which you have buildings |
||
Diamonds with a blue border |
Towns in which one of your convoys is anchored |
||
Blue squares |
Your convoy |
||
White squares |
A foreign convoy |
||
Black squares |
A convoy belonging to a pirate or a buccaneer |
||
Small black squares |
Pirate hideouts |
||
Small yellow squares |
A floating object (for example, castaways) |
||
13
The Mini Map also has other very useful functions:
Left-click on the map |
Shift the area of the sea chart displayed |
|
Left-click on town |
Enter town if you have a convoy or warehouse there |
|
Right-click on town |
Send a selected convoy to the town or trade with the town, if |
|
selected convoy is anchored there |
||
|
||
|
|
5.4 Sea Battles
If you have selected one of your convoys, you can provoke a sea battle by right-clicking on another convoy on the sea chart. As soon as the convoys are near enough to one another, the Encounter dialog box is displayed.
TIP
To wage a sea battle, you must have defined escort ships in your convoy, as only the escort ships from both sides can take part in a battle! For an explanation of how to define escort ships, see section 8.2 Convoys.
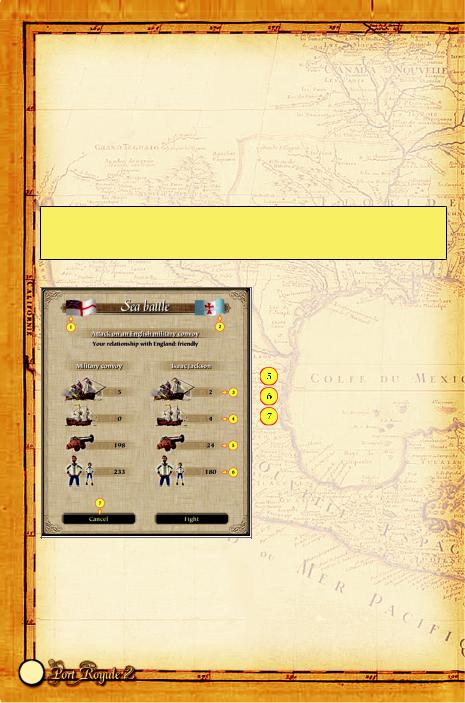
Encounter
 Your opponent’s flag
 Your flag
 Escort ships in the convoy
 Trading ships in the convoy Cannons on board the escort ships
Sailors on board the escort ships
If your convoy is attacked, you cannot
stop the battle.
In this case, you can only resort to
the “Evade” option (see below).
If you now choose “Attack”, the sea battle view opens and the battle can commence.
Evading
You may not always be the attacker. Military convoys and pirates may attack you if your convoys enter their field of vision. In this case, the Encounter dialog box also opens, provided that the convoy is not on an automatic trade route (see section 11 Trade Routes). You cannot stop this kind of battle.
However, if you do not want to wage the battle yourself, you can choose the “Evade” option. In this case, the battle is waged automatically by the captain of your convoy. However, the
14
captain adopts a very defensive position. His aim is to bring the battle to an end while minimizing the amount of damage to his convoy. It is of no interest to him how much damage he has inflicted on his opponent and nor will he loot or capture any ships.
The outcome of this type of battle is displayed immediately.
TIP
Convoys sailing on a trade route always select the “Evade” option automatically. You will then be informed of the outcome of the battle by a message, which you can call up from the message menu in the log.
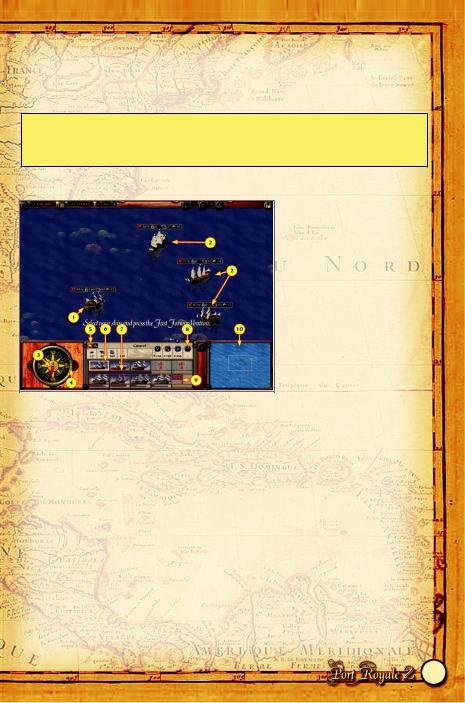
Sea Battle View
 Your active ship
 Opponent’s ships
 Wind direction
 The direction in which your ship is heading
 Morale of the crew and the captain’s combat experience
 Your escort ships and the selected ship. Before the battle commences, you can select the ship that you want to start the battle by clicking on it.
 Here, you can view the condition of the ship as well as the number of cannons and the size of the boarding crew it is carrying.
 Select your ammunition and activate the ready to board function
 Your opponent’s ships
 Mini Map of the sea battle with your active ship and your opponent’s ships
If you have several escort ships at the start of the battle, you can select the ship that you want to use to begin the battle. Then press the fast forward key (this is normally the space bar).
15
Battle Sequence
Only the escort ships take part in the battle (see below section 8.2 Convoys). Trading ships take no part in the fighting. However, the trading ships always fall to the victor.
The battle ends when the last escort ship belonging to one side sinks, flees or is boarded and the winner can then decide whether to loot or capture (that is, take command of) the trading ships.
To simplify the operation of the game, you can only control one ship at a time during the battle, while your opponent can control up to 5 ships. Before a battle begins, you must therefore select from among your escort ships the ship that you want to use to start the battle. To do this, click on one of your ships in the list of ships above and then press the fast forward key (space bar) to begin the battle.
Maneuvering
As on the sea chart, use the right mouse button to control your ship. Note that, in sea battles, you specify a direction instead of a destination. Since each ship has a certain amount of inertia, it always takes a little while before it turns in the direction specified.
Naturally, the ship makes much slower progress if it is sailing against the wind.
Centering
You can always center your ship during sea battles using the Shift key. Centering will remain activated if you press the “Caps Lock” key.
Switching Ships
If you have several escort ships, you can switch to another ship during the battle simply by selecting another ship from the list. Bear in mind that your previous ship is then set to the fleeing mode and can no longer be used in this battle!
TIP
Since a ship in fleeing mode can still be attacked, you should only select a new ship when the ship to be replaced has approached the edge of the map.
A ship in fleeing mode always tries to reach the edge of the sea battle area.
Open Fire!
Left-click to fire a broadside from your ship. In this case, you do not have to decide which side of the ship should fire: Fire is automatically directed from the side of your ship that can hit an opponent. This may also result in both sides of the ship firing if there is an opponent on either side of your ship.
To indicate to you which opponents your ship is attacking, the relevant opposing ships are marked with a red crosshair.
TIP
You can only fire if a red crosshair is displayed over an opponent’s ship. However, this does not necessarily mean that all your cannons will hit their target. You must always decide whether you have reached a good firing position.
16
Reloading
After you have opened fire, your cannons must be reloaded. This is indicated by the blue circle beneath your ship. If you have fewer crew members than cannons on board, the time taken to reload will increase dramatically. The time taken to reload is also affected by the motivation of those on board.
TIP
It is difficult to win a sea battle in which your opponent has far superior ships. Military convoys are especially powerful. If you find that you have underestimated the strength of an opponent during an attack, you can also set the level of difficulty to “Easy”, even in the middle of a sea battle.
Selecting Ammunition and Boarding
In the ship’s selection window below, you can choose between 3 different types of ammunition (provided that you have them on board your convoy). The ammunition is not stored on a particular ship in your convoy, but is always available to the entire convoy. You can also signal to your crew to prepare to board a ship.
Heavy cannonballs: Inflict the heaviest damage to the ship’s hull. Select this ammunition if you want to sink an opponent quickly. The more damage that is inflicted on a ship, the harder it is to maneuver.
Chain balls: These are particularly useful for destroying a ship’s sails. In this way, a ship can be rendered impossible to maneuver.
Grape shot: This puts the crew of a ship out of action.
Useful if you intend to board a ship subsequently.
Ready to board: Choose this option to prepare your crew to board a ship. Once your crew is ready to board, all you have to do is ram another ship to start the boarding procedure. You no longer have any control over the battle on board the ship. Of crucial importance here is the size of your crew and the number of cutlasses that the sailors have at their disposal.
TIP
As with reloading your cannons, it always takes a little while to switch ammunition and prepare to board a ship. During this time, you cannot fire your cannons.
Fleeing
Any ship that leaves the area of the sea battle while the sea battle is being waged is considered to have fled. It can no longer take part in the battle and falls to the winner after the battle is over.
5.5 Attacking a Town
If you sail to a town with a convoy, it normally docks in the harbor. However, you can also specify that the convoy is to attack the town instead of visiting it.
17
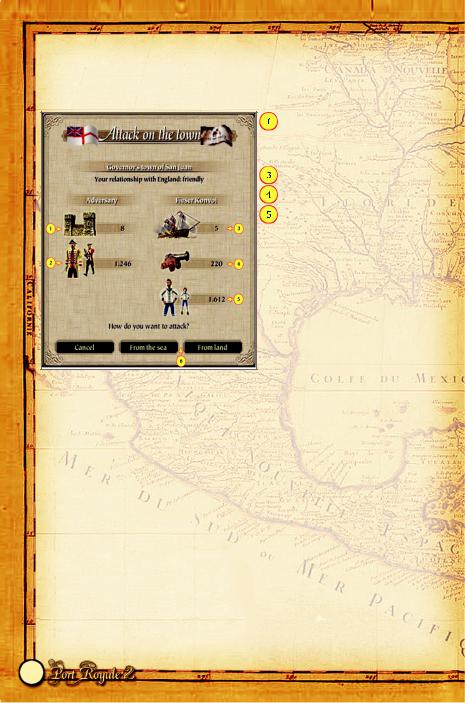
To do this, click on the “Attack Mode” button in the selection menu of the convoy and activate the “Attack Towns” option (also see section 8.2 Convoys).
When your convoy reaches the town, a dialog box displaying both the strength of the town and of your convoy opens (in the same way as for an encounter at sea).
The defensive towers in the town’s harbor
 The strength of the town guard Your escort ships
Your cannons
Your boarding crew that is available
for attacks from the land. It must be
armed with cutlasses or muskets.  You can decide here whether to attack
from the land or from the sea
Choose “From the Sea” to carry out an attack from the sea. If military convoys are anchored in the town, you must first attack and defeat them. Only then can you paralyze the harbor defenses by firing at the defensive towers.
Once the final tower goes up in smoke, the town capitulates and can then be looted. Alternatively, if a viceroy has issued you with a mission to capture a town (see section 12.3 Viceroys and Capturing Towns), then you can take possession of the town on behalf of another nation.
5.6 Land Battles
If you choose the “From Land” option when you attack a town, this means that you attack the town from the land. However, you must first defeat any military convoys that may be anchored in the town.
Before mounting an attack from the land, you must first decide how many close combat fighters and how many long-range fighters you want to deploy. The game always automatically deploys the same number of sailors from your boarding crew on the convoy as the number of muskets and cutlasses you have on board. However, if you have more weapons than sailors, you can control how these weapons are distributed.
18
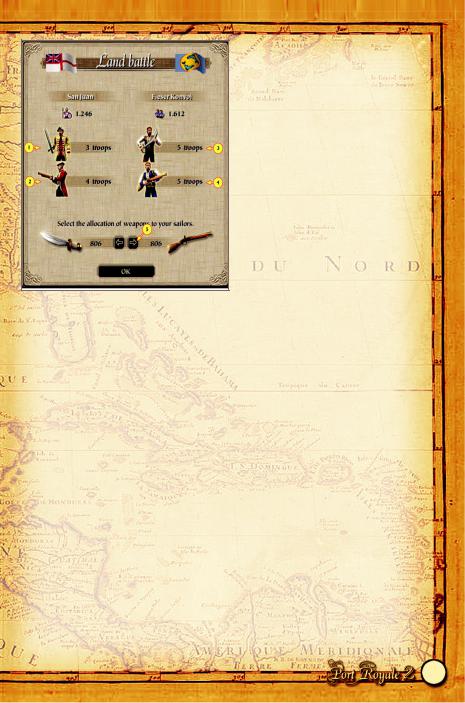
 The town’s swordsmen
 The town’s musketeers
 Your close combat fighters (armed with cutlasses)
 Your long-range fighters (armed with muskets)
 If you have more small arms than sailors on board, you can determine
the distribution of the weapons
yourself.
Your men are automatically organized into troops. Each troop consists of either close combat or long-range fighters. The more men you deploy, the more troops are formed (up to a maximum of 10 troops).
Land Attack Sequence
Your objective when attacking a town is to destroy one of the enemy’s town gates. If you succeed, the town capitulates and you can avoid further casualties. On the other hand, you can also win the battle by disabling all the defenders.
However: You do not have an unlimited amount of time to achieve victory.
If the fighting becomes too protracted, your troops lose courage and flee back to the ships. The amount of time that you have depends on the morale of your crew and the status of the town. The passage of time is measured by an hourglass. The fuller the hourglass is at the start of the battle, the more time you have at your disposal.
Once the battle begins, you can position your troops by clicking on them and then rightclicking. Your troops will automatically attack an enemy as soon as they are close enough.
19
 Left-click on a unit to select it. Selected troops are
indicated by a blue circle.
You can dispatch these troops
by right-clicking on them.  By moving your mouse
pointer over a unit, you can
display the hit points and
endurance of the troops.
 The hourglass displays the time you have remaining to achieve victory. If the battle takes a long time, your troops suffer a loss of morale and flee.
The units you have selected are highlighted in color.
The number of troops and the total number of sailors or soldiers.
Select all close combat or long-range fighters.
Order a retreat.
Tied Units
Troops that are attacked by an enemy are tied to that enemy. They can only be moved on if the enemy troops have been defeated. Exception: Surprise attacks.
Surprise Attacks
By right-double-clicking, you can order your troops to attack. The unit then moves towards the specified target more quickly than it would otherwise. However, enemy attackers are then ignored and the defense of your troop is reduced.
Apart from this, a unit can only carry out a surprise attack for a short period because it reduces the unit’s endurance (of which it only has a limited amount). However, the unit’s endurance will recover once the surprise attack is over.
Supporting Your Units
By right-clicking on selected troops, you can tie them to a friendly unit, which will then follow the tied troops and support your unit.
20
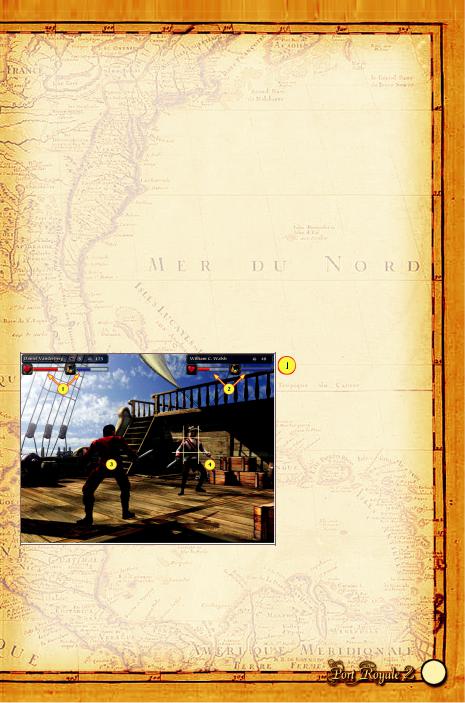
5.7 Duels
If you try to board a ship during a sea battle, the captain of your convoy may be challenged to a duel. As a matter of courtesy, your captain always accepts this type of challenge because it enables him to spare his crew.
The same thing may also occur during an attack on a town. The following situations may arise:
Situation |
|
If, during a sea battle, the captain of the |
If you win the duel, you take control of the |
opposing convoy happens to be on the ship |
enemy ship. |
that you want to board, this may result in a |
If you lose, you lose your ship to the enemy. |
duel. |
|
If you attack a town and manage to destroy |
If you win the duel, the attack on the town is |
the last cannon tower or the last town gate, |
deemed a success and you can then loot the |
this may result in a duel with the commander |
town or capture it (provided that you have |
of the town guard. |
been assigned a mission). |
During a land attack, the commander may |
If you lose, then your attack on the town is |
also challenge your captain to a duel to avert |
also unsuccessful. The crew then returns to |
another defeat if the morale of the troops in |
the convoy and the convoy continues to lie in |
the town is too low. |
wait in the town (see section 8.2 Convoys). |
|
|
A situation that results in a duel is actually always to your advantage. This is because the two adversaries fight it out between themselves and your troops suffer no further losses.
The health and endurance of your convoy’s captain
 The health and endurance of the opponent
 Right-click to enable your captain to ward off an attack
 To attack your opponent, leftclick on an area of his body
Controlling the Duel
Duels are controlled using the mouse only. By left-clicking on your opponent (he is always turned towards you), you can make an attacking movement against him. In this case, the part of your opponent’s body that you click on makes a difference. The more you vary your attacks, the less likely they are to be blocked.
You can block attacks by your opponent by right-clicking (provided that you react in time). It’s best to right-click as soon as you notice your opponent starting to attack.
21
 Loading...