


TABLE OF CONTENTS
INTRODUCTION . . . . . . . . . . . . . . . . . . . . . . . . . . . . . . . . . . . . . . . . . . . . . . . . . . 3 W H AT’S INCLUDED IN THE MANUAL . . . . . . . . . . . . . . . . . . . . . . . . . . . . . . . . 4 HOW TO INSTALL TORMENT . . . . . . . . . . . . . . . . . . . . . . . . . . . . . . . . . . . . . . . 4
View Readme | 4
Register | 4
Exit | 4
Uninstall | 4
THE OPENING MENU . . . . . . . . . . . . . . . . . . . . . . . . . . . . . . . . . . . . . . . . . . . . . . 5
Visions | 5
Abyss | 5
New Life | 5
Resume Life | 5
CHARACTER GENERAT I O N . . . . . . . . . . . . . . . . . . . . . . . . . . . . . . . . . . . . . . . . |
6 |
|
Armor Class |
| 8 |
|
Hit Points | |
8 |
|
THE INTERFACE—YOUR WINDOW ON THE PLA N E S . . . . . . . . . . . . . . . . . . |
9 |
|
It’s All About Control – How to Do Stuff | 10
Mouse Buttons and Control | 10
Left-Click: Action | 10
Right-Click: Information and
Cancel Actions | 11
Mouse Movement: Moves
Viewpoint | 11
Movement and You | 11
The World Screen Interface | 12
Portrait | 12
Inventory | 12
Encumberance | 13
The Paper Doll | 13
Quick Slots | 13
Statistics | 13
Talk | 13
The Dialog Window | 14
Stores, Inns, Taverns, and
Temples | 15
Special Power | 16
Use Item | 16
Cast Spell | 16
Saving Throws and Resistance | 17
Learning Spells | 17
Scribing Spells | 18
Attack | 19
Automap | 19
World Map | 19
Journal | 19
Planescape®: Torment™ |
1 |
THE MAIN INTERFA C E . . . . . . . . . . . . . . . . . . . . . . . . . . . . . . . . . . . . . . . . . . . 20
Bring Up Dialog | 20 Center on Character | 20 Activate Party AI | 20 Inventory | 20
Automap | 20
World Map | 20
Priest Spells | 21
Mage Spells | 21
Thievish Abilities | 22
Thieving | 22
Open Locks | 22
Find Traps | 22
Stealth | 22
Rest | 23
Statistics | 23
Journal | 23
Options | 23
Save, Load and Quit | 23
Gameplay Options | 23
Video Options | 24
Audio Options | 24
Keyboard Mappings | 24
The Clock | 25
Select All | 25
Stop All Actions | 25
Formation | 25
Portrait | 26
Health Bar | 26
LIFE AND DEATH IN TORMENT . . . . . . |
. . . . . . . . . . |
. . . . . . . . . . . . . . . . . . . . 2 6 |
||
How to Fight |
| |
26 |
|
|
Death, or They Can Kill You, but They Can’t Eat You |
| 26 |
|||
Then Again, Some of them Can Eat You |
| 27 |
|
||
THE PLANES, ALIGNMENTS, AND FA C T I O N S . . . . |
. . . . . . . . . . . . . . . . . . . . 28 |
|||
APPENDICES |
. |
. . . . . . . . . . . . . . . . . . . . |
. . . . . . . . . . |
. . . . . . . . . . . . . . . . . . . . 2 9 |
Appendix A |
| |
29 |
|
|
Stat Charts |
| |
29 |
|
|
Experience Point and Spell Level Charts | |
31 |
|
||
Appendix B |
| |
33 |
|
|
Warning! | 33
Dead... Again | 33
Top Floor of the Mortuary | 34
C R E D I T S . . . . . . . . . . . . . . . . . . . . . . . . . . . . . . . . . . . . . . . . . . . . . . . . . . . . . . 3 6 LIMITED WARRANTY . . . . . . . . . . . . . . . . . . . . . . . . . . . . . . . . . . . . . . . . . . . . 3 8 TECHNICAL SUPPORT . . . . . . . . . . . . . . . . . . . . . . . . . . . . . . . . . . . . . . . . . . . 3 9 INTERPLAY WEBSITE . . . . . . . . . . . . . . . . . . . . . . . . . . . . . . . . . . . . . . . . . . . . 48
2 |
Interplay™ Productions |
INTRODUCTION
Planescape®: Torment™ is the first Advanced Dungeons and Dragons®‚ singleplayer role-playing game set in TSR’s Planescape™ campaign setting. Developed by Interplay’s Black Isle Studios Division, Torment takes the Bioware Infinity Engine™ used for Baldur’s Gate™ and uses it to bring the Planes to your PC.
In Torment, you take on the role of a scarred, amnesiac immortal in search of his identity. From his initial awakening on the slabs of Sigil’s Mortuary to his journeys across the Outlands and the Outer Planes, Torment introduces the player character to the forces of faith and belief that govern the Planescape multiverse. A world this different takes a different type of hero to explore it. You are that hero.
Torment isn’t a role-playing game where death is that minute of irritation between the "game over" screen and reloading a saved game. In Torment, death serves to advance the plot and is even a tool for solving seemingly impossible problems… as an immortal, your character can regenerate from traumatic damage, shrug off stab wounds, and is a close personal friend of fast-developing scabs and blisters that harden and fall off within minutes.
The character creation system in Torment is also a little different than some RPGs you may have played. The game itself is the character generator… your actions throughout the game define your character’s development and even have the power to shape the world around you. You will find yourself gaining skills, new classes, and special abilities depending on your style of play. Although you will still gain experience points and advance in level, you’ll quickly discover that gathering memories is just as important as gaining experience, talking to the dead can yield more than talking to the living, and the most dangerous of enemies may be the only ones you can trust.
Your character will develop in power as he learns more about himself, but you won’t be alone. Torment allows you to recruit a variety of strange companions to join your quest, including puritan succubi, insane geometric shapes that talk to their weapons, foul-mouthed mimirs, and the walking dead. Some of the most vocal and unpredictable members of your parties may be your inventory items themselves.
Death is the least of your worries; as you’ll soon discover, you have more to fear from ideas and beliefs than from some berk with a sword. Welcome to the planes. Welcome to Torment.
Planescape®: Torment™ |
3 |
WHAT’S INCLUDED IN THE MANUAL
This manual contains all of the information that you’ll need to get up and running in Torment. Since much of the game involves solving the mystery of your character’s origins and learning just what you’re capable of doing, we’re not going to give away anything that you need to discover while you’re playing. One thing to keep in mind is that while we’re not giving away all of the things that you can do, new skills and abilities that you pick up will function in a very similar way to the ones we do explain. So, you’ll always know how to access and use a new skill, or spell, or ability, even if you have to experiment with it a bit to find out just what it does.
NOTE: For specific information on experience points, skills, and when you’ll be able to acquire spells, check out the Appendix at the end of the manual. It’s jam-packed with all kinds of useful charts and tables for you to refer to.
HOW TO INSTALL TORMENT,
SO YOU CAN START EXPLORING THE PLANES
To install Planescape: Torment, first insert the CD-ROM labeled Planescape: Torment Disc 1 into your CD-ROM drive and follow the on-screen instructions. If your Autorun is not enabled, click on the icon representing your CD-ROM drive under ‘My Computer.’ This will bring up a listing of the files on Planescape: Torment
Disc 1. Find AUTORUN.EXE and double-click to launch in install application.
After installing the game, other options will be available on the launching menu:
View Readme
The readme file contains last minute information and changes that could not be printed in this manual. Please take the time to view the readme file if you are having any problems with this product.
Register
Please take the time to register Planescape: Torment with Black Isle Studios. Your feedback is appreciated and will put you on the mailing list for special offers and game promotions.
Exit
This will close the launch window.
To start playing again later, select the Planescape: Torment application from the Black Isle Studios program group in your start menu.
Uninstall
When you’re ready, the Uninstall option will clean up everything except your saved games.
4 |
Interplay™ Productions |
THE OPENING MENU
There are a few options on the very first screen that you’ll see once you get the game installed and ready to play.
Visions
This button gives you access to any of the cut-scene movies that you’ve revealed during the game. If you want to review any of the cut-scene movies here’s the place to do it.
Abyss
Press this button to plunge into the abyss. This button allows you to quit the game.
New Life
This is the button to start the game for the first time. This will take you to the Character Generation screen (explained below) so you can create your hero and start playing.
Resume Life
This button gives you access to your saved games.
Planescape®: Torment™ |
5 |

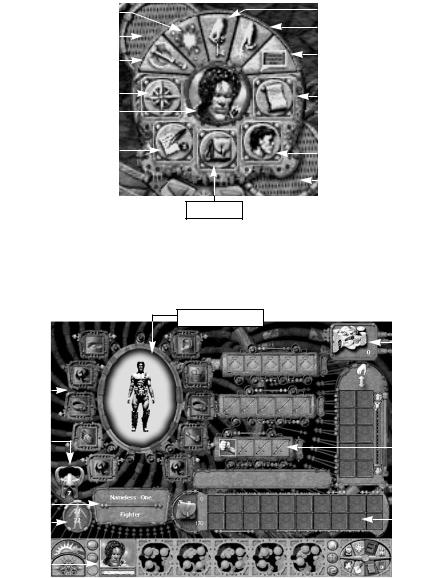
CHARACTER GENERATION
The first game screen you’ll encounter after getting Torment running is, appropriately enough, the Character Generation screen. Here you’ll generate the stats for your hero.
Decrease Stat Button |
|
|
|
Increase Stat Button |
|
|
|||
|
|
|
|
|
|
|
|
|
|
|
|
|
|
|
|
|
|
|
|
|
|
Press this to start over |
|
Press this when you’re |
|||
|
|
|
happy with your choices |
||
|
|
|
|
|
|
Even if you think you’re familiar with which of your character’s stats do what, you may want to read this section anyway. In Torment some of your character’s stats are used in new and different ways. There are a couple of things to keep in mind when you’re crafting your champion. You can’t be good at everything, so you should pick one or two of your character’s stats to excel in. Here’s an overview of your stats and how each one is important.
Stats are actually short for statistics, but everyone just calls them stats. You’ll see a lot of references to characters’ stats throughout the manual since they effect how your character interacts with the world.
6 |
Interplay™ Productions |
CHARACTER STAT |
WHAT IT DOES FOR YOU |
|
|
Strength |
This makes you a good fighter. If you want to be a |
|
real meat grinder of a warrior - raise your |
|
Strength score. |
|
|
Constitution |
This stat makes you tough to kill, almost always a |
|
plus considering how many people are trying to off |
|
you. One other bonus of a high Constitution is that |
|
you’ll regenerate faster. |
|
|
Dexterity |
This stat determines how difficult you are to hit, as |
|
well as how fast your reactions are. If you want to |
|
get the drop on your foes before they raise the |
|
alarm, high Dexterity helps. |
|
|
Intelligence |
The smarter you are the more witty things you can |
|
think of to say. Having a higher intelligence stat |
|
gives you more dialog choices, access to more |
|
spells, and a better chance to regain memories. |
|
|
Charisma |
A high Charisma stat means that people are more |
|
likely to listen to you, and even believe what you |
|
say, you’re so convincing. A high Charisma allows |
|
you to successfully bluff people more frequently. |
|
|
Wisdom |
The ability to absorb lessons from what’s happened |
|
to you is largely a function of Wisdom. You’ll gain |
|
experience points faster if you’re wise enough to |
|
learn from what you’re doing. A high Wisdom also |
|
gives you a better chance to regain lost memories. |
|
|
NOTE: Each of your character’s stats give you specific advantages (or disadvantages if the stat is especially low). For more information on exactly what bonuses or penalties are associated with each stat take a look at Appendix A (at the back of the book).
It’s not easy figuring out which stats are most important. Some of that depends on your style of play. If you like to go into a room with your sword swinging then Strength or even Dexterity might be your best bet. If, however, you like to talk your way through some situations and bamboozle your foes with some quick thinking and a sly tongue, then try Intelligence or Charisma. Regardless of your preference, it’s better to increase one or two stats above average while keeping the rest of your stats at ten or better than it is to increase one stat to superhuman levels by robbing your character of the ability to do anything but that one stat. A well-balanced character will generally be more successful than a specialist.
Planescape®: Torment™ |
7 |

Once you’ve finished assigning the stats to your character, you’re ready to begin playing.
Armor Class
This number shows how tough you are to whack with a melee weapon (like a pointed poniard or a big spiky club) or pincushion you with arrows. The lower your armor class (usually abbreviated as simply AC) number, the more difficult you are to hit. This even extends into negative numbers—so a character wearing, for example, Lower Plane Vermin Armor, with an armor class of, say –6, could walk through a scythe-slinging mob without breaking a sweat. On the other hand, another character sporting a worn cloth tunic, for an armor class of 10, would be cut to ribbons by the same attackers. The benefits of having a low AC apply to your party members and they apply to your enemies. If an opponent you’re squared off against has a thick carapace or burly-looking metal armor then they’re going to be more difficult for you to hit.
Hit Points
Armor is designed to keep you from being hit, however, even the best armor can fail in the face of a determined, or lucky, enemy. When your protection fails you’re going to take damage. The amount of damage that a character can withstand is measured in Hit Points. The more hit points your character has, the tougher they are, and the more damage they can withstand before being incapacitated or killed.
Keep a careful eye on this number. When a character’s Hit Points get low, consider healing them with magic or even withdrawing them from combat. If you don’t want to spend your magical abilities to heal a character (or don’t have any healing magic available at the moment), then resting will help your party members to regain Hit Points.
How High is Up? Or, Your Stats and You.
When you’re assigning points to your different stats at the beginning of the game you’re limited to a maximum of 18 in any one stat (18/00 for Strength). However, as you gain levels of experience during the game you’ll be able to assign more points to your stats—which can bring your stats over the initial maximum. As soon as your character gains a level of experience, you’ll gain a point to add to your existing stat scores. These additional points that you’ll earn during gameplay must be all be spent before your character can gain another level of experience. After going up a level go to your character screen, the one that shows your character stats, and add in the additional points (the total remaining is shown at the bottom left of the screen). So, there’s no reason to hold onto them—spend ‘em as you get ‘em.
You’ll probably figure out most of the following interface stuff on your own, but it’ll help if you take a quick look through this section before you play and then refer back to it for the finer points, later on. Just take a quick look to see the way things are laid out and then, if you need to later on, you can refer back to the manual to sort out any of the details that you might have missed.
8 |
Interplay™ Productions |
THE INTERFACE—YOUR WINDOW ON THE PLANES
Here’s where we get into the real nuts & bolts of how to play Torment. Take a look at the screen to see what the different parts of the screen look like and then we’ll tell you what you can do with each part of the interface.
The important information on the screen is divided up into a couple of sections.
WHAT YOU SEE |
WHAT IT DOES |
|
|
You |
This is where you are. Pretty important, but |
Note: This is the character that |
also pretty easy to figure out. We’re off to a |
you’re currently controlling— |
good start here. |
usually it’s your hero, but it can |
|
be any member of your party |
|
whose portrait you’ve selected. In |
|
either case, it’s the person you’re |
|
controlling right now. |
|
|
|
The World Screen Interface |
You, and your party members, interact with |
|
the world through this screen and interface. |
|
|
The Main Interface |
This info-packed part of the screen is where |
|
you’ll access your spells, inventory, and |
|
journal, as well as the game options. |
|
|
The Clock |
Not just a handy timepiece, this part of the |
|
screen allows you to stop time while you |
|
figure out what you want to do next. |
|
|
The Player Portraits |
Later in the game, you’ll find others that will |
|
join you in your adventures. You’ll pick which |
|
character you want to perform an action by |
|
clicking on their portrait. |
|
|
Planescape®: Torment™ |
9 |
This is You
This is a weaker character
Main Interface
|
|
|
|
|
|
The Clock |
|
The Portrait Area |
|
||
|
|
||||
It’s All About Control—How to Do Stuff
The way that you move around and interact with the game world is controlled on this screen. Most of the actions you can take are controlled through your mouse.
Mouse Buttons and Control
Here’s a list of all the things that you can do with your handy desktop rodent.
Left-Click: Action
•Selects a character or selects a portrait (if a character or group was selected before, this character or group is unselected and the new character is selected instead).
•Holding the [SHIFT] key while left-clicking causes your character to run to the area you’ve clicked on.
•If the [CONTROL] key is held down while Left-clicking on unselected characters, the characters will be added to the current character selection.
•Double-clicking on a portrait centers the view on that character.
10 |
Interplay™ Productions |
•Pushes buttons—selects action for the character: guard, talk, attack (click on attack button), etc.
•Casts spells and uses items once they’ve been selected.
•On terrain, walks selected character(s) to targeted location.
•Left-click and drag on terrain or portraits—selects multiple characters (creates draggable selection box).
•Picks up items with the current selected character(s). If more than one character is selected, the Nameless One (your hero) walks over to and picks up the item.
•On the Clock pauses and unpauses the game.
Right-Click: Information and Cancel Actions
•On an empty area of the screen, brings up the World Screen Interface.
•On a portrait brings up that character’s Inventory Screen.
•On an item or spell on the main game area brings up the appropriate item or spell properties screen.
•Cancels current actions—cancels attacks or spell casting.
Mouse Movement: Moves Viewpoint
The main game area will scroll up, down, left, or right if you move the mouse to the edge of the screen. This also occurs if you use the number pad or arrow keys. One thing to keep in mind is that you can adjust the scrolling speed, either faster or slower, on the Options Screen.
When you start Torment you’ll only have your hero to control, later though, you may have several companions that can help you. In order to select which one of your party will be performing an action, just click on their portrait at the bottom of the screen. The currently active character’s portrait will be highlighted and a cursor-ring will highlight around their feet, on the play screen. The first thing you’ll want to learn how to do is move.
Movement and Yo u
You can see where you are in the game, but that’s not enough, you’ll probably want to move around a bit. Remember the highlighted character is the person that you’re controlling now. Movement is all mouse-driven so if you can click your mouse, you already have all the movement skills you’re likely to need. In order to walk to an area of the screen Left-click on the part of the screen that you want your character to move to. If you want them to run to get there, hold down the [SHIFT] button on your keyboard and while you Left-click. Additionally, you can toggle running on and off.
Now that you know how to move around, you need to know how to interact with all of the things that you can walk, or run, to. You’ll need to use the World Screen Interface for all of that, so we’ll go over that next.
Planescape®: Torment™ |
11 |
The World Screen Interface
This nifty portable interface allows you to control what each of the characters in your party does. To access this interface, Right-click on any empty portion of the game screen to bring up the interface.
Use the Drag Handles to move the interface around on your screen if you wish.
|
|
|
|
|
|
|
|
|
|
|
|
Use Item |
|
||
Cast Spell |
|
|
|
|
|
|
|
|
|||||||
|
|
|
|
|
|
|
|
|
|
|
|
|
|
|
|
|
|
|
|
|
|
|
|
|
|
Special Power |
|
||||
Drag Handle |
|
|
|
|
|||||||||||
|
|
|
|
|
|
|
|
|
|
||||||
|
|
|
|
|
|
|
|
|
|
||||||
|
|
|
|
|
|
|
|
|
|
|
|
|
|
Talk |
|
Attack |
|
|
|
|
|
|
|
|
|
|
|
|
|
||
|
|
|
|
|
|
|
|
|
|
|
|
|
|||
|
|
|
|
|
|
|
|
|
|
|
|
|
|
|
|
|
|
|
|
|
|
|
|
|
|
|
|
|
|
|
|
Automap |
|
|
|
|
|
|
|
|
|
Spells |
|
||||
|
|
|
|
||||||||||||
|
|
|
|
|
|
|
|
|
|||||||
|
|
|
|
|
|
|
|
|
|
|
|
||||
Portrait |
|
|
|
|
|
|
|
|
|
|
|
|
|
||
|
|
|
|
|
|
|
|
|
|
|
|||||
|
|
|
|
|
|
|
|
|
|
|
|
|
|
|
|
Journal |
|
|
|
|
|
|
|
|
|
|
Statistics |
|
|||
|
|
|
|
||||||||||||
|
|
|
|
|
|
|
|
|
|||||||
|
|
|
|
|
|
|
|
|
|
|
|
|
|
|
|
|
|
|
|
|
|
|
|
|
|
|
|
|
|
|
|
|
|
|
|
|
|
|
|
|
|
Another Drag Handle |
|||||
|
|
|
|
|
|
|
|
|
|
||||||
Inventory
Portrait
This picture shows which of your characters you’re controlling. You can switch between characters by Left-clicking on their portrait. The character whose picture appears here will perform whatever action you select. You can also just left-click on the character portrait at the bottom of the screen to do the same thing.
Inventory
The Paper Doll
|
|
|
|
|
|
Copper |
||
|
|
|
|
|
|
|||
|
|
|
|
|
|
|
|
|
|
|
|
|
|
|
|
|
|
Item Slots |
|
|
|
|
|
|
||
|
|
|
|
|
|
|||
|
|
|
|
|
|
|
|
|
|
|
|
|
|
|
|
||
Armor |
|
|
|
|
|
Quick |
||
|
|
|
|
|
|
|
||
Class |
|
|
|
|
|
Slots |
||
|
|
|
|
|
|
|
|
|
|
|
|
|
|
|
|
|
|
Character |
|
|
|
|
|
|
|
|
Name |
|
|
|
|
|
|
||
|
|
|
|
|
|
|||
|
|
|
|
|
|
|
|
|
Hit Points |
|
|
|
|
|
|
Pack |
|
|
|
|
|
|
|
|||
|
|
|||||||
|
|
|
|
|
|
|
|
|
|
|
|
|
|
|
|||
Character |
|
|
|
|
|
|
|
|
Portraits |
|
|
|
|
|
|
||
|
|
|
|
|
|
|
|
|
12 |
|
|
|
Interplay™ Productions |
||||
Left-Clicking on this button takes you to the inventory screen for your selected character. Most of this screen is taken up by the Paper Doll representation of the character. Along the bottom of the screen is the character’s personal inventory and the encumbrance of the character. Items can be dragged and dropped on the Paper Doll, or dragged and dropped to other characters’ portraits to give the item to the other character.
Stackable items will automatically be stacked in your inventory, as you acquire them, and they can be unstacked by double Left-clicking on the item. Unstacked items can be stacked by dragging and dropping them on top of each other. Items placed in the Ground slots will be dropped at the character’s feet and can be picked up from the main game area.
The group pool of copper is shown on this screen as well.
Encumbrance
Each character has a maximum weight they can carry. The weight currently carried by the character is shown next to the Personal Inventory. Maximum weight carried is determined by the Strength of a character. When you’re carrying 100% of your carrying capacity, you can no longer run, you can only walk. If you pick up items totaling 120% of your maximum carrying capacity, you can’t even walk around anymore-you must drop weight (back down to 100% or less of your capacity) to be able to move again.
The Paper Doll
There are a number of distinct areas in the equipped items section. The actual items and areas that you can equip each character with, vary from character to character, but a partial list includes such items/areas as: eyeball, helm, cloak, amulet, L ring, R ring, wrists, gauntlets, quick weapons, quick items, and ammo. In any case, you won’t be allowed to place an item in an area where it won’t fit, so you don’t have to memorize which items go in which slots.
Quick Slots
The weapons or items that are put in the quick slots determine the quick attacks that are available to the character. These are, essentially, handy shortcuts that allow you access to your character’s items or abilities without having to sort through other screens. They are extremely useful in combat.
Statistics
Left-clicking on this button shows your character’s vital information.
Talk
Left-click on this button when you want your character, the Nameless One, to speak on behalf of your party. When you do this you’ll usually get a choice of several different things that you could say to whoever you’re talking to. Pick the dialog line that you want your character to say and the creature you’re talking to will respond.
Planescape®: Torment™ |
13 |
Usually this response is in the form of more dialogue. However, if you’ve just told a non-player character (any character that you don’t control) to go soak his head, they might respond a bit more violently.
Keep in mind that the characters and creatures that you’ll be chatting with do take into account the stats of your character, the Nameless One. If your character is smarter, you’ll have more dialog choices, if they’re Charismatic then they may have options to wheedle something out of the person that they’re talking to—dialog choices that might not be available to a dumber or less likeable hero.
You’ll need to talk to people in order to buy and sell stuff as well as gather information. So talk first, attack later.
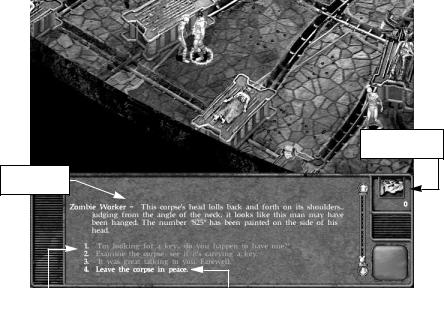
The Dialog Window
Copper Coins
Inventory
NPC Dialog/
Information
|
|
|
|
|
|
|
|
|
|
Player Responses |
|
Selected Choice (highlighted) |
||
Dialog uses a menu-based system where you Left-click on what you want to say from a list, or you can also use the number pad to select the number of the dialog response you want to use. What is available to be said varies according to the reaction adjustment and Charisma of the Nameless One. When more text scrolls up in the window than can be read at once, or when dialog is paused to give you a chance to read can be reviewed with scroll arrows on the right (up or down).
14 |
Interplay™ Productions |
 Loading...