


MENZOBERRANZAN

TABLE OF CONTENTS
A MESSAGE FROM DRIZZT...............................................................2
HOW TO PLAY.............................................................................................4
Basic Training for Combat..............................................................4
Apprentice Instructions for Spellcasting...................................5
Adventuring.............................................................................................8
Movement.................................................................................................8
NPC Encounters..................................................................................11
Things You Can Do from the Adventure Screen...............13
Save, Load, Pause, and Quit........................................................19
PLAYING IN-DEPTH..............................................................................20
Inventory Screen................................................................................20
Automapping......................................................................................23
The Menzoberranzan City Interface.........................................27
Adventuring Strategy......................................................................28
Game Options.....................................................................................30
CREATING YOUR PARTY OF CHARACTERS.....................32
Generating Characters....................................................................32
Character Basics................................................................................33
Races..............................................................................................33
Classes...........................................................................................36
Single-Class vs. Multi-Class................................................39
Alignments..................................................................................40
Ability Scores.............................................................................41
Other Characteristics.............................................................42
SPELLS AND POWERS.......................................................................44
Legend.....................................................................................................44
Character Powers..............................................................................45
Cleric Spells...........................................................................................49
Mage Spells..........................................................................................57
Strategies for Using Spells............................................................68
BESTIARY.....................................................................................................71
TABLES...........................................................................................................86
Level Advancement Tables...........................................................86
Ability Scores.......................................................................................88
INDEX OF SPELLS AND POWERS.............................................91
1
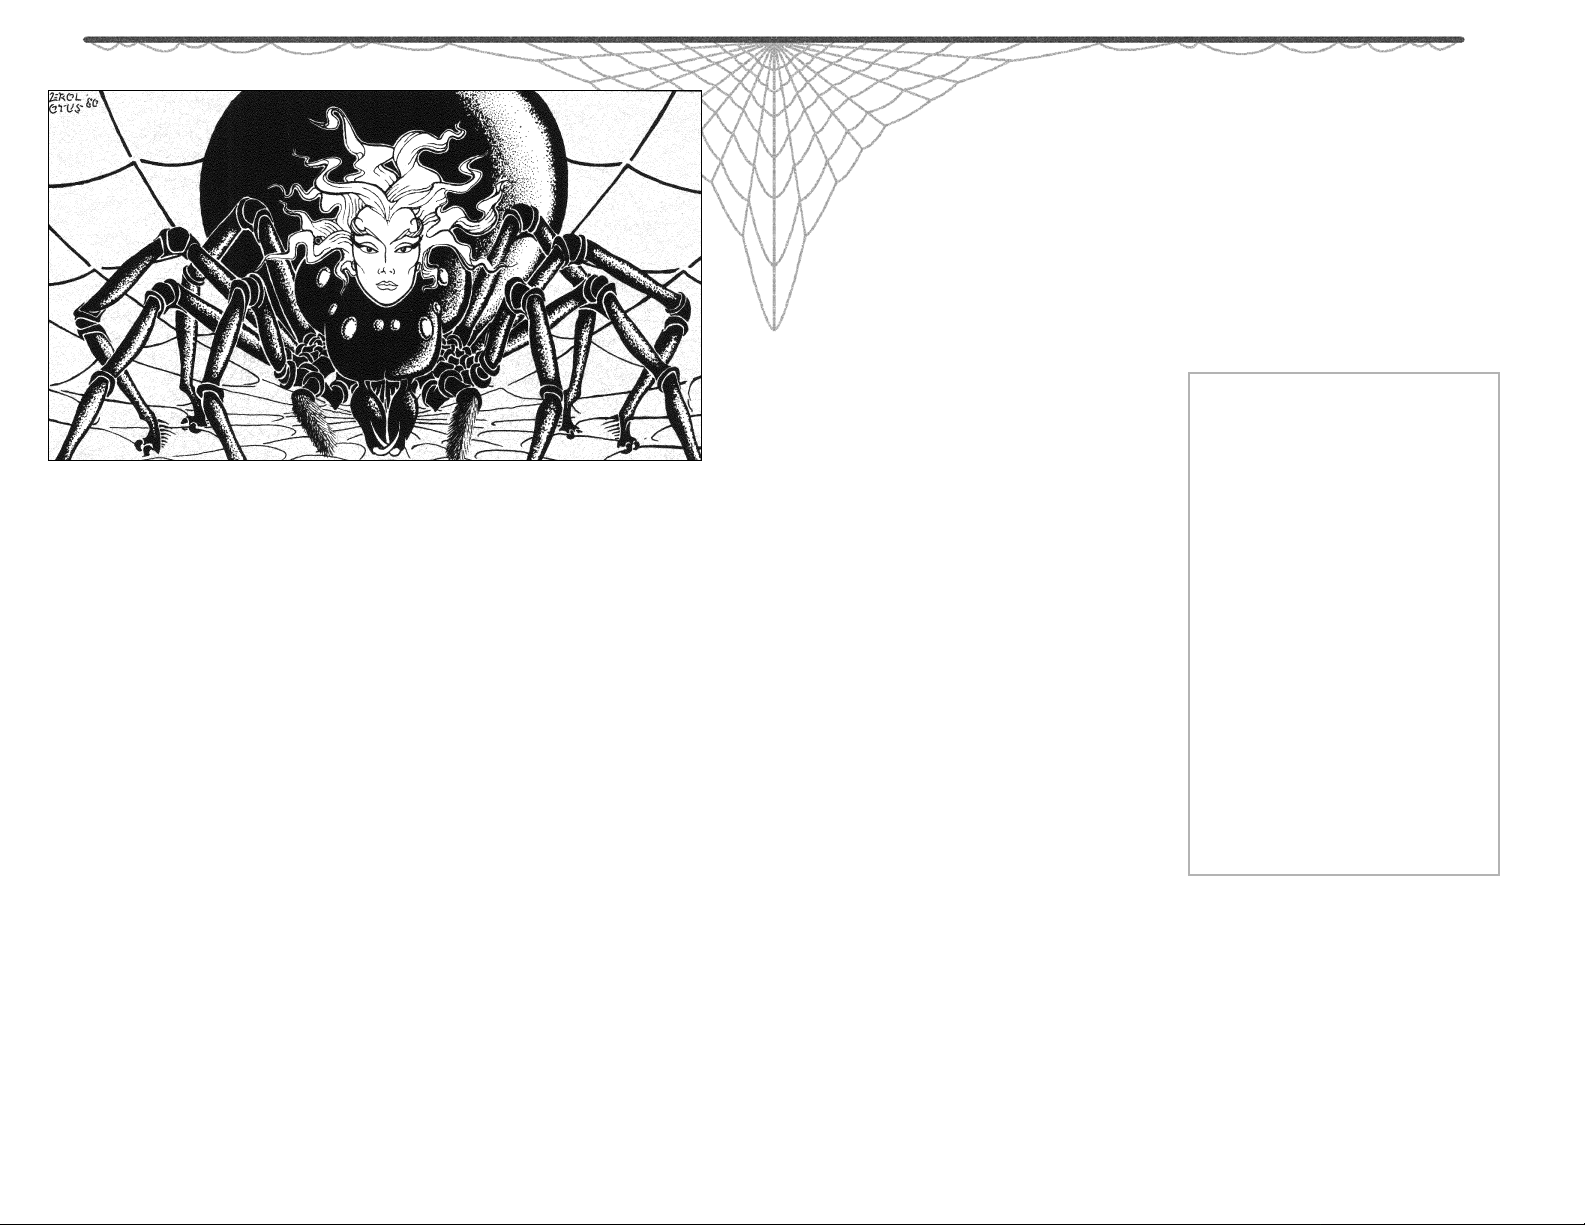
WELCOME TO THE UNDERDARK . . .
As darkness falls, the dark elves rise
to serve their Spider Queen.
The world below is the Underdark –
a blinding darkness to behold.
If you dare upon the drow elves’ lair,
their dark hearts and swords will fly.
Like spiders in their webs they wait,
for you, alas, are simply bait.
here is a world beneath the world humans know — a vast, lawless
land under the realms that see the sun. It is a perilous land of dark
T
caverns, crevices, and labyrinths: the realm below, the vast and mysterious Underdark. No surface dweller has seen all its depths and corners.
Beasts that no surface dweller yet knows of lurk in its shadowy depths.
Surviving explorers say the known dangers are bad enough.
What Comes
with This Game?
Your game box should contain
this rule book, a CD-ROM or
game disks, and a data card. The
rule book explains game commands and contains handy
references on characters, monsters, and spells. To play, install
your disks according to the
instructions on the data card,
which also shows how to start
quickly with a pre-saved game.
Using the Mouse
In this book, the term “click”
means move the cursor to the
desired area on the screen and
press either the left or right
mouse buttons. “Left-click” means
move the cursor to the desired
area and press the left mouse button. “Right-click” means move the
cursor to the desired area and
press the right mouse button.
“Double-click” means move the
cursor to the desired area and
press the right mouse button two
times in quick succession.
Getting Started Quickly
This game includes a character
generator that allows you to individually design and name the
characters for your adventure.
However, to start right away, you
may begin with a party of characters already included in a
pre-saved game.
Because your success depends on
the skills and talents of these
characters, you may wish to read
on, even when starting with the
party included in the game. The
sections “How to Play,” starting on
page 4, and “Creating Your Party
of Characters,” starting on page
32, can be very helpful.
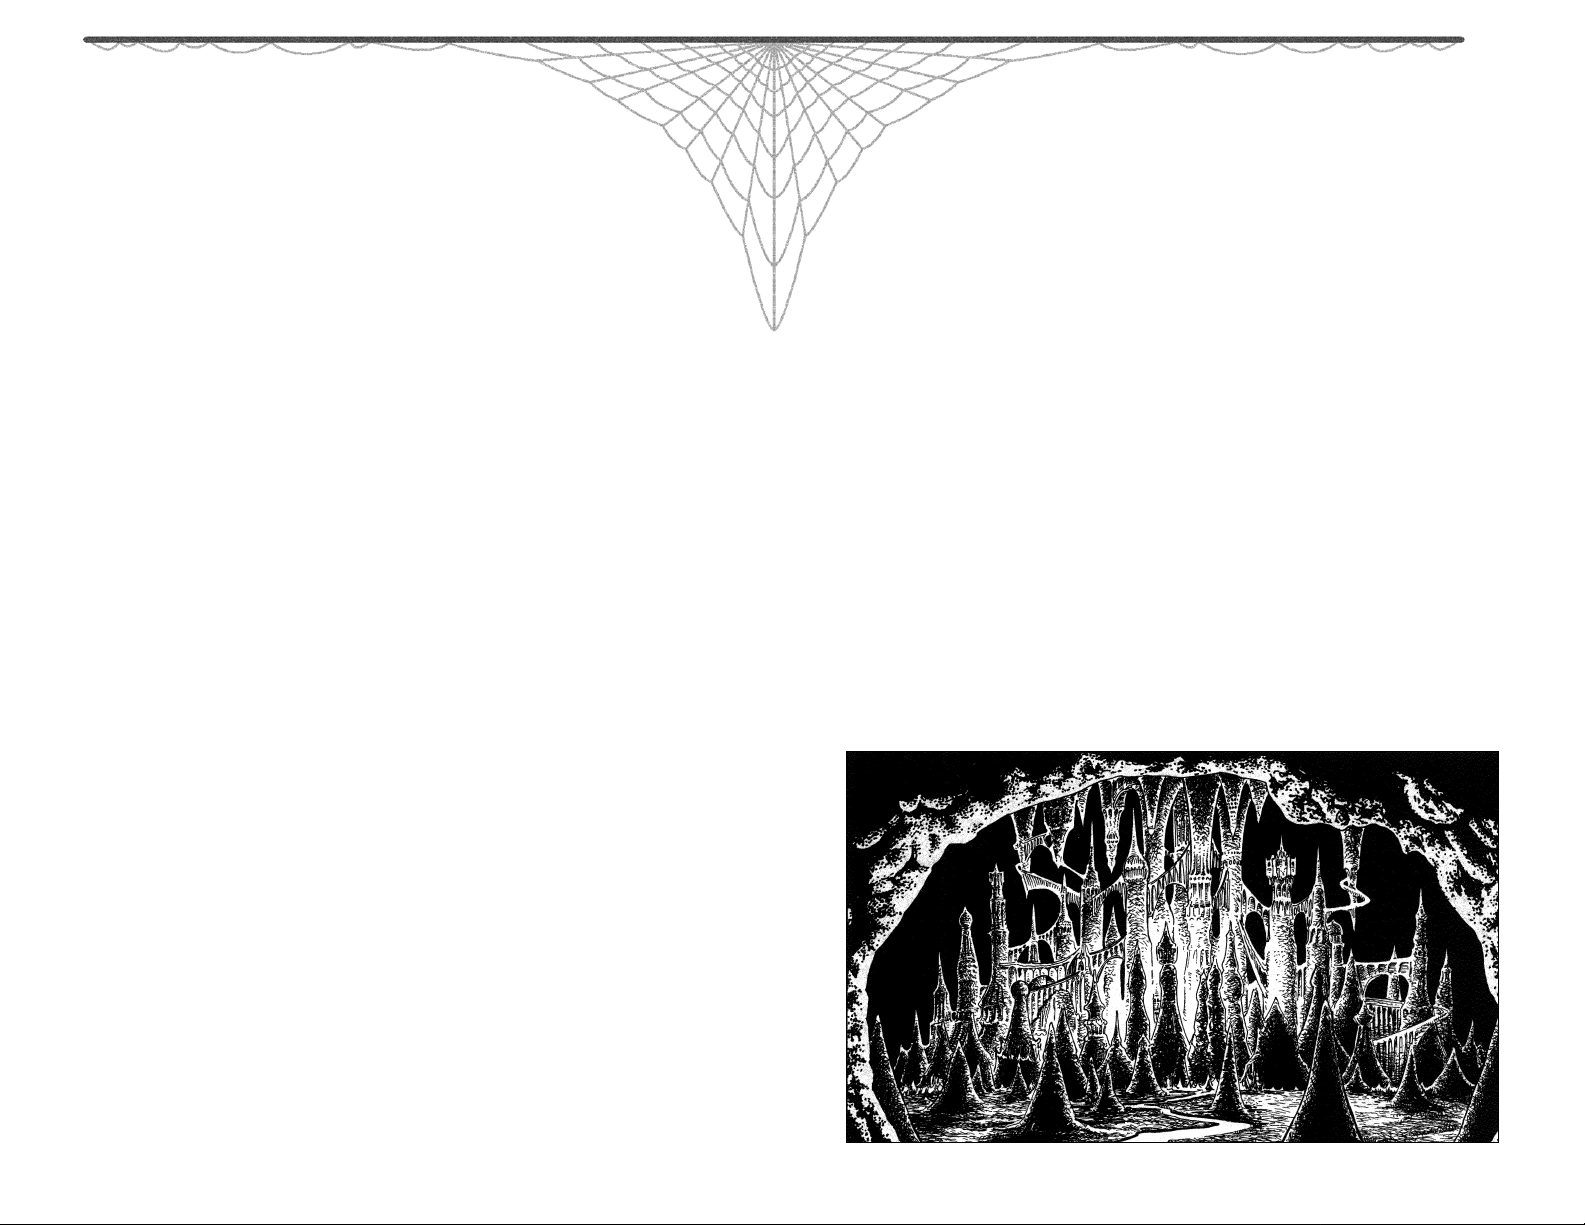
To the unwary traveler in the Underdark, a city may seem a refuge
from the creeping doom in the darkness. It is, after all, bustling with
life — with food, tools, and perhaps aid. Or, perhaps not.
Menzoberranzan is a place of evil within a infinite night. A city of
carved and spired stone castles, their smooth, unjointed, unbroken
expanses are lit with the soft, tinted flows of permanent faerie fires.
There live the dark elves, drow as they name themselves, who plot
against each other to praise Lolth, the Spider Queen.
Do you dare enter their realm? If so, danger and excitement beyond
your wildest nightmares are yours as your characters delve into the
murky Underdark. Riches and glory await, as well as horrible creatures
and danger. You know your party can face them and, perhaps, even
beat them in the light of day, but how will they fare in the darkness?

A MESSAGE
FROM DRIZZT
repeated so often and demonstrated so well
that they ring true in the minds of all my
On the Recent Danger
from the Underdark
You will never believe these words and,
indeed, I may never find the opportunity to
deliver them. Nevertheless I commit them to
parchment in an effort to ease the troubled
turnings of my own spirit. The raid upon your
village was not my doing. Or perhaps it was,
but not in the way you think. I led no drow
warriors out of the Underdark to burn your
homes and take your people hostage. Oh, no, I
was not their leader, nor was I among them.
But cause rests with me, I am certain. Place
the blame upon my shoulders if you will, for
kind. All, that is, except me. I do not know
how I survived these falsehoods, nor how I
overcame the rage and deceit my family sought
to plant within me. Yet survive I did, and in
doing so, I became a traitor to the dark elves,
and a traitor to Lolth, their Spider Queen.
Such treachery is unforgivable. I was lucky
to have escaped the Underdark, to have found
my way to a new lif e in the world of light.
Still, the memories of my evil homeland,
located so far beneath the earth, haunt me even
now. And other drow remember too. Thus they
have come for vengeance, come to find Drizzt
the merciful, Drizzt the weak, Drizzt the
fool. Your village merely got in their way.
the drow may have come in search of me as
much as for any other gain. Yes, they searched
for me. And, not finding me, they turned
their frustration upon you.
Compassion has no place in the city of my
birth. Menzoberranzan lives in the belief that
anything is acceptable if you can get away
with it. These laws bind drow society together,
Now I must descend once again into a
world I thought to have left behind. Innocents
shall not suffer because of me. Those who took
your villagers prisoner will feel the sting of my
scimitars. Finally, I t ell you this: if it is within
my power to do so, I shall return your friends
and family members to you, unharmed.
i
zzt
r
D
D
o
rden
U
’
4
5
HOW TO PLAY
Basic Training
for Combat
The village burns, innocent men,
women, and children have been
taken hostage, and those responsible still lurk among the ruins of
the village. “Dark elves!” someone
shouts, and suddenly the nature
of the raid is all too clear. Rising
up out of the Underdark, the
drow have struck! Among the
first creatures your party is likely
to encounter are the drow, the
merciless dark elves. Wielding
both swords and magic, they are
formidable enemies.
To attack, your characters must
have their weapons “in-hand” and
“ready.” To accomplish this, place
the mouse cursor over one of the
character portraits at the bottom
of the screen and left-click with
the mouse. The inventory screen
is displayed and the game
pauses. Items owned by your
characters, including weapons
and armor are displayed on this
screen. Do the standing figures
hold weapons in their hands,
swords, axes, slings, etc.? If so,
those weapons are “in hand.” If
your characters are barehanded,
look for weapons in the inventory
slots at the bottom of the screen.
By left-clicking on an object in an
inventory slot you can move it up
to your character’s hand. Leftclick again and it is “in hand.”
By “ready,” we mean the weapon
is in a usable condition. If it is
not, the weapon is shaded out on
the Adventure Screen.
A right-click returns you to the
Adventure Screen, and your characters are ready to do battle.
To attack, start at the Adventure
Screen. Place the mouse cursor
over the weapon you wish to use
and left-click with the mouse.
Place the cursor over the image
of the opponent. If your characters are close enough to engage
their enemy, the cursor changes
into a sword icon. Each time you
left-click, a character attacks with
a weapon. Note that this option
does not affect potions or books a
character may be carrying; it activates weapons only. Available
weapons appear above the character portraits at the bottom of
the screen, while the image of a
bare hand means the character
holds no weapon.
While it seems easy, keep some
common sense rules in mind:
♦ Both ranged and thrown
weapons have to be retrieved
after a fight and made
“ready” again.
♦ Ranged weapons, such as bows
and slings, require ammunition. Arrows are conveniently
carried in your character’s
quiver, while rocks for slings
are carried in a sling pouch.
To fire ranged weapons, left-click
on the readied weapon on the
Adventure Screen. More information on ranged and thrown
weapons can be found in the
“Adventuring” section starting
on page 8.
Note: it is possible to have an
item “in hand” but not “ready.”
Two-handed weapons, such as
bows, battle-axes, and two-handed
swords, demand the attention of
both of your character’s hands. On
the inventory screen, the weapon
appears in one hand, and the second hand needs to be free before
the weapon is “ready.”
Drow warriors receive a lifetime of battle training. For
young nobles like Drizzt, what
begins at the hands of a House
Weapon Master continues in
Melee-Magthere, where the
exhausting disciplines of the
Academy hone the students’
fighting skills to a razor’s edge.
After graduation come the
patrols, excursions into the
Underdark to protect the city
from marauding monsters or to
raid the mines of the deep
gnomes. Occasionally a raid on
the surface world is arranged.
Above all others, the drow hate
elves, their distant cousins who
live in the world of light.
Apprentice Instructions
for Spellcasting
You know your party is about to
encounter more dangers, another
drow raider, verbeeg giant, or perhaps a cloaker lord flying out of
the darkness, intent upon shredding your party to pieces with its
lashing tail. If the area is safe and
6 7
fate has given you time enough
to prepare, spells can be prayed
for or memorized.
To spellcast, first determine if a
mage or a cleric accompanies your
party. A mage has a golden spellbook displayed above his or her
portrait on the Adventure Screen.
For a cleric, a golden holy symbol
appears in the same location. (An
icon comprised of both a book
and a holy symbol is displayed for
a character with both skills.)
Bring up the Main Menu by moving the cursor to the upper left or
right corner of the Adventure
Screen, and left-clicking on the
button in either corner. The Main
Menu will appear in the center of
the Adventure Screen. When you
bring up the Main Menu, some of
the choices are: REST, PRAY, and
MEMORIZE. To choose cleric spells,
left-click on PRAY. To choose mage
spells, left-click on MEMORIZE.
When you click on MEMORIZE, a
spell screen appears; it contains a
list of mage spells. It also indicates
the number of spells available for
each level of your mage’s experience. To decide which spells are
readied for use, place the cursor
over the – or + signs next to your
choice and left-click. For example,
if three Level 1 spells are available, you may decide to use three
chill touch spells, or you may have
two of one sort and one of
another, or you could choose three
separate Level 1 spells.
If more than one mage is with the
party, icons bearing the names of
the mages appear at the top of the
spell screen. Simply click on the
name of the mage you wish to
memorize spells. Click on DONE
when you are finished.
When a cleric prays for spells, it is
done in a similar fashion. Simply
choose PRA Y instead of MEMORIZE
and follow the same pattern.
In order to use the spells chosen,
your character(s) must now rest .
REST is one of the choices on the
Main Menu. It is available only if
there are no monsters nearby and
if your party has the time to stop
and prepare its spells. Select the
REST option and your magic-users
prepare their mystical spells. If
characters with healing abilities
are in your party when this option
is chosen, a window appears and
asks if the healers wish to heal
the wounded members of the
party. Select YES and the healing
takes place while the screen
informs you of passing time. You
should note that a party’s rest
may be disturbed at any time if
intruders enter the area.
After praying for or memorizing
spells and then resting, the mages
and clerics in your party are ready
for battle. Point the cursor to the
mage’s golden spellbook or the
cleric’s holy symbol and left-click
to display a menu of Level 1
spells ready for immediate use.
Left-clicking on the buttons
labeled 2, 3, 4, etc. displays readied
spells from those levels, if any.
Pointing the cursor to the name of
the spell itself and left-clicking
activates that spell. Spells which
project an object or an effect over
distance require a second step:
pointing the cursor to the
intended target and left-clicking
again. Spells requiring the character to touch an opponent are
shown as a change in the hand
symbol above the character’s portrait. Left-click on the altered hand
image to use the spell.
Once used, spells must be regained
by praying for or memorizing
them, then resting once again.
Mages pick up more spells as
they journey through the various
caverns and labyrinths of this forsaken world. These spells are
found in the form of scrolls which
can then be added to the mage’s
spellbook. A character who is both
a cleric and a mage has his or
her spell lists displayed in two different colors, allowing you to
differentiate between the types of
spells. For more information on
scrolls and spellbooks, see the section, “Adding Spells to a Mage’s
Spellbook,” on page 13.
Drow Powers: In addition to
spells, special drow powers are
available to the party when they
are magically disguised as dark
elves. A ribbon appears when
powers are present, displayed in
the same location as a cleric’s
holy symbol or a mage’s spellbook. The ribbon appears in
combination with these icons if
the character is a cleric, mage, or
multi-classed magic-user. Leftclicking on the ribbon icon
brings up a standard spell list. To
display the characters’ powers,
left-click again on the A which
appears to the left of the 1st- level
spell button.
Drow magic: faerie fire and
levitation are two inherent
abilities of the drow. More devious and deadly than its name
implies, faerie fire is often used
to outline a target in magical
light, making it all the more difficult to escape a drow attack
in the Underdark. Levitation is
common in everyday life for the
drow; their cities and great
houses are built in a manner
which practically requires levi-
tation. Another common trick
of drow warriors is to throw a
globe of darkness which
envelops their opponent in a
black sphere within which even
the infrared vision of the drow
cannot operate. Beyond these
basic abilities, the priestesses
and wizards of the drow train
for long years to acquire more
deadly and potent spells. They
can be as formidable as the
most dreaded practitioners of
magic in the surface world.

8 9
The Adventure Screen
MAIN MENU BUTTON MAIN MENU BUTTON
GAME OPTIONS
QUICK SAVE
HOLY
SYMBOL
A HIT
POINT
BAR
REAR RANK
CHARACTER
QUICK RESTORE
FRONT RANK
CHARACTER
MAP
MESSAGE AREA
Adventuring
Movement
All movement takes place on
the Adventure Screen. You can
even customize basic movement
to your taste.
Arrow Movement
Place the mouse cursor over one
of the directional arrows centered
at the bottom of the screen and
left-click to move in that direction. The arrows displayed are:
COMPASS
LEVITATION BAR
FRONT RANK
CHARACTER
REAR RANK
CHARACTER
forward and “double time” forward, move forward and turn to
the right, and move forward and
turn to the left. Also available are:
backward, side-step to the right,
side-step to the left, and turn right
and turn left. The movement continues as long as the left mouse
button is held down and stops
when the button is released.
Walking your party into a wall or
other obstacle also effectively
stops their progress.
THE MOUSE
POINTER AS IT
APPEARS IN
COMBAT
AN IN-HAND
ITEM
A CHARACTER
PORTRAIT
MOVE FORWARD
MOVE
FORWARD
AND TURN
LEFT
TURN LEFT
MOVE LEFT
MOVE
BACKWARD
SPELL MENU
DOUBLE-TIME
FORWARD
On Screen Movement
While holding the left mouse button down, move the cursor into
the top third of the screen. The
cursor becomes an arrow and
your characters move in the direction it is pointing. Try moving the
cursor to various areas on the
screen and watch how the screen
responds to that movement.
Pushing the arrow to the very top
of the screen results in a “double
time” forward march. Movement
continues as long as the left
mouse button is held down. As
long as the left mouse button is
held down, no other function is
available. You cannot move and
simultaneously click to pick up
MOVE
FORWARD
AND TURN
RIGHT
TURN RIGHT
MOVE RIGHT
DIRECTIONAL ARROWS:
with the exception of DOUBLE-TIME FORWARD,
all the arrows refer to the same movements as
those on the game screen
objects, or move and simultaneously use the cursor to bring up
menus, etc. Once the left mouse
button is released and movement
ceases, the mouse cursor can be
used for other available functions.
Free Mouse Movement
For free mouse movement, press
the space bar on your computer’s
keyboard. Next, move the mouse
without pressing either the right
or left mouse button. The party
moves in the direction the mouse
is moved. Push the mouse forward and the party moves
forward. Push it to the side and
the party moves to the side.

10 11
Press the right mouse button
and the party moves forward
without the mouse having to be
moved. The party starts slowly
and then accelerates to a “double
time” march.
When you leave this mode, the
cursor reappears in the position it
occupied when you began free
mouse movement. Try working
with this method for a while and
see if it is right for you. If not,
press the space bar again to return
to the previous movement options.
Step Movement
Step movement is possible for
players who find the smooth
scrolling interface difficult to control. It allows the party to move
“one square at a time.” To activate
this option, move the cursor over
the compass located above the
movement arrows and left-click.
Please note, however, that “step
movement” is not available
simultaneously with “free mouse
movement” as described in the
previous paragraphs. Step movement is possible only when the
directional arrows are used. In
addition to clicking on the
Adventure Screen compass, step
movement may be activated from
the game options screen.
Levitation and Flying
At certain points in the game,
your party gains the abilities to
levitate and to fly. When these
abilities are present, a levitation
control bar appears to the right of
the movement arrows on the bottom of the Adventure Screen. This
control allows your party to levitate from one level to the next.
You should note that this ability
exists only when your party is
disguised as drow, or when the
ability is activated by a special
scroll or potion. Once levitation is
activated, you may use the bar in
the following fashion: place the
mouse cursor over the bar and
move it up or down along its
“slot.” On the Adventure Screen,
the viewpoint of your party rises
or falls as you move the levitation
bar up or down.
Levitation results in movement
up and down only. It is the ability
to change levels and not the ability to fly. Other spells, however,
may add flying to the party’s abilities for short periods of time.
When your party is flying, you
may not only change their level,
but may also use the other movement options as well. For
example, you could raise the levitation bar to its top position, then
click on the forward movement
arrows to send your party flying
forward through the cavernous
reaches of the Underdark.
NON-PLAYER CHARACTER
QUESTION
PRINT OPTION
NPC Encounters
Blasting monsters with fireballs
and having your characters wield
two-handed swords against bugbears is but half the fun. Much
care has been taken to design
this game as an interactive
adventure, one in which the storytelling and combat are effectively
balanced. When your party comes
across an NPC, or Non-Player
Character, you are given the
opportunity to ask several questions and learn more about the
dangers and difficulties of life in
the Underdark.
RESPONSE
NPC Dialogue
Your party is close enough to converse with an NPC if placing the
mouse cursor over the NPC
results in a “talk bubble.” Leftclick and a close-up of the NPC
appears along with one or more
questions your party may ask this
inhabitant of the Underdark.
Move the cursor to highlight the
question of your choice, then leftclick to set the response in
motion. Several levels of continuing questions may follow the
response. When you have learned
all you need to know, one or
more right-clicks takes you back
to the Adventure Screen.

12 13
In addition to the main encounters, your party has the
opportunity to talk with a number
of minor NPCs. In these cases a
left-click on the “talk bubble”
results in a single question from
the party. The face of the party
member asking the question is
displayed, along with his or her
question, in the center of the
Adventure Screen. The response
of the NPC may push your party
in the right direction, or offer you
valuable information about the
level you are exploring.
Many interesting quests and subplots await your party on its way
to the Underdark, and in the
houses, taverns, and temples of
Menzoberranzan. The dialogue
makes communication as interesting as exploration.
Talk or Fight
Occasionally, when your party
comes across a sentient creature
by itself, a talk bubble appears
over the creature where you
normally expect the sword icon to
appear. Intelligent and cunning,
this beast may have information
of interest to your party, or it may
be preparing to strike. Whether
or not to take the chance is your
decision. Clicking on the talk
bubble with the mouse causes
two selection buttons to appear,
one for “talk” and one for “fight.”
If “fight” is chosen, the creature
responds with a challenging comment, something along the lines
of, “I have no need to talk to the
likes of you. Prepare to die!” After
this, the response window vanishes. The creature pauses for a
second or two before attacking,
and the first-strike advantage
remains with the party.
If “talk” is chosen, one of the
party members asks a question
relating to the level being
explored, whereupon one of two
things happens:
1. The creature imparts helpful
but non-critical information.
2. The creature chooses to fight,
even though the party wishes to
talk. In this case, the party loses
the first-strike advantage. Shouting
an appropriate battle cry, something like, “Death to you, surface
dweller!”, the creature lunges to
the attack. The Underdark can be a
place both dangerous and treacherous, so be careful who, and
what, you talk to!
Add an NPC to Your Party
When the game begins, your
party starts with a maximum of
two characters. While these characters can never be dropped from
the party, many NPCs (Non-Player
Characters) eagerly await their
arrival, hoping to join the loyal
and dedicated characters on their
sworn quest. Should you decide to
allow another character into the
party, their portrait is placed in
one of the empty character slots at
the bottom of the Adventure
Screen. From then on, the new
character is handled in the same
way as the original characters.
Should you accept an NPC into
the party when all the character
slots on the Adventure Screen are
filled, a prompt appears asking
which NPC currently with the
party is to be dropped. Characters
dropped from the party may
announce a location where they
can be found by the party at a
later time, or they may go their
own way, never to be seen again.
When you drop an NPC from the
party to pick up a different NPC,
any objects in the departing character’s inventory are swapped into
the new character’s inventory. All
twelve slots are filled if necessary.
Objects from the departing character’s “mannequin” are the last
items swapped, and any object for
which there is no room in inventory is dropped to the ground.
The swapping of inventory
described in the last paragraph
has one important limitation.
Objects specific to a particular
character are never swapped. A
good example are Drizzt’s scimitars. Although Drizzt allows other
party members to use his famous
blades while he is with the party,
he takes his scimitars with him
when he leaves their company.
Items of this nature are described
in inventory by having the character’s name appear before the object.
For example: Drizzt’s scimitar .
Things You Can Do from
the Adventure Screen
All combat, spellcasting, and
exploration takes place from the
Adventure Screen. When other
screens are activated, they overlay
the Adventure Screen. Option
selections such as REST, PRAY,
MEMORIZE, AUTOMAP, LOAD, SAVE,
QUIT, and OPTIONS are available by
left-clicking on the Main Menu
buttons in the upper left or right
corner of the Adventure Screen.
When the Main Menu appears,
left-click on a selection in order
to choose it. You can access the
inventory screen by left-clicking
over any character’s portrait.
Add Spells to a
Mage’s Spellbook
When the party comes across
hidden scrolls, you can add these
to your mage’s spell list by scribing the scrolls into the mage’s
14 15
spellbook. To scribe a scroll, the
scroll must be selected and
moved on top of the spellbook
icon. Pick up the scroll and move
it to the inventory screen. Leftclick to place the scroll (and thus
the spell) into the mage’s spellbook. In this game the spellbook
is an icon displayed in the mage’s
inventory. If the spell already
exists in the spellbook, the scroll
does not scribe; however, the
scroll can still be used by placing
it in a mage’s hand and left-clicking to activate. See “Cast Spells
from Mage and Cleric Scrolls” on
page 15. (A side note: the spellbook cannot be picked up or
moved. It is a permanent fixture,
as it should be, for the spellbook
is a mage’s link to his art and
spellcasting ability.)
Attack Opponents
As previously mentioned, launch
your character’s attack by leftclicking on a weapon which is
“in-hand” and “ready.” Once used,
a weapon is shaded out until it is
ready again. Fighters, paladins,
and rangers can carry and fight
with a second weapon, but they
may suffer a penalty to their combat ability for doing so. As a
ranger, Drizzt is renowned in both
the Underdark and the surface
world for his ability to wield two
scimitars at once. Drizzt’s father
(and teacher) was fond of calling
the young drow “two-hands.”
Perhaps Drizzt’s greatest friend,
Guenhwyvar, is a black panther from another plane of
existence. Using the power of a
polished onyx figurine, Drizzt
calls Guenhwyvar to his side in
times of need. To use the power
of Guenhwyvar in combat,
place the onyx figurine in
Drizzt’s hand. From the
Adventure Screen, left-click on
the panther figurine in the
same way you activate any
weapon held by a character.
Guenhwyvar’s paws lash out
into the adventure window,
taking their toll on any opponent within range. When Drizzt
is holding the image of
Guenhwyvar, he can only wield
one of his scimitars. After a
period of time at Drizzt’s side,
Guenhwyvar must return to
the home plane from which it
comes. Therefore, Guenhwyvar
may not be available during
every combat encounter .
Cast Mage and Cleric Spells
After praying for or memorizing
spells and then resting, all of
your magic-users’ spells are ready
for use. Left-click on the mage’s
golden spellbook or the cleric’s
holy symbol to display a menu of
Level 1 spells ready for immediate use. Left-clicking on the
buttons labeled 2, 3, 4, etc. displays readied spells from those
levels. Activate the spell by click-
ing on the name of the spell, then
following the instructions as they
appear. Spells requiring the character to touch an opponent are
shown as a change in the hand
symbol above the character’s portrait. Left-click on the altered
hand image to use the spell.
Cast Spells from
Mage and Cleric Scrolls
Left-click on the in-hand scroll.
The scroll is consumed when the
spell is cast.
Check Character Status
The golden bar to the right of each
character’s portrait is a graphic
representation of the character’s
health. It diminishes if your character is wounded or harmed by
any magic means. Once the bar is
empty, your character is dead;
avoid this at all costs!
Left-click on the white skull icon
to display a list of afflictions
affecting a character. Poison,
paralysis, and rotting disease are
but a few of the unwelcome
examples. This icon only appears
if a character is afflicted.
Drink a Potion
Left-click on an in-hand potion or
select the potion and move it over
the character’s portrait, then right
or left-click. From the Inventory
Screen, this can be done by moving the potion over the head of
the mannequin figure and leftclicking to have the character
drink the potion.
Fire a Ranged Weapon (Bow,
Sling, or Hand Crossbow)
Left-click on any in-hand bow,
sling, or hand crossbow. To prepare a ranged weapon, place the
weapon in the character’s primary
hand. As you fire the weapon,
ammunition is expended from
either the quiver (arrows), or belt
pouch and backpack (sling
stones). You must have ammunition to fire ranged weapons.
Look at
Sign or
Writing
When the
party is
near a
sign or
other writing (such as on a tomb
or wall), the writing can be displayed for easy reading by
placing the mouse cursor over the
sign or writing and left-clicking.
Memorize Spells
With this option, mage characters select the spells they wish
to memorize. A menu including
the selection MEMORIZE appears
when you left-click on one of the
Main Menu buttons. Left-click
on MEMORIZE to display a list of
available mage spells. If more
than one mage is in the party,
the mages’ names appear on
icons at the top of the screen. You
can then choose which mage is
to memorize spells by clicking on
the appropriate icon.
16 17
Left-click on the – and + signs on
the spell screen to select spells.
Only the number and type of
spells available to a character of
your mage’s level and experience
are allowed; however, you have
much to look forward to as the
mage(s) in your party advance in
levels, becoming ever more masterful spellcasters. Remember, a
mage must REST before his or her
spells can be cast. For a detailed
look at spellcasting, see the
“Spellcasting” section beginning
on page 5.
Navigate
W atch the compass to maintain
your orientation and use the
AUTOMAP selection to view your
progress throughout the game.
Choose AUTOMAP from the menu
which appears in the center of the
screen. More information on
automap is available in the section
on “Automapping,” on page 23.
Open or Close a Container
To open a container, such as a
sack or a chest, place it in a
character’s left hand on the
character mannequin. To close
the container, left-click on the
character’s left hand.
Open a Gate
To open a gate, click on the release
lever or button near the gate. Some
gates are locked or guarded by
hidden traps and can only be
opened with keys or special
actions. See the section “Unlock a
Door or Gate” on page 19.
Open Doors
Open most doors by having your
characters walk through them.
Open other unlocked doors by
pointing the cursor to the center
of the door and left-clicking with
the mouse — assuming of course,
that your party is close enough to
open it. Other doors may require
a key, a spell, or the activation of
a hidden pressure plate to open
them. If the door is locked, see
the section “Unlock a Door or
Gate” on page 19.
Pick a Lock
To pick a lock, left-click on the
thief’s lock pick, move it over the
lock and click. Sometimes locks
are booby-trapped; thieves automatically attempt to disarm these
traps. However, a thief’s skill level
determines his or her success in
disarming such traps.
Pick Up and Drop Objects/
Add Items to Inventory
In the vast, unearthly reaches of
the Underdark many treasures
exist: gold, supplies, armor,
weapons, and keys to help the
party on its way. When you move
the cursor over an object which
can be picked up, the cursor
changes into a golden hand icon.
Right-click when the golden hand
icon is over the object to pick the
object up. Another right-click
drops it. To keep the object and
add it to one of your character’s
inventories, pick up the object
and move it to the character’s
portrait. Left-click to bring up the
inventory screen, and click again
over an inventory slot to place the
item in that slot. After picking up
the object, you may also double
right-click when the object is over
the character’s portrait. This automatically adds the item to that
character’s inventory. In the case
of an arrow, a double right-click
over the character’s portrait automatically adds the arrow to the
character’s quiver. In the case of a
sling stone, a double right-click
over a character’s in-hand sling
pouch automatically adds the
stone to the sling pouch.
In this game
world, some
objects can be
picked up from
tables. Important scrolls, books, and items,
those generally of critical importance to the game, can be found
resting on tables of similar
design. Pick up an object from a
table just as you would pick up
any other object.
On the Adventure Screen, right-
click to pick up, drop, use, and
throw objects, and left-click to
move, activate buttons and levers,
and operate character interactions.
This allows the party to continue
to move while “holding” an object
in the Adventure Screen.
Place an Object in a
Character’s Hand
After picking up an object on the
Adventure Screen, double rightclick over the character’s hand in
which you wish to place it. If an
object is already in the hand
you’ve chosen, the new object is
swapped with it and you can drop
the previous object by moving it
onto the adventure window and
right-clicking with the mouse. Any
object in a character’s hand can be
dropped or swapped in this way.
Pray for Spells
With this option, clerics (also
called priests) select the spells for
which they wish to pray. A menu,
including the selection PRAY,
appears when you move the cursor into the upper left or right
hand corners of the Adventure
Screen, and left-click on the button
in either corner. When you leftclick on PRAY, a screen of available
cleric spells appears. If more than
one cleric is in the party, their
names appear on icons at the top
of the screen. You can then choose
which cleric is to pray for spells by
clicking on the appropriate icon.
Left-click the cursor over the –
and + signs on the pray-for-spells
screen to select spells. Only the
number and type of spells available to a character of your cleric’s
level and experience are allowed.
With experience, the clerics in
your party will advance levels,
becoming ever more masterful

18 19
spellcasters. Clicking on DONE
returns you to the Adventure
Screen. Remember, a cleric must
REST before his or her spells can
be cast. For a detailed look at
spellcasting, see the “Spellcasting”
section beginning on page 5.
Read Books
or Scrolls
To read books or
scrolls, left-click
on the document. Some books or parchment
may be written in a language your
characters do not understand. In
this case, use a character who has
the comprehend languages ability
or spell. Or, perhaps your party
needs to find an NPC who can
read the text.
Rest
Click on either Main Menu button
in the top corners; choose REST.
This option allows characters to
rest, heal, and memorize spells.
How long they rest depends on
the number and level of spells
being memorized (or prayed for).
The party cannot rest with creatures nearby. Even if there are no
monsters in the vicinity, there is
always a chance of a random
encounter while the party sleeps.
Resurrect Dead Characters
When a character dies, his or
her portrait turns to a shade of
gray and all of the objects in their
inventory drop to the ground. A
cleric in the party may bring the
character back to life with a
raise dead spell. Unfortunately,
unlike other races, elves cannot
be resurrected.
Note: Dead characters can be
replaced when new NPCs join the
party; however, when a dead character is replaced with another
character, the dead character is lost
forever and cannot be returned to
life with a raise dead spell.
Throw an Item
After selecting an item from your
character’s inventory, or double
right-clicking to select the object
in a character’s hand on the
Adventure Screen (as described in
“Place Object in Character’s
Hand”), move the object onto the
Adventure Screen. Right-click
again when it is over the center
line of the screen to throw the
object. To drop an item, rightclick below the center line of the
Adventure Screen. This type of
throwing is not the same as
throwing a dart or dagger, which
is described next.
Throw a Ranged Weapon
(Dagger or Throwing Knife)
To throw a ranged weapon, leftclick on any in-hand dagger or
throwing knife. These weapons
are automatically replenished
with like items (if available) from
the character’s inventory. They are
not available for quick replacement if enclosed in a chest or
other container.
Unlock a Door or Gate
To unlock a door or gate, place
the appropriate key over a keyhole on the adventure window
and left-click. Keys on a key ring
need not be removed from the
ring; simply place the key ring
over the keyhole and left-click.
Use a Drow Power
To use a drow power, first look for
a ribbon placed near a cleric’s holy
symbol or a mage’s spellbook.
Then left-click on the ribbon icon
to bring up a standard spell list. To
display the characters’ powers, leftclick again on the A which
appears to the left of the 1st-level
spell button.
Use an Object in a
Character’s Hand
To use an object that is in a character’s hand, left-click on the
object or weapon where it appears
above the character’s portrait.
Save, Load,
Pause, and Quit
Save
To save your game, left-click on
one of the Main Menu buttons,
and then left-click over the SAVE
option. This displays a list of
named, saved games. Click on an
available slot, type in a name for
the game you are saving, and
press Enter to save it. Saving your
game from time to time is a very
good idea.
You can Quick Save by pressing
S on your keyboard, or by leftclicking on the QUICK SAVE button
on the Adventure Screen. These
methods allow you to save the
game without going through the
Main Menu.
To restore the game from the
quick save position you can either
click on the QUICK RESTORE button,
or you can press Shift + R on
your keyboard.
If your party dies, you have the
option to restore the game from a
previously saved position. This
saves you the trouble of going
through the menus to reestablish
your adventure.
Load
To restore a previously saved game,
left-click on one of the Main Menu
buttons, and left-click over the LOAD
option. This displays a list of
named, saved games. Click on the
button to the left of the game you
wish to play to load it.
Pause
Press P on the keyboard to pause
your game; press P again to
resume. The game also pauses if
you open the Main Menu, or open
a character’s inventory screen.
Quit
To quit the game, go to the Main
Menu and left-click on QUIT to
end your game.
20 21
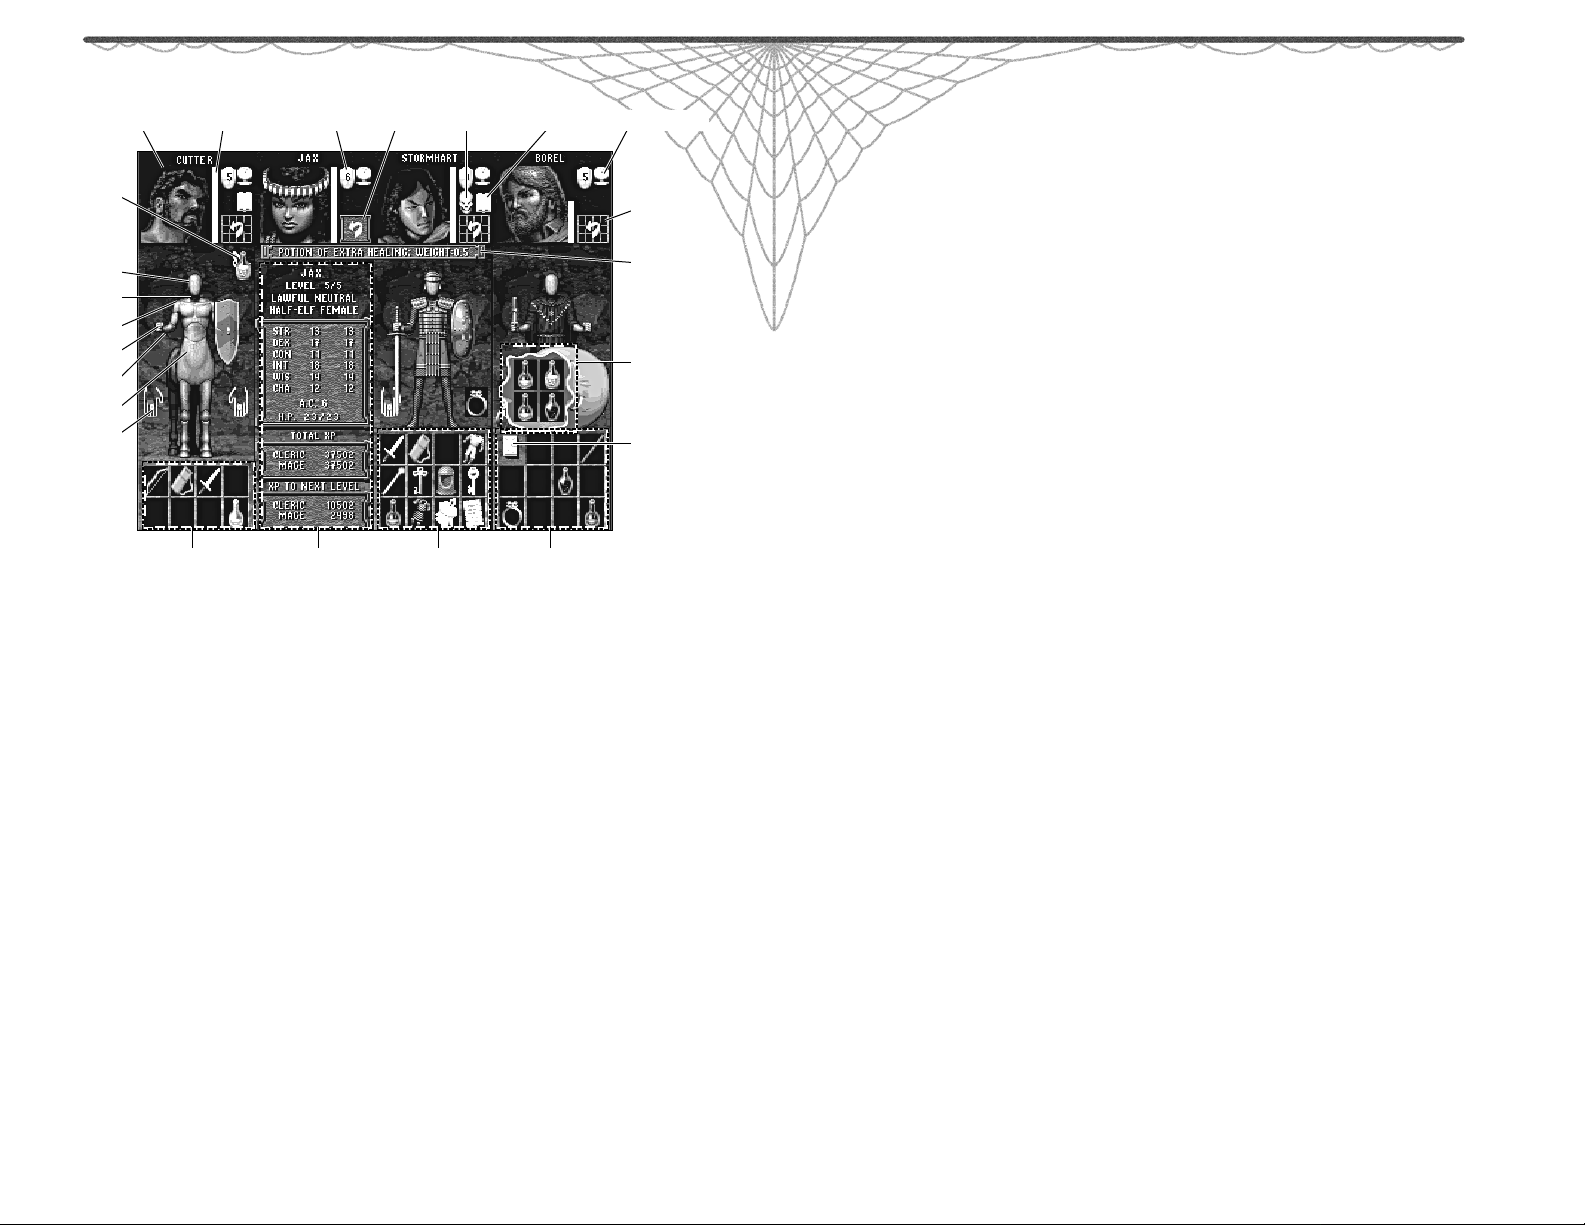
CHARACTER PORTRAIT
MOUSE
POINTER WITH
AN OBJECT
HEAD
NECK
SHOULDER
HAND
WRIST
BODY
RING
HIT POINT
BAR
ARMOR
CLASS
CHARACTER STATISTICS
PLAYING IN-DEPTH
Inventory Screen
To display the inventory screen,
move the cursor over one of the
character portraits at the bottom of
the Adventure Screen and left-click.
The inventory screen is divided
into four sections, one for each of
four possible characters, and contains slots for storing various
pieces of equipment in inventory.
Names and character portraits
appear at the top of each section.
DISPLAY
INVENTORY
WHITE
SKULL
WHITE
SPELLBOOK
INVENTORY SLOTSINVENTORY SLOTSINVENTORY SLOTS
ENCUMBRANCE
DISPLAY
STATISTICS
OBJECT
INFORMATION
CONTAINER
SLOTS
A MAGE’S
SPELLBOOK
Character Positions
in Party
Characters whose portraits appear
on the left and right sides of the
screen are considered to be in the
rear rank of the party. Characters
whose portraits appear near the
center of the screen are considered to be in the front rank. This
front and rear ranking applies
only to interior locations.
Characters outside are considered
to have formed a less-ordered
group and all react as if they have
positions in the front rank.
To change the rank positions of
your characters, left-click with the
cursor over the character’s name
at the top of the screen. The character’s slot becomes outlined in
white. Click on a blank slot to
move the character to that slot.
Click on another character’s
name to switch their positions.
Hit Point Bar
Hit points for each character are
represented by a yellow bar at the
right of the character’s portrait.
As a character takes damage, the
hit point bar descends to the bottom of the portrait square. When
hit points are dangerously low,
the bar turns red. When the bar is
empty, the character is dead and
his or her portrait turns gray.
Armor Class Symbol
The golden shield to the right of
the character portrait represents
his or her Armor Class (AC). The
number displayed on the shield is
the current AC value.
Scale Symbol/
Encumbrance
To the right of the Armor Class
symbol is the scale symbol. Leftclick on this icon and a window
appears displaying how much
weight the character is carrying,
how much he or she is capable of
carrying, and an encumbrance
rating from the “Encumbrance
Table” found on page 90. The
inside of the scale changes color
as encumbrance increases and
turns red when a character is
severely encumbered.
A moderately encumbered character receives a –1 penalty when
attacking; a heavily encumbered
character receives a –2 penalty
when attacking and a +1 penalty
to Armor Class; a severely
encumbered character receives
a –4 penalty and a +3 Armor
Class penalty when attacking.
White Skull Symbol
Left-click on this icon to display a
menu of afflictions currently affecting a character. Poison, paralysis,
and rotting disease are but a few
of the unwelcome examples. Note:
this icon does not appear unless a
character is afflicted in one form
or another.
White Spellbook
Left-click on the white spellbook
and a menu of magic spells currently influencing a character is
displayed. As with the white skull
symbol, this icon does not appear
until an active spell begins to
influence the character.
Statistics Display
Next to the character’s portrait on
the inventory screen is a small
red box with a curved arrow
inside. Left-clicking on this icon
displays statistical information
pertaining to the character.
Information displayed includes
22 23
the character’s class and alignment, as well as total experience
points gained and the number of
experience points necessary to
reach the next level. Right-clicking on the red box icon displays
statistical information for all of
the characters in the party.
When a character ‘s statistics are
displayed, the red box appears as a
black grid with a curved arrow
inside. Left-clicking on the changed
icon returns the view to the character’s inventory information. A
right-click on the black grid
returns the inventory information
for every character in the party.
Character Mannequins
Below the character portraits on
the inventory screen stand character mannequins. These
represent the characters’ bodies,
upon which can be placed clothing, armor, various weapons, and
items such as key rings, helmets,
etc. Items may be placed on the
following areas:
♦ Head: helmets.
♦ Neck: amulets and medallions.
♦ Hands: weapons, shields,
sacks, key rings, potions, or
any similar objects you wish
the character to use.
♦ Wrists: bracers and gloves.
♦ Shoulder: a quiver to
hold arrows.
♦ Body: Armor, cloaks, robes.
Though male, female, short, and
tall figurines are displayed, most
clothing fits any character. Two
exceptions to this rule exist. A
centaur wears only centaur armor
and a kenku wears only kenku
armor. Any other character can
wear centaur armor, but no other
character can wear kenku armor.
Rings
To the right and left of each character mannequin is a white line
sketch representing the character’s
hands. Rings can be placed on
these representations by left-clicking when a ring is over the hand
icon. Each character may wear up
to two rings at any one time.
Inventory Slots
Twelve inventory slots exist
beneath each character mannequin. An exception to this is
the centaur, who has only eight
inventory slots. Although the centaur has fewer inventory slots, he
has twice the weight-carryingcapacity of a fighter. Objects you
wish your characters to carry with
them on the adventure may be
placed in each character’s inventory slots. To do this, use the
object manipulation techniques
described in “Pick Up and Drop
Objects/Add Items to Inventory,”
in the section “Things You Can Do
from the Adventure Screen,” starting on page 13.
To Open a Container
To open a container, such as a
sack or a chest, place it in a character’s left hand on the character
mannequin. When this is done,
the container opens up and displays its contents. Objects within
the container may now be put into
inventory or swapped with items
already in inventory, or the character may simply place the entire
container in inventory. To close the
container, left-click on the charac ter’s left hand.
SCROLL
MAP NORTH
MAPPING
AREA
SCROLL
MAP
WEST
SCROLL MAP SOUTH
Automapping
As your party explores the many
lairs and labyrinths of the
Underdark, the last thing you
want to do is map each step of the
way with pencil and paper. We’ve
made it easy by including a versa-
Object Information
When you select an object, it is
superimposed over the mouse
pointer. When you select the
object on the inventory screen, a
message bar appears centered on
the screen below the character
portraits. The message bar gives
a short description of the object.
To return to the Adventure Screen,
right-click anywhere on the inventory screen except over the icon
used to switch between the inventory area and the statistical display.
SCROLL
MAP
EAST
QUILL
MAP TEXT
ON/OFF
PRINT
ERASE
SAVE MAP
TO DISK
VIEW
CUTAWAY
MAP
RETURN
TO GAME
tile automapping feature. The map
is displayed from the Adventure
Screen. To the left of the movement arrows at the bottom of the
screen are four icon buttons, the
third of which is a parchment
map icon. Left-clicking on this
GLOBAL SAVE
AND RESTORE

24 25
button displays the automap. You
can also choose the feature from
the Main Menu. To do this, choose
AUTOMAP from the Main Menu.
Features
You have a map area, scrolling
buttons, a legend, and various
function buttons. The legend and
buttons appear on the right side
of the screen. They represent the
abilities to: scroll through several
maps, display text, save to disk,
return to the game, display the
cut-away map, and global save
and restore. These buttons add a
number of versatile features to
the mapping process.
Line of Sight
The map area is based on your
character’s line-of-sight, so only
parts of a dungeon that have
been explored are shown.
Everything on the map reflects
the current status of the items
shown. Doors are displayed open
or closed. This makes automapping a very useful tool. Walls,
insets, doors, floors, trap doors,
rugs, pressure plates, illusionary
walls, your party, trees, creatures,
NPCs, and furniture are all displayed on the map. Note,
however, that items and creatures
of which your characters are not
yet aware are not shown.
Scroll Map –
North, South, East, West
At the top, bottom, and sides of
the automapping window are
small pyramids or triangles, icons
which can be used to scroll to the
north, south, east, and west of the
map. This becomes useful when
the map grows larger than can be
displayed in one window.
Scroll through Maps
The first icon below the legend
appears as a number of parchments between a right and a left
button. By clicking on the buttons
to either side, you scroll through
the maps you have made from
the levels you already explored.
Add Text
The second icon is a quill. Leftclicking on the quill allows you to
type notes anywhere on the map
window. Simply move the cursor
to the desired position and leftclick to begin your text line.
Hitting the Enter key allows you to
continue your text on the next line.
Up to four lines of text are available for each entry. Press the Esc
key to return the cursor to the
screen. Click on the quill again to
exit this mode.
Map Text On/Off
The third button has a capital letter
A. Clicking on this button hides or
displays the text which you have
entered on the map. You can temporarily hide text to allow better
viewing of the map. Restore text by
clicking on the button again. Note
that when the text button is off, text
will not be printed on any maps.
Erase
The fourth icon is a pencil eraser.
Left-click on the eraser and you
move the cursor over any line of
text on the map, then left-click
again to erase the line you have
chosen. Click on the eraser again
to exit this mode.
Print
The fifth icon is a computer
printer; click this button to print
the current map. Note that text
printed looks different from the
way it appears on your computer
screen. Text is printed below the
map, and letters at various locations on the map correspond to
text notes beside the same letters
printed beneath the map.
Special Note: Please be certain
your printer is On and set up to
print out a map. In order for the
print function to work, the printer
must be set to print the IBM character set. Refer to your printer
instructions for information on
how to set up your printer, and
if you are using a laser printer,
be aware you may have to
change the printer font to the
IBM character set.
Save Map to Disk
The sixth icon is a save button. It
represents information being
saved to a computer disk. By
selecting this option you save the
currently viewed map into a file
in the “Automaps” subdirectory.
They can be viewed in any text
editor and are in the format
AUTOXXX.MAP (where XXX is
replaced by numbers).
Exit
The seventh icon is an exit button.
It looks like a miniature version
of the Adventure Screen. Left-click
on this button to return to the
Adventure Screen.
26 27
Cut-Away Map
The eighth icon, located to the
right of the exit icon, represents a
cut-away map. This map is not
available at first, but is given to
your characters by one of the NPCs
they meet along the way. Once the
map is in your party’s possession,
left-clicking on this icon displays a
cut-away view of your party’s
descent into the Underdark. This
serves two functions. First, it gives
a sense of how far beneath the
surface your party has ventured
and how much distance yet
remains to Menzoberranzan.
Second, it allows you to access the
automaps of levels your party has
already explored in a quick and
easy fashion. Using the mouse cursor, simply highlight the level
containing the automaps you wish
to review, then left-click to display
those maps in the regular
automap mode. The first map of
the selected level appears automatically. This saves the time of
scrolling through a long list of
maps, a helpful feature if the information you want is several levels
above the current position of your
party. Information on the cut-away
map appears in two stages. Areas
which appear in outline have not
been explored by the party, and
automaps for these levels are not
yet available. Detailed areas have
been explored and can be highlighted by moving the cursor over
them as previously described. You
can simultaneously highlight all
explored levels by left-clicking on
the draftsman’s tool displayed in
the upper right hand corner of the
cut-away map. To the right of the
cut-away map are two icons, one
to return to the game and one to
return to the regular automap.
Global Save and Restore
The ninth icon shows two disks,
one on either side of a global
map. The disk to the left is “global
save” and the disk to the right is
“global restore.” Using this feature
saves all of the maps, text, and
information you have acquired,
even if your party dies. Ordinarily
mapping information is lost when
the last party member falls; however, if global save has been used,
your party’s hard won information
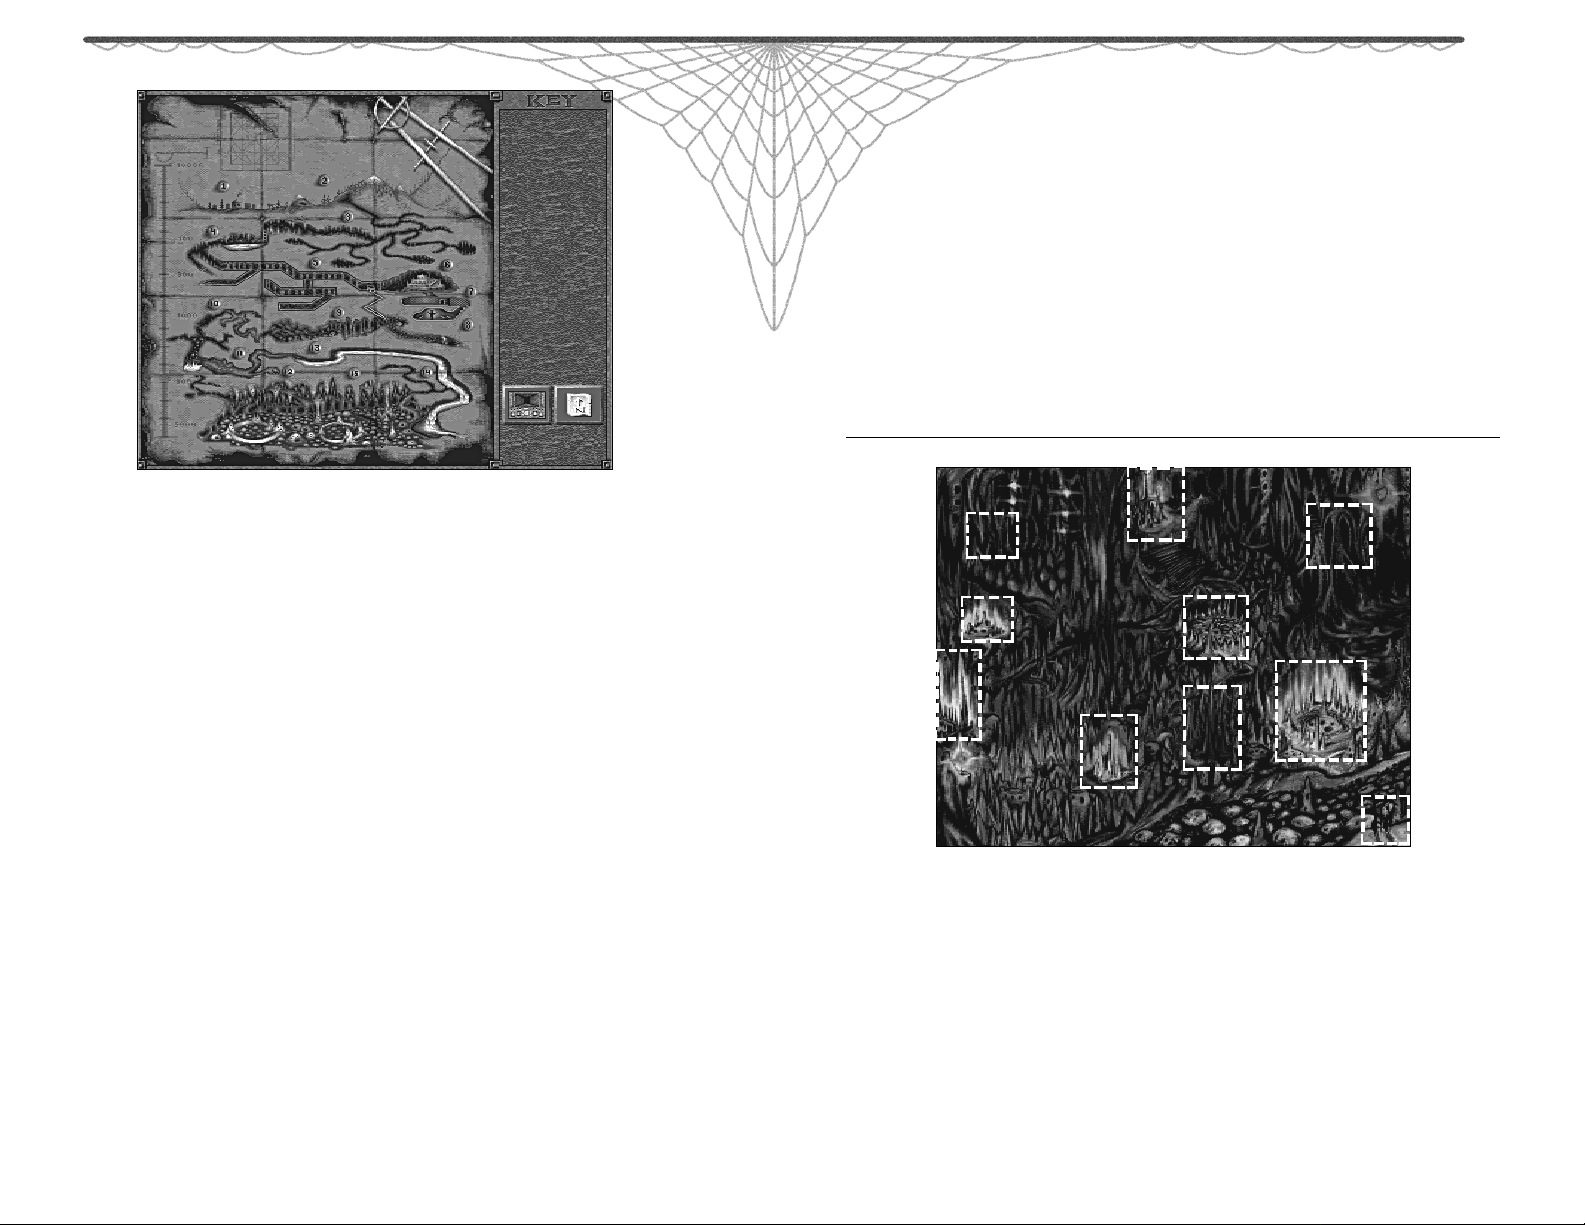
MANTLE CAVERN ONE
MANTLE CAVERN ONE
GOLLVELIUS’
GOLLVELIUS’
TAVERN
TAVERN
HOUSE
HOUSE
DO’URDEN
DO’URDEN
HOUSE FEY
HOUSE FEY
BRANCHE
BRANCHE
The Menzoberranzan
City Interface
Your party exits the mouth of a
tunnel, deep in the Underdark,
and before them stretches the
city of Menzoberranzan. The
Menzoberranzan City Interface is
a single screen displaying a map
of the city. Move the mouse cursor
can be made available to the next
set of characters sent into the
Underdark. Global save saves all
of the areas explored by the party
at the time of the save. Global
restore restores the maps and
information available at the time
of the last global save. Map areas
explored only in a previous game
are shaded out. In this way you can
see which areas are newly explored
and which have been restored from
a previous adventure.
TOWER OF
TOWER OF
SORCERE
SORCERE
MANTLE CAVERN TWO
MANTLE CAVERN TWO
MERCHANT’S
MERCHANT’S
BAZAAR
BAZAAR
HOUSE BAENRE
CARPATHIAN’S
CARPATHIAN’S
TOWER
TOWER
APPROACH TO MENZOBERRANZAN
APPROACH TO MENZOBERRANZAN
HOUSE BAENRE
over the screen, and the names
of the various drow houses and
other areas appear . To enter a
specific house or other area, leftclick when the area’s name is
displayed. Your party moves into
the chosen map and continues its
journey on the Adventure Screen.
Doors which leave any map in
the city and return you to the
 Loading...