


HEROES OF MIGHT AND MAGIC II

i
™
PMN 490-001
®

ii
© 2001 The 3DO Company. All Rights Reserved. 3DO, Heroes, Heroes of Might and
Magic, Might and Magic, New World Computing, and their respective logos, are trademarks
or registered trademarks of The 3DO Company in the U.S. and other countries. All other
trademarks belong to their respective owners. New World Computing is a division of
The 3DO Company.
The software and related manual for this 3DO product are copyrighted. No portion of this
product may be photocopied, scanned, translated, reproduced, copied or reduced to any
tangible or electronic medium or machine-readable form, or publicly performed or displayed,
without the prior written consent of The 3DO Company. The owner of this product is entitled
to use the software and related manual for his or her own use, but is not entitled to reproduce
and distribute any copies of the software or manual to any other individual or entity; nor to rent
or lease this product or any copy thereof to any third party.
iii
Credits
Designed and Directed: Jon Van Caneghem
Programming and Design: Phil Steinmeyer
Executive Producer: Mark Caldwell
Producer: Walt Hochbrueckner
Additional Design: Paul Rattner
Debbie Van Caneghem
Additional Programming: George Ruof
Todd Hendrix
Mark Caldwell
Writing: Paul Rattner
Art Director: Julia Ulano
Assistant Art Director: Bonita Long-Hemsath
Artists:
Julie Bateman Steve Jasper
Rebecca Christel April Lee
Shelly Garcia Lieu Pham
Sam Hasson Phelan Sykes
Louis Henderson Steve Wasaff
Tracy Iwata Scott White
Musical Production:
Rob King
Music and Sound Design:
Rob King
Steve Baca
Town Themes Composed and Conducted by:
Paul Romero
Vocalists:
Grant Youngblood
Kareen Meshagan
Manual and Helpfile:
Bryan Farina
Rozita Tolouey
Bruce Shlickbernd
Scenarios:
Jon Van Caneghem Bryan Farina
Debbie Van Caneghem Eric Heffron
Clayton Retzer Mark Palczynski
Christian Vanover Walt Hochbrueckner
Paul Rattner Bruce Shlickbernd
Benjamin Bent Craig Konas
QA Manager:
Peter Ryu
QA:
David Botan Kate McClelland
David Fernandez Timothy Lang
Bill Nesemeier Bryan Farina
Walter Johnson
Packaging:
Scott McDaniel Erik Biondo
Rozita Tolouey AKA Studios
Eric Schumacher
Special Thanks to:
Scott McDaniel Ted Chapman
Dean Frost Deane Rettig

iv
Table of Contents
Introduction . . . . . . . . . . . . . . . . . . . . . . . . . . . . . . . . . . . . . . . .v
What’s New . . . . . . . . . . . . . . . . . . . . . . . . . . . . . . . . . . . . . . . .vi
Basic Operations . . . . . . . . . . . . . . . . . . . . . . . . . . . . . . . . . . . .8
Tutorial . . . . . . . . . . . . . . . . . . . . . . . . . . . . . . . . . . . . . . . . . . .9
Main Menu . . . . . . . . . . . . . . . . . . . . . . . . . . . . . . . . . . . . . . . .18
Standard Game . . . . . . . . . . . . . . . . . . . . . . . . . . . . . . . . . . . .18
Campaign Game . . . . . . . . . . . . . . . . . . . . . . . . . . . . . . . . . . .21
Multiplayer Game . . . . . . . . . . . . . . . . . . . . . . . . . . . . . . . . . .21
Adventure Screen . . . . . . . . . . . . . . . . . . . . . . . . . . . . . . . . . . . .23
Adventure Window . . . . . . . . . . . . . . . . . . . . . . . . . . . . . . . . .23
Adventure Buttons . . . . . . . . . . . . . . . . . . . . . . . . . . . . . . . . .25
Options . . . . . . . . . . . . . . . . . . . . . . . . . . . . . . . . . . . . . . . .26
Game Play . . . . . . . . . . . . . . . . . . . . . . . . . . . . . . . . . . . . . . . . .30
Town Screen . . . . . . . . . . . . . . . . . . . . . . . . . . . . . . . . . . . . . . .34
Castle Screen . . . . . . . . . . . . . . . . . . . . . . . . . . . . . . . . . . . . .35
Hero Screen . . . . . . . . . . . . . . . . . . . . . . . . . . . . . . . . . . . . . . . .40
Movement . . . . . . . . . . . . . . . . . . . . . . . . . . . . . . . . . . . . . .45
Secondary Skills . . . . . . . . . . . . . . . . . . . . . . . . . . . . . . . . . . .46
Skill Advancement . . . . . . . . . . . . . . . . . . . . . . . . . . . . . . . . . .48
Hero Trading . . . . . . . . . . . . . . . . . . . . . . . . . . . . . . . . . . . . .50
Kingdom Overview . . . . . . . . . . . . . . . . . . . . . . . . . . . . . . . . . . .51
Combat . . . . . . . . . . . . . . . . . . . . . . . . . . . . . . . . . . . . . . . . . . .52
General Options . . . . . . . . . . . . . . . . . . . . . . . . . . . . . . . . . . .53
Combat Options . . . . . . . . . . . . . . . . . . . . . . . . . . . . . . . . . . .56
Siege Combat . . . . . . . . . . . . . . . . . . . . . . . . . . . . . . . . . . . .57
Spells . . . . . . . . . . . . . . . . . . . . . . . . . . . . . . . . . . . . . . . . . . . . .59
Creatures . . . . . . . . . . . . . . . . . . . . . . . . . . . . . . . . . . . . . . . . . .72
Structures . . . . . . . . . . . . . . . . . . . . . . . . . . . . . . . . . . . . . . . . . .93
Editor . . . . . . . . . . . . . . . . . . . . . . . . . . . . . . . . . . . . . . . . . . . .114
Keyboard Shortcuts . . . . . . . . . . . . . . . . . . . . . . . . . . . . . . . . . . .118
Customer Support . . . . . . . . . . . . . . . . . . . . . . . . . . . . . . . . . . .120
Hints and Tips . . . . . . . . . . . . . . . . . . . . . . . . . . . . . . . . . . . . . .121
EXPANSION MANUAL . . . . . . . . . . . . . . . . . . . . . . . . . . . . .128
v
Introduction
Heroes of Might and Magic II: The Succession Wars combines fantasy and strategy in a
battle for territory and resources. Players must fight between one and five enemy war-
lords to conquer new lands, collect resources and artifacts, and capture towns. These
towns need to be fortified and upgraded to produce and supply new armies. Strategic
planning and tactical cunning need to be combined and balanced for victory.

vi
What’s New
Heroes of Might and Magic II, the sequel to the first Heroes of Might and Magic, has
many new features and improvements. If you have played the first Heroes, here is a list
of the major changes in Heroes II. You can find more detailed information on each item
in the appropriate section of the manual.
Spells: The spell system now uses a spell points instead of spell memorization. You
permanently learn spells from the Mage Guilds, but have a finite number of spell points
to cast those spells. Many new spells have been added, and the spells are now catego-
rized in five levels, as opposed to four.
Combat: The battlefield has been enlarged, and new creatures have been added.
Creatures can now be affected by more than one non-contradictory spell at the same
time (Curse, Slow, and Protection can all be affecting a single creature).
Heroes: Two new hero types are available, the Wizard and the Necromancer. The
Wizard is a powerful spellcaster with an army of magical creatures, and the
Necromancer is a spellcaster that commands the undead.
Heroes now learn secondary skills, such as Archery and Leadership. Some of these
skills duplicate the innate abilities of the hero types in the first Heroes (Pathfinding for
the Barbarian, Navigation for the Sorceress). Heroes can know a maximum of eight
secondary skills, and there are 14 skills to choose from. These skills are learned when a
hero advances in level.
Towns: Towns have new defensive improvements, and some completely brand new
buildings, like the statue and the marketplace. Some creature dwellings can be upgraded
to produce new, upgraded creatures.
Creatures: Certain creatures can be upgraded, generally becoming faster and tougher,
though some creatures aquire special abilities when upgraded. Two new groups of crea-
tures have been added, one for the Wizard and one for the Necromancer.
vii
Adventure: The size of the maps can be smaller or larger than before (up to 1/4 the
area to 4 times the area). Many scenarios will now have different victory or loss condi-
tions instead of the standard ‘Kill ‘em all.’ These special circumstances will be explained
when you start the scenario. Two new terrain types, cracked wasteland and beach, and
many new adventure objects have been added.
Campaign: The primary campaign of Heroes II allows you to choose which of Lord
Ironfist’s sons you will aid in succeeding to the throne, Roland or Archibald. Each side
has a different set of elaborate and interesting scenarios, so be sure to try them both.
If you are not sure what something does, R-clicking on it will give quick information.
This works on buttons, skills, artifacts, creatures, spells, buildings, heroes, objects on
the map– almost anything you can find.
Have fun, and watch out for the Black Dragons!

8
Basic Operations
Mouse
When you are instructed to click on something, point to the object and click with the left
mouse button (or the only button on a Macintosh mouse). ‘R-click’ means click with the
right mouse button (Macintosh users need to hold down the ‘ ’ and click with the
mouse button).
You can get information on most things in the game by R-clicking on them. Most R-
click information requires that you hold down the mouse key to read the information.
File Selector
When loading or saving a games, you will be presented with a standard File Selectir win-
dow. To select a file, click on the name to highlight it. The name will now appear in the
red bar at the botton of the list. Click on OKAY. Click on the CANCEL to exit the
menu without making a selection, or press the ESC key.
If the list is longer than the display, you can scroll through the list in two ways. Along
the right side of the list is the slider bar and two arrow buttons. Click on either arrow
button to scroll in the direction indicated by the arrow. To get to a selection quickly on a
long list, drag the slider bar in the direction you want.
9
Tutorial
Don't have the patience to explore rulebooks? Want to learn the basics quickly so you can
dive into the game? This is where you want to start. This tutorial will walk you through a
few turns of the Tutorial scenario.
From the Main Menu, click on Load. Then click on Standard Game from the next menu.
That menu will be replaced by the File Selector. Click on the file name, Tutorial, to high-
light it. The name of the file will also appear in the dark brown bar just above the two but-
tons at the bottom of the File Selector. Click on Okay.
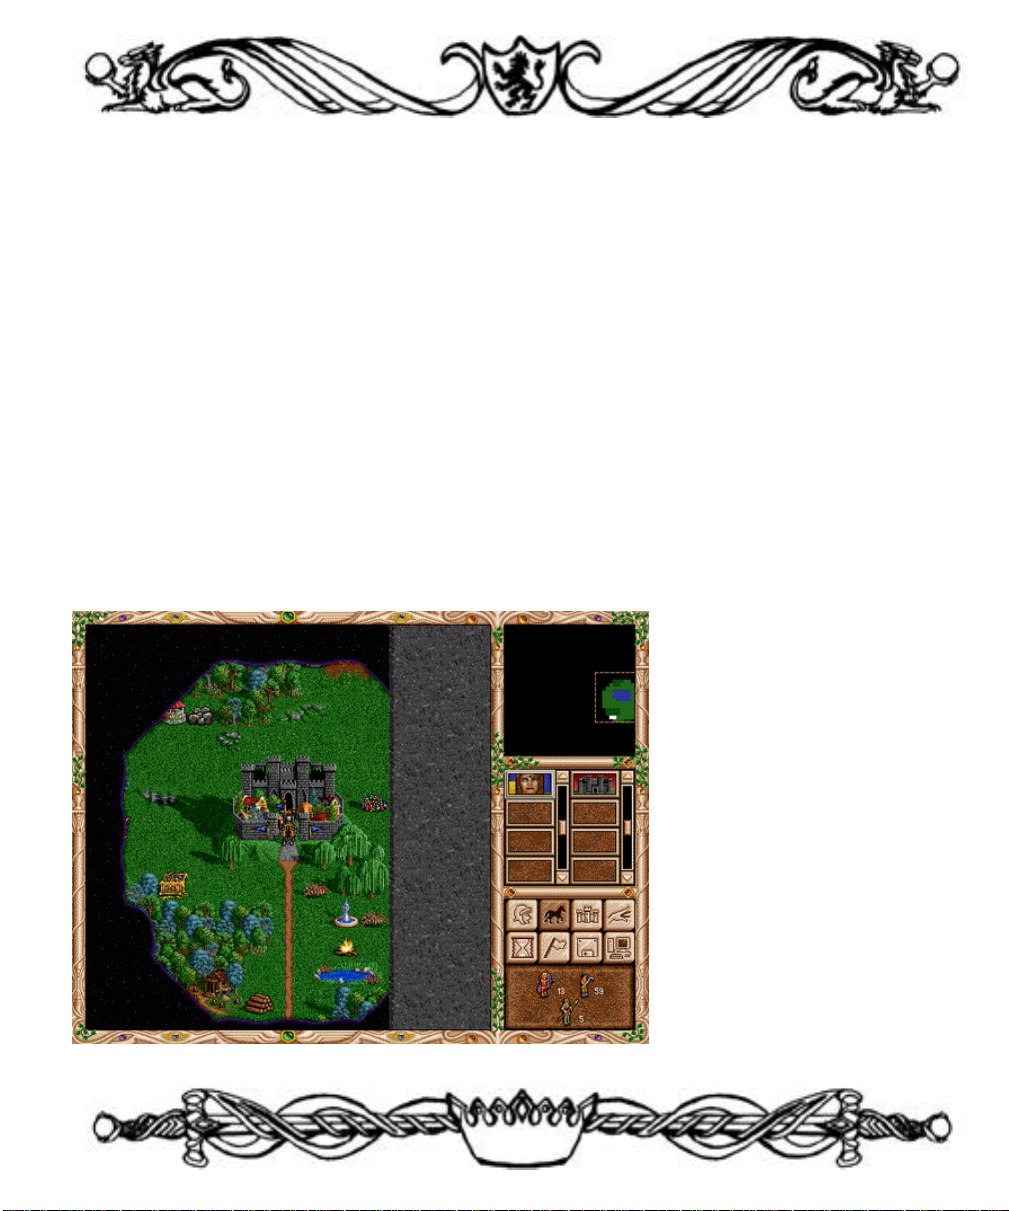
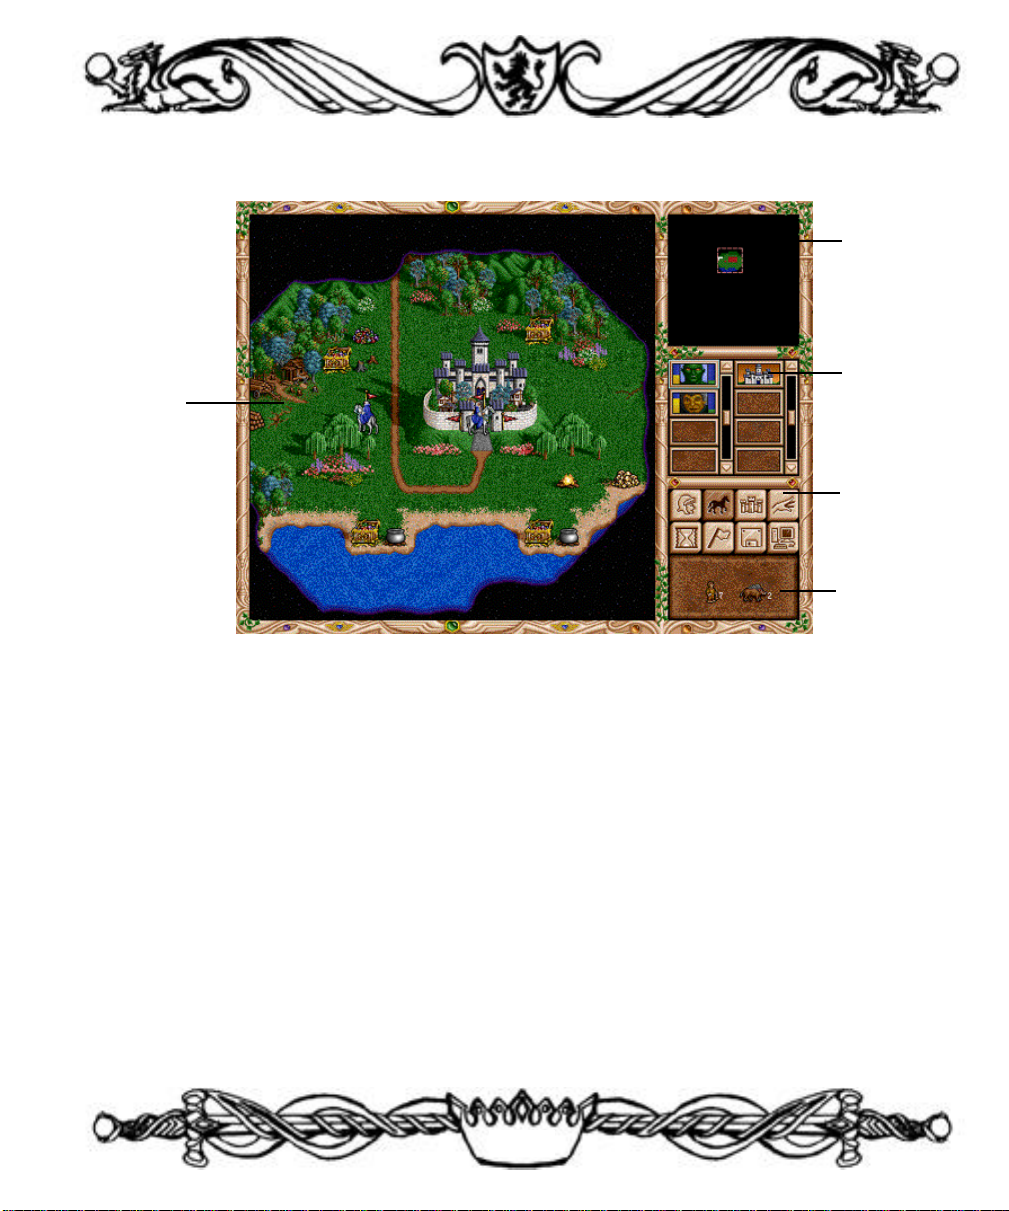
After the game loads, you will find yourself on the Adventure Screen. The big window on
the left is the Adventure Map. That's your castle in the middle with your starting hero sit-
ting astride a horse at its entrance. On the right are a variety of controls and indicators.
Let's explore these for a moment.
In the upper right is the
World Map. There's a pink
box around the area of the
map that is displayed in the
Adventure Map window. You
start off only knowing a short
distance beyond your own
castle. As you move your
heroes about, more of the
map becomes visible. Yo u
can scroll the Adventure
Map in a number of ways.
Move the cursor to the
extreme edge of the screen
and the Adventure Map will

10
scroll in that direction. Give it a try. If you scroll too far and can no longer tell where you
are, look up in the World Map. Place the cursor over the green blob that represents known
terrain and click. The castle and the surrounding environs are displayed again in the
Adventure Map window.
Below the World Map is a display showing your heroes and castles. This is the hero and
castle locator. The blue-eyed woman is the hero you happened to start with. There is a
light blue outline around her box, indicating she is the "active" hero. Place the cursor over
her picture and R-click and hold the button down. A window will come up displaying her
name, stats, and the type and number of troops that are accompanying her. Release the
mouse button and the display disappears (you can R-click on many things in the game to
get this kind of quick information). The blank boxes below Gwenneth (your hero) and your
castle are for future heroes and castles.
Beneath the hero and castle selectors are eight buttons that will aid in playing the game.
We'll discuss these as we go through the tutorial.
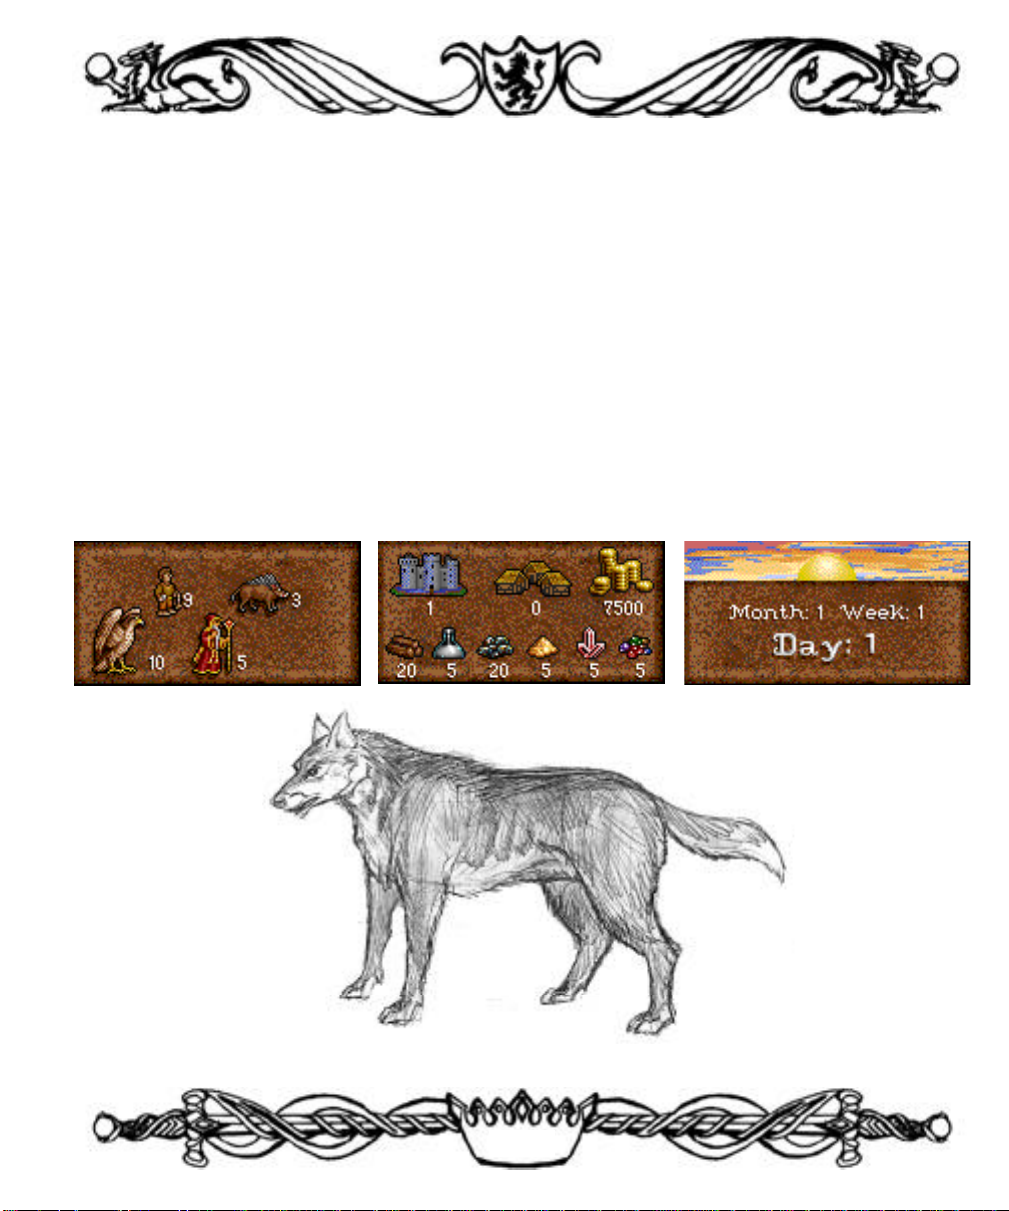
The bottom display is the Information Window. It currently shows the active hero’s army.
Place the cursor over this window and click. It now shows the amount of resources, towns,
and castles you control. It will automatically return to the army display after a few seconds.
Click on it again a couple of times. It will now show you the month, week, and day. New
recruits become available at the start of each week, so it's wise to keep track of the time.
This tutorial begins a few days into the week so that several buildings could be added to
your castle to get you into the thick of things faster.
Place the cursor over the castle next to your hero's icon in the castle selector and click (but
not on the monochromatic castle in the group of eight buttons). The castle now has the blue
box around it, indicating it is active. The Status Window also changes to display your
resources, since your hero is no longer active. Click on the castle a second time to bring
up the castle display.
Along the top of the castle window are the dwelling places of your potential recruits and
the exterior of the castle. Place the cursor over any of the structures and R-click (holding
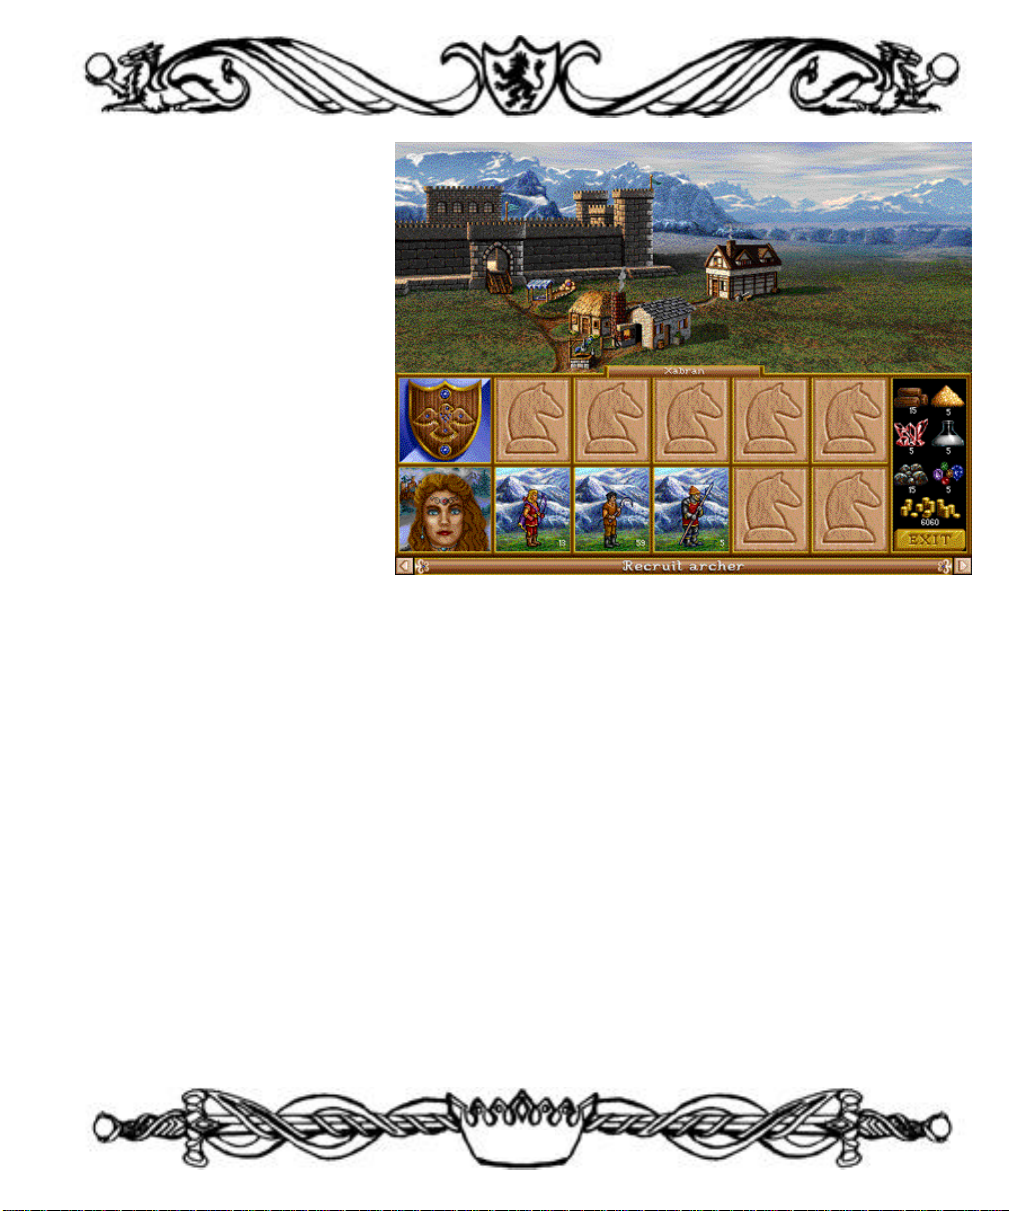
11
the button down) to see a
description of it. Three of the
s t r u c t u res are dwellings
where you can recruit troops.
The troop type, cost per unit,
and the number available are
listed. You will notice that
nobody seems to be home at
the moment (we already hired
them into your army).
Along the bottom of the
screen is your hero's portrait,
indicating she is in the castle.
Her accompanying tro o p s
are displayed in the row of
boxes to her right. You can have up to five different troop types in any hero's army. Note
that there are two spaces available in Gwenneth's army, indicated by the horse's head. Let's
fill those up.
Click on the castle near the top of the screen. The entire display now shows the various
dwellings that can be purchased. You already have the Thatched Hut, Archery Range,
Blacksmith, Tavern and Well structures (marked by the yellow check). The Archery
Range and Blacksmith each have a red X. Though you have the dwellings, you have not
as yet purchased the upgrades, nor can you until specific prerequisites are met. Upgrades
improve the quality of troops these dwellings normally provide. The Shipyard, Jousting
Arena, and Cathedral have prerequisites you don't currently have and are also marked
with a red X. The two portraits near the right side of the screen are the heroes that are
available for hire this week. You can only have one hero in a castle at a time, so these
heroes are also marked with an X. You can R-click on any on the buildings to get more
information about them. For now, place the cursor over the Armory and click.

12
A window comes up telling
you that the Armory pro-
duces Swordsmen. It also
re q u i res the Tavern and
Thatched Hut to be present
in the town (which we built
for you already). It will take
10 ore, 10 wood, and 2000
gold to build. A quick
glance to the re s o u rc e s
that are displayed on the
lower right of the screen
reveals you have the neces-
sities. Click on Okay.
The display shows the
castle exterior again, and the Armory is the red-roofed building near the middle of your
screen. Let's recruit some Swordsmen to fill out our army. Click on the Armory and a win-
dow entitled Recruit Swordsman comes up. There are four available at 250 gold each. You
can click on the up and down arrows to select the number of troops you want to recruit,
but in this case, it is easier to just click on the Max button. That will automatically choose
the maximum that you can afford, up the limits of how many are available. Click on Max
if you haven't already done so, and then click on Okay.
Four Swordsmen have been added to your castle garrison. The garrison occupies the five
boxes above the hero's army. They will defend your castle if a hero isn't there, but might
not be involved if a hero and accompanying army is in the castle. To transfer the troops
from the garrison to your army, first click on the Swordsmen. This highlights them with a
red outline. Now place the cursor over the empty space of the hero's army at the lower
right and click. The Swordsmen are now part of Gwenneth's army. You can transfer troops
from box to box by clicking on one troop, and then clicking on the troop that you want
them to exchange places with. You may also do partial troop transfers if the need should

13
arise by holding down the Shift key when transferring troops.
There are no more troops available for now, and you can only make one improvement in
your castle per turn– it's time for Gwenneth to go adventuring. Click on the Exit button on
the lower right.
We are back to the Adventure Window. Note that Gwenneth has the blue border around
her box indicating she is the active hero. Move the cursor around a bit in the Adventure
Map. The cursor will change depending on what it is over. Move the cursor over the trea-
sure chest that is sparkling just below and to the left of the castle entrance. As you move
the cursor it will change from either a spear or a horse to a rearing horse as it is placed
over the chest. The rearing horse indicates that there is an event there that the hero can
interact with. Once the horse is in the rearing position, click. A green path of arrows is now
displayed. This indicates the path the hero will take. She'll avoid all events, encounters and
obstacles to get to the destination you clicked on, now marked by a green X. Your hero
can reach anywhere along the path this turn where it is green. When the path or destina-
tion turns red, the hero won't reach there until subsequent turns. Once the path is set, click
on the destination a second time and the hero will move along the path towards the desti-
nation. Do that now.
You found some gold! You can either keep the gold or distribute it to the peasants for expe-
rience. At the start of each turn, you accumulate 1000 gold for each castle you own, 250
for each town, and 1000 for each gold mine. Building up your castle and army is an expen-
sive proposition, so the gold is needed there. At the same time, if you take the experience,
your hero's stats will eventually improve, becoming better in combat or spellcasting, and
will also gain new skills. For the purposes of this tutorial, click on Yes, but learning when
to choose one or the other is something your own experience and style will dictate.
Look next to your hero's portrait and you'll see a yellow bar indicating the amount of
movement she has left this turn. Be aware that it doesn't start at the top of the bar– there
are items that can improve her movement beyond the normal. Gwenneth still has some
movement left, so let's set a new destination. Click on the sparkling fountain below and

14
slightly to the right of your castle, making sure you have the rearing horse symbol. Note
the numeral 2 on the right of the horse. That means it will take all of Gwenneth's move-
ment this turn, and at least part of her movement next turn to reach there. Click to set the
path. The destination is marked with a red X this time, indicating you can't reach there this
turn. Move the cursor over to the button with the horse icon near the right side of the
screen and click. This is the Move button, an alternate command that tells your hero to
move along the path once it is set.
That's all for this turn. Click on the hourglass button. The Status Window will show the
computer players thinking and the cursor will become a sundial. Once the cursor changes
back and the Status Window reverts to Gwenneth's army, you can continue.
The red X is now green. Click on the Move button and Gwenneth continues along the path
you set last turn. A message box pops up and informs you that by drinking from the foun-
tain you will gain luck for your next battle. Good luck allows your troops to do double
damage for an attack in combat– watch the rainbow arch towards your warriors when it
happens.
Click on the pile of wood neatly stacked to the left of the road leading towards the bottom
of the screen and move your hero there. Roads are easier to move along than other types
of terrain. Don't worry about trying to precisely move along the road; your hero will do
that automatically if it is to your advantage. A message will appear briefly in the Status
Window saying that you have found a small amount of wood and will give the exact
amount.
As you moved towards the woodpile, more of the Adventure Map was revealed to you.
The hero unveils the map a set distance away as she moves about. Just to the left of where
the woodpile used to be is a wooden shack and wagon. R-click on it and you can see that
it is a sawmill. The sawmill produces two units of wood each turn as long as you own it.
Place the cursor over the front of the sawmill (be sure you have the rearing horse cursor
icon) and click twice. Read the text then click on Okay. Note that there is now a blue flag
flying over the sawmill, indicating that you own it. It will continue to add two units of wood

15
to your resources at the start of each turn until some other faction's hero captures it.
Below the sawmill and to the right there's a wooden signpost. Move to that. You'll run out
of movement before you get there. Click on the hour glass and when it is your turn again,
click on the move icon. Read the message and than click on Okay. Messages may give
important clues and it might be wise to stop and read them along the way.
The putrid green zombies on the right side of the map are guarding a small treasure cache,
daring Gwenneth to try and defeat them. No self-respecting hero can pass up the chal-
lenge like that, so place the cursor over the zombies. Note that the cursor becomes a
sword. This indicates if you move there, a battle will take place. Go ahead and move to
the zombies.
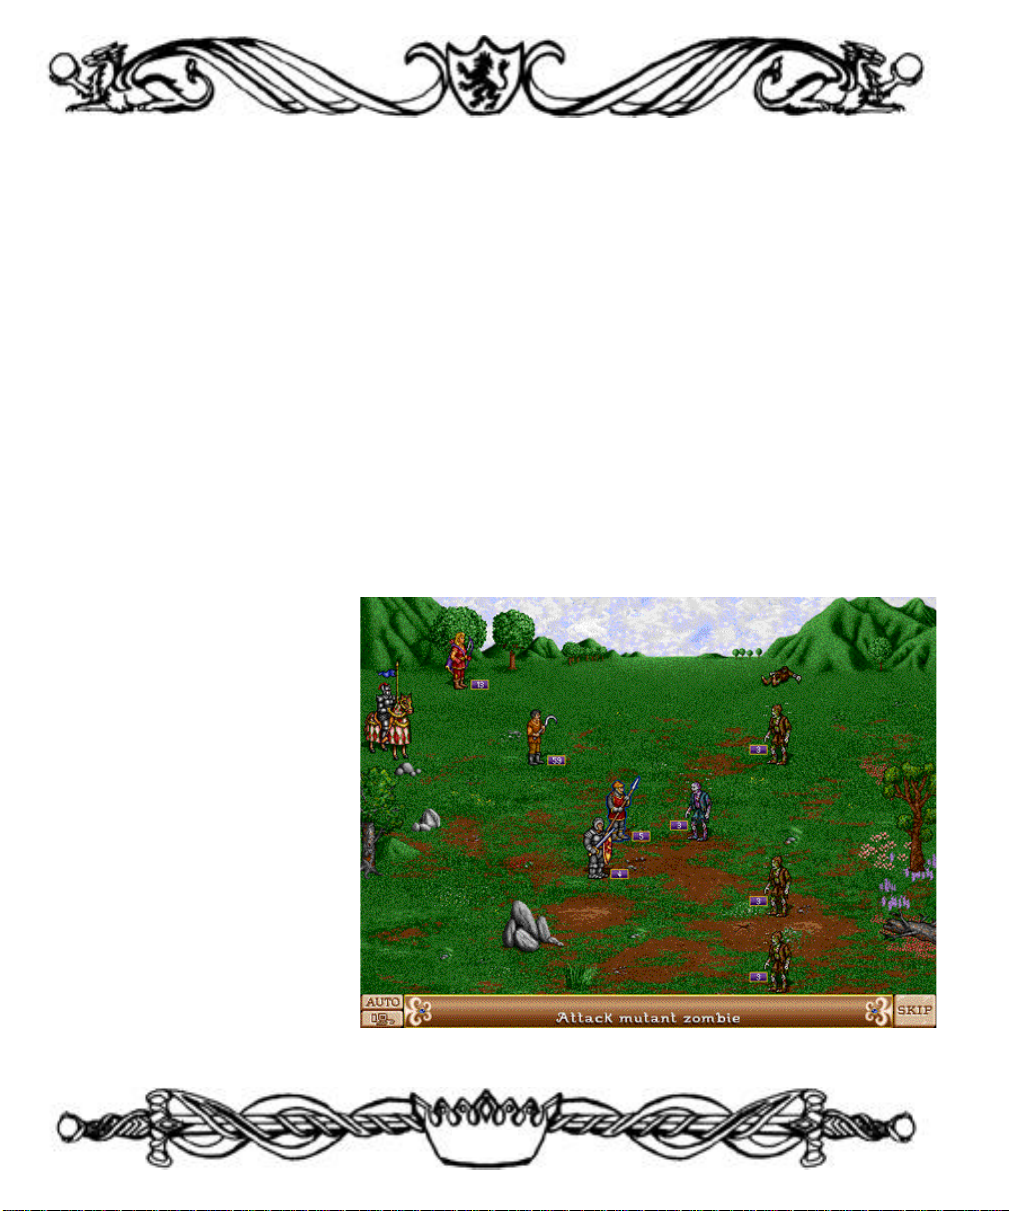
The combat screen shows terrain similar to the type the combat started on in the
Adventure Map. On the left side of the screen is the moving player's troops (the Attacker),
and on the right is the encountered group (the Defender). Thus, your troops will be lined
up on the left in any combat during your turn, and on the right in any combat during anoth-
er player's turn. Your troops are lined up from top to bottom in the same order that they
were lined up from left to right in your hero's display back at the castle.
Combat is fought in a series of rounds, with each unit getting to move and possibly attack
once each round. The faster the unit's Speed, the sooner it moves in the combat round.
The computer will determine which unit gets to move first. Your Pikemen are your fastest
unit and will have a glowing yellow outline when they are ready to be moved. R-click on
them to see their statistics. Now move the cursor around the field. You can move the
Pikemen to any position on the field where you see the Running Man icon. All you need
to do is click on the spot you want them to move to. An X with a circle behind it indicates
a spot they can't move to. Some terrain may be impassable (usually marked by a tree, pit,
bush, the odd flow of lava, etc.).
On the extreme left is your hero, mounted on a horse with your banner waving in the
breeze. Place the cursor over the hero– when the cursor changes to a helmet, click. A
window will pop up with Gwenneth's picture, her stats, and a group of four buttons.
16
These are the General's Options. Starting on the left is the Cast Spell button (the gestur-
ing hand). The Cast Spell button is darkened and can't be selected because Gwenneth
doesn't have any spells. The next button to the right is the Retreat button (the running
knight). Retreating loses all of your hero's troops, but she'll make her way back to any of
your castles with her experience and artifacts intact and can be recruited again. The next
button is the Surrender option (the white flag). This is similar to the Retreat option
except all your troops stay with your hero , but you must pay a penalty to the opposing
General. The more troops, the bigger the payment. To surrender, there must be an
opposing player's General to surrender to, and these zombies don't have one. Heroes
are your commanders: they direct your units (through you) on the battlefield, add their
offensive and defensive bonuses, and cast spells, but do not move about like their
troops. Click on the last button (four arrows) to exit the General's Options.
Your Pikemen are still waiting patiently for orders. Move the cursor straight to the right of
the Pikemen until you get the X symbol. Now back it up just a little until you get the
Running Man back. That's the limit of how far they can move. Go ahead and click. One
of the zombie groups will
come charging forward, but
won't be able to reach you.
Your Swordsmen's turn is
next– move them forward the
same as you did the Pikemen
(you might have to move the
cursor up or down a bit to get
around a big rock). Time to
soften them up a bit. After
some more zombies shamble
up, your archers should be
glowing. They are armed
with arrows that can strike at
a distance. Place the cursor

17
over the nearest zombie. The cursor becomes an arrow, indicating you can fire at the
group without moving. Go ahead and click. The arrow is fired (R-click on the archer to
see how many shots she has left) and the zombie group is greatly diminished or wiped out.
Troops with distance weapons have their attack damage halved if an enemy group is next
to them, so it is best to guard them and not advance. Your Peasant group is the slowest,
and can't get close enough to attack. Have them timidly creep forward as best they can.
Just to throw a monkey wrench into this tutorial some of your troops may, due to high
morale, get another move (it'll be obvious: a big golden bird appears above the inspired
troop's head). Just click the Skip button in the lower right for now, but normally this is a
great time to sneak in an extra attack.
All the units have moved and a new round starts. Your Pikemen will move first. There
should be one or more zombie groups within range of your Pikemen. Place the cursor near
the closest zombie pack. It should change to a sword. The direction the sword is pointing
from indicates where the Pikemen will be when they attack. There's definite tactical con-
siderations, but for the purposes of this tutorial, it doesn't matter which direction. Choose
one and click. Your Pikemen will lower their weapon and attack. Any zombies that survive
will then strike back.
Be aware that a group only gets a strike back against a unit next to them, and will only do
so against the first unit to attack them that round. Ganging up on one target can save wear
and tear on your army.
With the basics of combat under your belt, this tutorial now abandons you to your fate (no
whining- you should be able to obliterate those zombies with Gwenneth's army). Feel free
to continue on with the scenario, referring to the manual as questions arise. New recruits
will be available at your castle next turn. It might be wise to recruit a second hero, build
up another army (while staying put to guard the castle), while Gwenneth explores the coun-
tryside. Don't forget to build up the structures in your castle to get new types of units.
Happy adventuring!
18
Main Menu
Five options are presented in the Main Menu, each of these in detail are:
New Game
This option begins a new game of Heroes II. After selecting New Game, a second win-
dow will appear offering three different types of game to play:
Standard Game: A single scenario played by a single player.
Campaign Game: Multiple scenarios played by a single player.
Multiplayer Game: A single scenario played by multiple players.
Standard Game: After selecting Standard Game, you must choose which scenario you
wish to play. Clicking on the red bar labeled Scenario opens the scenario selection win-
dow. The buttons at the top of the scenario selection window will show only the scenarios
of the size you select e.g. Clicking the S button shows only the small maps.
Each scenario is labeled by:
Size: The dimensions of the map: Small, Medium, Large, and Extra-Large.
Number of Players:From two through six.
Win Conditions:How you win the scenario.
Standard: Capture all opposing castles and defeat all opposing heroes.
Capture Castle: Capture a specific castle.
Defeat Hero: Defeat a particular enemy hero.
Find Artifact: Find a particular artifact.
Wealth: Accumulate a specific amount of gold in your treasury.
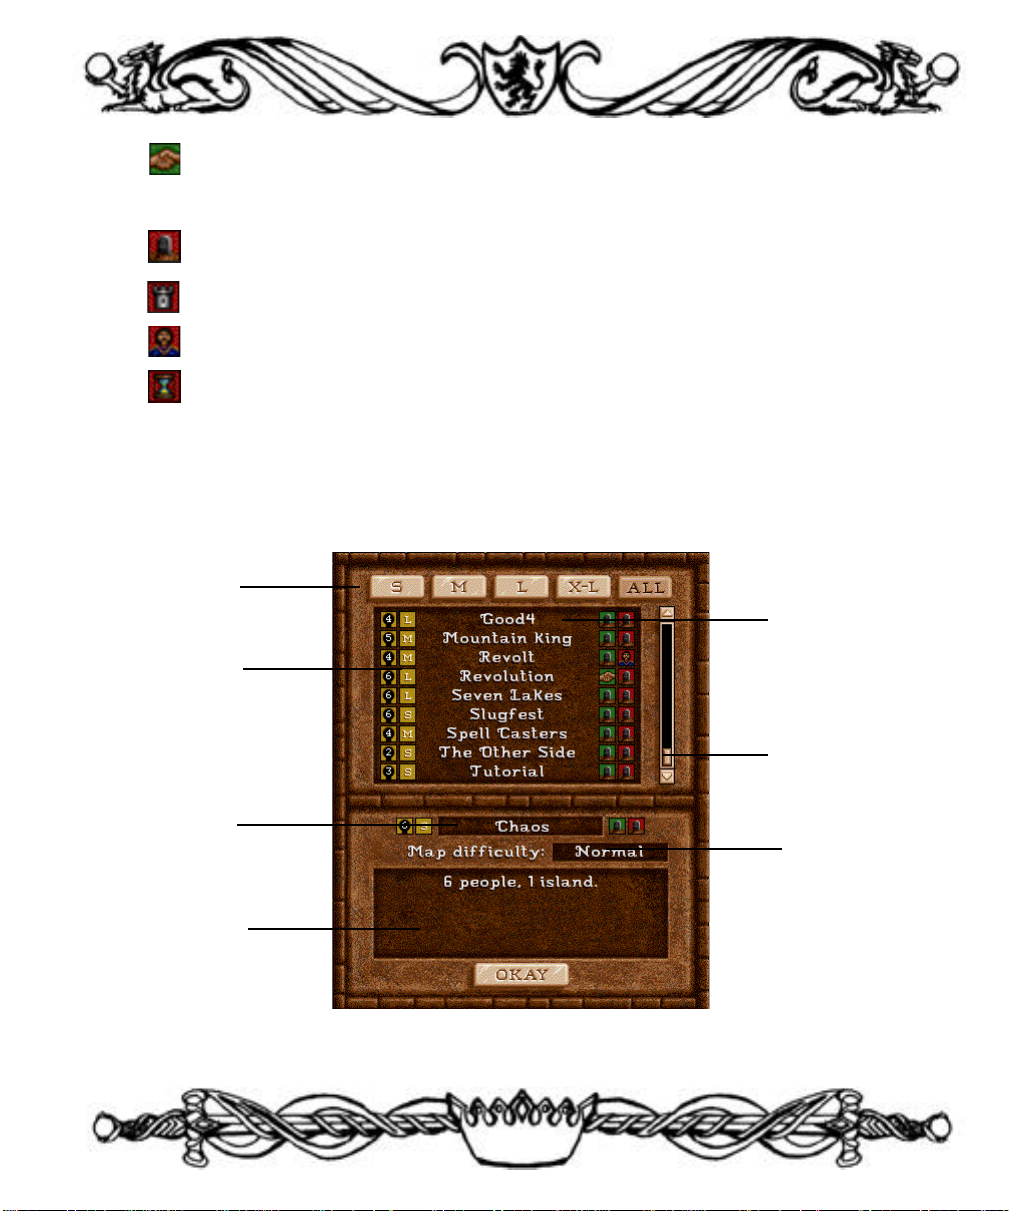
19
Team: Your team must defeat the opposing team (1 to 5 other players).
Loss Conditions:How you lose the scenario.
Standard: Lose all your heroes and castles.
Lose Castle: Lose a particular castle.
Lose Hero: Lose a particular hero.
Time Limit: Fail to complete objectives before time runs out.
Each scenario has a small description displayed at the bottom of the scenario selection
window. Included in this section is the difficulty rating of the map, harder difficulties gen-
erally indicate the human player is penalized– either by fewer resources, tougher creatures
near the starting castle, or the computer players starting with a distinct advantage.
Victory & Loss
Conditions
Size Selector
# Players and
Map Size
Selected
Scenario
Description
Scenario Name
Map Difficulty

20
After selecting the scenario, you must choose which game difficulty level to play at. The
difficulty is changed by selecting from the ratings at the top of the screen– Easy, Normal,
Hard, Expert, or Impossible. Game difficulty affects the resources you begin with, the
resources the computer players begin with, and the intelligence of the computer opponents.
Next, you need to determine which color you will be. The color you select determines
where you start on the map– if you select the same color on the same scenario, you will
always begin in the same place. To change colors, click on the color you wish to be. If
the color you wish to switch to is grayed out, then that color cannot be chosen by a human
player.
If the hero picture below your color has a blue background, then you are able to select
which hero type you wish to begin the scenario with. Click on the picture to cycle through
the hero types. If the background is gray, then that color is always that hero type– it can
never change. If the picture is a silhouette of multiple people, then that position begins with
different types of heroes and towns.
Scenario
Name
Starting
Hero
Chat
(multplayer)
Game
Difficulty
Players
Handicap
(multiplayer)
Rating

21
Campaign Game: Selecting this option begins the Campaign Game. After the introduc-
tion, you must choose which lord to serve– the noble Roland or the treacherous
Archibald. This is the only option you have in the Campaign Game.
Multiplayer Game: This option allows you to play Heroes II with other humans.
Selecting this option brings up a second window which allows you to determine which
communications device you will use to play multiplayer. In each multiplayer mode, you
must select a Player Name, which is used to identify you throughout the game.
Hotseat:In the Hotseat Window you need to select the number of players and
whether you wish to enter the players’ names.
Network:In the Network Window you select the type of network you will be
playing over. You can play over IPX and NetBios networks, or over the Internet
using TCP/IP. IPX and TCP/IP are only available in the Windows 95 version.
After selecting the type of network, you need to select whether you are the host
or the guest. Each game has only one Host, and the Host sets up the game. All
other players are Guests in the game. If the game was set up using TCP/IP, then
each Guest must input the Host’s IP address to connect.
Note: To use TCP/IP you must have Internet access, usually through an Internet
Service Provider (ISP). All guests must know the host’s IP address. For some
ISP’s, your IP address is always the same, otherwise it changes each time you
access the Internet. To determine your IP address, type WINIPCFG at a DOS
prompt.
Modem:In the Modem Window, you select whether you are the Host (Dials) or
Guest (Answers). Both players must then select the Modem Config button (only
the first time you play a modem game) to select the COM port their modem is
located at and the desired speed of the connection. The Host then inputs the
phone number of the Guest.
Direct Connect: In the Direct Connect Window, you select whether you are Host

22
or Guest. Select the COM port you are connecting from, and the desired speed
of the connection.
Multiplayer Scenario Select Window: From this window, the Host of the game selects
the scenario that will be played. Each player selects what color they will play, and which
hero type they will be (if that option is available). The game Difficulty for all players is set
by the Host, but any player may opt to take a mild or severe handicap. Severe handicap,
represented by the chained hands, means that you start with 30% fewer resources and you
generate 30% less gold and resources per turn. Mild handicap, represented by roped
hands, is 15% fewer resources. The area at the bottom is a chat window, just type in your
message and hit the enter key.
Load Game
This option loads a previously saved game, either Standard, Campaign, or Multiplayer.
Select the type of saved game you wish to load. All options will bring up a standard File
Select window. Simply click on the name of the scenario you wish to load, then click Okay
to load the game.
Credits
This option brings up the names of all the people who contributed to the creation of
Heroes of Might and Magic II: The Succession Wars.
High Scores
This option brings up the list of the High Scores achieved in Heroes II. The Campaign
button displays the best Campaign scores.
Quit
This option closes the program and returns you to your operating system.
23
Adventure Screen
Adventure Window
All game actions take place on the Adventure Window. From here you can examine the
surrounding countryside and move your heroes. The black areas on the Adventure
Window are the areas that you have not explored. Each town and hero you control will
“light up” the black areas of the map around them. To scroll the Adventure Window, move
the cursor to an edge of the screen– the cursor will change to an arrow, indicating the
direction of the scrolling.
World Map
The upper right section of the Adventure Screen is the World Map, which shows the
world as you know it. Explored sections are lit up, and unexplored areas are blacked out.
World Map
Locator
Buttons
Adventure
Buttons
Information
Window
Adventure
Screen

24
The pink rectangle within this map shows the portion of the world currently visible in the
Adventure Window. Clicking within this rectangle and dragging it around the World Map
will scroll the view in the Adventure Window. Clicking in the World Map, but outside the
pink rectangle, will instantly reposition the view in the Adventure Window to correspond
to the point clicked in the World Map.
Locator Buttons
These buttons represent the heroes and castles you own. The left section is reserved for
heroes, and the right section is reserved for castles and towns. Both sections display only
four heroes or castles at a time, but have scroll bars to scroll through all the heroes or cas-
tles you own.
Hero Locators: Portraits of your heroes are located in the left column. On either side of
the portrait are two vertical bars. The yellow bar on the left of the portrait represents how
much movement your hero has remaining. The green bar on the right represents how
many spell points your hero has remaining. One or more “+” symbols appear on the bar
if you have a large number of spell points or movement.
Clicking on the portrait will make that hero active and center the Adventure Window on
that hero. A light blue border surrounds the portrait of the active hero. By R-clicking on
the hero’s portrait you receive quick information on that hero. By double-clicking on the
portrait, or pressing the ENTER key, you receive more detailed information on the hero
(see also- Hero Screen). You can change the active hero and scroll through the hero loca-
tors by pressing the “H” key.
Town Locators: Towns and castles you own are represented in the right column of but-
tons. The activated town is highlighted by a light blue border. Clicking on a town locator
button will activate that town and center the Adventure Window on that town. R-clicking
on a town locator you receive quick information on the town. By double clicking on a town
button or pressing the ENTER key, you enter the Town Screen. After building a struc-
ture in a town, a symbol will appear in the upper right corner of that town’s button. You
can scroll through the town locators by pressing the “T” key.
25
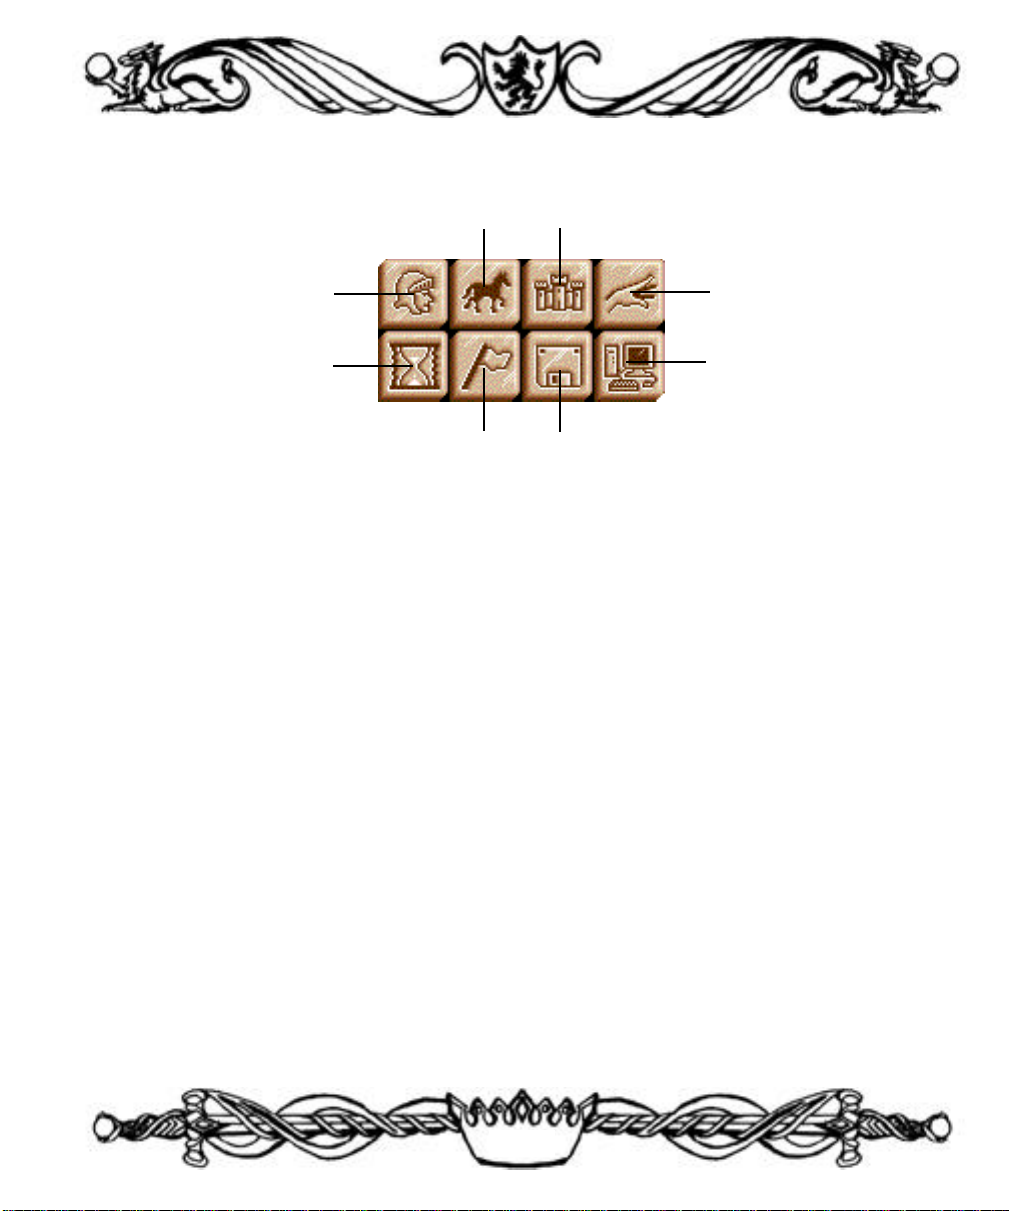
Adventure Buttons
Next Hero: Activates the next hero you have with movement points remaining,
centering the Adventure Window on that hero.
Move: Moves the active hero if that hero has a movement path plotted (represented by
green arrows on the Adventure Window).
Kingdom Overview: Displays the Kingdom Overview Screen. This screen lists
everything you own, towns, heroes, mines, and resources as well as showing your income
per day (see also– Kingdom Overview Screen).
Cast Spell: Brings up the active hero’s spellbook (if he has one) and displays the
Adventure spells known by that hero. The number below each spell is the cost in spell
points to cast the spell. Clicking on the upper right and left corners of the spellbook turn
the pages in the book. Clicking on a spell icon casts that spell and R-clicking on a spell
icon gives quick information about that spell. The bookmark on the lower left shows how
many spell points the hero has remaining, and the EXIT bookmark exits the spellbook
without casting any spells
End Turn: Ends your current turn and allows the next player to begin his turn.
Next Hero
End Turn
Move
Kingdom Overview
Adventure Options
Disk Options
System Options
Cast Spell
26
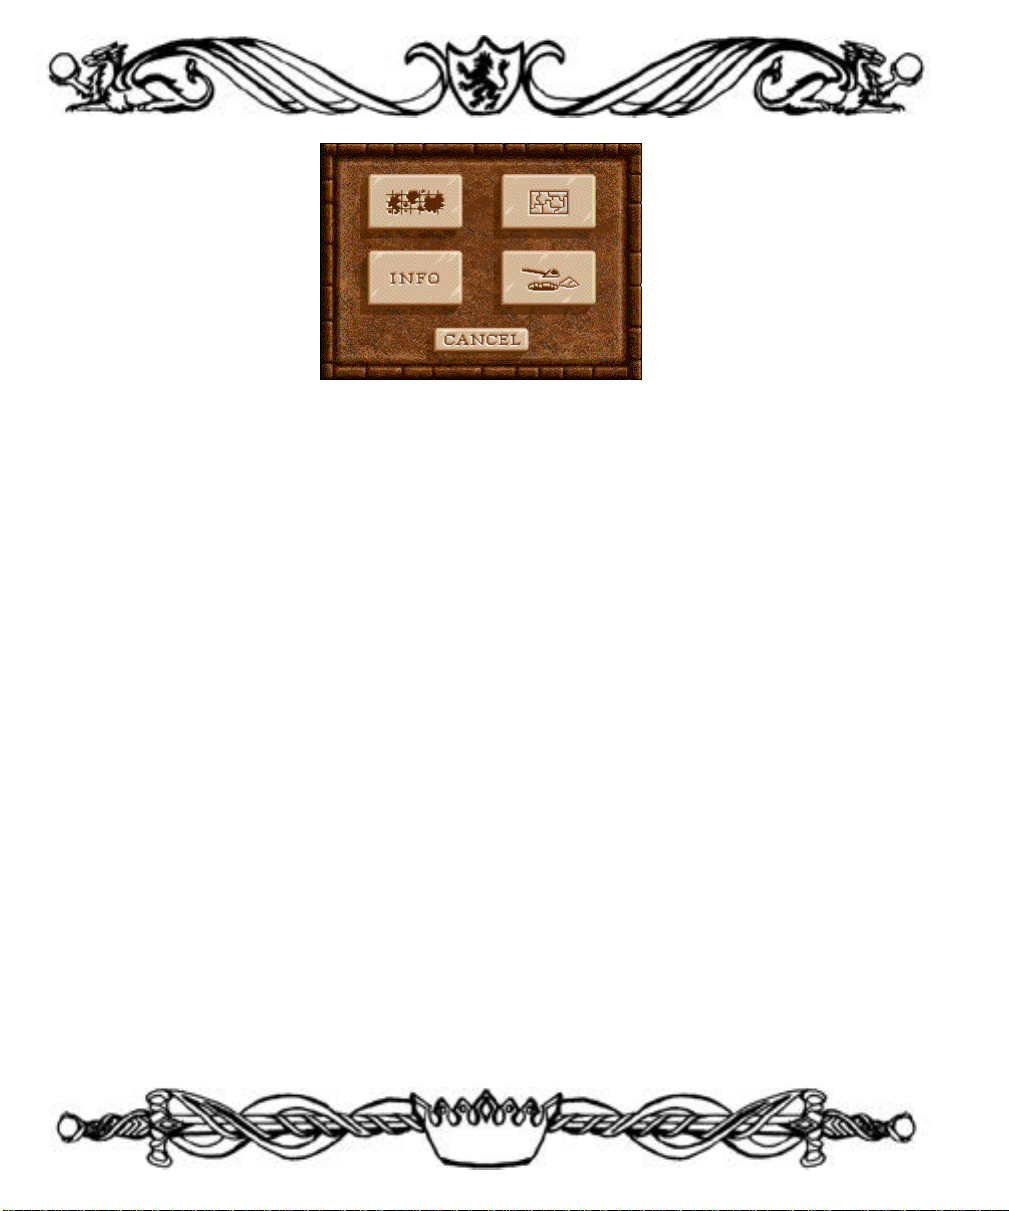
Adventure Options: Brings up a menu of actions for the Adventure Window.
View World:Shows the world as you know it, with only explored areas visible.
This view shows all towns, mines, and heroes (color coded to indicate which
player owns them), as well as showing visible resources and artifacts still
unclaimed.
View Puzzle: Displays the puzzle map that leads your hero to the Ultimate
Artifact. As you uncover pieces of the puzzle, more of the map is represented on
this screen. When you have uncovered enough pieces, the exact location of the
Ultimate Artifact is shown by an “X.” To uncover pieces of the puzzle, you must
find obelisks. Click on the EXIT in the upper right corner to return to the
Adventure Screen.
Dig/Search: The active hero spends his entire movement to search the position
he is at for the Ultimate Artifact. This action requires all the hero’s movement, so
he cannot move prior to attempting this.
Info: Shows the scenario information window. In Standard and Multiplayer
games, this gives the scenario’s name, description, difficulty, and victory and loss
conditions.
27
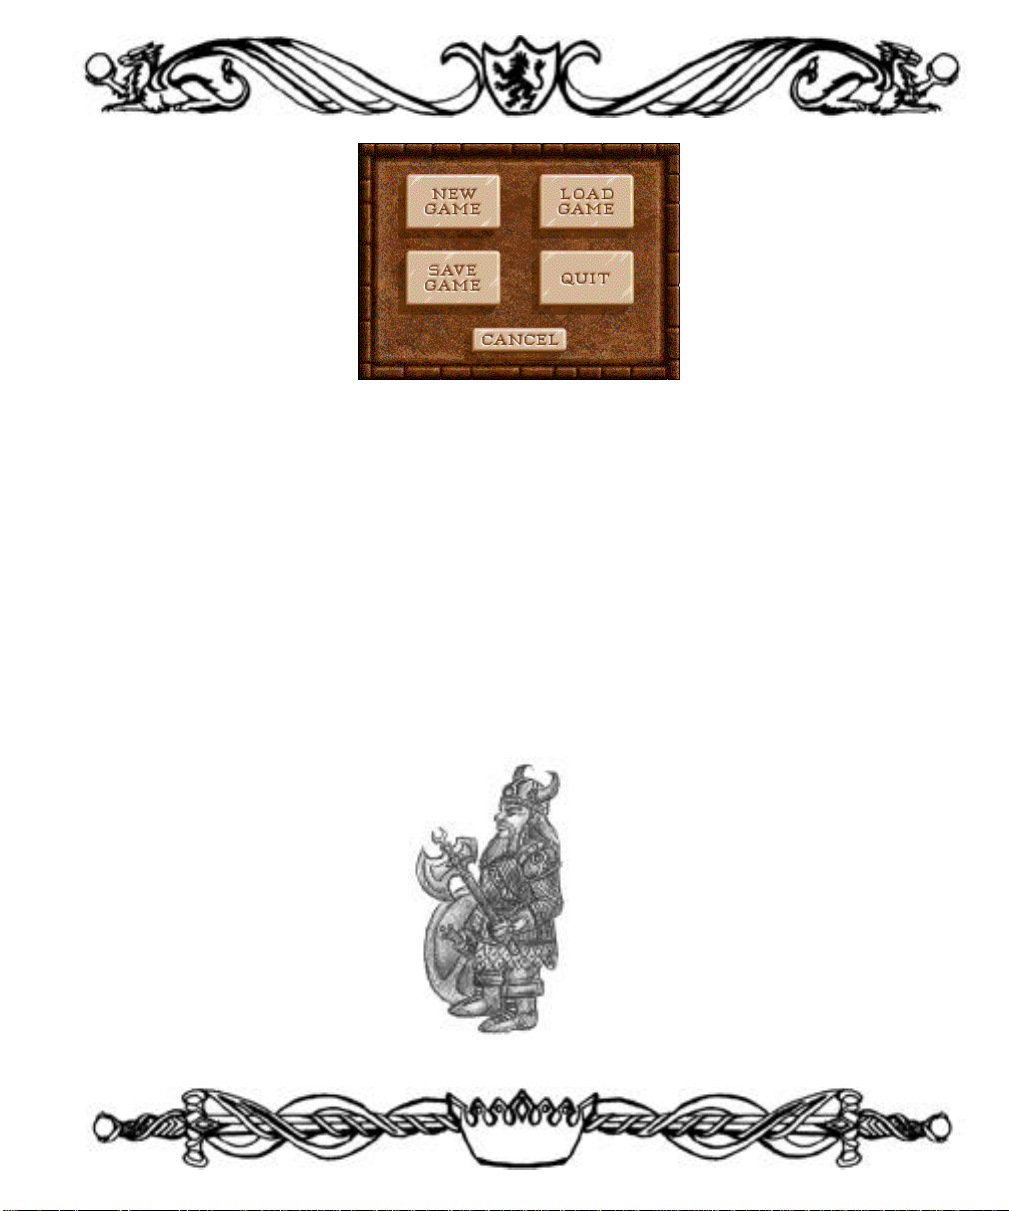
Disk Options: Brings up menu options for saving and loading games.
New Game:Exits your current game and returns you to the New Game menu.
Load Game:Allows you to load a previously saved game. Click on the name of
the game you wish to load, then click OKAY.
Save Game:Allows you to save your current game. Click on the colored bar to
enter in a name of your choice for the saved game, or click on a previously saved
game and click OKAY.
Quit: Ends your game and returns you to your operating system. All previously
unsaved actions are lost.
28
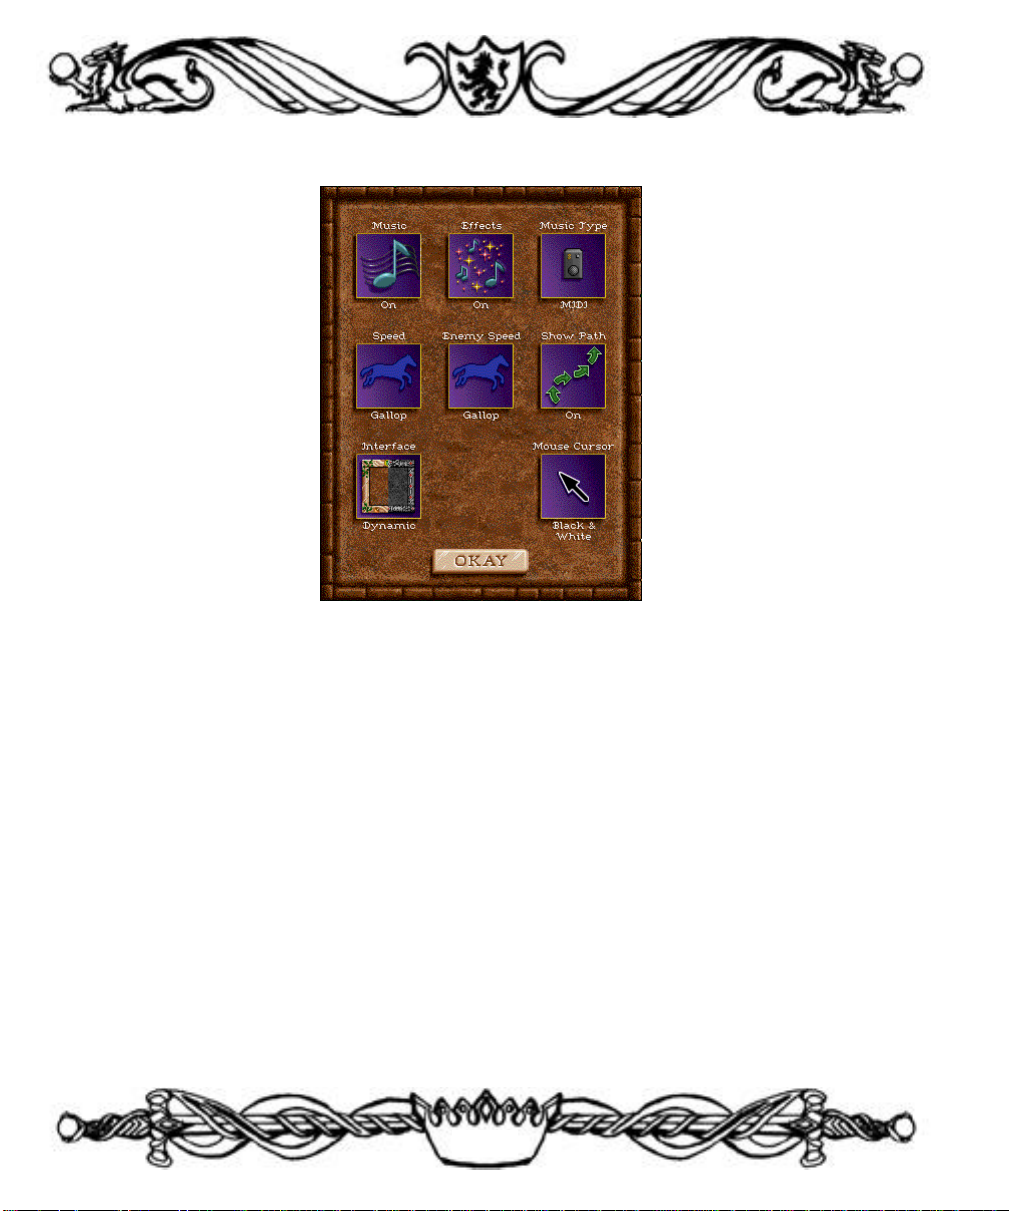
System Options: Brings up the System Options menu.
Music: Adjusts the music volume level.
Effects: Adjusts the effects volume level.
Sound Type:Changes the quality of the sound from MIDI to CD Stereo (Redbook).
Speed: Allows you to set your hero’s movement speed to Walk, Trot, Canter,
Gallop, or Jump.
Enemy Speed: Allows you to set the movement speed of the enemy heroes.
Show Path: Toggles the Show Path feature on and off. When Show Path is
turned off, your hero’s path is not shown. Clicking on an area of the Adventure
Window immediately moves the hero to that location. If the hero does not have
enough points to get there he will move as far as possible, leaving a path shown
in red for the following turn’s movement. If the Show Path feature is turned off,
29
you can still see the path a hero will take by holding down the CTRL key and
clicking on a location. If you like the path shown, release the CTRL key and
click again, or use the Move Button.
Borders: Toggles the interface borders between Good, Evil, and Dynamic (good
border when you start with a good hero, evil border when you start with an evil
hero).
Cursors:Toggles black and white or color mouse cursors. On some systems,
black and white cursors can speed up game play.
Information Box
The Information Box is located in the lower right corner. Clicking on this will toggle
between the active hero’s army, your resource summary, and the date.
30
Game Play
Hero Movement
Clicking on any area of the Adventure Window causes a path to appear for the active
hero. Green arrows show the path the hero will take with longer arrows representing
terrain that requires more movement points (snow, desert, swamp, etc.). A green “X”
shows a location that can be reached this turn. Red arrows indicate destinations that will
be reached in subsequent turns, with a red “X” appearing at the final destination, but not
necessarily meaning that the hero will have used all his movement points when he reach-
es the end of his path.
Once a path has been marked, click on the destination again, or click the Move button,
to cause the hero to begin moving along the path. If the destination is not reached that
turn, then on subsequent turns the hero’s path will be shown. To clear a hero’s path,
click on the hero. The hero will automatically take the most direct route to the destina-
tion you select, bypassing all obstacles and monsters during movement. If you want to
capture a mine, visit a location, fight an enemy, or anything else, you need to make that
your destination.
As your hero moves about, the cursor can change to any one of ten different icons on
the Adventure Window. If a number appears next to any of these icons, that is how
many turns it will take to reach the location.
Horse:This icon appears when the cursor is over terrain that the active hero
can move to. Clicking causes a movement path to be plotted to the location
of the click.
Rearing Horse:This icon appears when the cursor is over an event location
that the active hero can move to. Clicking will cause a path to be plotted to
the location of the click. Moving the hero to this location will activate the
event.
 Loading...