


GRAND PRIX 4
Hi,
reading this, it probably means that you’ve bought
Grand Prix 4. Thanks!
Grand Prix 4 is the latest evolution of
My name is Geoff Crammond and if you’re
the Grand Prix series, which I started writing over
10 years ago. Machines and techniques have
changed a lot since then. For example, the sheer
scale of the project has increased enormously.
Over 60 man-years of effort alone have gone into
the game since Grand Prix 3 was released in 2000!
ith Grand Prix 4, you’ll see a huge
leap forward in the look of the game, with the
inclusion of a new graphics engine specially designed
to use all the power of modern graphics hardware
support. And for the first time we use actual GPS
survey data to make the racetracks as accurate
as possible – the same road layout, width, height,
gradient and camber, as well as the all-important
kerb shapes and profiles, should now be there
just like real life.
W
But some things stay the same
– as always our endeavour is to produce something
that is as authentic as possible, while still being
as playable as possible. We hope that as you take
the chequered flag after winning an exhilarating and
exhausting race, you’ll agree that - like it says on
the box - nothing gets closer!
22222
3
SYSTEM REQUIREMENTS
MINIMUM :
Operating System: Windows®95/98/Me/XP
Processor: Intel Pentium
Memory: 64 MB RAM/ Video: 16MB
Hard disk space: 500 MB free
CD-ROM drive: 4X Speed
Video: DirectX 8.0 compatible Video Card
Sound: DirectX 8.0 compatible Sound Card
DirectX: DirectX 8.0
RECOMMENDED :
Operating System: Windows®95/98/Me/XP
Processor: Intel Pentium
Memory: 128 MB RAM or more/ Video : 32MB
Hard disk space: 720 MB free
CD-ROM drive: 4X Speed
Video: DirectX 8.0 compatible 3D Card
Sound: 100% DirectX 8.0 Hardware Accelerated Sound Card with EAX Support
DirectX: DirectX 8.0
®
II 400 MHz or equivalent
®
III 750MHz or equivalent
INSTALLATION
• Insert the Grand Prix 4 CD into your CD-ROM drive. If autorun is enabled,
Grand Prix 4 will take you to the Installation screen.
• Simply click on the ‘Install’ button and follow all on-screen directions.
• If autorun has not been enabled, you’ll have to double-click on the ‘My
Computer’ icon on the Windows
then click on ‘Setup.exe’. The simulation will now install.
• Follow all on-screen instructions.
• Once Grand Prix 4 is installed it will appear in the Program Group on the
START Menu.
Loading
• Select Start > Programs > Infogrames > Grand Prix 4. The game will now load.
THIS MANUAL
This manual is structured in such a way as to introduce the game to rookie
players and to encourage them to delve deeper to get the most out of the
real simulation. If you’re a Grand Prix 3 veteran you’ll be familiar with the
basic controls and could probably get racing quite quickly, but be aware that
there are differences between Grand Prix 3 and Grand Prix 4 so you’ll find it
very worthwhile reading the manual to understand all the
simulation controls.
THE README FILE
Note that this manual will guide you through most of the Grand Prix
4 simulation but due to printing constraints may not contain the most up to
date information. For all last minute information you are advised to consult
the Readme file found on the CD (selected by clicking on View Readme in the
Program group).
®
Desktop, then on the CD-ROM icon, and
CONTENTS
4
System Requirements
4
Installation
6
Controls
7
Getting Started
17
Cockpit Controls
21
Camera Views
23
TV Director
23
GPeadia
24
Circuits on the Formula One Circus
24
The multiplayer section
26
Car handling
31
Glossary
38
Credits
39
Customer Services
544444
CONTROLS
Throughout this manual, you’ll see references to the Accelerator, the Brake,
Changing Gear and Steering. How these controls operate depends on your
preference of Keyboard, Joystick, Wheel, or Joypad. The default Keyboard
and Joystick driving controls are:
KEYBOARD DRIVING CONTROLS
Accelerate
Brake
Steer Left
Steer Right
Change Up a gear
Change Down a gear
(If you are using separate buttons for changing up or down a gear there is no
need to accelerate when changing up.)
JOYSTICK DRIVING CONTROLS
Accelerate
Brake
Steer Left
Steer Right
Change Up a gear
Change Down a gear
(If you are using separate buttons for changing up or down a gear do not
accelerate.)
Note: All the above driving controls can be reassigned (see page X).
A
Z
<,
>.
Accelerate A key + Space
Space
Forward
Back
Joystick Left
Joystick Right
Accelerate + Press Fire Button
Press Fire Button
Miscellaneous Keys
See Driver Name
See Processor Occupancy
Decrease Cockpit View Angle
Increase Cockpit View Angle
PC Spec Information
Joystick On/Off
Background Sound On/Off
View Keys
Your Car Cockpit View
T-Cam View
Trackside Camera View
All On-car Camera Views
Chase View
Reverse Chase View
Car Ahead
Car Behind
Return to Your Cockpit
TV Director Mode
Network Keys
All Escape
to Menu Screen
SHIFT + U
N
O
Minus –
Plus +
CTRL + I
CTRL + J
CTRL + S
Right Arrow
Right arrow key a second time
Left Arrow
Page Up (Cycle through)
Page Down
Delete
Up Arrow
Down Arrow
Home
Insert
Two Player Link Keys
Send Message
Host Release Control in
Menus to other player
Hang Up
CTRL + M
CTRL + R
CTRL + H
OTHER KEYS
Driving Aid Keys:
Auto Brakes
F1
Auto Gears
F2
Auto-right the Car
F3
F4
Indestructible
F5
Show Best Line
F6
Suggested Gear
F7
Traction Control
F8
Steering Help
F9
Launch control
Action Keys:
Intending to Pit
Return to Pits
(Qualifying/Practice)
Leave Race
Pause
Pause
(when using Joystick)
Replay
Enter/Return
SHIFT + Q
Esc
P
Space
R (when the game is
in the PAUSED state)
GETTING STARTED
ONE LAP OF MONZA FOR ROOKIE DRIVERS
• Install and load Grand Prix 4 as explained previously. After
the opening animations, you will
be given the choice of Main
Menu, Quickrace, Quicklaps or
Gpaedia. Use Quickrace if you
want a quick blast of Grand Prix
4. But for the purposes of this
tutorial guide…
• Click on Main Menu.
For the duration of this
Quickstart tutorial, you will be
SCREEN 1 / MAIN
MENU
766666
racing under your own name.
You just need to select a team to race for and rename one of its drivers.
• Click on the Driver panel to go to the Driver
Select screen.
• In the Teams panel, one of the drivers is
already selected (the number is highlighted).
Click on the driver’s name to deselect.
• Highlight your preferred driver name and click
on Edit Names.
• Type in your name (or the name you want to
race under) and click on OK.
You are now Driver 4, racing for the Ferrari team. Your team’s badge now
appears in the background of the screen. From this screen you can also
access your individual Car Setup options and save the driver names. But for
this tutorial, simply click OK and you’ll return to the Main Menu screen. The
name you typed in will be shown as the Driver. Monza has been chosen as
the track where you’ll have your shakedown test.
• Click on the Track panel and you’ll be taken to the Track screen. A list of
the 2001 Championship Season tracks appears on the left.
• Click on Italy then select OK to return to the Main Menu.
Italy now appears in the Track panel. Now choose the kind of race you want.
• Click on the Race Type panel and select Practise.
• Click OK to return to the Main Menu. The preparations are over. It’s time
to drive!
• Click on the Drive button. You’ll see a Weather screen that details the
Current Track and Sky conditions and the Forecast chance of rain.
• Click OK to start your first practice session.
You’re now sitting in the Ferrari cockpit in the pits at Monza. As with any test
session, it’s now time to check the instruments and controls…
• Below the LCD screen on the steering wheel is
a row of nine lines. Each corresponds to a
Driving Aid designed to help you control the
car. Keys F1 to F9 turn each of these on and
off. In Rookie mode, all lights should be on
with the exception of Launch Control (F9)
which will only be on as default at the start of
a race. If they’re not, press the relevant F
key. Suggested Gear (F6) is not needed for
this session. With the Driving Aids activated,
you won’t have to worry about changing gear
or braking: this will be done automatically and all basic steering around the
circuit will also be assisted. You may crash if you stray from the racing line,
but your car will not be damaged. If you spin off the track, the car will right
itself once it has come to rest and face the right direction so you can get
on with the session.
SCREEN 2 / DRIVER
SELECT
SCREEN 3 / COKPIT
VIEW - PIT AT MONZA
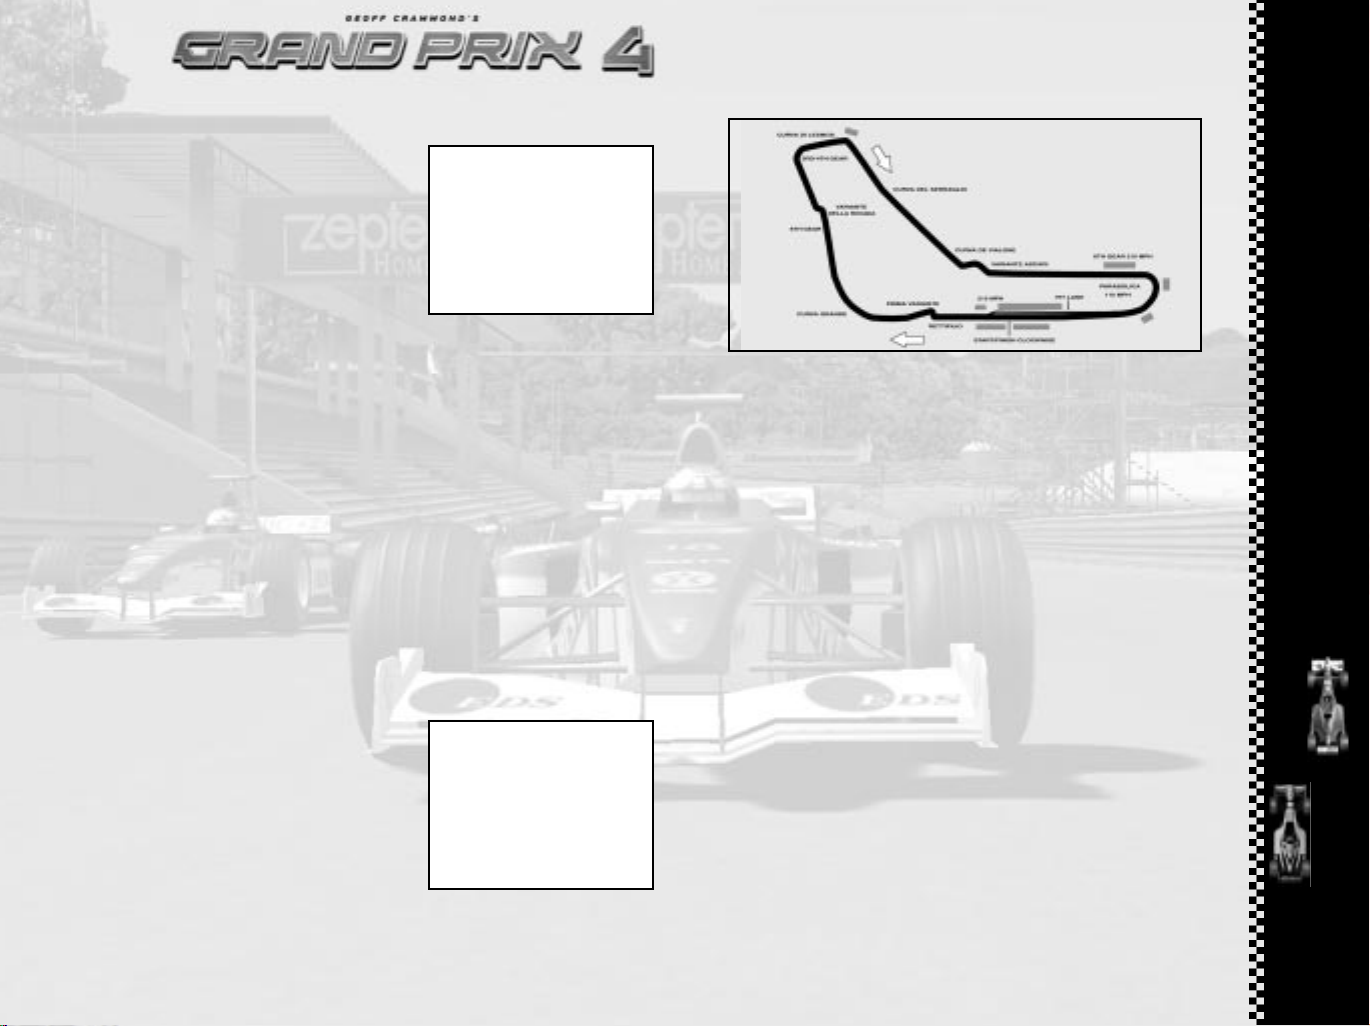
• Now check the Monza track plan below…
• Find the Start/Finish line and then run your eye clockwise
around the course until you come back to the Finish line. Check
where the pit lane joins the track so you’ll know exactly when
you’ll be on the actual racing track. Memorise the track plan
so you can anticipate what the corners will be like. As you
improve your racing skills and become more experienced, you’ll
realize just how important knowing each circuit will be to your
success.
• Select the Leave the Pits option on the LCD, using
• Now slowly squeeze the accelerator… Your car will begin to
• Steer out from your pit garage and drive down the pit lane.
• Try to keep the middle of the steering wheel lined up with the
Your car is still on its jacks in the garage.
the Throttle and Brake controls, then press the Gear Change
button. The car will come down off its jacks and you’ll see a
new LCD screen appear on the central steering wheel panel.
move forward (if it doesn’t, check that you’ve pressed F2 and
that the second symbol on the Driving Aids display is lit).
Remember that in race conditions, you’ll need to stick to the
pit lane speed limit of 50mph/80kph. If you want to pause the
simulation at any point, press key P (or Space if you are
driving with a Joystick, Wheel or a Joypad). Press P again to
reactivate. During this session, pause as many times as you
feel you need to, so that you can study the track plan and
anticipate what’s coming next. As you steer out of the pit
lane, join the main track, keeping on the inside of the broken
yellow line. Once on the circuit proper, the yellow line will be
replaced by a long broken white line.
broken white line as you progress around the circuit. This
white line is the Best Driving Line Driving Aid (F5): the
quickest possible line into and out of bends without spinning
off the track. At some point before the first bend, you
should, see a white sign with a black arrow bending to the
left, then countdown marker signs with 200 and 100. These
signs show how many metres remain before the approaching
left-hand bend.
988888
• This is a good spot to pause the simulation and check the Monza track plan
again: The first bend at Monza turns to the left and is followed by a sharp
right. Next is another left-right combination making up a double chicane
called the Variante Goodyear.
• Find the Prima Variante on your track plan and examine the next bend,
the Curva Grande.
This is what Formula One racing is all about: being aware of the next part of
the course and making sure you are properly prepared to drive through it.
Only by knowing what lies ahead can you optimise the line you take through
each corner.
• Reactivate the simulation by pressing P or the Space bar.
• Steer carefully around Variante Goodyear (don’t try to go too fast) - left
then right, along a short straight and left and right again. Try to follow the
broken line even though it sometimes appears to be aiming away from the
track. If you do leave the track at any time, steer back towards it (this
might be slippery on grass or gravel) to get back on the tarmac. If you have
spun and are facing the wrong way (and you still have the Auto-right the
Car (F3) Driving Aid on), don’t touch the controls. Wait for the car to right
itself and point in the correct direction.
• See how the ideal racing line takes you out of this last corner, using the
whole width of the track and taking you over to the left side of the road,
ready for the approach to the long sweeping right-hander: the Curva
Grande. You’ll probably find that you can drive quite fast through this
bend.
• Continue along the straight and go under the bridge. Just after the bridge
is a left turn.
• Press pause and have another look at the track plan. This left turn is the
first part of the Variante della Roggia: another chicane. Check how this
looks and imagine how you will drive through it.
• Now look ahead on the plan to the next three bends and try to imagine what
they will look like from the cockpit.
• Press the pause button again to continue.
• Steer through the chicane and on through the next two right hand curves
(Lesmo 1 and Lesmo 2). You’ll now face a long, downhill straight.
• Accelerate! As you’re moving, glance at the gear indicator (the red number
in the centre of the wheel display) as the car changes gear automatically.
Listen to the sound of the engine and watch the rpm indicator lights as the
gears change up and down. Get used to glancing quickly at the displays and
the mirrors as you’re travelling at speed. At the end of this straight is an
unusual chicane called the Variante Ascari. Pause, check your track plan,
analyse and memorise, reactivate the game and drive through the corners,
following the ideal racing line. The more you can commit to memory, the
easier the corners will be to drive through at speed.
• Accelerate along the straight and see if the automatic gear change will take
you into top gear (6th or 7th) before the auto-brakes slow you down for the
Curva Parabolica. As you come out of the bend, you’ll see the grandstands, the pits and a yellow dotted line marking the pit lane entrance.
Remember that each track has its own specific pit entrance and exit layout,
and it’s important to take a note of this as part of your race preparation.
• Keep following the broken white line. You’re now back on the start/finish
straight: the Rettifilio Tribune.
• Accelerate at full speed. You’ll see the starting grid - the
spaces where the cars line up for start of the race - and a
thick solid white line across the track that marks the end of
this lap.
• As you cross the line, you’ll be starting your first flying lap:
the timer on your cockpit lap time display will start. You can
pause the game at any time to double-check the track plan –
your lap time will not be affected.
• When you complete your first flying lap, check your time and
try another lap to see if you can beat your previous time.
CONTROLLING YOUR OWN BRAKES
Although the auto-brakes you were using are effective, they’re
still a Driving Aid. To get the very best lap speeds, you’ll need
to apply your own brakes. When you feel confident you’ve
mastered steering and the racing line, try switching off the
Auto-brakes Driving Aid:
• Press F1 and check that the auto-brakes light has gone out
on the bank of green icons below the LCD. Now it’s up to you
to choose the best moment to brake as you continue lapping
Monza! The car will feel very different this time. Remember
how the brakes are operated by your choice of controller:
Keyboard : Brake = Z
Joystick : Brake = Back
CONTROLLING YOUR OWN GEARS
• When you’re ready to try controlling your own gears, stop
on a straight part of the circuit and press F2 to cancel the
Auto-gears Driving Aid.
• Now press F6 to activate the Suggested Gear Driving Aid we
left off earlier in the session. The corresponding icon will light
up on the display. You’re now in control of ALL gear changes,
but to guide you, when you see a number in the Suggested
Gear panel, that will be the gear to be in as you go into the
NEXT corner. Check the gear change method for your choice
of controller:
Keyboard : Change Up a gear = Accelerate A key + Space
Change Down a gear = Space
Joystick : Change Up a gear = Accelerate + Press Fire Button
Change Down a gear = Press Fire Button
Note: If you have separate buttons for gear changes then you
do not need to accelerate to change up.
• Practise gear changing up and down and watch the red gear
indicator.
• Try to get into neutral (N) and then accelerate. The engine will
rev and make a highpitched noise.
• Blip the accelerator and look at how the revs rise on
the digital rev counter, then select first gear BUT keep the
111010101010
 Loading...