


HEALTH WARNING
For your health, rest about 15 minutes for each hour of play. Avoid playing when tired or suffering from lack of sleep. Always play in a brightly lighted room, and stay as far from the television screen as possible. Some people experience epileptic seizures when viewing flashing lights or patterns in our daily environment. These persons may experience seizures while watching TV pictures or playing video games. Even players who have never had any seizures may nonetheless have an undetected epileptic condition. Consult your doctor before playing video games if you have an epileptic condition or immediately should you experience any of the following symptoms during play: dizziness, altered vision, muscle twitching, ther involuntary movements, loss of awareness of your surroundings, mental confusion, and / or convulsions.
CONTENTS
Introduction…………………………………………………………………………1 This Manual ………………………………………………………………………1
Technical …………………………………………………………………………2
Specification………………………………………………………………………………………2 Installation ………………………………………………………………………………………2
Loading ……………………………………………………………………………………………2
The Readme file …………………………………………………………………………………2
QUICKSTART SECTION ……………………………………………………………3
Part One: The Driving Controls and Keys …………………………………………3
Keyboard Driving Controls ………………………………………………………………………3
Joystick Driving Controls…………………………………………………………………………3 Other Keys ………………………………………………………………………………………4
Driving Aids Keys ……………………………………………………………………………4
Action Keys……………………………………………………………………………………4 Miscellaneous Keys …………………………………………………………………………4
View Keys ……………………………………………………………………………………4
Network Keys …………………………………………………………………………………4
Two Player Link Keys ………………………………………………………………………4
Part Two: Getting Started …………………………………………………………5
One Lap of Monza for Rookie Drivers …………………………………………………………5
Controlling Your Own Brakes …………………………………………………………………10
Controlling Your Own Gears ……………………………………………………………………11
Driving into the Pits ……………………………………………………………………………12
Refuelling ………………………………………………………………………………………13
Tyres ……………………………………………………………………………………………13
Leaving the Pits…………………………………………………………………………………14
Car Setup Options ………………………………………………………………………………14
A Timed Qualifying Session ……………………………………………………………………15
A Non-Championship Race ……………………………………………………………………17
Pitstops………………………………………………………………………………………18
Flags …………………………………………………………………………………………18
Pulling Out …………………………………………………………………………………19
Saving the Game ……………………………………………………………………………19
Finishing the Race …………………………………………………………………………20
Winning the World Championship ……………………………………………………………21
1 |
i |

Part Three: The Cockpit Controls ………………………………………………22
Difficulty Level …………………………………………………………………………………23
Driving Aids ……………………………………………………………………………………23
Driving Aids and Difficulty Levels ……………………………………………………………24
Opposition Spread………………………………………………………………………………24
RPM Indicators …………………………………………………………………………………25
Gear Indicator …………………………………………………………………………………25
Flag Warning Lights ……………………………………………………………………………25
Driver Status Indicator …………………………………………………………………………25
Suggested Gear Indicator………………………………………………………………………25
Damage Indicator ………………………………………………………………………………25
Pits Indicator ……………………………………………………………………………………26
LCD Displays ……………………………………………………………………………………26
During Qualifying/Practice …………………………………………………………………26
During the Race ……………………………………………………………………………26
Split Times …………………………………………………………………………………26
Pitstop Controls …………………………………………………………………………………27
Qualifying ……………………………………………………………………………………27
Race …………………………………………………………………………………………27
Pit Strategy …………………………………………………………………………………27
Part Four: Camera Views and TV Director ………………………………………28
Cockpit View ……………………………………………………………………………………28
On Car Camera Views …………………………………………………………………………28
Other Car Views …………………………………………………………………………………28
Trackside Camera Views ………………………………………………………………………29
Chase View ………………………………………………………………………………………29
Reverse Chase View ……………………………………………………………………………29
TV Director ………………………………………………………………………………………30
Replay Mode ……………………………………………………………………………………30
CIRCUITS ON THE FORMULA ONE CIRCUS ………………………………………31
Australian Grand Prix …………………………………………………………………………32
Brazilian Grand Prix ……………………………………………………………………………33
Argentinian Grand Prix …………………………………………………………………………34
San Marino Grand Prix …………………………………………………………………………35
Spanish Grand Prix ……………………………………………………………………………36
Monaco Grand Prix ……………………………………………………………………………37
Canadian Grand Prix ……………………………………………………………………………38
French Grand Prix ………………………………………………………………………………39
British Grand Prix ………………………………………………………………………………40
Austrian Grand Prix ……………………………………………………………………………41
German Grand Prix ……………………………………………………………………………42
Hungarian Grand Prix …………………………………………………………………………43
Belgian Grand Prix ……………………………………………………………………………44
Italian Grand Prix ………………………………………………………………………………45
Luxembourg Grand Prix ………………………………………………………………………46
Japanese Grand Prix ……………………………………………………………………………47
MENU REFERENCE SECTION ……………………………………………………49
Startup Menu Screen ……………………………………………………………49
Quickrace ………………………………………………………………………………………49
Weather, Track and Sky Conditions ………………………………………………………49
Last Minute Changes button ………………………………………………………………49
Pitstop Strategy…………………………………………………………………………49 Tyre Choice ……………………………………………………………………………49
Car Setup ………………………………………………………………………………49
The Race ……………………………………………………………………………………50
Main Menu Screen ………………………………………………………………50
Driver ……………………………………………………………………………………………50
Load Driver Names/Save Driver Names …………………………………………………51
Edit Team Name ……………………………………………………………………………51
Driver Car Setups …………………………………………………………………………51
Track ……………………………………………………………………………………………51
Race Type ………………………………………………………………………………………52
Quickrace ……………………………………………………………………………………52
Practice………………………………………………………………………………………52 Non-Championship Race …………………………………………………………………53
The Championship Season ………………………………………………………………53
Difficulty …………………………………………………………………………………………53
Multiplayer ………………………………………………………………………………………53
ii |
iii |

Workshop ………………………………………………………………………………………53
About Grand Prix 3 …………………………………………………………………………53
Utilities ………………………………………………………………………………………53
View Circuit Records ………………………………………………………………………53
Review Performance ………………………………………………………………………53
Load Game ………………………………………………………………………………………54
Options …………………………………………………………………………………………54
Drive ……………………………………………………………………………………………54
Icon Buttons ……………………………………………………………………………………54
Exit ………………………………………………………………………………………………54
Game Options ……………………………………………………………………54
Controls …………………………………………………………………………………………54
Calibrate Joystick …………………………………………………………………………55
Keyboard Setup ……………………………………………………………………………55
Wheels/Pedals ………………………………………………………………………………55
Controls (Advanced) ……………………………………………………………………………55
Controller Type………………………………………………………………………………55 Steering ……………………………………………………………………………………56
Accelerate……………………………………………………………………………………57
Brake…………………………………………………………………………………………57 Clutch ………………………………………………………………………………………57
Gear Change…………………………………………………………………………………57 Force Feedback ……………………………………………………………………………57
Choose Control Method ……………………………………………………………………57
Edit Set Name ………………………………………………………………………………57
Load Control Set ……………………………………………………………………………58
Save Control Set ……………………………………………………………………………58
Calibrate Joystick …………………………………………………………………………58
Keyboard Setup ……………………………………………………………………………58
Driving Aids Options………………………………………………………………58
Driving Aids ……………………………………………………………………………………58
Driving Aids available with Difficulty Levels …………………………………………………59
Race Options ……………………………………………………………………60
Time/Distance Race Options …………………………………………………………………60
Quickrace Options ………………………………………………………………………………60
Race Weather ……………………………………………………………………………………60
Multiplayer (Hotseat) …………………………………………………………………………61
Opposition Spread………………………………………………………………………………61
All the Same ………………………………………………………………………………61
1998 Levels…………………………………………………………………………………61 Random ……………………………………………………………………………………61
Player Cars Only ………………………………………………………………………………61
Race Type ………………………………………………………………………………………61
Car Realism ……………………………………………………………………………………61
Graphics Options …………………………………………………………………62
Graphics Detail …………………………………………………………………………………62
Screen Resolution ………………………………………………………………………………62
Render Device …………………………………………………………………………………62
Advanced Options (Graphics) …………………………………………………………………62
Trackside Objects …………………………………………………………………………63
Frame Rate …………………………………………………………………………………63
Sound Options ……………………………………………………………………63
Save Options………………………………………………………………………63
Loading and Saving Files ………………………………………………………………………63
File Suffix Codes ………………………………………………………………………………64
THE GRAND PRIX MENU SECTION ………………………………………………65
Non-Championship Race …………………………………………………………65
Friday Free Practice ……………………………………………………………………………66
Add/Reduce Fuel……………………………………………………………………………66 Tyres …………………………………………………………………………………………66
Car Setup ……………………………………………………………………………………67
Saturday Free Practice …………………………………………………………………………67
Qualifying ………………………………………………………………………………………68
Quitting a Qualifying Lap …………………………………………………………………68
Accelerating Time …………………………………………………………………………68
Logged Data …………………………………………………………………………………69
Pre-Race Warm-Up ……………………………………………………………………………69
iv |
v |
The Race…………………………………………………………………………………………69 The Grid Display ……………………………………………………………………………69
Weather………………………………………………………………………………………69 Last Minute Changes ………………………………………………………………………69
Car Setup ……………………………………………………………………………………70
Starting Off …………………………………………………………………………………70
Escape Menu ………………………………………………………………………………70
Finishing the Race …………………………………………………………………………71
Race Completed Menu ……………………………………………………………………71
The Championship Season ………………………………………………………72
Hot Laps …………………………………………………………………………73
Saving a Hot Lap ………………………………………………………………………………73
Viewing a Hot Lap Replay ……………………………………………………………………73
THE MULTIPLAYER SECTION ……………………………………………………75
Connection Type ………………………………………………………………………………76
Serial Cable (2 players) ……………………………………………………………………76
Modem (2 players) …………………………………………………………………………76
IPX Network (2 or more players) …………………………………………………………76
TCP/IP Network (2 or more players)………………………………………………………76
Number to Dial …………………………………………………………………………………76
Player Name ……………………………………………………………………………………76
Game Selection …………………………………………………………………………………76
Session Selection ………………………………………………………………………………76
Host a New Session ………………………………………………………………………76
Join an Existing Session …………………………………………………………………77
Session Name …………………………………………………………………………………77
The Settings Button ………………………………………………………………………77
The Phonebook Button ……………………………………………………………………77
Connecting ………………………………………………………………………………………77
The Linking Screens ………………………………………………………………………77
The Network Game …………………………………………………………………………77
The Chat Button ……………………………………………………………………………77
The Options Button…………………………………………………………………………78 The Leave Session Button …………………………………………………………………78
The Close Session Button …………………………………………………………………78
Weather Screen ……………………………………………………………………………78
Last Minute Changes (Network) Screen …………………………………………………78
The Two-Player Link Screen ………………………………………………………………78
‘Hotseat’ Multiplayer Games ……………………………………………………79
How Does a ‘Hotseat’ Game Work?……………………………………………………………79
THE CAR HANDLING SECTION ……………………………………………………81
Introduction ………………………………………………………………………81
Part One: Basic Car Setup ………………………………………………………82
Basic Car Setup Options ………………………………………………………………………84
Front/Rear Wing Downforce Adjust ………………………………………………………84
Front/Rear Brake Balance …………………………………………………………………84
Gear Ratios …………………………………………………………………………………84
Putting it into Practice …………………………………………………………………………85
A Quick Demo ………………………………………………………………………………85
Part Two: Standard Car Setup Procedure ………………………………………88
Getting to Grips with Understeer and Oversteer ……………………………………………88
Typical Problems in Standard Setup …………………………………………………………89
Making step-by-step Setup Changes: Basic Principles ……………………………………90
Wing Angles …………………………………………………………………………………91
Gear Ratios …………………………………………………………………………………92
Brake Balance ………………………………………………………………………………92
Be Systematic ………………………………………………………………………………93
Save the Car Setup …………………………………………………………………………93
Choosing a Pit Strategy ………………………………………………………………………93
Part Three: Advanced Car Setup Procedure ……………………………………93
Part Four: Data Logging and Performance Analysis ……………………………94
Recording Data …………………………………………………………………………………95
Viewing Data ……………………………………………………………………………………95
Loading Data ………………………………………………………………………………95
Saving Data …………………………………………………………………………………95
Remove Lap/Remove All Laps ……………………………………………………………96
Copy to Foreground…………………………………………………………………………96 Graph Selected Laps ………………………………………………………………………96
Clear Selected Lap …………………………………………………………………………96
Performance Analysis …………………………………………………………………………96
Speed ………………………………………………………………………………………97
Steering Demand……………………………………………………………………………97
vi |
vii |

RPM …………………………………………………………………………………………97
Throttle ………………………………………………………………………………………97
Brake…………………………………………………………………………………………98 Gear …………………………………………………………………………………………98
Ride Heights - for each wheel ……………………………………………………………98
Suspension Travel - for each wheel ………………………………………………………98
Wheelspin - for each wheel ………………………………………………………………99
Lateral Acceleration ………………………………………………………………………99
Longitudinal Acceleration …………………………………………………………………99
Looking for Optimum Traction ……………………………………………………………99
Performance Display Controls ………………………………………………………………100
Map…………………………………………………………………………………………100 Zoom ………………………………………………………………………………………100
Highlight Selection ………………………………………………………………………100
Print/Print Setup …………………………………………………………………………100
Wet Weather Setup ……………………………………………………………………………100
Part Five: Driving Techniques …………………………………………………101
The Racing Line ………………………………………………………………………………101
Typical Corners and Bends …………………………………………………………………102
Reaction of the Car Through a Corner ………………………………………………………106
Marker Points …………………………………………………………………………………107
Braking …………………………………………………………………………………………107
Changing Down ………………………………………………………………………………108
Overtaking ……………………………………………………………………………………108
Driving Faster Through a Corner than a Rival ……………………………………………108
Slipstreaming …………………………………………………………………………………109
Outbraking a Rival Car ………………………………………………………………………109
Driving Errors …………………………………………………………………………………109
Loss of Control ………………………………………………………………………………110
Summary ………………………………………………………………………………………110
Flags ……………………………………………………………………………112
Race Marshal’s Flags …………………………………………………………………………112
Observation Post Flags ………………………………………………………………………112
Performance Analysis Colour Charts …………………………………………114
1998 SEASON STATISTICS ……………………………………………………117
Constructors’ Championship Results 1998 ……………………………………117
Drivers’ World Championship Results 1998……………………………………118
The Teams ………………………………………………………………………119
Williams Grand Prix Engineering ……………………………………………………………119
Ferrari SpA ……………………………………………………………………………………120
Benetton Formula Ltd ………………………………………………………………………121
McLaren International Ltd……………………………………………………………………122
Jordan Grand Prix Ltd ………………………………………………………………………123
Prost Grand Prix ………………………………………………………………………………124
Sauber AG ……………………………………………………………………………………125
Arrows Grand Prix International Ltd…………………………………………………………126 Stewart Grand Prix ……………………………………………………………………………127
Tyrrell Racing Organisation Ltd………………………………………………………………128 Minardi Team SpA ……………………………………………………………………………129
GRAND PRIX VETERANS’ SECTION………………………………………………131
Secrets of the Pro’s – Driving at the Limit …………………………………………………131
Introduction ………………………………………………………………………………131
How does a Tyre Work? …………………………………………………………………132
The Slip Zone ……………………………………………………………………………134
Controlling Weight Transfer ………………………………………………………………135
Weight Transfer and Balance (Understeer and Oversteer) ……………………………136
Traction Circle ……………………………………………………………………………137
Understeer versus Oversteer ……………………………………………………………138
Wet Weather Setup ………………………………………………………………………140
The Pits ………………………………………………………………………………………142
Summary …………………………………………………………………………………142
Basic Car Setup Options ……………………………………………………………………142
Front/Rear Wing Downforce Adjust ……………………………………………………142
Front/Rear Brake Balance ………………………………………………………………143
Gear Ratios ………………………………………………………………………………143
Save the Car Setup ………………………………………………………………………143
Advanced Car Setup………………………………………………………………………144 Typical Problems in Standard Setup ……………………………………………………144
Data Logging Guide ………………………………………………………………………146
Recording Data ……………………………………………………………………………146
Speed …………………………………………………………………………………146
Steering Demand ……………………………………………………………………147
RPM ……………………………………………………………………………………147
Throttle…………………………………………………………………………………147 Brake …………………………………………………………………………………147
Gear ……………………………………………………………………………………147
viii |
ix |

Ride Heights – for each wheel ………………………………………………………148
Suspension Travel – for each wheel ………………………………………………148
Wheelspin – for each wheel …………………………………………………………149
Standard Car Setup Procedure …………………………………………………………149
Making step-by-step Setup Changes: Basic Principles ………………………………149
Wing Angles……………………………………………………………………………149 Gear Ratios ……………………………………………………………………………151
Brake Balance…………………………………………………………………………151 Car Setup Advanced Level 1 ……………………………………………………………151
Making Setup Changes: Advanced Level 1 ……………………………………………152
Springs …………………………………………………………………………………152
Ride Height ……………………………………………………………………………153
Dampers ………………………………………………………………………………153
Anti-Roll Bars …………………………………………………………………………154
Tyre Wear ………………………………………………………………………………154
Car Setup Advanced Level 2 ……………………………………………………………154
Making Setup Changes: Advanced Level 2 ……………………………………………155
4-Way Adjustable Dampers …………………………………………………………155
Packers…………………………………………………………………………………155 Differential ……………………………………………………………………………157
Car Setup Reference Charts ……………………………………………………………158
Data Logging Guide ………………………………………………………………………165
Lateral Acceleration …………………………………………………………………165
Longitudinal Acceleration ……………………………………………………………165
GLOSSARY ………………………………………………………………………167
CUSTOMER INFORMATION ………………………………………………………170
Customer Services ………………………………………………………………170
Web Sites ………………………………………………………………………171
Notice/Warranty …………………………………………………………………171
Credits …………………………………………………………………………173
Introduction
Welcome to the most advanced Formula One racing simulation ever made. Grand Prix 3 is specifically designed to give you the complete racing experience. Whether you’re new to the game or a Grand Prix 1 or 2 veteran there’s plenty in this simulation for everyone. No matter what your experience of racing games, you’ll know that Grand Prix 3 is an instant classic, achieving new heights of performance, accuracy and attention to graphic 3D detail. Designed and written by the legendary Geoff Crammond, Grand Prix 3 is the answer to all Formula One racing fans’ prayers: it has the real teams, the real drivers, the real cars, the real engines, and the real tracks. In fact, everything you could ever want to tackle the Formula One World Championship Season. Complete!
But the cars are always the stars of this simulation. It’s not just that they look so perfect (which they do in abundance) but they handle just like the real thing (so we’ve been told by real Formula One drivers). Springs, dampers, wings, gear ratios, brake balance and ride height are just a few of the items that are realistically adjustable and that will truly affect car performance and handling characteristics. And you can study the effects of these adjustments by downloading telemetric data into the highly accurate performance analysis utility that will help you compare different car setups.
Now you’ve got Grand Prix 3 in your hands, get racing and good luck!
This Manual
This manual is structured in such a way as to introduce the game to rookie players and to encourage them to delve deeper to get the most out of the real simulation. If you’re a Grand Prix 2 veteran you’ll be familiar with the basic controls and could probably get racing quite quickly, but be aware that there are many differences between Grand Prix 2 and Grand Prix 3 so you’ll find it very worthwhile reading the manual to understand all the simulation controls.
x |
1 |
Technical
Specification
Make sure the specification shown on the Grand Prix 3 box matches that of your computer.
Installation
• Insert the Grand Prix 3 CD into your CD-ROM drive.
If autorun is enabled, Grand Prix 3 will take you to the Installation screen.
•Simply click on the ‘Install’ button and follow all on-screen directions.
•If autorun has not been enabled, you’ll have to double-click on the ‘My Computer’ icon on the Windows® Desktop, then on the CD-ROM icon, and then click on ‘Setup.exe’.
The simulation will now install.
•Follow all on-screen instructions.
•Once Grand Prix 3 is installed it will appear in the Program Group on the START Menu.
Loading
• Select Start > Programs > Hasbro Interactive > Grand Prix 3.
The game will now load.
The Readme File
Note that this manual will guide you through most of the Grand Prix 3 simulation but due to printing constraints may not contain the most up to date information. For all last minute information you are advised to consult the Readme file found on the CD (selected by clicking on View Readme in the Program group).
QUICKSTART SECTION
Part One: The Driving Controls and Keys
Throughout this manual, you’ll see references to the Accelerator, the Brake, Changing Gear and Steering. How these controls operate depends on your preference of Keyboard, Joystick, Wheel, or Joypad. The default Keyboard and Joystick driving controls are:
Keyboard Driving Controls
Accelerate |
= |
A |
Brake |
= |
Z |
Steer Left |
= |
<, |
Steer Right |
= |
>. |
Change Up a gear |
= Accelerate A key + Space |
|
Change Down a gear |
= |
Space |
(If you are using separate buttons for changing up or down a gear there is no need to accelerate when changing up.)
Joystick Driving Controls
Accelerate |
= |
Forward |
Brake |
= |
Back |
Steer Left |
= |
Joystick Left |
Steer Right |
= |
Joystick Right |
Change Up a gear |
= Accelerate + Press Fire Button |
|
Change Down a gear |
= |
Press Fire Button |
(If you are using separate buttons for changing up or down a gear do not accelerate.) Note: All the above driving controls can be reassigned (see page 54).
2 |
3 |
Other Keys
Driving Aid Keys: |
|
|
|
|
|
Auto Brakes |
= |
F1 |
Show Best Line |
= |
F5 |
Auto Gears |
= |
F2 |
Suggested Gear |
= |
F6 |
Auto-right the Car |
= |
F3 |
Throttle Help |
= |
F7 |
Indestructible |
= |
F4 |
Steering Help |
= |
F8 |
Action Keys: |
|
|
|
Intending to Pit |
= |
Enter/Return |
|
Return to Pits (Qualifying/Practice) |
= |
SHIFT + Q |
|
Leave Race |
= |
Esc |
|
Pause |
= |
P |
|
Pause (when using Joystick) |
= |
Space |
|
Replay |
= R (when the game is in the PAUSED state) |
||
Miscellaneous Keys: |
|
|
|
See Driver Name |
= |
N |
|
See Processor Occupancy |
= |
O |
|
Decrease Cockpit View Angle |
= |
Minus – |
|
Increase Cockpit View Angle |
= |
Plus + |
|
Virtual Cockpit On/Off |
= @ (Software graphics only) |
||
PC Spec Information |
= |
CTRL + I |
|
Joystick On/Off |
= |
CTRL + J |
|
Background Sound On/Off |
= |
CTRL + S |
|
View Keys: |
|
|
|
Your Car Cockpit View |
= |
Right Arrow |
|
Trackside Camera View |
= |
Left Arrow |
|
All On-car Camera Views |
= Page Up (Cycle through) |
||
Chase View |
= |
Page Down |
|
Reverse Chase View |
= |
Delete |
|
Car Ahead |
= |
Up Arrow |
|
Car Behind |
= |
Down Arrow |
|
Return to Your Cockpit |
= |
Home |
|
TV Director Mode |
= |
Insert |
|
Network Keys: |
|
|
|
All Escape to Menu Screen |
= |
SHIFT + U |
|
Two Player Link Keys: |
|
|
|
Send Message |
|
= |
CTRL + M |
Host Release Control in Menus to other player = |
CTRL + R |
||
Hang Up |
|
= |
CTRL + H |
Part Two: Getting Started
One Lap of Monza for Rookie Drivers
• Install and load Grand Prix 3 as explained previously.
After the opening animations, you will be given the choice of Quickrace or Main Menu. Use Quickrace if you want a quick blast of Grand Prix 3. But for the purposes of this tutorial guide…
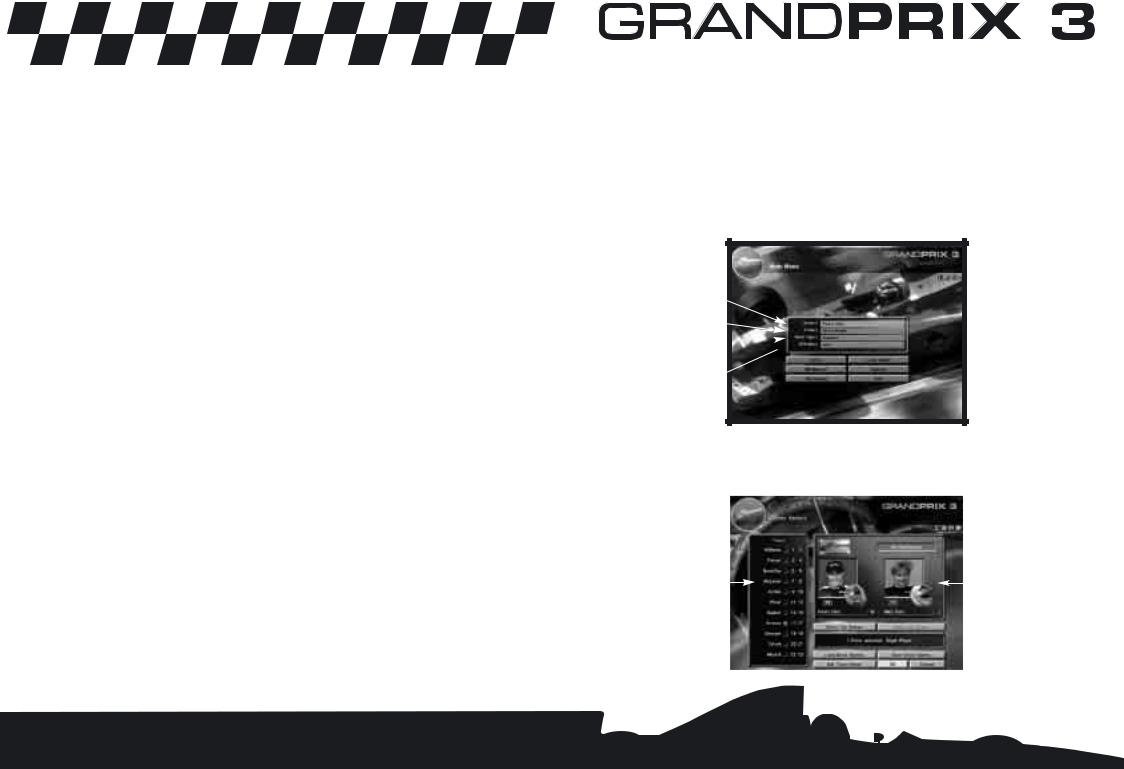
• Click on Main Menu.
Driver Panel
Track Panel
Race Type
Difficulty Level
For the duration of this Quickstart tutorial, you will be racing under your own name. You just need to select a team to race for and rename one of its drivers.
• Click on the Driver panel to go to the Driver Select screen.
Teams Panel |
|
|
|
Driver Panel |
|
|
|
|
|
|
|
|
|
|
4 |
5 |
•In the left hand Teams panel, one of the drivers is already selected (the number is highlighted). Click on the driver’s photo to deselect.
•Click on the button to the right of Ferrari to view the two team drivers, then click on the button to the right of driver number 4’s name: Eddie Irvine.
•Click on the name panel under Eddie’s photo and delete his name with the backspace key.
•Type in your name (or the name you want to race under) and press Return.
You are now Driver 4, racing for the Ferrari team. Your team’s badge now appears on screen, rotating in the top left corner.
From this screen you can also access your individual Car Setup options and save the driver names. But for this tutorial, simply click OK and you’ll return to the Main Menu screen. The name you typed in will be shown as the Driver.
Monza has been chosen as the track where you’ll have your shakedown test.
•Click on the Track panel and you’ll be taken to the Track screen. A list of the 1998 Championship Season tracks appears on the left and allows you to view each one from a number of positions.
•Click on Italy then select OK to return to the Main Menu.
Italy now appears in the Track panel.
Now choose the kind of race you want.
•Click on the Race Type panel and select Practice.
•Click OK to return to the Main Menu.
The preparations are over. It’s time to drive!
•Click on the Drive button. You’ll see a Weather screen that details the Current Track and Sky conditions and the Forecast chance of rain.
•Click OK to start your first practice session.
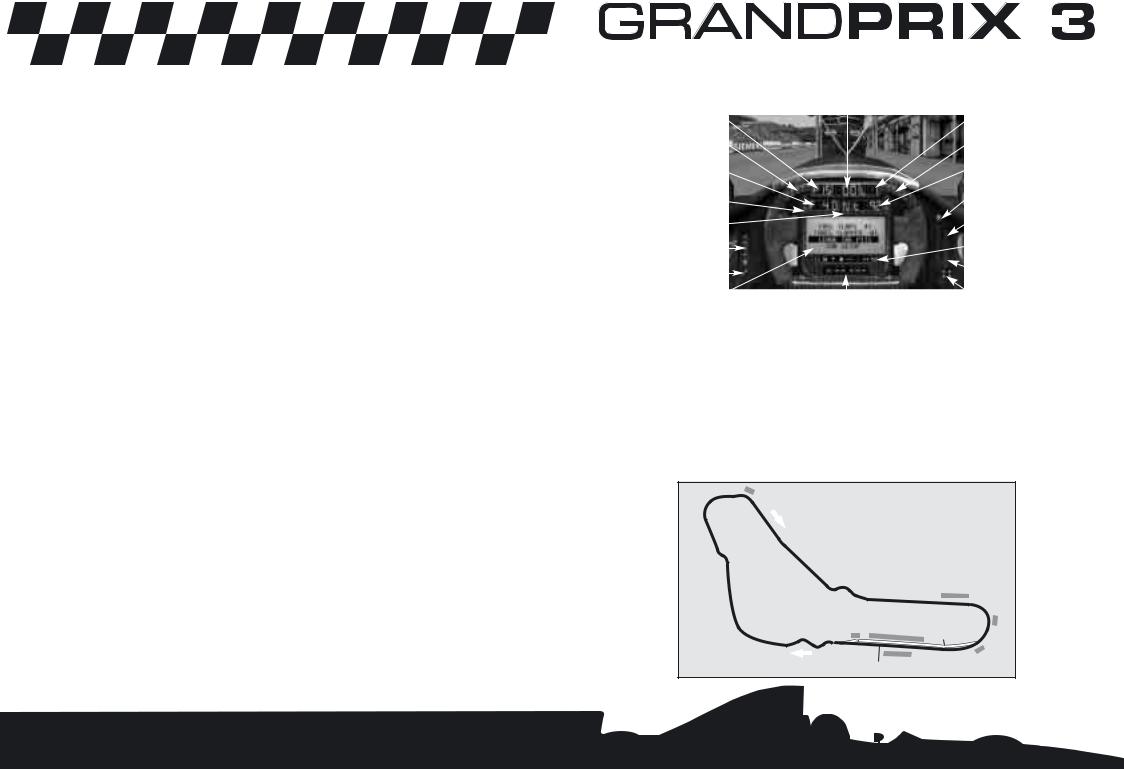
You’re now sitting in the Ferrari cockpit in the pits at Monza. As with any test session, it’s now time to check the instruments and controls…
|
|
Speed |
||
Current Position |
|
|
|
Current Lap |
|
|
|
||
RPM |
|
|
|
RPM |
Fuel Remaining |
|
|
|
Water Temperature |
(in laps) |
|
|
|
|
|
|
|
|
|
Flag Warning Lights |
|
|
|
Driver Status |
|
|
|
|
|
Current Gear |
|
|
|
Suggested Gear |
|
|
|
|
|
Difficulty Level |
|
|
|
Driving Aids |
|
|
|
|
|
Opposition Spread |
|
|
|
Damage |
LCD |
|
|
|
Pits |
|
|
|
||
|
|
|
||
|
|
Current Lap Time |
||
•Below the LCD screen on the steering wheel is a row of eight lights. Each corresponds to a Driving Aid designed to help you control the car. Keys F1 to F8 turn each of these on and off. In Rookie mode, all lights should be on. If they’re not, press the relevant F key. Suggested Gear (F6) is not needed for this session.
With the Driving Aids activated, you won’t have to worry about changing gear or braking: this will be done automatically and all basic steering around the circuit will also be assisted. You may crash if you stray from the racing line, but your car will not be damaged. If you spin off the track, the car will right itself once it has come to rest and face the right direction so you can get on with the session.
• Now check the Monza track plan below…
CURVA DI LESMOS 4TH-5TH GEAR
CURVA DEL SERRAGLIO
VARIANTE
DELLA ROGGIA
5TH GEAR
CURVA DE VIALONE
6TH GEAR 190 MPH
VARIANTE ASCARI
PARABOLICA
140 MPH
200 MPH PLUS
VARIANTE GOODYEAR |
PIT LANE |
CURVA GRANDE
RETTIFILIO 
START/FINISH CLOCKWISE
6 |
7 |

•Find the Start/Finish line and then run your eye clockwise around the course until you come back to the Finish line. Check where the pit lane joins the track so you’ll know exactly when you’ll be on the actual racing track. Memorise the track plan so you can anticipate what the corners will be like. As you improve your racing skills and become more experienced, you’ll realise just how important knowing each circuit will be to your success.
Your car is still on its jacks in the pits.
•Select the Leave the Pits option on the LCD, using the Throttle and Brake controls, then press the Gear Change button.
The car will come down off its jacks and you’ll see a new LCD screen appear on the central steering wheel panel.
• Now slowly squeeze the accelerator…
Your car will begin to move forward (if it doesn’t, check that you’ve pressed F2 and that the second symbol on the Driving Aids display is lit).
•Steer out from your pit and drive down the pit lane. Remember that in race conditions, you’ll need to stick to the pit lane speed limit of 50mph/80kph.
If you want to pause the simulation at any point, press key P (or Space if you are driving with a Joystick, Wheel or a Joypad). Press P again to reactivate. During this session, pause as many times as you feel you need to, so that you can study the track plan and anticipate what’s coming next.
As you steer out of the pit lane, join the main track, keeping on the inside of the broken yellow line. Once on the circuit proper, the yellow line will be replaced by a long broken white line.
•Try to keep the middle of the steering wheel lined up with the broken white line as you progress around the circuit. This white line is the Best Driving Line Driving Aid (F5): the quickest possible line into and out of bends without spinning off the track.
At some point before the first bend, you should, see a white sign with a black arrow bending to the left, then countdown marker signs with 200 and 100. These signs show how many metres remain before the approaching left-hand bend.
• This is a good spot to pause the simulation and check the Monza track plan again:
The first bend at Monza turns to the left and is followed by a sharp right. Next is another left-right combination making up a double chicane called the Variante Goodyear.
• Find the Variante Goodyear on your track plan and examine the next bend, the Curva Grande.
This is what Formula One racing is all about: being aware of the next part of the course and making sure you are properly prepared to drive through it. Only by knowing what lies ahead can you optimise the line you take through each corner.
•Reactivate the simulation by pressing P or the Space bar.
•Steer carefully around Variante Goodyear (don’t try to go too fast) - left then right, along a short straight and left and right again. Try to follow the broken line even though it sometimes appears to be aiming away from the track.
If you do leave the track at any time, steer back towards it (this might be slippery on grass or gravel) to get back on the tarmac. If you have spun and are facing the wrong way (and you still have the Auto-right the Car (F3) Driving Aid on), don’t touch the controls. Wait for the car to right itself and point in the correct direction.
•See how the ideal racing line takes you out of this last corner, using the whole width of the track and taking you over to the left side of the road, ready for the approach to the long sweeping right-hander: the Curva Grande. You’ll probably find that you can drive quite fast through this bend.
•Continue along the straight and go under the bridge. Just after the bridge is a left turn.
•Press pause and have another look at the track plan. This left turn is the first part of the Variante della Roggia: another chicane. Check how this looks and imagine how you will drive through it.
•Now look ahead on the plan to the next three bends and try to imagine what they will look like from the cockpit.
•Press the pause button again to continue.
•Steer through the chicane and on through the next two right hand curves (Lesmo 1 and
Lesmo 2).
You’ll now face a long, downhill straight.
• Accelerate!
As you’re moving, glance at the gear indicator (the red number in the centre of the wheel display) as the car changes gear automatically. Listen to the sound of the engine and watch the rpm indicator lights as the gears change up and down. Get used to glancing quickly at the displays and the mirrors as you’re travelling at speed.
At the end of this straight is an unusual chicane called the Variante Ascari. Pause, check your track plan, analyse and memorise, reactivate the game and drive through the corners, following the ideal racing line. The more you can commit to memory, the easier the corners will be to drive through at speed.
8 |
9 |
•Accelerate along the straight and see if the automatic gear change will take you into top gear (6th) before the auto-brakes slow you down for the Curva Parabolica.
As you come out of the bend, you’ll see the grandstands, the pits and a yellow dotted line marking the pit lane entrance. Remember that each track has its own specific pit entrance and exit layout, and it’s important to take a note of this as part of your race preparation.
•Keep following the broken white line. You’re now back on the start/finish straight: the
Rettifilio Tribune.
•Accelerate at full speed. You’ll see the starting grid - the spaces where the cars line up for start of the race - and a thick solid white line across the track that marks the end of this lap.
•As you cross the line, you’ll be starting your first flying lap: the timer on your cockpit lap time display will start. You can pause the game at any time to double-check the track plan – your lap time will not be affected.
•When you complete your first flying lap, check your time and try another lap to see if you can beat your previous time.
Controlling Your Own Brakes
Although the auto-brakes you were using are effective, they’re still a Driving Aid. To get the very best lap speeds, you’ll need to apply your own brakes.
When you feel confident you’ve mastered steering and the racing line, try switching off the Auto-brakes Driving Aid:
•Press F1 and check that the auto-brakes light has gone out on the bank of green icons below the LCD.
Now it’s up to you to choose the best moment to brake as you continue lapping Monza! The car will feel very different this time.
Remember how the brakes are operated by your choice of controller:
Keyboard |
|
|
Brake |
= |
Z |
Joystick |
|
|
Brake |
= |
Back |
Controlling Your Own Gears
•When you’re ready to try controlling your own gears, stop on a straight part of the circuit and press F2 to cancel the Auto-gears Driving Aid.
•Now press F6 to activate the Suggested Gear Driving Aid we left off earlier in the session. The corresponding icon will light up on the display.
You’re now in control of ALL gear changes, but to guide you, when you see a number in the Suggested Gear panel, that will be the gear to be in as you go into the NEXT corner.
Check the gear change method for your choice of controller:
Keyboard |
|
|
Change Up a gear |
= Accelerate A key + Space |
|
Change Down a gear |
= |
Space |
Joystick |
|
|
Change Up a gear |
= Accelerate + Press Fire Button |
|
Change Down a gear |
= |
Press Fire Button |
Note: If you have separate buttons for gear changes then you do not need to accelerate to change up.
•Practise gear changing up and down and watch the red gear indicator.
•Try to get into neutral (N) and then accelerate. The engine will rev and make a highpitched noise.
•Blip the accelerator and look at how the revs rise on the digital rev counter, then select first gear BUT keep the revs up - not too much power otherwise the car may spin.
The ‘1’ on the red gear change indicator in the centre will appear, showing that you’ve successfully selected 1st. You’ll start moving forward…
•Listen to the change in engine tone and watch your speed rise on the mph/kph indicator.
•Accelerate away and watch the rpm indicator lights illuminate as the revs increase. When the red light appears at the end of the set of green lights, change up to second gear (you’ll see a ‘2’ on the display).
•Try changing up as far as fourth gear, then try changing down before a corner by taking note of the Suggested Gear indicator.
Note: You don’t have to be braking when changing down, but you must not be accelerating.
Your car has six forward gears, neutral (N), and reverse (R). If you are in reverse, accelerate to move backwards (just like in a real car).
10 |
11 |

Driving into the Pits
Once you’re familiar with the Monza circuit and the basic car controls, practise driving back into the pits.
•At any point during the lap before you want to come in, press the Return key to let your pit crew know you’re going to come into the pits. The pit signal on your instrument panel will light up in green, giving you the ‘all clear’ to come in. If the pit signal is red, this means that your crew are busy with the other team car. Do another lap before trying again.
•Drive slowly into the pit lane keeping on the inside of the broken yellow line. The simulation will then ‘direct’ you into the correct bay, but you must brake when you have fully entered the bay.
As your car is jacked up by your crew, a Pit Options menu will appear on your cockpit LCD allowing you to add Fuel, change Tyres, Leave the Pits or go to the Car Setup Options. Use the A/Z keys or joystick Up/Down to select the option you want from your cockpit LCD menu.
Note: Grand Prix 3 features extremely detailed Car Setup Options, ranging from Basic to Advanced (Level 1) and Advanced (Level 2). To enjoy the simulation to the full, you can learn much more about setting up the car for the track conditions later in the manual.
Refuelling
•First select the Fuel option from your cockpit LCD menu.
•Use your left/right steering control to alter the amount of fuel (in laps) to be taken on board.
•Press the space bar or the joystick fire button to quit the Fuel menu.
Tyres
•Select Tyres from your cockpit LCD menu. The cockpit LCD will show your available sets of tyres with the amount of laps completed on each set. At the top of the LCD is the tyre type.
•Select using the A/Z keys or joystick Up/Down. Switch tyre type using the left/ right controls.
When you select Tyres on the LCD you will see three tyre sets marked 0, three tyre sets marked r1, r2, r3, three tyre sets marked q1, q2, q3 and one set marked qr.
The 0 sets are for practice.
The ‘r’ tyres are the sets allocated for the race (r1 starts the race, r2 being used at the first pitstop etc.) but you can also use these sets in practice if you have used up the other 0 sets.
12 |
13 |
The q sets are reserved for qualifying sessions with the exception of the one qr set which can be used in qualifying and race.
Note: A tyre set comprises of 4 tyres.
Be aware that there are different tyre sets for different conditions: two types of Dry – Hard and Soft and four types of wets – Intermediate, Hard, Soft and Monsoon, and that before you begin your qualifying sessions you will have to decide what type of Dry tyres you are going to race on during the rest of the race weekend
• Press the spacebar or the joystick fire button to exit the Tyres option.
Leaving the Pits
When you’re ready to leave the pits, highlight this option on the LCD, press the spacebar or fire button and the jacks will be lowered. You can now drive down the pit lane (remember the speed limit!) and re-join the circuit.
Car Setup Options
Select Car Setup Options from your cockpit LCD menu.
•This will take you to the Car Setup screen where you’ll be able to adjust all the basic options for your car: Front Wing, Brake Balance, Rear Wing, Gear Ratios and Pitstop Strategy. The Car Setup Options screen also gives you access to all the Advanced Setup options (Levels 1 and 2). For details on all these, see The Car Handling Section on page 81.
•Press OK to return to the Pits Options screen.
•Press Return to Cockpit to get back to your car.
•Press the Esc key to open the Practice menu.
•Select Leave Practice to return to the Main Menu screen.
Now you can try to get a good qualifying lap time and enter a race at Monza (you should know the track quite well by now). This will be a ‘one-off’ Non-Championship Race.
A Timed Qualifying Session
•From the Main Menu screen, click on the Race Type panel.
•Click on the Non-Championship Race button, then click on OK to go back to the Main Menu.
•Click on the Drive button and you’ll be taken to the Italian Grand Prix menu screen.
•Select Qualifying.
The Track and Sky conditions and Weather screen will appear. If it’s raining, you’ll want to fit special tyres for wet conditions. These wet tyres vary depending on whether it’s a light drizzle, rain or very heavy rain (monsoon). Remember, you can also do this from within the cockpit (in a pitstop) if race conditions change during a race.
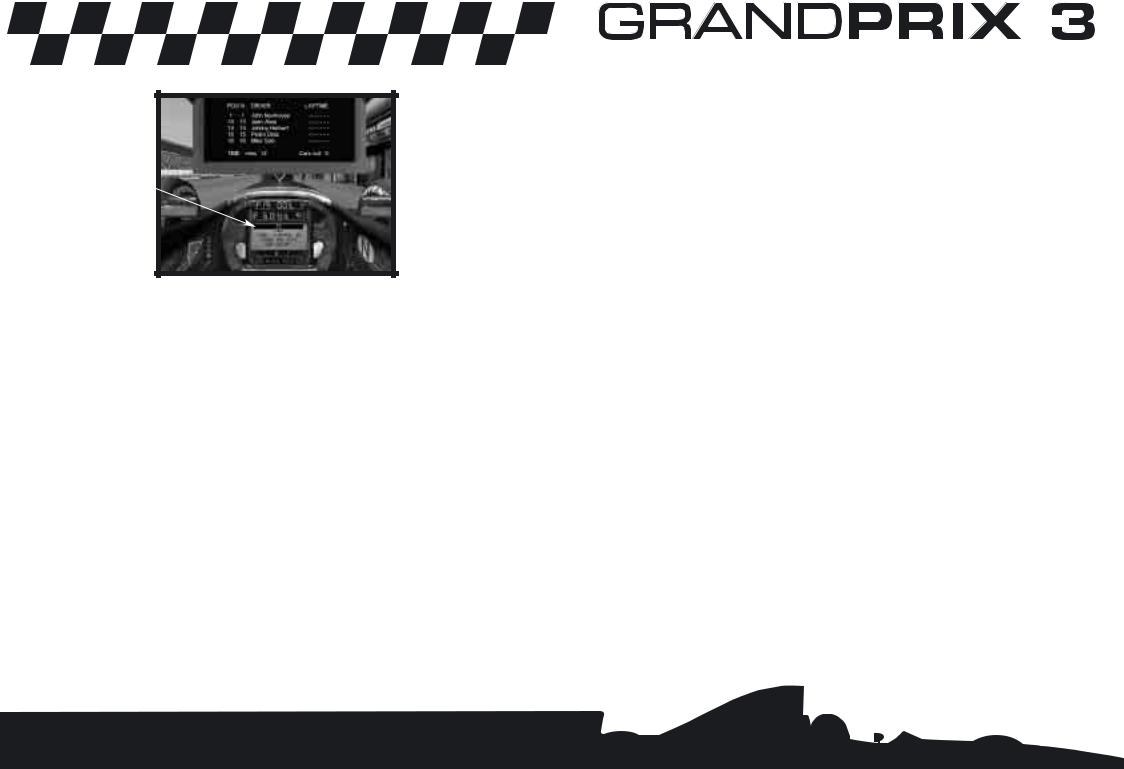
•Click OK. You’ll now be taken to the Pits, but this time, a ‘telemetric’ monitor will appear in front of your cockpit. This lists all drivers in the qualifying session, with your name highlighted.
Ideally, you should still be in Rookie difficulty level and have all your Driving Aids (F1 to F8) switched on - you’re free, of course, to deselect one or more of them.
14 |
15 |
Accelerate
Time Option
Check your tyres. You will see that qualifying tyres q1, q2, q3 and qr are available plus seven sets of the four wet types. Note: Once you go to qualifying the Dry tyre choice (Hard or Soft) in Car Setup screens is fixed for the rest of the race weekend. Wet tyres will always be available however.
Don’t adjust anything on the car at the moment. When you’re ready, set off on your first qualifying session.
•Press the spacebar (or the fire button in joystick control) and the telemetric monitor will swing out of the way and your car will lowered off its jacks.
•Using the experience you gained in the earlier session, drive away from the pits and complete a lap.
Remember, you won’t be timed until you cross the start/finish line for the first time. As soon as you do, the lap timer in the panel below the LCD will be triggered and your time for that lap will be displayed when you next cross the start/finish line.
The time remaining in the qualifying session is shown on the LCD in your steering wheel.
•When you have logged two lap times, return to the pits. (You can either drive around to the pit lane entrance or hit SHIFT + Q to jump back to the pits.)
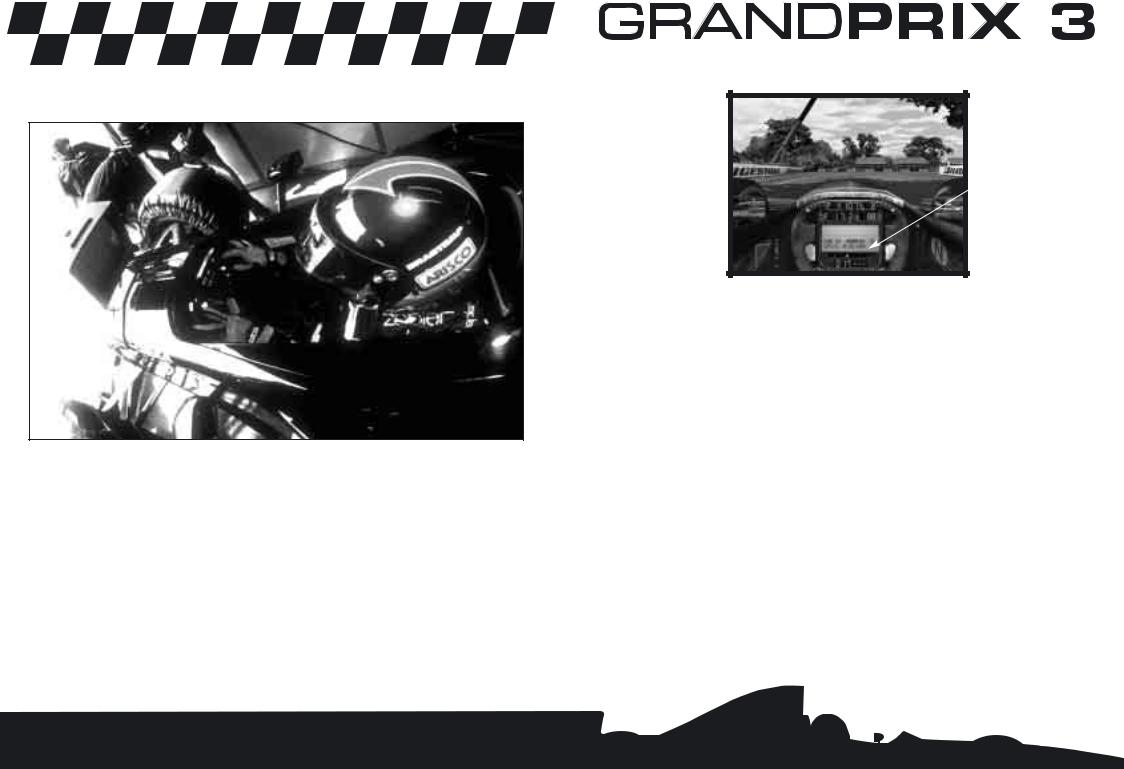
•Once you are in your bay, your car will be raised on its jacks and the monitor will appear once again in front of you showing practice times so far – the four nearest to your times and the current pole.
You can now change the qualifying tyre set by selecting Tyres and using the left/right control. Note: Qualifying tyres are only good for a limited amount of laps and the fresher they are the more effective they are.
You can now alter the setup of your car by selecting the Car Setup Options on the LCD display. If you’re still new to Formula One car setups, stick to the default settings of Grand Prix 3.
•If you want to speed up the qualifying session, select the fast forward symbol (>>) in the cockpit LCD menu.
•If you ever want to exit the session before the end, press Esc and select Abandon Qualifying. No time will be logged and you will start the race from the back of the grid.
When time is up, the Qualifying Over screen will appear. You can choose to View Full Session Times, or go to the Options screen (where you can alter Controls, Driving Aids, Race Options, Graphics, Sound, Save or Exit the game) or Continue with the NonChampionship Race.
•When you click on the Continue button, you’ll have the option of a Pre-Race Warm Up or you can go straight to the Race.
The Pre-Race Warm Up is a chance to practise on the circuit in full racing trim. For this Quickstart tutorial, you will go straight to the race.
•When Race is selected, you will see side-on views of the cars in their qualifying positions on the starting grid.
•Click on the control buttons to find your name and car, then click OK.
Again, the track, sky and weather conditions will appear on the screen, but this time, you’ll also be given the option to make Last Minute Changes such as altering Pitstop Strategy, Tyre Choice (for instance, if the weather has changed radically) and full Car Setup Options (at all 3 levels).
• Click OK when you’re ready to race.
A Non-Championship Race
You’re now on the starting grid at Monza – somewhere between a headline-grabbing pole position at the front of the field or on the last row if your performance was poor (or you failed to get a time)!
Your LCD display will show the number of laps in the race. This will be a percentage of the real race and can be altered in the Options menu (see page 60 for details). Your pitstop strategy (No Stop, One, Two or Three Stops) is also pre-set.
Whatever your position on the grid, you’ll be able to see the starting gantry: five banks of five lights.
16 |
17 |

Wait for the banks of lights to come on in sequence. When all five are glowing red, watch for the moment when they all go out. This is a random number of seconds later.
• When the red lights go out, the race is on!
The most dangerous moment of the race, yet also the best chance to make up places on the grid, be prepared to jostle for position as you head for the first corner. Be extra careful when you approach the braking area and be prepared to take evasive action to avoid touching other cars.
If you’ve selected Driving Aid F4, you’ll be indestructible but you might still be slowed and perhaps pushed off the track by other cars.
As you race, keep checking the cockpit display for:
• |
Your position |
= |
P |
• The lap you are currently on |
= |
L |
|
• The fuel left in tanks (in laps) |
= |
F |
|
• |
Your water temperature |
= |
T |
It’s best to choose a moment on one of the straights to carry out these checks.
Pitstops
If the Pits Indicator (cockpit lower right) turns green, you’re being called into the pits by your crew for a planned pitstop (to change tyres and refuel) or for an unplanned pitstop to repair damage. Drive into the pits as soon as you complete the current lap. If you want to cancel this order, press Return and the light will go out. Similarly if you decide you want to pit, press Return and the green Pit Indicator will light (press Return again to cancel).
Flags
At the side of the track, you may see race marshals waving different flags at the drivers:
YELLOW means NO OVERTAKING – there’s probably been a spin or accident on, or near the track. Do not overtake. When you see a marshal waving a GREEN flag, the yellow flag order has been cancelled – continue all out racing!
RED means stop racing immediately.
BLUE means a faster car is trying to overtake you.
The cockpit has flag warning LEDs to show which of the main flags are in force.
Throughout the race, you’ll be given information about who is achieving the fastest laps.
Pulling Out
If you ever want to leave the race at any time press the Esc key. A menu screen will appear: if you select the Abandon race option, you can Save the game (see below) and then return to the Main Menu.
Saving the Game
You can save the race at any point. Here’s how:
•Press Esc to freeze the race and access the Race menu.
•Select the Options button.
•Click on Save to go to the Save Game screen.
Note: The Option panels allow you to change the Path and Drive on your computer, but leave these as default for now.
•Click on Filename and name your saved game ‘Monza1’. Notice that it is given a .ran suffix where ra- stands for a non championship race, and -n identifies Monza as the track (see page 64 for a full list of track codes).
•When you have named the saved game, click on OK and you’ll get a confirmation that the game is saved.
If you return to this Saved Game screen, you will see Monza1.ran in the file/directories panel. If you select this file and look at the information panel (bottom right), you’ll see detailed information about this specific save:
Date saved |
Number of Players |
Time saved |
Race condition (e.g. in race/in pits) |
Race Type |
Laps completed |
Track |
Race Leader |
18 |
19 |

•Click on the Cancel button to return to the Options screen.
•Click on the Back button to return to the Race screen.
•Click on Return to Cockpit to return to the race (the game will be paused when you return to the cockpit).
•Press P to resume the race.
Finishing the Race
•Keep racing until you see the chequered flag waved over the start/finish line or you see a ‘Race Over’ message. You will then be taken to the Race Results screen.
This screen allows access to a number of screens showing extensive race information:
Full Race Results |
Driver Race Points |
Driver Best laps |
Constructor Race Points |
Circuit Records |
Lap Chart |
Starting Grid |
|
•Click on the Continue button and you’ll be taken to the Race Completed screen. This gives you the option to Race Again On This Circuit or to Leave the Circuit (return to Main Menu).
By now you will have seen just how different it feels to race compared to the practice and qualifying sessions. The big difference, of course, is the proximity of other cars and the competitive attitude of the other drivers - some are aggressive, others take chances, all have a real passion to win.
Winning the World Championship
If you have followed the Quickstart guide up to now, you should know the Monza circuit pretty well, but winning a World Championship means acquiring intimate knowledge of all 16 tracks on the calendar. If you undertake a Championship Season, you’ll be entered into the 1998 championship and race on all the tracks in the correct sequence – it’s hard work and there are no easy answers except practice and defining the correct car set up.
You can win the World Championship in Grand Prix 3 even at the lowest level starting with all eight Driving Aids turned on (F1 to F8) and with the opposition on their lowest performance level. Then, as you progress through the season, you can begin to turn off some of the Driving Aids, but if you do win the Championship, it will still only be at the lowest level.
To win the Championship at the highest Ace Level, you’ll need to drive with just the Ace Level Driving Aids on for the complete duration of the season.
20
Part Three: The Cockpit Controls
Packed into the confines of a typical Formula One car is a wealth of information designed to help the driver extract the best performance from his machine, to work out his race strategy and keep an eye on the opposition. Knowing how to use this information and acting on it in a fraction of a second can mean the difference between winning and losing.
You’ve had a taste of racing, but now it’s time to delve a little deeper into the cockpit and its many secrets.
Lap Time/Split Time
Display
Difficulty Levels
These five lights indicate your chosen Difficulty Level, the hardest at the top, the easiest at the bottom:
Ace
Pro
Semi-Pro
Amateur
Rookie
The Difficulty Level affects the ability of the opposition and also limits the number of driving aids you can switch on.
Driving Aids
These eight icons show which Driving Aids are active. The higher the Difficulty Level, the fewer of these will be switched on. Some can be turned on and off from inside the cockpit.
F1 – Auto Brakes
The computer applies braking functions to suit the circuit but will not brake to avoid other cars.
F2 – Auto Gears
The computer changes all the gears for you at the correct point.
F3 – Auto-right the Car
If you spin off the track, the computer will auto-right the car by pointing it in the correct direction so you can keep racing (so long as your car is not too badly damaged, in which case it will be craned off the track).
22 |
23 |

F4 – Indestructible
Your car will not be damaged, no matter how serious the shunt.
F5 – Ideal Line
A broken white line on the track shows the ‘best line’ around the track. Keep the line in the centre point of the cockpit.
F6 – Suggested Gear
This cockpit indicator shows the best gear to be in as you approach the next corner.
F7 – Throttle Help
This will reduce the throttle when the rear wheels spin.
F8 – Steering Help
This will help you with any basic circuit-driving manoeuvre that requires the steering wheel to be turned.
Driving Aids and Difficulty Levels
The number of Driving Aids available varies with each Difficulty Level:
|
F1 |
F2 |
F3 |
F4 |
F5 |
F6 |
F7 |
F8 |
|
Auto |
Auto |
Auto-right |
Indestructible |
Ideal |
Suggested |
Throttle |
Steering |
|
Brakes |
Gears |
the car |
|
Line |
Gear |
Help |
Help |
Ace |
|
|
|
|
|
|
|
|
|
|
|
|
|
|
|
|
|
Pro |
|
|
|
|
|
|
|
|
|
|
|
|
|
|
|
|
|
Semi-Pro |
|
|
|
|
|
|
|
|
|
|
|
|
|
|
|
|
|
Amateur |
|
|
|
|
|
|
|
|
|
|
|
|
|
|
|
|
|
Rookie |
|
|
|
|
|
|
|
|
|
|
|
|
|
|
|
|
|
Opposition Spread
The Opposition Spread indicator displays your chosen performance distribution among the other drivers. You can set up racing Opposition Spread by accessing Main Menu > Options
> Race Options screen.
A flat line means all teams and drivers have the same potential performance. A rising line simulates 1998 performances for all drivers and teams.
A wavy Line represents a random distribution of performance for all drivers and teams.
RPM Indicators
These two banks of five LEDs will light up as your revs increase and guide you as to when to change up or down a gear.
The final LED on each bank is red: when this lights up, change up a gear; when all the lights go out, change down a gear.
Like a conventional rev counter measuring revs per minute (rpm), the LCDs tell you at what speed your engine is spinning when in a particular gear. Keeping within the limits of the LCD scales will help you to change up a gear at the right time, avoid hitting the rev limiter (a device designed to prevent engine damage due to over-revving, for instance when dropping down to a lower gear), as well as show you when you are using too high a gear, losing speed in the process.
Gear Indicator
This tells you what gear you are currently in. There are 6 forward gears (6, 5, 4, 3, 2, 1), Neutral (N), and Reverse (R).
Flag Warning Lights
These two sets of three flag warning lights indicate the current colour flag in force, if any (yellow flag – no overtaking, red flag – stop the race, blue flag – car trying to overtake). If all six flags are flashing, look at your instruments or read the message on the LCD.
Driver Status Indicator
This shows the car is being driven by a player.
Suggested Gear Indicator (F6)
If the F6 Driving Aid is on, you will see a small number here telling you what gear you should be in before the next bend. This is an ‘intelligent aid’ and the suggestion will vary depending on the car setup you have chosen.
Damage Indicator
This diagram will highlight any faulty or damaged parts on the car. If any section is lit and you can still drive the car, make your way back carefully to the pits where the damage will be repaired.
24 |
25 |

Pits Indicator
This gives you the current status of your pit-to-crew communication:
Off |
– No pits request in force. |
Green |
– You’ve been called in to the pits by your team (press the Return key to |
|
cancel this order). |
Green |
– You’ve warned your team you’re coming in to the pits (by pressing the |
|
Return key). |
Red Cross |
– Your pit crew are currently busy with your other team car. Stay out. |
Press the Return key to inform your crew of your intention to pit. Press again to cancel.
LCD Displays
The central steering wheel LCD shows a lot of important information, depending on what you are doing at any given stage of the Grand Prix weekend.
During Qualifying/Practice:
Time to go – The amount of time in minutes and seconds left to complete this part of the qualifying session.
Car |
– |
Your car number. |
Runners |
– |
The number of cars on the track. |
Split/Best |
– |
Your best lap time or split time. |
During the Race: |
|
|
XX Lap Race |
– |
The number of laps in the race. |
Car |
– |
Your car number. |
Runners |
– |
The number of cars on the track. |
You will also receive split time information and nearest rival details.
Split Times
On each circuit, there are two intermediate timing points in addition to the start/finish line.
During practice, a ‘split’ time is shown on the LCD as you do a timed lap. This is a time you are trying to beat at the next intermediate timing point. The split times come from the best lap time you have achieved so far. As you cross the intermediate timing point, you will see a new time displayed. If this has a minus symbol, you know that you have put in a faster time.
During a race, a timed gap is shown on the LCD a little time after you cross the Start/Finish line. This shows the time difference between your car and the one behind and the one in front.
Pitstop Controls
Qualifying
The LCD shows Tyres, Fuel, Leave the Pits, Car Setup and (if in the middle of a session)
>> Accelerate Time
All tyres are marked with the number of laps driven on them.
Race
The LCD shows Fuel Laps + /- and Stops to Go +/-
When you come into the pits, the crew will automatically change your tyres to the next set of selected race tyres, and refuel the car according to the current pitstop strategy. If your race position warrants it, then you can adjust the pitstop strategy by increasing or decreasing Fuel carried and increasing or decreasing the number of pitstops. Use your Selector and Controller to change these values.
Pit Strategy
In the basic Car Setup screen there is a Pitstop Strategy panel that can be set to Automatic or Custom. Automatic will allow the computer to set a ‘sensible’ strategy based on race length and conditions. Custom allows you to set your own choice from None, 1 Stop, 2 Stops or 3 Stops. The bar graphs indicate a percentage and a lap of the race that you will stop at.
Just before you enter a race, a Last Minute Changes button (shown on the Weather >
Conditions screen) allows you to alter the Pitstop Strategy, Car Setup (and Tyre Choice) taking into account track conditions.
Your ‘Come into the Pits’ warning light (green) will come on as you cross the finishing/start line of the lap before you stop. Remember that you must go into the pits next time you pass the pit lane (or cancel the call by pressing Return).
26 |
27 |

Part Four: Camera Views and TV Director
You’re not limited to the cockpit view in Grand Prix 3. The simulation allows you to access a large number of other camera views. And if you’ve just pulled off a breathtaking overtaking manoeuvre or want to review a spin to see just what went wrong, you can select the replay option.
Cockpit View
Right Arrow Key
The race from the cockpit of your car. This is your default racing view.
Other Car Views
Up Arrow/Down Arrow/Home
On Car Camera Views
PageUp Key (Cycle through)
You can view the action from various cameras attached to your car. The PageUp key scrolls through a large number of views.
You can ‘jump’ into the cockpit of the car ahead by pressing the Up Arrow Key. Further presses will move you forward (one car per press). In the same way, you can move back through the field with the Down Arrow Key. The Home key will return you to your own car.
Trackside Camera Views
Left Arrow Key
View all the action centred on any car at any time during the race (Use Up/Down arrow keys to move through the field). The Right Arrow Key will return you to your own cockpit view.
Chase View
PageDown Key
View any car from just behind and slightly above it.
Reverse Chase View
Delete Key
View any car from the front and slightly above.
28 |
29 |
TV Director
Insert Key
TV Director mode automatically shifts the trackside views between different cars and different camera angles. When you press the Insert key, a ‘clapperboard’ will be displayed for five seconds in the top right hand corner of the screen. When you turn Director Mode off (by selecting any other view) the clapperboard will appear with a cross through it.
Replay Mode
Pause Key P + R
The Pause key (P) pauses the action and the R key replays the previous 20 seconds of action with an ‘R’ displayed on the top left of the screen. You can change all camera views during a Replay (see above). At the end of the 20 seconds, the game is left in Pause mode. Either press R again to see the replay as many times as you want, or press P to continue with the game and return to your original position (in your cockpit if you were racing).
CIRCUITS ON THE FORMULA ONE CIRCUS
Between the claustrophobic, twisting streets of yacht-strewn Monte Carlo and the open sweeps of a modern facility such as Austria’s A1-Ring with its generous run-off areas, similarities are few. Teams face a bewildering set of variables as the Formula One circus re-invents the playing field every two weeks.
Venues like Monza and Silverstone may be part of racing lore, corners like Lesmo, Tabac and Eau Rouge, part of every fan’s vernacular. But to a driver, they are simply places to be mapped and memorised, a clinical mix of braking point, apex and rumble strip. A trajectory to be optimised. An opportunity or a problem.
30 |
31 |
 Loading...