


T H E N E W B E N C H M A R K I N F L I G H T S I M T E C H N O L O G Y
¨

TABLE OF CONTENTS
INTRODUCTION ..................................................................................................... |
xvi |
About Falcon 4.0 ............................................................................................ |
xvi |
How to Use This Documentation ............................................... |
xvii |
CHAPTER 1: LEARNING HOW TO FLY .................................................................... |
1-1 |
Overview ...................................................................................... |
1-2 |
Training Mission Setup ............................................................. |
1-3 |
How to Load a Training Mission ............................................. |
1-3 |
Freeze Mode ................................................................................ |
1-4 |
Mission 1: Basic Aircraft Handling ............................................ |
1-4 |
The HUD ....................................................................................... |
1-5 |
HUD Control Options ................................................................ |
1-7 |
Cockpit Instruments .................................................................. |
1-7 |
Training Mission Overview ...................................................... |
1-9 |
Initial Conditions ......................................................................... |
1-9 |
Mission Description ................................................................... |
1-9 |
Mission 2: Takeoff ......................................................................... |
1-13 |
Training Mission Overview ................................................... |
1-13 |
Initial Conditions ...................................................................... |
1-14 |
Mission Description ................................................................ |
1-14 |
CHAPTER 2: LEARNING TO TURN ......................................................................... |
2-1 |
Mission 3: Max G Turn at Corner Airspeed ............................ |
2-2 |
Training Mission Overview ...................................................... |
2-4 |
Initial Conditions ......................................................................... |
2-4 |
Mission Description ................................................................... |
2-4 |
ACMI Debrief ............................................................................... |
2-7 |
Mission 4: Max G Turn Well Above Corner Airspeed ......... |
2-7 |
Training Mission Overview ...................................................... |
2-8 |
Initial Conditions ......................................................................... |
2-8 |
Mission Description ................................................................... |
2-8 |
ACMI Debrief ............................................................................... |
2-9 |
Mission 5: Max G Turn Well Below Corner Airspeed ...... |
2-10 |
Initial Conditions ...................................................................... |
2-10 |
Mission Description ................................................................ |
2-10 |
ACMI Debrief ............................................................................ |
2-11 |
Mission 6: Minimum Altitude Split S ..................................... |
2-12 |
Training Mission Overview ................................................... |
2-14 |
i
Initial Conditions ...................................................................... |
2-14 |
Mission Description ................................................................ |
2-14 |
ACMI Debrief ............................................................................ |
2-15 |
Mission 7: High-Speed Over-the-Top Maneuver ............... |
2-16 |
Training Mission Overview ................................................... |
2-16 |
Initial Conditions ...................................................................... |
2-16 |
Mission Description ................................................................ |
2-17 |
ACMI Debrief ............................................................................ |
2-18 |
Mission 8: Low-Speed Over-the-Top Maneuver |
|
ÊÊand Departures ............................................................................ |
2-19 |
Training Mission Overview ................................................... |
2-20 |
Initial Conditions ...................................................................... |
2-20 |
Mission Description ................................................................ |
2-21 |
Deep Stalls ................................................................................ |
2-23 |
ACMI Debrief ............................................................................ |
2-24 |
CHAPTER 3: LANDING AND NAVIGATION .............................................................. |
3-1 |
Mission 9: Landing From 10 nm out on Final ........................ |
3-2 |
Training Mission Overview ...................................................... |
3-2 |
Initial Conditions ......................................................................... |
3-2 |
Mission Description ................................................................... |
3-2 |
Mission 10: Landing From a Base Leg Position |
|
Using the Instruments ........................................................... |
3-7 |
Training Mission Overview ...................................................... |
3-9 |
Initial Conditions ......................................................................... |
3-9 |
Mission Description ................................................................ |
3-10 |
Mission 11: Flameout Landing ................................................. |
3-14 |
Training Mission Overview ................................................... |
3-15 |
Initial Conditions ...................................................................... |
3-15 |
Mission Description ................................................................ |
3-15 |
Mission 12: Navigation and Timing ........................................ |
3-18 |
The Inertial Navigation System ........................................... |
3-18 |
Steering Cues ........................................................................... |
3-19 |
Getting to the Selected Steerpoint ..................................... |
3-20 |
The HSI ....................................................................................... |
3-21 |
The HSD ..................................................................................... |
3-22 |
Getting to the Selected Steerpoint on Time .................... |
3-23 |
Training Mission Overview ................................................... |
3-25 |
Initial Conditions ...................................................................... |
3-25 |
Mission Description ................................................................ |
3-25 |
CHAPTER 4: AIR-TO-AIR WEAPONS ....................................................................... |
4-1 |
Mission 13: Air-to-Air Radar Modes .......................................... |
4-2 |
ii

Overview of Air-to-Air Radar Modes ..................................... |
4-2 |
ACM ............................................................................................... |
4-3 |
The B-Scope ................................................................................. |
4-6 |
RWS ............................................................................................... |
4-7 |
TWS ............................................................................................ |
4-11 |
VS ................................................................................................ |
4-12 |
Training Mission Overview ................................................... |
4-12 |
Initial Conditions ...................................................................... |
4-12 |
Mission Description ................................................................ |
4-12 |
Mission 14: 20mm Cannon (Air-to-Air) ................................. |
4-14 |
Gun Sight Theory .................................................................... |
4-15 |
Falcon Gun Sights ................................................................... |
4-17 |
LCOS ........................................................................................... |
4-17 |
EEGS ........................................................................................... |
4-18 |
Snapshoot Line ........................................................................ |
4-19 |
Training Mission Overview ................................................... |
4-19 |
Initial Conditions ...................................................................... |
4-19 |
Mission Description ................................................................ |
4-20 |
Mission 15: AIM-9 Sidewinder................................................. |
4-21 |
AIM-9 Mechanization ............................................................. |
4-22 |
How to Call up Your Air-to-Air Missiles .............................. |
4-24 |
Training Mission Overview ................................................... |
4-25 |
Initial Conditions ...................................................................... |
4-25 |
Mission Description ................................................................ |
4-26 |
Mission 16: AIM-120 AMRAAM .............................................. |
4-27 |
AIM-120 AMRAAM Mechanization................................... |
4-28 |
How to Call up Your AIM-120s ............................................ |
4-29 |
Training Mission Overview ................................................... |
4-29 |
Initial Conditions ...................................................................... |
4-29 |
Mission Description ................................................................ |
4-29 |
Mission 17: AIM-7 Sparrow ...................................................... |
4-30 |
AIM-7 Sparrow Mechanization ........................................... |
4-32 |
How to Call up Your AIM-7s ................................................. |
4-32 |
Training Mission Overview ................................................... |
4-33 |
Initial Conditions ...................................................................... |
4-33 |
Mission Description ................................................................ |
4-33 |
CHAPTER 5: AIR-TO-GROUND WEAPONS ............................................................... |
5-1 |
Mission 18: Air-to-Ground Radar Modes ................................. |
5-2 |
Ground Map Radar Mechanization ....................................... |
5-2 |
The Air-to-Ground Radar Display ........................................... |
5-2 |
Training Mission Overview ...................................................... |
5-7 |
iii

Initial Conditions ......................................................................... |
5-7 |
Mission Description ................................................................... |
5-7 |
Mission 19: CCRP With Unguided Bombs ........................... |
5-12 |
The CCRP Bombing Triangle ................................................ |
5-12 |
CCRP HUD Symbology .......................................................... |
5-13 |
Training Mission Overview ................................................... |
5-14 |
Initial Conditions ...................................................................... |
5-14 |
Mission Description ................................................................ |
5-14 |
Mission 20: CCIP Bombing ........................................................ |
5-17 |
The CCIP Bombing Triangle .................................................. |
5-17 |
CCIP HUD Symbology ............................................................ |
5-18 |
The CCIP Delay Cue (or How CCIP Becomes CCRP) ...... |
5-19 |
Training Mission Overview ................................................... |
5-20 |
Initial Conditions ...................................................................... |
5-20 |
Mission Description ................................................................ |
5-20 |
Bombing Options .................................................................... |
5-23 |
Mission 21: Dive Toss With Unguided Bombs ................... |
5-23 |
Dive Toss Employment .......................................................... |
5-23 |
The Dive Toss Bombing Triangle......................................... |
5-24 |
Dive Toss HUD Symbology ................................................... |
5-24 |
Training Mission Overview ................................................... |
5-26 |
Initial Conditions ...................................................................... |
5-26 |
Mission Description ................................................................ |
5-26 |
Mission 22: 20mm Cannon (Air-to-Ground) ....................... |
5-28 |
Training Mission Overview ................................................... |
5-28 |
Initial Conditions ...................................................................... |
5-28 |
Mission Description ................................................................ |
5-29 |
Mission 23: Rockets .................................................................... |
5-30 |
Training Mission Overview ................................................... |
5-30 |
Initial Conditions ...................................................................... |
5-30 |
Training Mission Description ............................................... |
5-31 |
Mission 24: AGM-65 Maverick Missile ................................. |
5-32 |
Maverick Display ..................................................................... |
5-32 |
Maverick Mechanization ....................................................... |
5-34 |
Maverick DLZ ........................................................................... |
5-39 |
Training Mission Overview ................................................... |
5-39 |
Initial Conditions ...................................................................... |
5-39 |
Mission Description ................................................................ |
5-39 |
Mission 25: Laser-Guided Bombs ........................................... |
5-42 |
Targeting Pod Slave Mode .................................................... |
5-43 |
Targeting Pod Boresight Mode ............................................ |
5-44 |
Targeting Pod Mechanization .............................................. |
5-45 |
iv

The Targeting Pod Display .................................................... |
5-45 |
HUD Displays............................................................................ |
5-47 |
Training Mission Overview ................................................... |
5-47 |
Initial Conditions ...................................................................... |
5-47 |
Mission Description ................................................................ |
5-47 |
Mission 26: HARM Air-to-Ground Missile ............................ |
5-52 |
HTS Mechanization ................................................................ |
5-53 |
The HTS Display....................................................................... |
5-53 |
Shooting a HARM ................................................................... |
5-55 |
HUD Displays............................................................................ |
5-56 |
Training Mission Overview ................................................... |
5-57 |
Initial Conditions ...................................................................... |
5-57 |
Mission Description ................................................................ |
5-57 |
CHAPTER 6: AIR-TO-AIR REFUELING ..................................................................... |
6-1 |
Mission 27: Air-to-Air Refueling ................................................. |
6-2 |
Finding the Tanker ..................................................................... |
6-2 |
Closing on the Tanker ............................................................... |
6-4 |
Getting Gas .................................................................................. |
6-5 |
Training Mission Overview ...................................................... |
6-7 |
Initial Conditions ......................................................................... |
6-7 |
Mission Description ................................................................... |
6-7 |
CHAPTER 7: MISSILE THREAT REACTION ............................................................. |
7-1 |
Mission 28: Missile Threat Reaction ........................................ |
7-2 |
Missile Guidance ........................................................................ |
7-2 |
Missile Flight Paths .................................................................... |
7-4 |
Threat Warning System ............................................................ |
7-5 |
Countermeasures ....................................................................... |
7-6 |
Training Mission Overview ...................................................... |
7-7 |
Initial Conditions ......................................................................... |
7-7 |
Mission Description ................................................................... |
7-7 |
CHAPTER 8: BASIC FIGHTER MANEUVERS ............................................................ |
8-1 |
Mission 29: Offensive BFM .......................................................... |
8-2 |
Turn Rate and Radius ................................................................ |
8-4 |
Corner Airspeed .......................................................................... |
8-4 |
Airspeed Control......................................................................... |
8-4 |
Energy ........................................................................................... |
8-5 |
Flying Offensive BFM ................................................................ |
8-5 |
Training Mission Overview ...................................................... |
8-6 |
Initial Conditions ......................................................................... |
8-6 |
Mission Description ................................................................... |
8-6 |
v

Mission 30: Defensive BFM ......................................................... |
8-8 |
Training Mission Overview ................................................... |
8-11 |
Initial Conditions ...................................................................... |
8-11 |
Mission Description ................................................................ |
8-11 |
Mission 31: Head-On BFM ......................................................... |
8-14 |
Options at the Pass ................................................................. |
8-14 |
One-Circle and Two-Circle Fights ........................................ |
8-18 |
Training Mission Overview ................................................... |
8-19 |
Initial Conditions ...................................................................... |
8-19 |
Training Mission Description ............................................... |
8-20 |
CHAPTER 9: INSTANT ACTION .......................................................................... |
9-1 |
Instant Action Options ................................................................... |
9-2 |
Mission .......................................................................................... |
9-3 |
Wave .............................................................................................. |
9-3 |
Air Defenses ................................................................................ |
9-3 |
The Map ........................................................................................ |
9-3 |
Ending Your Mission .................................................................. |
9-4 |
CHAPTER 10: DOGFIGHT................................................................................. |
10-1 |
Starting a Dogfight ....................................................................... |
10-2 |
Dogfight Setup ............................................................................... |
10-2 |
Furball ......................................................................................... |
10-3 |
Team Furball ............................................................................. |
10-4 |
Match Play ................................................................................. |
10-4 |
The Map ..................................................................................... |
10-5 |
Game Options .......................................................................... |
10-5 |
Saving a Dogfight Setup ............................................................ |
10-6 |
Flying the Dogfight ....................................................................... |
10-6 |
Exiting the Dogfight ..................................................................... |
10-6 |
Reviewing Your Dogfight ........................................................... |
10-6 |
CHAPTER 11: TACTICAL ENGAGEMENT ........................................................... |
11-1 |
Opening Screen ............................................................................. |
11-2 |
Training Missions .......................................................................... |
11-3 |
Playing a Tactical Engagement ................................................ |
11-3 |
Loading a Tactical Engagement .......................................... |
11-4 |
Quick Start: Building a Simple Mission ................................ |
11-5 |
Adding a Ground Strike ......................................................... |
11-5 |
Adding Opposition .................................................................. |
11-9 |
Adding Victory Conditions.................................................. |
11-11 |
Loading and Playing the Mission ...................................... |
11-14 |
vi

Building Tactical Engagements ............................................. |
11-15 |
Tactical Engagement Terminology ................................... |
11-15 |
The Tactical Engagement Editor ....................................... |
11-16 |
Mission Builder ...................................................................... |
11-17 |
Map Menus ............................................................................. |
11-19 |
Mission Builder Tools .......................................................... |
11-22 |
Mission Builder Windows ................................................... |
11-31 |
Teams ...................................................................................... |
11-36 |
Victory Conditions ............................................................... |
11-38 |
Save and Restore ................................................................. |
11-40 |
Exiting a Tactical Engagement ......................................... |
11-40 |
CHAPTER 12: CAMPAIGN ................................................................................ |
12-1 |
Understanding the Campaign .................................................. |
12-2 |
Jumping Into the Campaign ...................................................... |
12-3 |
Saving Your Campaign .......................................................... |
12-6 |
Creating a New Campaign ......................................................... |
12-7 |
Preliminary Campaign Screen ............................................. |
12-7 |
Mission Schedule Screen ................................................... |
12-10 |
Using Intelligence ................................................................. |
12-16 |
Mission Planning ........................................................................ |
12-20 |
Steerpoint Modification Menu ......................................... |
12-20 |
Flight Plan ................................................................................ |
12-21 |
Munitions Window .............................................................. |
12-22 |
Entering the Mission ................................................................. |
12-24 |
Taxiway vs. Runway Takeoff ............................................. |
12-24 |
Scramble................................................................................. |
12-24 |
Saving a Campaign .................................................................... |
12-25 |
Auto Save ............................................................................... |
12-25 |
Aborting a Mission ............................................................... |
12-25 |
Ending a Mission ........................................................................ |
12-26 |
Debriefing ............................................................................... |
12-26 |
Winning and Dying in a Campaign ...................................... |
12-26 |
CHAPTER 13: LOGBOOK ................................................................................. |
13-1 |
Adding a New Logbook Entry ................................................... |
13-2 |
The Pilot Information ................................................................... |
13-3 |
Pilot Picture ............................................................................... |
13-3 |
Callsign ....................................................................................... |
13-3 |
Pilot ............................................................................................. |
13-3 |
Password ................................................................................... |
13-3 |
Voice ........................................................................................... |
13-3 |
vii

Personal Data ........................................................................... |
13-4 |
Squadron Patch and Name .................................................. |
13-4 |
Rank ............................................................................................ |
13-4 |
Career Statistics ....................................................................... |
13-5 |
Campaign Statistics ................................................................ |
13-5 |
Dogfight Statistics .................................................................. |
13-6 |
Medals ........................................................................................ |
13-7 |
CHAPTER 14: ACMI ........................................................................................ |
14-1 |
How to Record in ACMI .............................................................. |
14-2 |
How to Review Your ACMI Tape ............................................. |
14-2 |
ACMI Controls ................................................................................ |
14-3 |
Events List ................................................................................. |
14-3 |
VCR Controls and Time Display ........................................... |
14-3 |
View Selection ......................................................................... |
14-4 |
View Manipulation Controls ................................................. |
14-6 |
Options ....................................................................................... |
14-7 |
How to Delete an ACMI File ...................................................... |
14-8 |
Screen Shots .................................................................................. |
14-8 |
CHAPTER 15: TACTICAL REFERENCE .............................................................. |
15-1 |
Specification Panel ................................................................. |
15-3 |
Entry Description .................................................................... |
15-3 |
3-D Model Display ................................................................... |
15-3 |
CHAPTER 16: SETUP ......................................................................................... |
16-1 |
Simulation ........................................................................................ |
16-2 |
Skill Level ................................................................................... |
16-2 |
Realism Rating ......................................................................... |
16-3 |
Flight Model .............................................................................. |
16-3 |
Avionics ...................................................................................... |
16-3 |
Weapons Effects ...................................................................... |
16-3 |
Autopilot .................................................................................... |
16-3 |
Air Refueling ............................................................................. |
16-4 |
Padlocking ................................................................................. |
16-4 |
Invulnerability ........................................................................... |
16-4 |
Unlimited Fuel .......................................................................... |
16-5 |
Unlimited Chaff and Flares ................................................... |
16-5 |
No Collisions ............................................................................. |
16-5 |
No Blackout............................................................................... |
16-5 |
Labels ......................................................................................... |
16-5 |
Disable Clouds ......................................................................... |
16-5 |
Radio Calls Use Bullseye ....................................................... |
16-5 |
viii

ACMI File Size .......................................................................... |
16-5 |
Graphics ............................................................................................ |
16-6 |
Video Driver .............................................................................. |
16-6 |
Video Card ................................................................................. |
16-6 |
Resolution ................................................................................. |
16-6 |
Textured Objects ..................................................................... |
16-7 |
Texture Smoothing ................................................................. |
16-7 |
Transparency ............................................................................ |
16-7 |
Gouraud Shading .................................................................... |
16-7 |
Haze ............................................................................................ |
16-7 |
Terrain Texture ......................................................................... |
16-7 |
Terrain Detail ............................................................................ |
16-7 |
Object Detail ............................................................................. |
16-7 |
Object Density .......................................................................... |
16-8 |
Player Bubble............................................................................ |
16-8 |
Vehicle Magnification ............................................................ |
16-8 |
Special Effects .......................................................................... |
16-8 |
Canopy Cues ............................................................................. |
16-8 |
Defaults ...................................................................................... |
16-9 |
Recommended Graphics Settings...................................... |
16-9 |
Sound ............................................................................................... |
16-10 |
Controllers .............................................................................. |
16-11 |
Game Controller .................................................................... |
16-11 |
Key Mapping........................................................................... |
16-14 |
CHAPTER 17: THE CONSOLES ........................................................................ |
17-1 |
HUD .................................................................................................... |
17-3 |
AOA Indexer ............................................................................. |
17-4 |
AR Status/NWS Indicator .................................................... |
17-5 |
Master Caution Light .............................................................. |
17-5 |
Left Eyebrow Warning Lights............................................... |
17-6 |
IFF Button .................................................................................. |
17-6 |
Threat Warning System........................................................... |
17-6 |
ICP and DED ............................................................................... |
17-8 |
Fuel Flow Indicator ................................................................... |
17-8 |
Right Eyebrow Warning Lights .............................................. |
17-8 |
Oil Pressure Indicator ............................................................... |
17-9 |
Nozzle Position Indicator ......................................................... |
17-9 |
RPM Indicator ............................................................................ |
17-9 |
MFDs .................................................................................................... |
17-9 |
Airspeed/Mach Indicator ....................................................... |
17-9 |
Altimeter ................................................................................... |
17-10 |
AOA Indicator .......................................................................... |
17-10 |
ix
Attitude Director Indicator................................................... |
17-10 |
Vertical Velocity Indicator .................................................... |
17-11 |
Horizontal Situation Indicator ............................................. |
17-11 |
Ejection Handle ....................................................................... |
17-13 |
Kneeboard ................................................................................ |
17-13 |
Voice Message System ........................................................ |
17-13 |
Left Auxiliary Console ........................................................... |
17-15 |
Autopilot Toggle Switch ....................................................... |
17-15 |
Emergency Stores Jettison Button ................................... |
17-15 |
Landing Gear Status Lights ................................................. |
17-15 |
Landing Gear Handle ............................................................ |
17-16 |
Horn Silencer Button ............................................................. |
17-16 |
Speed Brakes Position Indicator ........................................ |
17-16 |
HUD Control Panel ....................................................................... |
17-16 |
Auxiliary Threat Warning Panel .......................................... |
17-18 |
ECM Toggle Switch ............................................................... |
17-18 |
Manual Pitch Override Switch ............................................ |
17-18 |
Radio Channel ......................................................................... |
17-18 |
Radio Function Knob ............................................................. |
17-20 |
Right Auxiliary Console ........................................................ |
17-21 |
Magnetic Compass ................................................................ |
17-21 |
Fuel Quantity Indicator ......................................................... |
17-21 |
Caution Light Panel................................................................ |
17-21 |
Clock .......................................................................................... |
17-23 |
AVTR Toggle ............................................................................ |
17-23 |
Chaff/Flare Control Panel .................................................... |
17-23 |
Navigation System ...................................................................... |
17-24 |
CHAPTER 18: THE HUD ........................................................................................... |
18-1 |
Basic HUD Information ............................................................... |
18-2 |
Airspeed ..................................................................................... |
18-2 |
Altitude ....................................................................................... |
18-3 |
Altitude Low ............................................................................. |
18-3 |
Heading ...................................................................................... |
18-3 |
Flight Path Marker ................................................................... |
18-3 |
G Force Indicator ..................................................................... |
18-4 |
Max G Force Indicator ............................................................ |
18-4 |
HUD Mode Indicator .............................................................. |
18-4 |
Mach Indicator ......................................................................... |
18-5 |
Pitch Ladder .............................................................................. |
18-5 |
Steerpoint Marker ................................................................... |
18-5 |
Gun Cross (Boresight Cross) ................................................ |
18-6 |
Low Fuel..................................................................................... |
18-6 |
x

SOI (Sensor of Interest).......................................................... |
18-6 |
Break-X ....................................................................................... |
18-6 |
RPM ............................................................................................. |
18-7 |
Other HUD Modes ......................................................................... |
18-7 |
NAV Mode ................................................................................. |
18-7 |
Air-to-Air Missile ...................................................................... |
18-8 |
Air-to-Air Guns ........................................................................ |
18-14 |
Dogfight Mode ....................................................................... |
18-17 |
Missile Override Mode ......................................................... |
18-18 |
Air-to-Ground Weapons ....................................................... |
18-18 |
Rocket Launcher................................................................... |
18-25 |
Maverick AGM-65 Missile ................................................. |
18-26 |
Guided Bomb Units .............................................................. |
18-29 |
AGM-88A HARM ................................................................... |
18-31 |
Air-to-Ground Guns .............................................................. |
18-33 |
Reconnaissance Pod ........................................................... |
18-34 |
ILS ............................................................................................. |
18-35 |
HUD Controls ........................................................................ |
18-36 |
Easy and Simplified Avionics ................................................. |
18-36 |
CHAPTER 19: THE MFDS ........................................................................................ |
19-1 |
Option Select Buttons ................................................................. |
19-2 |
MFD Pages ....................................................................................... |
19-3 |
Main Menu Page ..................................................................... |
19-3 |
HSD Page ................................................................................... |
19-3 |
FCR Page ................................................................................... |
19-6 |
SMS Page .................................................................................. |
19-6 |
RWR Page................................................................................ |
19-18 |
HUD Page ................................................................................ |
19-18 |
CHAPTER 20: THE ICP AND DED .......................................................................... |
20-1 |
DED ..................................................................................................... |
20-2 |
ICP ....................................................................................................... |
20-2 |
Increment and Decrement Buttons ................................... |
20-2 |
Master Mode Buttons ............................................................ |
20-2 |
Override Buttons ..................................................................... |
20-3 |
Priority Function Buttons ...................................................... |
20-4 |
CHAPTER 21: THE RADAR ....................................................................... |
21-1 |
Radar Modes ................................................................................... |
21-2 |
Easy Mode ........................................................................................ |
21-2 |
Air-to-Air Mode ......................................................................... |
21-3 |
Air-to-Ground Mode ................................................................ |
21-4 |
xi

Simplified Mode ............................................................................. |
21-5 |
Air-to-Air Mode ......................................................................... |
21-6 |
Ground Map Mode .................................................................. |
21-9 |
Realistic Mode ................................................................................ |
21-9 |
FCR Page ................................................................................... |
21-9 |
Realistic Radar Air-to-Air Modes ......................................... |
21-9 |
Radar Jamming .................................................................... |
21-25 |
Realistic Radar Air-to-Ground Modes ............................. |
21-25 |
CHAPTER 22: THE VIEWS ........................................................................ |
22-1 |
Inside Views .................................................................................... |
22-2 |
HUD Only View ........................................................................ |
22-2 |
2-D Cockpit View ..................................................................... |
22-2 |
Virtual Cockpit View ............................................................... |
22-4 |
Padlock View ............................................................................ |
22-5 |
Extended FOV View ................................................................ |
22-7 |
Outside Views ................................................................................ |
22-8 |
View Controls ........................................................................... |
22-8 |
Satellite View ............................................................................ |
22-8 |
Action View ............................................................................... |
22-8 |
Tracking View ........................................................................... |
22-8 |
Enemy View .............................................................................. |
22-8 |
Incoming View ......................................................................... |
22-8 |
Weapon View ........................................................................... |
22-8 |
WeaponÕs Target View ........................................................... |
22-9 |
Friendly View ............................................................................ |
22-9 |
Friendly Ground Unit View .................................................... |
22-9 |
Chase View ............................................................................... |
22-9 |
Flyby View ................................................................................. |
22-9 |
Orbit View .................................................................................. |
22-9 |
Other View Features .................................................................... |
22-9 |
Labels ......................................................................................... |
22-9 |
Canopy Reflections .............................................................. |
22-10 |
Lift Line .................................................................................... |
22-10 |
Glance Forward and Glance Backward .......................... |
22-10 |
Look Closer ............................................................................ |
22-10 |
Night Vision............................................................................ |
22-10 |
Redout and Blackout ................................................................ |
22-10 |
CHAPTER 23: RADIO COMMANDS ....................................................................... |
23-1 |
AWACS Radio Commands ......................................................... |
23-2 |
AWACS Page ............................................................................ |
23-2 |
Vector Page ............................................................................... |
23-3 |
xii

Flight Radio Commands ............................................................. |
23-4 |
Combat Management Page ................................................. |
23-5 |
Mission Management Page ................................................. |
23-7 |
Formation Management Page ............................................. |
23-8 |
Identification Management Page .................................... |
23-11 |
Tower Radio Commands ......................................................... |
23-11 |
Tanker Radio Commands ........................................................ |
23-12 |
CHAPTER 24: AIRPORT OPERATIONS ....................................................... |
24-1 |
Ground Operations ....................................................................... |
24-2 |
Departure ......................................................................................... |
24-2 |
Recovery ........................................................................................... |
24-3 |
Approach Procedures .................................................................. |
24-3 |
Final Approach ............................................................................... |
24-5 |
Landing .............................................................................................. |
24-6 |
Emergencies .................................................................................... |
24-6 |
CHAPTER 25: AERODYNAMICS AND G FORCES ........................................ |
25-1 |
The Forces Acting on the Aircraft ........................................... |
25-2 |
G Force .............................................................................................. |
25-4 |
Maneuvering the Jet .................................................................... |
25-5 |
Stalls .................................................................................................. |
25-6 |
CHAPTER 26: ENEMY TACTICS ............................................................................. |
26-1 |
Connectivity .................................................................................... |
26-2 |
Synchronization ............................................................................. |
26-3 |
Redundancy ..................................................................................... |
26-3 |
SAM Tactics .................................................................................... |
26-3 |
AAA Tactics ..................................................................................... |
26-5 |
Enemy Fighter Tactics ................................................................. |
26-6 |
Missions ............................................................................................ |
26-6 |
BVR Tactics ...................................................................................... |
26-7 |
Dogfight Tactics .......................................................................... |
26-10 |
CHAPTER 27: MISSION PLANNING AND EXECUTION ................................. |
27-1 |
General Mission Planning .......................................................... |
27-2 |
Changing Your Flight Plan ..................................................... |
27-4 |
Adjusting Package Spacing.................................................. |
27-6 |
Target Planning ........................................................................ |
27-8 |
The Enemy ............................................................................. |
27-10 |
Ground Operations .............................................................. |
27-11 |
xiii

Takeoff and Climbout ............................................................... |
27-12 |
Ingress ..................................................................................... |
27-12 |
Threat Reaction .................................................................... |
27-15 |
Dealing With Enemy Aircraft ............................................ |
27-16 |
Dealing With SAMs ............................................................. |
27-17 |
Dealing With AAA ................................................................ |
27-19 |
The Attack Phase ....................................................................... |
27-20 |
Egress Phase ................................................................................ |
27-21 |
Conclusion .................................................................................... |
27-22 |
APPENDIX A: DESIGNER’S NOTES .............................................................. |
A-1 |
A View From the Cockpit ............................................................. |
A-2 |
A View From the Computer ......................................................... |
A-3 |
The Compromise of Flight Simulation Design .................. |
A-3 |
The Campaign and the Simulation ....................................... |
A-4 |
Flight Model ................................................................................ |
A-4 |
Pilot Overload ............................................................................. |
A-5 |
Graphics ....................................................................................... |
A-5 |
Terrain........................................................................................... |
A-5 |
Beyond the Bubble .................................................................... |
A-6 |
Sounds ......................................................................................... |
A-6 |
Radar and HUD Modes ............................................................ |
A-6 |
Hyper-Action ............................................................................... |
A-6 |
GLOC ............................................................................................. |
A-7 |
Tactical Engagement ................................................................ |
A-7 |
User Interface ............................................................................. |
A-7 |
The Electronic Battlefield System ......................................... |
A-7 |
F-16A vs. F-16C .......................................................................... |
A-7 |
Flying the Real F-16 .................................................................. |
A-8 |
Final Thoughts ........................................................................... |
A-8 |
APPENDIX B: GLOSSARY ..................................................................................... |
B-1 |
APENDIX C: AIRPORT MAPS ................................................................................ |
C-1 |
How to Use the Maps ..................................................................... |
C-2 |
APPENDIX D: LINEUP CARD ................................................................................. |
D-1 |
INDEX ............................................................................................................. |
BM-1 |
CREDITS ...................................................................................................... |
BM-21 |
CUSTOMER SUPPORT ................................................................................... |
BM-25 |
xiv
INTRODUCTION
ABOUT FALCON 4.0
Falcon 4.0 carries on a proud tradition of presenting the most accurate, realistic and engaging F-16 flight simulator available anywhere. In Falcon 4.0 youÕll pilot the F-16 Fighting Falcon, one of the premier dogfighting and air-to-ground combat aircraft in the world today. A favorite of experienced combat pilots, the F-16 is widely used by the United States and allied air forces. Falcon 4.0 simulates the F-16 with unbelievable fidelity. This is as real as it gets!
Inside Falcon 4.0, youÕll find four main arenas of play.
Instant Action is the place to go for an immediate adrenaline fix. Instant Action puts you into battle without any preliminaries. Your job is to shoot down as many aircraft and blow up as many ground targets as you can before you get killed. And youÕll have to be good to stay alive, because in Instant Action the enemies keep coming.
Dogfight is where youÕll duke it out in the skies under more controlled circumstances. In Dogfight, youÕll go head-to-head with other aircraft, controlled by human or AI pilots. A Dogfight arena can contain from two up to literally hundreds of planes. The action can be a free-for-all or you can fly in teams.
Tactical Engagement is the Falcon 4.0 construction set in which youÕll build your own complete air and ground missions. Or load the missions that come with Falcon 4.0, ones that your friends create or others that you find on the Internet. Tactical Engagement is the ultimate free-form mission builder.
xvi

INTRODUCTION
Campaign is the final challenge. In it, youÕre a highly trained F-16 pilot, a combat veteran assigned to a combat theater in which youÕll play a vital role. The Falcon 4.0 Campaign uses a complex real-time simulation engine that wages a major war on the Korean peninsula. Many battles are being fought simultaneously as you fly your sorties. If you successfully complete your missions, the enemy will be deprived of crucial supplies and your side will gain the edge. If you fail, the allied body count will start going up.
Other sections of Falcon 4.0 provide important features.
The Logbook is where youÕll keep your callsign and other personal information. The Logbook is Falcon 4.0Õs way of knowing whoÕs flying and keeps track of your points, rank and other statistics.
Tactical Reference is an important study guide for staying alive in the air. It shows you every aircraft, weapon, ground unit and naval unit youÕll encounter in Falcon 4.0. Use it to learn to visually identify enemy aircraft. Learn the threat warning signals that enemy missiles and radar make, so youÕll know when someone has locked you up with intent to kill.
ACMI (Air Combat Maneuvering Instrumentation) is the package that records everything that happens during a Falcon 4.0 mission. ItÕs one of the most useful tools you have as a fighter pilot because it gives you a chance to play back your mission, see your mistakes and glory in your brilliant moves.
HOW TO USE THIS DOCUMENTATION
Falcon 4.0 is a sophisticated simulator, but we have organized the documentation to get you flying right away. Be sure to read The CadetÕs Guide first so you can install and configure the game. If you want to get in the air and shoot things down, The CadetÕs Guide will tell you how.
Part 1 of this Flight Handbook covers all the training missions, from basic flying to operating the avionics and weapons suites. The training missions are where youÕll learn the Òhow toÓ of flying an F-16. Part 2 describes all the main modules, including Instant Action, Dogfight, Tactical Engagement and Campaign. Part 3 is a reference section that covers the details of avionics, weapons suites, displays, radar, views, radio commands and so on. Part 4 is for the advanced pilot, with lessons about enemy tactics and mission planning.
In addition to the two manuals, be sure to keep the Quick Reference Chart handy. The key card is a handy summary of the basic commands and functions. If youÕre interested in multiplayer games, check out The Communications Handbook.
INTRODUCTION
xvii

DonÕt feel overwhelmed by the amount of material presented here. If youÕre new to flight simulations, start with The CadetÕs Guide which describes the simplified avionics and flight model. Use the training missions in Part 1 of this manual to learn more about the F-16. If you need help on the interface screens, click the Help icon (which looks like a question mark) for more information. Also, donÕt forget to check out our Web site at www.falcon4.com for even more training information and tips from real fighter pilots.
WeÕve gone to great lengths to accurately model the F-16C Block 50/52 fighter jet. Given the sophistication of todayÕs combat aircraft, itÕs no surprise that the U.S. government spends more than a million dollars to train a combat pilot. This means you wonÕt learn Falcon 4.0 overnight. However, each step is guaranteed to be interesting and exciting. Before long youÕll be rocking the skies with the best of them. Good luck and good hunting!
xviii

PART 1:
TRAINING MISSIONS
CHAPTER 1: LEARNING HOW TO FLY CHAPTER 2: LEARNING TO TURN CHAPTER 3: LANDING AND NAVIGATION CHAPTER 4: AIR-TO-AIR WEAPONS CHAPTER 5: AIR-TO-GROUND WEAPONS CHAPTER 6: AIR-TO-AIR REFUELING CHAPTER 7: MISSILE THREAT REACTION CHAPTER 8: BASIC FIGHTER MANEUVERS
CHAPTER
1
LEARNING HOW
TO FLY
Part 1 of this Flight Handbook consists of 31 training missions. The missions themselves are located in the Tactical Engagement section of the game, and the mission descriptions and instructions are contained here in the manual. The missions are task-oriented and teach very specific skills. WeÕll provide all the instruction youÕll need to complete each learning objective, but there is one caveat. The training missions use a building block approach. If you try to fly one of the advanced missions without first learning the skill sets from the earlier missions, you may have difficulty. Pete Bonanni designed these missions and wrote the instruction that follows. He patterned this training syllabus after the training course that the U.S. Air Force uses to teach new fighter pilots how to fly the F-16.
Pete ÒBoomerÓ Bonanni is a highly experienced F-16 instructor pilot some of you may remember from Falcon 3.0. Pete provided the primary fighter pilot input to the Falcon 4.0 development team and is the author of Art of the Kill along with many other flight simulator books. His new book is titled The Official Falcon 4.0 Strategy Guide and is published by Prima.
OVERVIEW
These training missions are designed to teach you how to fly Falcon 4.0 in the same way as a real F-16 pilot learns to fly his jet. Falcon 4.0 is the most realistic flight simulation ever built, but it does feature scaleable levels of difficulty to aid new pilots. The skills and knowledge required to use the F-16Õs systems are not easy to learn, and will take time and effort to master. For this reason, I suggest you eat this elephant one bite at a time.
For further training, tips on techniques and other information about Falcon 4.0, donÕt forget to visit www.falcon4.com.
1-2
learning how to fly
TRAINING MISSION SETUP
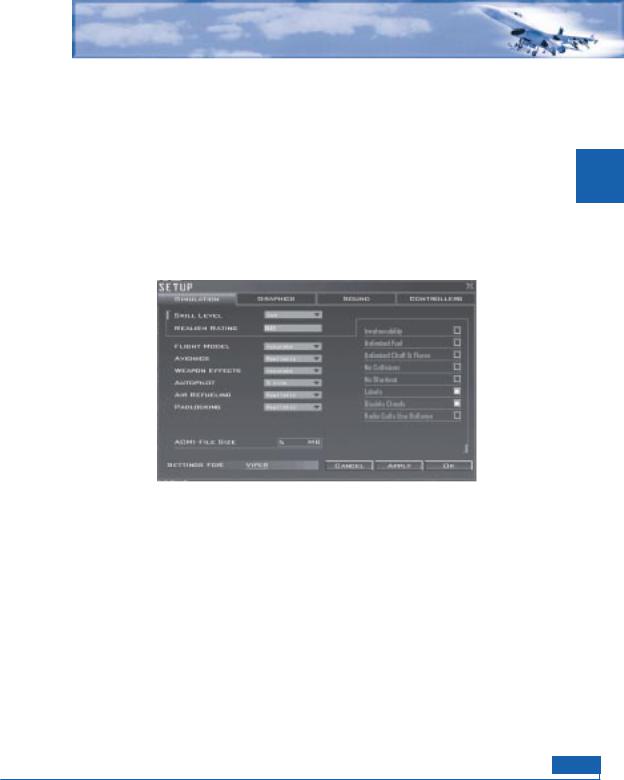
All of these training missions assume a specific setup. Please follow these instructions for all of the 31 training missions:
1. |
Select Setup from the main menu. |
C |
||
2. |
Click the Simulation tab at the top of the window. |
T P A H |
||
3. |
Select ÒAceÓ from the Skill Level option. This will set the Flight Model, Avionics, Weapons |
1 R E |
||
|
||||
|
Effects, Autopilot, Air Refueling and Padlocking to the proper options. |
|
||
4. |
On the right-hand side of the window, turn Labels on by clicking in the box. Also turn Disable |
|
||
|
Clouds on by clicking its box. |
|
||
|
|
|
|
|
|
|
|
|
|
5.Click the Graphics tab at the top of the window.
6.Make your Graphics selections based on your processor, video card, available RAM, etc. See Chapter 16: Setup for recommended settings.
HOW TO LOAD A TRAINING MISSION
To load a training mission, first click Tactical Engagement from the main menu. The Training tab will already be selected, and a list of training missions will appear underneath. Click on the training mission you want and click the Commit button in the bottom right-hand corner. Under Mission Schedule on the next screen, the training mission will be selected and you will see the default name (Ò2nd Lt. Joe PilotÓ) next to an aircraft icon. If you already created a pilot in the Logbook, you will see the name you selected instead. Click the Fly icon in the bottom right-hand corner to start the training mission.
1-3

FREEZE MODE
You can always press sPat any time during the training mission to ÒfreezeÓ the game. Unlike the regular pause mode (Pkey), freezing the game lets you operate all the F-16 avionics and instruments, most notably the radar. Note that the mission clock keeps ticking in Freeze mode. If you are supposed to be at a specific location at a specific time, the time you spend in Freeze mode counts against you.
MISSION 1: BASIC AIRCRAFT HANDLING
The objective of this mission is to learn how to control the Falcon. When you complete this mission, you will Òknow the struts and know the skin, know the barrel roll and spins.Ó Well, maybe not, but I just couldnÕt resist that line from a famous old fighter pilot song ÒBarnacle Bill the Pilot.Ó
There is no need to take the venerable Falcon up into the wild blue to duke it out with the bad guys if you canÕt control the jet. This mission is the first in a series of aircraft handling training missions patterned after the Air ForceÕs real F-16 training syllabus. In the real syllabus, this sortie is called ÒTR-1Ó or ÒTransition Sortie 1.Ó Keep in mind, however, that when a pilot first starts to fly the F-16, he or she already knows how to fly other jets. Since you Falcon 4.0 faithful have different levels of experience, I will start with the very basics. Bear with me and if you start to nod off, move on to the next mission. Just donÕt blame me later when you hear the low speed warning horn for the first time and soil your bloomers.
Controlling the plane in Falcon 4.0 (and the real F-16) is really not very difficult. Fighting in the jet, however, is another matter. Modern fighters like the F-16 are a dream to fly but devilishly hard to fight in. TodayÕs fighters barrage the pilot with information which, when combined with increased speed, creates a tempo of air combat that is close to the limits of human capability. Along with the challenge of sensor fusion and tempo, modern fighters also feature a violent high-G environment. G force is the force that acts on the jet when it turns. ItÕs like the old example of swinging a bucket of water on the end of a rope. The water stays in the bucket because of the force acting toward the outside of the arc. The G force on an aircraft is essentially the same thing except greater in magnitude. The G forces of modern air combat would turn the fighters of old into kindling (or paper clips). The fighter pilots of yore, of course, faced challenges of their own. Their primary challenge was the sheer difficulty of just flying their aircraft. Older aircraft were simply a lot harder to fly than the F-16. Skills such as flying an F-86 close to its maneuvering limit, manual bombing in the F-105 and marksmanship in a P-51 demanded great flying skill. The F-16, in contrast, has a flight control computer that controls Gs and other critical flight parameters to keep the pilot out of trouble. In addition, the F-16 Fire Control Computer puts the bombs on the target. In general, the F-16 is just easier to fly. I experienced the difference between a third and fourth generation fighter when I transitioned from the F-4 Phantom to the F-16. With the exception of landing, I found the F-16 far easier to fly than the F-4.
1-4

learning how to fly
Since Falcon 4.0 flies like the real jet, it should be relatively easy to fly. Just because flying the jet is easy, however, does not mean that it is effortless or that there is no learning curve. This mission will help you master flying so you can go on to the more complex and demanding air combat tasks. We will also cover a few displays and instruments that are also shown in other parts of this manual. Everything you need to fly this mission will be presented here.
THE HUD
First, load the training mission by selecting Ò01 Basic HandlingÓ under the Training tab in Tactical Engagement. Press sPto freeze the game while you look around the cockpit.
Falcon 4.0 features several views, but we will start with the cockpit. Press 2on the top row of the keyboard to make sure you are in the 2-D Cockpit view. This cockpit not only looks exactly like the real F-16 cockpit but also features the same functionality. The most obvious cockpit feature is the HUD (Head-Up Display). The HUD is located at the top of the cockpit and is by far the most useful of all cockpit displays.
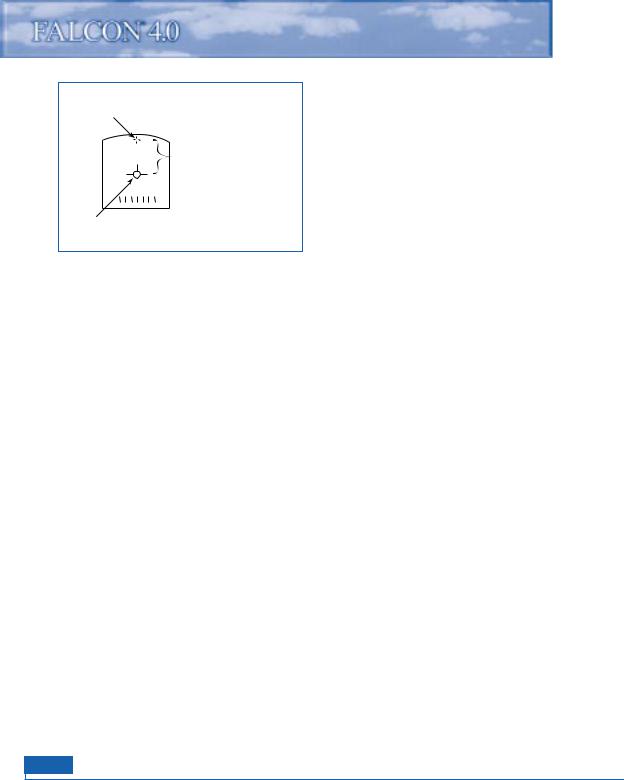
Here is a list of the parts labeled in Figure 1-1 and what they are used for in the HUD.
FPM (FLIGHT |
GUN CROSS |
PATH MARKER) |
PITCH LADDER |
|
G METER
ALTITUDE SCALE
AIRSPEED SCALE
HEADING SCALE
Figure 1-1
The flight path marker is the most useful part of the HUD. This symbol shows the pilot the flight path or vector that the jet is on. If you use your joystick to place the flight path marker on a point over the ground and hold it there, the jet will impact the ground on that exact spot. Hopefully, you wonÕt be doing that too often, but the flight path marker can be used in a very similar way to fly to a precise point on a runway. Just as importantly, the F-16 can be flown in level flight or precise climbs and dives using the flight path marker.
1 R E T P A H C
1-5
|
The gun cross is the small cross symbol at the |
|
Gun cross |
top of the HUD. It is an important reference |
|
since it represents the nose of the aircraft. |
||
|
||
AOA = difference in |
Keep in mind that the gun cross is not where |
|
the aircraft is pointing (although it is very |
||
degrees between gun cross |
||
and flight path marker |
close to where the aircraft is pointing). The |
|
|
difference between the gun cross (the nose of |
|
|
the aircraft) and the flight path marker is the |
|
Flight path |
AOA (Angle of Attack). |
|
marker |
|
The pitch ladder provides a level flight reference along with a reference for climbs
and descents. The long solid horizontal line in the middle of the HUD is the 0¡ pitch line. It can be easily differentiated from the other pitch ladder lines because it has no number associated with it. The dashed pitch ladder lines show descents in 5¡ increments while the solid lines show climbs.
The airspeed scale is on the left side of the HUD. Since this scale shows airspeed in increments of tens, Ò40Ó means that you are going 400 knots (nautical miles per hour). The airspeed scale has a ÒCÓ next to the tick mark, which stands for calibrated airspeed.
The altitude scale is on the right side of the HUD. This scale shows aircraft altitude in hundreds of feet above sea level, also called MSL (Mean Sea Level). Remember, the HUD altitude scale shows altitude MSLÑabove sea levelÑand not altitude above the ground (AGL). An altitude of Ò500Ó is 5,000 feet above sea level. When your penguin butt gets down below 1,200 feet from the ground, the radar altimeter brings up a new altitude display in the HUD. Since this scale shows hundreds of feet, when the sliding bar is next to Ò2,Ó you are 200 feet above the ground. Keep in mind that this is the ground directly underneath your jet and not the ground that is in front of you. As you climb and get above 1,500 feet, the scale goes back to the normal sea level scale.
The heading scale at the bottom of the HUD shows aircraft heading. The scale simply shows aircraft heading in tens of degrees. A heading of Ò27Ó would be 270¡.
The HUD G meter in the top left corner of the HUD shows current G forces acting on the jet, whereas the G meter at the bottom left corner of the HUD shows the maximum G force you have pulled so far during a given flight. See Chapter 25: Aerodynamics and G Forces for a detailed explanation of G.
1-6

learning how to fly
HUD CONTROL OPTIONS
Figure 1-1 shows all the HUD displays called up, which is the way that I fly in both Falcon 4.0 and the real F-16. Not all fighter pilots, however, use the HUD the same way, so you can configure your HUD display to suit your needs.
Press H to declutter the HUD. The first time you press H, it will remove the pitch ladder, the second time will remove the flight path marker. Press H a third time to return to the default HUD display.
Press cH to toggle the airspeed indicator and altimeter from tapes to discretes (analog to digital).
Press aHto change the HUD color. Since the ground can be colored green, this option can be very useful.
The HUD displays a lot more information, but we will talk more about diamonds and timing cues and that other stuff in the training missions to come.
COCKPIT INSTRUMENTS
We should discuss a number of cockpit instruments and displays before getting airborne. Make sure you are in the 2-D Cockpit view, as shown in Figure 1-3.
AIRSPEED |
|
INDICATOR |
ALTIMETER |
AOA |
|
INDICATOR |
ADI |
|
Figure 1-3
HSI
The ADI (Attitude Director Indicator) provides an artificial horizon and an aircraft symbol so you can tell the attitude or orientation of the aircraft relative to the earth.
1 R E T P A H C
1-7
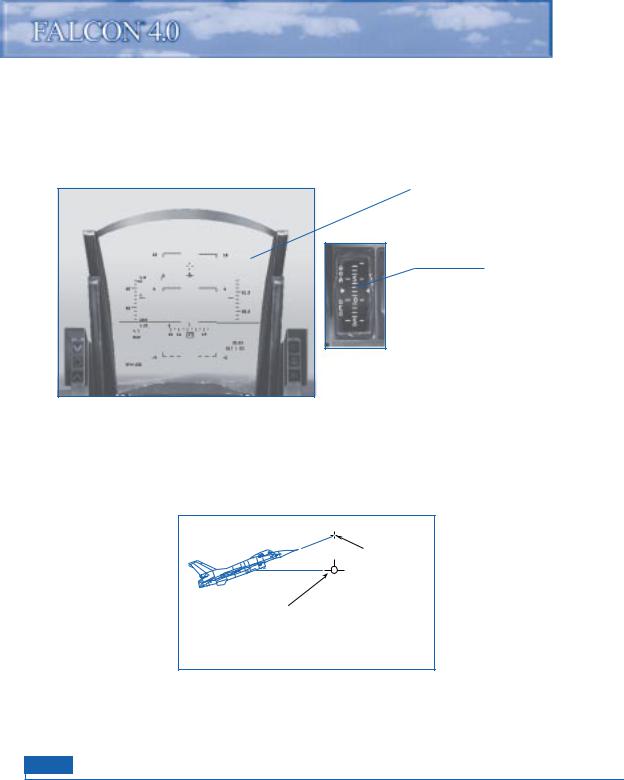
The airspeed indicator shows the aircraftÕs airspeed in hundreds of knots. When the red needle is on the Ò4,Ó you are going 400 knots.
The altimeter shows the MSL altitude (altitude above sea level) of the aircraft on the round dial. The digital readout on the inside of the dial shows the altitude in thousands of feet. The white needle on the dial displays the altitude in hundreds of feet.
HUD
AOA INDICATOR
Figure 1-4a
The AOA indicator is a tape that shows the angle of attack of the aircraft. In order to generate lift, the jet needs to have a positive angle of attack or fly at a positive angle into the relative wind (airflow). The F-16 has a 25¡ positive and 5¡ negative AOA limit. Remember that the AOA is the angular difference between the gun cross and the flight path marker. Figure 1-4a shows AOA, both in the HUD and on the gauge.
|
Longitudinal axis |
|
of the aircraft |
|
shown in HUD |
|
by the gun cross |
Flight path of the |
|
aircraft shown in |
|
the HUD by the |
|
flight path marker |
Figure 1-4b |
The HSI (Horizontal Situation Indicator) is a very complex gauge we will cover in Training Mission 12. For now, all you need to know about the HSI is that it can be used to indicate aircraft heading. The round moving dial on the HSI shows N/S/E/W for north, south, east and west. When the aircraft turns, the dial moves to indicate the change in aircraft heading.
1-8

learning how to fly
The RPM gauge shows the revolutions per minute of the turbine blades at the core of the engine. RPM is shown as a percentage, with 100% being the fastest the engine can go and 0% being an engine that is not turning at all. 70% is idle power. RPM is directly tied to throttle position, which controls how much thrust the engine produces.
TRAINING MISSION OVERVIEW
This mission starts with the Falcon in the air. Your goal on this mission is to get used to flying the jet and using the keyboard to control your various views.
INITIAL CONDITIONS
Airspeed: 400 knots
Altitude: 7,500 MSL and level
Throttle Setting: Mid-range
MISSION DESCRIPTION
1.Press sPto freeze the game. While we are frozen, letÕs go through the different view options. Access the views by pressing the number keys at the top of the keyboard.
Press 1to switch to the HUD Only view. The MFDs are the boxes visible at the bottom (or top) of the display. Change the MFD displays by pressing [for the left MFD, ]for the right MFD, s[for the top left MFD and s] for the top right MFD.
Press 2to put you back in the default 2-D Cockpit view. This view is mouseable, which means that you can use the mouse to flip switches, turn dials and move around the cockpit. There are three kinds of mouse pointers that are used in the 2-D cockpit. The red diamond indicates that you cannot interact with a cockpit control or dial. The green circle means that you can interact with a cockpit control or dial (by flipping a switch, etc.). The green arrow means that you can click to change your 2-D Cockpit view to look left, right, etc.
Press 3to enter the Virtual Cockpit. In Virtual Cockpit, use the hat switch on your joystick or press W, Z, Aand Son the numeric keypad to move your view around the cockpit. This view is very important because it is very useful in air combat and in improving your situational awareness or SA. SA is understanding where you are in relation to the world around you and, just as importantly, understanding where threats are in relation to you. Practice using the Virtual Cockpit while the simulation is in Freeze mode. If you hold down Aor S, notice that your view will stop near the ejection seat. Since you cannot see past the ejection seat in the real F-16, Falcon 4.0 has the same view limitation. You will hear a banging sound when you reach that limit. If you want to rotate your head (the view) to the other side of the cockpit, press Aor Son the numeric keypad again and you will move the view to the other side of the cockpit.
Press `to access the Satellite view, which is an overhead view of the world.
1 R E T P A H C
1-9
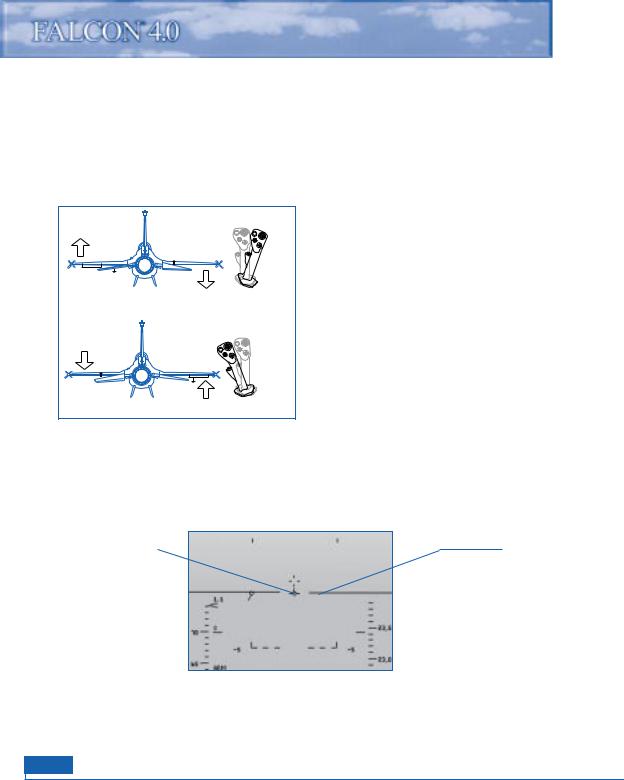
To get a closer look at the world, press L. Press Lagain to return to normal view. You can also press 7and 1on the numeric keypad to zoom an outside view further in or out.
Falcon 4.0 has additional views, but they will not be needed in this mission.
2.Bring up the 2-D Cockpit by pressing 2. Press sPagain to unfreeze the game.
3.Set the RPM gauge to 85% by using the throttle on your joystick or press +or -to set the throttle.
4.Move your joystick left to start an easy left
turn. Bank the wings to tilt the world about 60¡ and then pull back on the stick until your G meter reads 2.0. Figure 1-5 shows how to move your joystick and get the turn started.
Notice that when the wings are banked, the jet will turn or change heading. In the 2-D Cockpit view, you can watch the HUD heading scale move and you will see the aircraft banked on the ADI.
Figure 1-5
5.To keep the aircraft in level flight, ensure that the flight path marker is on the level line of the HUD. Do this by gently pulling back on the joystick until you get the flight path marker where
FLIGHT PATH |
|
MARKER (FPM) |
0¡ PITCH LINE |
1-10

learning how to fly
you want it. Figure 1-6 shows the turn with the flight path marker on the level or 0¡ pitch line. Practice making level turns to the right and left. Turn on the smoke by pressing aSto trace your path through the sky. Use the Satellite view (`key) to watch your turns from outside the aircraft. When you are done, return to straight and level flight. Bank opposite to the direction you are turning until the HUD 0¡ line is horizontal. Then move the flight path marker until the horizontal lines of the flight path marker align with the 0¡ line on the HUD.
6.Next, we will practice climbs and descents. To climb, align the HUD flight path marker with the 5¡ pitch line. Notice that the aircraft starts to climb and that both the cockpit and HUD altimeters show increasing numbers and that your airspeed decreases (if you donÕt, add more power). In addition, the movement of your flight path marker lags slightly behind your control inputs. After climbing 1,000 feet, level off for a few seconds by aligning your flight path marker with the level line. Notice that your altitude remains constant with the flight path marker on the 0¡ pitch or level line.
7.Practice a descent by pushing the joystick gently forward to align the flight path marker with the -5¡ pitch line. Your altitude will now decrease and your airspeed will increase. You must always manage your energy when flying. Climbs trade airspeed for altitude, whereas descents trade altitude for airspeed. After descending 1,000 feet, level off by placing the flight path marker on the HUD level line.
8.After accomplishing level turns and some straight ahead climbs, start combining turns and climbs together. For example, make a level turn due west, or Ò27Ó on your HUD heading tape. When you are heading west, start a climbing turn to east or Ò09Ó on the HUD heading tape. Try to climb 2,000 feet precisely. Set up parameters of your own to practice maneuvering the jet precisely.
9.Next, try doing level turns at low altitude, which is flying below 1,000 feet AGL. During these maneuvers, experiment with different HUD altitude options (Auto, Bar and Radar). Switch between these modes by using the mouse to switch to the lower left console in the 2-D Cockpit view. The HUD control panel on this console is a 3-way toggle switch that selects the
1 R E T P A H C
1-11
 Loading...