


 Loading...
F A L C O N 3 . 0 |
i |
F L I G H T M A N U A L

ii F A L C O N 3 . 0
Program Credits
Original Design Concept: |
Digital Actors: |
|
Gilman “Chopstick” Louie |
“Smokin’ Joe” Ward |
|
|
Scot “Woof” Bayless |
|
Simulation Team: |
Russel “Blue Jay” Reiss |
|
Erick “Jetbuster” Jap |
Matt “Mack Daddy” Carlström |
|
Gary “RC” Stottlemyer |
Zachary “Defiant” Fuller |
|
Kuswara “Porkchop” Pranawahadi |
Tony Beccia |
|
Les “Vulture” Watts |
Daniel “Bullfrog” Deremiah |
|
|
Marisa “No. 19” Ong |
|
Interface Team: |
Bill Hall |
|
Scot “Woof” Bayless |
Elizabeth Chambers |
|
Michael “Papa Bear” Mancuso |
Shannon Lee |
|
Ian “Blue Macaw” Falicov |
|
|
Daniel “Bullfrog” Deremiah |
Stunt Effects: |
|
|
Matt “Mack Daddy” Carlström |
|
Additional Programming: |
Elizabeth Chambers |
|
Farah “Stinger” Soebrata |
|
|
Don “Blaster” Harlow |
World Building: |
|
Rebecca “Stormtrooper” Ang |
Anthony “KnötHead” Chiang |
|
Donald “Cal” Tsang |
Daniel “Bullfrog” Deremiah |
|
Lee “Vaporizer” Powell |
“Smokin’ Joe” Ward |
|
|
Peter “Bandit” Ward |
|
Product Manager: |
Eric “Violator” Grotke |
|
Scot “Woof” Bayless |
Bradd “Bluto” Huddle |
|
Art: |
Sound and Music: |
|
Matt “Mack Daddy” Carlström |
Paul “Moggy” Mogg |
|
Dan “Dolphin” Guerra |
|
|
Chuck “Bunhead” Butler |
Quality Assurance: |
|
Louis “Cantoni” Sremac |
Kurt “Goat Killer” Boutin |
|
Zachary “Defiant” Fuller |
Brett “Flying Crip” Amick |
|
|
Steve “Scorpion” Blankenship |
|
Animation Direction, Special Effects |
Stephen “Buster” Keith |
|
and Camera: |
Lawrence “Hairball” Kevin |
|
Matt “Mack Daddy” Carlström |
||
Mike “Mad Mongoose” Nebeker |
||
Zachary “Defiant” Fuller |
||
Russel “Blue Jay” Reiss |
||
|
F A L C O N 3 . 0 |
iii |
|
|
Additional Quality Assurance:
Evan “Baron” Birkby
Eric “Cerebus” Chin
William “T-Square” Chin
Mike “Izzy” Isgur
Douglas “Opus” Lin
David “Wotan” Wessman
Beta Testers:
Frank “Turk” Bartolotta
Tom “KC” Basham
Terry “Pinecone” Carraway
James “Hawk” Cook
Alvin “Moondog” Dickerson
Matt “Mythman” Dimmic
Steve “Auger” Edwards
Mark “Endo” Estephanian
Mike “Black Viper” Hartmann
Buzz “Ballistic” Hoffman
Eric “Reckless” Pearson
Dave “Lawman” Reichlein
Donald “Blue Max” Rinker
Kevin “Thrusty” Turner
Michael “Misha” Vario
Steve “FT” Wartofsky
Mike “Moondawg” Weksler
Printed in the United States of America
Third Edition, December 1995
10 9 8 7 6 5 4 3
Special Thanks:
Manual Credits
Writing:
Robert “Spaceman” Giedt
Howard “Whiplash” Bornstein
Pete “Boomer” Bonanni
Kyle “Bulldog” Brink
“Smokin’ Joe” Ward
Steve “White Knight” Perrin
Editing:
Robert “Spaceman” Giedt
Marisa “No. 19” Ong
“Smokin’ Joe” Ward
Kyle “Bulldog” Brink
Maggie “Milagro” Brown
Technical Illustrations:
Chuck “Bunhead” Butler
Layout:
Van Winkle Design Group
Photos Courtesy of:
Armed Forces Journal
Aviation Week
General Dynamics
U.S. Department of Defense
Pete Bonanni
Gilman Louie
Dick Stamm
Shelley Addison, Tom Byron, the Customer Support crew, Erik Flom, Barbara Gleason, Rosann Goodrow, Rita Harrington, Guymond Louie, Ann McCue, Lisa Meucci, Michael Nelson, Hallie Park, Terry Thompson, our Production Department, Mike Hatfield at General Dynamics, Bob Carter of ThrustMaster, Ron Haidenger of Advanced Gravis, Joseph Colligan of Delta Lithograph, Linotext (Rod Hume), the Typesetting Shop in Oakland (Charlie Pettler, Rick Banker and Tinamarie Goldman), Air Combat USA in Fullerton (“Hollywood,” “Dooley,” “Club” and the rest of the guys), all the folks at Cermoss for helping dupe the disks, MapLink, and last but not least, Kevin Goyer and the 25th Aircraft Maintenance Unit for sharing their personal memories of Desert Storm
iv |
F A L C O N 3 . 0 |
|
|
Falcon 3.0 © 1991 Sphere, Inc. Falcon 3.0 is a trademark and Spectrum HoloByte is a registered trademark of Sphere, Inc. All Rights Reserved. Head to Head is a registered trademark of Hasbro, Inc. and is used under license. Other trademarks are the property of their respective holders.
|
S E C T I |
O N |
|
|
S E C T I O N |
I : I N T R O D U C T IO N |
|
|
1 |
|
|
|||
|
|
|
|
|
|
|
|
|
|
INTRODUCTION
2 |
F A L C O N 3 . 0 |
|
|
Introduction
Strapped into your seat, you scan the Iraqi landscape for bogeys. Nothing. Martyrs’ Bridge ought to be easy to take out. Suddenly, a high-pitched warning screeches at you. Your radar lights up like Times Square on the First. “2 bogeys at 11, 30 miles,” you radio to your wingman, almost shouting. “Roger, moving to intercept,” he responds. A quick check of the threat indicator shows they haven’t spotted you yet since they’re not breaking off. You and your wingie break combat spread, swing wide and try to pince them from the rear. Just before you attack, they catch your radar and break off. “Get ’em!” you yell, firing off a burst of rounds at the leader as he zips by while your wingie takes off after the other bandit.
Getting a closer look, your heart leaps into your throat as you notice that these planes are fast and lethal MiG-29s. Muttering sighs of relief that their radar didn’t spot you first, you break hard after the leader. He pulls up into a roll, and you follow keeping your energy high, then break down just after he makes his descent. Dead in your sights, you select and arm a Sidewinder, then fire it in his direction. Like he knew it was coming, the MiG dives fast to avoid the missile, dumping flares, and then pulls up hard. Your shallow dive catches him with his energy depleted, so you switch to guns and lay into him. Flames erupt from his engine and flak rains from his wounded bird. Spiraling downward toward the Tigris, the MiG pilot ejects just before his plane shatters like a used firecracker. The other MiG sees his comrade go down and bugs out towards Baghdad. During this time your wingman got shot up and a dirty smear on his tail says that he’s got one helluva fuel leak. “I’m a dot,” your wingie yells, pulling back and heading for home. “Roger,” you reply. Only four more miles to that bridge. Gotta go for it.
You drop to 2,000 feet to avoid radar — then home in on the bridge. “If those Iraqi tanks get there before me, Army’s gonna have my head.” Two miles to target, approaching visual. Martyrs’ Bridge comes into range, and you click to your GBU. Target lock, FIRE! The bomb glides through the air and slams into the center of the bridge, turning it into a hulk of twisted metal. As you wing around and head for home, you’re already thinking ahead to your next assignment…
Welcome to the world of Falcon 3.0, the most complete and accurate flight simulator on the market today. Strap yourself in and prepare for combat!
S E C T I O N I : I N T R O D U C T I O N |
3 |
|
|
About Falcon® 3.0™
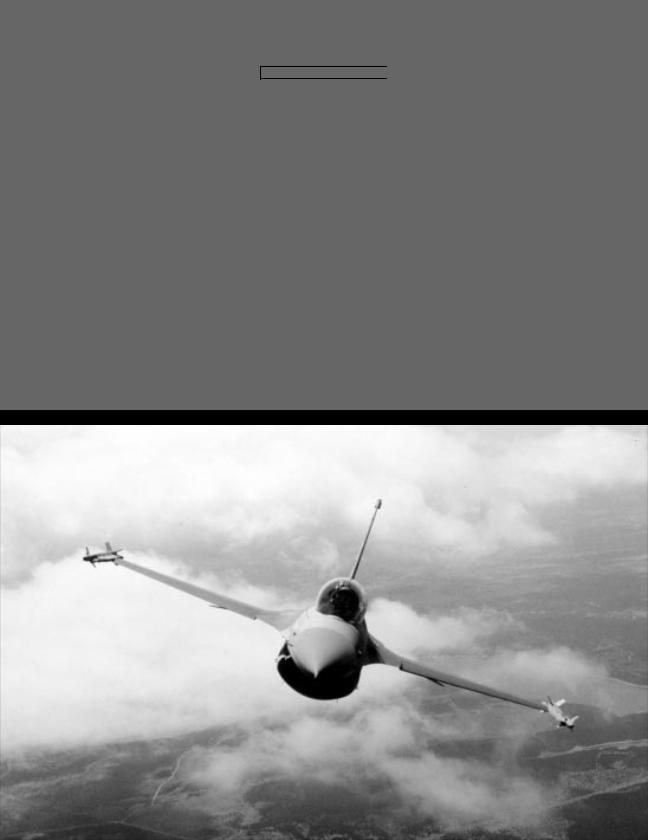
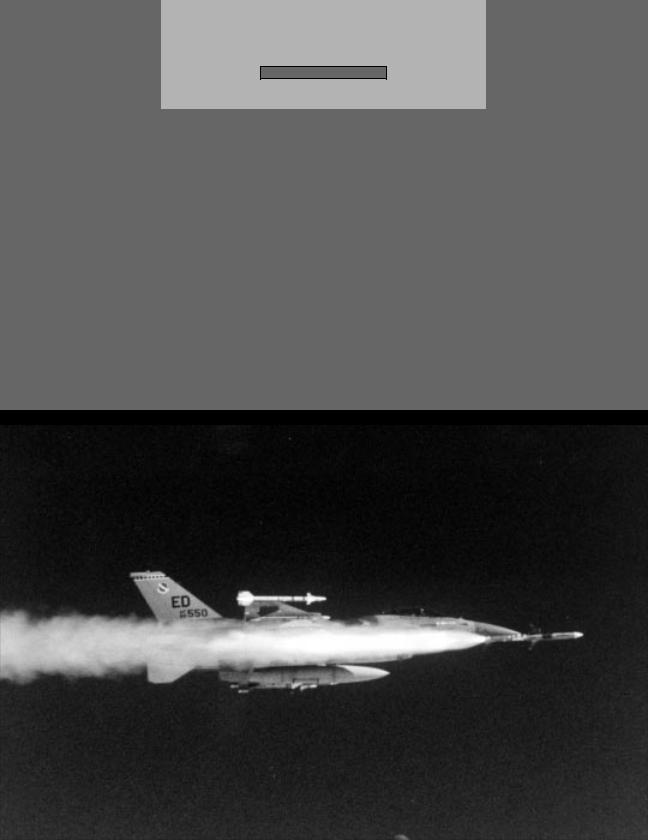
Falcon 3.0 is first and foremost a simulator of the F-16 Fighting Falcon — a dogfighting aircraft with the additional capability of air-to-ground bombing. It is not only one of the most maneuverable (and inexpensive) planes in the United States’ arsenal of aircraft, but it’s also a favorite of experienced combat pilots. Falcon 3.0 has been designed to provide the most authentic simulation of air combat possible on your computer.
Inside Falcon 3.0 are actually three games in one: the Instant Action mode for the novice flight sim pilot, the Red Flag training ground/mission editor where budding pilots can prepare for combat, and the Campaign mode in which you take the part of a squadron commander and lead your pilots to victory or defeat on one of three real-world battlefields.
Instant Action is designed for the novice pilot or the player who is interested in “mixing it up” without a lot of complexity. All you’ve got in this mode is your F-16 and lots of enemies. Instant Action can also serve as basic training for the simulation; you can learn how to fly and observe the characteristics of the various enemy aircraft. You will be scored based on the number of air and ground targets destroyed and the accuracy of the weapons you fired. Instant Action is fully described in Section II: Instant Action.
One feature of Red Flag is the set of training lessons described in Section VI: Air Combat School. These lessons will lead you through the operation of your F-16, from basic flight to air combat manuevers. They also cover the operation of the aircraft’s avionic and weapon systems. Another feature of Red Flag is the mission editor which allows you to create your own missions involving a great variety of air and ground forces.
The Campaign is the heart of Falcon 3.0. In the Campaign, you play the role of a squadron commander in one of three theaters of conflict: Panama, Israel or Kuwait. You assign the pilots of your squadron to various missions to achieve victory. You also take the role of the lead pilot on all missions; your skills determine the outcome of every mission and eventually the outcome of the war. The computer controls your wingmen and the overall course of the conflict. The progress of the campaign is strongly influenced by your success or failure on the battlefield, so no two campaigns will ever be exactly alike.
In addition to the three major modes of play described above, Falcon 3.0 has other features: ACMI (Air Combat Maneuvering Instrumentation), which allows you to record and review mission action, a Configuration section for customizing game features, and a Communications mode that allows you to battle your friends head-to-head using a modem, network or a direct connection.
4 |
F A L C O N 3 . 0 |
|
|
How to approach this manual
Don’t worry about the length of this book — by no means do you need to read it all to experience the thrill of Falcon 3.0.While a lot of the manual describes how to play the game, not every section needs to be tackled at once.
Before continuing with this manual, you should turn to Section III: Installation and Loading and read the Installation and Loading procedures. This section will explain where to find the Install program and how it operates. It will tell you how to load the game and configure your system to utilize expanded memory (EMS).
Next, you should turn to Section IV: War Room, which gives a brief overview of Falcon 3.0’s interface and describes how to get to the various areas of the game. From the War Room, you can choose to fly around in Instant Action (Section II), to change some of the hardware or software options for the game (Section X), or to edit one of your squadrons (Section V). After setting up a squadron, you can either go on a training mission (Section VI) or begin a new campaign (Section VIII).
S E C T I O N
II |
5 |
S E C T I O N I I : I N S T A N T A C T O N |
INSTANT
ACTION
6 |
F A L C O N 3 . 0 |
|
|
Instant Action
Instant Action puts you into the air immediately. No setup, no required objectives, no hassle
— just straight piloting.
If you haven’t already installed Falcon 3.0, install it according to the directions in Section III: Installation and Loading. To enter Instant Action, load Falcon 3.0. You will see an introductory sequence followed by the title screen and game credits.
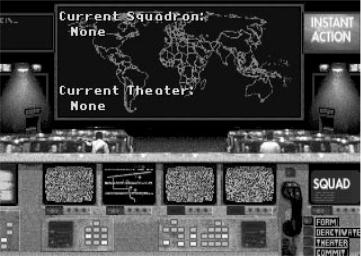
Welcome to the War Room
The screen that follows is the War Room. Using the keyboard or the mouse, you can access other sections of the game by selecting one of the various monitors in the War Room.
If you have gone to the Configuration area before, go there now, select the Beginner button and return. If you want to adjust the settings to make it more difficult or more realistic, please see Section X: Configuration for full instructions.
If you have never gone to the Configuration screen before, don’t worry; you’ll automatically start at the Beginner setting.
Selecting the large screen at the upper left of the War Room exits you to DOS; selecting the large monitor at the upper right launches you straight into Instant Action.
Zero to 450 in six seconds
After some video animations, you will find yourself airborne, cruising at 450 knots directly over an enemy ground installation.
Start fighting — you’re on your own, with unlimited fuel, weapons and time. Every radar contact is hostile, every dot on the horizon is the enemy, and everything on the ground wants you shot down. The goal is simple: see how long you can last and how many of them you can take with you before you buy the farm.
S E C T I O N I I : I N S T A N T A C T I O N |
7 |
|
|
Time out!
The game can be paused by pressing P. A paused game can be restarted the same way.
Pressing qwill also halt the game as well as bring up the menu bar. A number of options, discussed in Section IX: Flight, are available through the various menu selections. Return to play by pulling down the FILE menu and selecting Return to Game.
Controlling the plane
The Quick Reference Card has a full keyboard command listing, but here are the basics.
|
|
Nose |
Padlock |
|
|
Nose down |
|
|
down |
view |
|
|
|
|
Num |
|
|
- |
|
Bank right |
|
/ |
* |
Throttle – |
|
||
Mil/AB switch |
Lock |
|
||||
|
|
|
|
|
|
|
Left |
7 |
8 |
9 |
|
Right view |
Bank left |
|
|
|||||
view |
Home |
|
Pg Up |
|
Throttle + |
|
|
|
+ |
Nose up |
|||
|
|
|
|
|||
|
4 |
5 |
6 |
|
||
Bank |
|
Bank right |
|
|||
left |
|
|
|
|
|
|
|
1 |
2 |
3 |
|
|
Fire weapon |
Front |
|
Rear view |
Weapons |
|||
view |
End |
|
Pg Dn |
|
|
|
|
|
|
|
select |
||
|
0 |
|
. |
Enter |
|
|
|
|
|
Air-to-air |
|
||
|
|
|
|
|
||
|
Ins |
|
Del |
|
weapons select |
|
|
|
|
|
|
||
|
Drop |
Nose |
Drop |
|
|
|
|
flares |
up |
chaff |
|
|
|
To bank left or right, just push the stick to that side. Pull back on the stick to climb, and push forward on the stick to dive. Pull back and bank simultaneously to turn tighter. If you are using the keyboard, the arrow keys take the place of the stick.
Control the throttle with +and -. Watch the RPM Indicator on the right side of the cockpit as you increase and decrease the power; for dogfighting, 60%–80% power is optimum. But if you need to extend or are just plain out of airspeed, kick in the afterburners with/. When you first fire the ’burners, you will see “AB1” displayed in the MIL/AB Indicator, next to the RPM Indicator. This means you are in the first stage of afterburner. Use <and >to scale through the five afterburner stages. Shut down the afterburners with /.
8 |
F A L C O N 3 . 0 |
|
|
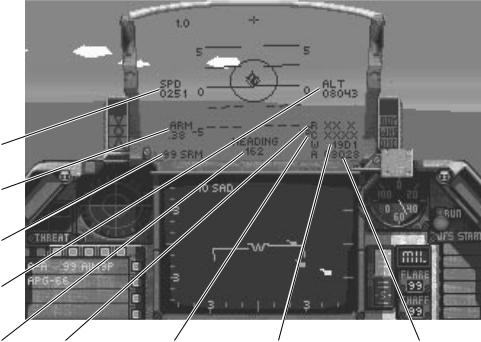
The Head-Up Display (HUD)
G Force
Indicator 
Pitch 
Ladder
Aiming 
Reticle
Airspeed
Mach
Indicator
HUD Mode
Indicator
Altitude
Above
Sea Level
Heading |
Range |
Closure |
Distance to |
Altitude Above |
|
to Target |
Rate |
Waypoint |
Ground |
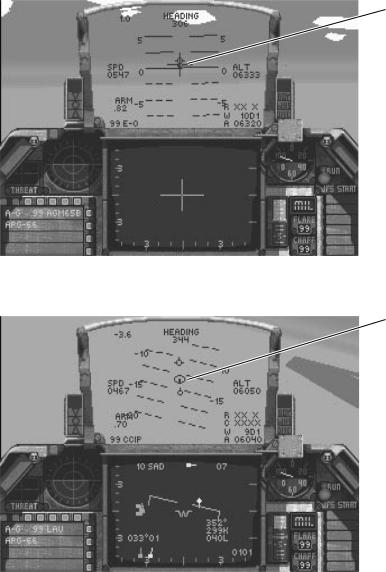
Pause the game for a moment. Now look at the center of your screen, where all the green writing is. The area within this metal frame is the HUD.
The symbols
The tiny circle in the center is the Center Point; its purpose is to help keep the pilot’s attention focused in chaotic situations.
The larger circle around the Center Point is the Aiming Reticle. In general, any target within the aiming reticle has a good chance of being hit, assuming it is in range and you are locked on. Within the Aiming Reticle, a number of different targeting aids may appear. These will be discussed later.
Overlaid on the Aiming Reticle is the Pitch Ladder, a wide band of lines with numbers next to them. The lines are parallel to the horizon, and the numbers at either end indicate the plane’s pitch in degrees. Zero degrees is parallel to the ground, 90 degrees is pointing straight up, and -90 degrees is pointing straight down.
At the top of the HUD is the plus sign. If an air-to-air target is within visual range, a line will extend from the plus sign in the direction of the selected target.
S E C T I O N I I : I N S T A N T A C T I O N |
9 |
|
|
The figures
Centered in the bottom of the HUD is your current heading in degrees, where 000 is due north, 090 is due east, 180 is due south and 270 is due west. Next to the heading will be the Waypoint Caret which tells you which way to turn to head to your next waypoint. For example, if the heading read “270>,” you should bank to the right to reach your next waypoint. When you are heading directly towards your waypoint, the Waypoint Caret will read “>xxx<.”
Next to the heading, in the lower right-hand corner of the HUD, are four numbers. The top one is the range to the current target in feet. The next is the closure rate — your speed relative to the target. If your closure rate is positive, then you are approaching your target at that speed (in knots). If it is negative, then your target is pulling away at that rate. The third number is the distance to the next waypoint. The bottom number is your altitude above terrain, which shows how high above the dirt you are.
Above the range figure, at the middle of the right-hand side of the HUD, is your altitude in feet. This is how high above sea level you are — not how far above terrain your plane is.
At the top left of the HUD is a number indicating how many Gs you are pulling and whether they are negative or positive. This is only of concern if you are playing with Redout/Blackout active (see Section X: Configuration).
The number displayed below the G readout, about the midpoint of the left side of the HUD, is your airspeed in knots.
The Mach Indicator (a number with a decimal point) is below. This is your speed in Mach numbers; 1.0 is equal to the speed of sound, 2.0 is twice the speed of sound, and so on.
Below the Mach indicator is the number “99” followed by a threeor four-letter code. The number “99” indicates that you have unlimited armament; the letter code indicates what HUD mode you are in. The HUD mode automatically changes when a new weapons system is selected. The various modes (CCIP, DGFT, ILS, SRM, STRF and so on) are explained in detail in Section IX: Flight.
How to shoot
The Stores Control Panel in the lower left-hand corner of your Front View shows what weapons mode you are in, either “A-A” (Air-to-Air) or “A-G” (Air-to-Ground). If you are in A-A mode, press Bto switch to A-G; in A-G mode, press eto switch to A-A. The panel also shows which weapons system is currently active. In A-G mode, Bwill cycle through the various air-to-ground weapons. If you are in A-A mode, cycle through the air-to-air weapons by pressing e.

10 |
F A L C O N 3 . 0 |
|
|
Target
 Diamond
In A-A mode with any of the missiles selected, a diamond will appear within the Aiming Reticle. This shows where the missile is seeking. When an enemy enters the Aiming Reticle and is within visual range, the missile will automatically lock on and the Aiming Reticle will flash as long as the lock is maintained. Hit zto fire the missile.
Gun Funnel
In A-A mode with the M61A1 gun active, a pair of lines will appear within the Aiming Reticle. As you maneuver, these lines will curve and sweep up or down, forming what is known as the funnel. The point of the funnel, where the two lines meet, is where shells from the gun will arrive. A good rule of thumb for ranging and accuracy: if both of the target’s wingtips touch the sides of the funnel, it is within range and likely to be hit. Hit zto fire.
S E C T I O N I I : I N S T A N T A C T I O N |
11 |
|
|
Cross
Hairs
In A-G mode with AGM-65Bs, AGM-65Ds or GBU-15s selected, cross hairs will appear in the middle of the Aiming Reticle. When a target enters the Aiming Reticle, the cross hairs will automatically lock on and follow the target. Press zto fire.
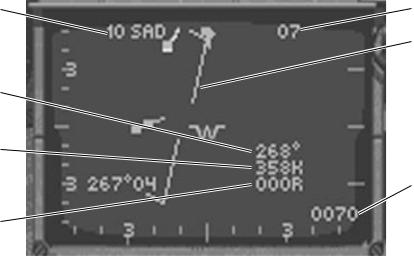
Bombsight
In A-G mode with LAUs or with the gun selected, the bombsight (a targeting dot with a circle around it) will appear near the Center Point. When the dot is on the target, press z to fire.
12 |
F A L C O N 3 . 0 |
|
|
Bombsight
With all other A-G weapons, weapons delivery requires two actions: designating the target and releasing the weapon. A bombsight similar to that used for the gun and LAU rockets will appear with a line extending upwards from the targeting dot. When the target is in the targeting circle at the base of the line, hit zonce. This designates the target, identifying it for the on-board bombing computer. If you continue flying over the target, the computer will automatically release the bomb at the correct time to strike the target you selected. Or you can release it yourself by pressing zany time after designating. Pressing ztwice quickly will release a bomb immediately.
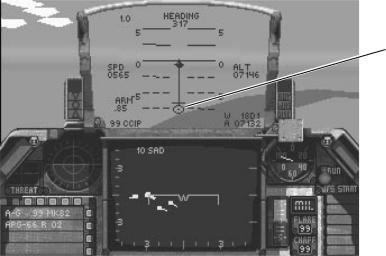
The radar
Below the HUD is the Radar/Electro-Optical (REO) Display. This is where the various radar and weapons guidance systems display their information. There are two REO Display modes; one is for air-to-air combat, and one is for air-to-ground.
S E C T I O N I I : I N S T A N T A C T I O N |
13 |
|
|
Radar |
Target’s |
Scale |
Altitude |
|
Waterline |
Target’s |
|
Heading |
|
Target’s |
|
Airspeed |
|
|
Closure |
|
Rate |
Target’s |
|
Aspect |
|
Angle |
|
In air-to-air mode, your plane’s position will be in the center of the REO display. Any plane above the center will be in front of you, and any plane below the REO’s center will be behind you. The long green line across the center is called the waterline and shows your roll (your plane’s left-right tilt in relationship to the ground). The ends of the waterline bend toward the ground to aid in orientation.
In the upper left corner is a number followed by the letters “SAD” (Situation Awareness Display). The number shows the scale of the display. The number “20,” for example, means that it is 20 miles from the top of the display to the waterline. The scale will automatically change as necessary.
In the upper right corner of the REO Display is a two-digit number. This is the enemy’s altitude in thousands of feet.
Near the lower right corner of the A-A REO Display are three numbers. The top one is the target’s heading in degrees, the middle one is the target’s airspeed in knots, and the bottom one is the aspect angle to the target. Aspect angle is covered in Section VI: Air Combat School.
In the very bottom of the right side is the closure rate, which is also displayed in the HUD.
If you have any radar contacts, they will be shown on your REO Display. The target you are tracking will show up as a diamond; any other contacts will be displayed as squares. The color of the square or diamond indicates the contact’s relative altitude as compared to your F-16’s altitude:
jOrange targets are more than 3,000 feet below you.
jWhite targets are within 3,000 feet of you in altitude.
jBlue targets are over 3,000 feet above you.
The line extending outward behind each radar contact shows the contact’s direction of travel. To track a different target, press T.
14 |
F A L C O N 3 . 0 |
|
|
In air-to-ground mode, Maverick missiles and GBUs use the REO to display a video picture from their target acquisition sensors. When you have selected either of these weapons, the REO will display a set of cross hairs and video of any targets picked up by the sensor.
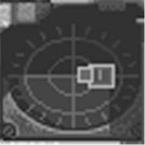
Using the Threat Warning System
The circular screen to the left of the REO Display is the Threat Warning Indicator. Any enemy with active radar will show up as a blip on this screen. The screen is divided by two lines. Anything above the horizontal line is in front of your plane, and everything below the line is behind you. The shape of the blip indicates what is emitting the radar signals: diamonds are enemy aircraft, large squares are enemy surface-to-air missiles, and small squares are air-to-air missiles in flight. The numbers inside the blips indicate the type of radar being used (which is not important in Instant Action).
To the left of the Threat Indicator is the Threat Warning Panel. If enemy radar locks onto your plane, the “LCK” light will come on. If a missile is launched at you, the “LNH” light will warn you.
S E C T I O N I I : I N S T A N T A C T I O N |
15 |
|
|
Have a look around
You have many different views to help you see your adversaries and your position. Select these views by pressing the number keys 1 through 0 or j, y, h, and u (1, 3, 7 and 9 on the numeric keypad).
In all five outside views, 1will zoom in, 2will zoom out and 3and 4will rotate the image.
Press 1 to switch to Satellite View, which shows your plane from above.
Press 2 to switch to Ground View, which shows your plane from below.
Press 7 to switch to the Wingman View, which is not active because you are on your own in Instant Action.
Switch to Track View by pressing 9. This shows your plane from behind if no enemies are in view. If enemies are in sight, the view will always keep the target and your plane visible at the same time. Also, if you’ve got a missile coming inbound, this view will keep it in sight.
The Chase View also shows your plane from behind, but as if the camera were chasing you
— it lags behind your maneuvers slightly, whereas the tracking view does not. Press 0 (zero) to switch to the chase plane view.
Select the Left View from the cockpit by pressing h( 7on the numeric keypad) or 4. Switch to the Right View by pressing u( 9on the numeric keypad) or 6. Check your six, or Rear View, by pressing y( 3 on the numeric keypad) or 5.
Press j(1 on the numeric keypad) to return to the Front View.
16 |
F A L C O N 3 . 0 |
|
|
Level advancement
After you destroy a certain number of enemy aircraft, you will automatically advance to the next level of Instant Action play. Every enemy pilot in this new wave of aircraft will have an Enemy Logic Level set one higher than what you selected in the Configuration screen. (For example, if you had Enemy Logic Level set to VETERAN in the Configuration screen, the next wave of aircraft will have Ace pilots.) After the Ace aircraft wave, all pilots in subsequent logic level are set to Ace.
Scoring
Instant Action is the only part of Falcon 3.0 in which a score is kept. The score for destroying any air or ground target is determined by the difficulty of the feat. The skill, the aircraft and the weapons of a defeated pilot all add up to determine the point value of a dogfight victory. In addition, the presence of multiple bogeys in the area will increase the value of both air and ground targets. Although you have been given unlimited weapons, every missile fired and every bomb dropped subtracts from your point total. Then, your base score will be multiplied based on your realism setting in the Configuration area. So, if you want a high score, don’t waste your weapons. This is good practice for the campaign anyway, since every weapon will be precious at the higher levels of realism.
To erase the Instant Action high scores list, simply erase the file TOPTEN from your FALCON3 directory. Type del topten eat the DOS prompt.
Good luck and watch your six!
S E C T I O N
III |
17 |
S E C T I O N I I I : I N S T A L L A T O N A N D L O A D I N G |
INSTALLATION AND LOADING
18 |
F A L C O N 3 . 0 |
|
|
Installation and Loading introduction
Please read this chapter for instructions on how to install and load Falcon 3.0. In addition, if you have any trouble getting the game to run, please refer to the troubleshooting section at the end of this section.
Contents of the package
Your Falcon 3.0 package should contain:
jFalcon 3.0 CD-ROM
jFalcon 3.0 Flight Manual
jFalcon 3.0 Quick Reference Card
System requirements
The minimum system requirements for Falcon 3.0 are:
jIBM PC 80386 or 80486 compatible
j1MB RAM
j602K (616,448 bytes) of free conventional memory
jDOS 5.0 or later
jVGA graphics
jCD-ROM drive
jHard drive with 11MB free We recommend the following:
jJoystick, dual joysticks, CH FlightStick Pro, ThrustMaster Flight Control System (FCS) or rudder pedals
jThrustMaster Weapons Control System (WCS)
jMouse
jAd Lib, Sound Blaster, Roland MT-32 or Roland LAPC-1 sound card
j2MB RAM with EMS (expanded memory)
jExpanded memory manager, such as EMM 386, QEMM or 386Max
jNull-modem serial cable or modem for two-player communications
For optimum performance, you should have the following:
jIBM PC 80486 compatible
j4MB RAM with EMS (expanded memory)
j602K (616,448 bytes) of free conventional memory
jDOS 5.0 or later
j16-bit VGA graphics
jDouble-speed CD-ROM drive
S E C T I O N I I I : I N S T A L L A T I O N A N D L O A D I N G |
19 |
|
|
jHard drive with 11MB free
jDual joysticks, CH FlightStick Pro with rudder pedals, or ThrustMaster FCS and WCS with rudder pedals
jSound Blaster and either a Roland MT-32 or Roland LAPC-1 sound card
How to install
Before starting the installation, please be sure you have the proper CD-ROM software installed on your machine. If you are unsure whether you have the proper software installed on your computer, consult your CD-ROM owner’s manual for more information.
Please follow the instructions below only if you are running DOS 5.0 through DOS 6.22. If you are running Windows 95, please refer to the “Compatibility with Windows” section.
1.Insert the Falcon 3.0 disc in your CD-ROM drive.
2.Type d: eat the DOS prompt. (If your CD-ROM drive is a letter other than D, type that letter instead.)
3.Type install eat the DOS prompt.
4.Click on “View and print Readme” to view the Readme file which contains important last-minute information. Use the mouse or arrow keys to read the entire file. If you wish to print the Readme file for future reference, click the Print Readme button. When you are finished, click the Exit button to return to the main menu.
5.Click on “Install game.”
6.Click on “Install standard version.” The next screen checks to see if your computer system meets the system requirements for Falcon 3.0. The three columns onscreen are a description of the requirement category, the game’s requirement and the detected value on your computer. If a system requirement is highlighted in yellow, you will be able to install Falcon 3.0 but may have problems running it. If a particular requirement is highlighted in red, you cannot install Falcon 3.0.
7.If a particular system requirement is highlighted in red, click on “Suggest Fix” for possible solutions on solving the problem.
8.Click the OK button to continue.
9.Select a hard drive from the list in the left window. Make sure you have enough hard drive space (at least 11MB free). Click OK to continue.
10.The next screen allows you to change the destination directory where Falcon 3.0 will be installed. The default directory is \FALCON3. If you wish to change the path, press the Bkey to erase “\FALCON3” and type in a new name. Otherwise, click the OK button to continue.
11.Click the Install button to confirm that the source drive (your CD-ROM drive), destination drive and destination path are correct.
20 |
F A L C O N 3 . 0 |
|
|
12.The installer will begin to copy files from the Falcon 3.0 CD-ROM to your hard drive. The bar in the upper left-hand corner displays the completion percentage of the installation. If you need to stop the installation, click the Abort button.
13.After all the files have been copied to your hard drive, a summary of “suggested fixes” will be displayed as well as instructions on how to load the game.
Configuring your memory
The most common problem in running Falcon 3.0 is finding enough free conventional memory. Most IBM PC compatible computers come standard with at least 1MB RAM. The first 640K RAM is known as conventional memory. Physical memory above 1MB RAM is known as extended memory. Some of Falcon 3.0’s features use expanded memory (EMS). Memory managers (such as EMM386, QEMM or 386Max) can convert extended memory to expanded memory.
Due to the realism and complexities of the game, Falcon 3.0 requires a lot of free conventional memory to operate: 602K or 616,448 bytes.
If you do not have enough free conventional memory, an error message will be displayed: “Falcon version 3.05 requires 602K (616,448 bytes) of free conventional RAM.”
Type mem eat the DOS prompt to see how much free conventional memory you have. The number on the line “largest executable program size” must be at least 616,448 bytes in order to run Falcon 3.0.
Finding free memory
To configure your computer with as much available conventional memory as possible, you must load DOS high. Check your CONFIG.SYS file to make sure it includes the line “DOS=HIGH,UMB.”
A commercial memory manager such as QEMM or 386Max can improve your computer’s performance by using less conventional memory. Run your memory manager’s optimization program to free up as much conventional memory as possible. If you’re using DOS 6.0 or later, type memmaker e at the DOS prompt. If you’re using QEMM, type optimize e. If you’re using 386Max, type maximize e.
Falcon 3.0 will not run if you have any RAM-resident programs (such as RAM disks, DOS shells, print spoolers, etc.) running in the background. You can try loading them into high memory instead of conventional memory. You can also temporarily disable them by temporarily modifying your AUTOEXEC.BAT and CONFIG.SYS files so they do not load TSRs.
S E C T I O N I I I : I N S T A L L A T I O N A N D L O A D I N G |
21 |
|
|
Creating a boot disk
If you are still having problems freeing up enough conventional memory, the simplest solution is to create a special floppy disk called a “boot disk.” Use this disk to configure your computer when you turn it on. The boot disk contains versions of your computer’s startup files (AUTOEXEC.BAT and CONFIG.SYS) that will work with Falcon 3.0. When you are done playing with the games, you can remove the boot disk, restart your computer and return to your original configuration.
If you are running DOS 5.0 through DOS 6.22, we have supplied batch files for different configurations. Before you start, make sure you have a blank floppy disk available.
1.Insert a blank disk into your floppy drive.
2.To create a bootable system disk, type format a: /s eat the DOS prompt.
3.Type cd\falcon3 eto change to your \FALCON3 directory.
4.Type one of the following depending on your computer system:
bootemm to create a boot disk that configures 1MB of EMS as well as works for Packard Bell and IBM PS/1 computers
bootmice to create a boot disk that configures 1MB of EMS and loads the mouse driver high
bootdspc to create a boot disk for a computer running DoubleSpace (not DriveSpace)
bootnet to create a boot disk that loads the network drivers, IPX and NET5
5.If you are using a software compression driver on your hard drive (such as Stacker or Super Stor), you may need to modify your boot disk. Edit the CONFIG.SYS file on the boot disk to include the device driver and load it high with the Devicehigh command. Consult the manual for your software compression utility if you need further instructions on how to load the driver into high memory.
6.To use your boot disk, turn off your computer, insert the boot disk into the floppy drive and then restart your computer.
22 |
F A L C O N 3 . 0 |
|
|
Boot disk examples
The AUTOEXEC.BAT and CONFIG.SYS files below show examples for different computer configurations if you are running DOS 5.0 through DOS 6.22.
For mouse, 1MB EMS and EMM386:
AUTOEXEC.BAT
prompt $p$g
path c:\dos;c:\cd lh c:\mouse\mouse
CONFIG.SYS
device=c:\dos\himem.sys device=c:\dos\emm386.exe 1024 ram buffers=30,0
files=30
dos=high,umb
stacks=0,0
For QEMM, DoubleSpace, mouse and SCSI:
AUTOEXEC.BAT
path c:\dos;c:\qemm;c:\msmouse;c:\utils;c:\bat prompt $p$g
c:\msmouse\omouse.com (replace with your mouse driver)
CONFIG.SYS
device=c:\qemm\qemm386.sys ram dos=high
files=30
buffers=30
stacks=0,0
device=c:\qemm\loadhi.sys c:\dos\dblspace.sys /move (DoubleSpace driver)
S E C T I O N I I I : I N S T A L L A T I O N A N D L O A D I N G |
23 |
|
|
Compatibility with Windows
Unfortunately, Falcon 3.0 will not run under Windows 3.0 or Windows 3.1.
Although we do not recommend running Falcon 3.0 under Windows 95, it can be done if you run the game in MS-DOS mode only and if you can free up enough conventional memory (602K or 616,448 bytes).
MS-DOS mode in Windows 95
To install Falcon 3.0 under Windows 95, switch to MS-DOS mode:
1.Select “Shut Down…” from the Start menu.
2.Select “Restart the computer in MS-DOS mode?” from the dialog box.
3.You will see the DOS prompt (which will usually look like C:\WINDOWS).
4.Insert the Falcon 3.0 disc into your CD-ROM drive.
5.Change to your CD-ROM drive by typing d: e(if your CD-ROM drive is a letter other than D, substitute that letter instead).
6.Type install eto start the Falcon 3.0 installer and follow the instructions under “How to install.”
Windows 95 boot disk
The biggest problem in getting Falcon 3.0 to run under Windows 95 is freeing up enough conventional memory (602K or 616,448 bytes). The easiest way to free up enough conventional memory under Windows 95 is to use a boot disk. We have created a utility that creates a boot disk specifically for Windows 95, available online at our Customer Support BBS, America Online, GEnie, CompuServe, FTP site and other locations. Look for the file named FAL95.EXE. Download the file and follow the instructions in the Readme file to create a Windows 95 boot disk for Falcon 3.0.
24 |
F A L C O N 3 . 0 |
|
|
You can also create your own Windows 95 boot disk for Falcon 3.0 by following the instructions below:
1.Insert a blank disk into your floppy drive.
2.Double-click the icon for “My Computer.”
3.Right-click on the icon for your floppy drive, usually “31⁄2" Floppy (A:).”
4.Select “Format…” from the pop-down menu.
5.In the Format dialog box, select “Full” for “Format type” and click to put a checkmark next to “Copy system files” under “Other options.”
6.Click on the Start button.
7.After the floppy disk has been formatted, click on the Close button to exit the Format dialog box.
8.From the Start menu, select Notepad from the Accessories program group.
9.Type the following:
prompt $p$g
path c:\windows;c:\windows\command;c:\dos loadhigh mouse
c:
10.Select “Save” from the File menu.
11.Click twice on the icon that moves up one level. (The icon looks like a folder with an up arrow.)
12.Double-click the icon for your floppy drive, usually “31⁄2" Floppy (A:).”
13.Click in the box next to “File name:” and type autoexec.bat.
14.Click the Save button.
15.Select “New” from the File menu.
16.Type the following:
device=c:\windows\himem.sys device=c:\windows\emm386.exe 2048 ram dos=high,umb
buffers=30
files=30
stacks=0,0
17.Select “Save” from the File menu.
18.Click in the box next to “File name:” and type config.sys.
19.Click the Save button.
20.Close the Notepad accessory program.
21.In order to use your mouse in Falcon 3.0, you must copy a mouse driver onto this boot disk. The mouse driver is usually named something like MOUSE.COM or MOUSE.EXE and is usually located in a directory called \MOUSE.
S E C T I O N I I I : I N S T A L L A T I O N A N D L O A D I N G |
25 |
|
|
22.From the Start menu, select Windows Explorer.
23.Right-click on the icon for your hard drive (usually C:).
24.Select “Find…” from the pop-down menu.
25.In box for “Named:” type mouse.
26.Look for a file called MOUSE.EXE or MOUSE.COM in the list of found files.
27.To copy the mouse driver to your boot disk, drag the icon for MOUSE.EXE or MOUSE.COM to the floppy drive icon, which is usually “31⁄2" Floppy (A:)” and is located in the window for “My Computer.”
28.To use the boot disk, insert it into your floppy drive and select “Shut Down…” Choose “Restart your computer?” in the next dialog box. After your computer reboots, you should now have enough free conventional memory to install and run Falcon 3.0. Use this boot disk each time you want to play Falcon 3.0.
EMS (expanded memory)
Falcon 3.0 takes advantage of EMS if you have at least 1MB of EMS. EMS can be used in different ways: to run the ACMI, to load altitude and object data (for faster access), and to play the digitized radio messages. The latter three options can be turned on and off from the System Setup screen.
To check how much EMS you have, type mem eat the DOS prompt. The number next to “bytes free EMS memory” tells you how much available EMS you have. You will need a memory manager (such as EMM386, QEMM or 386Max) to convert extended memory into expanded memory. See your memory manager’s manual for information on how to configure your system for expanded memory.
If your computer has only 1MB RAM total, we recommend using your memory manager to load other device drivers (mouse, network, etc.) into high memory. You will be unable to hear the digitized radio messages or use the ACMI replay. You will be able to play in Communications mode, but unless your network drivers are loaded high, you can’t play over a Novell NetWare-compatible network.
If your computer has 2MB RAM total, you can edit your CONFIG.SYS file to have 1MB (1024K) EMS. This will allow you to hear digitized radio messages and place the altitude and object data into expanded memory. If you don’t have enough EMS remaining to use the ACMI, you may want to turn off some of the other options.
If your computer has at least 4MB RAM total, you should be able to load all the altitude and object data into expanded memory as well as hear the digitized radio messages. This will also give you enough EMS to use the ACMI. The more available EMS you have, the longer your ACMI replay can be.
26 |
F A L C O N 3 . 0 |
|
|
Troubleshooting
If Falcon 3.0 is freezing with a blank screen as soon as you try to run the game, the problem is most likely caused by an error in your Falcon 3.0 configuration file. The easiest way to fix this problem is to delete the FALCON3.DEF file by typing del falcon3.def ewhen you’re in the \FALCON3 directory. After you load the game, go to the System Setup screen in Configuration and select the correct hardware options.
If Falcon 3.0 is freezing with a blank screen and you have an Acer motherboard, you need to use ACER.COM, a utility we supply to solve the problem. The utility is located in the \UTILS\ACER directory on your Falcon 3.0 CD-ROM. See the ACER.TXT file for more information.
If you are having video flickering problems and your video card is based on a Tseng ET4000/w32 chip set, you need to use the supplied replacement files to solve the problem. The files are located in the \UTILS\TSENG directory on your Falcon 3.0 CD-ROM. See the TSENG.TXT file for more information.
If you want greater control of your joystick, you may want to load TMSTICK.COM. For more information on this joystick utility, please read the TMSTICK.TXT file in the \UTILS\TMSTICK directory on your Falcon 3.0 CD-ROM.
Compatibility with Falcon 3.0 add-ons
Unfortunately, because the Classic version of Falcon 3.0 is the latest version, it is not compatible with any of the add-on programs: Operation: Fighting Tiger, MiG-29 or Hornet: Naval Strike Fighter. You cannot install any of these add-on programs to this version of
Falcon 3.0.
Loading...