


Table of Contents
GETTING STARTED |
2 |
Installing Descent: FreeSpace The Great War |
2 |
PLAYING DESCENT: FREESPACE THE GREAT WAR |
2 |
Launching |
2 |
Creating A Pilot |
3 |
The Main Hall |
4 |
Briefing |
5 |
Commit |
6 |
Debriefing |
7 |
Combat Ready |
8 |
MULTIPLAYER DESCENT: FREESPACE THE GREAT WAR |
9 |
Multiplayer Basics |
9 |
Creating a Pilot |
10 |
Join A Game |
10 |
Starting A New Game |
12 |
Host Setup |
14 |
Host Options |
15 |
Briefing |
17 |
Ship and Weapon Selection |
17 |
In-mission |
19 |
Debriefing |
19 |
General Network/Multiplayer Options |
20 |
Voice Options |
21 |
Observer Mode |
22 |
Global Options Menu |
22 |
General Options Menu |
23 |
Voice Options Menu |
24 |
Parallax Online |
25 |
Pre-Game Screens |
26 |
Main Hall |
26 |
Options |
27 |
Multi Options Screen |
28 |
Detail Options |
29 |
Controls Config |
31 |
HUD Config |
33 |
Barracks |
34 |
Statistics |
36 |
Tech Room |
38 |
Technical Database |
38 |
|
Table of Contents |
|
Mission Simulator |
38 |
|
View Cutscenes |
39 |
|
Credits Screen |
39 |
|
Campaign Room |
39 |
|
Ready Room |
40 |
|
Command Briefing |
41 |
|
Mission Briefing |
42 |
|
Ship Selection |
43 |
|
Weapons Loadout |
46 |
|
IN-GAME SCREENS |
48 |
|
The HUD (Heads-Up Display) |
48 |
|
MESSAGING WINGMEN |
54 |
|
Message What? |
54 |
|
Select Ship |
54 |
|
What Command? |
55 |
|
REARMING & REPAIRING |
57 |
|
MISSILE FIRING AND COUNTERMEASURES |
58 |
|
Heat-Seeking vs. Aspect-Seeking |
58 |
|
Countermeasures |
59 |
|
ADVANCED TARGETING |
60 |
|
MATCHING SPEED |
60 |
|
ENDING THE MISSION |
61 |
|
FRED (FreeSpace Mission Editor) |
61 |
|
RANK, PROMOTIONS, AND MEDALS |
62 |
|
ENERGY TRANSFER SYSTEM (ETS) |
63 |
|
WEAPON SELECTION & LINKING |
65 |
|
HOTKEYS |
66 |
|
Hotkey Usage |
66 |
|
Defining Hotkeys |
67 |
|
CREDITS |
68 |
|
WARRANTY |
70 |
|
TECHNICAL SUPPORT |
71 |
|
DESCENT: FREESPACE THE GREAT WAR: ©1998 Volition, Inc. All Rights Reserved. Descent, Descent: FreeSpace The Great War, Interplay, the Interplay logo and "By Gamers. For Gamers." are trademarks of Interplay Productions. All Rights Reserved. Parallax is a trademark of Parallax Software Corporation. All Rights Reserved. Volition and the Volition logo are trademarks of Volition, Inc. All Rights Reserved. All other trademarks and copyrights are property of their respective owners.
Descent: FreeSpace
G E T T I N G S T A R T E D
Installing Descent: FreeSpace The Great War
Please see the Installation Instructions insert found in your Descent: FreeSpace box.
If you have installation problems with Descent: FreeSpace, please consult the Troubleshooting section in the README.TXT file. If there is no solution to your problem, please contact Interplay Technical Support for assistance at (949) 553-6678.
P L A Y I N G D E S C E N T :
F R E E S P A C E T H E G R E A T W A R
This section will get you playing Descent: FreeSpace quickly.
Launching
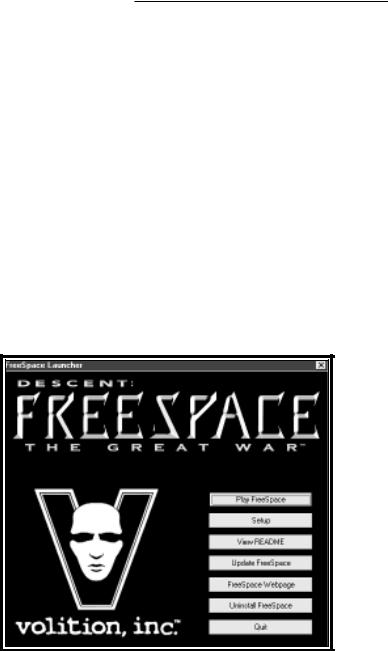
The first thing you’ll see when you run Descent: FreeSpace is the Launcher program. The Launcher allows you to change hardware options, among other things.
2
The Great War™
If you have a 3D hardware accelerator, click the “Setup” button. Under the Video tab, click the “Detect Available Cards” button. The drop-down list will now contain your rendering options. Choose the one corresponding to your 3D accelerator and press or click the “Ok” button.
On the Descent: FreeSpace Launcher menu, click the “Play FreeSpace,” button and the game will start.
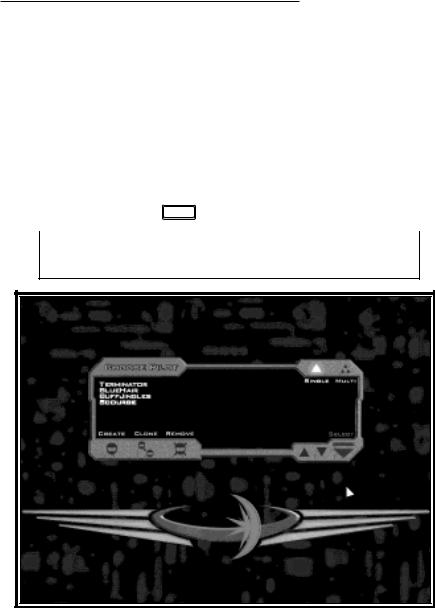
Creating a Pilot
The first screen you’ll see is the Pilot Selection screen. Since this is the first time Descent: FreeSpace has been played, you will start by being prompted for your pilot’s Callsign. This is the nickname of your pilot. When you have typed
in your pilot’s Callsign, press |
Return |
and click the “Select” button. |
|
|
|
|
|
|
NOTE: If this is |
the |
first pilot you are creating, you will |
automatically be taken to the main hall after pressing return.
Once in the game, you may also manage your pilots from the Barracks room.
3

Descent: FreeSpace
The Main Hall
The Main Hall screen serves as the Main Menu for Descent: FreeSpace. From here, you can access the Ready Room, Barracks, Campaign Room, Tech Room, Options screen, or Exit (to Windows). Pressing the right mouse button repeatedly will cycle through the various “hotspots” found in the Main Hall.
Hitting  will bring up a Help Overlay, outlining the locations of the various rooms of the Main Hall. Hitting
 anywhere else in the Descent: FreeSpace interface will bring up similar Help Overlays.
For now, use the mouse to click on the Ready Room to begin your first Training mission.
NOTE: It is strongly recommended that you play the three training missions found at the start of the FreeSpace Campaign. They will teach you the basics of flight control, targeting, weapons management, and communication in the FreeSpace universe.
4
The Great War™
Briefing
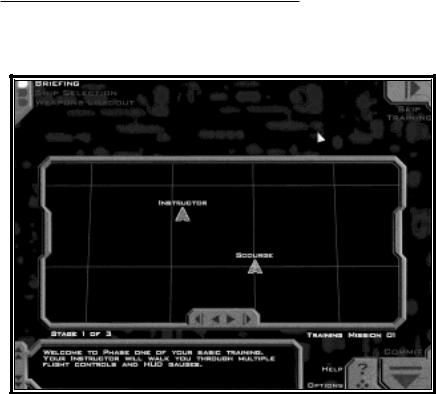
After entering the Ready Room, you will be placed in the first Training mission’s briefing.
This screen is where you will receive the overview of your upcoming mission, including instructions on what your objectives are, and how you might go about meeting them.
In the upper left you’ll see choices for Briefing, Ship Selection, and Weapons Loadout. Later, you will use these buttons to move to the different pre-mission screens. For now, Briefing is all you need.
In the lower right, you’ll see buttons for Options, Help, and Commit. Help is the same as hitting  , and will bring up a screen-specific overlay, briefly explaining the onscreen options.
In the center of the screen is a computer-generated mission map. This iconbased display will show you a graphical overview of what you can expect in this mission, including wing names (wings are groups of ships), ship names, installations, and other objects. You may use the mouse to click on any map icon to see a real-time view of how it will appear in the mission.
5
Descent: FreeSpace
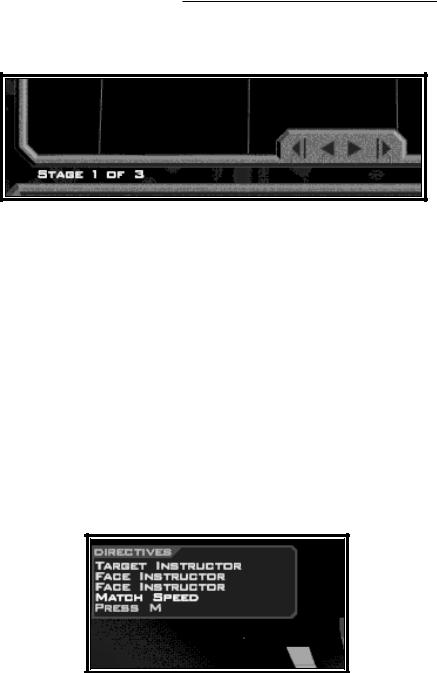
Below the mission map is the actual briefing text. If you have voice enabled, the briefings will be read to you, one “stage” at a time. To navigate through the briefing stages, use the arrow buttons on the bottom edge of the mission map.
Stage indicator and stage arrows in Briefing.
Commit!
Once you have reviewed the briefing for this training mission, click the “Commit” button in the lower right corner. Clicking Commit will accept your mission orders and put you into the actual game.
For help regarding the flight and combat controls, press  while in a mission. Screens detailing the current key controls will appear. You may also use the Reference Card found in your Descent: FreeSpace box for a list of the default control keys.
For the training missions, follow the instructions given to you by your instructor. He will outline the basics of Descent: FreeSpace fighter control and combat. Watch the onscreen messages to see the keys needed to follow his orders.
Your instructions will also appear in the Directives Display found on the left side of your HUD (heads-up display).
6
The Great War™
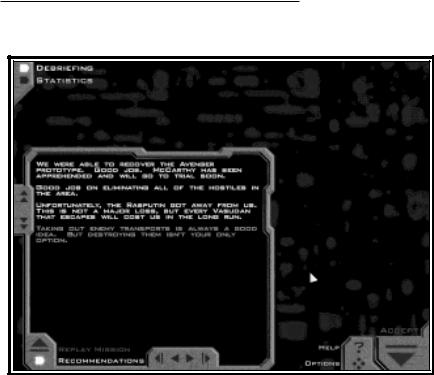
Debriefing
Following each mission, you will be shown the Debriefing Screen.
Your commanding officer will give you a breakdown of the mission, and evaluate your performance. You may also view your Pilot’s mission statistics from here.
If you perform exceedingly well in combat situations, you may be granted a medal or promotion during Debriefing. If you did not perform well enough, and failed one or more of your Primary Objectives, you may be forced to Replay the mission.
By clicking the “Recommendations” button, you maybe given specific tips on how to correctly meet all outlined objectives.
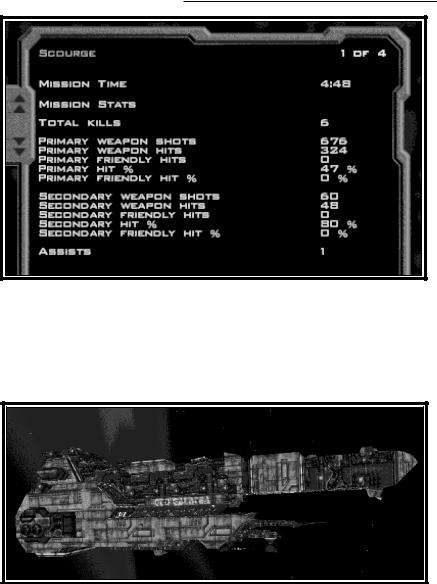
In the upper left, you’ll see that you can view Statistics for the mission you’ve just flown. Viewing flight statistics is a good way to measure your performance.
7
Descent: FreeSpace
If you have followed your training instructions, you should now be ready for your remaining Training missions. Click Accept to advance to the next mission.
Combat Ready!
Once your Training missions are complete, you will begin your tour of duty aboard the GTD Galatea by flying your first combat mission. Fly well, Pilot!
8

The Great War™
M U L T I P L A Y E R D E S C E N T :
F R E E S P A C E T H E G R E A T W A R
Descent: FreeSpace allows you to play with up to 12 other people over any network which supports TCP/IP.
Volition provides a free Internet game tracking and statistic keeping service called Parallax Online. This service will allow players all over the world to meet and play Descent: FreeSpace games together. On top of providing a place to meet, Parallax Online will track statistics for all registered players.
See page 25 for details on Parallax Online.
Multiplayer Basics
There are several different multiplayer modes in Descent: FreeSpace: cooperative, team vs. team, and dogfight. In cooperative games, all players fly on the same team working together to achieve similar objectives. In team vs. team mode, up to 4 players on a side fly against each other, each team having their own set of objectives to achieve. In dogfight mode, it is every pilot for himself in an attempt to rack up the highest number of kills.
Multiplayer games can take place as a single mission or a campaign. A multiplayer campaign has all the same characteristics of a single player campaign, including multiple missions and mission branching.
Descent: FreeSpace multiplayer games always have one server, and one or more clients. The server of a multiplayer game is the machine which runs the game simulation for all other clients in the game. Additionally, there is always one host of the game. In general, the host and the server of the game are the same. See the section on “Dedicated Servers” in the README.TXT file found in your Freespace directory, for more information on running a server which doesn’t require a host.
The speed of your network game is mostly dependent on the speed of your connection to the server of the game. Because the server of the game sends almost all game related information to clients, this connection speed dictates how fast a client’s machine will update the game state. The connection speed is measured by the ping time. The lower the ping time, the faster your connection to the server.
9
Descent: FreeSpace
SPECIAL NOTE: In order to serve a multiplayer game on the internet, you must have a fast connection to the Internet. It is recommended that you have at least a 56k Modem Connection in order to run a game server.
Creating a Pilot
You must first create a multiplayer pilot from the Pilot Selection screen or from the Barracks room. See the Barracks section on page 34 for the different ways in which you may manage your multiplayer pilot.
Join a Game!
Once you have created and selected a multiplayer pilot, you can enter the Ready Room to join a game.
This screen will list all active games that your computer can find. Each line in the join window will contain the name of a game, the type of game being played (cooperative, team vs. team, dogfight), the status of the game (forming, briefing, in mission, etc), number of players, and ping time to the server.
10
The Great War™
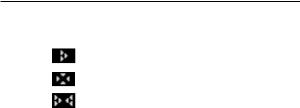
The type of game is represented by the following icons:
Cooperative
Dogfight
Team vs. Team
The status of the game may be one of the following:
•Forming – The game has not yet started. Depending on game options, a player may join during this stage.
•Briefing – The game has entered the briefing stage where players get their objectives and select their ships and weapons. A player may not join a game when it is in this state.
•In Game – The mission is currently being flown. Depending on game options, a player may join during this state.
•Paused – The mission is currently paused. Players may not join during this state.
•Debriefing – All players are in the debriefing stage. Players may be able to join the game during this state.
Once you find a game that you wish to join, double click on the game title, or highlight the game title and click the join button. If you try to join a game that is not accepting players, or is in a state in which players cannot join, you will receive a dialog indicating why you could not join the game. Once you have joined a game, you are placed in the following screen:
11
Descent: FreeSpace
This screen shows the other players currently in the game, a name and description of the mission that the host of the game has selected, and a large chat window.
When the selected mission is a team vs. team mission, all players will have red or green team icons to the left of their name. Any client may choose their own team by highlighting their pilot name, and selecting one of the two team buttons on the pilot listing. However, the server may choose to reassign that client to another team. If the server changes the client to a new team, the client may no longer select their own team.
Once the host has decided to start the game, all clients are automatically moved into the briefing stage.
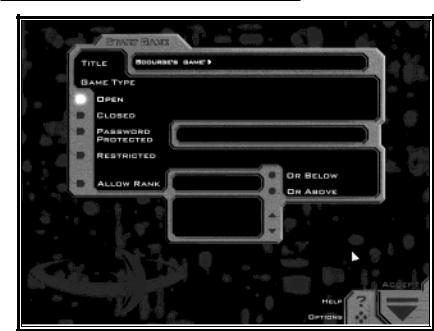
Starting a New Game
If you wish to start your own game, click on the “Create Game” button in the join screen. Once you click this button, you are shown the following screen:
12
The Great War™
You may pick a name for your game. You also have several options about restricting who can join your game and when they can join. The following is a list of options that you can choose:
*Open Game – In an open multiplayer game, any client may join your game at anytime during which joining is allowed (i.e. the forming, in-mission, and debriefing states).
*Closed Game – In a closed multiplayer game, clients may only join during the forming state. Any client attempting to join during the in-mission or debriefing state will be unable to join.
*Restricted Game – A restricted game allows the host to accept or reject any client wishing to join when the client tries to join in mission. When a client
does try to join in mission, the host must accept or reject that join request by pressing  or
or  .
.
*Password Protected – You can assign a password to your game. A client may only join your game if they know the password. The password is always required to join the game, regardless of the state.
13
Descent: FreeSpace
*Rank Allowances – You can further restrict the above four types of games, by allowing only players above or below a certain rank. Any player who tries to join and does not meet the rank criteria is rejected.
Once you have selected your name, and what join methods you wish to allow, click on the “Accept” button.
Host Setup
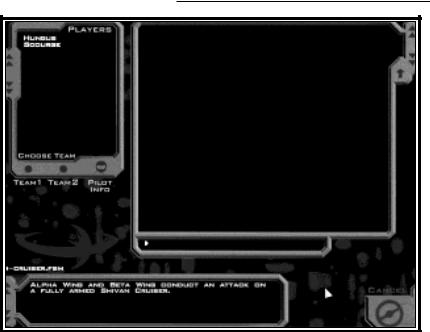
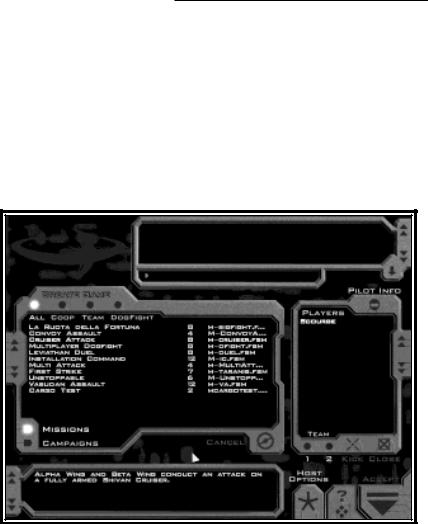
You are now in the host setup screen. From here, you may select which mission or campaign to play, choose teams for team vs. team missions, and select the game options for the game which you are starting.
The mission/campaign selection area allows you to choose what mission or campaign you wish to fly. Click the ‘Missions’ button to display which multiplayer missions are available, and click the ‘Campaigns’ button to display all available multiplayer campaigns. Additionally, you can use the filter buttons (All, Coop, Team, Dogfight) along the top of this display to narrow down your choices to a particular type of multiplayer game that you wish to play.
14

The Great War™
The player list area shows what clients have currently joined your game. You may use the buttons on this box as follows:
*Kick – Clicking this button will kick the selected player from the game.
*Close – When this button is active, no other clients may join your game. Once you leave the host setup screen, clients may once again join if the restrictions allow.
*Team 1 / 2 – When a team vs. team mission or campaign is selected, you may use these buttons to place players on the team you desire.
There is also a chatbox in this screen which you can use to communicate with other players in the game. Notice the dropdown button on the chatbox which allows you to expand the box downward allowing you to see more of the previous chat lines. Clicking this button again allows you to compress the chatbox to its original size.
Host Options
There are a number of options which can be set for a multiplayer game by the host. The options screen is reached by clicking the “Host Options” button on the host setup screen.
15

Descent: FreeSpace
Host Options Cont.
AI Orders: Determines which players can use the Comm menu system to order AI (artificial intelligence) ships.
Observers: This specifies the number of permanent observers allowed in the mission, 0 - 4. This number applies only to the number of people who initially join a mission as an observer. It has no bearing on players who become observers after running out of respawns.
End Mission: Determines who can end the mission by jumping out (default  -
- ).
).
Time Limit: Specifies the maximum duration of a mission (in minutes). After this time has expired, all players are automatically warped out of a mission. A setting of 0 means no time limit.
Respawn Limit: The number of respawns available to a player in a mission. This value may be between 0 and the maximum number specified in the mission file.
Kill Limit: When any players kill count reaches this limit, the mission is automatically marked as over and all players are warped out. Applicable only in multiplayer missions.
Skill Level: Specifies the skill level that the selected multiplayer mission will be played at. This option is distinct from the skill level slider in the Global Options menu.
Voice Transmission: Determines whether or not real-time voice transmission is allowed during the multiplayer game.
Voice Quality: Sets the quality of voice for real-time voice transmission (if enabled). The higher the setting, the higher the CPU usage for compression and decompression. 5 is a good balance between compression and CPU usage.
Message Duration: Specifies the number of seconds allowed for a real-time voice message.
Per Player Voice Wait: This setting is used to specify how long a player must wait after sending a real-time voice message before he can send a new message. For instance, if this option is set to 15 seconds, a player will not be allowed to send real-time voice messages more than once per 15 seconds.
16
The Great War™
Briefing
The multiplayer briefing gives each player their orders and instructions for their mission. In cooperative missions, this briefing is the same for all players in the game. For team vs. team missions, each team will receive separate briefings.
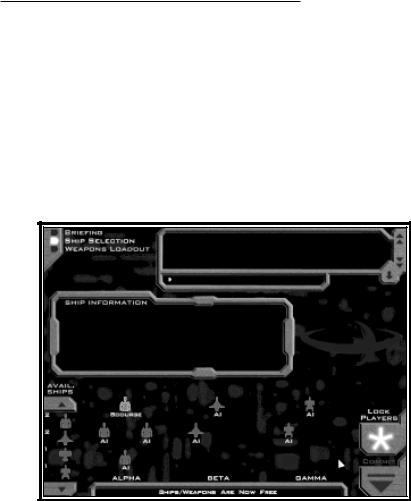
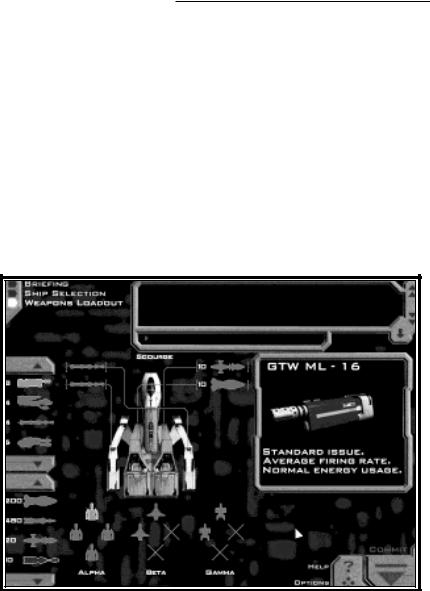
Ship and Weapon Selection
Ship selection for multiplayer is different than for single player. It also varies slightly depending on the mode of play. First, all players must be assigned to a ship, then ships and weapons may be selected. All players are initially assigned a random ship which may be changed by the host (or team captain in a team vs. team game).
In cooperative missions, the host of the game must assign all players to ships before players can choose their own ship and weapons. The host is free to drag and drop player names from one ship to another. For example, some players of the game may wish to fly in a particular wing which contains only bombers. The host can move those players into that wing by dragging and dropping a player into the desired wing position. Once all players have been placed, the host clicks on the “Lock” button. Once players have been locked, they are free to start making ship/weapon selections.
17
Descent: FreeSpace
(Note: once players have been locked, they cannot be unlocked). Any ships which are not being flown by a player will be flown by the AI.
In team vs. team missions, the “team captains” of each team must assign players to ships before the ship selection process can begin. The “team captain” is designated by the host when the teams are initially formed before the briefing stage begins. Once each team captain assigns players, the captain must click on the “lock” button after which all members of his team may select their ship and weapons if desired.
After players have been locked, all clients in the game may be free to select a different ship and weapons for themselves. Ship and weapon selection for clients happens in the exact same manner as for single player, with the only difference being that clients can only outfit their own ships. The host has the ability to outfit his ship, and any AI ships.
In cooperative missions, all players must share the same ship and weapon resources. In team vs. team missions, all players in a particular team must share the same ship and weapon resources.
18

The Great War™
Once you are done making your ship and weapon choices, click the “Commit” button on any of the three screens (briefing, ship selection, or weapon selection). Once everyone has committed their changes, you are ready to start your mission!
In-mission
Missions in multiplayer games proceed just like single player missions with a few exceptions.
When a multiplayer game is paused, every player in the game is paused automatically. The pause screen in multiplayer has a chat area for people to communicate during the pause time. Only the player who paused the game or the host of the game may unpause the game after it has been paused unless setup otherwise.
If you target a ship being flown by a human player, their callsign will appear in the target info area on the HUD.
When you die in multiplayer games, you will have the ability to respawn into a new ship and continue playing unless designated otherwise by the host. The number of times that a player is allowed to respawn is a mission setting that can be modified by the host in the host options screen. Once out of respawns, a player can either quit, or re-enter the mission as an observer. See page 22 for information on observers.
The mission is over when any player that is allowed to end the mission engages their subspace drives. (See the host options for details on who can end a mission). Once the mission is ended, all players are warped out and taken to the debriefing.
Debriefing
The debriefing screen is very similar to the single player version. The main addition is the ability to view mission statistics for any player currently still in the game by selecting that player in the player list box, then clicking the “Statistics” button in the upper left corner.
If you are playing in campaign mode, once all players have accepted the mission, everyone will be moved to the next mission in the multiplayer campaign.
19
Descent: FreeSpace
General Network/Multiplayer Options
The general network/multiplayer options screen can be reached by pressing  from anywhere in the game, then clicking the “Multi” icon along the top of the options screen.
On the left hand side of this screen, you can choose network options which affect how your computer searches for multiplayer games to join. The “Allow Broadcast” buttons determine whether your machine will look for Descent:
FreeSpace games on your local TCP/IP subnet. If you are using a service provider to connect to the Internet, we recommend that you play Descent: FreeSpace with “Broadcast Locally” off.
If you register with Parallax Online, you may use the area at the bottom left of this screen to input your Parallax Online username and password. When you enter the Ready Room, Descent: FreeSpace will validate your username with Parallax Online. Once validated, any multiplayer game that you start will automatically be registered with Parallax Online. Also, any game statistics will be transferred to Parallax Online once you are done playing.
20

The Great War™
Voice Options
Descent: FreeSpace supports a number of ways to communicate with other players in the game. In addition to a chat box in all pre and post mission screens and the pause dialog, Descent: FreeSpace supports the ability to record your voice through a microphone connected to your sound card, and send that recording to all other players in the game (real-time voice). The real-time voice option is only supported on sound cards which allow recording and playback of sound simultaneously. To see if your sound card supports both, choose the “Setup” button in the Launcher, and click on the Audio tab. This property sheet will indicate whether or not your card supports real-time voice.
Using real-time voice in game is easy. In any screen where a chat box is present (any pre or post mission screen as well as the in-mission pause dialog), you may press and hold the  key which is located directly above the TAB key. While holding the key, talk into your microphone. Once you are done talking, release the key and your recorded voice will be sent to all other players in the game. The amount of time which you can talk is set by the host (see the section Host Options on page 15 for details).
While in mission, voice works slightly differently. There are 4 separate keys ( !  , @
, @  , #
, #  , or $
  ) available for real-time voice and typed messages. Quickly pressing one of these keys allows to you type a message, while pressing and holding one of these keys allows you to send a real-time voice message.
In-Mission Messaging Keys:
1:Press the !  key to send a message to everyone in the game. When typing a message, you may also preface your message with “name:” to send your typed message to a specific player. When using the “name:” feature, your message is sent to all players whose callsign begins with “name”. So “Hungus: blah blah” will send the message “blah blah” to all players whose callsign begins with “Hungus”.
2:Press the @  key to send a message to everyone on your team (team vs. team games only).
3:Press the #  key to send a message to everyone on the opposing team (in team vs. team games only).
4:Press the $  key to send a message to the ship that you currently have targeted.
21

Descent: FreeSpace
In addition to these in-mission messaging options, you may also send “orders” to other players in the game using the Comm Menu system (see page 54). When you message a player using this system, that player will receive a HUD message stating your order.
Observer Mode
An observer of a multiplayer game is simply a player who cannot directly interact with the progress of the mission. You may join a game as an observer by clicking the “Join as Observer” button in the join screen. In mission, if you die and are out of respawns, you are given the option of returning to the game as an observer.
Observers have a limited HUD, but are allowed to use all targeting keys to view the status of any ship in the game. They may also chat, send messages, and use any of the external camera views.
Global Options Menu
There are a number of general network options available in global Options screen ( ).
).
On the left side of this screen, you may set options regarding how Descent: FreeSpace should find games you wish to join. By choosing the IP address option, you will be able to add an IP address to Descent: FreeSpace. Click on the Add button to add an IP address. To remove an IP address from the list, simply click on the IP address you wish to remove, followed by clicking the REM button. Selecting the “Broadcast locally” option allows your computer to search
22
 Loading...