


Should you experience a technical problem concerning the operation of this product, please contact our technical support staff. Also, check out the Support page on our web site listed below:
e-mail: support@cdv.de
Official web site: www.cossacks.com
Credits
Producer - Sergiy Grygorovych
Chief Programmer - Andrew Shpagin
Tools Programmer - Sergei Ivantsov
Chief Artist - Dmitry Zenin
Artist - Andrew Zenin
Artist - Roman Nesin
Historical Advisor/Artist - Andrew Zavolokin
Mission Design - Alex Dragon
Sound Engineer/Composer - Andrew Prishchenko
Sound Engineer - Ilya Ivashchenko
QA-Team
Leader QA-Team - Andrew Lutskevich
Tester - Eugene Volik
Tester - Alex Kovalenko
Tester - Sergei Belov
Project Manager - Anton Bolshakov
General Manager - Sergiy Grygorovych
© 2 0 0 0 C DV S o f t w a re E n t e r t a i n m e n t AG a n d G S C G a m e Wo r l d . D u p l i ca t i o n p ro h i b i t e d e x ce p t i n l e g a l l y s p e c i f i e d |
ca s e s. |
A l l v i o l a t i o n s w i l l b e p ro s e c u t e d u n d e r c i v i l a n d c r i m i n a l l a w. N OT I N T E N D E D F O R R E N TA L P U R P O S E S . |
|
|
|
Table of Contents |
|
1. |
|
GETTING STARTED ....................................................................... |
6 |
2. |
|
STARTING THE GAME .................................................................... |
7 |
2.1 |
Game Menus ................................................................................................................. |
8 |
|
2.2 |
Game Interface ............................................................................................................ |
14 |
|
3. |
|
CONTROLS .............................................................................. |
22 |
4. |
|
GAME SETUP ........................................................................... |
29 |
4.1 |
Single Player ................................................................................................................ |
29 |
|
4.2 |
Multiplayer .................................................................................................................. |
34 |
|
4.3 |
Internet Lobby ............................................................................................................. |
44 |
|
5. |
ON THE WAY TO WORLD DOMINATION ........................................... |
46 |
|
5.1 |
Economic Development ................................................................................................. |
46 |
|
5.2 |
Trade .......................................................................................................................... |
51 |
|
5.3 |
Constructing Buildings ................................................................................................... |
52 |
|
5.4 |
Technologies and Research ............................................................................................. |
56 |
|
5.5 |
Populating Your State .................................................................................................... |
57 |
|
5.6 |
Raising an Army ........................................................................................................... |
58 |
|
5.7 |
Combat Actions ........................................................................................................... |
62 |
|
1
TECHNOLOGIES AND UPGRADES ............................................................ |
69 |
Resource Extraction ................................................................................................................ |
70 |
Unit Creation ........................................................................................................................ |
73 |
Vessels ................................................................................................................................. |
74 |
Infantry and Cavalry............................................................................................................... |
75 |
Forge Harnesses for Horses ...................................................................................................... |
78 |
Artillery ............................................................................................................................... |
81 |
Aerostatics ........................................................................................................................... |
84 |
BUILDINGS ..................................................................................... |
85 |
Economic Structures .............................................................................................................. |
86 |
Dwellings .............................................................................................................................. |
88 |
Mill ................................................................................................................................. |
89 |
Storehouse ........................................................................................................................... |
89 |
Gold Mine ........................................................................................................................... |
90 |
Iron Mine ............................................................................................................................. |
90 |
Coal Mine ............................................................................................................................ |
90 |
Market................................................................................................................................. |
90 |
Fortifications ......................................................................................................................... |
91 |
Military Structures ................................................................................................................. |
92 |
Stable ................................................................................................................................. |
95 |
Artillery Depot...................................................................................................................... |
96 |
Shipyard............................................................................................................................... |
97 |
Scientific and Technological Structures ...................................................................................... |
98 |
Academy.............................................................................................................................. |
98 |
2

Blacksmith .......................................................................................................................... |
100 |
Other Structures .................................................................................................................. |
101 |
Mosque ............................................................................................................................. |
103 |
Church .............................................................................................................................. |
103 |
UNITS ......................................................................................... |
105 |
Civilian Units ...................................................................................................................... |
106 |
Montgolfiers ....................................................................................................................... |
109 |
Shooting Infantry .................................................................................................................. |
119 |
Strelets .............................................................................................................................. |
124 |
Janissary ............................................................................................................................ |
126 |
Grenadiers.......................................................................................................................... |
127 |
Cavalry .............................................................................................................................. |
129 |
Light Cavalry with Cold Steel ................................................................................................. |
129 |
Heavy Cavalry with Cold Steel ............................................................................................... |
136 |
Shooting Cavalry Units ......................................................................................................... |
141 |
Artillery ............................................................................................................................. |
144 |
Cannon .............................................................................................................................. |
145 |
Civilian Vessels .................................................................................................................... |
148 |
Warships ............................................................................................................................ |
149 |
Battleships .......................................................................................................................... |
152 |
INDEX ........................................................................................ |
155 |
LICENCE AGREEMENT ...................................................................... |
160 |
TECHNOLOGY TREE ........................................................................ |
161 |
3

4

Cossacks
European Wars
5
1. GETTING STARTED
1.1.1 SYSTEM REQUIREMENTS
Minimum system requirements: Pentium 200, 32MB of RAM, 1MB DirectX compatible video card, double speed CD-ROM drive, DirectX compatible sound card, mouse. This configuration will allow the game to run satisfactorily with a resolution of 800x600 (to launch the game your monitor must support 1024x768) and a small number of units.
Recommended system requirements: Pentium II 350, 64MB of RAM, 4MB DirectX compatible video card, 10 speed CD-ROM drive, DirectX compatible sound card, mouse. This configuration will allow the game to run satisfactorily in high resolutions with a large number of units.
1.1.2 OPERATING SYSTEM
You must be running Windows 95, Windows 98, Windows 2000 or Windows NT 4.0 with Service Pack 4 in order to play Cossacks.
1.1.3 VIDEO
An SVGA monitor and DirectX compatible video card with 1MB of memory are required to play the game. We recommend that you install the latest driver versions for your video card. The game does not require a 3D acceleration.
Note:
Your monitor must support a 1024x768 resolution for the game to run. If your monitor supports only resolutions lower than 1024x768, Cossacks will not run.
Note:
You must have an installed version of DirectX 6.0 or higher on your computer for the game to run. If you do not already have DirectX installed, you can install it from the game CD.
1.1.4 AUDIO
This game requires any DirectX compatible sound card to run. We recommend installing the latest driver versions for your sound card.
Note:
When testing we discovered that old sound cards in ISA slots and sound cards with Yamaha XG chipsets with old drivers lead to computer problems. This problem can only be eliminated by installing the latest drivers for these video cards.
Note:
You must have an installed version of DirectX 6.0 or higher on your computer for the game to run. If you do not already have DirectX installed, you can install it from the game CD.
6

1.1.5 CONTROLS
The game is controlled by a standard two-button mouse and a Microsoft compatible keyboard.
1.1.6 HARD DRIVE
You will need 400MB of free space on your hard drive and a double speed or faster CD-ROM drive to install and run the game.
1.1.7 MULTIPLAYER
To play a network game via LAN you must have a LAN-connected 10/100 Mbit network card as well as IPX or TCP/IP protocols installed on your computer.
To play via a modem your computer must have a 28,800 Kbit or higher modem with Internet access installed and connected to a local telephone network. Multiplayer games can also be played via any other kind of Internet access: ISDN, Cable, T1 and others.
1.1.8 GAME INSTALLATION
To install the game, please do the following:
1.Place the Cossacks disk in your CD-ROM drive.
2.If your computer has Autorun capability, the Cossacks Installer menu will automatically appear on your screen.
If your computer's Autorun function is disabled, you will have to run the setup.exe file manually from the root directory of the game CD.
3.Then follow the wizard installer instructions.
1.2.1 TROUBLESHOOTING
Note:
We strongly recommend not to overclock your CPU or other components of your computer. Apart from running the risk of rendering these components useless, there is also a chance of your software, including Cossacks, becoming unstable.
2. STARTING THE GAME
You can launch the game by clicking on the Cossacks icon on your desktop if you chose to create this icon during the installation. You can also run the game by choosing the corresponding entry in the Start - Programs - GSC Game World menu.
After launching you can either watch the intro or skip it by pressing any key. This will take you to the Main Menu where you are free to select a Single Player or Network Game, to Load Game, to access the Options, watch the Intro again or Exit the program and return to Windows.
7
2.1 GAME MENUS
2.1.1 MAIN MENU
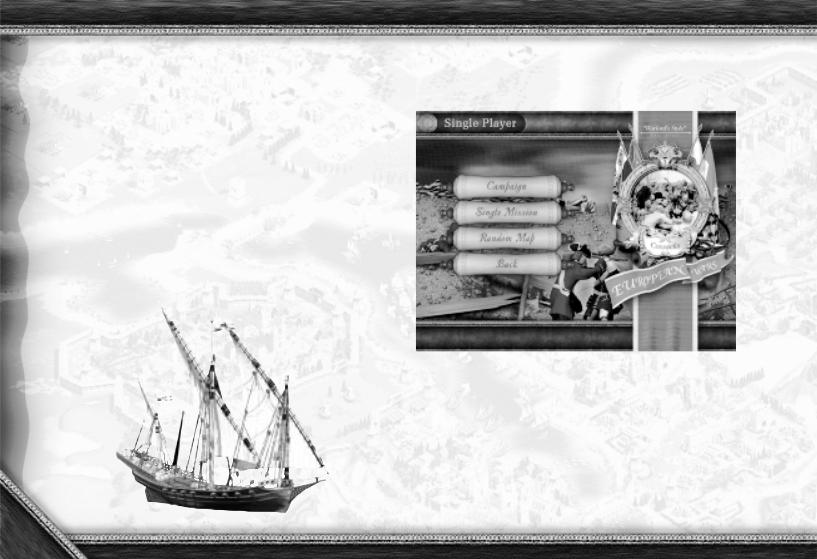
Single Player - Select this option and enter or select a player name to access the Single Player menu where you can select one of the Single Player game variants - Campaign, Single Mission or Random Map.
Multiplayer - Select this option and enter or select a player name to access the Multiplayer menu where you select one of the Multiplayer game variants - Deathmatch or Historical Battle.
Load Game - Select this option to load a previously saved game. Options - Select this option to change the game settings.
Intro - Select this option to run the intro.
Exit - Select this option to quit the game and return to Windows.
2.1.2 SINGLE PLAYER MENU
Campaigns - Select this option to access the Campaigns menu where you can launch either a Tutorial, an English, a Ukrainian, French or Russian campaign.
Single Mission - Select this option to choose one of the single player missions.
Random Map - Select this option to access the Random Map menu where you can change the game settings.
Back - Select this option to return to the Main Menu.
8
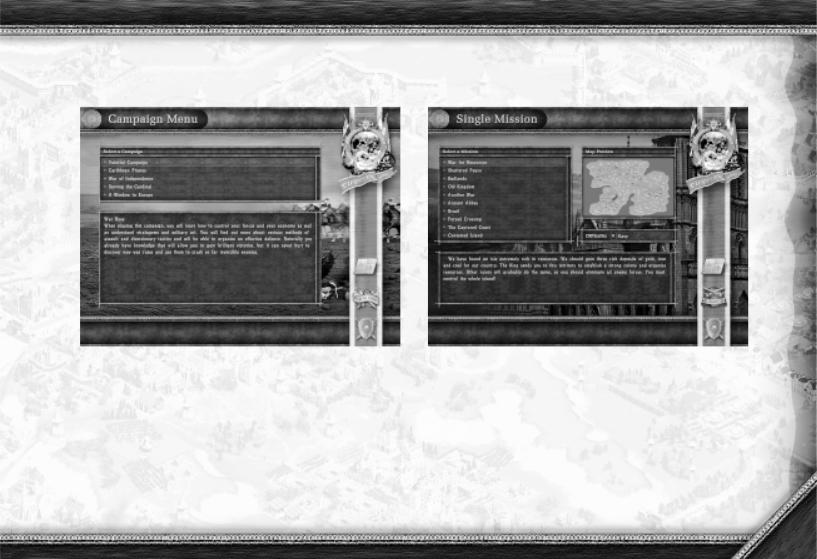
Campaigns Menu |
Single Missions Menu |
Selecting one of the campaigns will take you to the corresponding campaign where you can launch only the first mission. After completing the first mission of a campaign you will be able to launch the next.
In the Single Missions menu you will be able to run any single mission in any order you like.
9
Random Map Menu |
Multiplayer Menu |
The Random Map menu will allow you to adjust several settings for random maps.
You can run the game using either a previously designed map or a random map generated differently each time, which provides you with a practically unlimited selection of maps.
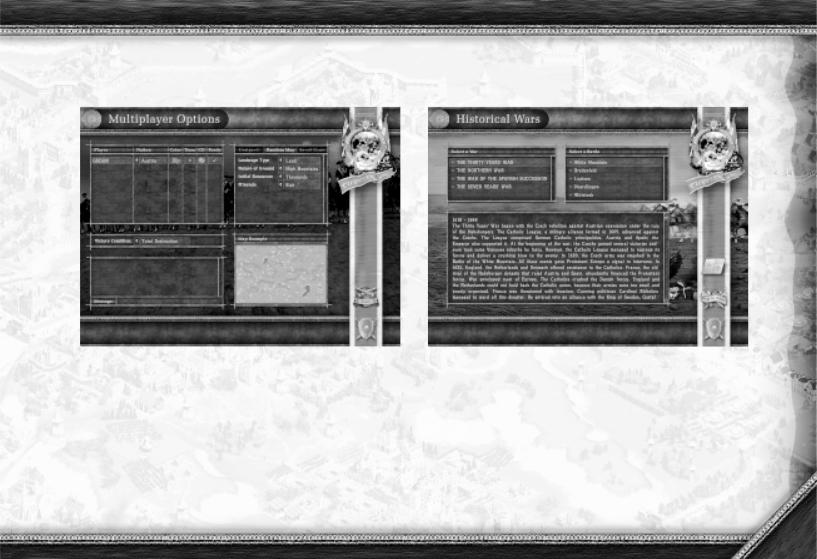
Deathmatch - Select this option to run the game against other players via a modem, in a local area network or via the Internet. The process of creating and joining a network game is described in chapter 4.2.
Historical Battle - Having chosen this mode you will be able to play through the best known historical battles with another player via modem, LAN or the Internet. The process of creating and joining a network game is described in chapter 4.2
10
Deathmatch Options |
Historical Wars |
This menu allows you to adjust all the settings for a network game if you are creating your own game or connect to a created one. All the details on creating and connecting to network games as well as on settings are available in section 4.2.
This section will teach you about the wars played in the game - The Thirty Years' War, The Seven Years' War, The Continental War, The War for the Spanish Succession and the Northern War. You can also select a battle to take part in from this screen.
11
Historical Battle |
Historical Battle Options |
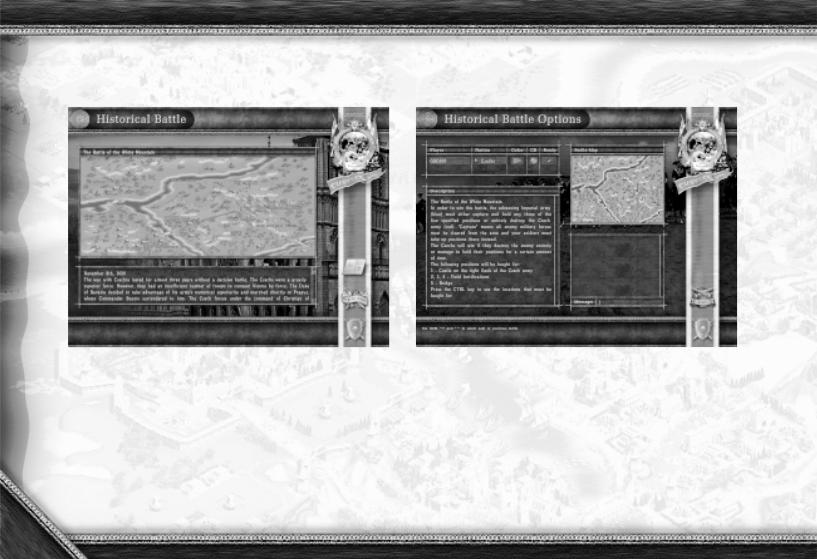
This screen offers detailed information on how the battle you selected developed, what forces took part in it and who was the victor.
Here you can choose the side you are going to fight for as well as find out the conditions of victory.
12
Options
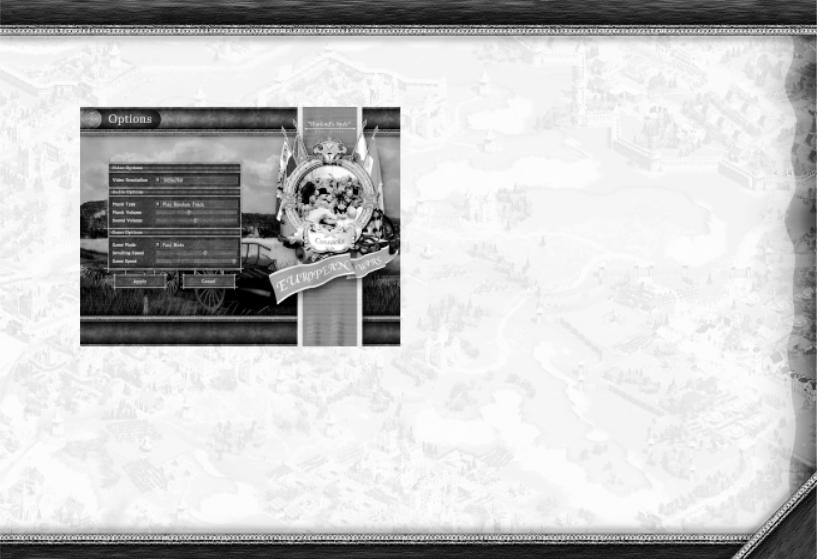
Video Resolution - This menu allows you to set the video resolution for the game. You will have access to all the modes supported by your video card, for example from 800x600 to 1600x1280. High resolutions have many advantages but, of course, the higher the resolution is, the more powerful a computer you will need.
Music Type - This menu allows you to adjust the running sequence for CD music or turn it off entirely.
The option Do Not Play Music allows you to turn the music off.
The Play National Music Only mode - allows you to listen to only one musical track that corresponds to the nation you are playing for. In the Play Random Track mode, all sixteen tracks will be run randomly.
Music Volume - Allows you to adjust the music volume.
Sound Volume - Allows you to adjust the sound effects volume.
Game Mode - Allows you to adjust the unit animation speed. Slow Mode - In this mode all units move slowly. This allows the game events to develop less rapidly, involving less arcade fighting, which gives you time for tactical manoeuvres, etc. Fast Mode - In this mode all units move faster and the game events develop more rapidly with more arcade fighting. This lessens your time for tactics and manoeuvres. The difference between the two modes is relative and the choice is purely a matter of taste.
Scrolling Speed - Allows you to adjust the screen scrolling speed. We recommend setting it to the maximum. It only makes sense to lower the scrolling speed if the game is run on a very powerful computer and the scrolling is very fast.
Game Speed - Allows you to adjust the game speed. We recommend setting it to the maximum. It only makes sense to lower the game speed if the game is run on a very powerful computer and the game action is very fast.
13
ENCYCLOPAEDIA
The game contains a detailed encyclopaedia highlighting historical events that took place in Europe between the 16th and 18th centuries. It also provides detailed game information, i.e. about units and structures and their characteristics. You can run the encyclopaedia from the game by clicking on the "Encyclopaedia" button.
2.2 GAME INTERFACE
2.2.1 Basic Game Screen
All the basic events of the game take place within the basic game screen. The top section of the screen contains an information panel
(1) showing the quantity of resources you possess. In the middle of this panel you will find a button (2). Pressing it will cause the function menu to pop up, giving you access to the following:
1.Game Menu (F12) - Clicking on this entry or hitting the "F12" key will bring up a menu allowing you to load or save the game, change options or return to the Main Menu.
2.Show Unit Information (U) - Clicking on this entry or hitting the "U" key will bring up an additional menu allowing you to obtain detailed information on units and buildings.
Double-click the entry or press the "U" key once more to hide this menu. Find more details about this additional menu in chapter 2.2.6.
3.Show Game Information (I) - Clicking on this entry or hitting the "I" key will bring up an additional menu allowing you to get information about the number of points for each player, the losses, market prices and resources extracted and consumed. Double-click the entry or press the "I" key again to hide this menu. Find more details on this additional menu in the section 2.2.7.
4.Toggle Mini-Map Modes (M) - Clicking on this entry or hitting the "M" key will enable you to decrease the mini-map size and enlarge the viewed area. Double-click the entry or press the "M" key again to return to the original size of the map.
5.Show Inaccessible Zones (Q) - Clicking on this entry or hitting the "Q" key will allow you to see the impassable zones on your map. These areas will be marked with a blue net. The impassable zones are mountain slopes, landscape irregularities, swamps, rivers and seas, etc. Double-click the entry or press the "Q" key again to remove the marking.
6.Turn On Transparent Mode (O) - Clicking on this entry or hitting the "O" key will allow you to make all buildings, walls and towers transparent in order to spot all units behind these objects. Doubleclick the entry or press the "O" key once more to make the objects opaque.
14
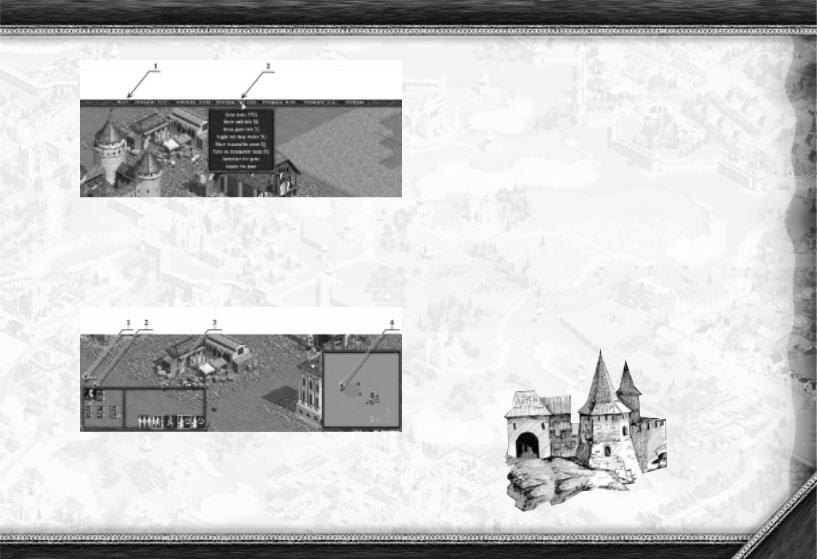
In the lower part of the screen you will see text messages (1), information about selected units or buildings (2), the orders a player can give to a selected object, buildings available for construction by peasants, upgrades available in the selected building (3). There is a mini-map in the lower right corner (4).
2.2.2 CURRENT TEXT MESSAGES
All the events in the game, i.e. completion of building construction, unit training finished or upgrading completed, are accompanied by corresponding text messages in the lower left-hand corner of your game screen (1).
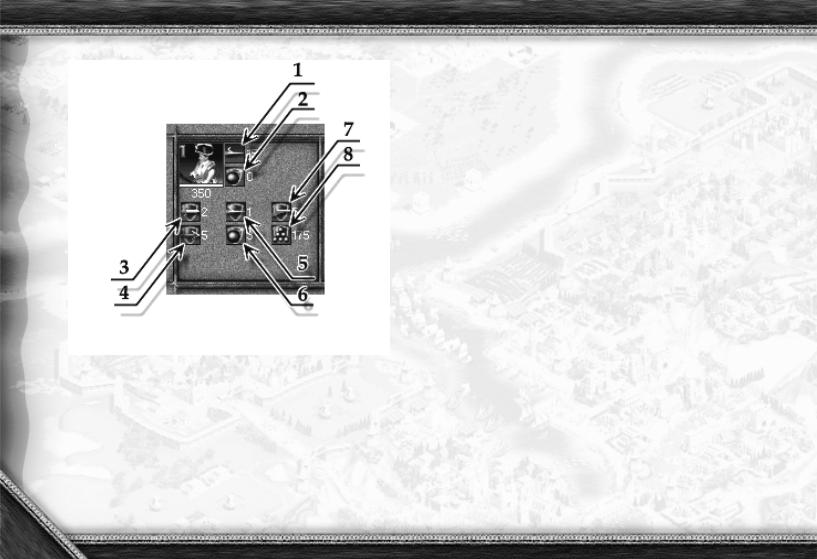
2.2.3INFORMATION ON SELECTED UNIT OR BUILDING
Information on selected units or buildings includes: attack parameters and type (1), defence parameter added to all types of defence (2), as well as HP. Thus, the given unit has 350 HP, delivers a stroke of 15
(1), has no defence bonus (2), a protection of 2 against sabres and swords (3), 5 against arrows (4), 1 against pikes and lances (5), 3 against cannonballs (6), 5 against rifle bullets (7), 175 against grapeshot
(8).
15
Find more details about parameters of units and buildings under the respective section.
2.2.4 MINI-MAP
The mini-map gives a scale reflection of the whole map you are playing on. This is an important part of the game interface. Unlike the main screen, where you see only a small map area, the mini-map allows you to notice all the events on the territory under the control of your units. Thus, the mini-map allows you to spot and control all the events taking place on your map. With the mini-map you can see enemy forces moving, where your troops are under attack, locate enemy objects etc.
The territory that your units or buildings cannot see is hidden by opaque fog of war.
The mini-map surface shares characteristics with the main screen map. You can point the direction of movement or attack for your forces by clicking on the mini-map. Having clicked on the mini-map you will be transferred to a correspondent surface area.
You can increase or decrease the mini-map size by pressing the "M" key.
Note:
An important and useful mini-map feature is the ability to show where your forces and buildings are attacked. When an enemy assaults your units or buildings, a white rectangle will appear, accompanied by a special sound. Keep a close eye on the mini-map in order to react to assaults in time.
16

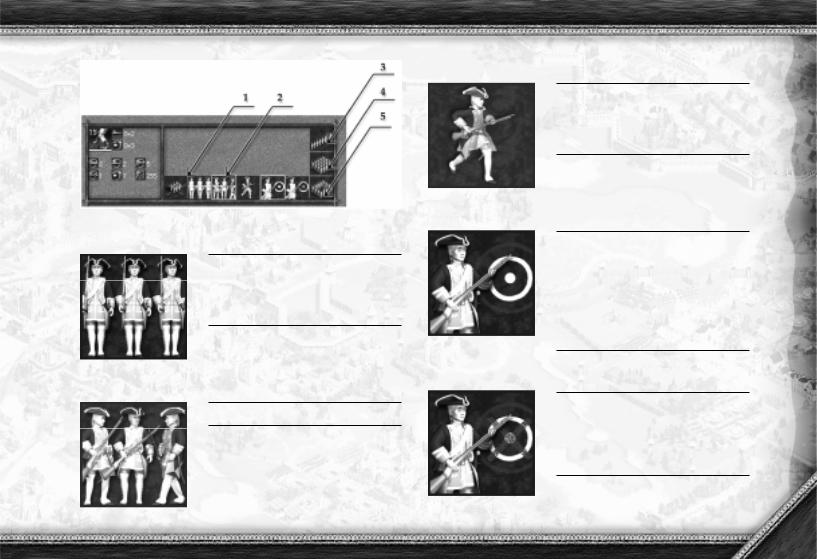
2.2.5MILITARY FORMATIONS AND BATTERIES MENU
Once you have at least one formation or a battery, the Formations and Batteries menu icon will pop up in the interface (1). On pressing this icon, you will see icons of all the formations you currently possess (2). These icons show you which troops and guns are in formations, the types of formation they are in, their numbers and the number of soldiers or guns they include.
This menu allows you to quickly select the required formation or battery. Point the cursor at a formation icon to see it marked on the map. Clicking on a formation icon will select the corresponding formation.
2.1.6 UNIT INFORMATION MENU
Pressing the "U" key or the corresponding entry in the functional menu will activate a Unit Information Menu. Here you can obtain detailed information about a unit - its parameters, value, resources consumed, upgrades etc.
Clicking on the entry "General" displays a unit's cost parameters, building time, resources spent and consumed, as well as the number of points given for this unit when scores are drawn up.
17

Description
Clicking on "Description" displays a brief description of a unit or building, its advantages and drawbacks.
1 - wood, 2 - gold, 3 - stone, 4 - food, 5 - iron, 6 - coal
18
Unit Upgrades
Pressing "Unit Upgrades" will allow you to look at upgrades available for this unit or building.
Large icons indicate general upgrades carried out in the academy or in the blacksmith. Below you will find tables showing how far unit attack and defence parameters can be improved by training units in barracks and stables.
Point at any upgrade with the cursor to receive a pop-up hint describing the upgrade and its cost.
Next
Clicking on "Next" will take you to the next unit or building.
Previous
Clicking on "Previous" will take you back to the previous unit.
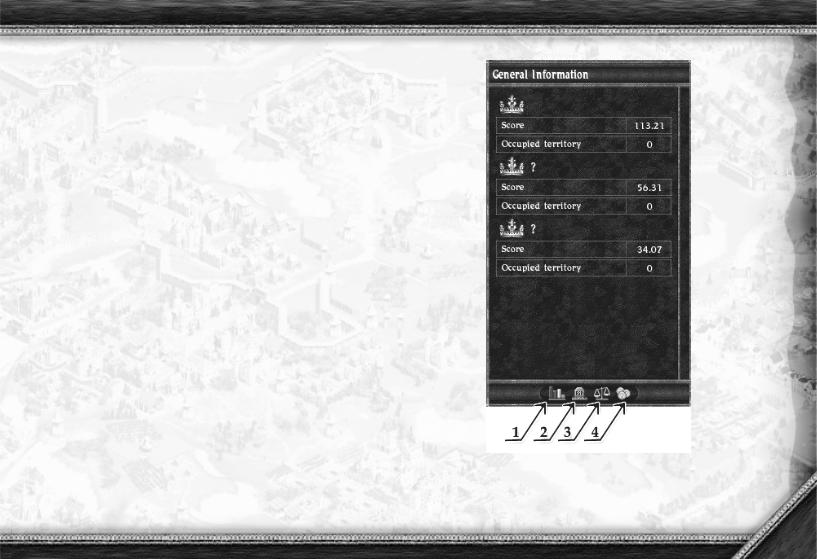
2.2.7 GAME INFORMATION MENU
Pressing the "I" key or clicking on the corresponding entry in the functional menu brings up the Game Information menu. Here you can obtain detailed information about each player's number of scores, losses, market prices and quantity of resources extracted and consumed.
1 - General information, 2 - List of casualties, 3 - Market prices. (Comparative chart for exchange of resources) 4 - Number of people occupied procuring resources.
19
2.2.8 STATISTICS SCREEN (FOR RANDOM MAP
AND DEATHMATCH MODES ONLY)
Once a game in Random Map or Deathmatch mode is over, press ESC to proceed to the Statistics section, which includes three screens providing detailed information on the game.
2.2.9 POPULATION DYNAMICS CHART
The top section of this screen contains a chart of population changes within the game, where the colour of the curves corresponds to the players' distinguishing colours.
The horizontal bar reflects the duration of the game, the vertical bar represents the population.
Below are the players' upgrade sequences. They are arranged on the chart according to the time they took place.
Pointing the cursor at an upgrade icon will activate a pop-up hint describing what kind of an improvement it is.
Click on the "Forward" button to access the next (score) screen.
20
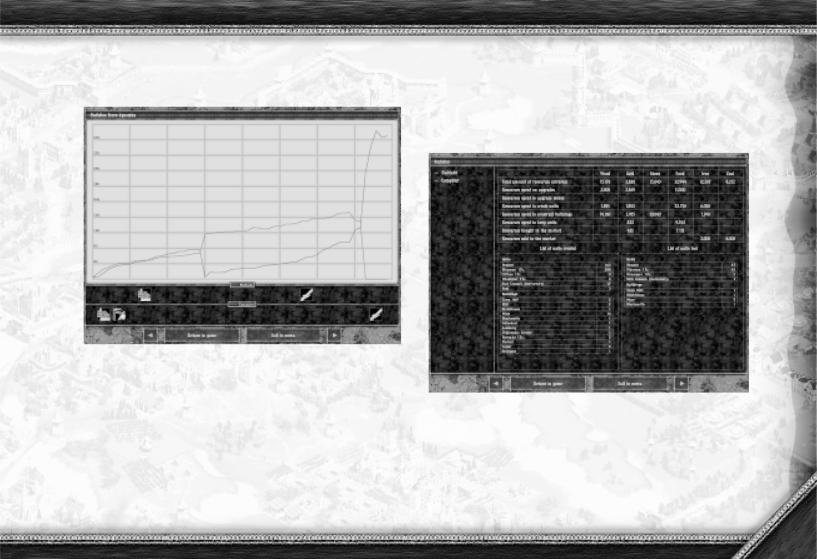
Score Dynamics Chart
The top section of this screen contains a chart showing the score changes for each player in the game. The curve colour corresponds to the players' distinguishing colour.
The horizontal bar reflects the time, the vertical bar represents the population.
Below are the players' upgrade sequences. The improvements are arranged according to the time scale on the chart.
Pointing the cursor at an upgrade icon will activate a pop-up hint describing what kind of an improvement it is.
Click on the "Forward" button to access the next (statistics) screen. Click on "Back" to return to the previous (population) screen.
Statistics
This screen will provide you with detailed information on virtually all the game parameters. Here you can see the amount of resources you procured, how much of them was spent and what on, how many units and what types you built and lost, etc.
21

Click on "Back" to return to the previous (score) screen.
How to resume a game
Click on "Return to game" to return to the game.
How to return to the menu
Click on "Back to the Main Menu" to return to the menu.
3. CONTROLS
You can control the game with the help of the normal two-button mouse. There are hotkeys available for the most frequent or important actions. You will find a complete list of hotkeys under 3.1.18.
3.1.1 SELECTING UNITS OR BUILDINGS
To select a unit or a building, click on it with the left mouse button.
To cancel the selection of a unit or a building, click on any other place on the map with the right mouse button.
3.1.2SELECTING SEVERAL UNITS OR BUILDINGS
To select several units or structures, left-click on any other place on the map, then hold the mouse button down while moving the mouse. You will see a frame following the cursor. All your units or structures that are within this frame will be selected as soon as you release the mouse button.
22
3.1.3 CONVENTIONAL UNIT MOVEMENT
Select a unit, a group of units or a formation.
Click on the map or mini-map with the right mouse button to indicate the place you want your units to go to.
3.1.4 DIRECTIONAL UNIT MOVEMENT
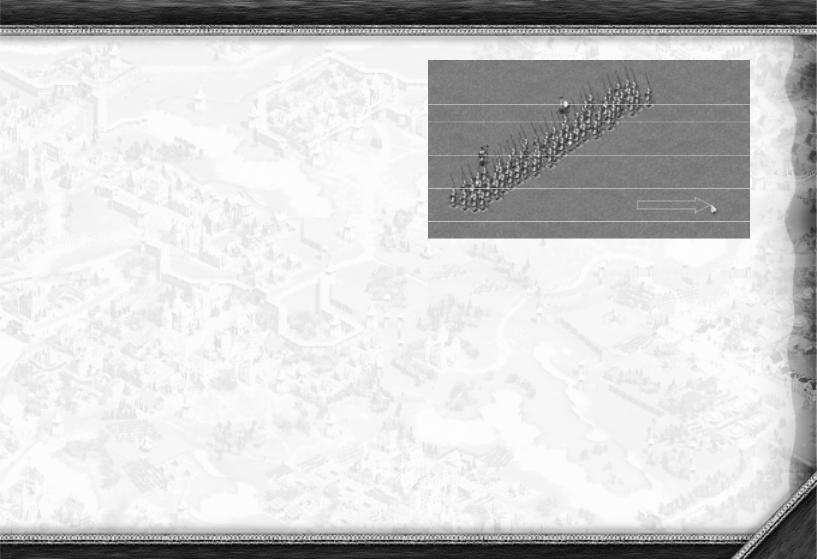
Select a unit, group of units, a formation or battery.
Click and hold the right button on the map indicating the place you want your units to go to. Keep holding the right mouse button and move the cursor - you will see a pointer. The tip of it will indicate the location of your units and the end will indicate the direction for units to face.
The directional control of your units will not only allow you to better control and use your troops, but also to gain tactical superiority over the enemy.
For example, rear and flank attacks are very dangerous, especially for formations.
3.1.5 HOTKEYS FOR UNITS AND FORMATIONS
Any unit, group of units, formation or battery can be hotkeyed. Select a unit, group of units, formation or battery and press CTRL + any number from 0 to 9. You can now select this unit, group of units, formation or battery by pressing the assigned key.
You can add other units to the group of selected units. Simply select your units, hold Shift and select the units to be added. Now two groups of units are selected. Press CTRL + any number from 0 to 9 to hotkey the newly set group.
23
3.1.6 UNIT MOVEMENT ON DEFINED ROUTES
You can define the route for your units. Select a group of units and click on the map in different places while holding the Shift key to set a route for your troops to follow.
3.1.7 UNIT MOVEMENT OVER WATER SURFACES
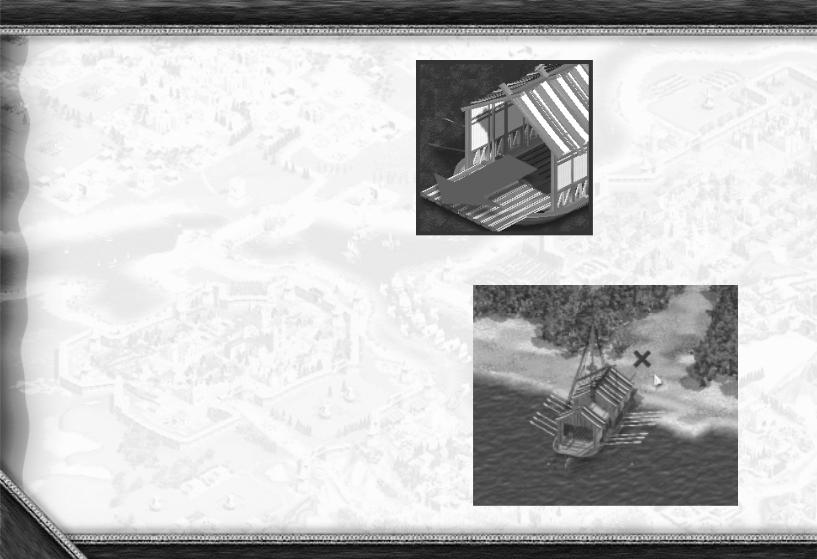
You can transport your units across water by means of a ferry. You can build a ferry in the shipyard. Select the ferry and click on the shore where your units are gathered. The ferry's mooring point will be indicated by a flashing red cross. Then select your units and click on the ferry for them to board it. The ferry's capacity is 80 units. When the units are on board, they will be able to cross the water. When you are close to the other side, carry out the same mooring procedure. To put units ashore select the ferry and click on the "Disembark Unit" icon, which is on the interface screen.
24
3.1.8 UNITS' ACTIONS
Different units can do different things. Peasants, for example, can chop trees, quarry stone, harvest crops from the fields, build and repair structures, etc. Fighting units can attack and capture unguarded peasants, artillery and some enemy structures.
Every described activity is identified by a special cursor which will appear when you select a corresponding unit and pass the cursor over different objects. This will allow you to learn what exactly each unit can do with specific objects.
3.1.9 BUILDING UNITS
Select the appropriate structure to build your unit by clicking on it with the left mouse button. You will see unit icons on the interface screen.
Left-click on the corresponding unit. The number 1 will appear on the icon, which means you have ordered one unit to be built. A white line will increase along the bottom of the icon. When the white line reaches the end, the unit is complete and will exit the building in which it was created.
Detailed information on unit construction is available under "Technologies and Upgrades".
3.1.10 CONSTRUCTING BUILDINGS
Select one or several peasants to see icons of the structures available in the lower left-hand part of the screen.
Left-click on the icon of the structure you want to build. The cursor will change to show a flashing semi-transparent structure.
Move the flashing structure to the place where you want to build it and left-click. The foundation of the structure will appear on the surface and the peasants will begin to build it.
Detailed information on structure construction is available under "Buildings".
3.1.11 REPAIRING DAMAGED BUILDINGS
Select one or several peasants.
Right-click on a damaged structure for the peasants to start repairing it.
25

3.1.12 PROCURING RESOURCES WITH PEASANTS
Select one or several peasants.
Left-click on the resources you want to procure.
3.1.13 UPGRADES
Select a structure where upgrades are available to see upgrade icons in the lower left part of the screen.
Left-click on the required upgrade.
You will see a progress bar indicating the progress percentage of the upgrade. As soon as the progress bar reaches the end, the upgrade is complete.
3.1.14 ATTACKING ENEMY UNITS
Select fighting units.
Right-click on the enemy units you want to attack. Your units will move to attack enemy objects.
Note:
Shooting units, artillery and ships cannot shoot over hills, walls and structures.
3.1.15 ATTACKING ENEMY BUILDINGS
Select artillery, ships, towers, grenadiers or archers and right-click on the enemy object.
Note:
Only artillery, ships, grenadiers and archers can destroy structures, stone walls and towers. Other units cannot attack structures, towers and walls.
3.1.16 SETTING ACTION SEQUENCE
You can set the sequence of actions for units to follow. For example, peasants can be given a sequence of several structures to build. To set the sequence you must:
Select units.
Press and hold Shift while setting the action sequence.
3.1.17 GIVING ORDERS
You can set different action modes for your troops to make them act as efficiently as possible. In order to give orders to a fighting unit or group of units you must:
Select fighting units to see order icons in the lower left part of the screen (2).
Click on the corresponding icon.
26
Go and Attack
On receiving this command units moving from point A to point B will always attack and pursue enemies they come across. After the enemy is eliminated, your units will continue to point B.
Enable Attack
Stand Ground
After receiving this order your units will protect their position and not fall back, whatever happens. They will not chase enemies who pass by, but they will attack if an enemy enters their range of fire.
Units which receive this command will always attack and pursue any enemy they spot. For instance, if you send your units from point A to point B they come across an enemy detachment, they will attack and chase the enemy until it is eliminated. As soon as the enemy is eradicated, your units will remain in that position without proceeding to point B.
Disable Attack
Cancel Stand Ground
This order cancels the Stand Ground order.
Units receiving this command will never attack or pursue an enemy. For example, if you send your units from point A to point B, they will ignore all enemy troops and continue moving. Thus, your units will always reach point B.
27

3.1.18 HOTKEYS
F12 - brings up a menu
M - reduces/enlarges the mini-map
I - show/hide game information
U - show/hide object information
Q - show/hide impassable areas
O - turn transparent mode for structures on/off Del - delete selected object
Pause - pause game
D - increase game speed
Enter - enter password
CTRL+A - select all units except ships
CTRL+S - select all ships
CTRL+B - select all structures
Select unit & CTRL+Z - select all units of this type
Double-click on unit
- select all units of this type within the visible area of the map
Select structure & CTRL+click on the map
- show the assembly point for constructed units
Select unit & CTRL+1 - 9 - hotkey unit or squad
1 - 9 - quick access to the hotkeyed unit or squad
Select unit & Space
- place selected unit in the centre of the screen
CTRL+P - show all idle peasants
CTRL+M - show all improperly filled mines
Select unit & Shift + select additional unit
- add new units to the group of selected units
Select unit & Shift+click on the map - set the route for the units
Select game objects (including CTRL+A, CTRL+S and CTRL+B) & click on the game object icon in the menu
- select all objects of this type
Select game objects (including CTRL+A, CTRL+S and CTRL+B) + Shift & click on the game object icon in the menu
- deselect all objects of this type
Select unit & A+point out the place for the unit to go to
- selected units go to the destination point attacking all the enemies they meet on the way
28
4. GAME SETUP
4.1 SINGLE PLAYER
4.1.1 CAMPAIGN
In campaigns, players are required to complete a number of missions united by the same storyline. You will have access to 5 campaigns: English, Ukrainian, French, Russian and Tutorial. When you select one of the campaigns for the first time, you will be able to run only the first mission. It must be completed in order to get through to the following mission.
Starting Campaigns
Select the Single Player option in the Main Menu. Enter your name or select an existing name. In the next menu select the Campaigns option and afterwards choose the campaign and mission and click on "Start".
In order to learn the basic rules of Cossacks it is recommended to complete the Tutorial. Select the Tutorial Campaign in the Campaigns menu.
Gameplay
The missions in Cossacks are full of thrilling and hazardous adventures. You will participate in events that will determine the fate and history of the world.
Before starting a mission you can learn the true historical background preceding the events described in the mission.
At the beginning of your mission, you will receive a list of current objectives, which it is your first and foremost task to complete. While playing through the missions you will receive information on other tasks.
How can I find out about my current objectives, tasks accomplished and conditions of failure?
Press the "F1" key to find out about your current objectives and conditions of failure.
Note: If you completed several missions of a campaign in a previous game and return to the same campaign, you should select the name you used before in the name entry section in order to continue the missions of that campaign. Should you select or enter another name, you will be unable to continue your game and will have to start from the very beginning or continue somebody else's game.
4.1.2 SINGLE MISSIONS
Single missions have no common storyline. You can run any of ten missions in any order you like.
Starting Missions
Select the Single Player option in the Main Menu. Enter your name. In the following menu select the Single Missions option and afterwards choose any mission.
29
 Loading...