


2 |
Before playing Summary |
2 |
||
|
1.1 |
Introduction |
2 |
|
|
1.2 |
Installation |
2 |
|
2 |
Basic principles |
3 |
||
|
2.1 Object of the game |
3 |
||
|
2.2 |
Learn to play in 5 minutes |
3 |
|
3 |
Detailed instructions |
4-30 |
||
|
3.1 Interface |
4 |
||
|
|
3.11 |
Main game screen |
4-7 |
|
|
3.12 |
Interface Bar |
7-10 |
|
3.2 |
Sailing |
11-13 |
|
|
|
3.21 |
Field of vision |
11 |
|
|
3.22 |
Selection of ships |
11 |
|
|
3.23 |
Move a ship |
12 |
|
|
3.24 |
Manœuvre the sails |
13 |
|
3.3 |
Trade and trans shipment of merchandise |
14-17 |
|
|
|
3.31 |
General points |
14 |
|
|
3.32 |
Trade of merchandise |
14 |
|
|
3.33 |
Transshipment of merchandise |
15-17 |
|
3.4 |
Naval combat |
17-20 |
|
|
|
3.41 |
Fire the cannon another ship |
17-19 |
|
|
3.42 |
Fire the cannon against an enemy port |
19 |
|
|
3.43 |
Combat in armada |
19-20 |
|
3.5 |
Boarding |
20-24 |
|
|
|
3.51 Resolution of a boarding |
20-24 |
|
|
3.6 |
Crew management |
24-25 |
|
|
|
3.61 |
Your reputation |
24 |
|
|
3.62 |
Recruitment |
25 |
|
3.7 |
Management of ports and principalities |
26-29 |
|
|
|
3.71 |
A port’s buildings |
26 |
|
|
3.72 |
Trade of marchandise and ships |
26-27 |
|
|
3.73 |
Spies |
28-29 |
|
3.8 |
Pirate hideouts |
29 |
|
|
3.9 |
Treasure islands |
29-30 |
|
|
|
3.91 |
Hide a part of one’s treasure/isolated islands |
29 |
|
|
3.92 |
Look for a treasure |
30 |
4 |
Missions |
30 |
||
|
4.1 |
Principles |
30 |
|
|
4.2 |
Messages |
30 |
|
5 |
Reference Guide |
31-36 |
||
|
5.1 |
List of ships |
31-33 |
|
|
5.2 |
List of merchandise |
34 |
|
|
5.3 |
Alarms |
34-35 |
|
|
5.4 |
Keyboard shortcuts |
36 |
|
1

vCorsairs Manual v
1 Before playing
1.1 Introduction
Welcome to the world of Corsairs, a world of adventure, of freedom, where the exhilaration of sailing, gold fever, the sound of cannons and the
fierceness of boarding are combined.
You will soon embody one of these corsairs, who, devoted to the cause of his nation, will do anything to make that nation prosper and shine in the four corners of the world, from the Caribbean to the coast of Australia...
During numerous missions, you must:
-Sink or capture enemy ships.
-Capture enemy ports.
-Protect your nation’s ports.
-Sink or capture pirates, like the terrible Blackbeard.
Moreover, whether by lucrative trade or by the force of weapons, you can also grow richer for your country’s benefit...and your own!
And as your exploits, conquests and feat of arms go by, your reputation will not cease to grow and you will soon possibly be even more admired than your king and more dreaded than the most ferocious pirates!
1.2 Installation
System Requirements:
Computer: PC or 100% compatible
Processor: P133 minimum, P200 recommended.
Memory: 32 MB of RAM recommended
Minimum hard disk space required: 100 MB minimum.
Speed of CD-ROM drive: X4
Video card: All cards are supported by Direct X
Keyboard and mouse 100% Microsoft compatible
Game installation
Insert the CD Corsairs in your drive and wait a few seconds for a window to appear on screen.( If the window does not pop up, double click on “Work station” and then on “CD ROM”, and finally on “AutoPlay.exe” )
Choose Installation, then follow the instruction on screen. A message will tell you if the installation was successful.
2

2 Basic principles
2.1 Object of the game:
Y ou are a corsair, devoted to the nation that you have chosen.
In the adventure mode, you must perform a series of missions entrusted to you by your king, and at the same time improve your reputation as much as possible.
You objective will thus be to successfully complete all of your missions, while in addition obtaining the best possible score. Your “score” will be directly dependent on your reputation.
In the tutorial mode (training), the object of the game is simply to successfully complete a mission.
2.2 Learn to play in 5 minutes
In order to quickly absorb the basic principles of the game, you are offered 4 tutorial missions.
These 4 missions are meant to familiarise you with all of the important aspects of the game.
Mission 1: Explorer’s certificate
Mission 2: Gunner’s certificate
Mission 3: Boarding certificate
You must board a ship and capture it.
Mission 4: Corsair’s certificate
You must place a spy on board an enemy ship.
You must capture the enemy port.
At the launching of the game, choose “Sail” then “Tutorial Missions” then “Explorer’s certificate”. Then you just follow the instructions displayed on screen.
3
3 Detailed instructions
Convention used in this manual:
“Click” means to click with the left button of the mouse.
3.1 Interface
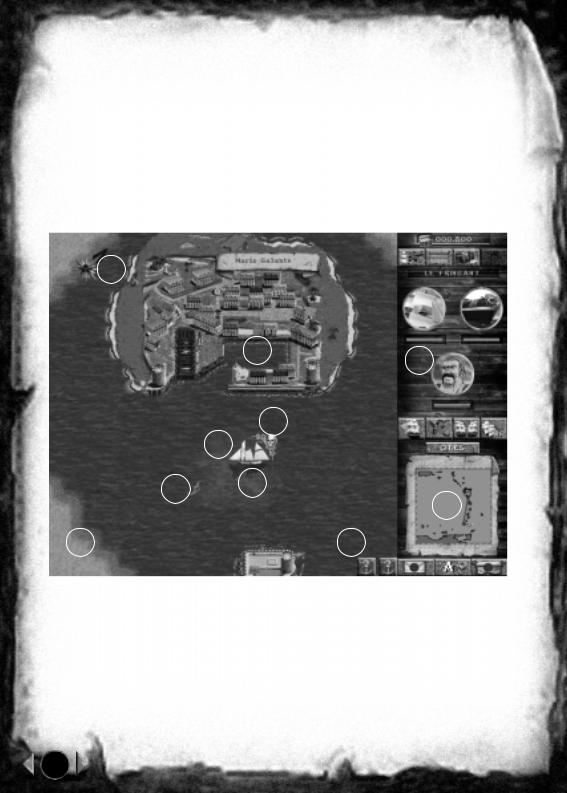
3.11 Main game screen
5
4
3
2
1
10 6
7
9 |
8 |
W hat do we see?
1- The ship:
The flag it bears designates the nation to which it belongs.
4
2- The cursor of selection of your ship:
1
2
3
4
You can see several facts summed up in it: 1,2,3 and 4 are the conditions of the ship. When the colour is green, there is no problem.
When the colour is orange, the ship is damaged. When the colour is red, the damage is significant.
1:Condition of the sails
2:Condition of the hull
3:Various facts:
u The background is the colour of the nation (Blue background = French...)
u The head:
l Jolly Rogers (skull & cross-bones): 2 cases
s You have selected a ship from your nation: the corsair is not located aboard this ship.
s You have selected an enemy ship: representation by default. This does not mean that the corsair is not located aboard this ship.
l The corsair’s head: the corsair is located aboard the selected ship. l The eye: You have a spy aboard this ship. If a special character
(enemy corsair for example) is located aboard this ship then you see the head of the character blink in alternation with the eye.
4:Percentage of men aboard the ship in relation to the maximum capacity that the ship can hold.
Note: When you select an enemy ship you cannot control it. If a spy is aboard you can study the hold of this ship and will possess all information concerning this ship.
3- The ship-info window:
It displays various facts about the ship currently selected, like the cargo breakdown, the condition of the hull, etc. We will explain it in detail a little further on in this manual.
5

4- The port:
The group of buildings and structures which make up the port.
If it belongs to your nation here you can:
 Repair or build ships.
 Build, repair or improve buildings.
 Tranship resources from one ship to another, anchored in the same anchoring zone.
 Sell or purchase merchandise.
The flag that the port bears designates the nation to which it belongs. It is not possible for a ship to anchor itself in a port’s anchoring zone unless this port belongs to its nation. If the ship attempts to anchor itself in a foreign port, the port’s defences engage in combat against the intruder.
5- The compass rose:
Permanently displayed on screen, it allows the direction of the wind to be known at all times.
6- Anchoring zone:
The zone of light blue sea indicates that your boat can drop anchor here.
7- The mini-map:
It shows the whole of the maritime region concerning the current mission.
By clicking with the right button of the mouse on the mini-map, the main game screen displays this zone.
8- Alarm icons:
These icons inform you of all important events that unfold outside of the main game screen.
Moreover, an event’s direction is indicated by the position of the icon around the screen. You can centre the game screen on one of these “events” by clicking on it with the right button of the mouse, or simply find out about the type of event by clicking on it with the left button.
The alarm icons are explained in detail further on in this manual (Cf. chapter 5.3).
6
9-Unknown zones:
The zones displayed in light yellow indicate the zones beyond the view of all friendly ports or ships.
10The cursor:
By default, its form adapts to that which it is pointing.
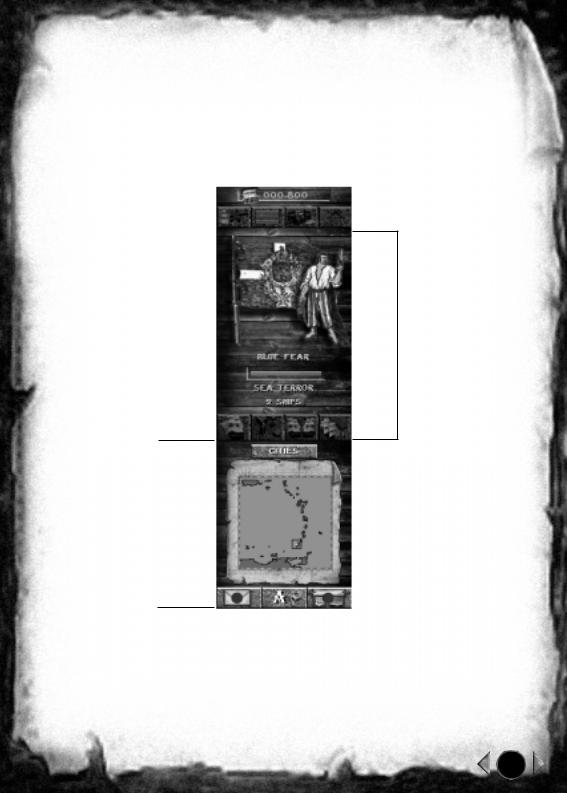
3.12 Interface Bar (no ship selected)
1
2
1
The illustration above represents the interface bar permanently situated to the right of the screen.
It is split into 2 parts:
1:The fixed interface, which always looks the same.
2:The contextual interface, whose appearance varies according to the manipulations executed in the fixed interface or the context (example: the ship is anchored to a port)
7
3.121 The fixed interface
1
2 3 4
5
12 |
13 |
14 |
15 |
|
11 |
|
|||||
|
|
|
|
|
|
6
10
78 9
Let’s examine the above illustration and explain in detail each numbered element’s function:
Unless otherwise specified, we consider that a ship is selected.
8

1Indicates the amount of treasure aboard the ship.
If no ship is selected, it indicates the cumulative total of your fortune (total treasure of all your ships and secret hideaways).
2Allows you to adjust the sail level, the ship’s type of cannonballs.
3Allows you to consult the condition of the sails and the hull of the selected ship.
4Allows you to consult in detail:
-The ship’s cargo ( quantity of: Cannons, Munitions, Rum, Provisions, Freight, Precious freight, Special objets )
-The personnel aboard the ship ( number of corsairs, captains, sailors, special characters )
5Location for the contextual interface.
6Allows you to access a list of all the cities classified by nation. When you click on the button you unroll the list of cities.
You have the name of the city and above it 2 figures. These 2 figures correspond to the price of the selected resource.
On the left = price for which you will purchase this resource On the right = price for which you will sell this resource The cities are classified by nation.
Cities Button : classification by city name.
Sale Button : classification from the most expensive to the least
expensive in Sale mode.
Purchase Button : classification from the least expensive to the most expensive in Purchase mode.
Scroller page : By clicking on this button you unscroll the pages. Scroller Nation : By clicking on this button you unscroll the Nations. If you click with the right button of the mouse on a city, you centre the screen directly on this city.
If you click with the left button of the mouse, the selected boat goes to this city.
7Allows you to reread the objective(s) of the mission.
8Allows you to reread the objective(s) of the mission.
9Allows you to consult the list of messages.
10Mini-map: It represents the whole of the maritime region concerning the current mission, and allows you to localise at a glance the “visible” ships and ports of each nation (visible = within the of sight of a friendly port or ship or also a ship with a friendly spy aboard). It also allows you to quickly display any part of the map on screen.
9

11Contextual interface’s port icons. Although a part of the contextual interface, this series of 4 icons (13,14,15,16) is so frequent on screen that it is important to know them well. They appear on screen as soon as the ship is anchored to a port or a principality.
12Repair or build a ship in a port. Purchase or sell a ship in a principality.
13Repair or build a building.
14Tranship merchandise from one ship to another.
15Trade with the port or a principality.
3.122 The contextual interface
The contextual interface varies according to the manipulations executed in the fixed interface or the context (example: the ship is anchored in a port)
The working order of the contextual interface will be explained in detail in the chapters concerned (Example: the working order of the Way-points will be explained in detail in the Sailing chapter)
10
3.2 Sailing
3.21 Field of vision
3.211 Principle:
Y ou cannot see everything that happening on the map. Your field of vision is limited to the line of visibility of:
n Your ships n Your ships
As such, an enemy ship will not appear unless it sails into the field of vision of one of your ships or ports (or also if you have a spy aboard an enemy ship. See “Spies” chapter)
Everything that you cannot see is displayed by a yellow beige parchment, on screen.
3.212 Discovery of the zone:
On the mini-map as well as on the game screen you can distinguish the yellow beige zones. This zone is not yet known and is represented in the form of a
parchment. As in the past, this parchment is not very precise: it is possible that certain islands do not appear or that the islands are not situated at the location indicated on the parchment
3.213 Range of visibility:
Each ship possesses a range of visibility. So you cannot see enemy ships evolve unless one of your ships is located close at hand. However, one can
also see them pass in proximity to your ports by placing a spy aboard them (Cf. 3.73 Spies)
3.22 Selection of ships:
Before being able to operate a ship, and in particular to move it, you must first select it.
To select a ship, just click on it with the left button of the mouse. To select several ships, you have 2 possibilities:
n Include the ships in a square drawn with the mouse. To do this, the left button of the mouse must be held down and the cursor moved so as to draw the square.
n Click on the icon  of the interface bar to select all of one’s ships.
11
 Loading...