


Instruction manual
EB 333
Oven

en
Table of contents
Intended use |
4 |
|
|
Important safety information |
5 |
|
|
Causes of damage |
7 |
|
|
Environmental protection |
7 |
Saving energy |
7 |
Environmentally-friendly disposal |
7 |
|
|
Familiarising yourself with your appliance |
8 |
Oven |
8 |
Display and operating controls |
9 |
Symbols |
9 |
Colours and display |
10 |
Additional information ( and ) |
10 |
Cooling fan |
10 |
Function selector positions |
11 |
Accessories |
12 |
Special accessories |
12 |
|
|
Before using the appliance for the first time |
13 |
Setting the language |
13 |
Setting the time format |
13 |
Setting the clock |
13 |
Setting the date format |
13 |
Setting the date |
14 |
Setting the temperature format |
14 |
Ending initial set-up |
14 |
Heating up the oven |
14 |
Cleaning accessories |
14 |
|
|
Activating the appliance |
15 |
Standby |
15 |
Activating the appliance |
15 |
|
|
Operating the appliance |
16 |
Cooking compartment |
16 |
Inserting accessories |
16 |
Switching on |
16 |
Rapid heating |
16 |
Safety shut-off |
16 |
|
|
Timer functions |
17 |
Calling up the timer menu |
17 |
Timer |
17 |
Stopwatch |
17 |
Cooking time |
18 |
End of cooking time |
19 |
|
|
Long-term timer |
20 |
Setting the long-term timer |
20 |
Individual recipes |
21 |
Recording a recipe |
21 |
Programming a recipe |
21 |
Entering names |
22 |
Starting recipes |
22 |
Change recipe |
22 |
Deleting recipes |
22 |
Core temperature probe |
23 |
Inserting the core temperature probe into the food |
23 |
Setting the core temperature |
24 |
Core temperature guidelines |
25 |
Rotisserie spit |
26 |
Preparation |
26 |
Switching on the rotisserie spit |
27 |
Switching off the rotisserie spit |
27 |
|
|
Roasting function |
27 |
|
|
Child lock |
28 |
Activate the child lock |
28 |
Deactivating the child lock |
28 |
|
|
Basic settings |
29 |
|
|
Cleaning and maintenance |
31 |
Cleaning agents |
31 |
Removing the shelf supports |
32 |
|
|
Pyrolytic self-cleaning |
33 |
Preparing pyrolytic self-cleaning |
33 |
Starting pyrolytic self-cleaning |
33 |
Cleaning accessories with pyrolytic self-cleaning |
33 |
|
|
Trouble shooting |
34 |
Power cut |
34 |
Demo mode |
34 |
Replacing the oven light bulb |
35 |
|
|
After-sales service |
35 |
E number and FD number |
35 |
|
|
Tables and tips |
36 |
Vegetables |
37 |
Side dishes and meals |
38 |
Fish |
40 |
Meat |
41 |
Poultry |
43 |
Grilling and roasting |
44 |
Baked items |
45 |
Dough proving (leaving to rise) |
48 |
2
en
Desserts |
49 |
Defrosting |
50 |
Preserving |
51 |
Disinfecting |
51 |
Drying |
52 |
Baking stone |
53 |
Roasting dish |
54 |
Acrylamide in foodstuffs |
55 |
Additional information on products, accessories, replacement parts and services can be found at www.gaggenau.com and in the online shop www.gaggenau.com/zz/store
3
en Intended use
Intended use
Read these instructions carefully. Only then will you be able to operate your appliance safely and correctly. Retain the instruction manual and installation instructions for future use or for subsequent owners.
This appliance is only intended to be fully fitted in a kitchen. Observe the special installation instructions.
Check the appliance for damage after unpacking it. Do not connect the appliance if it has been damaged in transport.
Only a licensed professional may connect appliances without plugs. Damage caused by incorrect connection is not covered under warranty.
This appliance is intended for domestic use only. The appliance must only be used for the preparation of food and drink. The appliance must be supervised during operation. Only use this appliance indoors.
This appliance is intended for use up to a maximum height of 2000 metres above sea level.
This appliance may be used by children over the age of 8 years old and by persons with reduced physical, sensory or mental capabilities or by persons with a lack of experience or knowledge if they are supervised or are instructed by a person responsible for their safety how to use the appliance safely and have understood the associated hazards.
Children must not play with, on, or around the appliance. Children must not clean the appliance or carry out general maintenance unless they are at least 8 years old and are being supervised.
Keep children below the age of 8 years old at a safe distance from the appliance and power cable.
Always slide accessories into the cooking compartment correctly. See description of accessories in the instruction manual.
4
Important safety information |
en |
m Important safety information
m Warning – Risk of fire!
Combustible items stored in the cooking compartment may catch fire. Never store combustible items in the cooking compartment. Never open the appliance door if there is smoke inside. Switch off the appliance and unplug it from the mains or switch off the circuit breaker in the fuse box.
A draught is created when the appliance door is opened. Greaseproof paper may come into contact with the heating element and catch fire. Do not place greaseproof paper loosely over accessories during preheating. Always weight down the greaseproof paper with a dish or a baking tin. Only cover the surface required with greaseproof paper. Greaseproof paper must not protrude over the accessories.
m Warning – Risk of burns!
The appliance becomes very hot. Never touch the interior surfaces of the cooking compartment or the heating elements. Always allow the appliance to cool down. Keep children at a safe distance.
Accessories and ovenware become very hot. Always use oven gloves to remove accessories or ovenware from the cooking compartment.
Alcoholic vapours may catch fire in the hot cooking compartment. Never prepare food containing large quantities of drinks with a high alcohol content. Only use small quantities of drinks with a high alcohol content. Open the appliance door with care.
m Warning – Risk of scalding!
The accessible parts become hot during operation. Never touch the hot parts. Keep children at a safe distance.
When you open the appliance door, hot steam may escape. Open the appliance door with care. Keep children at a safe distance.
Water in a hot cooking compartment may create hot steam. Never pour water into the hot cooking compartment.
m Warning – Risk of injury!
Scratched glass in the appliance door may develop into a crack. Do not use a glass scraper, sharp or abrasive cleaning aids or detergents.
m Warning – Risk of electric shock!
Incorrect repairs are dangerous. Repairs may only be carried out and damaged power cables replaced by one of our trained after-sales technicians. If the appliance is defective, unplug the appliance from the mains or switch off the circuit breaker in the fuse box. Contact the after-sales service.
The cable insulation on electrical appliances may melt when touching hot parts of the appliance. Never bring electrical appliance cables into contact with hot parts of the appliance.
Do not use any high-pressure cleaners or steam cleaners, which can result in an electric shock.
When replacing the cooking compartment bulb, the bulb socket contacts are live. Before replacing the bulb, unplug the appliance from the mains or switch off the circuit breaker in the fuse box.
5
en Important safety information
A defective appliance may cause electric shock. Never switch on a defective appliance. Unplug the appliance from the mains or switch off the circuit breaker in the fuse box. Contact the after-sales service.
The insulation of an incompatible meat probe may be damaged. Only use the meat probe which is recommended for this appliance.
m Warning – Risk of fire!
Loose food residues, grease and meat juices may catch fire during pyrolytic cleaning. Remove coarse dirt from the cooking compartment and from the accessories before every pyrolytic cleaning cycle.
The appliance will become very hot on the outside during the pyrolytic cleaning cycle. Never hang combustible objects, e.g. tea towels, on the door handle. Do not place anything against the front of the oven. Keep children at a safe distance.
m Warning – Risk of burns!
The cooking compartment will become very hot during the pyrolytic cleaning cycle. Never open the appliance door or move the locking latch by hand. Allow the appliance to cool down. Keep children at a safe distance.
; The appliance will become very hot on the outside during the Self-cleaning cycle. Never touch the appliance door. Allow the appliance to cool down. Keep children at a safe distance.
m Warning – Risk of serious damage to health!
The appliance will become very hot during the pyrolytic cleaning cycle. The non-stick coating on baking trays and tins is destroyed and noxious gases are released. Never let non-stick baking trays and tins go through the pyrolytic cleaning cycle. Only enamelled accessories may be cleaned at the same time.
6
Causes of damage |
en |
Causes of damage |
|
Environmental protection |
Caution!
–Accessories, foil, greaseproof paper or ovenware on the cooking compartment floor: do not place accessories on the cooking compartment floor. Do not cover the cooking compartment floor with any sort of foil or greaseproof paper. Do not place ovenware on the cooking compartment floor if a temperature of over 50 ºC has been set. This will cause heat to accumulate. The baking and roasting times will no longer be correct and the enamel will be damaged.
–Water in a hot cooking compartment: do not pour water into the cooking compartment when it is hot. This will cause steam. The temperature change can cause damage to the enamel.
–Moist food: do not store moist food in the cooking compartment when it is closed for prolonged periods This will damage the enamel.
–Fruit juice: when baking particularly juicy fruit pies, do not pack the baking tray too generously. Fruit juice dripping from the baking tray leaves stains that cannot be removed. If possible, use the deeper universal pan.
–Cooling with the appliance door open: only allow the cooking compartment to cool when it is closed. Even if the appliance door is only open a little, front panels of adjacent units could be damaged over time.
–Very dirty door seal: If the door seal is very dirty, the appliance door will no longer close properly when the appliance is in use. The fronts of adjacent units could be damaged.Always keep the door seal clean.
–Appliance door as a seat, shelf or worktop: Do not sit on the appliance door, or place or hang anything on it. Do not place any cookware or accessories on the appliance door.
–Inserting accessories: depending on the appliance model, accessories can scratch the door panel when closing the appliance door. Always insert the accessories into the cooking compartment as far as they will go.
–Carrying the appliance: do not carry or hold the appliance by the door handle. The door handle cannot support the weight of the appliance and could break.
The sections below list a number of energy-saving tips and provide information on disposing of your appliance.
Saving energy
Use baking tins that are dark-coloured, painted black or have an enamel coating. These absorb the heat particularly well.
Open the appliance door as infrequently as possible when the appliance is in use.
You can place two cakes next to one another in the cooking compartment. In hot-air mode, you can bake on more than one level at a time.
For longer cooking times, you can switch the appliance off 10 minutes before the end of the cooking time and use the residual heat to finish cooking.
Environmentally-friendly disposal
Dispose of packaging in an environmentally-friendly manner.
This appliance is labelled in accordance with European Directive 2012/19/EU concerning used electrical and electronic appliances (waste electrical and electronic equipment - WEEE). The guideline determines the framework for the return and recycling of used appliances as applicable throughout the EU.
7

en Familiarising yourself with your appliance
Familiarising yourself with your appliance
Use this section to familiarise yourself with your new appliance. The control panel and the individual operating controls are explained. You will find information on the cooking compartment and the accessories.
Oven
1Door seal
2Grill element
3Interior lighting
4Opening for core temperature sensor
5Rotary spit drive
6Opening for additional heating element (optional accessory for the baking stone and roasting dish)
7Door handle
8
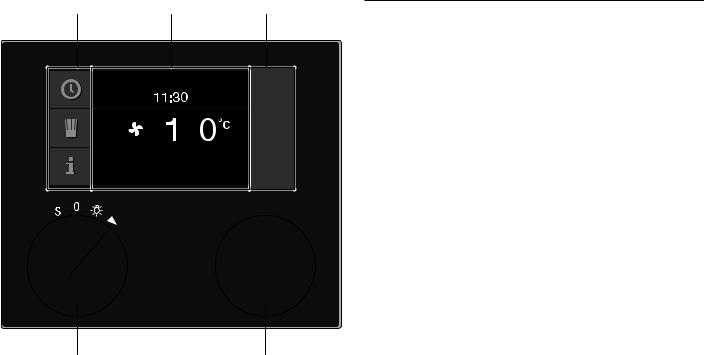
Display and operating controls
|
|
|
|
|
|
|
|
|
|
1 |
Control panel |
These areas are touch sensitive. |
|
|
Touch a symbol to select the |
|
|
corresponding function. |
|
|
|
2 |
Display |
The display shows, for example, |
|
|
current settings and options. |
|
|
|
3 |
Rotary selector |
You can use the rotary selector to |
|
|
set the temperature and to make |
|
|
further settings. |
|
|
|
4 |
Function selector |
The function selector is used to |
|
|
select the type of heating, the |
|
|
cleaning function or the basic set- |
|
|
tings. |
|
|
|
Familiarising yourself with your appliance en
Symbols
Symbol |
Function |
I |
Start |
|
|
Ø |
Stop |
|
|
H |
Pause/End |
|
|
' |
Cancel |
|
|
Ž |
Delete |
|
|
™ |
Confirm/save settings |
|
|
C |
Selection arrow |
|
|
( |
Call up additional information |
|
|
’ |
Rapid heating with status indicator |
|
|
i |
Call up individual recipes |
|
|
g |
Record menu |
|
|
% |
Edit settings |
|
|
4 |
Enter name |
|
|
l |
Delete letters |
|
|
0 |
Child lock |
|
|
M |
Call up timer menu |
|
|
/ |
Call up long-term timer |
|
|
° |
Demo mode |
|
|
+ |
Call up core temperature probe |
|
|
m |
Start rotisserie spit |
|
|
, |
Stop rotisserie spit |
|
|
¤ |
Start roasting function |
|
|
£ |
End roasting function |
|
|
9

en Familiarising yourself with your appliance
Colours and display
Colours
The different colours are used to guide the user in the relevant setting situations.
Orange |
Initial settings |
|
Main functions |
|
|
Blue |
Basic settings |
|
Cleaning |
|
|
White |
Values which can be set |
|
|
Appearance
Depending on the situation, the appearance of symbols, values or the entire display changes.
Zoom |
The setting that you are changing |
|
will appear larger on the display. |
|
If you have set a time and it is about |
|
to run out, it will appear larger on |
|
the display just before it runs out |
|
(e.g. 60 seconds before the end, if |
|
you have set the timer). |
|
|
Pared-down |
After a short while, the amount of |
display |
information shown on the display |
|
will be reduced and only the most |
|
important information will |
|
remain.This function is pre-set and |
|
can be changed in the basic |
|
settings. |
Additional information ( and )
By touching the ( symbol, you can call up additional information. For example, information on the heating function set or on the current temperature of the cooking compartment.
Note: During continuous operation, small fluctuations in temperature are normal after the oven has heated up.
The ) symbol is displayed for important information and action prompts.Important information on safety and operation mode are occasionally shown automatically. These messages either disappear automatically after a few seconds or must be confirmed with ™.
Cooling fan
Your appliance has a cooling fan. The cooling fan switches on during operation. Depending on the appliance version, the hot air escapes above or under the door.
After removing cooked food, keep the door closed until the appliance cools down. The appliance door must not be left ajar, as adjoining kitchen furniture may be damaged. The cooling fan continues to run for a certain time after operation and then switches off automatically.
Caution!
Do not cover the ventilation slots. Otherwise, the appliance will overheat.


10
|
|
|
|
|
Familiarising yourself with your appliance |
en |
Function selector positions |
|
|
||||
|
|
|
|
|
|
|
|
|
|
|
|
|
|
|
|
|
|
|
|
|
|
|
|
|
|
|
|
|
|
|
|
|
|
|
|
|
|
|
|
||
|
|
|
|
|
|
|
|
|
|
|
|
||
|
|
|
|
|
||
|
|
|
|
|
||
Position |
Function/heating function |
Temperature range |
Application |
|
||
|
|
|
|
Default temperature |
|
|
|
|
|
|
|
|
|
0 |
"Off" position |
|
|
|
|
|
|
|
|
|
|
|
|
ž |
Light |
|
|
|
|
|
|
|
|
|
|
||
2 |
Hot air |
|
50 - 300 °C |
Hot air: For cakes, biscuits and bakes on more than one level. |
||
|
H |
|
170 °C |
The fan in the back panel of the oven distributes the heat |
|
|
|
|
|
|
|
evenly throughout the cooking compartment. |
|
3 |
Eco hot air* |
|
50 - 300 °C |
Energy-saving hot air mode for cakes, small baked items, |
|
|
|
I |
|
170 °C |
bakes and gratins. The oven lighting and the catalytic con- |
|
|
|
|
verter remain off. The oven temperature can only be displayed |
||||
|
|
|
|
|
||
|
|
|
|
|
while the oven is heating up. |
|
|
|
|
|
|
|
|
4 |
Top + bottom heating |
|
50 - 300 °C |
For cakes in tins or on a baking tray, bakes, roasts. |
|
|
|
N |
|
170 °C |
|
|
|
|
|
|
|
|
||
5 |
Top + Y bottom heating |
50 - 300 °C |
For tray bakes, biscuits, cakes with meringue, grilling and |
|
||
|
O |
|
170 °C |
browning bakes. |
|
|
|
|
Ideally suited to heating the food specifically from above once |
||||
|
|
|
|
|
||
|
|
|
|
|
again towards the end of preparation. |
|
|
|
|
|
|
|
|
6 |
Top heating |
|
50 - 300 °C |
Targeted heating from above, for example grilling fruit flan |
|
|
|
P |
|
170 °C |
with meringue. |
|
|
|
|
|
|
|||
|
|
|
|
|||
7 |
Y Top + bottom heating |
50 - 300 °C |
For cheesecake, bread in loaf tins, dishes in a bain marie (e.g. |
|||
|
M |
|
170 °C |
egg custard and crème brûlée).For braising without a lid and |
||
|
|
warming up food (food dries out less). |
|
|||
|
|
|
|
|
|
|
|
|
|
|
|
Ideally suited to heating the food specifically from below once |
|
|
|
|
|
|
again towards the end of preparation. |
|
|
|
|
|
|
|
|
8 |
Bottom heating |
|
50 - 300 °C |
For the final baking stage (such as for moist fruit flans), for |
|
|
|
L |
|
170 °C |
boiling down, for dishes in a bain marie. |
|
|
|
|
|
|
|||
|
|
|
|
|||
9 |
Hot air + bottom heating |
50 - 300 °C |
Additional heating from below for moist cakes and flans, such |
|||
|
K |
|
170 °C |
as fruit flans. |
|
|
|
|
|
|
|||
|
|
|
|
|
||
10 |
Hot air + Y bottom heating |
50 - 300 °C |
For high bakes, lasagne, onion tart, egg dishes (e.g. tortilla |
|
||
|
J |
|
170 °C |
and farmer's omelettes). |
|
|
|
|
|
|
|||
|
|
|
|
|
|
|
11 |
Full surface grill + |
|
50 - 300 °C |
Even, all-round heating for meat, poultry and whole fish. |
|
|
|
air recirculation |
|
220 °C |
|
|
|
|
Z |
|
|
|
||
|
|
|
|
|
||
|
|
|
|
|
||
12 |
Full surface grill |
|
50 - 300 °C |
For grilling flat pieces of meat, sausages or fillets of fish. Grill- |
||
|
Q |
|
220 °C |
ing and cooking "au gratin". |
|
|
|
|
|
|
|||
|
|
|
|
|
|
|
13 |
Compact grill |
|
50 - 300 °C |
Only the centre part of the grill heating element is heated. |
|
|
|
S |
|
220 °C |
Energy-saving grilling for small amounts of food. |
|
|
|
|
|
|
|||
|
|
|
|
|
|
|
14 |
Baking stone function |
|
50 - 300 °C |
Only with the baking stone (optional accessory) |
|
|
|
T |
|
250 °C |
Baking stone heated from below for crisp stone-baked pizza, |
||
|
|
|
|
|
bread or bread rolls. |
|
*Heating function used to determine the energy efficiency class in accordance with EN 60350-1.
11
en |
Familiarising yourself with your appliance |
|
|||
|
|
|
|
||
Position Function/heating function |
Temperature range |
Application |
|||
|
|
|
Default temperature |
|
|
|
|
|
|
|
|
15 |
|
Roasting dish function |
50 |
- 220 °C |
Only with the roasting dish (optional accessory) |
|
|
U |
180 °C |
Heatable cast iron roasting dish for large joints of meat, |
|
|
|
|
|
|
bakes or festive roasts. |
16 |
|
Dough proving |
30 |
- 50 °C |
Proving: For yeast dough and sourdough. |
|
|
V |
38 |
°C |
Dough will rise considerably more quickly than at room tem- |
|
|
|
|
|
perature. The optimal temperature setting for yeast dough is |
|
|
|
|
|
38 °C. |
|
|
|
|
|
|
17 |
|
Defrosting |
40 |
- 60 °C |
Even, gentle defrosting. |
|
|
W |
45 |
°C |
For vegetables, meat, fish and fruit. |
|
|
|
|
|
|
18 |
|
Keeping food warm |
30 |
- 120 °C |
Keeping food warm, pre-heating porcelain cookware. |
|
|
X |
70 |
°C |
|
|
|
|
|
|
|
S |
|
Basic settings |
|
|
Your appliance can be adjusted to your requirements in the |
|
|
t |
|
|
basic settings. |
|
|
|
|
|
|
|
|
Pyrolytic self-cleaning |
485 °C |
Self-cleaning |
|
|
|
œ |
|
|
|
*Heating function used to determine the energy efficiency class in accordance with EN 60350-1.
Accessories
Use only the accessories supplied with the product or available from the after-sales service. They are specially designed for your appliance. Ensure that you always insert the accessories into the cooking compartment the right way round.
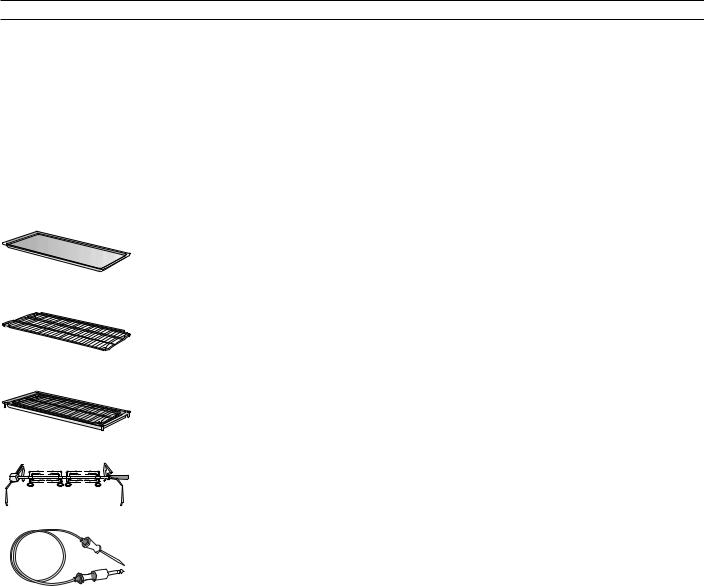
Your appliance is equipped with the following accessories:
Enamel baking tray
Wire rack
Grill tray with wire rack
Rotary spit
Plug-in core temperature probe
Special accessories
You can order the following special accessories from your specialist dealer:
BA 018 105 Pull-out system
Fully extendable telescopic pull-out rack and pyrolysis-proof cast frame
BA 028 115 Baking tray, enamelled, 30 mm deep
BA 038 105 Wire rack, chromium-plated, without opening, with feet
BA 058 115 Heating element for baking stone and roaster
BA 058 133 Baking stone
Including baking stone support and pizza paddle (order heating element separately)
BA 090 100 Back rotary knob, set of 2
BS 020 002 Pizza paddle, set of 2
GN 340 230 Cast aluminium roaster GN 2/3, 165 mm high, non-stick coated
Only use the accessories as specified. The manufacturer accepts no liability if these accessories are used incorrectly.
12
Before using the appliance for the first time
In this section, you can find out what you must do before using your appliance to prepare food for the first time. Read the section entitled 'Important safety information' beforehand.
The appliance must be fully installed and connected to the mains.
After connection to the mains, the "Initial settings" menu appears in the display. You can now make settings for your new appliance.
Language
Time format
Time
Date format
Date
Temperature format
Notes
–The "Initial settings" menu will appear only after the appliance has been connected to a power supply and switched on for the first time, or if the appliance has not been connected to a power supply for a number of days.
Once the appliance has been connected to a power supply, the GAGGENAU logo will appear first for approximately 30 seconds. The "Initial settings" menu will then appear automatically.
–You can change the settings at any time (see section entitled 'Basic settings').
Setting the language
The preset language appears in the display.
1Turn the rotary selector to select the required display language.
2Confirm with ™.
'HXWVFK
6SUDFKH
Note: If the language is changed, the system restarts. This takes a few seconds.
Before using the appliance for the first time |
en |
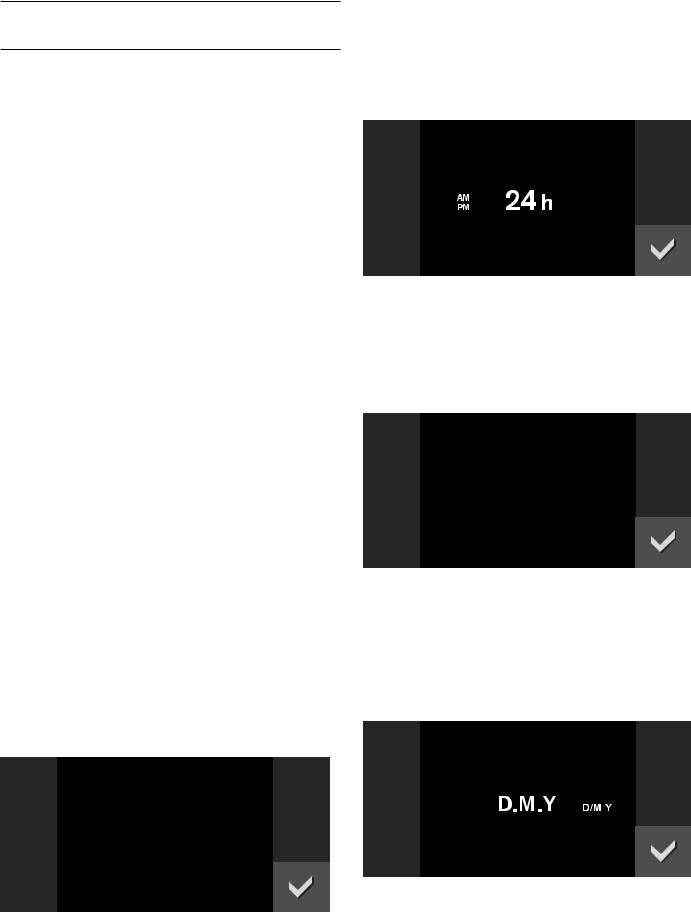
Setting the time format
The two possible formats 24h and AM/PM appear in the display. The default is the 24h format.
1Use the rotary selector to select the desired format.
2Confirm with ™.
7LPH IRUPDW
Setting the clock
The time is shown in the display.
1Set the desired time using the rotary selector.
2Confirm with ™.
7LPH
Setting the date format
The three possible formats D.M.Y, D/M/Y and M/D/Y appear in the display. The default is the D.M.Y format.
1Use the rotary selector to select the desired format.
2Confirm with ™.
'DWH IRUPDW
13
en Before using the appliance for the first time
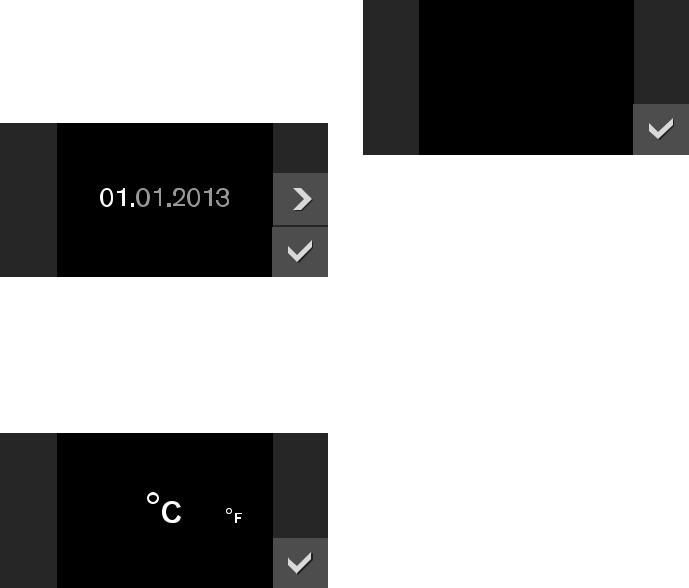
Setting the date
The preset date appears in the display. The day setting is already active.
1Set the day using the rotary selector.
2Touch the C symbol to switch to the month setting.
3Set the month using the rotary selector.
4Touch the C symbol to switch to the year setting.
5Set the year using the rotary selector.
6Confirm with ™.
'DWH
Setting the temperature format
The two possible formats °C and °F appear in the display. The default setting is °C.
1Use the rotary selector to select the desired format.
2Confirm with ™.
7HPSHUDWXUH IRUPDW
Ending initial set-up
"Initial set-up complete" appears in the display.
Confirm with ™.
,QLWLDO VHW XS FRPSOHWH
The appliance enters standby mode and the standby screen appears. The appliance is now ready for operation.
Heating up the oven
Ensure that no packaging remnants have been left in the cooking compartment.
To remove the new cooker smell, heat up the oven when it is empty and closed. One hour with H Hot air at
200°C is ideal. For instructions on how to set this type of heating, refer to the Operating the appliance
section.
Cleaning accessories
Before using the accessories for the first time, clean them thoroughly using hot detergent solution and a soft cloth.
14
Activating the appliance
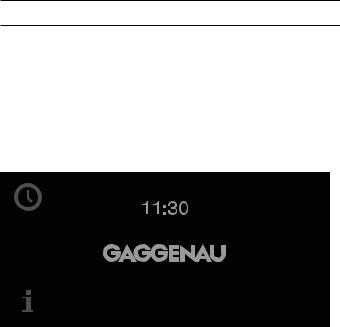
Standby
The appliance goes into standby mode if no function has been set or the child lock is activated.
The brightness of the control panel is dimmed in standby mode.
Notes
–Different displays are available for standby mode.
The default setting is the GAGGENAU logo and the clock. To change the display, refer to the Basic settings section.
–The brightness of the display depends on the vertical viewing angle. You can adjust the display using the "Brightness" setting in the basic settings.
Activating the appliance |
en |
Activating the appliance
To exit standby mode, you can either
Turn the function selector,
Touch a control panel,
Open or close the door.
You can now set the desired function. You can read about how to set functions in the respective chapters.
Notes
–When "Standby screen = off" is selected in the basic settings, you must turn the function selector to exit standby mode.
–The appliance returns to the standby screen if you have not made any settings for a long time after activation.
–When the door is open, the interior lighting switches off after a short time.
15

en Operating the appliance
Operating the appliance
Cooking compartment
The cooking compartment has three rack levels. The rack levels are counted from the bottom up.
Caution!
–Do not place anything directly on the cooking compartment floor. Do not line it with aluminium foil. A build-up of heat could damage the appliance.
–Do not slide any accessories between the shelf positions, or they may tilt.
Inserting accessories
The accessories have a locking function.The locking function prevents the accessories from tilting when they are pulled out.The accessories must be inserted into the cooking compartment correctly for the tilt protection to work properly.
When inserting the wire rack, make sure that
the lug ¨ is pointing downwards
the safety bar © on the wire rack is at the back and on top.
Switching on
1Set the required heating mode using the function selector. The chosen heating mode and the default temperature are displayed.
2If you want to change the default temperature: set the required temperature with the rotary selector.
The preheating symbol ’ appears on the display. The bar continuously shows the preheating status. When the set temperature is reached, a signal sounds and the preheating symbol ’ goes off.
Note: The oven interior lighting stays switched off at a temperature setting below 70°C
Switching off:
Turn the function selector to 0.
Rapid heating
With the "Rapid heat-up" function, your appliance reaches the desired temperature particularly quickly in the top heating, bottom heating and top/bottom heating types of heating.
To ensure an even cooking result, do not place your food in the cooking compartment until "Rapid heat-up" is complete and the ’ heat-up symbol goes out.
Note: The "Rapid heat-up" function is preset in the factory settings. In the basic settings, you can select ’ Rapid heat-up or “ Heat-up.
Safety shut-off
For your protection, the appliance is equipped with an automatic safety shut-off. Any heating process is switched off after 12 hours if the oven is not operated in this time. A message appears in the display.
Exception:
The long-term timer has been programmed.
Set the function selector to 0, then the appliance can be operated again as usual.
16
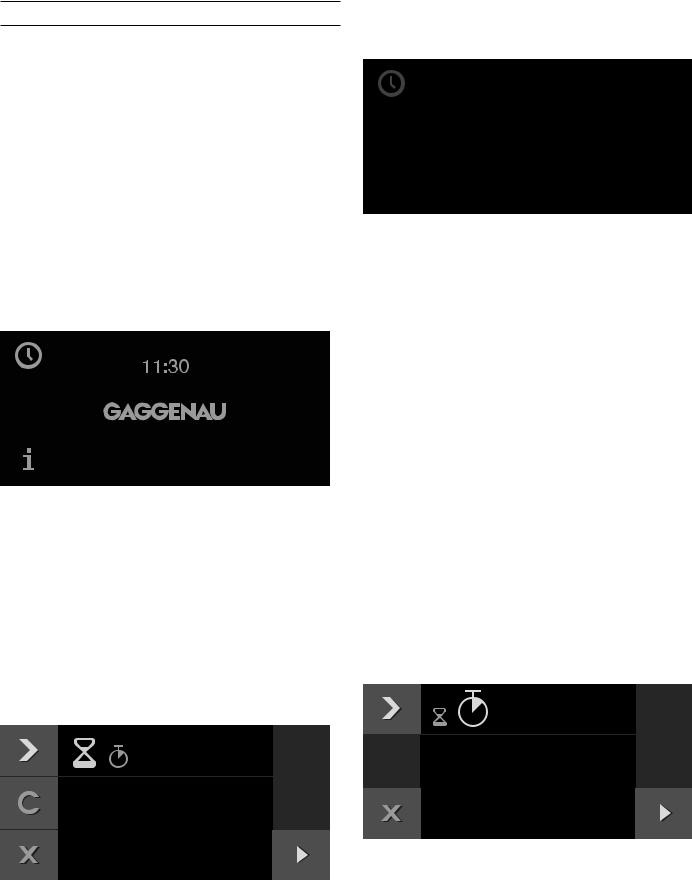
Timer functions
You use the timer menu to make the following settings:
Š Short-term timer
p Stopwatch
6 Cooking time (not in standby mode)
5 Cooking time end (not in standby mode)
Calling up the timer menu
You can call up the timer menu from any mode. Only from the basic settings, function selector is set to S, the timer menu is not available.
Touch the M symbol.
The timer menu is displayed.
Timer
The timer runs independently of the other appliance functions. You can enter a maximum of 90 minutes.
Setting the timer
1Call up timer menu.
The "Timer" Š function is displayed.
2Turn the rotary selector to set the required cooking time.


7LPHU
3 Start with I.
Timer functions |
en |
The timer menu closes and the time begins to count down. The Š symbol and the countdown appear in the display.


A signal sounds once the time has elapsed. Touch the ™ symbol to silence.
You can exit the timer menu at any time by pressing the ' symbol. This erases the settings.
To stop the timer:
Call up timer menu. Touch C to select the "Timer" Š function and touch the H symbol. To allow the timer to continue counting down, touch the symbol I.
Switching off the timer early:
Call up timer menu. Touch C to select the "Timer" Š function and touch the Ž symbol.
Stopwatch
The stopwatch runs independently of the other appliance functions.
The stopwatch counts from 0 seconds up to 90 minutes.
It also has a pause function, which enables you to temporarily stop the clock.
Starting the stopwatch
1Call up the timer menu.
2Touch C to select the p "Stopwatch" function.


6WRSZDWFK
3 Touch I to start.
17
 Loading...