


Gaggenau 762, 690, 756, 677, 603 User Manual
...
Planning guide for modular refrigerator, freezer and wine columns.
Table of contents
Installation options 174
Kitchen Design — basic terms |
175 |
Cabinetry style & cut-out depth |
176 |
Additional planning notes |
177 |
Door swivel range |
177 |
Appliance dimensions |
|
Wall clearance RC/RF/RW |
178 |
Appliance dimensions
Wall clearance RB/RY 179
Dimensions for the installation cavity 180
Door panel dimensions |
181 |
Planning example for an individual appliance |
182 |
Planning example for a side-by-side solution |
183 |
Planning examples |
184 |
Planning information |
186 |
Toe-kick area/upper molding of cut-out |
188 |
Installation accessories |
189 |
Refrigeration 173
Installation options.
ThemodularrefrigeratorandfreezercolumnconceptfromGaggenauoffersyouavarietyofinstallationpossibilities.Insome instances, special accessories are required!
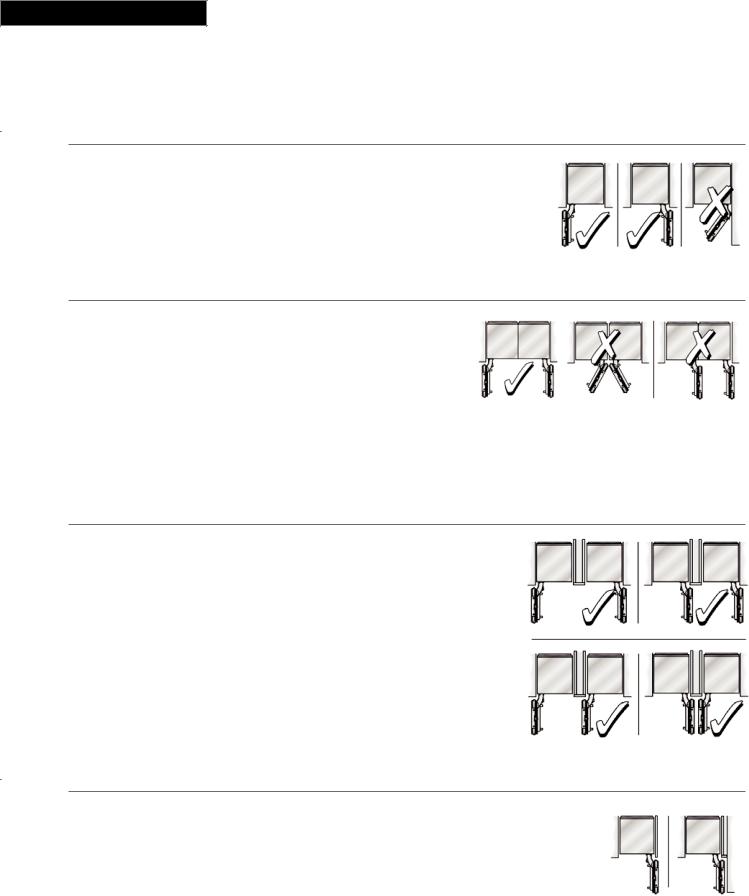
Individual column installations
Any appliance can be installed as a stand-alone unit. Ensure a cutout flush to the appliance at a depth of minimum 4" (102mm), preferably 6"
(152 mm) on the top and sides.
Note: It is absolutely essential to ensure that the appliance is installed in such a way that the doors do not interfere with an adjacent wall or other kitchen elements.
Side-by-Side installations (SxS)
The proper installation of any side-by-side two column combination requires an installation kit (RA 460 000). It combines two individual units into a side-by-side unit. For combinations that involve freezers and wine columns, this kit is already pre-installed to the unit. For all other SxS combinations or instances where any appliances are installed less than 6" (152 mm) apart from another but not connected SxS, a heating kit (RA 460 010) is required.
Note: A partition of minimum ⅝" (16 mm) is required to ensure the doors do not interfere with one another when opened. Use a partition to separate appliances and observe the door swivel range. (See page 177 for details on door swivel range dimensions.)
Multiple column installations with partition walls between
When dimensioning the partition, note the thickness of the door panel (including handles) as well as the swivel range (see page 177 on swivel range) to prevent damage if the doors are opened at the same time. If the thickness of a partition between two products is less than 6", then a heating kit (RA 460 010) is required. It must be installed on the right side wall of the left-side appliance.
Three appliances can be installed together only if a partition — minimum
⅝" (16 mm) — is placed between two of the appliances. Ensure that door panel thickness (including handles) as well as the swivel range are accounted for.
At the end of a cabinetry run
All Gaggenau refrigeration appliances must be completely enclosed on the top and sides. If one side of the appliance is visible, a decorative side panel must be used for covering it. This side panel must be properly affixed to the floor, room wall and any overhead furniture/ fixtures before the appliance is placed in the cutout.
174 Refrigeration
Kitchen design — basic terms.
To clarify the terms which are used in this planning guide, please refer to the following definitions:
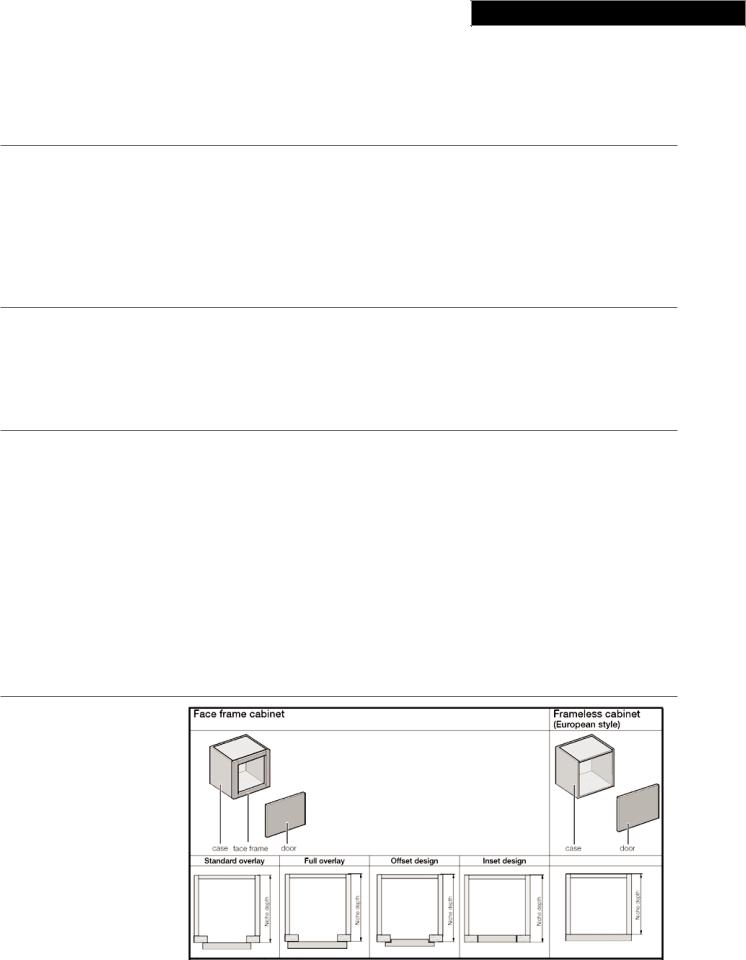
Case |
This is the main body of a kitchen cabinet. |
|
|
Face Frame (Cabinet) |
This is a decorative frame at the front of a kitchen cabinet and is typical for North |
|
America. Variations by manufacturer in kitchen design construction may purposely |
|
have a clearly visible face frame that is a part of the kitchen aesthetics. European |
|
design and styling of cabinets (frameless cabinetry) typically do not have a frame. |
|
|
Door |
The kitchen cabinetry door panel is the element of kitchen furniture largely defining |
|
the aesthetic design of a kitchen. It can have any conceivable look — from modern to |
|
traditional. In this planning guide a ¾" (19 mm) thick door panel is presumed. |
Appliance Door Panel
The modular refrigerator and freezer columns from Gaggenau are intentionally designed to be equipped and delivered with custom made appliance door panels that perfectly match the end-user‘s installed kitchen cabinetry. Typically the normal appliance door panel thickness is expected to be ¾" (19 mm). However, a thicker appliance door panel can be accommodated if such door panels are used on the end-user‘s kitchen cabinetry or in order to emulate the look of the visible face frame (addition to the door) on the refrigerator as well.
Cutout (Niche)
The cutout is the cavity where a Gaggenau refrigerator or freezer is installed. The width of the cutout (18",24",30",..) is dependent on the appliance. The cutout depth is equal to the depth of the kitchen cabinet (case+face frame). It does NOT include the thickness of the cabinetry door panel. For proper planning of the cutout depth, please refer to the respective chapter on page 180 in this planning guide.
The main idea of the Gaggenau modular refrigerator and freezer column concept is, that you can simply replace any standard size kitchen cabinet with a refrigerator column. You can create a suitable cutout by leaving a respective gap between two tallcabinets.Alternativelyyoumaycreateanenclosure,thattheappliancewillfitinto.
However this is not the original design intent (basic idea).
When planning the installation cutout, it is important that the side walls are completely flush! Please make sure that there is not any kind of face frame at the front of the cutout. If, for some reason this is not the situation, please make sure that the depth of this face frame (furniture return) is more than 4" (100 mm) so that the appliances can be properly secured.
Kitchen Cabinetry
Illustration
Refrigeration 175
Cabinetry style and cut-out depth.
As previously described, the required depth of the installation cavity is mainly dependent on the kitchen design. Gaggenau refrigerator and freezer columns are designed for a cutout depth of 24" (610 mm). So, if the kitchen cabinet (case + face frame) is 24" deep, this should accommodate many standard installations.
Please be advised that additional depth may be required for kitchen designs intending the look of flush fascia across the cabinetry and the refrigerator door panel.
The below cabinetry styles detail requirements for the cutout and custom panel.
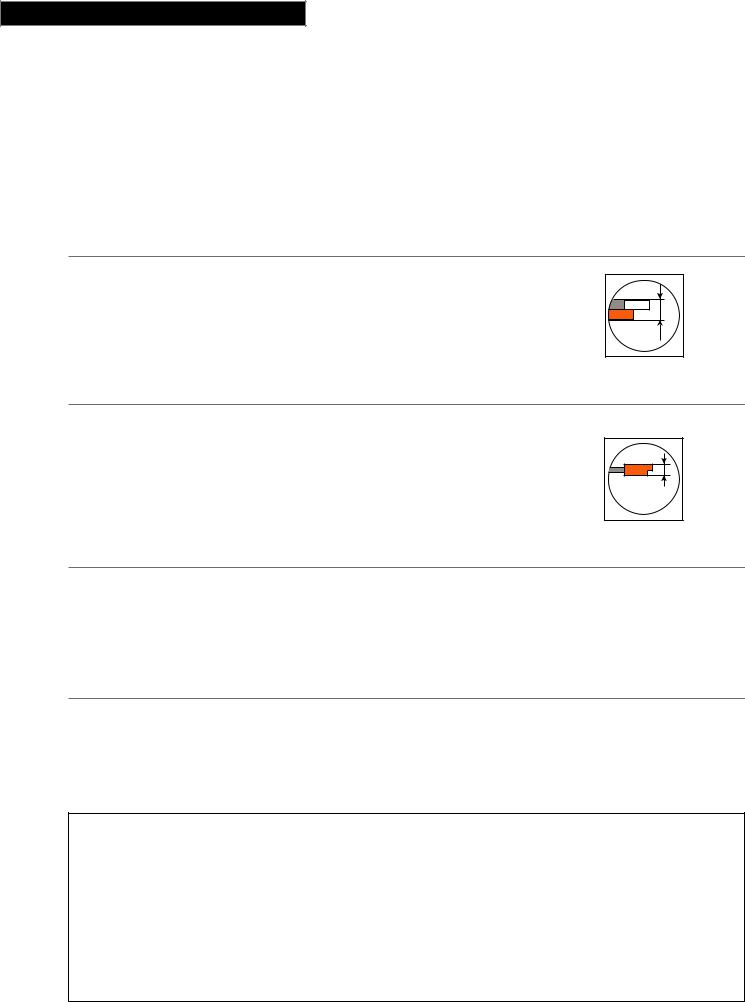
A) Standard Overlay Design — 25" (635 mm) cutout depth
On a kitchen with standard overlay cabinetry, the face frame is also an important part of the design. If the same aesthetics are to be continued on the refrigerator, then not only the door cabinetry panel thickness (e.g. ¾") is included, additionally the face frame thickness must be emulated. Thereby the resulting thickness of the appliance door panel is ¾" + ¾" = 1 ½" (face frame emulation + door panel = custom appliance door panel). This cumulative thickness of the resulting custom appliance door panel requires added depth for the installation cavity. Example 24"+ ¾" = 24 ¾" (recommended is 25").
1 ½" |
appliance door panel (emulating a face frame)
B) Full Overlay Design — 25" (635 mm) cutout depth
The above mentioned requirements are of course also valid for kitchens with full overlay design. However there are some chances to work with a cutout depth of 24": For this, the small remaining visible area of the fully overlaid face frame has to be emulated within the standard appliance door panel thickness of ¾". This can be done by simply ignoring the visible area of the face frame on the refrigerator (“extended size“ of the appliance door panel) or by emulating the face frame by creating a respective “nose“ on the appliance door panel (see drawing).
¾" |
appliance door panel with nose
C) Offset Design, Flush Inset Design — 25" (635 mm) cutout depth
Here, the kitchen cabinetry door panels are NOT completely mounted on the cabinet, but partially or fully inserted into the face frame. Due to this, such offset or inset design kitchens do not gain sufficient installation depth by the door panel. If any appliance door panel (thickness e.g. ¾") is installed on the refrigerator, the complete depth dimension of the “paneled refrigerator“ will be 24"+ ¾" = 24 ¾" (629mm). The minimum depth of the cutout is therefore also 24 ¾" (recommended is 25").
D) European style kitchen cabinetry — 24" (610 mm) cutout depth
If the kitchen design is based on European style cabinetry, there is no need to emulate the look of a face frame, as such a frame does not exist on any of the kitchen cabinets.
Therefore a 24" (610 mm) deep cutout will always be sufficient.
24" Cutout depth is sufficient for:
––frameless cabinetry kitchen design with any kind of appliance door panels
––standard overlay or full overlay kitchen design with appliance stainless steel door panels.
––full overlay kitchen design with appliance custom door panels with “extended size” or with “nose” (to emulate face frame look).
25" Cutout depth is required for:
––standard or full overlay kitchen design with appliance door panels with thickness bigger than ¾" (to emulate face frame look)
––offset or inset design kitchens with any kind of appliance door panels
176 Refrigeration
Additional planning notes
Read all instructions in the installation manual completely and carefully prior to installation. Installation manuals are supplied with the appliance and are also available at www.gaggenau-usa.com.
Refrigeration appliances are top heavy and must be secure to prevent the possibility of tipping forward. Anti-tip protection is required.
Keep doors closed until the appliance is completely installed and secured per installation instructions.
Due to size and weight of appliance and to reduce risk of personal injury or damage to the product — TWO PEOPLE ARE REQUIRED FOR PROPER INSTALLATION.
When installing a refrigeration appliance next to a BO/
BSovenwithhandle(optional),asideclearanceof2 ⅜"(60 mm) is required if the BO/BS handle is on the same side as the hinge of the refrigeration appliance.
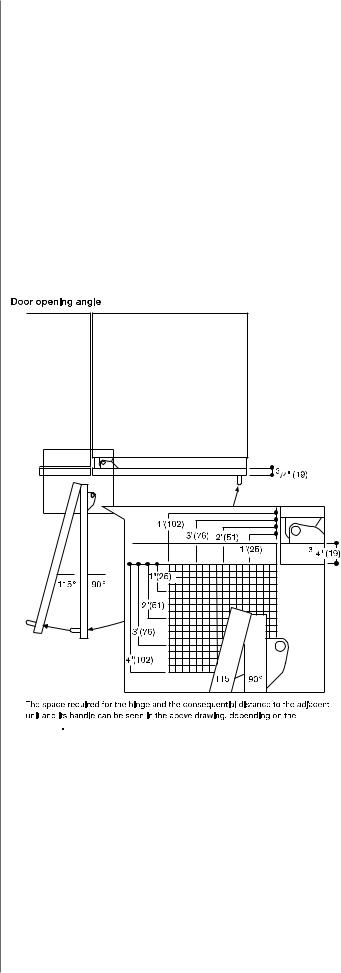
Door swivel range
To ensure correct kitchen planning it is essential to take opening angle of the appliance door into account (plus fitted cabinet door and handle). There should be no possibility of collision with other kitchen furnishings (worktops, handles of other cabinetry etc.) or parts of the room (walls, protrusions etc.).
The space needed for the hinge and the consequential distance to the adjacent cabinetry and its handle can, depending on the panel thickness, be seen in the following drawing. The drawing assumes a panel thickness of ¾".
––Restrict the door opening angle to 90°
(standard 115°) with a door stop pin installed into the hinge.
––Install a spacer between the appliance and the kitchen element that creates the interference.
––Rearrange surrounding cabinetry or appliance.


 ¾" (19 mm).
Numbers indicated
inside parenthesis ( ) = mm
Refrigeration 177
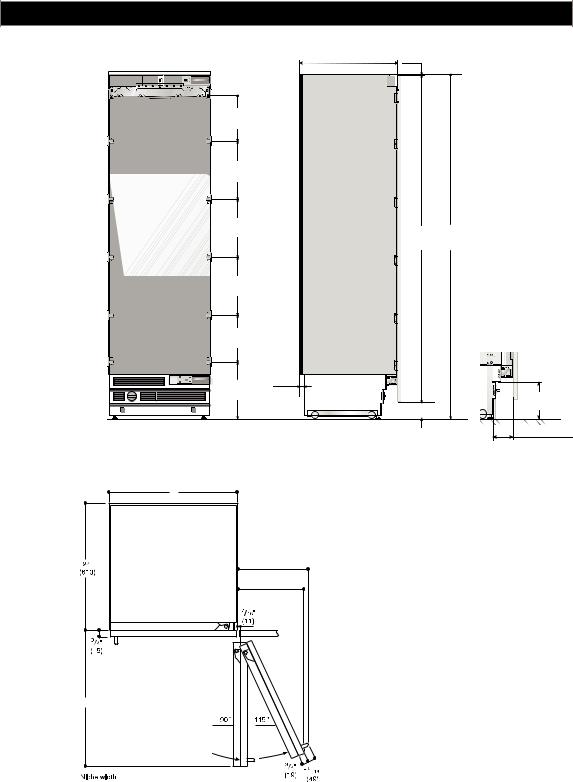
Appliance dimensions & Wall clearance RC/RF/RW (single-door columns).
 A
A
 B
B 
24" ⅛"
(610)(3)
11 ⁄ "
(287.4)
14 ³⁄ "
(360)
14 ³⁄ "
(360) 79⅞" 84"
(2029) (2133)
14 ³⁄ "
(360)
11 ⁄ "
(287.4)
|
1 ⁄ " |
|
13 ⅛" |
(29) |
|
(333.7) |
|
7⅛" |
|
|
|
|
|
(181) |
|
4" |
|
|
(102) |
2 ¹³⁄ "–4 ³⁄ " |
Wall clearance RC/RF/RW |
|
(72-106.7) |
|
|
|
C |
|
|
E2
E1
D
Appliance type |
A |
B |
C |
D |
E1 |
E2 |
|
|
|
|
|
|
|
18" models |
17 ¾"(451) |
14 ⅛" (385) |
18"(457) |
20 ¹¹⁄ "(525) |
9 ¼" (235) |
10 ⁄ "(265) |
|
|
|
|
|
|
|
24" models |
23 ¾"(603) |
21 ³⁄ "(538) |
24"(610) |
26 ⅝" (677) |
11 ¾" (299) |
13" (330) |
|
|
|
|
|
|
|
30" models |
29 ⅞"(756) |
27 ³⁄ "(690) |
30"(762) |
32 ¹¹⁄ "(830) |
14 ⁄ "(363) |
15 ⁄ "(395) |
|
|
|
|
|
|
|
Notes
––The leveling feet have an adjustment range of
+1 ⅜" to -½". The standard height displayed in the pictures is ½".
––For proper ventilation of the appliance, the clearance between the floor and bottom edge of the
cabinet front must be at least 3 ⁄ ".
––Dimension “B” indicates width position of door panel fixation brackets.
––The panel thickness of customized doors can range from between ¾" to 1 ⁄ ".
Numbers indicated
inside parenthesis ( ) = mm
178 Refrigeration
 Loading...