


 Loading...
User’s Guide
Guide d’utilisation
Learn how to use your Fujitsu LIFEBOOK Q572 Tablet PC
Découvrez comment utiliser votre PC Tablette LIFEBOOK Fujitsu Q572

User’s
Guide
Learn how to use your Fujitsu STYLISTIC® Q572 Tablet PC

Copyright and Trademark Information
Fujitsu America, Inc.has made every effort to ensure the accuracy and completeness of this document. Because ongoing development efforts are made to continually improve the capabilities of our products, however, the data contained herein represents Fujitsu design objectives and is provided for comparative purposes; actual results may vary based on a variety of factors. This product data does not constitute a warranty. Specifications are subject to change without knowledge.
Fujitsu and the Fujitsu logo are registered trademarks of Fujitsu Limited; STYLISTIC is a registered trademark of Fujitsu America, Incorporated. Microsoft and Windows are registered trademarks or trademarks of Microsoft Corporation in the United States and/or other countries.
The SD Logo is registered with the U.S. Patent and Trademark Office and with other trademark offices around the world by SD-3C, LLC. AMD and Radeon are trademarks or registered trademarks of Advanced Micro Devices, Inc.
OmniPass is a trademark of Softex, Inc.
Skype is a trademark of Skype Limited.
Broadcom is a registered trademark of Broadcom Corporation.smartcard
Norton Internet Security is a trademark of Symantec Corporation in the United States and other countries. AirPrime is a trademark of Sierra Wireless Inc.
Gobi3000 is a trademark of Qualcomm Inc.
Adobe and Adobe Reader are registered trademarks or trademarks of Adobe Systems Incorporated in the United States and/or other countries. Ralink is a registered trademark of Ralink Technology Corporation.
Bluetooth and the Bluetooth logo are registered trademarks of Bluetooth SIG, Inc. Realtek is a trademark of Realtek Semiconductor Corp.
Wi-Fi is a trademark of the Wireless Ethernet Compatibility Alliance (WECA).
All other products are trademarks or registered trademarks of their respective companies. All other trademarks mentioned herein are the property of their respective owners.
Copyright 2012 Fujitsu America, Incorporated. All rights reserved. No part of this publication may be copied, reproduced, or translated, without the prior written consent of Fujitsu America, Incorporated. No part of this publication may be stored or transmitted in any electronic form without the prior consent of Fujitsu America, Incorporated. B5FK-0131-01ENZ0-00

USER GUIDE FOR WIRELESS BROADBAND CONNECTION
IF YOU HAVE THE OPTIONAL WIRELESS WAN (WWAN) DEVICE INSTALLED IN YOUR TABLET PC, THE WWAN USER’S GUIDE IS LOCATED AT:
http://solutions.us.fujitsu.com/www/content/support/mobile/support_notices
PLEASE CLICK “3G MINI-CARD GOBI3000 REGULATORY AND SAFETY INFORMATION” TO OPEN THE FULL USER GUIDE CONTAINING WARNINGS AND PRECAUTIONS ASSOCIATED WITH RF SAFETY WHEN USING THE WWAN DEVICE.
DECLARATION OF CONFORMITY according to FCC Part 15
Responsible Party Name: |
Fujitsu America, Inc. |
Address: |
1250 E. Arques Avenue |
|
Sunnyvale, CA 94085 |
Telephone: |
(408) 746-6000 |
Declares that product: |
Base Model Configuration: STYLISTIC Q572 Tablet PC |
Complies with Part 15 of the FCC Rules.
This device complies with Part 15 of the FCC rules. Operations are subject to the following two conditions:
(1) This device may not cause harmful interference, (2) This device must accept any interference received, including interference that may cause undesired operation.
IMPORTANT SAFETY INSTRUCTIONS
This unit requires an AC adapter to operate. Use only UL Listed I.T.E. Class II Adapters with an output rating of 19 VDC, with a current of 3.16A (60 W).
AC adapter output polarity: |
+ |
When using your tablet PC, basic safety precautions should always be followed to reduce the risk of fire, electric shock and injury to persons, including the following:
• CAUTION: HOT SURFACE: THE BOTTOM OF THIS COMPUTER CAN BECOME HOT WHEN USED FOR LONG PERIODS OF TIME. WHEN USING THIS DEVICE, TAKE CAUTION TO LIMIT LONG TERM OR CONTINUOUS USE WHILE RESTING IT ON EXPOSED SKIN, SUCH AS THE LAP.
• CAUTION: RISK OF EXPLOSION IF BATTERY IS REPLACED BY AN INCORRECT TYPE. DISPOSE OF USED BATTERIES ACCORDING TO THE INSTRUCTIONS CONTAINED HEREIN.
•Do not use this product near water for example, near a bathtub, washbowl, kitchen sink or laundry tub, in a wet basement or near a swimming pool.
•Use only the power cord and batteries indicated in this manual. Do not dispose of batteries in a fire. They may explode. Check with local codes for possible special disposal instructions.
SAVE THESE INSTRUCTIONS
For Authorized Repair Technicians Only
DANGER OF EXPLOSION IF LITHIUM (CLOCK) BATTERY IS INCORRECTLY REPLACED. REPLACE ONLY WITH THE SAME OR EQUIVALENT TYPE RECOMMENDED BY THE MANUFACTURER. DISPOSE OF USED BATTERIES ACCORDING TO THE MANUFACTURER’S INSTRUCTION.
FOR CONTINUED PROTECTION AGAINST RISK OF FIRE, REPLACE ONLY WITH THE SAME TYPE AND RATING FUSE.

Recycling your battery
Over time, the batteries that run your mobile computer will begin to hold a charge for a shorter amount of time; this is a natural occurrence for all batteries. When this occurs, you may want to replace the battery with a fresh one*. If you replace it, it is important that you dispose of the old battery properly because batteries contain materials that could cause environmental damage if disposed of improperly.
Fujitsu is very concerned with environmental protection, and has enlisted the services of the Rechargeable Battery Recycling Corporation (RBRC)**, a non-profit public service organization dedicated to protecting our environment by recycling old batteries at no cost to you.
RBRC has drop-off points at tens of thousands of locations throughout the United States and Canada. To find the location nearest you, go to www.RBRC.org or call 1-800-822-8837.
If there are no convenient RBRC locations near you, you can also go to the EIA Consumer Education Initiative website (http://EIAE.org/) and search for a convenient disposal location.
Remember – protecting the environment is a cooperative effort, and you should make every effort to protect it for current and future generations.
*To order a new battery for your Fujitsu mobile computer, go to the Fujitsu shopping site at www.shopfujitsu.com in the US or www.fujitsu.ca/products/notebooks in Canada.
** RBRC is an independent third party to which Fujitsu provides funding for battery recycling; RBRC is in no way affiliated with Fujitsu.

Contents
About This Guide . . . . . . . . . . . . . . . . . . . . . . . . . . . . . . . . . . . . . . . . . . . . . .11
Conventions Used in the Guide . . . . . . . . . . . . . . . . . . . . . . . . . . . . . . . . 11
Fujitsu Contact Information . . . . . . . . . . . . . . . . . . . . . . . . . . . . . . . . . . . 12
Chapter 1 Getting to Know Your Tablet PC
Overview . . . . . . . . . . . . . . . . . . . . . . . . . . . . . . . . . . . . . . . . . . . . . . . . . . . . .14
Locating the Connectors and Controls. . . . . . . . . . . . . . . . . . . . . . . . . . . . .15
Front Features. . . . . . . . . . . . . . . . . . . . . . . . . . . . . . . . . . . . . . . . . . . . . . 15 Back Features . . . . . . . . . . . . . . . . . . . . . . . . . . . . . . . . . . . . . . . . . . . . . . 17 Left Side Features . . . . . . . . . . . . . . . . . . . . . . . . . . . . . . . . . . . . . . . . . . . 19 Right Side . . . . . . . . . . . . . . . . . . . . . . . . . . . . . . . . . . . . . . . . . . . . . . . . . 20
Status Indicator Panel. . . . . . . . . . . . . . . . . . . . . . . . . . . . . . . . . . . . . . . . . .22
Display Panel . . . . . . . . . . . . . . . . . . . . . . . . . . . . . . . . . . . . . . . . . . . . . . . . .24
Active Digitizer/Touchscreen . . . . . . . . . . . . . . . . . . . . . . . . . . . . . . . . . . . .26
Active Digitizer Display. . . . . . . . . . . . . . . . . . . . . . . . . . . . . . . . . . . . . . . 26 Using the Capacitive Touchscreen . . . . . . . . . . . . . . . . . . . . . . . . . . . . . . 30 Caring for the Pen. . . . . . . . . . . . . . . . . . . . . . . . . . . . . . . . . . . . . . . . . . . 32 Changing the Pen Battery . . . . . . . . . . . . . . . . . . . . . . . . . . . . . . . . . . . . 33 Replacing the Pen Tip. . . . . . . . . . . . . . . . . . . . . . . . . . . . . . . . . . . . . . . . 33
Tablet PC Buttons . . . . . . . . . . . . . . . . . . . . . . . . . . . . . . . . . . . . . . . . . . . . .35
6
Chapter 2 Getting Started with Your Tablet PC
Power Sources . . . . . . . . . . . . . . . . . . . . . . . . . . . . . . . . . . . . . . . . . . . . . . . 37
Connecting the Power Adapters . . . . . . . . . . . . . . . . . . . . . . . . . . . . . . . . 37
Starting Your STYLISTIC Tablet PC . . . . . . . . . . . . . . . . . . . . . . . . . . . . . . . 39
Power On . . . . . . . . . . . . . . . . . . . . . . . . . . . . . . . . . . . . . . . . . . . . . . . . . . 39 Boot Sequence . . . . . . . . . . . . . . . . . . . . . . . . . . . . . . . . . . . . . . . . . . . . . 40 Hard Disk Drive Passwords . . . . . . . . . . . . . . . . . . . . . . . . . . . . . . . . . . . . 40 BIOS Setup Utility . . . . . . . . . . . . . . . . . . . . . . . . . . . . . . . . . . . . . . . . . . . 41 Booting the System. . . . . . . . . . . . . . . . . . . . . . . . . . . . . . . . . . . . . . . . . . 42 Starting Windows the First Time. . . . . . . . . . . . . . . . . . . . . . . . . . . . . . . . 42
Power Management . . . . . . . . . . . . . . . . . . . . . . . . . . . . . . . . . . . . . . . . . . 44
Power/Suspend/Resume Switch . . . . . . . . . . . . . . . . . . . . . . . . . . . . . . . . 44 Sleep Mode . . . . . . . . . . . . . . . . . . . . . . . . . . . . . . . . . . . . . . . . . . . . . . . . 44 Hibernation (Save-to-Disk) Feature. . . . . . . . . . . . . . . . . . . . . . . . . . . . . 45 Windows Power Management . . . . . . . . . . . . . . . . . . . . . . . . . . . . . . . . . 46 Restarting the System. . . . . . . . . . . . . . . . . . . . . . . . . . . . . . . . . . . . . . . . 46 Powering Off . . . . . . . . . . . . . . . . . . . . . . . . . . . . . . . . . . . . . . . . . . . . . . . 46
Chapter 3 User-Installable Features
Lithium Polymer Battery. . . . . . . . . . . . . . . . . . . . . . . . . . . . . . . . . . . . . . . 47
Recharging the Batteries . . . . . . . . . . . . . . . . . . . . . . . . . . . . . . . . . . . . . 48
Replacing the Battery . . . . . . . . . . . . . . . . . . . . . . . . . . . . . . . . . . . . . . . . 49
Secure Digital Cards. . . . . . . . . . . . . . . . . . . . . . . . . . . . . . . . . . . . . . . . . . . 52
Installing SD Cards . . . . . . . . . . . . . . . . . . . . . . . . . . . . . . . . . . . . . . . . . . 52
Removing an SD Card . . . . . . . . . . . . . . . . . . . . . . . . . . . . . . . . . . . . . . . . 53
7 -
Chapter 4 Troubleshooting Your Tablet PC
Troubleshooting. . . . . . . . . . . . . . . . . . . . . . . . . . . . . . . . . . . . . . . . . . . . . . 54
Identifying the Problem . . . . . . . . . . . . . . . . . . . . . . . . . . . . . . . . . . . . . . 54 Specific Problems . . . . . . . . . . . . . . . . . . . . . . . . . . . . . . . . . . . . . . . . . . . 56 Power On Self Test Messages . . . . . . . . . . . . . . . . . . . . . . . . . . . . . . . . . . 62
Restoring Your System Image and Software. . . . . . . . . . . . . . . . . . . . . . . 63
Saving and Recovering Your Factory and System Images . . . . . . . . . . . . 63 Backing Up a System Image . . . . . . . . . . . . . . . . . . . . . . . . . . . . . . . . . . . 65 Recovery and Utility tools . . . . . . . . . . . . . . . . . . . . . . . . . . . . . . . . . . . . . 69 Recovering your Factory Image using Recovery and Utility . . . . . . . . . . 71 Downloading Driver Updates . . . . . . . . . . . . . . . . . . . . . . . . . . . . . . . . . . 72
Chapter 5 Care and Maintenance
Caring for your Tablet PC. . . . . . . . . . . . . . . . . . . . . . . . . . . . . . . . . . . . . . . 73
Cleaning your Tablet PC . . . . . . . . . . . . . . . . . . . . . . . . . . . . . . . . . . . . . . 74
Storing your Tablet PC. . . . . . . . . . . . . . . . . . . . . . . . . . . . . . . . . . . . . . . . 76
Traveling with your Tablet PC . . . . . . . . . . . . . . . . . . . . . . . . . . . . . . . . . . 76
Batteries . . . . . . . . . . . . . . . . . . . . . . . . . . . . . . . . . . . . . . . . . . . . . . . . . . 77
Media Care . . . . . . . . . . . . . . . . . . . . . . . . . . . . . . . . . . . . . . . . . . . . . . . . 78
Secure Digital Cards . . . . . . . . . . . . . . . . . . . . . . . . . . . . . . . . . . . . . . . . . 79
Chapter 6 System Specifications
Specifications . . . . . . . . . . . . . . . . . . . . . . . . . . . . . . . . . . . . . . . . . . . . . . . . 80
Microprocessor . . . . . . . . . . . . . . . . . . . . . . . . . . . . . . . . . . . . . . . . . . . . . 80
Chipset. . . . . . . . . . . . . . . . . . . . . . . . . . . . . . . . . . . . . . . . . . . . . . . . . . . . 80
Memory . . . . . . . . . . . . . . . . . . . . . . . . . . . . . . . . . . . . . . . . . . . . . . . . . . . 80
Video . . . . . . . . . . . . . . . . . . . . . . . . . . . . . . . . . . . . . . . . . . . . . . . . . . . . . 81
Audio . . . . . . . . . . . . . . . . . . . . . . . . . . . . . . . . . . . . . . . . . . . . . . . . . . . . . 81
Mass Storage Device Options . . . . . . . . . . . . . . . . . . . . . . . . . . . . . . . . . . 81
Communications . . . . . . . . . . . . . . . . . . . . . . . . . . . . . . . . . . . . . . . . . . . . 82
Security Features. . . . . . . . . . . . . . . . . . . . . . . . . . . . . . . . . . . . . . . . . . . . 82
8 -
Device Ports. . . . . . . . . . . . . . . . . . . . . . . . . . . . . . . . . . . . . . . . . . . . . . . . 82
Power. . . . . . . . . . . . . . . . . . . . . . . . . . . . . . . . . . . . . . . . . . . . . . . . . . . . . 83
Dimensions and Weight . . . . . . . . . . . . . . . . . . . . . . . . . . . . . . . . . . . . . . 83
Environmental Requirements. . . . . . . . . . . . . . . . . . . . . . . . . . . . . . . . . . 83
Popular Accessories. . . . . . . . . . . . . . . . . . . . . . . . . . . . . . . . . . . . . . . . . . 84
Included Software . . . . . . . . . . . . . . . . . . . . . . . . . . . . . . . . . . . . . . . . . . . 84
Learning About Your Software . . . . . . . . . . . . . . . . . . . . . . . . . . . . . . . . . 84
Regulatory Information . . . . . . . . . . . . . . . . . . . . . . . . . . . . . . . . . . . . . . . 86
Appendix A: WLAN User’s Guide
Before Using the Optional Wireless LAN. . . . . . . . . . . . . . . . . . . . . . . . . . 91
Wireless LAN Device Covered by this Document . . . . . . . . . . . . . . . . . . . 91 Characteristics of the WLAN Device . . . . . . . . . . . . . . . . . . . . . . . . . . . . . 91 Wireless LAN Modes Using this Device. . . . . . . . . . . . . . . . . . . . . . . . . . . 92 Deactivating/Disconnecting the WLAN Device. . . . . . . . . . . . . . . . . . . . . 94 Deactivation Using the Wireless On/Off Switch . . . . . . . . . . . . . . . . . . . . 95 Disconnection Using the Icon in the Taskbar. . . . . . . . . . . . . . . . . . . . . . 95 Activating the WLAN Device . . . . . . . . . . . . . . . . . . . . . . . . . . . . . . . . . . . 95
Configuration of the WLAN Device. . . . . . . . . . . . . . . . . . . . . . . . . . . . . . . 96
Configuring the WLAN Using Windows . . . . . . . . . . . . . . . . . . . . . . . . . . 96 Connection to the network . . . . . . . . . . . . . . . . . . . . . . . . . . . . . . . . . . . . 96
Troubleshooting the WLAN. . . . . . . . . . . . . . . . . . . . . . . . . . . . . . . . . . . . . 97
Troubleshooting . . . . . . . . . . . . . . . . . . . . . . . . . . . . . . . . . . . . . . . . . . . . 97
WLAN Specifications . . . . . . . . . . . . . . . . . . . . . . . . . . . . . . . . . . . . . . . . . . 99
Specifications . . . . . . . . . . . . . . . . . . . . . . . . . . . . . . . . . . . . . . . . . . . . . . 99
Using the Bluetooth Device . . . . . . . . . . . . . . . . . . . . . . . . . . . . . . . . . . . . 100
What is Bluetooth . . . . . . . . . . . . . . . . . . . . . . . . . . . . . . . . . . . . . . . . . . . 100 Where to Find Information About Bluetooth . . . . . . . . . . . . . . . . . . . . . . 100
9 -
Appendix B: Fingerprint Sensor Device
Introducing the Fingerprint Sensor Device . . . . . . . . . . . . . . . . . . . . . . . . 102
Getting Started . . . . . . . . . . . . . . . . . . . . . . . . . . . . . . . . . . . . . . . . . . . . . 103
Installing OmniPass . . . . . . . . . . . . . . . . . . . . . . . . . . . . . . . . . . . . . . . . . 103
User Enrollment . . . . . . . . . . . . . . . . . . . . . . . . . . . . . . . . . . . . . . . . . . . . 106
Using OmniPass . . . . . . . . . . . . . . . . . . . . . . . . . . . . . . . . . . . . . . . . . . . . 108
Configuring OmniPass . . . . . . . . . . . . . . . . . . . . . . . . . . . . . . . . . . . . . . . 113
OmniPass Control Center . . . . . . . . . . . . . . . . . . . . . . . . . . . . . . . . . . . . . 115
Troubleshooting . . . . . . . . . . . . . . . . . . . . . . . . . . . . . . . . . . . . . . . . . . . . 117
Index . . . . . . . . . . . . . . . . . . . . . . . . . . . . . . . . . . . . . . . . . . . . . . . . . . . . . . . 119
10 -

Preface
About This Guide
The STYLISTIC→ Q572 Tablet PC is a high-performance pen-based computer that has been designed to support Microsoft→Windows→ 7 and Windows 8 Professional editions.
This manual explains how to operate your Tablet PC hardware and built-in system software.
The STYLISTIC Q572 Tablet PC is a completely self-contained unit with a 10.1” WXGA LED backlit IPS display with 160 degree vertical and horizontal viewing angles. It has a powerful interface that enables it to support a variety of optional features.
Conventions Used in the Guide
Pages with additional information about a specific topic are cross-referenced within the text. On screen buttons or menu items appear in bold. Example: Click OK to restart your Tablet PC.
THE INFORMATION ICON HIGHLIGHTS INFORMATION THAT WILL ENHANCE YOUR UNDERSTANDING OF THE SUBJECT MATERIAL.
THE CAUTION ICON HIGHLIGHTS INFORMATION THAT IS IMPORTANT TO THE SAFE OPERATION OF YOUR COMPUTER, OR TO THE INTEGRITY OF YOUR FILES. PLEASE READ ALL CAUTION INFORMATION CAREFULLY.
11

THE WARNING ICON HIGHLIGHTS INFORMATION THAT CAN BE HAZARDOUS TO EITHER YOU, YOUR TABLET PC, OR YOUR FILES. PLEASE READ ALL WARNING INFORMATION CAREFULLY.
Fujitsu Contact Information
Service and Support
You can contact Fujitsu Service and Support in the following ways:
•Toll free: 1-800-8FUJITSU (1-800-838-5487)
•Website:
U.S.A. - us.fujitsu.com/solutions Canada - www.fujitsu.ca
Before you place the call, you should have the following information ready so that the customer support representative can provide you with the fastest possible solution:
•Product name
•Product configuration number
•Product serial number
•Purchase date
•Conditions under which the problem occurred
•Any error messages that have occurred
•Type of device connected, if any
Fujitsu Shopping Online
You can go directly to the online by going to the website at: www.shopfujitsu.com.
Maintaining Latest Configuration
To ensure that you always have the most current driver updates related to your system, you should occasionally access the Fujitsu Software Download Manager (FSDM) utility. The FSDM utility is available to allow you to download the latest drivers, utilities, and applications from the Fujitsu Support site. If you have a Windows 7 operating system, you will need to go to the Support Site (http://support.fujitsupc.com/CS/Portal/support.do?srch=DOWNLOADS).
12 - About This Guide
Limited Warranty
Your Tablet PC is backed by a Fujitsu International Limited Warranty. Check the service kit that came with your tablet for the Limited Warranty period and terms and conditions.
13 - About This Guide
Chapter 1
Getting to Know Your Tablet PC
Overview
The STYLISTIC→ Q572 Tablet PC is a high-performance pen-based computer that has been designed to support Microsoft→ Windows→ 7 and Windows® 8 Professional editions.
This chapter provides an overview of the STYLISTIC Q572 Tablet PC and its many features.
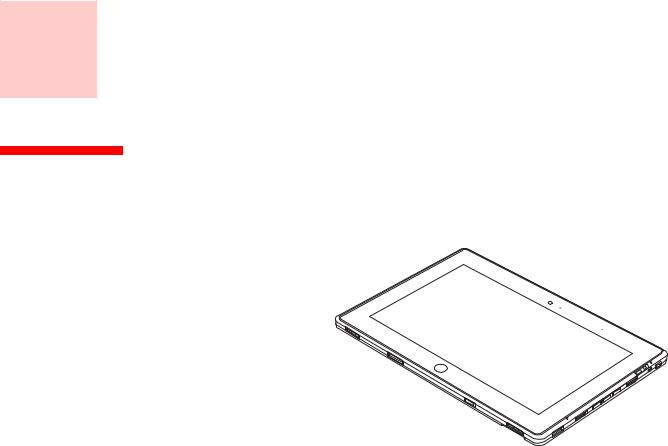
Figure 1. STYLISTIC Q572 Tablet PC
14
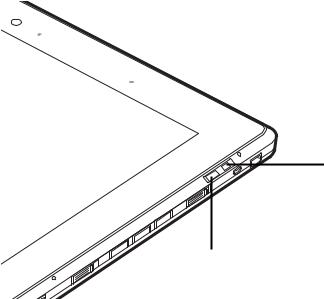
Locating the Connectors and Controls
Features and controls that you use to operate your Tablet PC are outlined below and illustrated in Figures 2 and 3. Details on using these features and controls are provided later in this manual.
Display |
Front Web Camera |
Speaker
Web Camera Access LED

 Ambient Light Sensor
Docking Cradle Connector 
Windows Button
Docking Cradle Guide Pin 
Speaker
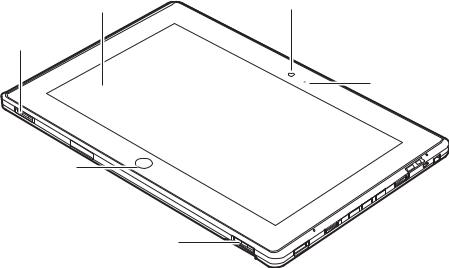
Figure 2. STYLISTIC Q572 Tablet PC Features (Bottom, Right View)
Front Features Front Web Camera
The front-facing HD (1280 x 720 pixel) web camera allows you to take pictures of yourself to send over the internet.
Web Cam Access LED
The web cam access LED indicates when the web camera is in use.
15 - Locating the Connectors and Controls
Ambient Light Sensor
The ambient light sensor automatically recognizes lighting conditions and adjusts the display to provide optimum battery life.
Display
The 10.1” Wide XGA display offers 160 degree vertical and horizontal viewing angles.
Speakers
The speakers allow you to hear sound from the system.
Docking Cradle Guide Pin
The docking cradle guide pin provides an alignment point when docking your system in the cradle.
Windows Button
Pressing the Windows button gives you quick access to the Modern Start screen.
Docking Cradle Connector
Allows you to connect the optional STYLISTIC Docking Cradle.
Display
The 10.1” HD display offers 160 degree vertical and horizontal viewing angles.
16 - Locating the Connectors and Controls

|
|
Battery Lock Latch |
SmartCard Slot |
|
SD Card Slot |
|
|
|
Rear Web Camera |
|
Battery Release Latch |
|
|
|
|
|
Removable Battery |
|
Fingerprint Sensor |
Pen Tether Attachment Point |
|
|
Figure 3. STYLISTIC Q572 Tablet PC Features (Back View)
Back Features Battery Lock Latch
The battery lock latch is used with the battery release latch to allow removal of the battery.
SD Card Slot
The Secure Digital (SD) card slot allows you to insert a flash memory card for data storage. Flash memory cards allow you to transfer data to and from a variety of different digital devices. See “Secure Digital Cards” on page 52.
17 - Locating the Connectors and Controls
Battery Release Latch
The battery release latch is used with the battery lock latch to allow removal of the battery.
Removable Lithium Polymer Battery
Can be removed and replaced with a charged battery. See “Lithium Polymer Battery” on page 47.
Pen Tether Attachment Point
The pen tether attachment point is used to connect your pen -- or stylus -- to the system to prevent its loss.
Fingerprint Sensor
The fingerprint sensor allows you to start your system by swiping your finger over the sensor. See “Introducing the Fingerprint Sensor Device” on page 102.
Rear Web Camera
The 5.0 megapixel auto-focus rear web camera allows you to take pictures of objects in front of you for sharing over the internet.
Smart Card Slot
The dedicated Smart Card slot allows you to insert a Smart Card on which you can store such data as medical information or electronic “cash”.
18 - Locating the Connectors and Controls
|
|
|
|
|
|
|
|
|
|
|
|
|
|
|
|
Air Vents |
|
|
USB 2.0 Connector |
DC-In Jack |
|||||||||||||||||||||||||||||||||||
|
|
|
|
|
|
|
|
|
|
|
|
|
|
|
|
|
|
|
|
|
|
|
|
|
|
|
|
|
|
|
|
|
|
|
|
|
|
|
|
|
|
|
|
|
|
|
|
|
|
|
|
|
|
|
|
|
|
|
|
|
|
|
|
|
|
|
|
|
|
|
|
|
|
|
|
|
|
|
|
|
|
|
|
|
|
|
|
|
|
|
|
|
|
|
|
|
|
|
|
|
|
|
|
|
|
|
|
|
|
|
|
|
|
|
|
|
|
|
|
|
|
|
|
|
|
|
|
|
|
|
|
|
|
|
|
|
|
|
|
|
|
|
|
|
|
|
|
|
|
|
|
|
|
|
|
|
|
|
|
|
|
|
|
|
|
|
|
|
|
|
|
|
|
|
|
|
|
|
|
|
|
|
|
|
|
|
|
|
|
|
|
|
|
|
|
|
|
|
|
|
|
|
|
|
|
|
|
|
|
|
|
|
|
|
|
|
|
|
|
|
|
|
|
|
|
|
|
|
|
|
|
|
|
|
|
|
|
|
|
|
|
|
|
|
|
|
|
|
|
|
|
|
|
|
|
|
|
|
|
|
|
|
|
|
|
|
|
|
|
|
|
|
|
|
|
|
|
|
|
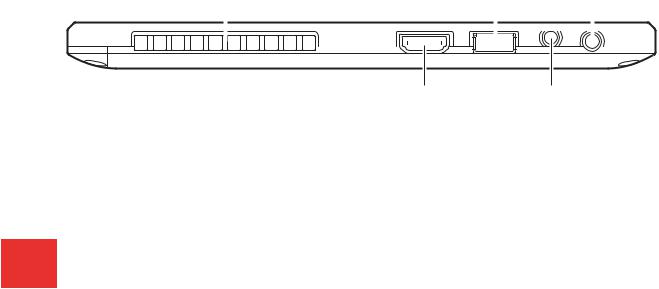
HDMI Connector |
Headphone Jack |
Figure 4. STYLISTIC Q572 Tablet PC Features Left Side
Left Side Features
Air Flow Vents
The air flow vents assist in proper cooling of the system.
TO PROTECT YOUR TABLET FROM DAMAGE AND TO OPTIMIZE SYSTEM PERFORMANCE, BE SURE TO KEEP ALL AIR VENTS UNOBSTRUCTED, CLEAN, AND CLEAR OF DEBRIS. THIS MAY REQUIRE PERIODIC CLEANING, DEPENDING UPON THE ENVIRONMENT IN WHICH THE SYSTEM IS USED.
DO NOT OPERATE THE TABLET IN AREAS WHERE THE AIR VENTS CAN BE OBSTRUCTED, SUCH AS IN TIGHT ENCLOSURES OR ON SOFT SURFACES LIKE A BED OR CUSHION.
USB 2.0 port
Allows you to connect Universal Serial Bus-compliant devices (compliant with USB Standard Revision 2.0) to the Tablet PC. Four additional USB ports are located on the optional STYLISTIC Docking Cradle.
DC input connector
Allows you to connect the AC adapter or auto adapter.
Line Out/Headphone Jack
Allows you to connect a set of stereo headphones.
HDMI Connector
The HDMI connector is used to connect compatible digital devices with your computer (such as a high-definition television or AV receiver).
19 - Locating the Connectors and Controls
|
|
|
|
|
|
|
|
|
|
|
|
|
|
|
|
|
|
|
Built-in Microphone |
||||||||
|
|
|
|
Built-in Microphone |
Volume Up Button |
Power Indicator |
|
Pen Tether |
|||||||||||||||||||
|
|
|
|
|
|||||||||||||||||||||||
|
|
|
|
|
|
|
|
|
|
|
|
|
|
Charge Indicator |
|
|
|||||||||||
USB 2.0 Connector |
Power/Suspend/Resume Switch |
|
|
|
Attachment Point |
||||||||||||||||||||||
|
|
|
|
|
|
|
|
|
|
|
|
|
|
|
|
|
|
|
|
|
|
|
|
|
|
|
|
|
|
|
|
|
|
|
|
|
|
|
|
|
|
|
|
|
|
|
|
|
|
|
|
|
|
|
|
|
|
|
|
|
|
|
|
|
|
|
|
|
|
|
|
|
|
|
|
|
|
|
|
|
|
|
|
|
|
|
|
|
|
|
|
|
|
|
|
|
|
|
|
|
|
|
|
|
|
|
|
|
|
|
|
|
|
|
|
|
|
|
|
|
|
|
|
Wireless On/Off Switch |
||
Volume Down Button |
||||
|
Rotation Lock Button |
Pen Attachment Slot |
||
Figure 5. STYLISTIC Q572 Tablet PC Features Right Side
Right Side USB 2.0 port
Allows you to connect Universal Serial Bus-compliant devices (compliant with USB Standard Revision 2.0) to the Tablet PC. Four additional USB ports are located on the optional STYLISTIC Docking Cradle.
Built-in Microphones
The built-in microphones allow you to input analog audio.
Power/Suspend/Resume Switch
Allows you to turn on, off, sleep, resume, hibernate or wake the Tablet PC in order to optimize battery life. See “Starting Your STYLISTIC Tablet PC” on page 39.
Volume Up / Volume Down Buttons
The Volume Up and Volume Down buttons allow you to control the volume of the tablet.
20 - Locating the Connectors and Controls
Charge and Power Indicators
Indicate the operational status of the Tablet PC power and battery charge level. See “Status Indicator Panel” on page 22.
Pen Tether Attachment Point
The pen tether attachment point is used to connect your pen -- or stylus -- to the system to prevent its loss.
Pen Attachment Slot
The pen attachment slot allows you to attach an optional pen holder to secure your pen.
Wireless On/Off switch
The wireless on/off switch is used to turn the optional WLAN, WWAN, and Bluetooth devices on and off. Switching the device off when not in use will help to extend battery life.
Rotation Lock Button
The rotation lock button is used to Pause or Resume the auto rotation feature. If the auto rotation feature is resumed, the display rotates automatically when the system is rotated. When the auto rotation feature is paused, the display doesn't rotate automatically when the tablet is rotated.
21 - Locating the Connectors and Controls
Status Indicator Panel
Icons appear under each of the system status LEDs in the status display indicating the status of system power and battery charge status. The location of icons in the Status display is shown in Figure 6.
Table 1 explains how the LEDs associated with the individual icons are displayed, and describes what the variations of that display indicate. (If an icon is not displayed, it indicates that the related system function is off or inactive.
Power Indicator
Charge/DC-In Indicator
Figure 6. Status Display Icons
22 - Status Indicator Panel

Table 1. Status Display Conditions
In the following table, a “blinking” LED flashes at the rate of once per second; an LED that is “blinking, slow” flashes at the rate of one second on, five seconds off.
Icon |
Mode/State |
LED State |
Remarks |
|
|
|
|
|
|
|
|
• On State |
Blue, |
The system is powered on and ready for use. |
|
|
• Idle Mode |
continuous |
|
|
|
|
|
|
|
|
|
|
|
|
|
• Sleep |
Blue, blinking |
The system has suspended and saved active settings to RAM. |
|
|
|
|
|
Power |
• Off State |
Off |
The system has suspended and saved settings and data to |
|
• Hibernate |
|
the hard disk drive. |
||
|
|
|
|
|
|
|
|
|
|
|
|
• On State |
Green |
AC adapter and battery are available and charged battery |
|
|
• Idle Mode |
|
level is 50-100%. |
|
|
|
|
|
|
|
Orange |
AC adapter and battery are available and charged battery |
|
|
|
|
||
|
|
• Sleep |
|
level is less than 50%. |
|
|
|
|
|
Charge/DC In |
• Hibernate |
Green, blinking |
Tablet PC is in Suspend mode, AC adapter and battery are |
|
|
available and charged battery level is 50-100%. |
|||
|
|
• Off State |
|
|
|
|
|
|
|
|
|
Orange, |
Tablet PC is in Suspend mode, AC adapter and battery are |
|
|
|
|
||
|
|
|
blinking |
available and charged battery level is less than 50%. |
|
|
|
|
|
|
|
|
Off |
The AC Adapter is not available. |
|
|
|
|
|
23 - Status Indicator Panel

Figure 7. Tablet PC Display Panel
Display Panel
Your STYLISTIC Q572 Tablet PC contains an LCD display panel that is backlit for easier viewing in bright environments. The slate design of your Tablet PC allows you to easily hold the unit and rotate it 90o, 180o, or 270o in either direction. This display is used as a tablet, much as you would a pad of paper.
Adjusting Display Panel Brightness
To adjust brightness with the power management utility:
From the Modern Start screen, press [Windows]+[X], then select Control Panel. In View by:, select one of the icon views. Select Display, then click Adjust brightness in the left pane. Under Choose or customize a power plan, select the plan settings you want to use. Drag Screen brightness: bar (at the bottom of the window) to the left or right, depending on your preference.
24 - Display Panel
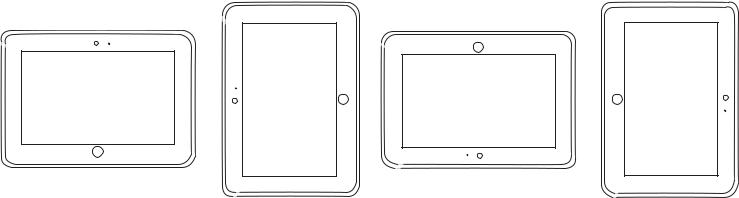
Holding the Tablet PC
The STYLISTIC Q572 can be held in any of four orientations, depending upon how you would like to use it. There are primary and secondary landscape orientations and primary and secondary portrait orientations. (The orientation nomenclatures reflect those used in the button utility). When you rotate the system using the Rotation button, the order in which it rotates is illustrated below.
Primary Landscape Orientation |
Secondary Portrait |
Secondary Landscape Orientation |
Primary Portrait |
|
Orientation |
|
Orientation |
25 - Display Panel
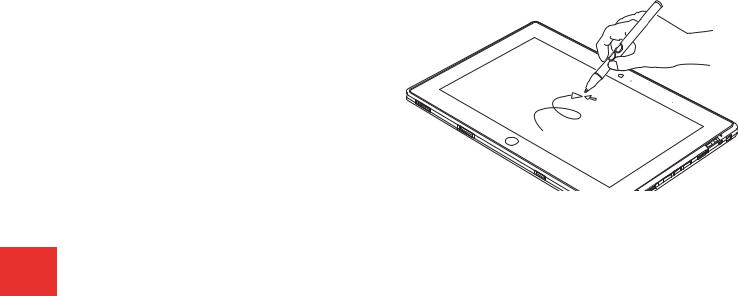
Active Digitizer/Touchscreen
Active Digitizer Display
The integrated active digitizer allows you to use the included stylus (also called a “pen”) as a pointing device.
(For detailed information about caring for your stylus, go to “Caring for the Pen” on page 32.)
You can use the stylus to click, double-click, drag items and icons, write text, or to draw like a pen or pencil in applications that support this behavior, such as drawing or painting programs. See the documentation that came with your application for details.
Figure 8. Using the Active Digitizer Display
• DO NOT USE EXCESSIVE FORCE WHEN TAPPING OR WRITING ON THE SCREEN WITH THE STYLUS. EXCESSIVE FORCE COULD RESULT IN DAMAGE TO THE LED AND/OR ACTIVE DIGITIZER.
• TO PURCHASE ADDITIONAL OR REPLACEMENT STYLUSES, VISIT THE FUJITSU ACCESSORIES WEBSITE AT: WWW.SHOPFUJITSU.COM.
26 - Active Digitizer/Touchscreen

Clicking on Active Digitizer Display
To left-click, touch the object you wish to select and then lift the stylus tip immediately.
Figure 10. Right-clicking Active Digitizer
Figure 9. Clicking on the Active Digitizer Display
Right-Clicking on Active Digitizer
Right-click can be accomplished by holding the front toggle button down while tapping on the screen. To change the settings for the right-click feature, go to Modern Start screen->[Windows]+[X]-> Control Panel -> Pen and Touch. In the Pen Options tab, select “Press and Hold” then click the [Settings] button.
27 - Active Digitizer/Touchscreen

Double-Clicking
To double-click, touch the item twice, and then immediately remove the stylus tip.
Figure 11. Double-clicking the Display
Dragging
Dragging means moving an item with the stylus by touching the screen, moving and then lifting the stylus. To drag, touch the Active Digitizer Display with your stylus on the item you wish to move. While continuing to touch the screen with the stylus, drag the item to its new location by moving the stylus across the screen, and then lifting the stylus to release it.
Figure 12. Dragging on the Display
28 - Active Digitizer/Touchscreen

Calibrating the Display
In order to ensure accurate tracking between the stylus and cursor, you must run the Calibration Utility before you use the system for the first time, or after you change the display resolution.
To run the calibration utility:
1Go to Modern Start screen -> [Windows]+[X]-> Control Panel.
2Double-click the Tablet PC Settings icon and select the Display tab
3Click the [Calibrate] button, then select whether you want to calibrate pen input or touch input.
4Adjust the display of your Tablet PC to a comfortable angle and find the (+) symbol in the upper-left corner of the display.
DO NOT USE EXCESSIVE FORCE WHEN TAPPING ON THE SCREEN DURING CALIBRATION. USE OF EXCESSIVE FORCE COULD RESULT IN DAMAGE TO THE LED AND/OR TOUCH PANEL.
5Using the stylus or your finger (depending upon which type of input you are calibrating), firmly touch the screen directly on the (+) symbol. Lift the stylus from the screen and the target will move to a different location on the screen.
6Repeat step 5 until you have selected all of the (+) symbols.
7Once you have selected all the symbols, press the [OK] button.
8Touch the stylus to various points on the screen to verify that the screen is correctly calibrated. If you are not satisfied with the screen’s calibration, press the [Calibrate] button to begin again.
29 - Active Digitizer/Touchscreen
Loading...