


 Loading...
Operating Manual |
System |
FUJITSU LIFEBOOK E549 FUJITSU LIFEBOOK E559
Congratulations on your purchase of an innovative product from Fujitsu.
The latest information about our products, tips, updates etc. can be found on the Internet at: "http://www.fujitsu.com/fts/"
You can find driver updates at: "http://support.ts.fujitsu.com/download" Should you have any technical questions, please contact:
•our Hotline/Service Desk ("http://support.ts.fujitsu.com/contact/servicedesk")
•Your sales partner
•Your sales office
We hope you enjoy working with your new Fujitsu system!

Published by / Contact address in the EU
Fujitsu Technology Solutions GmbH
Mies-van-der-Rohe-Straße 8
80807 Munich, Germany "http://www.fujitsu.com/fts/"
Copyright
© Fujitsu Technology Solutions GmbH 2019. All rights reserved.
Publication Date
05/2019
Order No.: A26391-K485-Z320-1-7619, edition 1
FUJITSU LIFEBOOK E549 FUJITSU LIFEBOOK E559
Operating Manual
Innovative technology |
7 |
Ports and controls |
9 |
Important notes |
15 |
First-time setup of your device |
19 |
Working with the notebook |
22 |
Security functions |
51 |
Connecting external devices |
58 |
Removing and installing components |
|
during servicing |
64 |
Settings in BIOS Setup Utility |
73 |
Troubleshooting and tips |
76 |
Technical data |
84 |
Manufacturer’s notes |
86 |
Index |
87 |

Remarks
Information on the product description meets the design specifications of Fujitsu and is provided for comparison purposes. Several factors may cause the actual results to differ. Technical data is subject to change without prior notification. Fujitsu rejects any responsibility with regard to technical or editorial mistakes or omissions.
Trademarks
Fujitsu, the Fujitsu logo and LIFEBOOK are registered trademarks of Fujitsu Limited or its subsidiaries in the USA and other countries.
Microsoft and Windows are trademarks or registered trademarks of Microsoft Corporation in the USA and/or other countries.
The terms HDMI and HDMI High-Definition Multimedia Interface and the HDMI logo are trademarks or registered trademarks of HDMI Licensing Administrator, Inc. in the United States and other countries.
Adobe Reader is a trademark of Adobe Systems Incorporated.
USB Type-C™ and USB-C™ are trademarks of the USB Implementers Forum in the USA and other countries.
All other trademarks specified here are the property of their respective owners.
Copyright
No part of this publication may be copied, reproduced or translated without the prior written consent of Fujitsu.
No part of this publication may be saved or transferred by any electronic means without the written approval of Fujitsu.

Contents
Contents
Innovative technology . . . . . . . . . . . . . . . . . . . . . . . . . . . . . . . . . . . . . . . . . . . . . . . . . . . . . . . . . . . . . . . . . 7
Further information . . . . . . . . . . . . . . . . . . . . . . . . . . . . . . . . . . . . . . . . . . . . . . . . . . . . . . . . . . . . . . . . . . . . . . 7 Notational conventions . . . . . . . . . . . . . . . . . . . . . . . . . . . . . . . . . . . . . . . . . . . . . . . . . . . . . . . . . . . . . . . . . . 8
Ports and controls . . . . . . . . . . . . . . . . . . . . . . . . . . . . . . . . . . . . . . . . . . . . . . . . . . . . . . . . . . . . . . . . . . . . . |
9 |
FUJITSU LIFEBOOK E549 . . . . . . . . . . . . . . . . . . . . . . . . . . . . . . . . . . . . . . . . . . . . . . . . . . . . . . . . . . . . . . |
9 |
FUJITSU LIFEBOOK E559 . . . . . . . . . . . . . . . . . . . . . . . . . . . . . . . . . . . . . . . . . . . . . . . . . . . . . . . . . . . . . . |
12 |
Important notes . . . . . . . . . . . . . . . . . . . . . . . . . . . . . . . . . . . . . . . . . . . . . . . . . . . . . . . . . . . . . . . . . . . . . . . . |
15 |
Safety notes . . . . . . . . . . . . . . . . . . . . . . . . . . . . . . . . . . . . . . . . . . . . . . . . . . . . . . . . . . . . . . . . . . . . . . . . . . . . |
15 |
Additional safety notes for devices with radio components . . . . . . . . . . . . . . . . . . . . . . . . . . . . . . . . . . |
16 |
Energy saving . . . . . . . . . . . . . . . . . . . . . . . . . . . . . . . . . . . . . . . . . . . . . . . . . . . . . . . . . . . . . . . . . . . . . . . . . . |
16 |
Energy saving under Windows . . . . . . . . . . . . . . . . . . . . . . . . . . . . . . . . . . . . . . . . . . . . . . . . . . . . . . . |
16 |
Travelling with your notebook . . . . . . . . . . . . . . . . . . . . . . . . . . . . . . . . . . . . . . . . . . . . . . . . . . . . . . . . . . . . |
17 |
Before you travel . . . . . . . . . . . . . . . . . . . . . . . . . . . . . . . . . . . . . . . . . . . . . . . . . . . . . . . . . . . . . . . . . . . |
17 |
Notebook: transporting . . . . . . . . . . . . . . . . . . . . . . . . . . . . . . . . . . . . . . . . . . . . . . . . . . . . . . . . . . . . . . . |
17 |
Cleaning the notebook . . . . . . . . . . . . . . . . . . . . . . . . . . . . . . . . . . . . . . . . . . . . . . . . . . . . . . . . . . . . . . . . . . |
18 |
First-time setup of your device . . . . . . . . . . . . . . . . . . . . . . . . . . . . . . . . . . . . . . . . . . . . . . . . . . . . . . . . . |
19 |
Unpacking and checking the device . . . . . . . . . . . . . . . . . . . . . . . . . . . . . . . . . . . . . . . . . . . . . . . . . . . . . . |
19 |
Selecting a location . . . . . . . . . . . . . . . . . . . . . . . . . . . . . . . . . . . . . . . . . . . . . . . . . . . . . . . . . . . . . . . . . . . . . |
20 |
Mains adapter connecting . . . . . . . . . . . . . . . . . . . . . . . . . . . . . . . . . . . . . . . . . . . . . . . . . . . . . . . . . . . . . . . |
20 |
Switching on the device for the first time . . . . . . . . . . . . . . . . . . . . . . . . . . . . . . . . . . . . . . . . . . . . . . . . . . |
21 |
Working with the notebook . . . . . . . . . . . . . . . . . . . . . . . . . . . . . . . . . . . . . . . . . . . . . . . . . . . . . . . . . . . . |
22 |
Status indicators . . . . . . . . . . . . . . . . . . . . . . . . . . . . . . . . . . . . . . . . . . . . . . . . . . . . . . . . . . . . . . . . . . . . . . . . |
22 |
Switching on the notebook . . . . . . . . . . . . . . . . . . . . . . . . . . . . . . . . . . . . . . . . . . . . . . . . . . . . . . . . . . . . . . . |
25 |
Notebook: switching off . . . . . . . . . . . . . . . . . . . . . . . . . . . . . . . . . . . . . . . . . . . . . . . . . . . . . . . . . . . . . . . . . . |
25 |
Keyboard . . . . . . . . . . . . . . . . . . . . . . . . . . . . . . . . . . . . . . . . . . . . . . . . . . . . . . . . . . . . . . . . . . . . . . . . . . . . . . . |
26 |
Virtual numeric keypad . . . . . . . . . . . . . . . . . . . . . . . . . . . . . . . . . . . . . . . . . . . . . . . . . . . . . . . . . . . . . . |
28 |
Separate number block . . . . . . . . . . . . . . . . . . . . . . . . . . . . . . . . . . . . . . . . . . . . . . . . . . . . . . . . . . . . . . |
29 |
Function keys and key combinations . . . . . . . . . . . . . . . . . . . . . . . . . . . . . . . . . . . . . . . . . . . . . . . . . . |
29 |
Keyboard with background lighting (optional) . . . . . . . . . . . . . . . . . . . . . . . . . . . . . . . . . . . . . . . . . . |
31 |
Country and keyboard settings . . . . . . . . . . . . . . . . . . . . . . . . . . . . . . . . . . . . . . . . . . . . . . . . . . . . . . . |
31 |
Touchpad and touchpad buttons . . . . . . . . . . . . . . . . . . . . . . . . . . . . . . . . . . . . . . . . . . . . . . . . . . . . . . . . . . |
32 |
Moving the pointer . . . . . . . . . . . . . . . . . . . . . . . . . . . . . . . . . . . . . . . . . . . . . . . . . . . . . . . . . . . . . . . . . . |
32 |
Selecting an item . . . . . . . . . . . . . . . . . . . . . . . . . . . . . . . . . . . . . . . . . . . . . . . . . . . . . . . . . . . . . . . . . . . . |
32 |
Executing commands . . . . . . . . . . . . . . . . . . . . . . . . . . . . . . . . . . . . . . . . . . . . . . . . . . . . . . . . . . . . . . . . |
32 |
Dragging items . . . . . . . . . . . . . . . . . . . . . . . . . . . . . . . . . . . . . . . . . . . . . . . . . . . . . . . . . . . . . . . . . . . . . . |
33 |
LCD screen . . . . . . . . . . . . . . . . . . . . . . . . . . . . . . . . . . . . . . . . . . . . . . . . . . . . . . . . . . . . . . . . . . . . . . . . . . . . |
33 |
Webcam . . . . . . . . . . . . . . . . . . . . . . . . . . . . . . . . . . . . . . . . . . . . . . . . . . . . . . . . . . . . . . . . . . . . . . . . . . . . . . . |
34 |
Rechargeable battery . . . . . . . . . . . . . . . . . . . . . . . . . . . . . . . . . . . . . . . . . . . . . . . . . . . . . . . . . . . . . . . . . . . |
35 |
Charging, caring for and maintaining the battery . . . . . . . . . . . . . . . . . . . . . . . . . . . . . . . . . . . . . . . |
35 |
Removing and installing the battery . . . . . . . . . . . . . . . . . . . . . . . . . . . . . . . . . . . . . . . . . . . . . . . . . . . |
36 |
Using the power-management features . . . . . . . . . . . . . . . . . . . . . . . . . . . . . . . . . . . . . . . . . . . . . . . . . . . |
38 |
Adjusting fan control . . . . . . . . . . . . . . . . . . . . . . . . . . . . . . . . . . . . . . . . . . . . . . . . . . . . . . . . . . . . . . . . . |
39 |
Memory cards . . . . . . . . . . . . . . . . . . . . . . . . . . . . . . . . . . . . . . . . . . . . . . . . . . . . . . . . . . . . . . . . . . . . . . . . . . |
40 |
Supported formats . . . . . . . . . . . . . . . . . . . . . . . . . . . . . . . . . . . . . . . . . . . . . . . . . . . . . . . . . . . . . . . . . . |
40 |
Inserting the memory card . . . . . . . . . . . . . . . . . . . . . . . . . . . . . . . . . . . . . . . . . . . . . . . . . . . . . . . . . . . |
40 |
Removing the memory card . . . . . . . . . . . . . . . . . . . . . . . . . . . . . . . . . . . . . . . . . . . . . . . . . . . . . . . . . . |
40 |
Loudspeakers and microphones . . . . . . . . . . . . . . . . . . . . . . . . . . . . . . . . . . . . . . . . . . . . . . . . . . . . . . . . . . |
41 |
SIM card (configuration dependent) . . . . . . . . . . . . . . . . . . . . . . . . . . . . . . . . . . . . . . . . . . . . . . . . . . . . . . . |
42 |
Fujitsu |
3 |

Contents |
|
Inserting the SIM card . . . . . . . . . . . . . . . . . . . . . . . . . . . . . . . . . . . . . . . . . . . . . . . . . . . . . . . . . . . . . . . |
43 |
Removing the SIM card . . . . . . . . . . . . . . . . . . . . . . . . . . . . . . . . . . . . . . . . . . . . . . . . . . . . . . . . . . . . . . |
44 |
Wireless components Wireless LAN / Bluetooth / LTE . . . . . . . . . . . . . . . . . . . . . . . . . . . . . . . . . . . . . . |
45 |
Switching the wireless components on and off . . . . . . . . . . . . . . . . . . . . . . . . . . . . . . . . . . . . . . . . . |
45 |
Setting up WLAN access . . . . . . . . . . . . . . . . . . . . . . . . . . . . . . . . . . . . . . . . . . . . . . . . . . . . . . . . . . . . |
45 |
Access via LTE . . . . . . . . . . . . . . . . . . . . . . . . . . . . . . . . . . . . . . . . . . . . . . . . . . . . . . . . . . . . . . . . . . . . . |
45 |
Ethernet and LAN . . . . . . . . . . . . . . . . . . . . . . . . . . . . . . . . . . . . . . . . . . . . . . . . . . . . . . . . . . . . . . . . . . . . . . . |
46 |
Port Replicator (optional) . . . . . . . . . . . . . . . . . . . . . . . . . . . . . . . . . . . . . . . . . . . . . . . . . . . . . . . . . . . . . . . . |
47 |
Ports on the Port Replicator . . . . . . . . . . . . . . . . . . . . . . . . . . . . . . . . . . . . . . . . . . . . . . . . . . . . . . . . . . |
47 |
Connecting the notebook to the Port Replicator . . . . . . . . . . . . . . . . . . . . . . . . . . . . . . . . . . . . . . . |
48 |
Connecting the mains adapter to the Port Replicator . . . . . . . . . . . . . . . . . . . . . . . . . . . . . . . . . . . |
49 |
Switching on the notebook via the port replicator . . . . . . . . . . . . . . . . . . . . . . . . . . . . . . . . . . . . . . . |
49 |
Disconnecting the notebook from the Port Replicator . . . . . . . . . . . . . . . . . . . . . . . . . . . . . . . . . . |
50 |
Security functions . . . . . . . . . . . . . . . . . . . . . . . . . . . . . . . . . . . . . . . . . . . . . . . . . . . . . . . . . . . . . . . . . . . . . |
51 |
Configuring the fingerprint sensor . . . . . . . . . . . . . . . . . . . . . . . . . . . . . . . . . . . . . . . . . . . . . . . . . . . . . . . . |
51 |
Configuring the palm vein sensor . . . . . . . . . . . . . . . . . . . . . . . . . . . . . . . . . . . . . . . . . . . . . . . . . . . . . . . . . |
52 |
Using the Security Lock . . . . . . . . . . . . . . . . . . . . . . . . . . . . . . . . . . . . . . . . . . . . . . . . . . . . . . . . . . . . . . . . . |
52 |
Configuring password protection in BIOS Setup Utility . . . . . . . . . . . . . . . . . . . . . . . . . . . . . . . . . . . . . . |
53 |
Protecting BIOS Setup Utility (supervisor and user password) . . . . . . . . . . . . . . . . . . . . . . . . . . . |
53 |
Password protection for booting of the operating system . . . . . . . . . . . . . . . . . . . . . . . . . . . . . . . |
55 |
Password protection for the hard disk . . . . . . . . . . . . . . . . . . . . . . . . . . . . . . . . . . . . . . . . . . . . . . . . . |
55 |
Trusted Platform Module (TPM) (device-dependent) . . . . . . . . . . . . . . . . . . . . . . . . . . . . . . . . . . . . . . . |
56 |
Enabling TPM . . . . . . . . . . . . . . . . . . . . . . . . . . . . . . . . . . . . . . . . . . . . . . . . . . . . . . . . . . . . . . . . . . . . . . . |
56 |
Disabling TPM . . . . . . . . . . . . . . . . . . . . . . . . . . . . . . . . . . . . . . . . . . . . . . . . . . . . . . . . . . . . . . . . . . . . . . |
56 |
SmartCard reader (configuration dependent) . . . . . . . . . . . . . . . . . . . . . . . . . . . . . . . . . . . . . . . . . . . . . . |
57 |
Inserting the SmartCard . . . . . . . . . . . . . . . . . . . . . . . . . . . . . . . . . . . . . . . . . . . . . . . . . . . . . . . . . . . . . |
57 |
Connecting external devices . . . . . . . . . . . . . . . . . . . . . . . . . . . . . . . . . . . . . . . . . . . . . . . . . . . . . . . . . . . |
58 |
Connecting an external monitor . . . . . . . . . . . . . . . . . . . . . . . . . . . . . . . . . . . . . . . . . . . . . . . . . . . . . . . . . . |
59 |
Connecting USB devices . . . . . . . . . . . . . . . . . . . . . . . . . . . . . . . . . . . . . . . . . . . . . . . . . . . . . . . . . . . . . . . . |
60 |
USB connection with charging function (USB Type-C) . . . . . . . . . . . . . . . . . . . . . . . . . . . . . . . . . . |
61 |
USB port with charging function (Anytime USB charge) . . . . . . . . . . . . . . . . . . . . . . . . . . . . . . . . . |
62 |
How to remove USB devices correctly . . . . . . . . . . . . . . . . . . . . . . . . . . . . . . . . . . . . . . . . . . . . . . . . |
62 |
Headset port . . . . . . . . . . . . . . . . . . . . . . . . . . . . . . . . . . . . . . . . . . . . . . . . . . . . . . . . . . . . . . . . . . . . . . . . . . . |
63 |
Removing and installing components during servicing . . . . . . . . . . . . . . . . . . . . . . . . . . . . . . . . . |
64 |
Notes on installing and removing boards and components . . . . . . . . . . . . . . . . . . . . . . . . . . . . . . . . . . |
64 |
Preparing to remove components . . . . . . . . . . . . . . . . . . . . . . . . . . . . . . . . . . . . . . . . . . . . . . . . . . . . . . . . |
65 |
Removing a cover . . . . . . . . . . . . . . . . . . . . . . . . . . . . . . . . . . . . . . . . . . . . . . . . . . . . . . . . . . . . . . . . . . . . . . . |
66 |
Installing and removing memory expansion . . . . . . . . . . . . . . . . . . . . . . . . . . . . . . . . . . . . . . . . . . . . . . . . |
67 |
Removing memory modules . . . . . . . . . . . . . . . . . . . . . . . . . . . . . . . . . . . . . . . . . . . . . . . . . . . . . . . . . . |
67 |
Installing a memory module . . . . . . . . . . . . . . . . . . . . . . . . . . . . . . . . . . . . . . . . . . . . . . . . . . . . . . . . . . |
68 |
Installing and removing an M.2 module (configuration dependent) . . . . . . . . . . . . . . . . . . . . . . . . . . . |
68 |
Installing an M.2 module . . . . . . . . . . . . . . . . . . . . . . . . . . . . . . . . . . . . . . . . . . . . . . . . . . . . . . . . . . . . . |
69 |
Removing an M.2 module . . . . . . . . . . . . . . . . . . . . . . . . . . . . . . . . . . . . . . . . . . . . . . . . . . . . . . . . . . . . |
69 |
Removing and installing the hard disk (only LIFEBOOK E559 with HDD configuration level) . . . . |
70 |
Removing a hard disk . . . . . . . . . . . . . . . . . . . . . . . . . . . . . . . . . . . . . . . . . . . . . . . . . . . . . . . . . . . . . . . |
70 |
Installing a hard disk . . . . . . . . . . . . . . . . . . . . . . . . . . . . . . . . . . . . . . . . . . . . . . . . . . . . . . . . . . . . . . . . . |
71 |
Attaching the cover . . . . . . . . . . . . . . . . . . . . . . . . . . . . . . . . . . . . . . . . . . . . . . . . . . . . . . . . . . . . . . . . . . . . . |
72 |
Finishing component removal . . . . . . . . . . . . . . . . . . . . . . . . . . . . . . . . . . . . . . . . . . . . . . . . . . . . . . . . . . . . |
72 |
Settings in BIOS Setup Utility . . . . . . . . . . . . . . . . . . . . . . . . . . . . . . . . . . . . . . . . . . . . . . . . . . . . . . . . . . |
73 |
Starting the BIOS Setup Utility . . . . . . . . . . . . . . . . . . . . . . . . . . . . . . . . . . . . . . . . . . . . . . . . . . . . . . . . . . . |
73 |
4 |
Fujitsu |

|
Contents |
Operating the BIOS Setup Utility . . . . . . . . . . . . . . . . . . . . . . . . . . . . . . . . . . . . . . . . . . . . . . . . . . . . |
. . . . . 74 |
Exiting BIOS Setup Utility . . . . . . . . . . . . . . . . . . . . . . . . . . . . . . . . . . . . . . . . . . . . . . . . . . . . . . . . . . . |
. . . . . 75 |
Exit Saving Changes - save changes and exit BIOS Setup Utility . . . . . . . . . . . . . . . . . . |
. . . . . 75 |
Exit Discarding Changes – Discard changes and exit BIOS Setup Utility . . . . . . . . . . . . |
. . . . . 75 |
Load Setup Defaults – Copy Standard Entries . . . . . . . . . . . . . . . . . . . . . . . . . . . . . . . . . . . . |
. . . . . 75 |
Discard Changes – Discard changes without exiting the BIOS Setup Utility . . . . . . . . . . |
. . . . . 75 |
Save Changes - save changes without exiting the BIOS Setup Utility . . . . . . . . . . . . . . . |
. . . . . 75 |
Save Changes and Power Off . . . . . . . . . . . . . . . . . . . . . . . . . . . . . . . . . . . . . . . . . . . . . . . . . . |
. . . . . 75 |
Troubleshooting and tips . . . . . . . . . . . . . . . . . . . . . . . . . . . . . . . . . . . . . . . . . . . . . . . . . . . . . . . . . |
. . . . . 76 |
Help if problems occur . . . . . . . . . . . . . . . . . . . . . . . . . . . . . . . . . . . . . . . . . . . . . . . . . . . . . . . . . . . . . . |
. . . . . 76 |
Restore contents of the hard disk from Recovery CD/DVD . . . . . . . . . . . . . . . . . . . . . . . . . . . . . |
. . . . . 77 |
Restoring the system under Windows 10 . . . . . . . . . . . . . . . . . . . . . . . . . . . . . . . . . . . . . . . . . . . . . |
. . . . . 77 |
The notebook’s date or time is incorrect . . . . . . . . . . . . . . . . . . . . . . . . . . . . . . . . . . . . . . . . . . . . . . |
. . . . . 78 |
When certain characters are entered on the keyboard, only numerals are written . . . . . . . . |
. . . . . 78 |
The notebook’s LCD screen remains blank . . . . . . . . . . . . . . . . . . . . . . . . . . . . . . . . . . . . . . . . . . . |
. . . . . 78 |
The LCD screen is difficult to read . . . . . . . . . . . . . . . . . . . . . . . . . . . . . . . . . . . . . . . . . . . . . . . . . . . |
. . . . . 78 |
The external monitor remains blank . . . . . . . . . . . . . . . . . . . . . . . . . . . . . . . . . . . . . . . . . . . . . . . . . |
. . . . . 79 |
The external monitor is blank or the image is unstable . . . . . . . . . . . . . . . . . . . . . . . . . . . . . . . . |
. . . . . 79 |
The notebook cannot be started . . . . . . . . . . . . . . . . . . . . . . . . . . . . . . . . . . . . . . . . . . . . . . . . . . . . . |
. . . . . 80 |
The notebook stops working . . . . . . . . . . . . . . . . . . . . . . . . . . . . . . . . . . . . . . . . . . . . . . . . . . . . . . . . |
. . . . . 80 |
The printer does not print . . . . . . . . . . . . . . . . . . . . . . . . . . . . . . . . . . . . . . . . . . . . . . . . . . . . . . . . . . . |
. . . . . 81 |
The wireless connection to a network does not work . . . . . . . . . . . . . . . . . . . . . . . . . . . . . . . . . . |
. . . . . 81 |
SmartCard reader is not recognised. . . . . . . . . . . . . . . . . . . . . . . . . . . . . . . . . . . . . . . . . . . . . . . . . . |
. . . . . 81 |
SmartCard PIN forgotten . . . . . . . . . . . . . . . . . . . . . . . . . . . . . . . . . . . . . . . . . . . . . . . . . . . . . . . . . . . |
. . . . . 81 |
SmartCard lost . . . . . . . . . . . . . . . . . . . . . . . . . . . . . . . . . . . . . . . . . . . . . . . . . . . . . . . . . . . . . . . . . . . . |
. . . . . 82 |
Error messages on the screen . . . . . . . . . . . . . . . . . . . . . . . . . . . . . . . . . . . . . . . . . . . . . . . . . . . . . . |
. . . . . 82 |
Technical data . . . . . . . . . . . . . . . . . . . . . . . . . . . . . . . . . . . . . . . . . . . . . . . . . . . . . . . . . . . . . . . . . . . . |
. . . . . 84 |
LIFEBOOK . . . . . . . . . . . . . . . . . . . . . . . . . . . . . . . . . . . . . . . . . . . . . . . . . . . . . . . . . . . . . . . . . . . . . . . . |
. . . . . 84 |
Rechargeable battery . . . . . . . . . . . . . . . . . . . . . . . . . . . . . . . . . . . . . . . . . . . . . . . . . . . . . . . . . . . . . . |
. . . . . 84 |
Mains adapter (notebook computer) . . . . . . . . . . . . . . . . . . . . . . . . . . . . . . . . . . . . . . . . . . . . . . . . . |
. . . . . 85 |
Mains adapter (port replicator) . . . . . . . . . . . . . . . . . . . . . . . . . . . . . . . . . . . . . . . . . . . . . . . . . . . . . . |
. . . . . 85 |
Manufacturer’s notes . . . . . . . . . . . . . . . . . . . . . . . . . . . . . . . . . . . . . . . . . . . . . . . . . . . . . . . . . . . . . |
. . . . . 86 |
Disposal and recycling . . . . . . . . . . . . . . . . . . . . . . . . . . . . . . . . . . . . . . . . . . . . . . . . . . . . . . . . . . . . . |
. . . . . 86 |
Other certification markings . . . . . . . . . . . . . . . . . . . . . . . . . . . . . . . . . . . . . . . . . . . . . . . . . . . . . . . . . |
. . . . . 86 |
Index . . . . . . . . . . . . . . . . . . . . . . . . . . . . . . . . . . . . . . . . . . . . . . . . . . . . . . . . . . . . . . . . . . . . . . . . . . . . . |
. . . . . 87 |
Fujitsu |
5 |

Contents
6 |
Fujitsu |
Innovative technology
Innovative technology
... and ergonomic design make your device a reliable and convenient companion.
The device boots very quickly, is ready for immediate use and offers a particularly long operating time because of its high capacity battery.
With the user-friendly "BIOS Setup Utility" you can control your notebook’s hardware and better protect your system against unauthorised access by using the powerful password properties.
Information on the connections and user components of your notebook can be found in "Ports and controls", Page 9.
Further information
The Windows drivers for your device can be found on our Internet site. The factory installation of your device does not support any other operating system. Fujitsu Technology Solutions accepts no liability whatsoever
if any other operating system is used.
Software oriented components of these instructions refer to Microsoft products, if they come within the scope of the delivery.
If you install other software products, pay attention to the operating instructions of the manufacturer.
Fujitsu |
7 |

Innovative technology
Notational conventions
|
|
|
Pay particular attention to text marked with this symbol. Failure to observe |
||
|
|
|
these warnings could pose a risk to health, damage the device or lead |
||
|
|
|
to loss of data. The warranty will be invalidated if the device becomes |
||
|
|
|
defective through failure to observe these warnings. |
||
|
|
|
Indicates important information for the proper use of the device. |
||
|
|
|
|
|
|
|
► |
Indicates an activity that must be performed |
|||
|
|
Indicates a result |
|||
|
|
|
|
||
|
|
|
|
|
|
|
This font |
indicates data entered using the keyboard in a program dialogue or at |
|||
|
|
|
the command line, e.g. your password (Name123) or a command used to |
||
|
|
|
start a program (start.exe) |
||
|
This font |
indicates information that is displayed on the screen by a program, e.g.: |
|||
|
|
|
Installation is complete. |
||
|
|
|
|
|
|
|
This font |
Indicates |
|||
|
|
|
• terms and texts used in a software interface, e.g.: Click on Save |
||
|
|
|
• names of programs or files, e.g. Windows or setup.exe. |
||
|
"This font" |
Indicates |
|||
|
|
|
• cross-references to another section, e.g. "Safety information" |
||
|
|
|
• cross-references to an external source, e.g. a web address: For more |
||
|
|
|
information, go to "http://www.fujitsu.com/fts/" |
||
|
|
|
• Names of CDs, DVDs and titles or designations for other materials, |
||
|
|
|
e.g.: "CD/DVD Drivers & Utilities" or "Safety/Regulations" manual |
||
|
Key |
|
indicates a key on the keyboard, e.g: |
F10 |
|
|
|
|
|||
|
This font |
indicates terms and texts that are emphasised or highlighted, e.g.: Do |
|||
|
|
|
not switch off the device |
||
8 |
Fujitsu |

Ports and controls
Ports and controls
This chapter presents the individual hardware components of your device. It gives an overview of the indicators and ports of the device. Please familiarise yourself with these components before you start to work with the device.
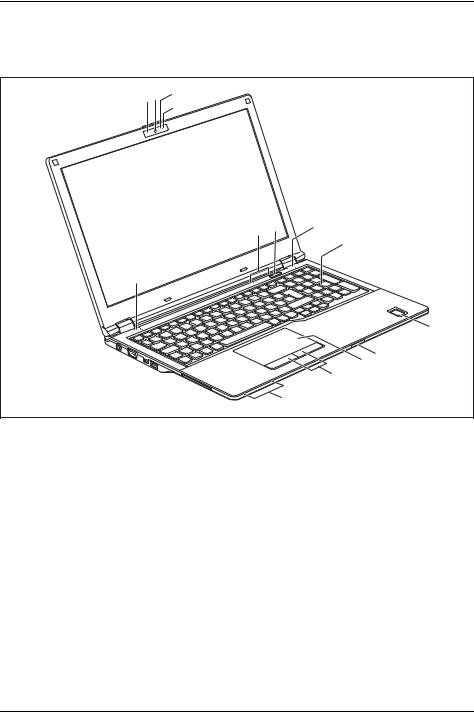
FUJITSU LIFEBOOK E549
Front |
|
|
|
1 2 |
3 |
|
|
|
1 |
|
|
|
6 |
5 |
4 |
4 |
|
|
|
|
|
|
7 |
|
|
|
8 |
|
|
|
9 |
|
|
|
10 |
|
|
|
11 |
1 |
= Microphone (optional) |
7 |
= Fingerprint sensor (optional) or palm |
2 |
= WebCam (optional) |
|
sensor (optional) |
3 |
= WebCam LED (optional) |
8 |
= Memory card slot |
4 |
= Loudspeakers |
9 |
= Touchpad buttons |
5 |
= ON/OFF button |
10 |
= Touchpad |
6 |
= Status indicators |
11 |
= Status indicators |
Fujitsu |
9 |
Ports and controls
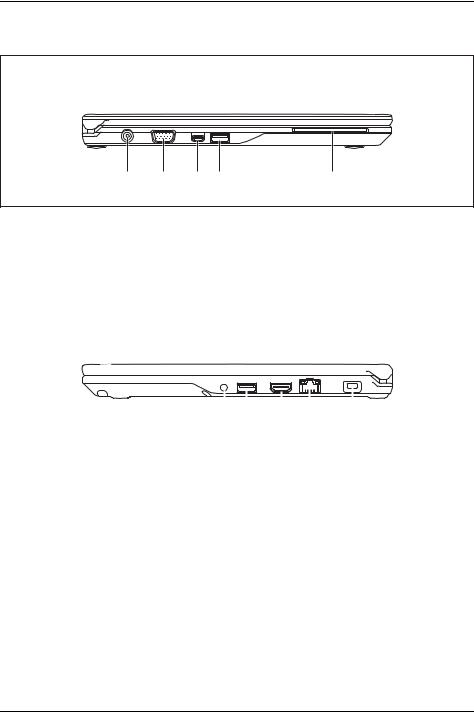
Left side
1 |
2 |
3 |
4 |
5 |
1 |
= DC input connector (DC IN) |
4 |
= USB 3.1 Gen1 port with charging function |
2 |
= Monitor port (VGA) |
|
(USB Type-A, Anytime USB charge) |
3 |
= USB port 3.1 Gen2 with recharge function |
5 |
= SmartCard reader (optional) |
|
(USB Type-C with DisplayPort 1.2) |
|
|
Right side
|
|
|
|
|
|
|
|
|
|
|
|
|
|
|
|
|
|
|
|
|
|
|
|
|
|
|
|
|
|
|
|
|
|
|
|
|
|
|
|
|
|
|
|
|
|
|
|
|
|
|
|
|
|
|
|
|
|
|
|
|
|
|
|
|
|
|
|
|
|
|
|
|
|
|
|
|
|
|
|
|
|
|
|
|
|
|
|
|
|
|
|
|
|
|
|
|
|
|
|
|
|
|
|
|
|
|
|
|
|
|
|
|
|
|
|
|
|
|
|
|
|
|
|
|
|
|
|
|
|
|
|
|
|
|
|
|
|
|
1 |
2 |
3 |
4 |
5 |
|
|
|
|
|
|
|
||||||||||
|
|
|
|
|
|
|
|
|
|
|
|
|
|
|
|
|
|
|
|
|
|
|
1 |
= Headset port |
4 |
= LAN port |
|
|
|
|
|
|
|
|
|
|
|||||||||
2 |
= USB 3.1 Gen1 port (USB Type A) |
5 |
= Security Lock device |
|||||||||||||||||||
3 |
= HDMI port |
|
|
|
|
|
|
|
|
|
|
|
|
|
|
|
|
|
||||
10 |
Fujitsu |
Ports and controls
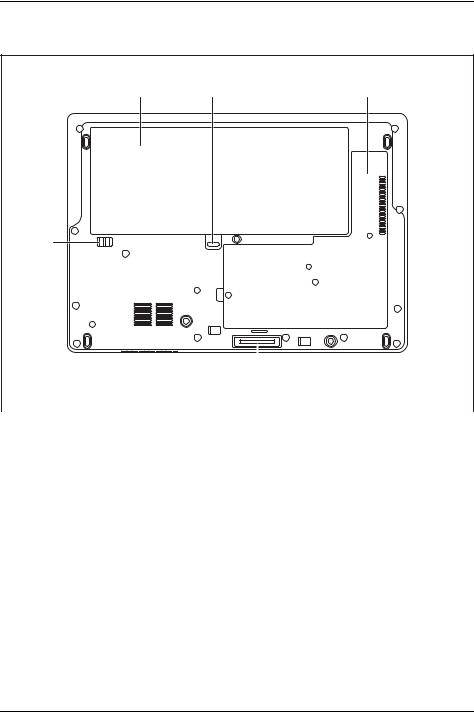
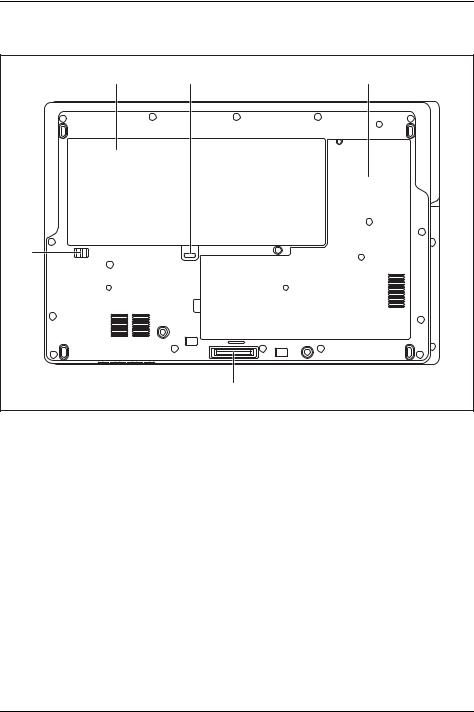
Bottom
1 |
2 |
3 |
5
|
|
|
|
|
|
|
|
|
|
|
|
|
|
|
|
|
|
4 |
|
|
|
|
|
|
|
|
|
1 |
= |
Battery (SIM card under the battery) |
4 |
|
= Port Replicator port |
|
2 |
= |
Battery release 1 |
5 |
|
= Battery release 2 |
|
3= Memory service compartment for DIMM modules, M.2 module and LTE module
Fujitsu |
11 |
Ports and controls
FUJITSU LIFEBOOK E559
Front |
|
|
|
1 2 |
3 |
|
|
|
1 |
|
|
|
6 |
5 |
4 |
|
|
|
7 |
4 |
|
|
|
|
|
|
8 |
|
|
|
10 9 |
|
|
|
11 |
|
|
|
12 |
1 |
= Microphone (optional) |
8 |
= Fingerprint sensor (optional) or palm |
2 |
= WebCam (optional) |
|
sensor (optional) |
3 |
= WebCam LED (optional) |
9 |
= Memory card slot |
4 |
= Loudspeakers |
10 |
= Touchpad |
5 |
= ON/OFF button |
11 |
= Touchpad buttons |
6 |
= Status indicators |
12 |
= Status indicators |
7 |
= Separate numeric keypad |
|
|
12 |
Fujitsu |
Ports and controls
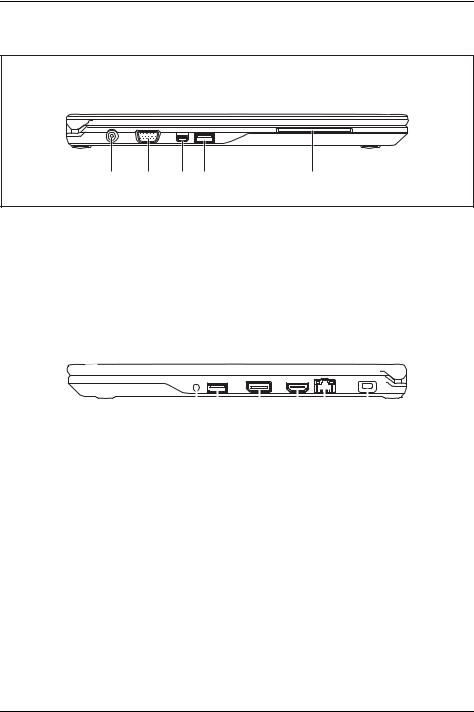
Left side
1 |
2 |
3 |
4 |
5 |
1 |
= DC input connector (DC IN) |
4 |
= USB 3.1 Gen1 port with charging function |
2 |
= VGA monitor port |
|
(USB Type-A, Anytime USB charge) |
3 |
= USB port 3.1 Gen2 with recharge function |
5 |
= SmartCard reader (optional) |
|
(USB Type-C with DisplayPort 1.2) |
|
|
Right side
|
|
|
|
|
|
|
|
|
|
|
|
|
|
|
|
|
|
|
|
|
|
|
|
|
|
|
|
|
|
|
|
|
|
|
|
|
|
|
|
|
|
|
|
|
|
|
|
|
|
|
|
|
|
|
|
|
|
|
|
|
|
|
|
|
|
|
|
|
|
|
|
|
|
|
|
|
|
|
|
|
|
|
|
|
|
|
|
|
|
|
|
|
|
|
|
|
|
|
|
|
|
|
|
|
|
|
|
|
|
|
|
|
|
|
|
|
|
|
|
|
|
|
|
|
|
|
|
|
|
|
|
|
|
|
|
|
|
|
|
|
|
|
|
|
|
|
|
|
|
|
|
|
|
|
|
|
|
|
|
|
|
|
|
|
|
|
|
|
|
|
|
|
|
|
|
|
|
|
|
|
|
|
|
|
|
|
|
|
|
1 |
2 |
|
3 |
4 |
|
5 |
6 |
|
|
|
|
|
|
|
|||||||||||
|
|
|
|
|
|
|
|
|
|
|
|
|
|
|
|
|
|
|
|
|
|
|
|
|
||
1 |
= Headset port |
|
|
|
4 |
|
= HDMI port |
|
|
|
|
|
|
|
|
|
|
|||||||||
2 |
= USB 3.1 Gen1 port (USB Type A) |
|
|
|
5 |
|
= LAN port |
|
|
|
|
|
|
|
|
|
|
|
|
|||||||
3 |
= Displayport |
|
|
|
6 |
|
= Security lock device |
|||||||||||||||||||
Fujitsu |
13 |
Ports and controls
Bottom |
|
|
1 |
2 |
3 |
5 |
|
|
|
|
4 |
1 |
= |
Battery (SIM card under the battery) |
4 |
= |
Port replicator port |
2 |
= |
Battery release 1 |
5 |
= |
Battery release 2 |
3= Memory service compartment for DIMM modules, hard disk (HDD or M.2 module) and LTE module
14 |
Fujitsu |

Important notes
Important notes
This chapter contains essential safety information which must be followed when working with your notebook. Other notes also provide useful information which will help you with your notebook.
Safety notes
Please follow the safety notes provided in the "Safety/Regulations" manual as well as the safety notes given below.
Please pay special attention to the sections in the manual marked with the symbol on the left.
When connecting and disconnecting cables, observe the relevant notes in this operating manual.
In order to prevent burn injury or the device from overheating, do not lay the device directly on your lap and make sure that the ventilation openings are not obstructed.
Read the information on the ambient conditions in the "Technical data", Page 84 and "First-time setup of your device", Page 19 before preparing your notebook for use and switching it on for the first time.
When cleaning the device, please observe the relevant notes in the section "Cleaning the notebook", Page 18.
Pay attention to the additional safety notes for devices with wireless components provided in the "Safety/Regulations" manual.
Please refer to the notes in the chapter "Removing and installing components during servicing", Page 64.
This notebook complies with the relevant safety regulations for data processing equipment. If you have questions about using your notebook in a particular area, please contact your sales outlet or our Hotline/Service Desk.
Opening angle of the LCD screen
Please open the LCD screen carefully until you feel resistance. Do not try to open it further with force!
Fujitsu |
15 |
Important notes
Additional safety notes for devices with radio components
If a radio component (Wireless LAN, Bluetooth, LTE) is integrated in your notebook, you must be sure to observe the following safety notes when using your notebook:
•Switch off the radio components when you are in an aircraft or driving in a car.
•Switch off the radio components when you are in a hospital, an operating room or near a medical electronics system. The transmitted radio waves can impair the operation of medical devices.
•Switch off the radio components when you let the device get near flammable gases or into hazardous environments (e.g. petrol station, paintshops), as the transmitted radio waves can cause an explosion or a fire.
For information on how to switch radio components on and off, see chapter "Switching the wireless components on and off", Page 45.
Energy saving
Switch the notebook off when it is not in use. Switch off external, connected devices if you are not using them. If you use the energy saving functions, the notebook uses less energy. You will then be able to work for longer before having to recharge the battery.
Energy efficiency is increased and the environmental impact is reduced.
You save money while protecting the environment.
Energy saving under Windows
►Make use of the power management features (see ""Using the power-management features", Page 38").
16 |
Fujitsu |
Important notes
Travelling with your notebook
Please observe the points listed below when travelling with your notebook.
Before you travel
►Back up important data stored on your hard disk.
►Switch off the wireless component for data security reasons. With data traffic via a wireless connection, it is also possible for unauthorised third parties to receive data.
Information on activating data encryption is provided in the documentation for your wireless component.
►If you wish to use your notebook during a flight, first check with the flight attendants if it is OK to do so.
When travelling in other countries
►If you are travelling abroad, check that the mains adapter can be operated with the local mains voltage. If this is not the case, obtain the appropriate mains adapter for your notebook. Do not use any other voltage converter!
►Check whether the local mains voltage and the power cable are compatible. If this is not the case, buy a power cable that matches the local conditions.
►Contact the relevant authorities of the country you will be travelling in as to whether you may operate the radio component integrated into your notebook computer. Please observe the additional safety instructions for devices with radio components, found in the handbook “Safety/formalities”.
Notebook: transporting
Protect the notebook from severe shocks and extreme temperatures (e.g. direct sunlight in a car).
►Switch the notebook off.
►Unplug the mains adapter and all external devices from the power socket.
►Disconnect the mains adapter cable and the data cables for all external devices.
►Close the LCD screen.
►To protect against damaging jolts and bumps, use a notebook carrying case to transport your notebook.
Fujitsu |
17 |

Important notes
Cleaning the notebook
Do not clean any interior parts yourself; leave this job to a service technician.
Only use cleaning products designed for computers. Normal household cleaners and polishes can damage the markings on the keyboard and the device, the paintwork or the notebook itself.
Ensure that no liquid enters the notebook.
The LCD screen very sensitive to scratches. Only clean the display surface with a very soft, slightly damp cloth.
►Switch the notebook off.
►In order to prevent accidentially switching the device on, remove the power cable from the mains adaptor and remove the battery (see "Removing and installing the battery", Page 36).
The surface can be cleaned with a dry cloth. If particularly dirty, use a cloth which has been moistened in mild domestic detergent and then carefully wrung out.
You can use disinfectant wipes to clean the keyboard and the touchpad. Ensure that no liquid enters the device.
18 |
Fujitsu |
First-time setup of your device
First-time setup of your device
Please read the chapter "Important notes", Page 15.
If your device is equipped with a Windows operating system, the necessary hardware drivers and supplied software are already pre-installed.
Before you switch on the device for the first time, connect it to the mains voltage using the mains adapter, see "Mains adapter connecting", Page 20. The mains adapter must be connected during the entire installation process.
A system test is performed when your device is first switched on. Various messages can appear. The display may remain dark for a short time or may flicker.
Please follow the instructions on the screen.
NEVER switch off your device during the first-time setup process.
When the device is delivered, the battery is located in the battery compartment. The battery must be charged if you want to operate your device using the battery.
When used on the move, the built-in battery provides the device with the necessary power. You can increase the operating time by using the available energy-saving functions.
For instructions on how to connect external devices (e.g. mouse, printer) to your device, please refer to the operating manual for your device.
Unpacking and checking the device
Should you discover any damage that occurred during transportation, notify your local sales outlet immediately!
►Unpack all the individual parts.
►Check your device for any visible damage which may have occurred during transportation.
You may need the packaging in the future, if you need to transport your device.
Fujitsu |
19 |
First-time setup of your device
Selecting a location
Select a suitable location for the device before setting it up. Follow the instructions below when doing so:
•Never place the device or the mains adapter on a heat-sensitive surface. The surface could be damaged as a result.
•Never place the device on a soft surface (e.g. carpeting, upholstered furniture, bed). This can block the air vents and cause overheating and damage.
•The underside of the device heats up during normal operation. Prolonged contact with the skin may become unpleasant or even result in burns.
•Place the device on a stable, flat, non-slippery surface. Please note that the rubber feet of the device may mark certain types of delicate surfaces.
•Keep other objects at least 100 mm / 3.94 inches away from the device and its mains adapter to ensure adequate ventilation.
•Never cover the ventilation slots of the device.
•Do not expose the device to extreme environmental conditions. Protect the device from dust, humidity, and heat.
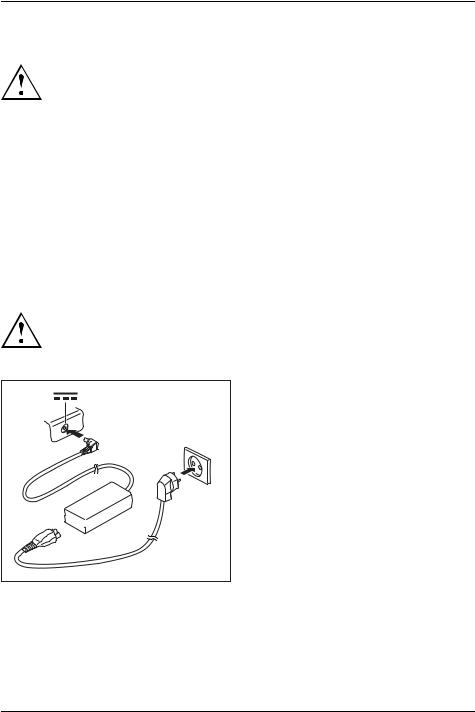
Mains adapter connecting
Observe the safety notes in the enclosed "Safety/Regulations" manual.
The supplied power cable conforms to the requirements of the country in which you purchased your device. Make sure that the power cable is approved for use in the country in which you intend to use it.
► Connect the power cable (1) to the power adapter provided for the device, see chapter "Technical data", Page 84.
|
► |
Plug the mains cable (2) into a mains outlet. |
3 |
► Connect the mains adapter cable (3) to |
|
|
the DC jack (DC IN) of the device. |
|
|
|
|
2
1


20 |
Fujitsu |
First-time setup of your device
Switching on the device for the first time
When you switch on the device for the first time, the supplied software is installed and configured. Because this procedure must not be interrupted, you should set aside enough time for it to be fully completed and connect the device to the mains using the mains adapter.
During the installation process, DO NOT restart the device unless you are requested to do so!
To make it easier to use your device for the first time, the operating system is pre-installed on the hard disk.
► Switch on your device.
► During installation, follow the instructions on screen.
If a Windows operating system is installed on your device, you will find more information on the system and drivers, help programmes, updates, manuals etc. on the device or on the Internet under "http://www.fujitsu.com/fts/support/".
You can find information and help on the Windows operating system functions on the Internet at "http://windows.microsoft.com".
Fujitsu |
21 |
Working with the notebook
Working with the notebook
This chapter describes the basics for operating your notebook. Please read the chapter entitled "Connecting external devices", Page 58 for instructions on how to connect devices such as a mouse and a printer to the notebook.
Please refer to the notes in "Important notes", Page 15.
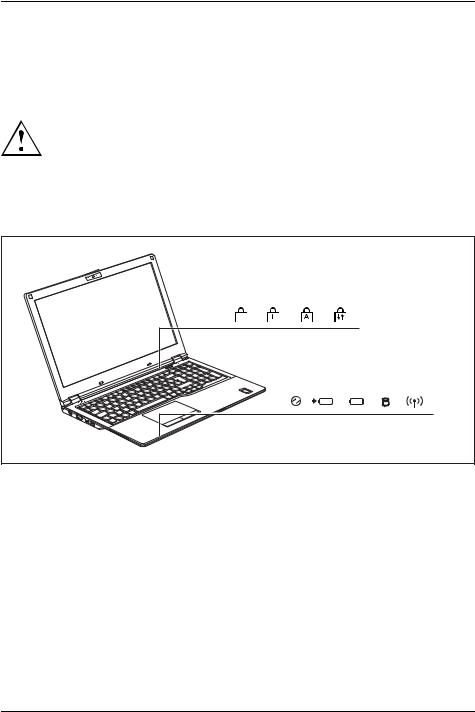
Status indicators
The status indicators provide information about the status of the power supply, the hard disk and the keyboard functions.
F |
22 |
Fujitsu |
Working with the notebook
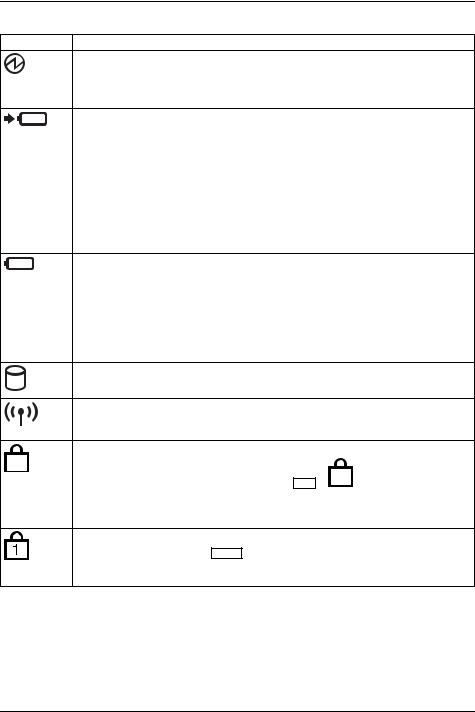
Indicator Description
Power-on indicator/Standby
•Indicator is illuminated: The notebook is switched on.
•Indicator flashes: The notebook is in standby mode.
•Indicator is off: The notebook is switched off.
Battery charging indicator/power connector
The state of charge of the battery is shown by the battery indicator.
•The indicator lights up white: The battery is charged or no battery is inserted.
•The indicator lights up orange: the mains adapter is connected and the battery is being charged.
•Indicator flashes orange: the mains adapter is connected but the battery cannot be charged as the battery is too hot or cold for charging. The charging process is continued as soon as the battery reaches a permissible temperature again.
•Indicator flashes red: An error has occured.
•The indicator is not illuminated: the mains adapter is not connected.
Battery indicator
•The indicator lights up white: The battery charge is between 51% and 100% of its maximum.
•The indicator lights up orange: The battery charge is between 13% and 50% of its maximum.
•The indicator lights up red: The battery is charged to between 0% and 12% of its maximum capacity.
•Indicator flashes red: An error has occured.
Drive indicator
The indicator lights up: The hard disk drive is being accessed.
Radio components indicator
•Indicator is illuminated: The wireless components are switched on.
•Indicator is off: The wireless components are switched off.
F Lock indicator
F
The indicator lights up: The key combination Fn + F has been pressed. Instead of the imprinted standard functions of the function keys, the Fn functions can be executed by pressing the keys directly (see chapter "Function keys and key combinations", Page 29).
Num Lock indicator
Indicator is illuminated: The Num key has been pressed. The virtual numerical keypad is activated. You can output the characters indicated on the upper right of the keys.
Fujitsu |
23 |

Working with the notebook
Indicator |
Description |
||||
|
Caps Lock indicator |
||||
|
Indicator is illuminated: The Caps Lock key has been pressed. All the characters |
||||
|
you type will appear in upper case. In the case of overlay keys, the character |
||||
|
printed on the upper left of the key will appear when that key is pressed. |
||||
|
Scroll Lock indicator |
||||
|
Indicator is illuminated: the key combination |
|
+ |
|
has been pressed. The |
|
Fn |
Scr |
|||
|
effect that this key has varies between applications. |
||||
24 |
Fujitsu |
Working with the notebook
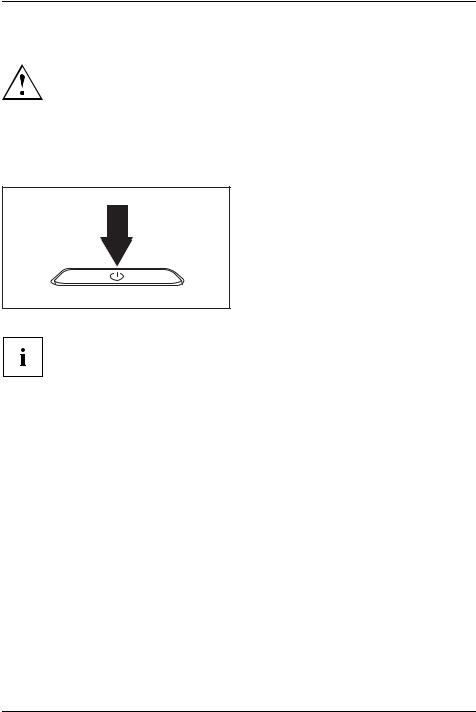
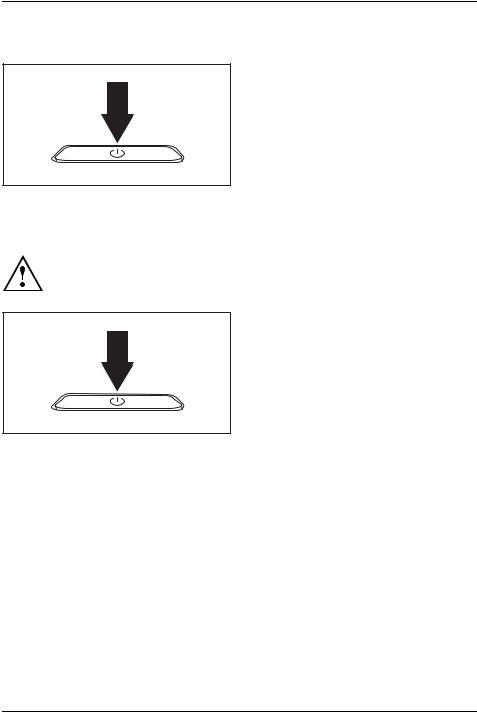
Switching on the notebook
► Open the LCD screen.
► Press the ON/OFF button for about 1 second to switch the notebook on.
The power-on indicator is lit.
Notebook: switching off
Back up your data and close all applications before you switch off your device. Otherwise data might be lost.
► Shut down the operating system correctly.
► If the notebook does not switch itself off automatically, press the ON/OFF button for about five seconds.
► Close the LCD screen.
Fujitsu |
25 |
Loading...