


B5FH-5971.book Page 1 Thursday, May 23, 2002 4:13 PM
Copyright
Fujitsu PC Corporation has made every effort to ensure the accuracy and completeness of this document. However, as ongoing development efforts are continually improving the capabilities of our products, we cannot guarantee the accuracy of the contents of this document. We disclaim liability for errors, omissions, or future changes.
Fujitsu, the Fujitsu logo, and LifeBook are registered trademarks of Fujitsu Limited.
The following are registered trademarks of Microsoft Corporation: MS, MS-DOS, Windows.
PCMCIA is a trademark of the Personal Computer Memory Card International Association.
Intel and Pentium are registered trademarks of Intel Corporation or its subsidiaries in the United States and other countries.
Adobe Acrobat Reader is a registered trademark of Adobe System Inc.
EarthLink is a registered trademark of EarthLink Network, Inc.
Quicken® is a registered trademark of Intuit, Inc.
Sony MiniDisc is a trademark of Sony Electronics, Inc.
Philips is a trademark of Koninklijke Philips Electronics N.V.
PowerQuest and Drive Image are registered trademarks of PowerQuest Corporation.
C o p y r i g h t
Netscape 6 is a registered trademark of Netscape Communications Corporation.
McAfee is a registered trademark of Network Associates/ McAfee.com, Inc.
The DVD player found in some models of the LifeBook notebook incorporates copyright protection technology that is protected by method claims of certain U.S. patents and other intellectual property rights owned by Macrovision Corporation and other rights users. Use of this copyright protection technology must be authorized by Macrovision Corporation, and is intended for home and other limited viewing uses only unless authorized by Macrovision Corporation. Reverse engineering or disassembly is prohibited.
Dolby Headphone manufactured under license from Dolby Laboratories. “Dolby”, “Pro Logic”, and the double-D symbol are trademarks of Dolby Laboratories. Copyrights 1992-1999 Dolby Laboratories. All rights reserved.
All other trademarks mentioned herein are the property of their respective owners.
© Copyright 2002 Fujitsu PC Corporation. All rights reserved. No part of this publication may be copied, reproduced, translated, stored or transmitted in any electronic form without the written consent of Fujitsu PC Corporation.
B5FH-5971-02EN-00
DECLARATION OF CONFORMITY according to FCC Part 15
Responsible Party Name: |
Fujitsu PC Corporation |
Address: |
5200 Patrick Henry Drive |
|
Santa Clara, CA 95054 |
Telephone: |
(408) 982-9500 |
Declares that product: |
Model Configurations: |
|
LifeBook C2010 Notebook |
|
LifeBook C2111 Notebook |
|
complies with Part 15 of the FCC Rules. |
This device complies with Part 15 of the FCC rules. Operations are subject to the following two conditions:
(1) This device must not be allowed to cause harmful interference, (2) This device must accept any interference received, including interference that may cause undesired operation.

B5FH-5971.book Page 2 Thursday, May 23, 2002 4:13 PM
L i f e B o o k C S e r i e s N o t e b o o k

B5FH-5971.book Page 1 Thursday, May 23, 2002 4:13 PM
T a b l e o f C o n t e n t s
Fujitsu LifeBook® C Series notebook
Table of Contents
1 |
|
Keyboard |
|
|
|
Using the Keyboard . . . . . . . . . . . . . . . . . . . . . . |
15 |
||
PREFACE |
|
Numeric Keypad . . . . . . . . . . . . . . . . . . . . . . . . |
15 |
|
|
Windows Keys |
15 |
||
|
|
|||
Preface |
|
Cursor Keys . . . . . . . . . . . . . . . . . . . . . . . . . . . . |
15 |
|
|
Function Keys |
16 |
||
About This Guide |
3 |
|||
|
|
|||
Fujitsu Contact Information . . . . . . . . . . . . . . . . . |
3 |
Volume Control |
|
|
Warranty |
3 |
|
||
Controlling the Volume |
17 |
|||
|
|
|||
|
|
Setting the Hardware Volume Control . . . . . . . . |
17 |
2
GETTING TO KNOW
YOUR COMPUTER
Overview
Unpacking . . . . . . . . . . . . . . . . . . . . . . . . . . . . . . 7
Touchpad Pointing Device
Clicking . . . . . . . . . . . . . . . . . . . . . . . . . . . . . . . 18 Double-Clicking . . . . . . . . . . . . . . . . . . . . . . . . . 18 Dragging . . . . . . . . . . . . . . . . . . . . . . . . . . . . . . 19 Scrolling. . . . . . . . . . . . . . . . . . . . . . . . . . . . . . . 19 i-Scroller . . . . . . . . . . . . . . . . . . . . . . . . . . . . . . 19 Touchpad Control Adjustment . . . . . . . . . . . . . . 19
Locating the Controls
and Connectors
Top and Front Components . . . . . . . . . . . . . . . . . 8
Left-Side Panel Components . . . . . . . . . . . . . . . . 9
Right-Side Panel Components . . . . . . . . . . . . . . 10
Back Panel Components. . . . . . . . . . . . . . . . . . . 11
Bottom Components . . . . . . . . . . . . . . . . . . . . . 12
Status Indicator Panel
Power Indicator. . . . . . . . . . . . . . . . . . . . . . . . . 13
AC Adapter Indicator . . . . . . . . . . . . . . . . . . . . 13
Battery Level Indicator. . . . . . . . . . . . . . . . . . . . 13
Battery Charging Indicator . . . . . . . . . . . . . . . . 14
Media Player Access Indicator . . . . . . . . . . . . . . 14
Hard Drive Access Indicator. . . . . . . . . . . . . . . . 14
Floppy Drive Access Indicator . . . . . . . . . . . . . . 14
PC Card Access Indicators . . . . . . . . . . . . . . . . . 14
NumLk Indicator . . . . . . . . . . . . . . . . . . . . . . . . 14
CapsLock Indicator . . . . . . . . . . . . . . . . . . . . . . 14
ScrLk Indicator . . . . . . . . . . . . . . . . . . . . . . . . . 14
LifeBook Application Panel
Selector Switch . . . . . . . . . . . . . . . . . . . . . . . . . 20 Application Launch Media Player Buttons . . . . . 20 Configuring your LifeBook Application Panel . . . 20 Using the Media Player . . . . . . . . . . . . . . . . . . . 21 Desktop Control Panel . . . . . . . . . . . . . . . . . . . . 22
3
GETTING STARTED
Power Sources
Connecting the Power Adapters . . . . . . . . . . . . 25
Display Panel
Opening the Display Panel. . . . . . . . . . . . . . . . . 26
Adjusting Display Panel Brightness. . . . . . . . . . . 26
Closing the Display Panel. . . . . . . . . . . . . . . . . . 26

B5FH-5971.book Page 2 Thursday, May 23, 2002 4:13 PM
L i f e B o o k C S e r i e s N o t e b o o k
Starting Your LifeBook Notebook
Power On . . . . . . . . . . . . . . . . . . . . . . . . . . . . . 27 Boot Sequence . . . . . . . . . . . . . . . . . . . . . . . . . . 27 BIOS Setup Utility . . . . . . . . . . . . . . . . . . . . . . . 27 Booting the System . . . . . . . . . . . . . . . . . . . . . . 28 Windows Product Activation
(Windows XP Only) . . . . . . . . . . . . . . . . . . . . 28 Registering Your LifeBook notebook . . . . . . . . . 29 Installing Click Me!. . . . . . . . . . . . . . . . . . . . . . . 29
Power Management
Suspend/Resume/Power On Button. . . . . . . . . . 30
Suspend Mode. . . . . . . . . . . . . . . . . . . . . . . . . . 30
Hibernation (Save-to-Disk) Feature . . . . . . . . . . 30
Display Timeout . . . . . . . . . . . . . . . . . . . . . . . . . 31
Hard Disk Timeout . . . . . . . . . . . . . . . . . . . . . . . 31
Windows Power Management . . . . . . . . . . . . . . 31
Restarting the System. . . . . . . . . . . . . . . . . . . . . 31
Power Off . . . . . . . . . . . . . . . . . . . . . . . . . . . . . 31
4
USER-INSTALLABLE FEATURES
Lithium ion Battery
Recharging the Batteries. . . . . . . . . . . . . . . . . . . 35 Replacing the Battery . . . . . . . . . . . . . . . . . . . . . 36
Internal Floppy Disk Drive
Loading a Disk . . . . . . . . . . . . . . . . . . . . . . . . . . 37 Ejecting a Disk . . . . . . . . . . . . . . . . . . . . . . . . . . 37 Preparing a Disk for Use. . . . . . . . . . . . . . . . . . . 37
Media Player Drive
Media Player Software . . . . . . . . . . . . . . . . . . . . 38 Loading a CD, DVD, CD-RW
or Combo (“Media”) . . . . . . . . . . . . . . . . . . . 38 Removing Media . . . . . . . . . . . . . . . . . . . . . . . . 39 Using the Media Player Software . . . . . . . . . . . . 39 Using Dolby™ Headphone. . . . . . . . . . . . . . . . . 40 Using the Media Player on Battery Power . . . . . 40 Auto Insert Notification Function . . . . . . . . . . . . 41
MiniDisc Recorder
Connecting an Optical Digital Cable. . . . . . . . . . 42
PC Cards
Installing PC Cards . . . . . . . . . . . . . . . . . . . . . . . 43
Removing PC Cards . . . . . . . . . . . . . . . . . . . . . . 43
Memory Upgrade Module
Installing a Memory Upgrade Module . . . . . . . . 45
Removing a Memory Upgrade Module . . . . . . . 46
Checking the Computer Recognition
of New Memory Capacity. . . . . . . . . . . . . . . . 46
Device Ports
Modem (RJ-11) Telephone Jack. . . . . . . . . . . . . 48
Internal LAN (RJ-45) Jack. . . . . . . . . . . . . . . . . . 48
IEEE 1394 Port . . . . . . . . . . . . . . . . . . . . . . . . . . 48
Universal Serial Bus Port. . . . . . . . . . . . . . . . . . . 48
Parallel Port . . . . . . . . . . . . . . . . . . . . . . . . . . . . 48
Microphone Jack . . . . . . . . . . . . . . . . . . . . . . . . 48
Stereo Line-In Jack. . . . . . . . . . . . . . . . . . . . . . . 49
Optical Digital Audio-Out Connector. . . . . . . . . 49
S-Video Out Port . . . . . . . . . . . . . . . . . . . . . . . . 49
Headphone Jack . . . . . . . . . . . . . . . . . . . . . . . . 49
External Monitor Port . . . . . . . . . . . . . . . . . . . . 49
5
USING THE INTEGRATED
WIRELESS LAN
FCC Regulatory Information . . . . . . . . . . . . . . . 53
Before Using This Device . . . . . . . . . . . . . . . . . . 54
Connecting Windows 2000 Systems . . . . . . . . . 55
Network Connection: Windows 2000 . . . . . . . . 56
Connecting Windows XP Systems . . . . . . . . . . . 59
Troubleshooting. . . . . . . . . . . . . . . . . . . . . . . . . 63
About IP Addresses . . . . . . . . . . . . . . . . . . . . . . 67
Specifications . . . . . . . . . . . . . . . . . . . . . . . . . . . 68
6
TROUBLESHOOTING
Troubleshooting
Fujitsu Service Assistant . . . . . . . . . . . . . . . . . . . 71
Identifying the Problem . . . . . . . . . . . . . . . . . . . 71
Specific Problems . . . . . . . . . . . . . . . . . . . . . . . . 71
Troubleshooting Table . . . . . . . . . . . . . . . . . . . . 72
Power On Self Test Messages . . . . . . . . . . . . . . 80
Emergency Media Player Tray Release . . . . . . . . 81
Modem Result Codes. . . . . . . . . . . . . . . . . . . . . 81
Drivers and Applications CD . . . . . . . . . . . . . . . 82
Drive Image Special Edition (DISE) . . . . . . . . . . . 82
B5FH-5971.book Page 3 Thursday, May 23, 2002 4:13 PM
T a b l e o f C o n t e n t s
7
CARE AND MAINTENANCE
Care and Maintenance
Fujitsu LifeBook Notebook . . . . . . . . . . . . . . . . . 85
Batteries . . . . . . . . . . . . . . . . . . . . . . . . . . . . . . . 86
Floppy Disks and Drives . . . . . . . . . . . . . . . . . . . 86
Media Care . . . . . . . . . . . . . . . . . . . . . . . . . . . . 87
PC Cards . . . . . . . . . . . . . . . . . . . . . . . . . . . . . . 87
8
SPECIFICATIONS
Specifications
Configuration Label . . . . . . . . . . . . . . . . . . . . . . 91
Microprocessor. . . . . . . . . . . . . . . . . . . . . . . . . . 91
Memory. . . . . . . . . . . . . . . . . . . . . . . . . . . . . . . 91
Video . . . . . . . . . . . . . . . . . . . . . . . . . . . . . . . . . 91
Audio. . . . . . . . . . . . . . . . . . . . . . . . . . . . . . . . . 91
Mass Storage Device Options. . . . . . . . . . . . . . . 91
Integrated Pointing Device. . . . . . . . . . . . . . . . . 92
Communications . . . . . . . . . . . . . . . . . . . . . . . . 92
LifeBook Application Panel . . . . . . . . . . . . . . . . . 92
Theft Prevention Lock SLot . . . . . . . . . . . . . . . . 92
Device Ports . . . . . . . . . . . . . . . . . . . . . . . . . . . . 92
Keyboard . . . . . . . . . . . . . . . . . . . . . . . . . . . . . . 92
Power . . . . . . . . . . . . . . . . . . . . . . . . . . . . . . . . 92
Dimensions and Weight . . . . . . . . . . . . . . . . . . . 92
Environmental Requirements . . . . . . . . . . . . . . . 93
Pre-Installed Software . . . . . . . . . . . . . . . . . . . . 93
Regulatory Information . . . . . . . . . . . . . . . . . . . 95
Notice . . . . . . . . . . . . . . . . . . . . . . . . . . . . . . . . 95
9
GLOSSARY
Glossary . . . . . . . . . . . . . . . . . . . . . . . . . . . . . . . 10

B5FH-5971.book Page 4 Thursday, May 23, 2002 4:13 PM
L i f e B o o k C S e r i e s N o t e b o o k

B5FH-5971.book Page 1 Thursday, May 23, 2002 4:13 PM
1
Preface
1

B5FH-5971.book Page 2 Thursday, May 23, 2002 4:13 PM
 L i f e B o o k C S e r i e s N o t e b o o k
2
B5FH-5971.book Page 3 Thursday, May 23, 2002 4:13 PM
Preface
ABOUT THIS GUIDE
The LifeBook® C Series notebook from Fujitsu is a powerful notebook computer. It is powered by a fast Intel® Pentium® 4 processor, has a large built-in color display, and brings the computing power of desktop personal computers (PCs) to a portable environment.
This manual explains how to operate your Fujitsu LifeBook notebook’s hardware and built-in system software.
Your LifeBook notebook comes with Microsoft® Windows XP Home, Windows XP Professional, or Windows 2000 pre-installed.
The Fujitsu LifeBook notebook is a completely selfcontained unit with an active-matrix (TFT) color LCD display. It has a powerful interface that enables it to support a variety of optional features.
Conventions Used in the Guide
Keyboard keys appear in brackets.
Example: [Fn], [F1], [ESC], [ENTER] and [CTRL].
Pages with additional information about a specific topic are cross-referenced within the text.
Example: (See page xx.)
On screen buttons or menu items appear in bold Example: Click OK to restart your notebook computer.
DOS commands you enter appear in Courier type. Example: Shut down the computer?
P O I N T
The point icon highlights information that will enhance your understanding of the subject material.
 C A U T I O N
The caution icon highlights information that is important to the safe operation of your computer, or to the integrity of your files. Please read all caution information carefully.
 W A R N I N G
The warning icon highlights information that can be hazardous to either you, your LifeBook notebook, or your files. Please read all warning information carefully.
P r e f a c e
FUJITSU CONTACT INFORMATION
Service and Support
You can contact Fujitsu Service and Support in the following ways:
■Toll free: 1-800-8Fujitsu (1-800-838-5487)
■Fax: 1-901-259-5700
■E-mail: 8fujitsu@fujitsupc.com
■Web site: http://www.fujitsupc.com
Before you place the call, you should have the following information ready so that the customer support representative can provide you with the fastest possible solution:
■Product name
■Product configuration number
■Product serial number
■Purchase date
■Conditions under which the problem occurred
■Any error messages that have occurred
■Hardware configuration
■Type of device connected, if any
Fujitsu Online
You can go directly to the online Fujitsu product catalog for your LifeBook notebook by clicking on the LifeBook Accessories web site URL link, located in the Windows Start menu.
You can also reach Fujitsu Service and Support on-line by clicking on the Fujitsu Service and Support web site URL link, located in the Service and Support Software folder of the Windows Start menu.
P O I N T
You must have an active internet connection to use the online URL links.
WARRANTY
Your LifeBook notebook is backed by a one year International Limited Warranty. Check the service kit that came with your LifeBook notebook for warranty terms and conditions.
3

B5FH-5971.book Page 4 Thursday, May 23, 2002 4:13 PM
L i f e B o o k C S e r i e s N o t e b o o k – S e c t i o n O n e
4
B5FH-5971.book Page 5 Thursday, May 23, 2002 4:13 PM
2
Getting to Know Your Computer
5
B5FH-5971.book Page 6 Thursday, May 23, 2002 4:13 PM
L i f e B o o k C S e r i e s N o t e b o o k – S e c t i o n T w o
6
B5FH-5971.book Page 7 Thursday, May 23, 2002 4:13 PM
O v e r v i e w
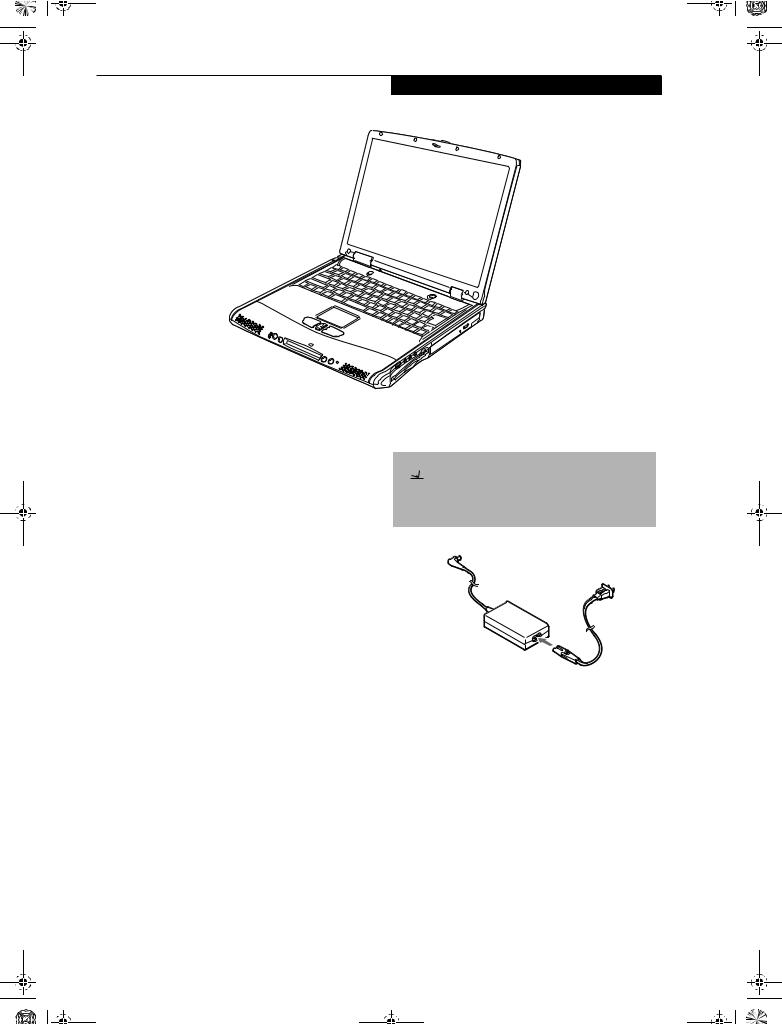
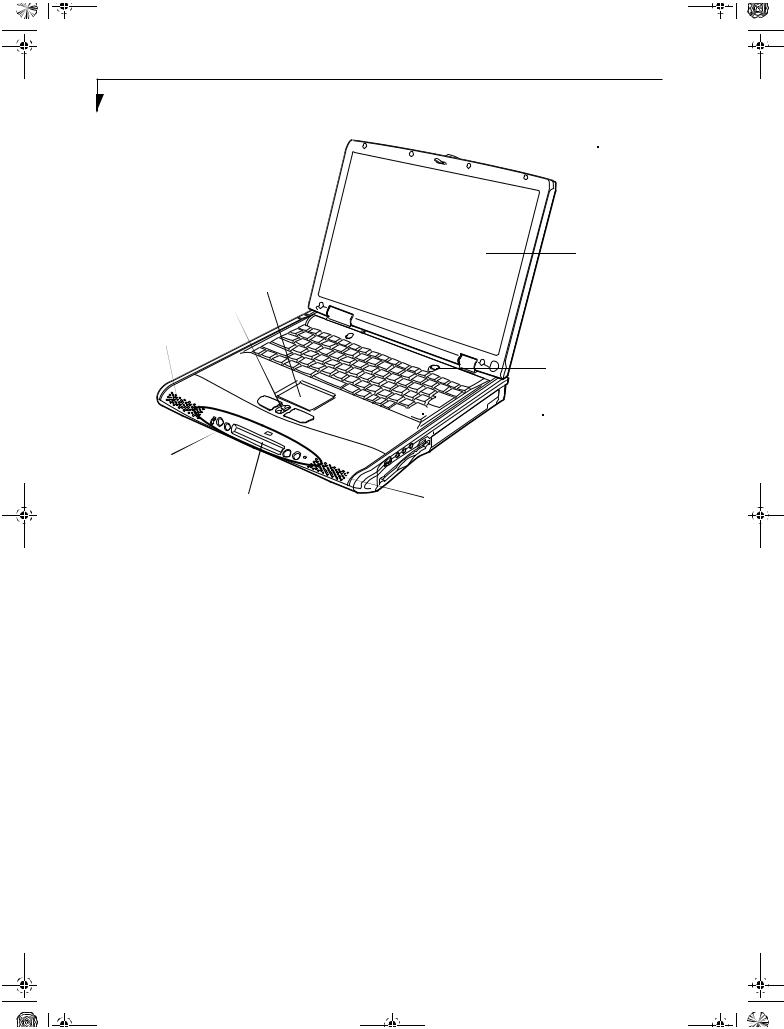
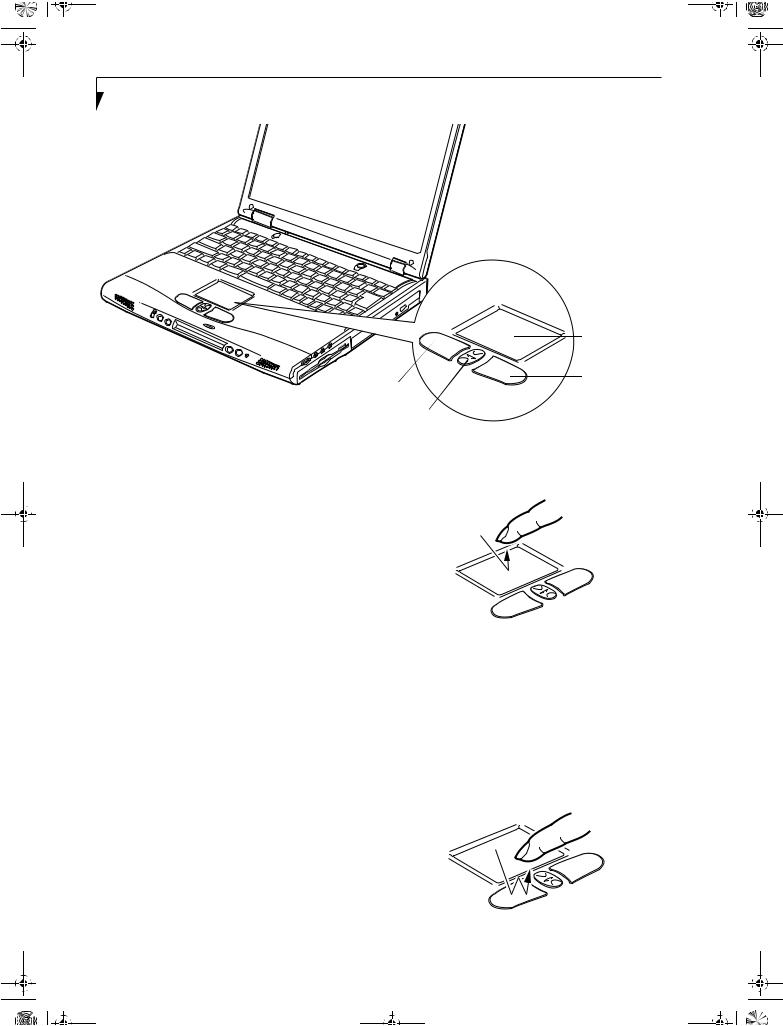
Figure 2-1 Fujitsu LifeBook C Series notebook (15” model shown)
Overview
This section describes the components of your Fujitsu LifeBook notebook. We strongly recommend that you read it before using your notebook – even if you are already familiar with notebook computers.
UNPACKING
When you receive your LifeBook notebook, unpack it carefully, and compare the parts you have received with the items listed below.
For a Pre-configured model you should have:
■LifeBook C Series notebook from Fujitsu (Figure 2-1)
■Lithium ion battery, pre-installed
■AC adapter with AC power cord (Figure 2-2)
■Phone/Modem (RJ-11) telephone cable
■Drivers and Applications CD
■Fujitsu Service Assistant CD
■Getting Started Guide
■User’s Guide (this document)
■Premium Care registration card and envelope
■International Limited Warranty Brochure
■Microsoft-associated product materials
Depending upon the configuration of your notebook, you may have also received the following items:
■DVD Application CD
■CD-RW Application CD
■An additional main battery
Once you have checked and confirmed that your LifeBook notebook system is complete, read through the following pages to learn about all of your notebook’s components.
 P O I N T
Detailed specifications about your LifeBook notebook can be found in the chapter entitled “Specifications” on page 91.
Figure 2-2 Typical AC Adapter
7
B5FH-5971.book Page 8 Thursday, May 23, 2002 4:13 PM
L i f e B o o k C S e r i e s N o t e b o o k – S e c t i o n T w o
Display
Panel
Latch
Display Panel
Touchpad
Scroll Button
Stereo Speaker
Suspend/Resume/
Power On Button


 Keyboard
LifeBook
Application
Panel
Status LCD Panel |
Stereo Speaker |
Figure 2-3 LifeBook notebook with display open (15” model shown)
Locating the Controls
and Connectors
TOP AND FRONT COMPONENTS
The following is a brief description of your LifeBook notebook’s top and front components. (Figure 2-3)
Display Panel Latch
The display panel latch locks and releases the display panel.
Display Panel
The display panel is a color LCD panel with back lighting for the display of text and graphics. (See Display Panel on page 26 for more information.)
LifeBook Application Panel
The LifeBook Application Panel allows you to either launch your favorite applications by the touch of a button or to use as a media player when your unit is on.
(See LifeBook Application Panel on page 20 for more information.)
Status LCD Panel
The Status LCD Panel displays symbols that correspond with a specific component of your LifeBook notebook.
(See Status Indicator Panel on page 13 for more information.)
Suspend/Resume/Power On Button
The Suspend/Resume/Power On button allows you to suspend notebook activity without powering off, resume your notebook from suspend mode, and power on your notebook when it has been shut down from Windows.
(See Suspend/Resume/Power On Button on page 30 for more information.)
Stereo Speakers
The built-in boxless dual speakers allow for stereo sound.
Keyboard
A full-size keyboard with dedicated Windows keys.
(See Keyboard on page 15 for more information.)
Touchpad Pointing Device
The Touchpad pointing device is a mouse-like cursor control with three buttons (left, right, and scroll buttons). (See Touchpad Pointing Device on page 18 for more information.)
8
B5FH-5971.book Page 9 Thursday, May 23, 2002 4:13 PM
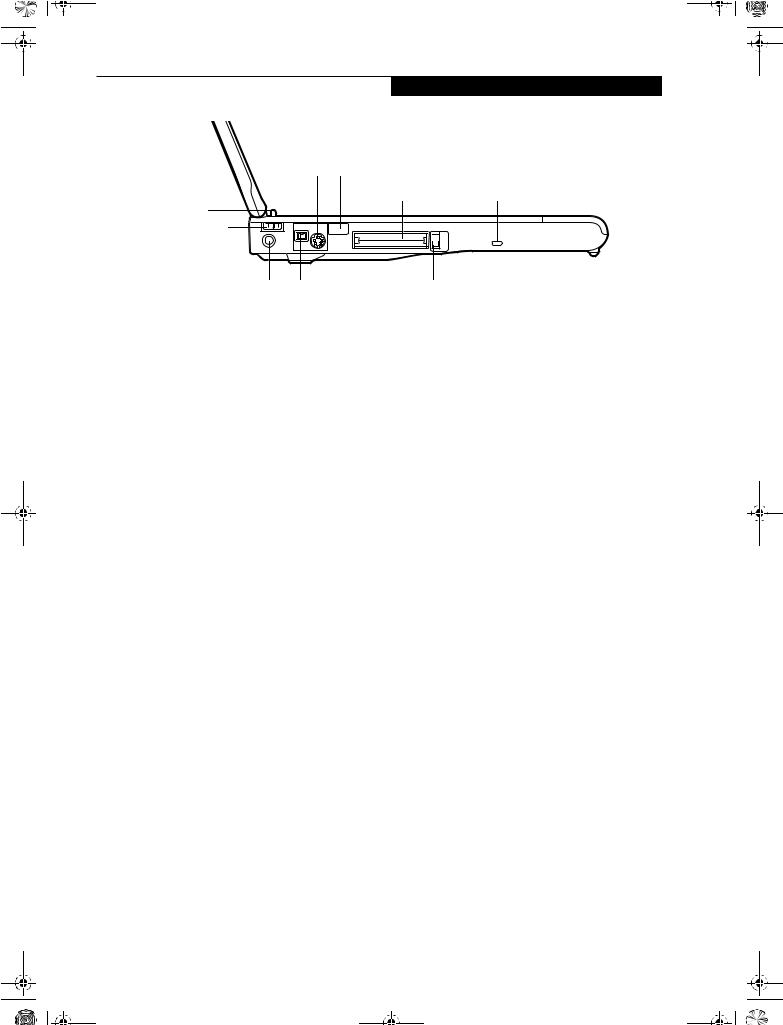
L o c a t i n g t h e C o n t r o l s a n d C o n n e c t o r s
S-Video |
Infrared |
|
Out Port |
Port |
|
Closed Cover |
PC Card Slots |
Anti-Theft Lock Slot |
|
|
|
Switch |
|
|
Power Switch |
|
|
DC Power Jack IEEE 1394 |
PC Card Eject Buttons |
|
(4-pin) Port
Figure 2-4 LifeBook notebook left-side panel
LEFT-SIDE PANEL COMPONENTS
The following is a brief description of your LifeBook notebook’s left-side components. (Figure 2-4)
Closed Cover Switch
The closed cover switch turns off the LCD back lighting when the display is closed.
Power Switch
The power switch turns system power on and off.
DC Power Jack
The DC power jack allows you to plug in the AC adapter or the optional Auto/Airline adapter to power your LifeBook notebook and charge the internal Lithium ion battery.
IEEE 1394 (4-pin) Port
The 1394 port is used to connect between your LifeBook notebook and a peripheral such as a digital video
camera.(See IEEE 1394 Port on page 48 for more information.)
S-Video Out Port
The S-Video output is used to transmit a higher resolution video signal to a compatible TV or VCR.(See S-Video Out Port on page 49 for more information.)
Infrared Port
The fast IrDA-compatible port allows you to communicate with another IrDA-compatible infrared device without a cable.
PC Card Slots
The PC Card Slots allow you to install two Type I/II PC Cards or one Type III PC Card. (See PC Cards on page 43 for more information.)
Anti-theft Lock Slot
The anti-theft lock slot allows you to attach an optional physical lock-down device.
9
B5FH-5971.book Page 10 Thursday, May 23, 2002 4:13 PM
L i f e B o o k C S e r i e s N o t e b o o k – S e c t i o n T w o
Headphone Jack
|
|
|
|
|
Stereo Line-in/Optical Digital Audio-Out Jack |
||||||||
|
|
|
|
|
|||||||||
|
|
|
|
|
|
Microphone Jack |
|||||||
Volume Control |
|
|
|
|
|
Media Player Eject Button |
|||||||
|
|
|
|
|
|||||||||
|
|
|
|
|
|
|
|
|
|
|
|
|
|
|
|
|
|
|
|
|
|
|
|
|
|
|
|
|
|
|
|
|
|
|
|
|
|
|
|
|
|
|
|
|
|
|
|
|
|
|
|
|
|
|
|
|
|
|
|
|
|
|
|
|
|
|
|
|
|
|
|
|
|
|
|
|
|
|
|
|
|
|
|
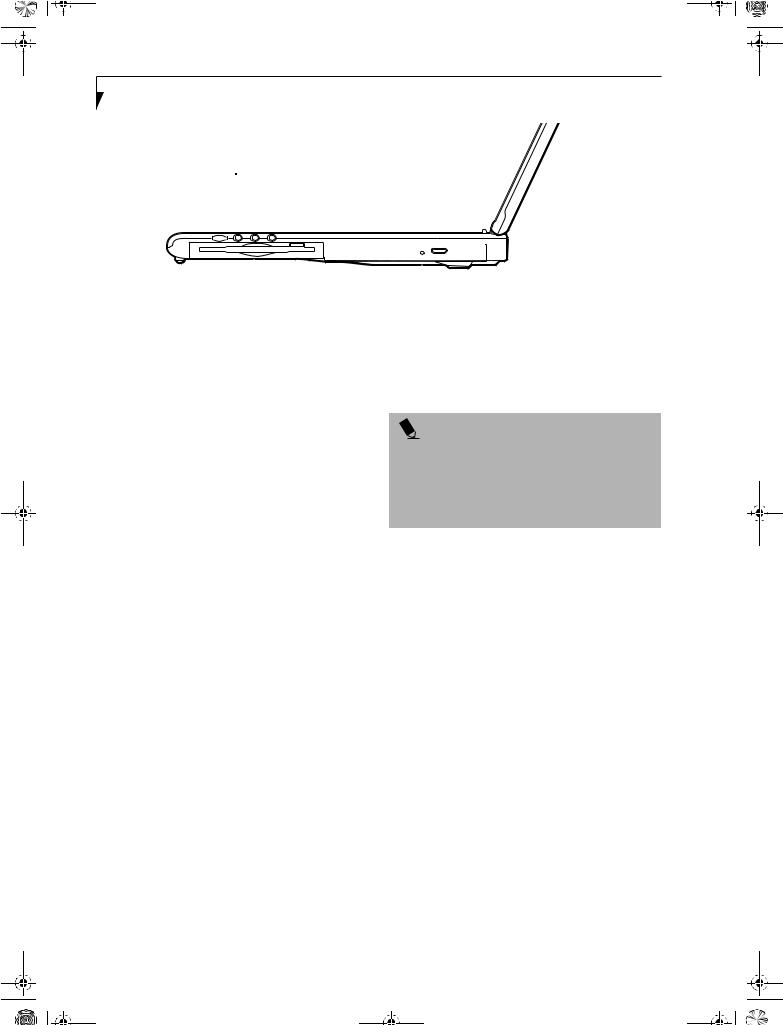
Internal Floppy Disk Drive |
Media Player Emergency Media Player Tray Release |
Figure 2-5 LifeBook notebook right-side panel
RIGHT-SIDE PANEL COMPONENTS
The following is a brief description of your LifeBook notebook’s right-side components. (Figure 2-5)
Volume Control
The volume control provides manual control of the sound level of all audio output. (See Volume Control on page 17 for more information.)
Headphone Jack
The headphone jack allows you to connect headphones or powered external speakers. (See Headphone Jack on page 49 for more information.)
Stereo Line-in Jack
The stereo line-in jack allows you to connect an external audio source. (See Stereo Line-In Jack on page 49 for more information.)
Optical Digital Audio-Out Jack
The optical digital audio-out jack allows you to download digital audio onto a MiniDisc recorder’s SPDIF (Sony Philips Digital Interface) format. (See Optical Digital Audio-Out Connector on page 49 for more information.)
Microphone Jack
The microphone jack allows you to connect an external mono microphone. (See Microphone Jack on page 48 for more information.)
Internal Floppy Disk Drive
A standard floppy disk drive to accommodate 3.5” floppy disks. ((See Internal Floppy Disk Drive on page 37 for more information.)
P O I N T S
■The media player that your LifeBook notebook uses is determined by the configuration of your system.
■The terms “media” and “media disc” in this document refer to any of the possible media drives or media discs available for your notebook (i.e., DVD, CD-ROM, CD-R, or CD-RW).
Media Player
The media player allows you to play back a media disc.
(See Media Player Drive on page 38 for more information.)
Media Player Eject Button
The media player Eject Button allows you to open the media player tray to remove or install a DVD, CD-R, or CD-ROM. (See Media Player Drive on page 38 for more information.)
Emergency Media Player Tray Release
The Emergency Media Player Tray Release allows you to open the media player tray without powering on your LifeBook notebook.
10
B5FH-5971.book Page 11 Thursday, May 23, 2002 4:13 PM
L o c a t i n g t h e C o n t r o l s a n d C o n n e c t o r s
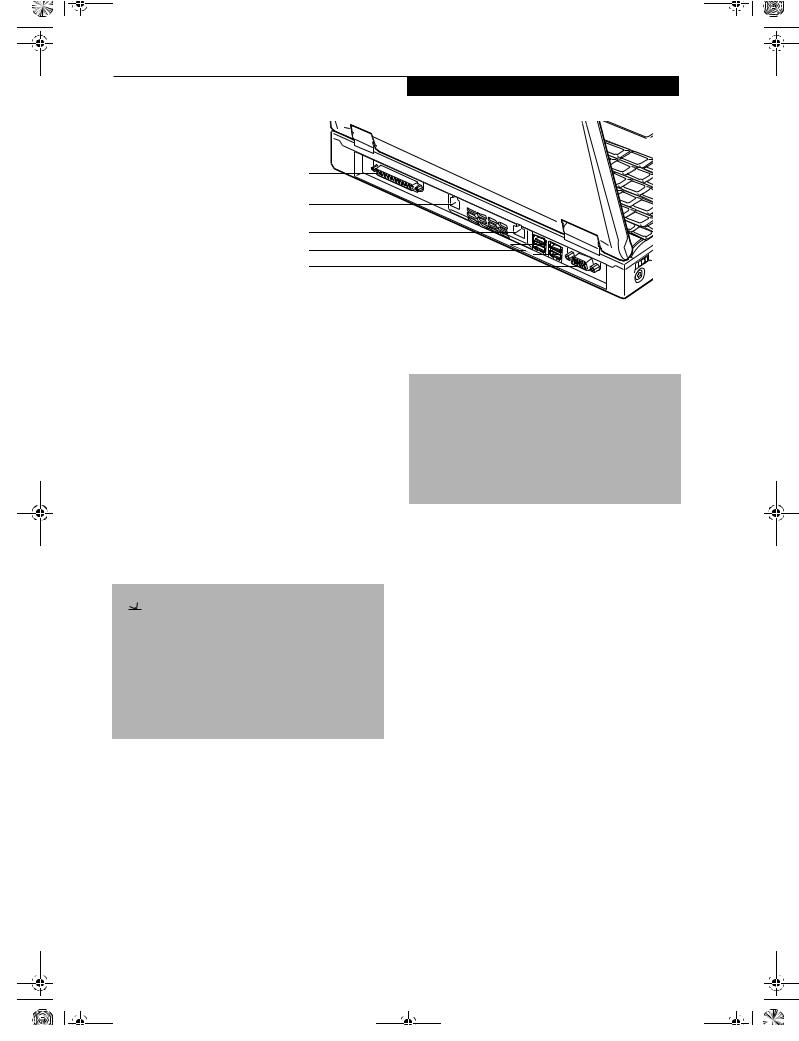
Parallel Port
Modem Jack (RJ-11)
LAN Jack (RJ-45)
USB Ports (Qty. 4)
External Monitor Port
Figure 2-6 LifeBook notebook back panel
BACK PANEL COMPONENTS
The following is a brief description of your LifeBook notebook’s back panel components. (Figure 2-6)
Parallel Port
The parallel port allows you to connect parallel devices, such as a printer. (This is also sometimes referred to as an LPT port.) (See Parallel Port on page 48 for more information.)
Modem (RJ-11) Telephone Jack
The Modem (RJ-11) telephone jack is for attaching a telephone line to the internal 56K modem. (See Modem (RJ11) Telephone Jack on page 48 for more information.)
 P O I N T S
■The internal modem is designed to the ITU-T V.90 standard. Its maximum speed of 53000bps is the highest allowed by FCC, and its actual connection rate depends on the line conditions. The maximum speed is 33600bps at upload.
■The internal modems on all Fujitsu LifeBook notebooks from are certified for use in the United States and Canada. The modem may be certified in other countries.
 W A R N I N G
The internal modem is not intended for use with Digital PBX systems. Do not connect the internal modem to a Digital PBX as it may cause serious damage to the internal modem or your entire LifeBook notebook. Consult your PBX manufacturer’s documentation for details. Some hotels have Digital PBX systems. Be sure to find out BEFORE you connect your modem.
LAN Jack (RJ-45)
The LAN jack is designed to accept a Local Area Network (LAN) RJ-45 plug. (See Internal LAN (RJ-45) Jack on page 48 for more information.)
USB Ports
The four USB ports allow you to connect Universal Serial Bus devices. (See Universal Serial Bus Port on page 48 for more information.)
External Monitor Port
The external monitor port allows you to connect an external monitor. (See External Monitor Port on page 49 for more information.)
11

B5FH-5971.book Page 12 Thursday, May 23, 2002 4:13 PM
L i f e B o o k C S e r i e s N o t e b o o k – S e c t i o n T w o
Lithium ion
Battery Bay
Main Unit and
Configuration
Label
Certificate of Authenticity Label (approximate location)
Figure 2-7 LifeBook notebook bottom panel
BOTTOM COMPONENTS
The following is a brief description of your LifeBook notebook’s bottom panel components. (Figure 2-7)
Main Unit and Configuration Label
The configuration label shows the model number and other information about your LifeBook notebook. In addition, the configuration portion of the label has the serial number and manufacturer information that you will need to give your support representative. It identifies the exact version of various components of your LifeBook notebook. (See Configuration Label on page 91 for more information.)
Lithium ion Battery Bay
The battery bay contains the internal Lithium ion battery. It can be opened for the removal of the battery when stored over a long period of time or for swapping a discharged battery with a charged Lithium ion battery.
(See Lithium ion Battery on page 35 for more information.)
12
B5FH-5971.book Page 13 Thursday, May 23, 2002 4:13 PM
S t a t u s I n d i c a t o r P a n e l
Battery
Charging
Power
|
|
|
|
|
|
|
|
|
|
|
|
|
|
|
|
|
|
|
|
|
|
|
|
|
|
|
|
|
|
|
|
|
|
|
|
|
|
|
|
|
|
|
|
|
|
|
|
|
|
|
|
|
|
|
|
|
|
|
|
|
|
|
AC Adapter |
|
|
Battery |
|
Hard Drive |
|
Floppy |
PC Card |
NumLk |
ScrLk |
||||||||||
|
|
|
|
|
|
Identifier |
|
Access |
|
Drive |
Access |
|
|
|
|
|||||
|
|
|
|
|
|
|
|
|
|
|
|
|
|
|
|
CapsLk |
||||
|
|
|
|
|
|
|
|
|
|
|
|
|
Access |
|
|
|
||||
|
|
|
|
|
|
|
|
|
|
|
|
|
|
|
|
|
|
|
||
|
|
|
|
|
|
|
|
|
|
|
|
|
|
|
|
|
|
|
||
|
|
|
|
|
|
|
|
Battery |
|
Media Player |
|
|
|
|
|
|
||||
|
|
|
|
|
|
|
|
Level |
|
Access |
|
|
|
|
|
|
|
|
||
|
|
|
|
|
|
|
|
|
|
|
|
|
|
|
|
|
|
|
||
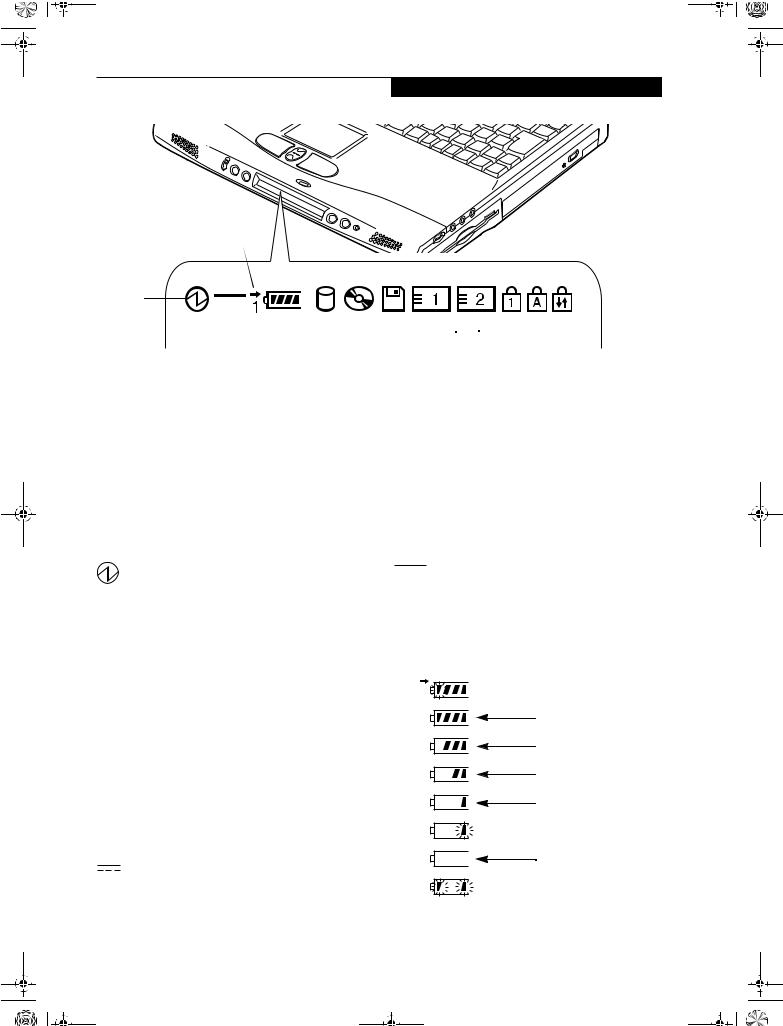
Figure 2-8 Status Indicator Panel
Status Indicator Panel
The Status Indicator displays symbols that correspond with a specific component of your Fujitsu LifeBook notebook. These symbols (when visible) tell you how each of those components is operating. (Figure 2-8)
POWER INDICATOR
The Power indicator symbol states whether your system is operational. It has several different states, each of which tells you what mode your LifeBook notebook is in at that time.
■Steady On: This means that there is power to your LifeBook notebook and that it is ready for use.
■Flashing: This means that your LifeBook notebook is in Suspend mode.
■Steady Off (not visible): This means that your system is either in Save-to-Disk mode, or that your LifeBook notebook has been turned off with the power switch.
If you are charging your battery, the Power indicator symbol will remain on even if your LifeBook notebook is shut off. The Power indicator symbol will also remain on if you have either adapter connected and are shut down from Windows, but have not turned off the power switch.
AC ADAPTER INDICATOR
The AC Adapter indicator states whether your LifeBook notebook is operating from the AC adapter, the Auto/ Airline adapter or the batteries. This icon has two
different states that can tell you what power source your LifeBook notebook is using.
■On: This means that either of the adapters are currently in use.
■Off: Power is only coming from the batteries, and you do not have an adapter connected.


 BATTERY LEVEL INDICATOR
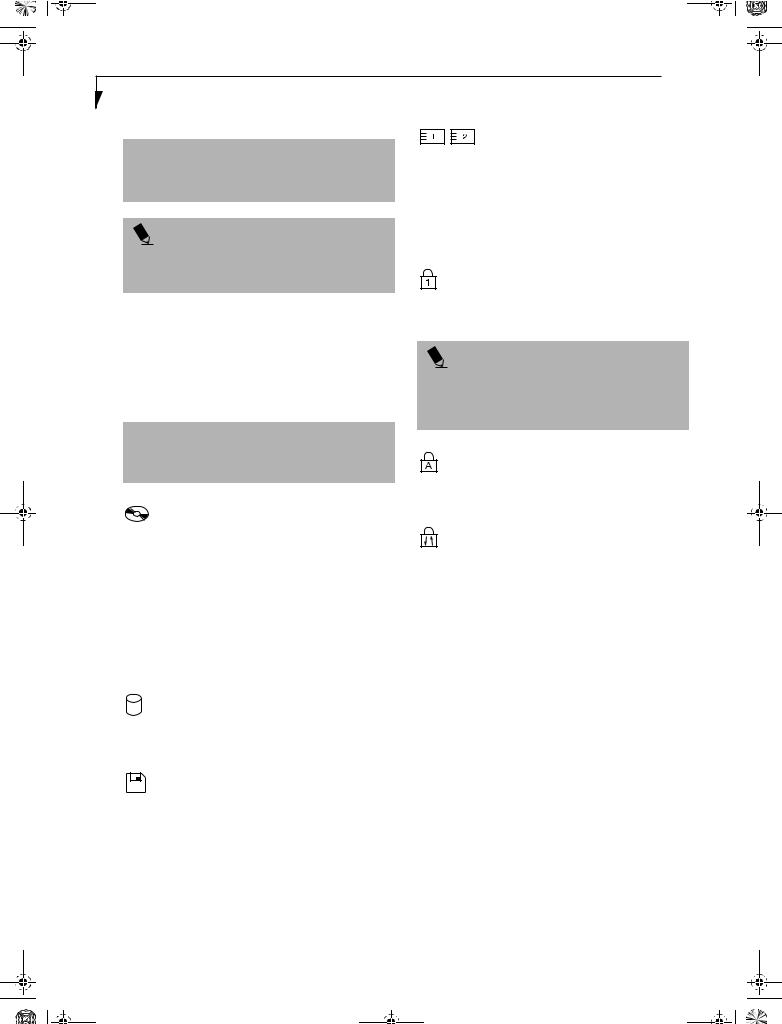
The Battery Level indicator states whether or not the primary Lithium ion battery is installed. In addition, this symbol states how much charge is available within the battery. The symbol will only be displayed for a battery that is currently installed in your LifeBook notebook. (Figure 2-9)
 76%–100% Charging
76%–100%
51%–75%
26%–50%
11%–25%
 Low Warning <11%
Critical Low or
Dead Battery
 Shorted Battery
Figure 2-9 Battery Level Indicator
13
B5FH-5971.book Page 14 Thursday, May 23, 2002 4:13 PM
L i f e B o o k C S e r i e s N o t e b o o k – S e c t i o n T w o
 C A U T I O N
A shorted battery is damaged and must be replaced.
(Figure 2-9)
P O I N T
If there is no battery activity, the power adapters are not connected, or the power switch is Off, the Battery Level indicator will also be off.
 BATTERY CHARGING INDICATOR
Located to the left of the Battery Level indicator is a small arrow symbol. This symbol indicates whether the battery is charging or not. This indicator operates whether the power switch is in the On or Off position, and will flash if the battery is too hot or cold to charge.
 C A U T I O N
Batteries subjected to shocks, vibration or extreme temperatures can be permanently damaged.
MEDIA PLAYER ACCESS INDICATOR
The media player Access indicator tells you that the media player drive is being accessed. If the Auto Insert Notification function is active, the indicator will flash periodically when your system is checking the media player drive. If the Auto Insert Notification function is not active, the indicator will only flash when you access the media player drive. The default setting is the Auto Insert Notification function active.
(See Auto Insert Notification Function on page 41 for more information)
HARD DRIVE ACCESS INDICATOR
The Hard Drive Access indicator states whether your internal hard drive is being accessed.
PC CARD ACCESS INDICATORS
The PC Card Access indicators state whether or not your LifeBook notebook is accessing a PC Card. The indicators will flash if your software tries to access a PC Card even if there is no card installed. The first indicator represents the built-in PC card slot; the second indicates when a modular PC Card slot is installed. (See PC Cards on page 43 for more information)
NUMLK INDICATOR
The NumLk indicator states that the internal keyboard is set in ten-key numeric keypad mode.
P O I N T
If you are using the optional external numerical keypad, pressing the [NumLk] key will activate the external keypad. The indicator will come on, however it will not change any of the functionality of your keyboard keys.
CAPSLOCK INDICATOR
The CapsLock indicator states that your keyboard is set to type in all capital letters.
SCRLK INDICATOR
The ScrLk indicator states that your scroll lock is active.
FLOPPY DRIVE ACCESS INDICATOR
The Floppy Drive Access indicator states whether the internal floppy disk drive is being accessed. This indicator will flash if your software tries to access a disk even if no floppy disk drive is installed. (See Internal Floppy Disk Drive on page 37 for more information)
14

B5FH-5971.book Page 15 Thursday, May 23, 2002 4:13 PM
K e y b o a r d
Function Keys
X
Fn Key |
Start Key |
Numeric Keypad |
Start Key |
Application Key |
Cursor Keys |
Figure 2-10 Keyboard
Keyboard
USING THE KEYBOARD
Your Fujitsu LifeBook notebook has an integral 87-key keyboard. The keys perform all the standard functions of a 101-key keyboard, including the Windows keys and other special function keys. This section describes the following keys.
■Numeric keypad
■Cursor keys
■Function keys
■Windows keys
NUMERIC KEYPAD
Certain keys on the keyboard perform dual functions as both standard character keys and numeric keypad keys. NumLk can be activated by pressing the [NumLk] keys. Turning off the NumLk feature is done the same way.
Once this feature is activated you can enter numerals 0 through 9, perform addition ( + ), subtraction ( - ), multiplication ( * ), or division ( / ), and enter decimal points ( . ) using the keys designated as ten-key function keys. The keys in the numeric keypad are marked on the front edge of the key to indicate their secondary functions.
P O I N T
If you are using the optional external numerical keypad, pressing the [NumLk] key will activate the external keypad. The indicator will come on, however it will not change any of the functionality of your keyboard keys.
WINDOWS KEYS
Your LifeBook notebook has three Windows keys, consisting of two Start keys and an Application key. The two Start keys display the Start menu. This button functions the same as your on-screen Start menu button. The Application key functions the same as your right mouse button and displays shortcut menus for the selected item. (Please refer to your Windows documentation for additional information regarding the Windows keys.)
CURSOR KEYS
The cursor keys are the four arrow keys on the keyboard which allow you to move the cursor up, down, left and right in applications. In programs such as Windows Explorer, it moves the “focus” (selects the next item up, down, left, or right).
15
B5FH-5971.book Page 16 Thursday, May 23, 2002 4:13 PM
L i f e B o o k C S e r i e s N o t e b o o k – S e c t i o n T w o
FUNCTION KEYS
Your LifeBook notebook has 12 function keys, F1 through F12. The functions assigned to these keys differ for each application. You should refer to your software documentation to find out how these keys are used.
The [Fn] key provides extended functions for the LifeBook notebook and is always used in conjunction with another key.
■[Fn+F3]: Pressing [F3] while holding [Fn] will toggle the Audio Mute on and off.
■[Fn+F4]: Pressing [F4] while holding down [Fn] allows you to toggle between an internal mouse (touchpad) and an external mouse (PS/2-type).
■[Fn+F5]: Pressing [F5] while holding [Fn] allows you to toggle between video compensation and no compensation. (Video compensation controls spacing on the display. When it is enabled, displays with less than 1024 x 768 or 800 x 600 pixel resolution will still cover the entire screen.)
■[Fn+F6]: Pressing [F6] repeatedly while holding [Fn] will lower the brightness of your display.
■[Fn+F7]: Pressing [F7] repeatedly while holding [Fn] will increase the brightness of the display.
■[Fn+F10]: Pressing [F10] while holding [Fn] allows you to change your selection of where to send your display video. Each time you press the combination of keys you will step to the next choice. The choices, in order, are: built-in display panel only, both built-in display panel and external monitor or external monitor only.
16
B5FH-5971.book Page 17 Thursday, May 23, 2002 4:13 PM
V o l u m e C o n t r o l
Volume Control
Your Fujitsu LifeBook notebook has multiple volume controls which interact with each other.
 P O I N T
Any software that contains audio files will also contain a volume control of its own. Both the main LifeBook notebook volume control and the software volume control will interact with each other, but it should be noted that if you set your software volume to Off, you will override the main volume control setting and the software setting will control the maximum knob setting.
CONTROLLING THE VOLUME
There is the hardware volume control located on the LifeBook notebook itself, and the volume control set from within the Volume Control on the Taskbar. In addition to those, there are also application volume controls that are set individually within each program.
Each source discussed above puts an upper limit on the volume level that must then be followed by the other sources. For example:
■Your hardware volume control is all the way down, therefore your individual software application’s volume control has no effect on the volume.
We recommend that you use the hardware volume controls to set the upper limit for the sound level and then make fine adjustments with the Volume Control on the Taskbar and individual application software.
SETTING THE HARDWARE
VOLUME CONTROL
1.Turn the volume control knob to the right (i.e., towards the back of your LifeBook) to increase the volume.
2.Turn the volume control knob to the left (i.e., towards the front of your LifeBook) to decrease the volume. (See figure 2-5 on page 10 for location)
17
B5FH-5971.book Page 18 Thursday, May 23, 2002 4:13 PM
L i f e B o o k C S e r i e s N o t e b o o k – S e c t i o n T w o
Touchpad
Right Button
Left Button
Scroll Button with i-Scroller
Figure 2-11 Touchpad pointing device
Touchpad Pointing Device
The Touchpad pointing device comes built into your Fujitsu LifeBook notebook. It is used to control the movement of the pointer to select items on your display panel. The Touchpad is composed of a cursor control, a left and right button, and a scrolling button. The cursor control works the same way a mouse does, and moves the cursor around the display. It only requires light pressure with the tip of your finger. The left and right buttons function the same as mouse buttons. The actual functionality of the buttons may vary depending on the application that is being used. The scrolling button allows you to navigate quickly through pages, without having to use the scroll bars. When you press the center of the scrolling button (the “i-scroller”), the LifeBook Application Panel is launched. (Figure 2-11)
CLICKING
Clicking means pushing and releasing a button. To left-click, move the cursor to the item you wish
to select, press the left button once, and then immediately release it. To right-click, move the mouse cursor to the item you wish to select, press the right button once, and then immediately release it. You also have the option to perform the clicking operation by tapping lightly on the Touchpad once. (Figure 2-12)
Figure 2-12 Clicking
DOUBLE-CLICKING
Double-clicking means pushing and releasing the left button twice in rapid succession. This procedure does not function with the right button. To double-click, move the cursor to the item you wish to select, press the left button twice, and then immediately release it. You also have the option to perform the double-click operation by tapping lightly on the Touchpad twice.
(Figure 2-13)
Figure 2-13 Double-clicking
18
B5FH-5971.book Page 19 Thursday, May 23, 2002 4:13 PM
P O I N T S
■If the interval between clicks is too long, the double-click will not be executed.
■Parameters for the Touchpad can be adjusted from the Mouse Properties dialog box located in the Windows Control Panel.
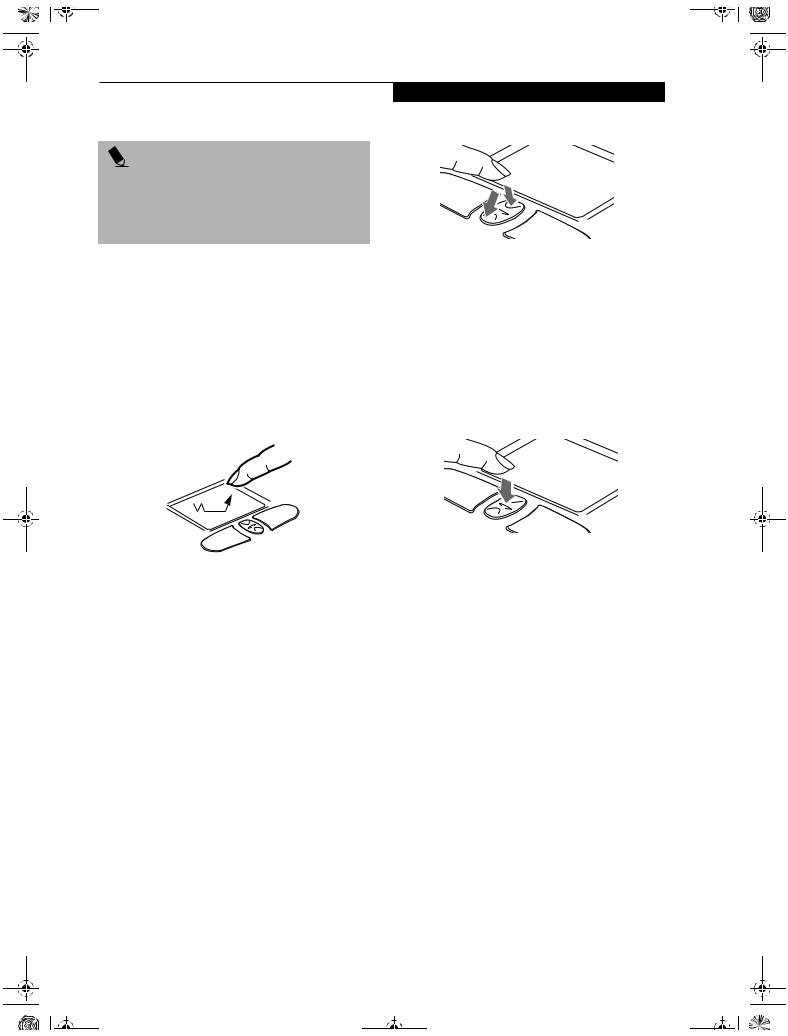
DRAGGING
Dragging means pressing and holding the left button, while moving the cursor. To drag, move the cursor to the item you wish to move. Press and hold the left button while moving the item to its new location and then release it. Dragging can also be done using the Touchpad. First, tap the Touchpad twice over the item you wish to move making sure to leave your finger on the pad after the final tap. Next, move the object to its new location by moving your finger across the Touchpad, and then release your finger. (Figure 2-14)
Figure 2-14 Dragging
SCROLLING
Using the Scrolling button allows you to navigate through a document quickly without using the window’s scroll bars. This is particularly useful when you are navigating through on-line pages. To use the Scrolling button, press the crescent shape at the top or bottom of the button to scroll up or down a page. When you have reached the desired section of the page, release the button. (Figure 2-15)
T o u c h p a d P o i n t i n g D e v i c e
Figure 2-15 Scrolling
i-SCROLLER
In addition to using the scroll button to scroll up and down the screen, you can also use it to launch your LifeBook Application Panel. To do so, press the scroll button directly in the middle (Figure 2-16). A hidden button called the “i-Scroller” is located directly beneath the scroll button. When you press the scroll button, the i-Scroller automatically launches your LifeBook Application Panel.
Figure 2-16 Using i-Scroller
TOUCHPAD CONTROL ADJUSTMENT
If you need to change or adjust any of the touchpad control functions, you can customize them from the Mouse properties dialog box in the Control Panel. Click on Start, select Settings > Control Panel, then doubleclick Mouse.
19
B5FH-5971.book Page 20 Thursday, May 23, 2002 4:13 PM
L i f e B o o k C S e r i e s N o t e b o o k – S e c t i o n T w o
Selector Switch
Application Launcher Buttons
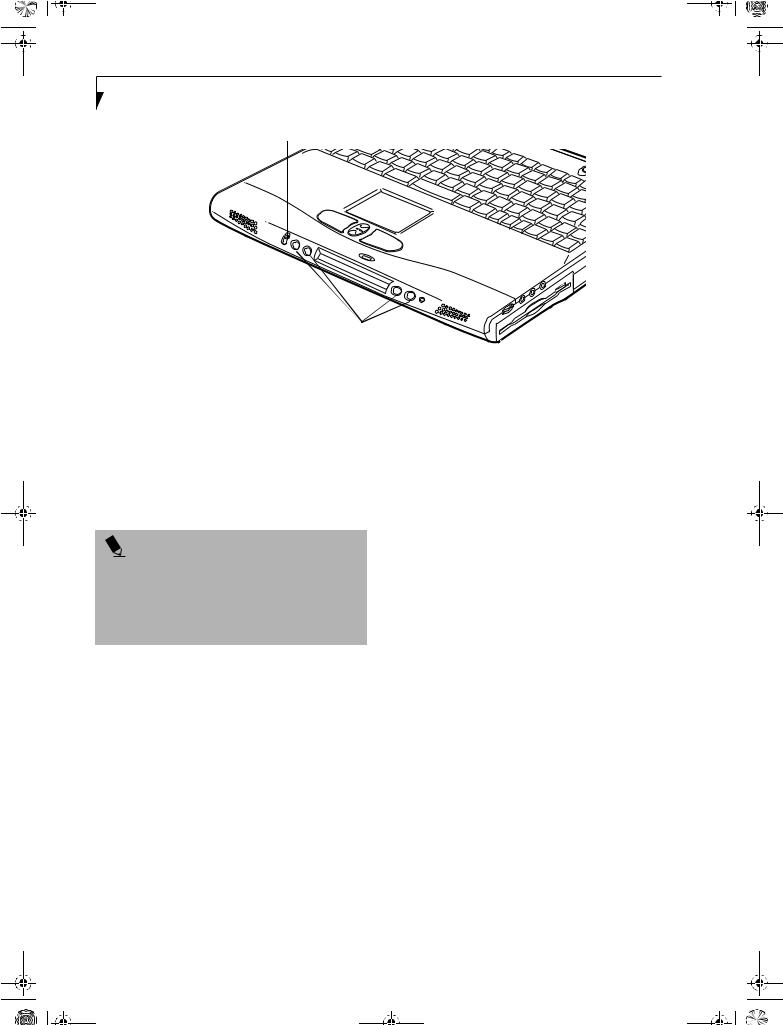
Figure 2-17 LifeBook Application Launcher Buttons
LifeBook
Application Panel
A unique feature of your Fujitsu LifeBook notebook is the LifeBook Application Panel. This panel allows you to operate the media player drive either as an independent audio media player or to launch applications with the touch of one button.
P O I N T S
■LifeBook Application Panel uses the date and time settings of your LifeBook notebook. If the date and time are incorrect, you can adjust this setting in the Windows Control Panel.
■The media player that your LifeBook notebook uses is determined by the configuration of your system.
Your LifeBook notebook is pre-installed with software utilities that let you operate and configure your LifeBook Application Panel. These utilities are found under the Start menu, under Programs, then under LifeBook Application Panel. They include a media player, Application Panel Setup, Application Panel Guide, Activate Panel and Deactivate Panel. The LifeBook Application Panel system makes your LifeBook notebook more than just another notebook computer.
The panel consists of the following elements:
SELECTOR SWITCH
Located at the far left of the panel, this switch allows you to select the function of the panel—either as an Application Launcher, a media player, or as a lock. Set the switch to the middle position when the Application Launcher buttons are not being used.
APPLICATION LAUNCH
MEDIA PLAYER BUTTONS
When the selector switch is in the Application position, pressing any of the buttons will launch a user-defined application. When the selector switch is in the Media Player position, the buttons operate the media player, and when the selector switch is in the Lock position, the buttons are disabled and do nothing when pressed.
CONFIGURING YOUR LIFEBOOK APPLICATION PANEL
When you start your system, the LifeBook Application Panel is automatically activated. An icon resembling a finger pressing a button will appear on the system tray (the indented portion of the status bar where the clock is displayed). When you see this icon you will know that the LifeBook Application Panel is active.
As an application launcher, the LifeBook Application Panel is very flexible, giving you a variety of options. To set up the Panel to best suit your needs, we have provided the Application Panel Setup utility that quickly and easily helps you make the most of this valuable feature.
To configure your LifeBook Application Panel with Application Panel Setup:
1.Click on Start.
2.Click on Programs.
3.Click on LifeBook Application Panel.
4.Click on Application Panel Setup.
The Application Panel Setup utility will appear. There are tabs that correspond to the application buttons on the LifeBook Application Panel. When you receive your LifeBook notebook, these buttons are pre-configured to launch specific programs. (See Specifications on page 91 for more information).
20
B5FH-5971.book Page 21 Thursday, May 23, 2002 4:13 PM
P O I N T
The tabs in Application Panel Setup may not be in the same order as the buttons on your LifeBook notebook. Please select the tab you wish to change carefully.
To change an application associated with one of the buttons, click on the tab for the button you would like to reconfigure. Click on Browse from the Start Menu, scroll down the list of applications, click on the application you wish to launch with this button, and then click OK. The button will now launch the new application.
One of the buttons may be preconfigured to launch your default Internet browser. In order to reconfigure it to launch a different program, follow these easy steps:
1.Click on Other from the Internet browser box.
2.Click on Browse from Start Menu.
3.Scroll down the list of applications, and click on the application you wish to launch with this button.
4.Click OK.
The button will now launch the new application. If you want to return to launching your default Internet browser with this button, you need only click on “Default Internet Browser” from the Internet browser box. Be aware that you will erase the settings for the “other application”. If you wish to go back to launching the “other application” from this button, you will need to reconfigure it as described above.
At the bottom of each application setup page are two selectable options. The first will enable/disable the button when your LifeBook notebook is in Standby mode, and the second will enable/disable the button when your LifeBook notebook is in the pseudo-off state. You can enable/ disable either or both of these functions simply by clicking on the option.
P O I N T
If you choose to have the buttons work when the LifeBook notebook is in standby, they will function even if hit accidentally, and will turn on your LifeBook notebook even if you are not present or using your LifeBook notebook. This could deplete your battery, and you will need to recharge it before using the LifeBook notebook. As a precaution, move the selector switch to the Lock position when you are away from your LifeBook notebook.
L i f e B o o k A p p l i c a t i o n P a n e l
When you have finished with Application Panel Setup, click on OK, and the new settings will take effect. You can reconfigure your LifeBook Application Panel as often as you like.
USING THE MEDIA PLAYER
The media player enables you to use your LifeBook notebook’s media player drive as an audio media player.
P O I N T S
■If you shut down from Windows while the media player is playing an audio CD, it will stop.
■You cannot go into Suspend Mode or Hibernation (Save-to-Disk) Mode while the media player is playing a CD.
■The media player will only play when the system is powered on.
There is no configuration required for media player operation. The buttons are pre-configured to work like a normal media player. When the selector switch is in the bottom position, the buttons will operate as follows:
■Stop/Eject: This is the first button to the right of the Selector switch. If you press it once, it will stop an audio CD that is playing. If you press it twice, it will eject the audio CD.
■Play/Pause: This is the second button to the right of the Selector switch. Press this button to start playing an audio CD starting at Track 1. While the audio CD is playing, press it to pause. Press it again to continue.
 P O I N T S
■If you press the play button and nothing happens, you either have the Selector switch set to the Application or Lock position, there is no audio CD in the media player drive, you have a CD other than an audio CD in the drive, or system is not powered on.
■Because of the Windows CD auto-insertion function, audio CDs will start playing immediately after they are inserted if your LifeBook notebook is On. This will not happen if you are using the media player in Suspend or Pseudo-off modes.
■Fast Backward: This is the third button to the right of
the Selector switch. Press this button once to skip one track back.
■Fast Forward: This is the fourth button to the right of the Selector switch. Press this button once to skip forward one track.
21
B5FH-5971.book Page 22 Thursday, May 23, 2002 4:13 PM
L i f e B o o k C S e r i e s N o t e b o o k – S e c t i o n T w o
DESKTOP CONTROL PANEL
Your LifeBook notebook includes a desktop control panel for your notebook’s desktop that you can use at any time. You may use this panel to operate the media player when you have the Selector switch in the Application or Lock position.
To use the desktop control panel:
1.Click on Start.
2.Click on Programs.
3.Click on Lifebook Application Panel.
4.Click on Display CD Player.
The desktop control panel will appear in the upper right corner of your screen. To close the panel:
1. Click on the “x” button.
To minimize the panel:
2. Click on the “-” button.
You can select from four appearances for your desktop control panel. Simply double click on the track display area of the panel, and a menu will appear which will allow you to select from a pull down menu. On the same pop-up are two other options: “Always on top” and “Continuous Play”. If you click on “Always on top” the desktop controls will always be seen on your screen, no matter what other application you are running. If you click on “Continuous Play”, your media player will automatically start over at the beginning of the CD in the drive as soon as it finishes the last track.
You can move the desktop control panel to anywhere on your desktop. Drag it by clicking on the track number display, holding it down, and dragging the control panel. When you place it where you would like, release the mouse button.
P O I N T S
■If you have your display set to 256 colors, the basic display will appear no matter which one you select. You will need to set your display colors to more than 256 in order to select other display appearances.
■When you close the media player’s desktop control panel, it will stop the audio media player. Simply press the Play button if you would like to continue listening, and the media player will restart at track 1. The Selector switch must be in the media player position.
Deactivating and Activating the LifeBook Application Panel
To deactivate the LifeBook Application Panel, follow these easy steps:
1.Click on Start.
2.Click on Programs.
3.Click on LifeBook Application Panel.
4.Click on Deactivate Panel.
To reactivate, follow the same procedure, except for step 4. Click on Activate Panel instead.
P O I N T
Every time you start Windows, the LifeBook Application Panel is activated, even if you deactivated it before you shut down.
Application Panel Setup
■If you insert an audio CD which has both audio and data tracks into the media player drive, the media player may fail to play the first audio track.
■The Volume Up, Volume Down and Mute controls for the media player desktop control panel adjusts the volume of the CD audio line only. It does not adjust your LifeBook notebook’s master software volume control or the manual volume on the LifeBook notebook.
■The media player desktop control panel is designed to be displayed in High Color (16-bit) or in True Color (24-bit or more). If you have your LifeBook notebook’s display set for 256 colors or less Media Player will display in a “basic” mode.
22

B5FH-5971.book Page 23 Thursday, May 23, 2002 4:13 PM
3
Getting Started
23
B5FH-5971.book Page 24 Thursday, May 23, 2002 4:13 PM
 L i f e B o o k C S e r i e s N o t e b o o k – S e c t i o n T h r e e
24
 Loading...