


Fujitsu P-TE1130, HE4VS01E, P-TE1120, HE4VS01W, P-TE1100 User Manual
...English
USER’S MANUAL (1/2)
(Functions and connections)
WIDE PLASMA DISPLAY
P42VCA30W/P42VCA30E
WITH OPTIONAL VIDEOBOARD (P-TE1100/P-TE1110/P-TE1120/P-TE1130)
HE4VS01W/HE4VS01E
WITH OPTIONAL VIDEOBOARD (HETES01/HETES02)
Contents
Page
•Accessories ······················································ E-2
•Part Names and Functions ······················· E-3–E-6
•Installation ······················································· E-7
•Options ······················································ E-8–E-9
•Factory Settings ············································ E-10
•Specification ···················································E-11
Before Use
•Safety Precautions ··············· User’s manual (2/2)
Usage
•Using the Remote Control ··· User’s manual (2/2)
•Connecting the Display to External
Equipment ···························· User’s manual (2/2)
•Basic Operations ·················· User’s manual (2/2)
• |
Selecting Input Mode ··········· User’s manual (2/2) |
• |
Watching Pictures on the Wide Screen |
|
··············································· User’s manual (2/2) |
Adjustments
•Adjusting Pictures (PICTURE Menu)
··············································· User’s manual (2/2)
•Adjusting Screen Position and Size (POSITION/SIZE Menu) ········ User’s manual (2/2)
•Adjusting Audio (AUDIO Menu)
··············································· User’s manual (2/2)
•Other Adjustments
(FEATURES Menu) ··············· User’s manual (2/2)
•Initialization of User Adjustment Value (FACTORY DEFAULT) ··········· User’s manual (2/2)
•Cleaning and Maintenance ··· User’s manual (2/2)
Before using the display, read the User’s manual (1/2) and the User’s manual (2/2) carefully so that you know how to use the display correctly.
Refer to these manuals whenever questions or problems about operation arise. Be sure to read and observe the safety precautions.
Keep these manuals where the user can access them readily.
* Installation and removal require special expertise. Consult your product dealer for details.
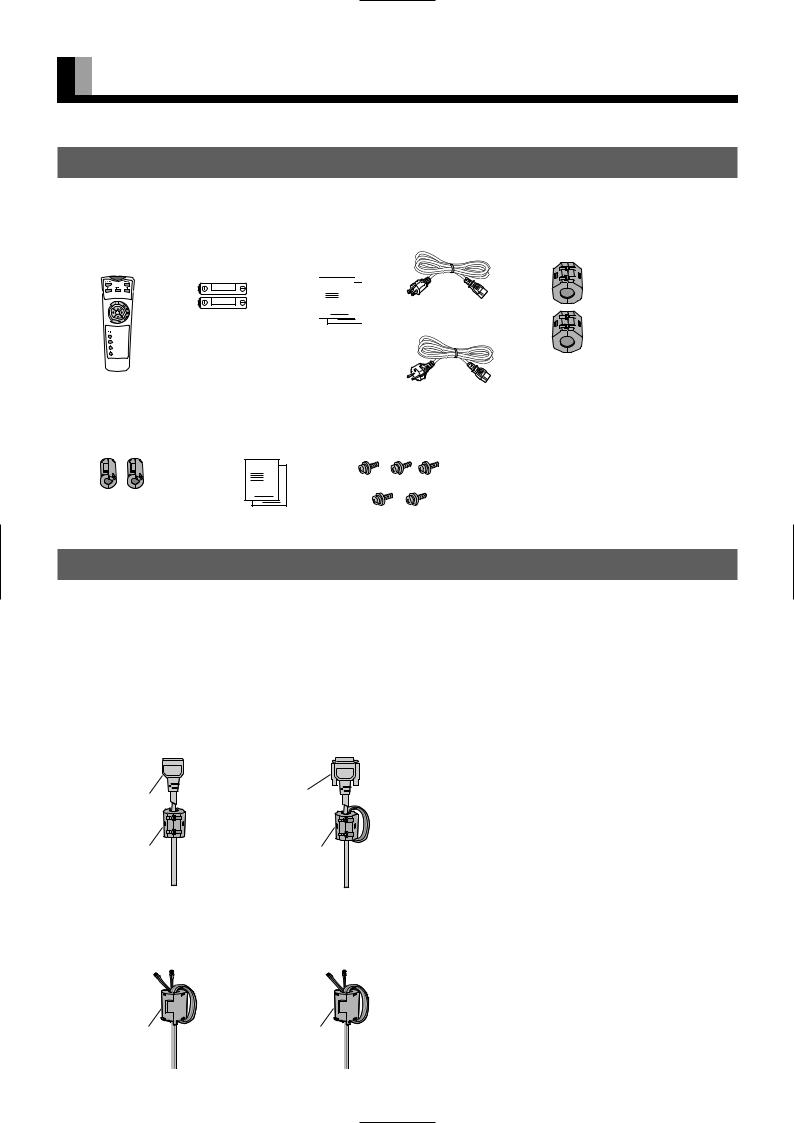
ACCESSORIES
CHECKING ACCESSORIES
• Display
One remote control Two AA batteries Two user’s manuals One power cable Two big ferrite cores


(W Type)
(E Type)
• Video board
Two small ferrite cores Two user’s manuals |
Five M3 screws |
|
|
(supplied on models |
|
with external speaker |
|
output terminals) |
|
CONNECTING THE DISPLAY TO EXTERNAL EQUIPMENT
Carefully check the terminals for position and type before making any connections.
Loose connectors can result in picture or color problems. Make sure that all connectors are securely inserted into their terminals.
Ferrite cores
These ferrite cores are used to attenuate undesired signals.
Two big ferrite cores
When connecting a cable to the power input terminal, RS-232C terminal, attach one of these ferrite cores to the cable near the terminal.
Power Cable |
RS-232C Cable |
Ferrite Core |
Ferrite Core |
Two small ferrite cores
When connecting a cable to the external speaker output terminal attach one of these ferrite cores to the cable near the terminal.
Ferrite Core |
Ferrite Core |
E-2

PART NAMES AND FUNCTIONS
Front


1Power indicator lamp
This lamp shows the state of the power supply.
Lit (red): |
Power OFF (stand-by) |
Lit (green): |
Power ON |
Lit (orange): |
Power saving (DPMS: Power |
|
saving function) mode ON |
Flashing (red or green): Malfunction (Flashes differently depending on the type of malfunction.)
2Remote control signal receiver
Receives signals from the remote control.
Warning
If the power indicator lamp flashes red or green, this signifies that the display has developed a problem. When this happens, be sure to remove the power plug from the receptacle and contact your dealer. Leaving the display power ON can result in fire or electric shock.
E-3
English

PART NAMES AND FUNCTIONS (Continued)
Back and bottom (With the video board)
|
|
|
|
|
|
|
|
|
|
|
|
|
|
|
|
|
|
|
|
|
|
|
|
|
|
|
|
|
|
|
|
|
|
|
|
|
|
|
|
|
|
|
|
|
|
|
|
|
|
|
|
|
|
|
|
|
|
|
|
|
|
|
|
|
|
|
|
|
|
|
|
|
|
|
|
|
|
|
|
|
|
|
|
|
|
|
|
|
|
|
|
|
|
|
|
|
|
|
|
|
|
|
|
|
|
|
|
|
|
|
|
|
|
|
|
|
|
|
|
|
|
|
|
|
|
|
|
|
|
|
|
|
|
|
|
|
|
|
|
|
|
|
|
|
|
|
|
|
|
|
|
|
|
|
|
|
|
|
|
|
|
|
|
|
|
|
|
|
|
|
|
|
|
|
|
|
|
|
|
|
|
|
|
|
|
|
|
|
|
|
|
|
|
|
|
|
|
|
|
|
|
|
|
|
|
|
|
|
|
|
|
|
|
|
|
|
|
|
|
|
|
|
|
|
|
|
|
|
|
|
|
|
|
|
|
|
|
|
|
|
|
|
|
|
|
|
|
|
|
|
|
|
|
|
|
|
|
|
|
|
|
|
|
|
|
|
|
|
|
|
|
|
|
|
|
|
|
|
|
|
|
|
|
|
|
|
|
|
|
|
|
|
|
|
|
|
|
|
|
|
|
|
|
|
|
|
|
|
|
|
|
|
|
|
|
|
|
|
|
|
|
|
|
|
|
|
|
|
|
|
|
|
|
|
|
|
|
|
|
|
|
|
|
|
|
|
|
|
|
|
|
|
|
|
|
|
|
|
|
|
|
|
|
|
|
|
|
|
|
|
|
|
|
|
|
|
|
|
|
|
|
|
|
|
|
|
|
|
|
|
|
|
|
|
|
|
|
|
|
|
|
|
|
|
|
|
|
|
|
|
|
|
|
|
|
|
|
|
|
|
|
|
|
|
|
|
|
|
|
|
|
|
|
|
|
|
|
|
|
|
|
|
|
|
|
|
|
|
|
|
|
|
|
|
|
|
|
|
|
|
|
|
|
|
|
|
|
|
|
|
|
|
|
|
|
|
|
|
|
|
|
|
|
|
|
|
|
|
|
|
|
|
|
|
|
|
|
|
|
|
|
|
|
|
|
|
|
|
|
|
|
|
|
|
|
|
|
|
|
|
|
|
|
|
|
|
|
|
|
|
|
|
|
|
|
|
|
|
|
|
|
|
|
|
|
|
|
|
|
|
|
|
|
|
|
|
|
|
|
|
|
|
|
|
|
|
|
|
|
|
|
|
|
|
|
|
|
|
|
|
|
|
|
|
|
|
|
|
|
|
|
|
|
|
|
|
|
|
|
|
|
|
|
|
|
|
|
|
|
|
|
|
|
|
|
|
|
|
|
|
|
|
|
|
|
|
|
|
|
|
|
|
|
|
|
|
|
|
|
|
|
|
|
|
|
|
|
|
|
|
|
|
|
|
|
|
|
|
|
|
|
|
|
|
|
|
|
|
|
|
|
|
|
|
|
|
|
|
|
|
|
|
|
|
|
|
|
|
|
|
|
|
|
|
|
|
|
|
|
|
|
|
|
|
|
|
|
|
|
|
|
|
|
|
|
|
|
|
|
|
|
|
|
|
|
|
|
|
|
|
|
|
|
|
|
|
|
|
|
|
|
|
|
|
|
|
|
|
|
|
|
|
|
|
|
|
|
|
|
|
|
|
|
|
|
|
|
|
|
|
|
|
|
|
|
|
|
|
|
|
|
|
|
|
|
|
|
|
|
|
|
|
|
|
|
|
|
|
|
|
|
|
|
|
|
|
|
|
|
|
|
|
|
|
|
|
|
|
|
|
|
|
|
|
|
|
|
|
|
|
|
|
|
|
|
|
|
|
|
|
|
|
|
|
|
|
|
|
|
|
|
|
|
|
|
|
|
|
|
|
|
|
|
|
|
|
|
|
|
|
|
|
|
|
|
|
|
|
|
|
|
|
|
|
|
|
|
|
|
|
|
|
|
|
|
|
|
|
|
|
|
|
|
|
|
|
|
|
|
|
|
|
|
|
|
|
|
|
|
|
|
|
|
|
|
|
|
|
|
|
|
|
|
|
|
|
|
|
|
|
|
|
|
|
|
|
|
|
|
|
|
|
|
|
|
|
|
|
|
|
|
|
|
|
|
|
|
|
|
|
|
|
|
|
|
|
|
|
|
|
|
|
|
|
|
|
|
|
|
|
|
|
|
|
|
|
|
|
|
|
|
|
|
|
|
|
|
|
|
|
|
|
|
|
|
|
|
|
|
|
|
|
|
|
|
|
|
|
|
|
|
|
|
|
|
|
|
|
|
|
|
|
|
|
|
|
|
|
|
|
|
|
|
|
|
|
|
|
|
|
|
|
|
|
|
|
|
|
|
|
|
|
|
|
|
|
|
|
|
|
|
|
|
|
|
|
|
|
|
|
|
|
|
|
|
|
|
|
|
|
|
|
|
|
|
|
|
|
|
|
|
|
|
|
|
|
|
|
|
|
|
|
|
|
|
|
|
|
|
|
|
|
|
|
|
|
|
|
|
|
|
|
|
|
|
|
|
|
|
|
1 OFF/STD-BY |
|
|
switch |
|||||||||||||||||||||||||||||||||||||||||||||
|
|
|
|||||||||||||||||||||||||||||||||||||||||||||||
|
|||||||||||||||||||||||||||||||||||||||||||||||||
|
|
|
|
|
|
|
OFF |
|
|
:The power indicator lamp goes off, and the power can’t be turned on by the power button. The power is partly supplied. |
|||||||||||||||||||||||||||||||||||||||
|
|
|
|
|
|
|
|
|
|||||||||||||||||||||||||||||||||||||||||
|
|
|
|
|
|
|
STD-BY |
|
|
:The power indicator lamp lights red, and the power can be turned on or off by the power button. |
|||||||||||||||||||||||||||||||||||||||
|
|
|
|
|
|
|
|
|
|||||||||||||||||||||||||||||||||||||||||
|
|
|
|
|
|
|
|
|
|||||||||||||||||||||||||||||||||||||||||
2RS-232C terminal (RS-232C)
This terminal is provided for you to control the display from the PC. Connect it to the RS-232C terminal on the PC. When connecting a cable, attach a ferrite core to the cable. (See P. E-2.)
3RGB1 input terminal (RGB1 INPUT/mD-sub)
Connect this terminal to the PC’s display (analog RGB) output terminal or decoder (digital broadcast tuner, etc.) output terminal.
4Power input terminal
Connect this terminal to the power cable supplied with the display. When connecting a cable, attach a ferrite core to the cable. (See P. E-2)
E-4
 Loading...