


10 ppm

USER’S MANUAL
TM
10V 14V
10/14 ppm page printer

Notice to American
@– u˝C æ u dgÆQ' K§ƒc iubbhj
ˆ› æ æZp u¯•D– u˝C˘º´«¯gp•Ø–˘
I˘ ˜¢ •“C– u“ WI e rW M@ ˜g
p‡ŒØ˘CdgWQ ł«N–•–˘“ Ł •D
@ ]`˜‡¢Ł¢ ˜”‡¢D
Users
Federal Communications Commission
Radio Frequency Interference Statement
Notice: This equipment has been tested and found to comply with the limits for a
Class B digital device, pursuant to Part 15 of the FCC Rules. These limits are
designed to provide reasonable protection against harmful interference in a
residential installation. This equipment generates, uses, and can radiate radio
frequency energy and, if not installed and used in accordance with the instructions,
may cause harmful interference to radio communications. However, there is no
guarantee that interference will not occur in a particular installation. If this
equipment does cause harmful interference to radio or television reception, which
can be determined by turning the equipment off and on, the user is encouraged to
try to correct the interference by one or more of the following measures:
• Reorient or relocate the receiving antenna.
• Increase the separation between the equipment and receiver.
• Connect the equipment into an outlet on a circuit different from that to which the
receiver is connected.
• Consult the dealer or an experienced radio / TV technician for help.
FCC warning: Changes or modifications not expressly approved by the party
responsible for compliance could void the user’s authority to operate the equipment.
Notes
• Testing of this equipment was performed on model number M3878SA14AV.
• The use of a non-shielded interface cable with the referenced device is prohibited.
The length of the parallel interface cable must be 3␣ meters (10␣ feet) or less. The
length of the serial interface cable must be 15␣ meters (50␣ feet) or less.
• The length of the power cord must be 3 meters (10 feet) or less.
Laser Safety Information
This printer has been designed and manufactured according to FDA regulations
“title 21, CFR, chapter I, subchapter J, based on the Radiation Control for Health
and Safety Act of 1968”, and is classified as class 1 laser product.
Warning: Use of controls, adjustments or performance of procedures other than
those specified herein may result in hazardous radiation exposure.
Notice to Canadian
Users
Notice to German
Users
This class B digital apparatus meets all requirements of the Canadian InterferenceCausing Equipment Regulations.
Cet appareil numérique de la Classe B respecte toutes les exigences du Règlement sur
le matériel brouilleur du Canada.
Bescheinigung des Herstellers/Importeurs
Hiermit wird bescheinigt, daß der/die/das
• Maschinenlärminformationsverordnung 3. GSGV, 18.01.1991: Der höchste
Schalldruckpegel beträgt 70 dB (A) oder weniger gemäß EN27779-1991.
Notice to Japanese
Users
User’s Manual FM-1

In case that the interface board, Ethernet C, is installed, this equipment complies
@– u˝C æ u dgÆQ' K§ƒc iubbhj
ˆ› Œ æZp u¯•D– u ˘º´«¯gp•Ø˘dgW
Q ł«N–•–˘“ Ł •D– Œ ˝gp “K ¨˛ u‚Ø
⁄v ‡ŒØ–˘“ Ł •D
with EMI regulations as follows:
Notice to American
Users
Federal Communications Commission
Radio Frequency Interference Statement
Notice: This equipment has been tested and found to comply with the limits for a
Class A digital device, pursuant to Part 15 of the FCC Rules. These limits are
designed to provide reasonable protection against harmful interference when the
equipment is operated in a commercial environment. This equipment generates,
uses, and can radiate radio frequency energy and, if not installed and used in
accordance with the instruction manual, may cause harmful interference to radio
communications. Operation of this equipment in a residential area is likely to cause
harmful interference in which case the user will be required to correct the
interference at his own expense.
FCC warning: Changes or modifications not expressly approved by the party
responsible for compliance could void the user’s authority to operate the equipment.
Notes
• Testing of this equipment was performed on model number M3878SA14AV.
• The use of a non-shielded interface cable with the referenced device is prohibited.
The length of the parallel interface cable must be 3␣ meters (10␣ feet) or less. The
length of the Ethernet interface cable must be 100␣ meters (328␣ feet) or less for type
10BASE-2 and 185 meters (607 feet) or less for type 10BASE-T.
• The length of the power cord must be 3 meters (10 feet) or less.
Laser Safety Information
This printer has been designed and manufactured according to FDA regulations
“title 21, CFR, chapter I, subchapter J, based on the Radiation Control for Health
and Safety Act of 1968”, and is classified as class 1 laser product.
Warning: Use of controls, adjustments or performance of procedures other than
those specified herein may result in hazardous radiation exposure.
Notice to Canadian
Users
Notice to German
Users
Notice to European
and Oceanian Users
This class A digital apparatus meets all requirements of the Canadian InterferenceCausing Equipment Regulations.
Cet appareil numérique de la Classe A respecte toutes les exigences du Règlement sur
le matériel brouilleur du Canada.
Bescheinigung des Herstellers/Importeurs
Hiermit wird bescheinigt, daß der/die/das
• Maschinenlärminformationsverordnung 3. GSGV, 18.01.1991: Der höchste
Schalldruckpegel beträgt 70 dB (A) oder weniger gemäß EN27779-1991.
Warning: This is a product which meets Class A of AS/NZS3548 and EN55022.
In a domestic environment this product may cause radio interference in which case
the user may be required to take adequate measures.
Notice to Japanese
Users
FM-2 User’s Manual

As an International ENERGY STARSM Partner, Fujitsu Limited has determined that
this product meets the International E
energy efficiency.
The International ENERGY STAR Office Equipment Program is an international
program that promotes energy saving through the use of computers and other office
equipments. The program backs the development and dissemination of products
with functions that effectively reduce energy consumption. It is an open system in
which business proprietors can participate voluntarily. The targeted products are
office equipment such as computers, displays, printers, facsimiles, and copiers.
Their standards and logos are uniform among participating nations.
NERGY STAR Office Equipment Program for
CE Declaration
This product sold in Europe conforms to the standards in accordance with EC
Directives. The copy of “Declaration of Conformity” is attached in the next page.
User’s Manual FM-3

FM-4 User’s Manual

The contents of this manual may be revised without prior notice and
without obligation to incorporate changes and improvements into units
already shipped.
Fujitsu has made every effort to ensure that the information included
here is complete and accurate at the time of publication. The company
assumes no liability for errors and omissions.
Copyright © 1996 Fujitsu Limited
Printed in Japan. All rights reserved. No part of this manual may be
reproduced or translated, stored in a database or retrieval system, or
transmitted, in any form or by any means, electronic, mechanical,
photocopying, recording, or otherwise, without the prior written
permission of Fujitsu Limited.
C145-E145-02EN, November 1996
Trademark Acknowledgment
Fujitsu is a registered trademark of Fujitsu
Limited. The following companies own
the other trademarks used in this manual:
Adobe Systems, Inc.: PostScript
Agfa Division of Miles Inc.: Albertus,
Antique Olive, Arial, CG Omega, CG
Times, Clarendon Condensed, Coronet,
Courier, Garamond, Letter Gothic,
Marigold, Symbol, Times New Roman,
Univers, Univers Condensed, Wingdings
Apple Computer, Inc.: AppleTalk,
LocalTalk, Macintosh, TrueType
AT&T: UNIX
Centronics Data Computer Corporation:
Centronics
Hewlett-Packard Corporation: HewlettPackard, LaserJet, LaserJet 4, PCL
International Business Machines
Corporation: IBM, IBM PC/AT, IBM
PS/2, PC-DOS
Microsoft Corporation: Microsoft, MSDOS, Windows
Lexmark: MarkVision
Miles, Inc.: Intellifont
Novell, Inc.: Netware
Xerox Corporation: 4024, Ethernet,
Xerox
User’s Manual FM-5

Precautions
Read this section and remember these instructions to ensure your safety and
your printer’s correct performance. Follow the cautions and notices labeled on
the printer or marked with icons in the manual. Save this manual for future
reference.
• Use only the power cord furnished with the printer and a properly grounded
outlet. Do not use an extension power cord.
• Confirm that the rated voltage of your printer matches the voltage of your
power outlet. The maximum wattage of the printer is 600 watts.
• Turn off the printer and disconnect the power cord before beginning
maintenance operations.
• Disconnect the power cord from the outlet whenever you are not using the
printer for an extended period of time.
• Disconnect the power cord from the outlet whenever thunder storms are
nearby. Leaving the power cord connected may allow damage to the printer
or other property.
• Do not put the printer in direct sunlight, near a heater, or near water. Leave
adequate space around the printer.
• Do not touch any connector contacts and corona wires. This could cause
electrostatic damage to the printer.
• Do not touch the heat roller and motors if you have been printing recently.
These parts may be hot.
• Do not touch or scratch the green drum surface, and do not expose it to light
for more than three minutes.
• Use only a shielded interface cable of 3 meters (10 feet) or less for the parallel
interface, 15 meters (50 feet) or less for the serial interface, 100 meters (328
feet) or less for Ethernet interface 10BASE-T connection, and 185 meters
(607 feet) or less for the Ethernet interface 10BASE-2 connection.
• Be sure the printer is turned off before connecting the interface.
• Do not turn the printer off while it is printing.
• Do not disassemble or remove any components unless instructed in the
maintenance procedures.
• Keep the print unit upright when removing or installing it.
• Do not apply excessive pressure on the corona wire when cleaning it.
• Do not use alcohol or other cleaning solutions on the drum surface or on any
interior parts of the printer.
• Clear paper jams quickly, especially when they occur in the heat roller unit.
• Do not drop small objects, such as paper clips, into the printer.
• Do not set page margins off the physically printable page area.
• Turn off the printer and disconnect the power cord immediately if an
abnormal condition occurs: for instance, if the printer smokes, prints
abnormally, becomes wet, or falls. Then consult your dealer.
FM-6 User’s Manual

Contents
Preface ............................................................................................ v
Manual and Floppy Disks................................................................. v
Operating Environments .................................................................vi
Conventions ....................................................................................vi
Control Panel...........................................................................vii
Chapter 1 Getting Started ........................................................................... 1–1
Getting Acquainted ..................................................................... 1–1
Getting Ready ............................................................................. 1–4
Picking a Suitable Location ................................................... 1–4
Unpacking and Checking Your Printer ................................. 1–5
Setting Up ................................................................................... 1–7
Preparing the Print Unit and Installing the Toner Bottle ...... 1–7
Loading Paper and Installing the Paper Tray ....................... 1–10
Connecting the Power Cord ............................................... 1–12
Connecting the Printer to Your Computer ................................ 1–13
About Interfacing ................................................................ 1–13
Connecting to the Parallel Port ........................................... 1–14
Printing a Test Page Offline ................................................ 1–15
Installing the Printer Driver....................................................... 1–16
Get to Know Your Printer Driver ....................................... 1–16
Printer Driver for Windows 3.1/3.11 .................................. 1–17
Printer Driver for Windows 95 ........................................... 1–17
Plug and Play Printer Detection ................................... 1–17
Set-up from Printers Folder .......................................... 1–18
Printing Your First Document ................................................... 1–19
Adjusting Print Density ...................................................... 1–20
If Something Goes Wrong .................................................. 1–21
Where To Go From Here .......................................................... 1–22
User’s Manual i

Contents
Chapter 2 Using Printer Software ............................................................... 2–1
Remote Setup Utility Program, PPMENU .................................. 2–1
Installing PPMENU ............................................................. 2–2
Factory Defaults .................................................................... 2–4
Printer Management Utility Program, Lexmark’s MarkVision ..... 2–6
Installing MarkVision ........................................................... 2–6
Menu Bar Functions ............................................................. 2–7
Chapter 3 Printing and Paper Handling ...................................................... 3–1
Control Panel Tutorial ................................................................ 3–1
The Control Panel ................................................................ 3–1
Indicators ....................................................................... 3–2
Message Display ............................................................. 3–3
Buttons........................................................................... 3–3
Control Panel Functions.............................................................. 3–5
Printing Data Remaining in the Buffer ................................. 3–5
Clearing an Error Condition to Continue Printing ............... 3–5
Clearing the Buffer and Reinitializing the Printer.................. 3–6
Printing a Status Report ........................................................ 3–6
Printing a Font Report .......................................................... 3–8
Selecting Paper Tray, MFF, or Manual Paper Feed ............. 3–10
Setting MFF Paper Size ....................................................... 3–11
Selecting Menu Option and Resetting Menu ...................... 3–12
Menu Functions ........................................................................ 3–12
Menu Structure and How to Use Control Panel Buttons .... 3–12
Submenus, Items, and Options ........................................... 3–13
Menu Items ............................................................................... 3–16
Handling Paper ......................................................................... 3–19
Paper Types and Sizes ......................................................... 3–19
General Tips................................................................. 3–22
Preprinted Sheets.......................................................... 3–22
Transparencies .............................................................. 3–22
Envelopes ..................................................................... 3–23
Labels ........................................................................... 3–24
Changing the Paper Tray Size ............................................. 3–24
Feeding Paper Manually...................................................... 3–27
Setting Up the Rear Stacker ................................................ 3–28
Printing on Nonstandard Size Paper and on Envelopes ....... 3–29
Considerations on Paper Size........................................ 3–29
Page Orientation .......................................................... 3–30
ii User’s Manual

Contents
Chapter 4 Enhancing and Customizing the Printer ..................................... 4–1
Adding RAM ............................................................................... 4–1
Installing an Alternate Emulation ................................................ 4–3
Installing an Interface Expansion Board ....................................... 4–4
Installing an Interface Board ................................................. 4–4
Connecting to the Serial Port ................................................ 4–5
Connecting the Serial Interface Cable ............................. 4–5
Selecting the Serial Interface ........................................... 4–6
Verifying Serial Parameter Settings ................................. 4–6
Connecting to the LocalTalk Port ......................................... 4–7
Connecting the LocalTalk Interface Cable...................... 4–8
Selecting the LocalTalk Interface .................................... 4–8
LocalTalk Specifications ................................................. 4–8
Connecting to the Ethernet Port ........................................... 4–9
Connecting the Ethernet Interface Cable ........................ 4–9
Selecting the Ethernet Interface .................................... 4–10
Ethernet Specifications ................................................. 4–10
Adding Paper Sources ................................................................ 4–10
Paper Feeder ....................................................................... 4–10
Changing the Paper Tray Size ............................................. 4–12
Different Paper Tray Sizes................................................... 4–15
Multi-function Feeder......................................................... 4–15
Chapter 5 Maintenance .............................................................................. 5–1
Preventive Maintenance............................................................... 5–1
Periodic Routine Maintenance .................................................... 5–2
Replacing the Toner Bottle ................................................... 5–2
Replacing the Print Unit and Internal Cleaning .................... 5–5
Removing the Print Unit ................................................ 5–6
Cleaning the Paper Path ................................................. 5–7
Cleaning the Corona Wire ............................................. 5–8
Cleaning the Paper Guide before the Corona Wire......... 5–9
Installing the New Print Unit ....................................... 5–10
Resetting the Print Unit Counter ................................. 5–13
Cleaning the Precharger Wire ............................................. 5–15
Repacking the Printer ................................................................ 5–16
User’s Manual iii

Contents
Chapter 6 Solving Problems ....................................................................... 6–1
Clearing Paper Jams .................................................................... 6–1
Operational Problems .................................................................. 6–8
Print Quality Problems ................................................................ 6–9
Error Indications ....................................................................... 6–11
Action-required Status Indications............................................. 6–14
Printer Status Indications .......................................................... 6–15
Warning Messages ..................................................................... 6–16
Appendix A Font Samples .............................................................................. A–1
Bitmapped Fonts ......................................................................... A–1
Scalable Intellifonts...................................................................... A–1
Scalable TrueType Fonts ............................................................. A–2
Appendix B Supplies and Accessories .......................................................... B–1
Supplies ....................................................................................... B–1
Accessories ................................................................................... B–1
Appendix C Specifications ............................................................................ C–1
Glossary ................................................................................... GL–1
Index ......................................................................................... IN–1
Fujitsu Offices......................................................... Inside back cover
iv User’s Manual

Preface
Thank you for purchasing the Fujitsu PrintPartner 10V/14V Page
Printer. The PrintPartner 10V is a 10-ppm, 600-dpi, laser printer. The
PrintPartner 14V is a 14-ppm, 600-dpi, laser printer. The PrintPartner
10V/14V is compatible with the HP LaserJet 4 printers, which are an
industry-standard page printers.
Available options are:
• 1-, 2-, 4-, 8-, 16-, and 32-megabyte memory expansion cards
• FPS card: PostScript level 2 compatible emulation
• Interface expansion boards: serial interface, LocalTalk, and Ethernet C
• Paper trays (trays 1 and 2): A4, A5, letter, legal, and executive sizes
• Paper feeder: Base mechanism plus paper tray (tray 2)
• Multi-function feeder
Manual and
Floppy Disks
User’s Manual v
The PrintPartner 10V/14V has a single user’s manual. This user’s manual
provides a summary of everything for from non-technical users unfamiliar
with page printers to highly experienced technical users.
The PrintPartner 10V/14V comes with seven floppy disks.
• Windows Printer Drivers (two disks) which provide the computer’s
operating system with the programs that control this printer.
• MarkVision (three disks), printer management utility program,
which allows you to easily understand the printer (status, statistics,
or features) and displays the printer control panel on your
computer display to remotely operate the printer.
• Network Printer Utility (one disk), which allows you to remotely
change or confirm settings of Ethernet C board of the printer or
locally check the printer.
• PPMENU (one disk), the printer remote setup utility program,
which allows you to easily customize and program your printer to
your computer and software environments, using your computer
keyboard and display.

Organization
Operating
Environments
Conventions
To run the Printer Driver, you need an IBM PC/AT or PS/2
computer or compatible running MS-Windows 3.1/3.11 or MSWindows 95.
To run MarkVision, you need an IBM PC/AT or PS/2 computer or
compatible running MS-Windows 95 (not MS-Windows 3.1/3.11),
with at least 5MB of memory available on a hard disk, a 3.5" double-
sided high density (2HD) floppy disk drive, and a VGA (640 × 480
dots) or higher resolution display.
To run the Network Printer Utility, you need an IBM PC/AT or PS/
2 computer or compatible running MS-Windows 3.1/3.11 (not MSWindows 95), with at least 5MB of memory available on a hard disk,
a 3.5" double-sided high density (2HD) floppy disk drive, and a
VGA (640 × 480 dots) or higher resolution display.
To run PPMENU, you need an IBM PC/AT or PS/2 computer or
compatible running MS-DOS, with at least 1MB of memory
available on a hard disk, a 3.5" double-sided high density (2HD)
floppy disk drive, and a VGA (640 × 480 dots) display. You must
also be using PC-DOS version 5.02, MS-DOS version 3.3, or higher
version.
Icons draw your attention to advisory messages, as illustrated below.
A line precedes and follows the message to show where the message
begins and ends.
Caution:
!
✍
vi User’s Manual
Ignoring this information could result in personal injury.
Notice:
Ignoring this information could result in loss of data or harm to your
☞
equipment.
Important:
These notes contain remarks, tips, and other useful supplementary
information.
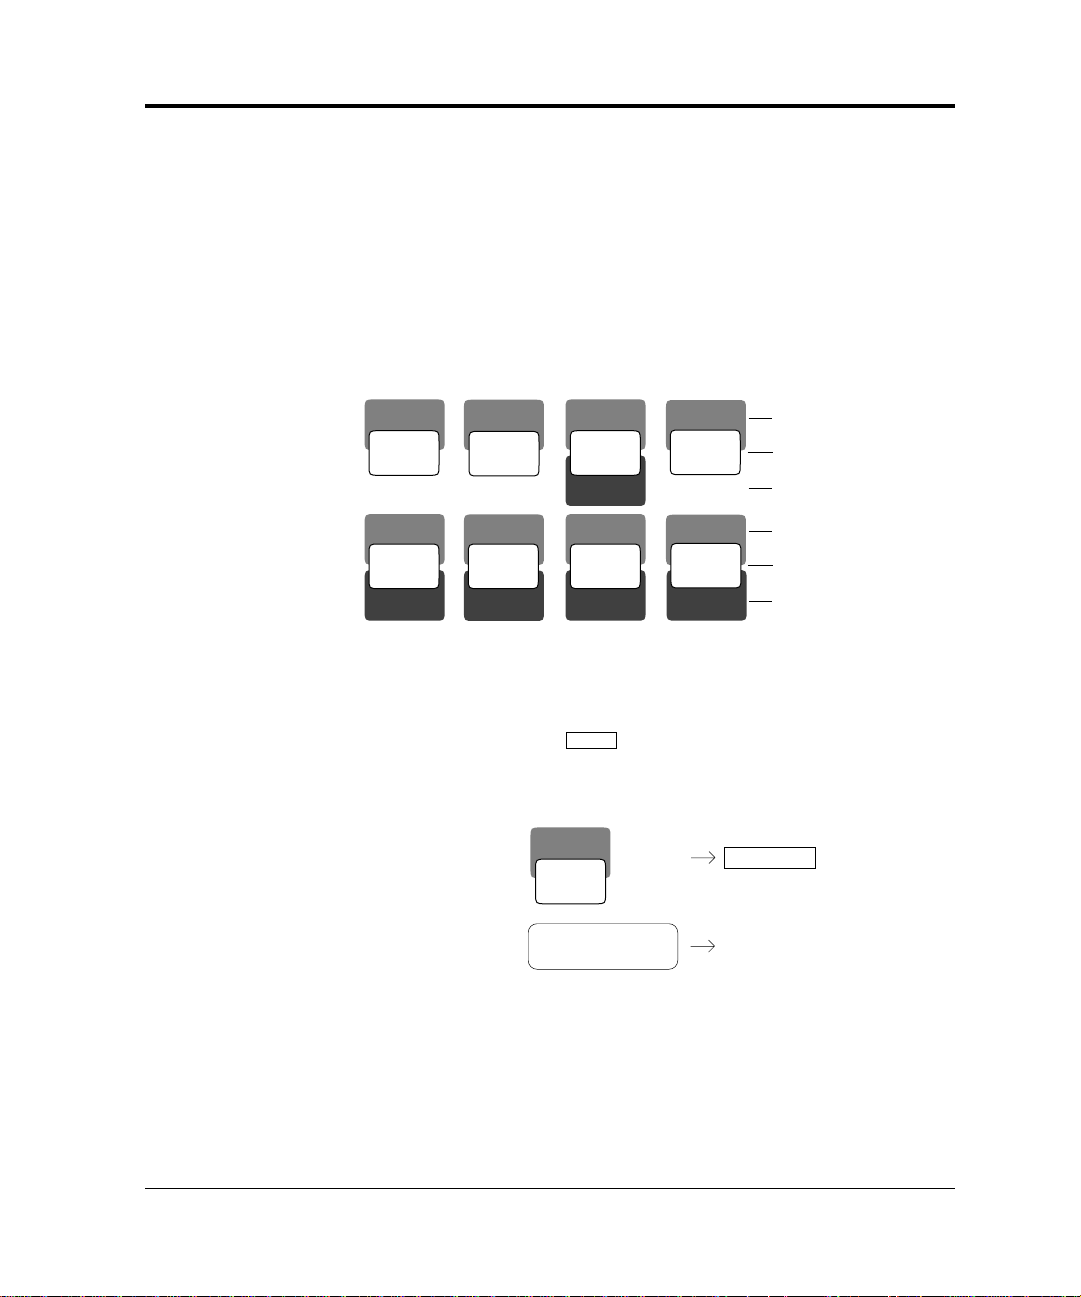
Control Panel
READY
The printer’s control panel incorporates two rows of buttons, with each
button having one or two labels (see below). The physical button is
beneath the rectangular section of no-labeled space. The top label
represents the basic function, which is activated by a touch of the
button. The bottom label represents the second function, which is
activated when you release the button after holding it down more than
five seconds.
CONT.
RESET
FORM
FEED
TRAY
SELECT
MFF
PAPER SIZE
MENUREADY
RESET
MENU
ENTER
SELF
TEST
+
–
PRINT
FONT
Basic functions
Physical buttons
Second functions
Basic functions
Physical buttons
Second functions
The control panel has a character display of 16 columns × 2 lines.
In text, the names of the control panel buttons appear as all capital
letters inside a box like
appear in a fixed-spacing font like
and control panel display messages
READY. Button names or messages
occupying two lines are expressed in a single line shown below.
FORM
Buttons:
Display messages:
FEED
READY
TONER LOW
FORM FEED
READY TONER LOW
The asterisk in the display column indicates that the displayed
option is currently selected in the selected menu.
User’s Manual vii

viii User’s Manual

CHAPTER
GETTING
STARTED
1
Getting
Acquainted
Getting Started
This chapter provides complete setup instructions in the following
sections:
•Getting Acquainted. Learning the printer’s main parts and its paper
paths.
•Getting Ready. Choosing a suitable location and unpacking the printer.
•Setting Up. Assembling the printer.
•Connecting the Printer. Selecting an interface and connecting to the
computer.
•Installing the Printer Driver.
•Printing Your First Document.
•Where to Go from Here.
The illustrations on the following pages identify the main parts of the
printer and two routes of paper feeding.
throughout the manual, so take some time to become familiar with
them.
These parts are referred to
User’s Manual 1-1
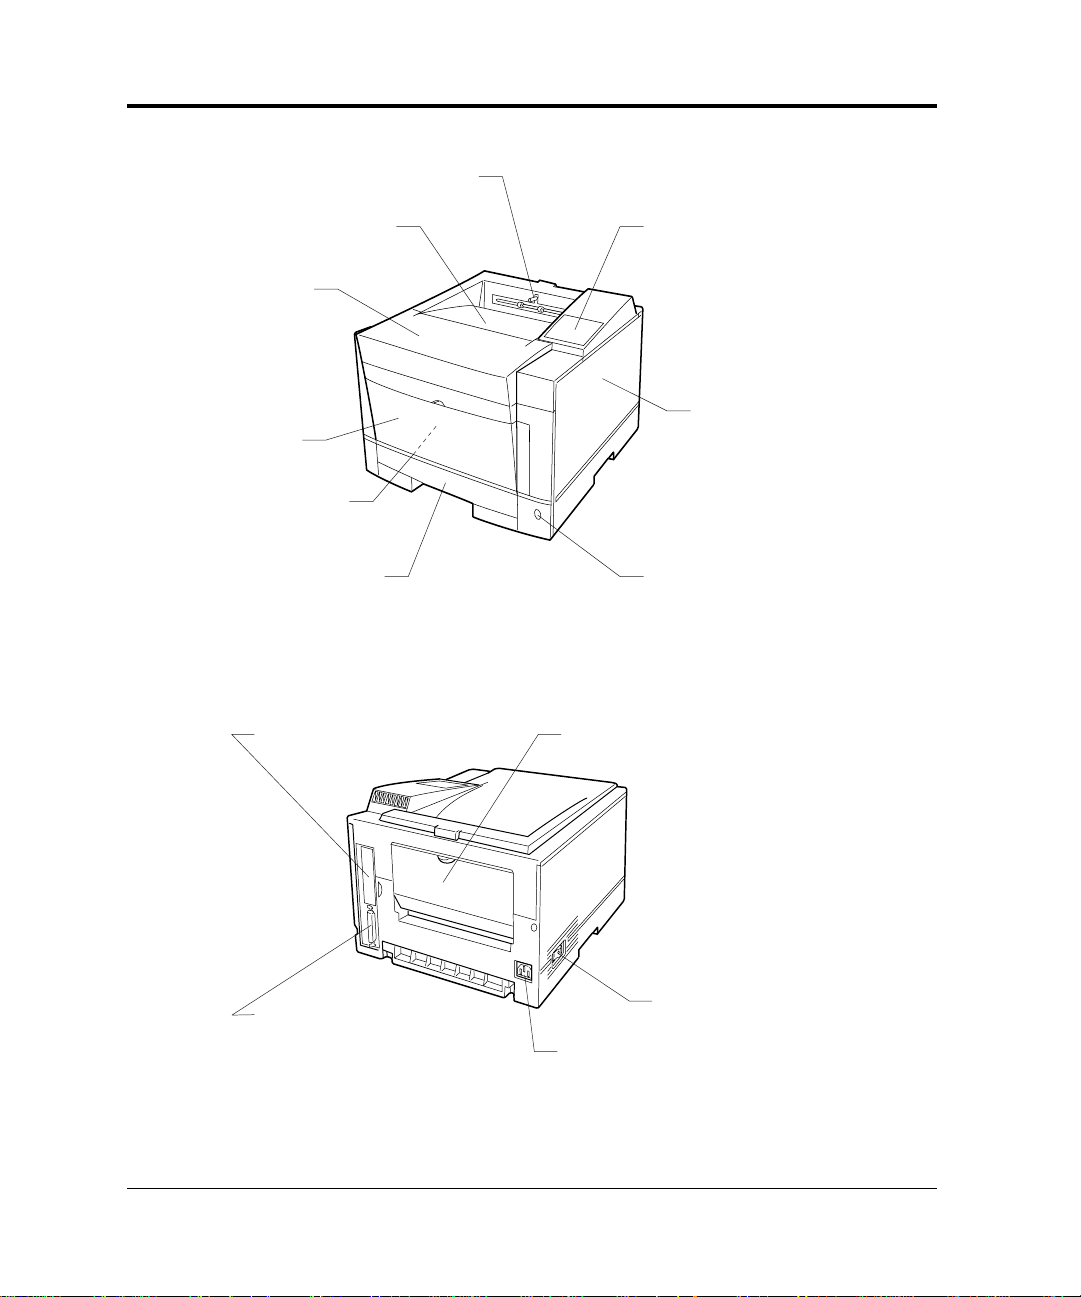
Getting Acquainted
Stacker-full sensor
Top cover
(Paper stacker)
Upper door
Front cover
Manual feed slot
(inside the cover)
Paper tray
Interface board
slot cover
Control panel
Slide cover
(Font/emulation card slot
and RAM card slots inside)
Multi-function feeder
connector
Figure 1–1 Front and right side view
Rear stacker
Centronics parallel
interface connector
Power cord
connector
Power switch
Figure 1–2 Rear and left side view
1-2 User’s Manual

Getting Acquainted
Print unit
Toner bottle
Print density dial
Figure 1–3 Interior view
The path from the paper tray to the top cover is for ordinary paper.
The straight path from the manual feed slot or optional multifunction feeder to the rear stacker is for transparencies and envelopes.
Top cover
(main stacker)
GETTING
STARTED
Manual
feed
slot
Paper tray
From optional paper tray
Rear
stacker
Figure 1–4 Paper paths
User’s Manual 1-3
Getting Ready
Getting Ready
This section will help you:
• Choose a suitable location for the printer
• Inventory the parts of the printer as you unpack it
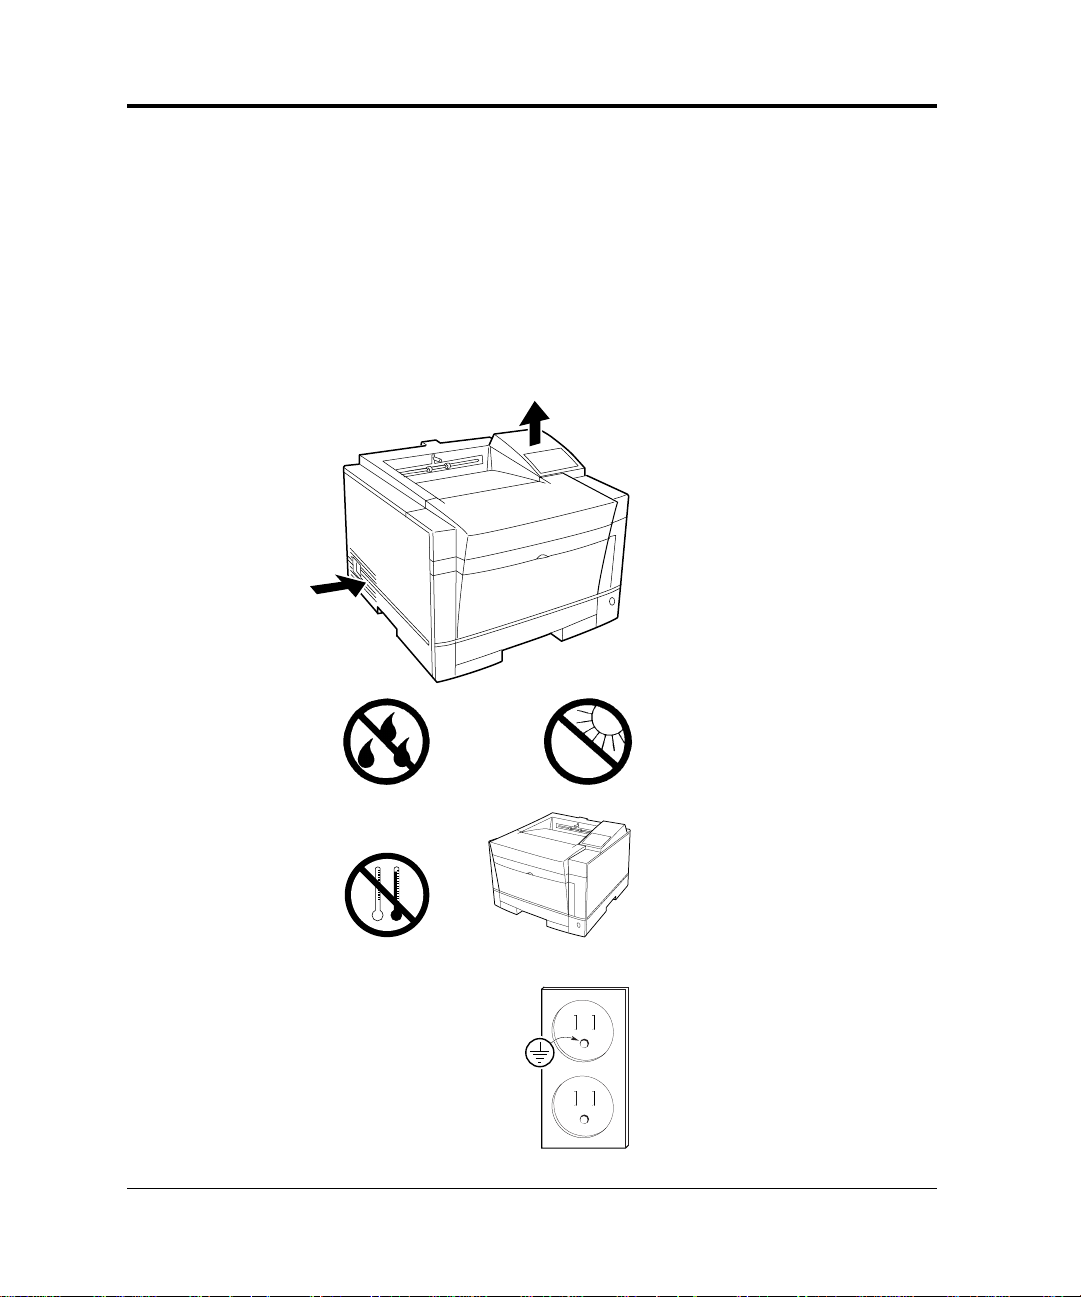
Picking a Suitable Location
The first step is to pick a suitable location for your printer. For peak
performance and usability, follow these guidelines:
• Place the printer on a
sturdy, level surface.
• Choose a room that is well
ventilated and free of
excessive dust. Leave space
on either side of the printer
for proper ventilation.
• To avoid exposing the
printer to extremes of
temperature, do not put the
printer in direct sunlight or
near a heater. Ideal room
temperature is from 10°C
to 35°C (50°F to 95°F).
below
above
+10
+35
°C
°C
Humidity should be
between 20% and 80% RH
(no condensation).
• Use a grounded AC power
outlet. Do not use a threepronged adapter in an
ungrounded outlet.
1-4 User’s Manual
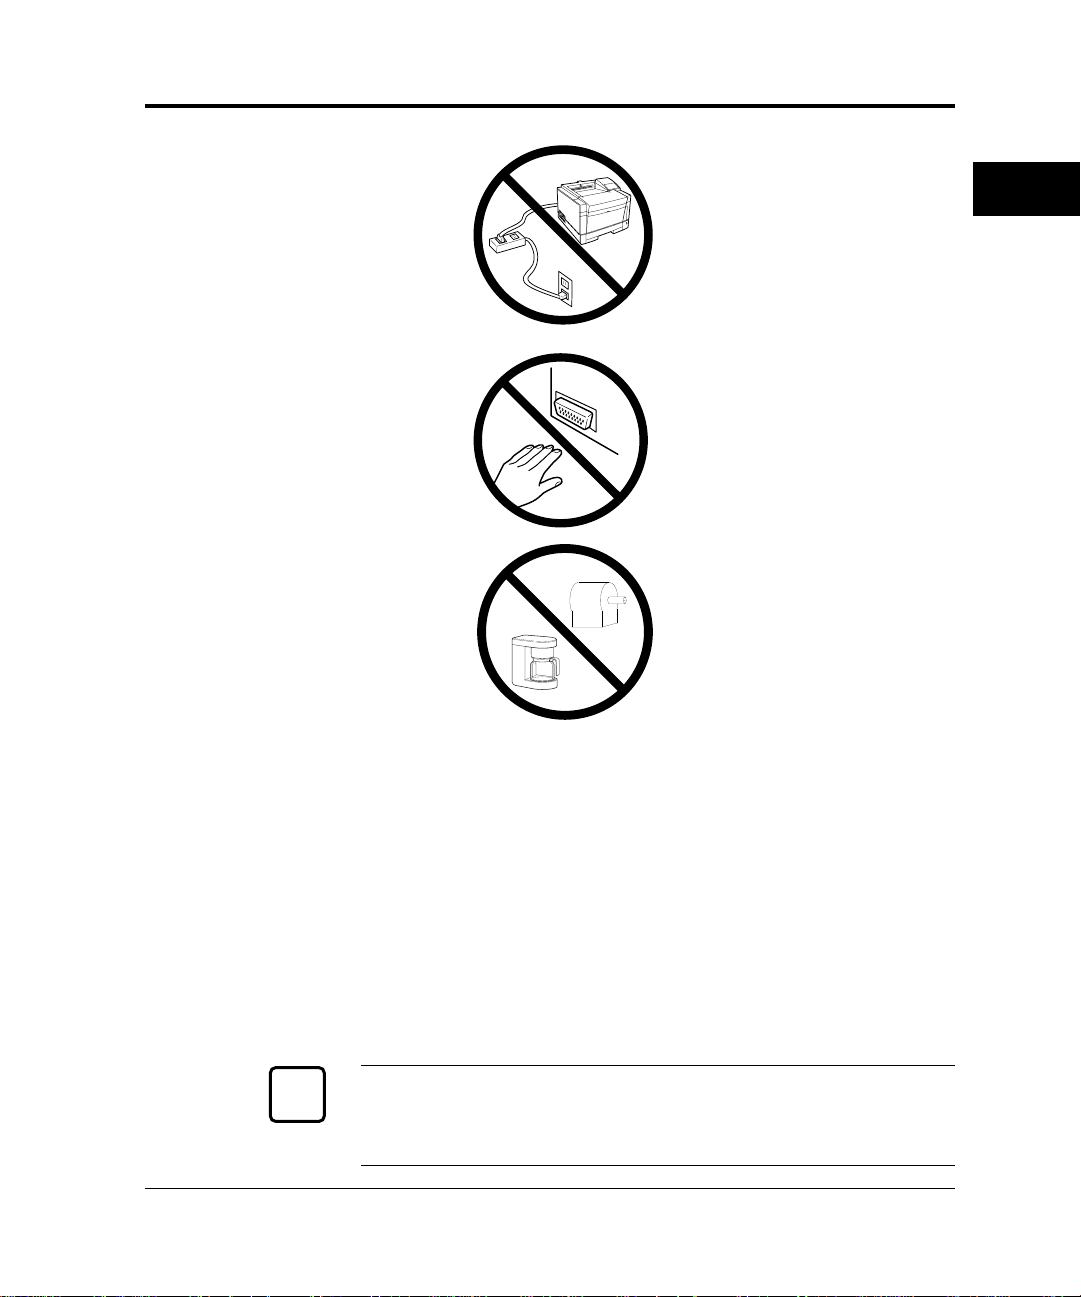
Getting Ready
• Use only the power cord
furnished with the printer.
Do not use an extension
cord.
• Do not touch any
connector contacts and
corona wires to avoid
possible electrostatic
damage to the printer.
• Do not use a circuit shared
with equipment that causes
electrical noise, such as
motors.
GETTING
STARTED
• Do not use a circuit shared
with equipment that uses a
lot of power, such as a
copier or a coffee maker.
Unpacking and Checking Your Printer
As you unpack the printer, check each item carefully for damage. If
you find damage, notify your dealer. Check also that you have
received all the items shown below.
This printer comes with everything you need except an interface
cable. If you do not yet have a cable, you must purchase one before
you can connect the printer to your computer.
✍
User’s Manual 1-5
Important:
Save the original carton and packing materials in case you need to
store or transport your printer.
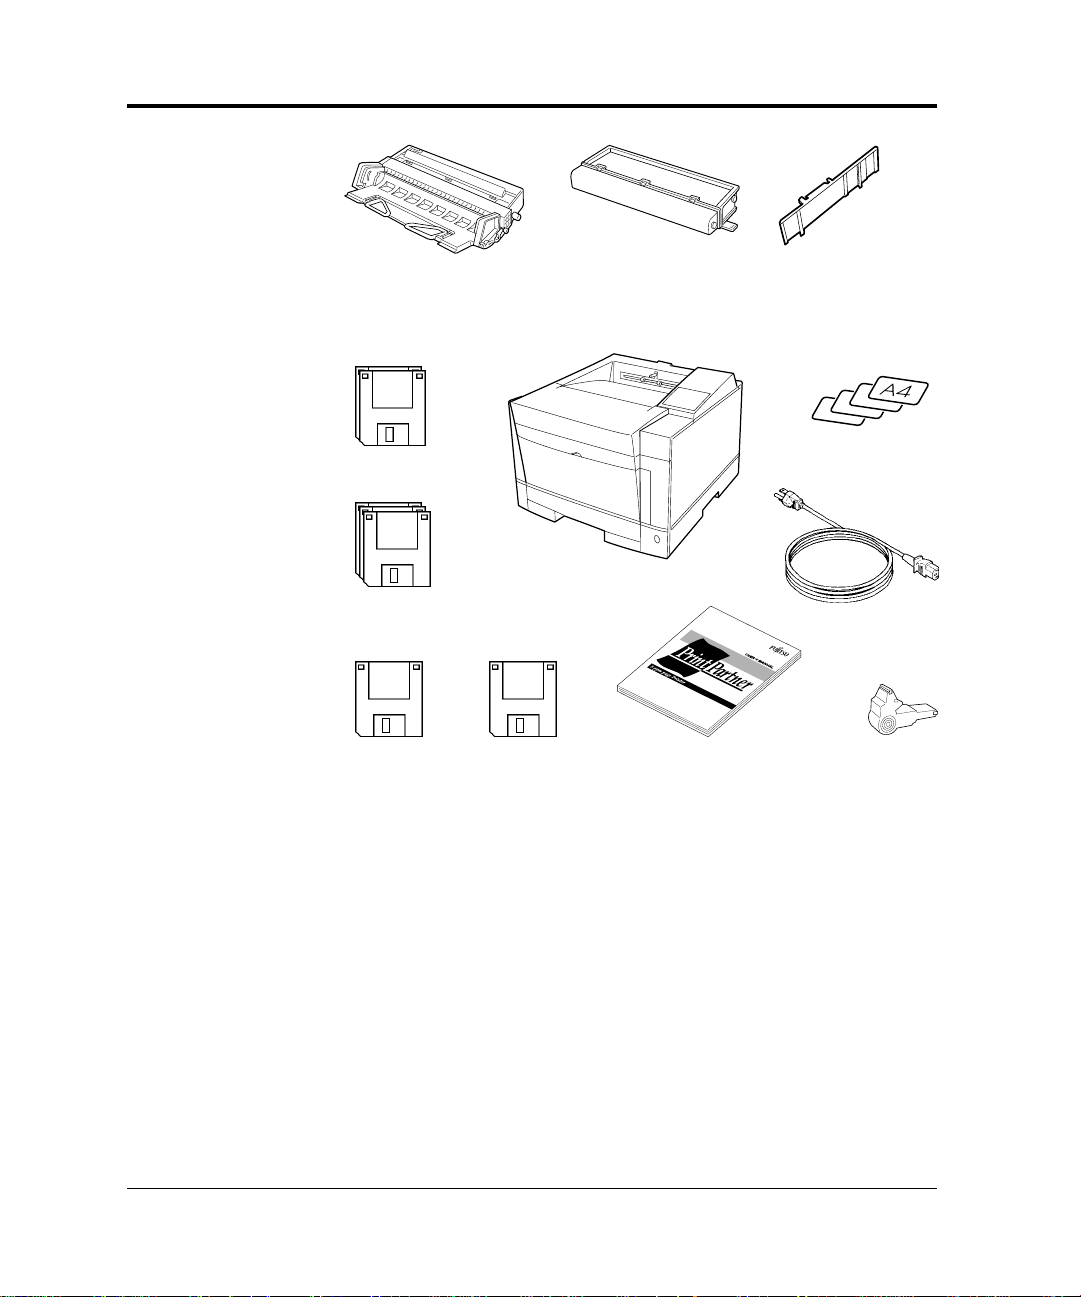
Getting Ready
Print unit
(placed in printer)
Printer driver
disks
MarkVision disks
Network printer
utility disk
PPMENU disk
Toner
bottle
Printer
User’s
manual
Left paper
guide
(for paper tray)
Paper size
label
Power
cord
Cleaning
brush
• An interface cable is not a standard accessory. Please purchase
an appropriate cable according to the interface you intend to
use.
• The power cord may differ slightly from this figure depending
on the country where you purchased the printer.
• The left paper guide is an accessory for the printer customized
for Letter size paper. It needs to be installed in the paper tray
when the paper tray is adjusted for Executive, A4, or A5 size
paper.
Figure 1-5 Printer inventory
1-6 User’s Manual

Setting Up
Setting Up
This section describes how to assemble the printer and connect the
power cord after choosing a suitable location for the printer and
checking that you received all the parts.
Preparing the Print Unit and Installing the Toner Bottle
This printer is shipped with the print unit mounted and protective
materials attached. Be sure to remove the two protective materials
from the print unit. This operation is possible with the print unit
mounted. First prepare and install the following two components:
• Print unit (photoconductor drum, developing unit, etc.)
• Toner bottle
The toner bottle first installed after you purchase the printer will last
about 2500 printed pages under the condition of 5% coverage on A4
paper. The succeeding toner bottles last about 5000 printed pages
each.
Notice:
Do not touch any connector contacts and corona wires to avoid
☞
possible electrostatic damage to the printer.
Be careful with the print unit’s drum (the green surface). The drum
is easily damaged by contamination or by exposure to light for more
than three minutes. Follow these guidelines:
• Never touch or scratch the drum surface.
• When the print unit is not in the printer, store it in a dark place or
cover it with a clean sheet of paper.
• When the print unit is in the printer, keep the printer top cover
closed. If you must work inside the printer for more than three
minutes, remove the print unit with the toner bottle mounted and
store it in a dark place.
GETTING
STARTED
User’s Manual 1-7
Setting Up
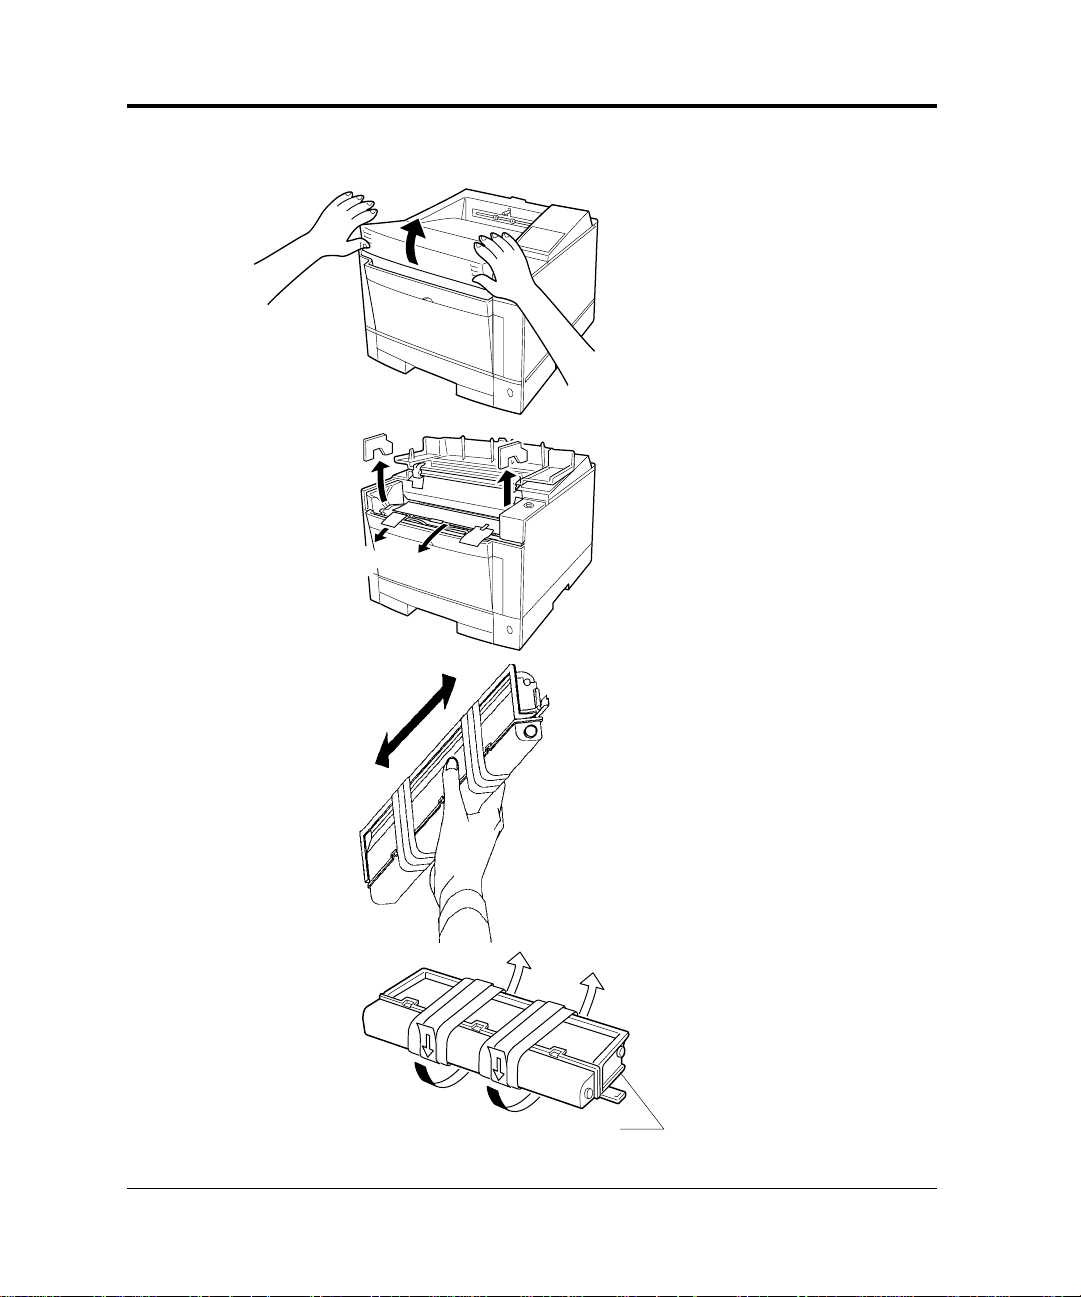
To prepare the print unit and install the toner bottle, follow these steps:
1. Open the upper door. Lift
the milled portions at the
front left and right of the
upper door to open it.
e
2. Remove the protective
materials from the print unit.
Remove protective sheet q.
Pull clear tape w until its
blue end is visible and remove
w
q
it. Remove two restraint
cushions e.
3. Remove the toner bottle
from its bag.
4. Shake the toner bottle by
moving it back and forth in
a horizontal motion several
times.
5. Remove the plastic seal
from the toner bottle.
Gently pull off the seal being
careful not to spill toner.
Handle to seal carefully to
avoid staining your hands or
clothes.
Projecting guide
1-8 User’s Manual
6. Install toner bottle. Slide
both projecting guides of the
toner bottle into the grooves
of the print unit.
Notice:
If you have installed the toner bottle, do not remove it from the print
☞
unit until it is empty. This could causes toner to spill into the printer.
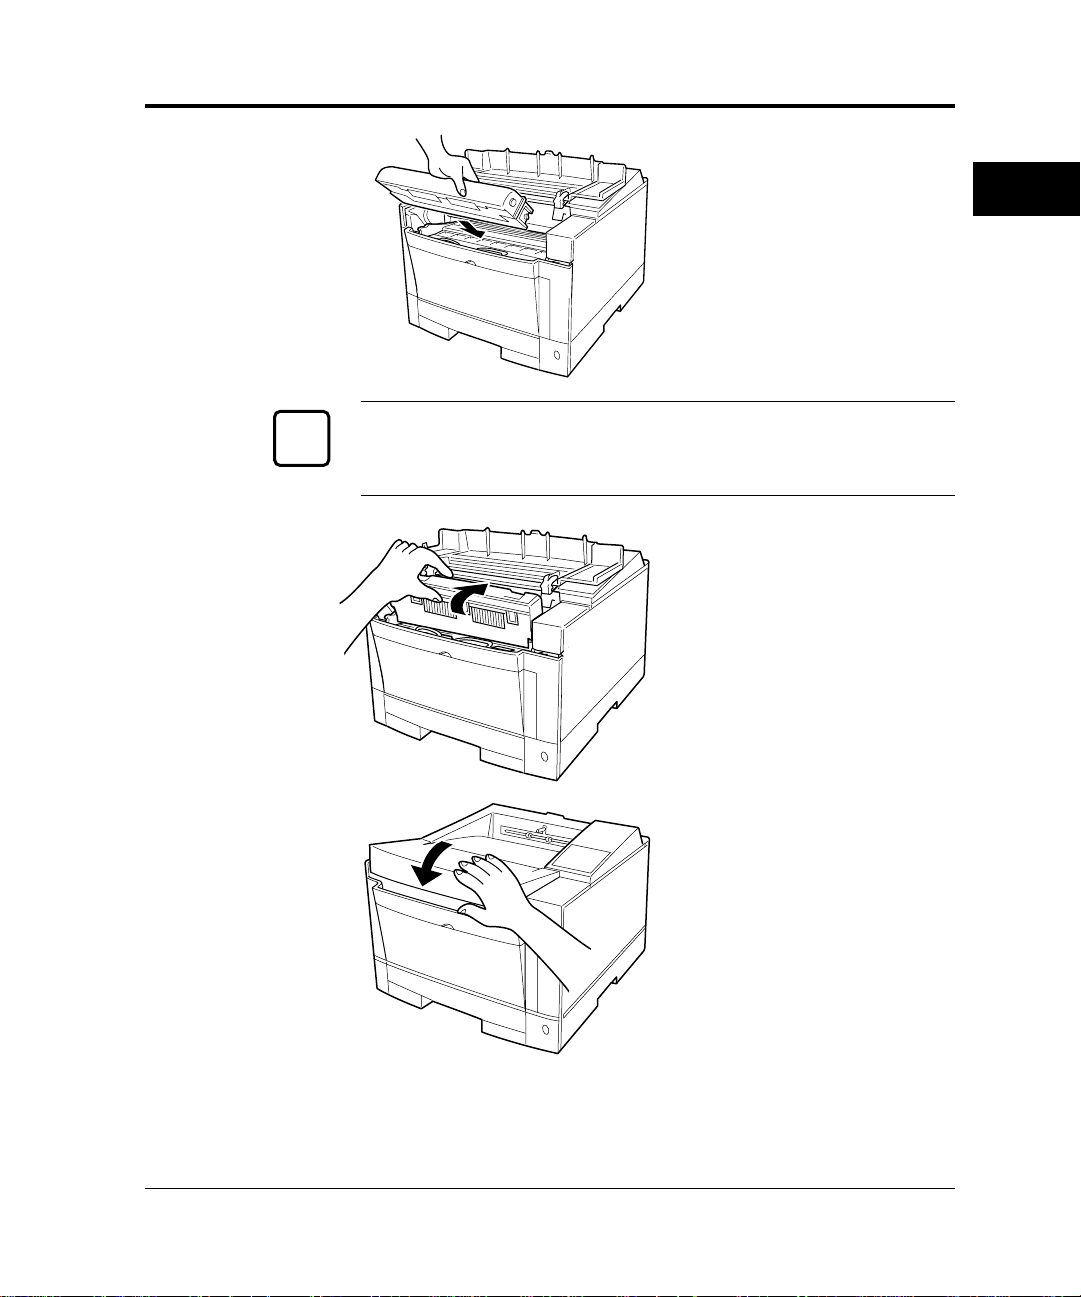
7. Lock the toner bottle. Push
the toner bottle forward until
it clicks into place. (The
bottle stands nearly upright
when installed correctly.)
Setting Up
GETTING
STARTED
8. Close the printer’s upper
door. Press down firmly on
the front portion of the upper
door and make sure the upper
door is locked completely.
User’s Manual 1-9
Setting Up
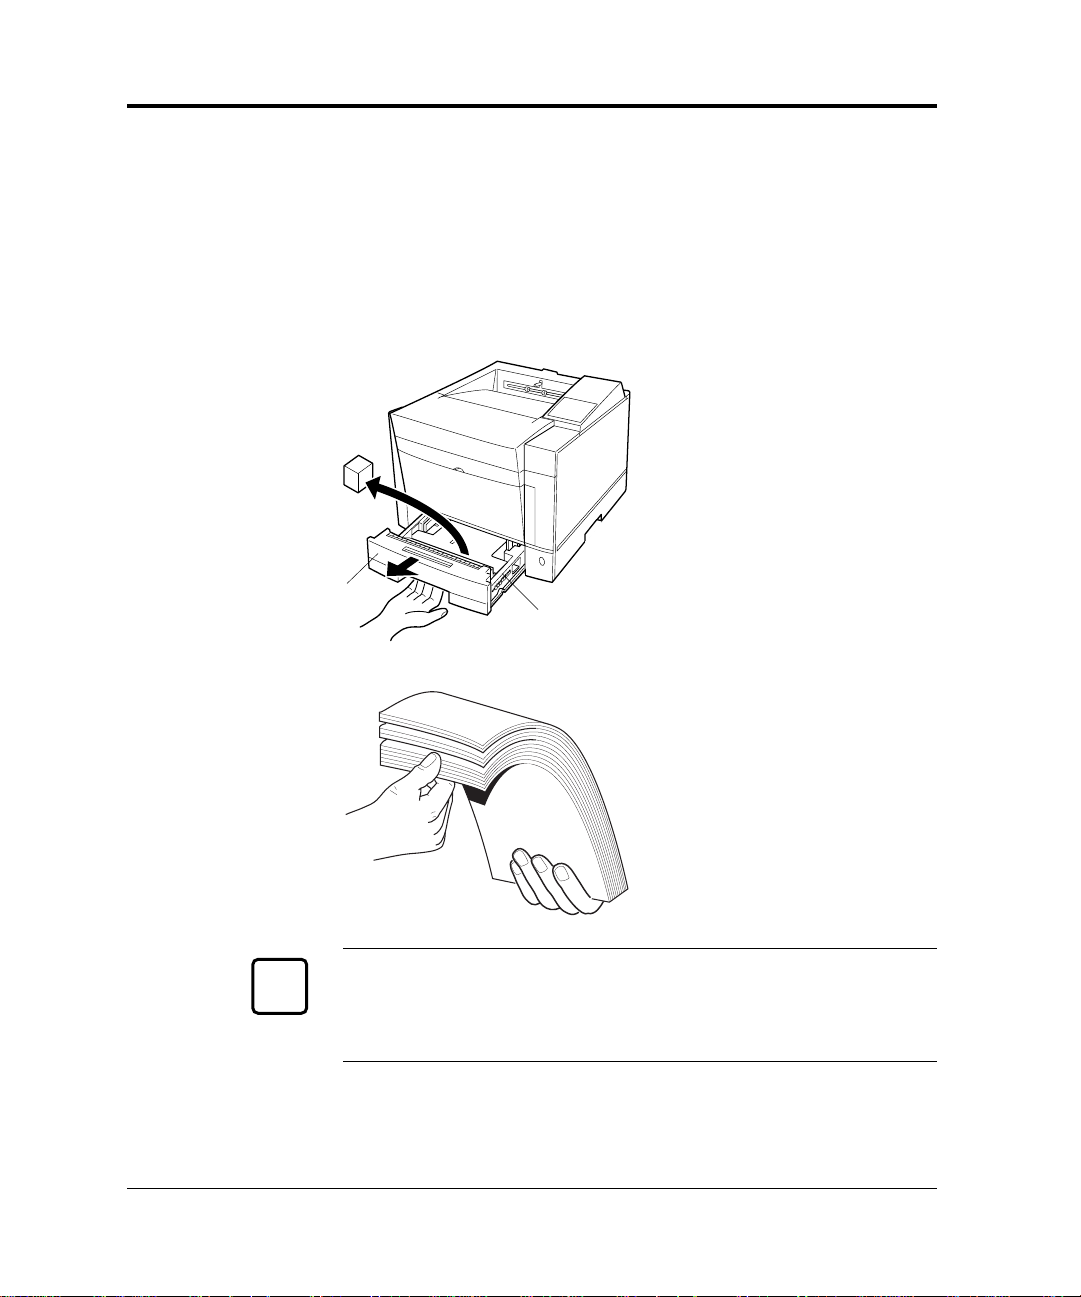
Loading Paper and Installing the Paper Tray
This printer has a single paper tray that is preset for letter size (8.5 x 11.0
inches) paper for U.S. customers and to A4 size (210 x 297 mm) paper
for European customers. (You can adjust the paper tray to a different size
paper. See Chapter 3. You can purchase an optional paper tray. See
Chapter 4 and Appendix B.) You should load about 50 sheets of copier
paper to test the printer.
1. Pull the paper tray out of the
printer.
q
2. Prepare the paper tray.
Remove restraint cushion q.
Check green indicator w is
*
w
positioned according to the
tray size label (*).
3. Prepare a paper stack.
Prepare paper of the size
indicated by the size label (*).
Fan the paper stack both ways
to prevent sheets from
sticking together.
Notice:
Put the paper stack in the paper tray with the printing side faced down.
☞
If paper is curled, remove the curl.
1-10 User’s Manual
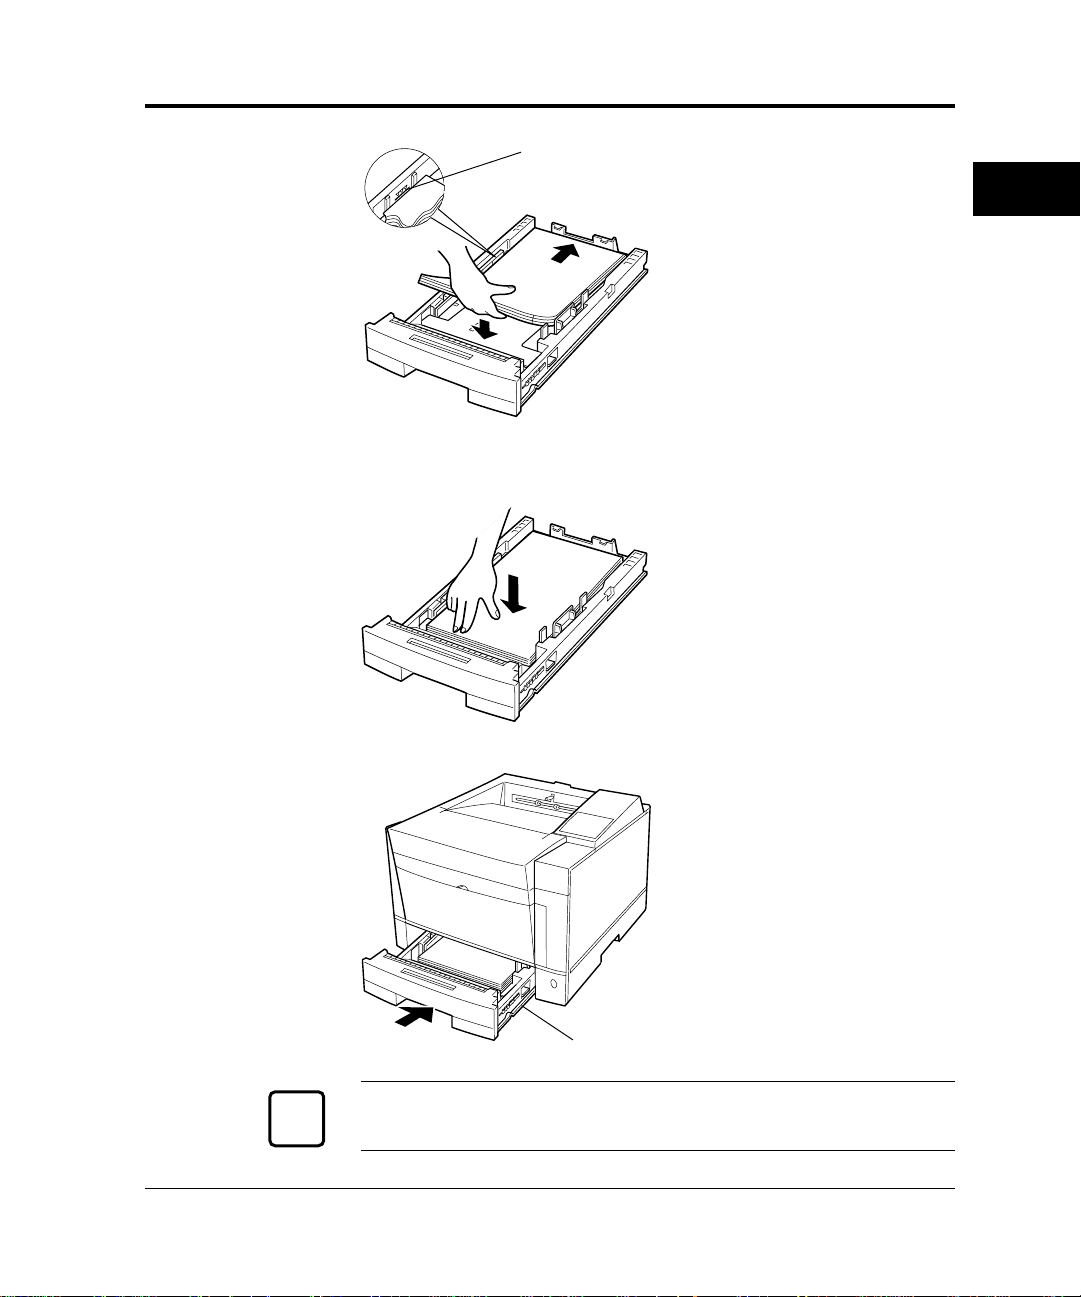
Setting Up
Limit mark
4. Load the paper. Place the
front portion of the paper
stack on the tray and slide it
backwards so that the stack is
placed under the two
stoppers. Gather the edges of
the stack together to ensure
correct positioning of paper
in the tray.
Make sure the stack does not
exceed the limit mark.
5. Lock the pressure plate. If
the front of the stack is raised,
push it down until the
pressure plate clicks into
place.
GETTING
STARTED
6. Install the paper tray. Align
the sides of the tray with the
guide grooves of the tray slot
and firmly slide the tray all
the way into the slot.
Guide
Notice:
You cannot install the paper tray with the pressure plate raised.
☞
User’s Manual 1-11
Setting Up
q
Notice:
If the paper guide is not in the locked position, the printer will not work.
☞
7. Remove the protective
material from the rear
stacker. Open the rear stacker
and remove restraint cushion
q. Make sure the paper
guide is pushed down in the
locked position. Close the
rear stacker.
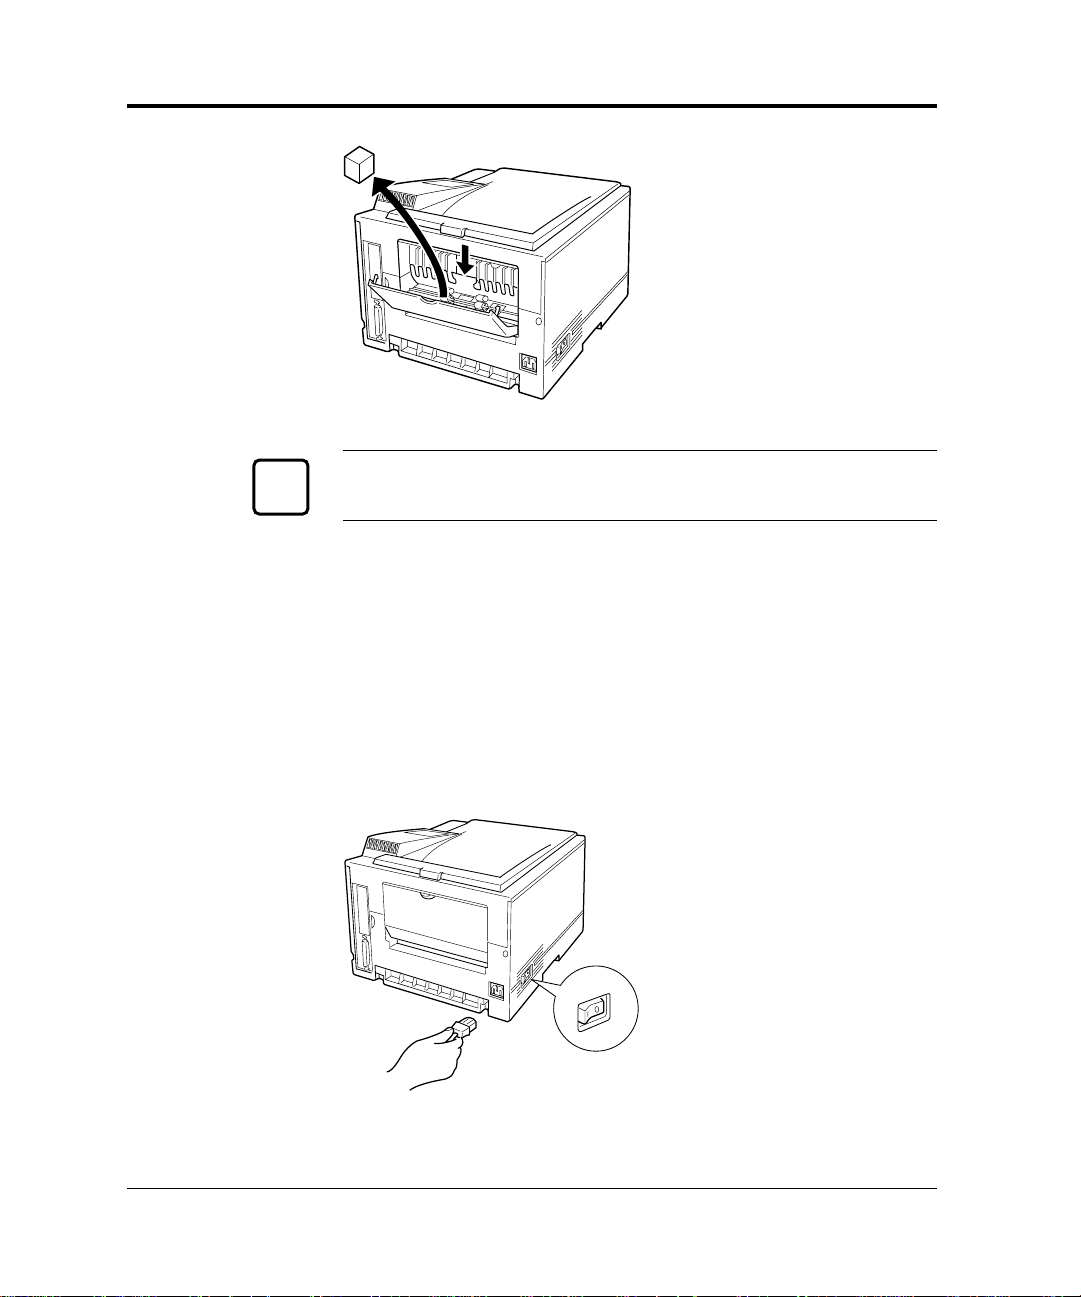
Connecting the Power Cord
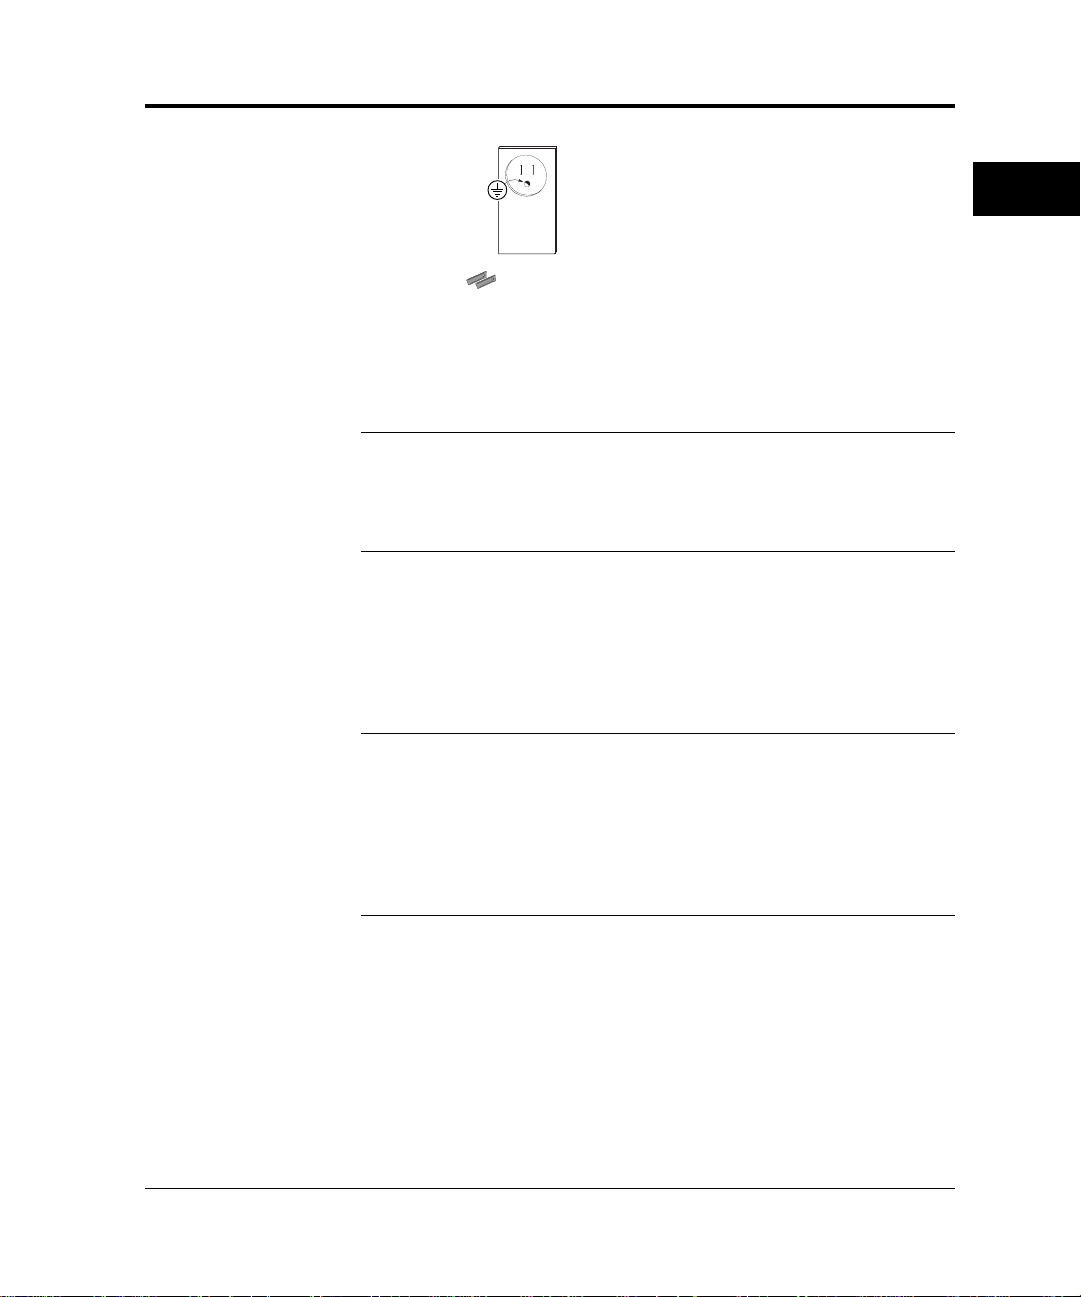
This printer comes equipped with one of the two voltage ratings:
• 120 VAC (such as for the USA)
• 220 to 240 VAC (such as for Europe)
The manufacturer’s nameplate on the back of the printer indicates this
rating. Confirm that the rated voltage of your printer matches the voltage
of your power outlet.
1. Check that the printer is
turned off. The “O”-marked
side of the switch should be
depressed.
2. Plug the female end of the
power cord into the
connector on the left back
of the printer.
1-12 User’s Manual
Connecting the Printer to Your Computer
3. Plug the male end into a
wall outlet.
Caution:
For your safety, use only a properly grounded outlet. To avoid possible
electromagnetic interference or power supply problems, do not use an
extension cord.
This section explains how to connect the printer to your computer via
the parallel interface. For information about the serial interface (option),
see Chapter 4.
GETTING
STARTED
Notice:
The following restrictions apply to interface cables:
• To comply with regulations for radio frequency emissions, use only
shielded cable for computer-to-printer communications.
• The length of the parallel interface cable must be 3 meters (10 feet) or
less.
About Interfacing
You can connect the printer to your computer using a standard parallel
interface. Many computers have a parallel interface port. However, if
your computer does not have the parallel interface port, or for printers
used in a network, the following optional interfaces
User’s Manual 1-13
are available.

Connecting the Printer to Your Computer
• Serial (RS-232C/422A)
Use a serial interface if the printer is not near the computer. Many
computers have both parallel and serial interface ports. Serial
communication can operate up to 15 meters (50 feet). Parallel
communication is normally limited to 3 meters (10 feet).
• LocalTalk
Use the LocalTalk interface if the printer is connected to a Macintosh
network.
• Ethernet C
Use Ethernet C if the printer is used in a NetWare or UNIX
environment.
For any of these options refer to Chapter 3.
Connecting to the Parallel Port
This printer does not come with a parallel interface cable. You can use a
standard Centronics interface cable (sold separately) for this purpose.
Your dealer can advise you on the cable you require.
Notice:
Be sure the printer is turned off before connecting the interface.
☞
Do not touch any connector contacts or corona wires to avoid possible
electrostatic damage to the printer.
To make the connection, plug
the cable connector into the
parallel interface port on the
back of the printer. Secure the
connector with the wire clips.
Plug the other connector into
your computer’s parallel port.
Consult your computer
documentation if you need
p.
hel
1-14 User’s Manual
Connecting the Printer to Your Computer
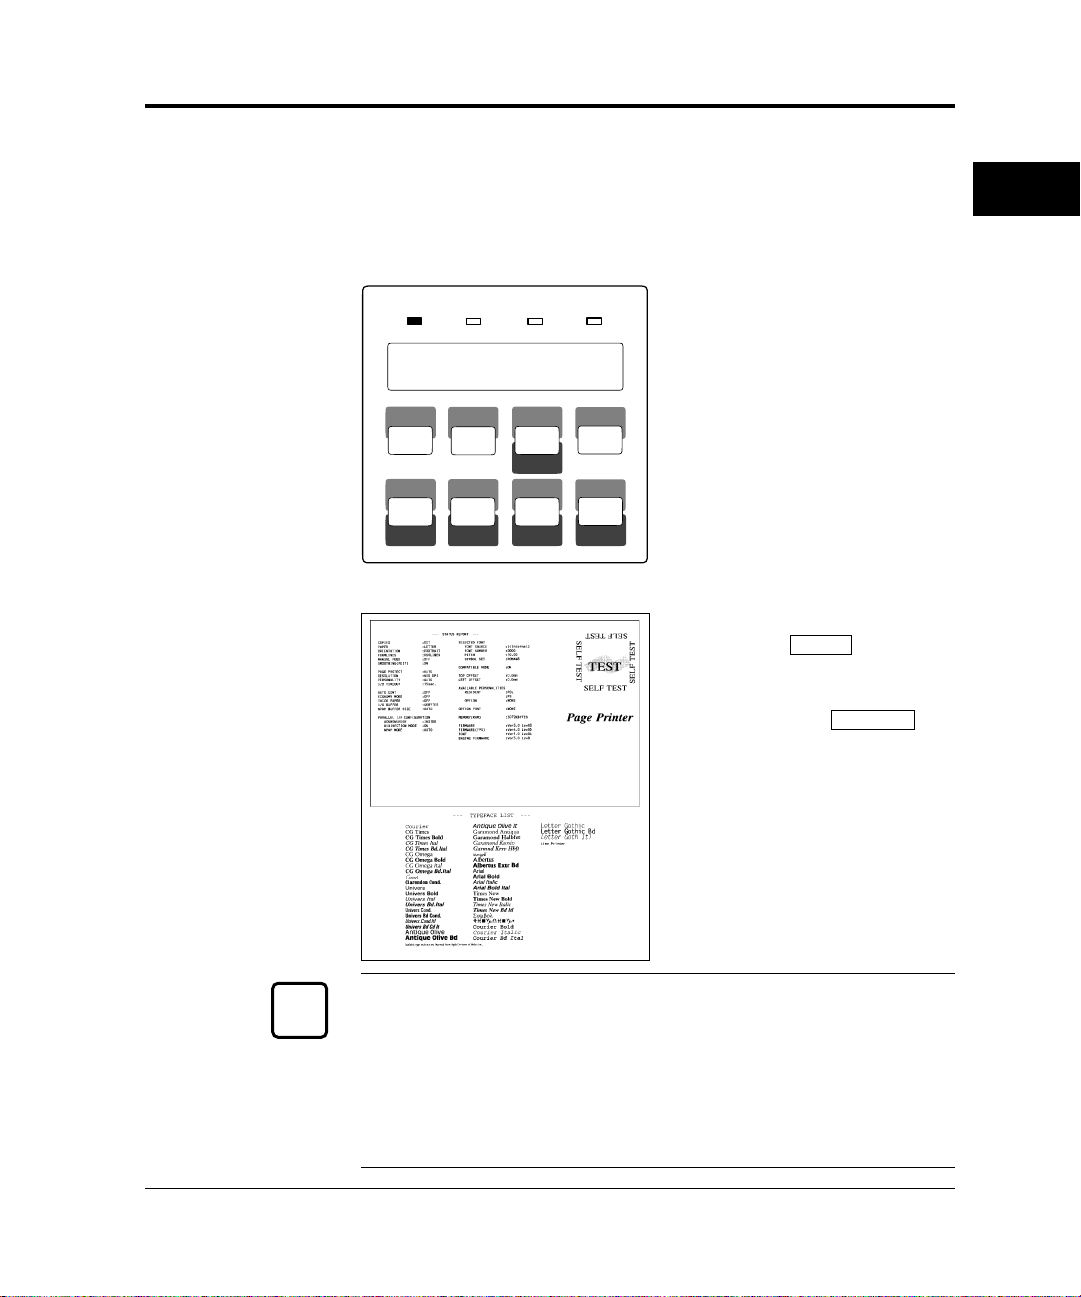
Printing a Test Page Offline
The printer has a status report function which prints a page summarizing
printer option settings and showing samples of resident fonts. Use this
function to check the printer performance offline.
GETTING
STARTED
POWER
READY
CONT.
RESET
ONLINE
FORM
FEED
TRAY
SELECT
MFF
PAPER SIZE
DATA
MENUREADY
RESET
MENU
ENTER
SELF
TEST
ERROR
PRINT
FONT
1. Turn the printer on. The
printer initializes the
mechanism and then enters
the ready state. The message
display indicates
+
–
<<<INITIALIZE>>>
WARMING UP,
then
READY
,
.
2. Print a test page offline.
Press the
READY
button to
put the printer offline (the
ONLINE indicator turns
off). Press the
SELF TEST
button for more than five
seconds. The message display
indicates
SELF TEST
and
the DATA indicator flashes.
A status report page is
printed. Check that the
printing is successful.
Notice:
With the FPS card (option) installed in the printer, the status report is
☞
for either the PCL emulation (standard) or the FPS emulation depending
on the emulation you used for printing the last document; however, the
status report is for the FPS emulation if it is printed immediately after
the printer is turned on. To clearly select the report, use the test menu in
setup mode.
User’s Manual 1-15
 Loading...