


LUMINESCENT IMAGE ANALYZER
LAS-3000
OPERATION GUIDE
2nd Edition 2004. Jun.

Introduction
Thank you for purchasing the FUJIFILM Luminescent Image Ana-
lyzer LAS-3000.
This guide is used for explanation of the equipment. Therefore,
this guide simply describes each function and usage. Please see
the Operation Manual for more detailed informations.
Index
1 |
Features of the Luminescent Image Analyzer |
3 |
|
2 |
System Configuration and Parts Identification |
3 |
|
3 |
Preparation for Exposure |
6 |
|
|
1 |
Activation |
6 |
4 |
2 |
Setting of Samples |
6 |
Exposure of Samples (Lite mode) |
7 |
||
|
1 |
Setting of Mode |
7 |
|
2 |
Method and Tray position Setting |
7 |
|
3 |
Adjustment of Focus |
8 |
|
4 |
Exposure Type and Exposure Time Setting |
8 |
|
5 |
Setting of Sensitivity |
8 |
|
6 |
Exposure |
9 |
|
7 |
Saving the Exposed Image |
9 |
|
8 |
Printing the Exposed Image |
10 |
5 |
9 |
Termination |
10 |
Exposure of Samples (Pro mode) |
11 |
||
6 |
Cautions on Use |
12 |
|
|
1 |
Sample Tray |
12 |
Appendix |
12 |
||
|
■ Exposure Type |
12 |
|
|
■ Operation required to be carried out for exposure with |
|
|
|
|
green and red LED incident light sources (Optional) |
13 |
|
■ Detection Sensitivity and Number of Pixels |
14 |
|
|
■ Detection Reagents and Settings of LAS-3000 |
14 |
|
In LAS-3000, the excitation light (incident/transmitted light), filter, lens, and the components of the analytic part vary depending on the system you are using. Please confirm each system. The basic system of “LAS-3000” is described in this Operation Guide.
2
1 Features of the Luminescent Image Analyzer
In LAS-3000, chemiluminescent and fluorescent samples can be detected in high sensitivity, Dark frame correction and Flat frame correction are equipped for the quantitative analysis of the images. A digitized image of stained gel, membrane or film can be obtained by white light illumination.
●A super CCD camera of 3,200,000 pixels is employed. A high-resolution image of 6,300,000 pixels is obtained by the special image processing procedure.
●A newly designed lens of F0.85 with remote focus and remote iris is mounted.
Chemiluminescence can be detected in high sensitivity through use of a four-step pixel binning function.
●Fluorescence can be detected in high sensitivity using a UV transmitted illuminator and incident blue LED.
●Wider range of fluorescent reagents can be detected by the use of green and red incident LEDs in addition to the blue one (Optional).
●The operability is remarkably improved by the newly designed Image Reader software.
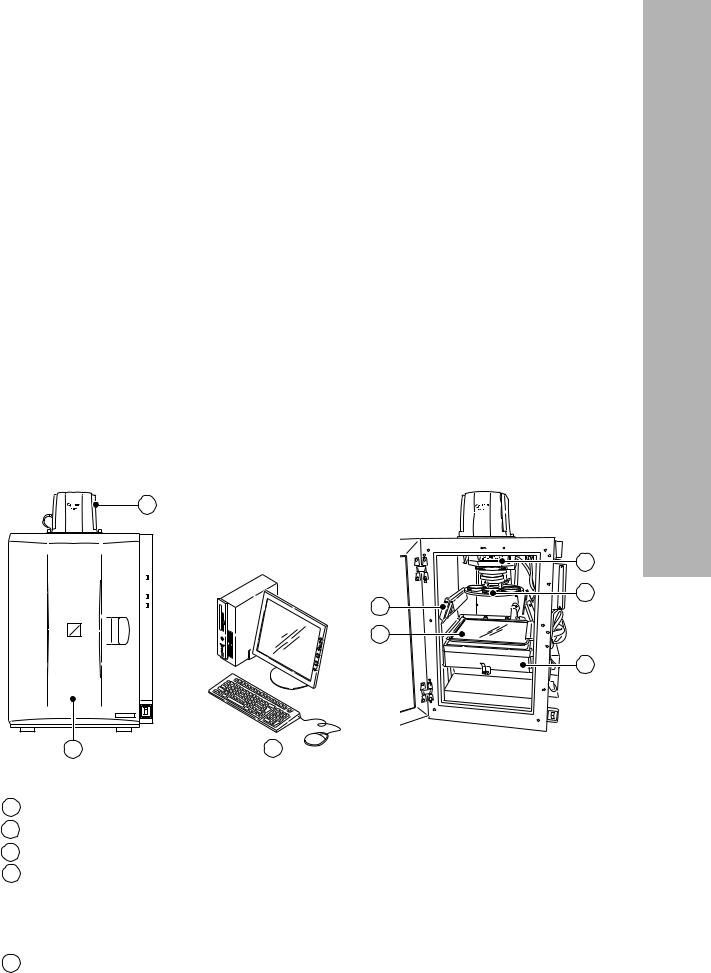
2 System Configuration and Parts Identification
< System configuration of LAS-3000: An Example > |
< Internal view of intelligent dark box (IDX) > |
1
3
6
4 7
5
|
2 |
8 |
|
|
|
|
Name |
Description |
|
|
|
1 |
Camera head |
CCD cooling function and image data output USB port |
2 |
Intelligent dark box (IDX) |
Dark box |
3 |
Lens unit |
F0.85/43mm |
4 |
Incident light source |
Blue LED (460nm) incident light sources |
|
|
White LED incident light sources |
|
|
Green LED (520nm) incident light sources (Optional) |
|
|
Red LED (630nm) incident light sources (Optional) |
|
|
|
5 |
Transmitted light source |
312nm UV light source or |
|
|
White transmitted light source |
GUIDE OPERATION 3000-LAS
3

6 |
Filter |
Y515Di (filter for blue LED) |
|
|
605DF40 (EtBr detecting filter) |
|
|
510DF10 (GFP detecting filter) |
|
|
575DF20 (filter for green LED) (Optional) |
|
|
R670 (filter for red LED) (Optional) |
|
|
|
7 |
Sample tray |
EPI tray (for chemiluminescence and incident light source) |
|
|
DIA tray (for transmitted light source) |
|
|
NP tray (for titer plate) |
|
|
DIA-UV tray (for UV transmitted light source) |
|
|
|
8 |
Computer |
Exposure operation and analysis work |
● |
Pictrography |
High quality digital color printer |
4

Image Reader Software
The Image reader software consists of Lite and Pro modes. In the Lite mode, luminescence can be easily detected because a detection method has been set. In the Pro mode, advanced combination can be set.
< Screen in Lite mode >
Menu
Exposure Type
Sets the exposure method.
Exposure Time 
Sets the exposure time.
Sensitivity
Sets the sensitivity.
Image acquire & Digitize
A digitized image is also exposed consecutively with a Chemiluminescence image (only when the method is Chemiluminescence).
The setting state such as the temperature condition of CCD is displayed.
The tray positon and light  conditions in the intelligent dark box(IDX)is displayed.
Pro mode selector button
Press this button to switch to the Pro mode.
Method/Tray position |
Focusing |
Start |
Sets the detection method |
Adjusts the focusing. |
Starts the |
and tray position. |
|
exposure. |
< Screen in Pro mode >
Menu
Exposure Type
Sets the exposure method.
Exposure Time 
Sets the exposure time.
Sensitivity/Resolution 
Sets the sensitivity and resolution.
Invert Pixels
Exposes the image whose concentration value is inverted.
The setting state such as the temperature condition of CCD is displayed.
The tray positon and light  conditions in the intelligent dark box(IDX)is displayed.
Lite mode selector button
Press this button to switch to the Lite mode.
Darkbox option setting |
Focusing |
Start |
Sets the light source, filter, and |
Adjusts the focusing. |
Starts the |
tray position. |
|
exposure. |
GUIDE OPERATION 3000-LAS
Please use the Pro mode, in case of using green LED or red LED incident light source. Please use the Lite
mode for imaging of chemiluminescence, digitizing, EtBr detection by UV light source, fluorescence detec- 5 tion by blue LED, using the preset conditions.
 Loading...