


Operation Manual
Version 2.0
2006. Mar

2006. Mar
Contents |
2006. Mar |
|||
|
Contents |
|
|
|
|
|
|
|
|
|
|
|
|
|
Part 1 Preparations Before Use ...................................................................... |
1 |
|
|
|
|
|
|
|
|
1. Starting the Image Reader ................................................................................................. |
2 |
|
|
|
2. About the Main Window ..................................................................................................... |
4 |
|
||
|
|
|
|
|
Part 2 Reading Imaging Plates ........................................................................ |
5 |
|
|
|
|
|
|
|
|
1. |
Setting the Reading Conditions.......................................................................................... |
6 |
|
|
2. |
Setting the IP on the IP Stage ............................................................................................ |
8 |
|
|
3. |
Setting the IP Stage on the FLA-7000 ............................................................................... |
8 |
|
|
4. Starting Reading ................................................................................................................ |
9 |
|
||
|
|
|
||
Part 3 Reading Fluorescent Samples ........................................................... |
13 |
|
||
|
|
|
|
|
1. |
Setting the Reading Conditions........................................................................................ |
14 |
|
|
2. |
Setting a Fluorescent Sample on the FLUOR Stage........................................................ |
17 |
|
|
3. |
Setting the FLUOR Stage on the FLA-7000 ..................................................................... |
17 |
|
|
4. Starting Reading .............................................................................................................. |
17 |
|
|
|
|
|
|
||
Part 4 Reading Digitized Samples ................................................................ |
21 |
|
||
|
|
|
|
|
1. |
Setting the Reading Conditions........................................................................................ |
22 |
|
|
2. Setting a Digitized Sample on the FLUOR Stage............................................................. |
25 |
|
|
|
3. |
Setting the FLUOR Stage on the FLA-7000 ..................................................................... |
25 |
|
|
4. Starting Reading .............................................................................................................. |
25 |
|
|
|
|
|
|
|
|
Part 5 Lasers and Filters, Other Settings ..................................................... |
29 |
|
|
|
|
|
|
|
|
1. Registering Laser and Filter Combinations (Method) ....................................................... |
30 |
|
|
|
2. |
Filter Module Settings (Filter Module) .............................................................................. |
31 |
|
|
|
2a. Registering Filters in the Image Reader ............................................................................................ |
31 |
|
|
|
2b. Saving the Four Types of Filter Combinations .................................................................................... |
34 |
|
|
|
2c. Recalling Four Types of Filter Combinations ...................................................................................... |
35 |
|
|
|
2d. Registering a New Filter Name .......................................................................................................... |
35 |
|
|
3. Other Settings (Preference )... .......................................................................................... |
36 |
|
|
|
|
3a. Settings for Scanning (Scan Settings) ............................................................................................... |
36 |
|
|
|
3b. Selecting the File Format for Saving and the Analyzing Software to Launch (Image File Settings) ... 38 |
|||
|
|
|
|
|
Part 6 Installing and Uninstalling the Software ........................................... |
41 |
|
|
|
|
|
|
|
|
1. Installation (For Windows®) .............................................................................................. |
42 |
|
|
|
|
1a. Installation of FUJI USB Control Driver .............................................................................................. |
42 |
|
|
|
1b. Installation of FUJI USB Function Driver............................................................................................ |
47 |
|
|
|
1c. Installation of Image Reader FLA-7000 Software .............................................................................. |
48 |
|
|
2. Uninstallation (For Windows®) .......................................................................................... |
49 |
|
|
|
i

2006. Mar
3. Installation (For MacintoshTM) ........................................................................................... |
50 |
4. Uninstallation (For MacintoshTM)....................................................................................... |
50 |
Part 7 Troubleshooting ................................................................................... |
51 |
1. Errors ............................................................................................................................... |
52 |
2. Warnings .......................................................................................................................... |
52 |
ii

Part
1
Preparations Before Use
|
2006. Mar |
1. Starting the Image Reader |
|
|
|
1. Starting the Image Reader |
Caution |
Please note that the GUI screens may change without notice.
Note1:
The Image Reader FLA-7000 software is available in two types: a Windows version, and a Macintosh version. Both versions have the same functions.
This manual uses the screens of the Windows version. If you are using the Macintosh version, follow the instructions in this manual, except those of OS-related operations (such as starting and exiting the software).
Note2:
The following computers are compatible:
OS: Windows XP Professional SP2 or later, Mac OS X 10.3 or later
Memory: 512 MB Interface: USB 2.0
Precautions for Use
Do not connect any USB devices other than the FLA-7000 to the computer in which the Image Reader is installed. Otherwise, it may cause malfunction.
During reading, do not use any USB devices other than the FLA7000 connected to the computer. If USB devices are used simultaneously, image data may be lost.
1-1 Turn on the FLA-7000 and peripheral devices.
Caution
If an Imaging Plate is inserted in the FLA-7000 before turning it on, its scanned data cannot be guaranteed. The sensitivity of the Imaging Plate may deteriorate, based on the self-diagnosis of the FLA-7000.
USB
Connection
1-2 Turn on the computer.
2
1. Starting the Image Reader |
2006. Mar |
|
|
|
|
1-3 Make sure that the FLA-7000 has completed the warm-up. (Only the power lamp on the upper left panel on the front of the FLA7000 is lit up when the warm-up is completed.)
Then, perform the procedures below.
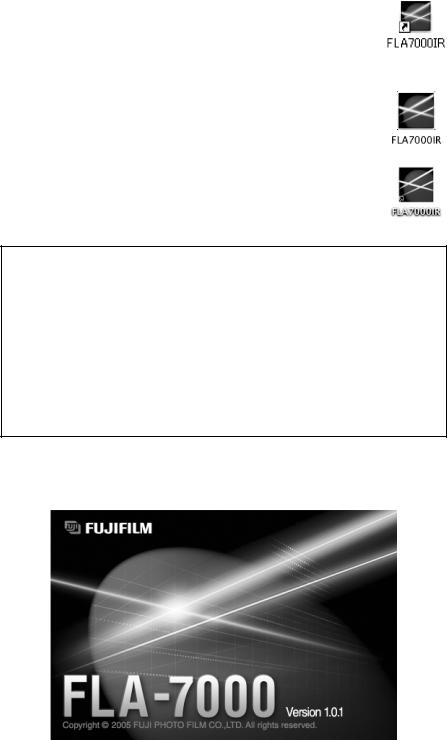
For the Windows version:
Start the Image Reader FLA-7000 software from the
Startup menu, or use the shortcut key.
Shortcut Key
For the Macintosh version:
Double-click the alias or the software to start the
Image Reader FLA-7000 software.
Software
Alias
Note:
After starting the Image Reader, its condition is displayed in the
Status area.
•When disconnected:
Cannot recognize FLA-7000. Please check connection and power.
•During warm-up:
FLA-7000 is in self-diagnosis. Please wait.
•When reading is possible: Ready
1-4 The main window of the Image Reader FLA-7000 software is displayed.
3

|
2006. Mar |
2. About the Main Window |
|
|
|
2. About the Main Window
IP Mode
Click when reading an imaging plate.
Fluorescence Mode
Click when reading fluorescent samples.
Digitizing Mode
Click when performing digitizing.
Method
Click this button to register or erase combinations of lasers and filters.
Filter Module
Use this button to change or register the filter.
Preference... |
Filter |
Use this button to set |
The loaded filters |
the display menu, file |
are displayed. |
format, or the Log/ |
|
Square Root of image |
|
data type. |
|
Status
The status of the FLA-7000 is displayed.
Ready
The FLA-7000 is ready for scanning.
Laser
The conditions of the loaded laser units are displayed.
In this example, there are four types of laser units loaded:
LD 670 nm laser, LD 650 nm laser, LD 473 nm laser, LD 635 nm laser.
All the laser units except for the LD 670 nm laser are ready for operation (OK).
The condition of the LD 670 nm laser shows that it cannot be used (NG).
4

Part
2
Reading Imaging Plates
|
2006. Mar |
1. Setting the Reading Conditions |
|
|
|
1.Setting the Reading
Conditions
1-1 Click the  button.
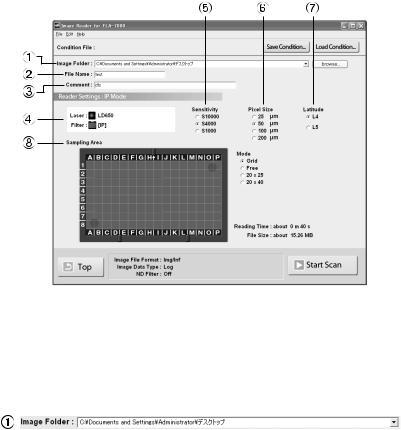
The Reader Settings window for the IP mode is displayed.
 : Return to the main window from the IP mode.
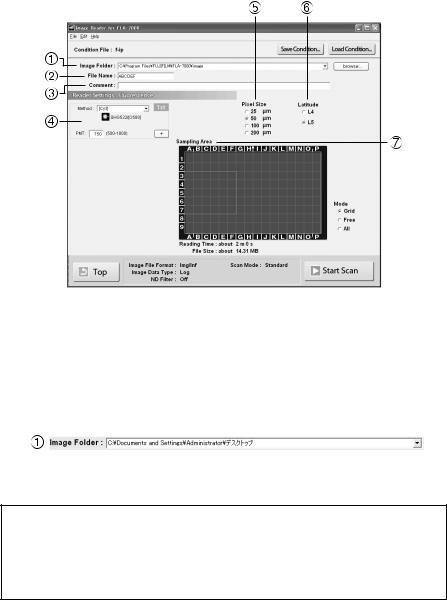
1-2 Make these settings before reading IPs.
Refer to the following explanations of reading conditions when making settings.
:
Specify where to save the file after reading.
Click the  button.

 :
:
Input the name of a file for saving data of a read image.
You may not start reading unless you input a file name.

 :
:
The comment is saved with the image as a file, and can be viewed with the analyzing software. Input it if necessary.
6
1. Setting the Reading Conditions |
2006. Mar |
|
|
|
|
 Before starting reading, make sure that the LD 650 nm laser is shown and the IP filter is selected in the Setting field as shown below.
In IP reading, the LD 650 nm laser and IP filter are selected automatically.
The laser used for reading is displayed.
The filter used for reading is displayed.
Note:
To use the IP mode, the LD 650nm laser must be loaded, and the IP filter must be set. If these conditions are not fulfilled, the Reader Settings window for the IP mode cannot be accessed.
: Click to select from three types of reading sensitivity, as
shown on the left.
S10000
Sensitivity: high
Sensitivity: low
S1000
: Set the pixel size for reading. Click to select from one of the 4 types, as shown on the left. A sample with a smaller pixel size is analyzed more finely.
200 |
100 |
50 |
25 m |
||
|
|
|
|
|
|
Short |
Reading Time |
Long |
|||
|
|
|
|
|
|
Small |
Image File Size |
Large |
|||
: Specify the dynamic range. The dynamic range that can be detected is bigger with L5 than with L4. If the signals of the sample are in the L4 range, the density gradation is represented more finely if L4 is selected.
7
|
2006. Mar |
2. Setting the IP on the IP Stage/3. Setting the IP Stage on the FLA-7000 |
|
|
|
2.Setting the IP on the IP Stage
3.Setting the IP Stage on the FLA-7000
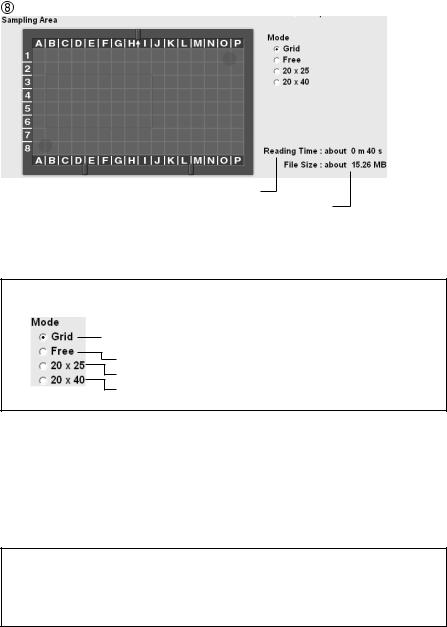
Estimated time until reading finishes.
Size of the file.
Drag and select the scanning area on the IP stage.
Note:
 Select this to specify the reading area based on the 2.5 cm grid lines on the IP stage.
Select this to specify the reading area arbitrarily. Select this to specify a reading area of 20 cm x 25 cm. Select this to specify a reading area of 20 cm x 40 cm.
 : Use this button when saving the reading conditions in a file. You may save reading conditions that are used frequently with this function and recall them later with
  .
.
 : Use this button when recalling reading conditions saved with
 .
.
Note:
When starting the Image Reader, the settings information from the previous session is displayed.
Set the IP on the IP stage.
For instructions on setting the IP, see the Fluorescent Image Analyzing System FLA-7000 Operation Manual.
Set the IP stage on the FLA-7000.
For instructions on setting the IP stage on the FLA-7000, see the Fluorescent Image Analyzing System FLA-7000 Operation Manual.
8
4. Starting Reading |
2006. Mar |
|
|
|
|
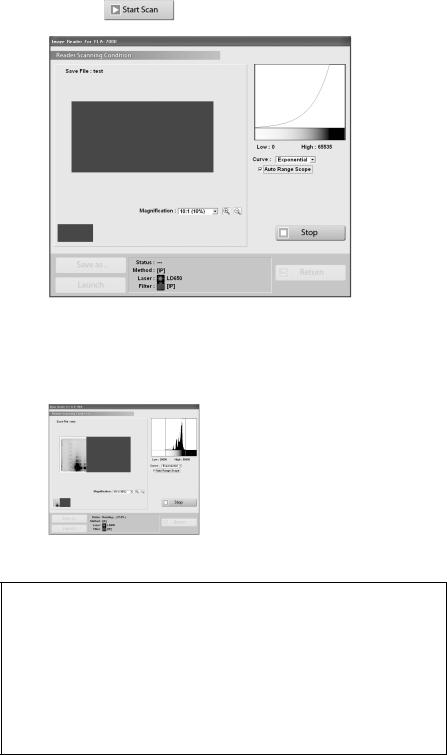
4. Starting Reading |
4-1 |
Click the |
button to start reading. |
The scanned area is displayed in the real-time window, as shown below.
The stage is read from the left towards the right.
Reading may be finished at any time before the whole scanning area has completed reading. Click the  button when you want to finish reading.
Note1:
If you click Stop during reading, the part that has not been read yet will be saved as an image with a data value of 0 (light intensity of 0).
Note2:
When you click the  button, reading itself is canceled. You cannot start reading again from the location where reading stopped.
9
|
2006. Mar |
4. Starting Reading |
|
|
|
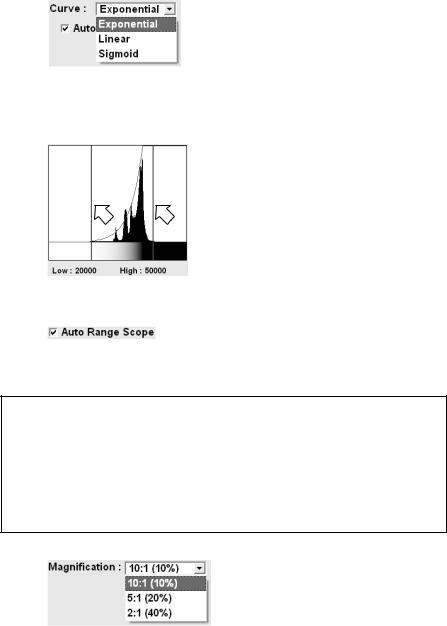
4-2 When you want to change the display parameters of the real-time window, refer to the explanations below.
: Select the type of tone curve from the pulldown menu.
Exponential: The exponential tone curve is
|
used to adjust gradations. |
Linear: |
The linear tone curve is used |
|
to adjust gradations. |
Sigmoid: |
The sigmoid tone curve is |
|
used to adjust gradations. |
: Drag the adjuster.
You may adjust the density of the read image.
Data of a lower light intensity that the line on the left (Low value) will be displayed as a completely white image, and data of a higher light intensity than the line on the right (High value) will be displayed as a completely black image.
: If Auto Range Scope is checked, the Image Reader automatically corrects the optimum tone.
Note:
The Image Reader converts data read from samples to images that have an information of 65536 tones, with 0 being the value for white, and 65535 being the value for black.
The tones are indicated by the horizontal axis of the tone curve graph.
: You may change the display area by selecting a magnification ratio from the pull-down menu. In addition, after reading, if you click the display area after clicking the  buttons, the clicked area can be enlarged or reduced.
10

4. Starting Reading |
2006. Mar |
|
|
|
|
4-3 |
: Save the data with a different file name. |
 : Launch the registered analyzing software to display the image.
4-4 To read a second IP continuously, carry out reading by following the above procedures.
Click the  button to return to the first Reader Settings window.
Do not open the stage door of the FLA-7000 until the stage has completely returned. If it is opened, close it immediately. When scanning finishes, the  and
and  buttons become active, but the
  button is grayed out until the stage has completely returned.
4-5 Finish reading.
Before turning off the power of the FLA-7000, shut down the Image Reader software.
11

|
2006. Mar |
4. Starting Reading |
|
|
|
Note:
If the photo-multipliers (PMT) are replaced with a multi-alkali PMT, the IP mode switches from that of the regular IP mode to a PMT voltage adjustment mode. The PMT voltage adjustment mode differs from the regular IP mode in that a sensitivity level that matches the scanned sample can be set independently. Replacement of the standard PMT with a multi-alkali PMT is done by a serviceman. For details, contact an authorized dealer.
The Sensitivity settings differ from that of the regular IP mode. The operation procedures for other settings are the same as those of the regular IP mode. Follow the operation procedures of the regular IP mode.
IP mode
PMT voltage adjustment mode
You may set the voltage to be applied to the PMT as an integral value within the predetermined range. The larger the value is, the higher the sensitivity, but noise will be greater.
200V |
1000V |
||
|
|
Value |
|
Small |
|
|
Large |
|
|
||
|
|
Sensitivity |
|
Low |
|
|
High |
|
|
||
12

Part
3
Reading Fluorescent Samples
|
2006. Mar |
1. Setting the Reading Conditions |
|
|
|
1.Setting the Reading
Conditions
1-1 Click the  button.
The Reader Settings window for the Fluorescence mode is displayed.
 : Return to the main window from the Fluorescence mode.
1-2 Make these settings before reading fluorescent samples. Refer to the following explanations of reading conditions when making settings.
:
Click the  button and specify where to save the file after reading.
Note:
When scanning multiple times, the image data is saved in the folder with the name specified in File Name, which is automatically created in the specified location.

 :
:
Input the name of a file for saving data of an image.
You may not start reading unless you input a file name.
14
 Loading...