


FujiFilm 16229945, XP100, 16231792, 16229646, XP160 User Manual
...DIGITAL CAMERA
FINEPIX XP150/XP160 FINEPIX XP100/XP110
Owner’s Manual
Thank you for your purchase of this product. This manual describes how to use your FUJIFILM digital camera and the supplied software. Be sure that you have read and understood its contents and the warnings in “For Your Safety”(Pii) before using the camera.
For information on related products, visit our website at http://www.fujifilm.com/products/digital_cameras/index.html
BL01640-201 EN
Before You Begin
First Steps 
Basic Photography and Playback 
More on Photography 
More on Playback 
Movies 
Connections 
Menus 
Technical Notes 
Troubleshooting 
Appendix 

 For Your Safety
IMPORTANT SAFETY INSTRUCTIONS
•Read Instructions: All the safety and operating instructions should be read before the appliance is operated.
•Retain Instructions: The safety and operating instructions should be retained for future reference.
•Heed Warnings: All warnings on the appliance and in the operating instructions should be adhered to.
•Follow Instructions: All operating and use instructions should be followed.
Installation
Power Sources: This video product should be operated only from the type of power source indicated on the marking label. If you are not sure of the type of power supply to your home, consult your appliance dealer or local power company. For video products intended to operate from battery power, or other sources, refer to the operating instructions.
Grounding or Polarization: This video product is equipped with a polarized alternatingcurrent line plug (a plug having one blade wider than the other). This plug will fi t into the power outlet only one way. This is a safety feature. If you are unable to insert the plug fully into the outlet, try reversing the plug. If the plug should still fail to fi t, contact your electrician to replace your obsolete outlet. Do not defeat the safety purpose of the polarized plug.
Alternate Warnings: This video product is equipped with a three-wire grounding-type plug, a plug having a third (grounding) pin. This plug will only fi t into a grounding-type power outlet. This is a safety feature. If you are unable to insert the plug into the outlet, contact your electrician to replace your obsolete outlet. Do not defeat the safety purpose of the grounding type plug.
Overloading: Do not overload wall outlets and extension cords as this can result in a risk of fi re or electric shock.
Ventilation: Slots and openings in the cabinet are provided for ventilation, to ensure reliable operation of the video product and to protect it from overheating, and these openings must not be blocked or covered. The openings should never be blocked by placing the video product on a bed, sofa, rug, or other similar surface.
This video product should not be placed in a built-in installation such as a bookcase or rack unless proper ventilation is provided or the manufacturer’s instructions have been adhered to. This video product should never be placed near or over a radiator or heat register.
Attachments: Do not use attachments not recommended by the video product manufacturer as they may cause hazards.
Water and Moisture: Do not use this video product near water—for example, near a bath tub, wash bowl, kitchen sink, or laundry tub, in a wet basement, or near a swimming pool, and the like (excluding waterproof products).
Power-Cord Protection: Power-supply cords should be routed so that they are not likely to be walked on or pinched by items placed upon or against them, paying particular attention to cords at plugs, convenience receptacles, and the point where they exit from the appliance.
Accessories: Do not place this video product on an unstable cart, stand, tripod, bracket, or table. The video product may fall, causing serious injury to a child or adult, and serious damage to the appliance. Use only with a cart, stand, tripod, bracket, or table recommended by the manufacturer, or sold with the video product. Any mounting of the appliance should follow the manufacturer’s instructions, and should use a mounting accessory recommended by the manufacturer.
An appliance and cart combination should be moved with care. Quick stops, excessive force, and uneven surfaces may cause the appliance and cart combination to overturn.
ii

For Your Safety
Antennas
Outdoor Antenna Grounding: If an outside antenna or cable system is connected to the video product, be sure the antenna or cable system is grounded so as to provide some protection against voltage surges and builtup static charges. Section 810 of the National Electrical Code, ANSI/NFPA No. 70, provides information with respect to proper grounding of the mast and supporting structure, grounding of the lead-in wire to an antenna discharge unit, size of grounding conductors, location of antenna discharge unit, connection to grounding electrodes, and requirements for the grounding electrode.
EXAMPLE OF ANTENNA GROUNDING AS PER
NATIONAL ELECTRICAL CODE
Ground Clamp |
Antenna Lead |
|
in Wire |
Electric Service
Equipment
Ground Clamps 
Power Service Grounding
Electrode System (NEC ART
250. PART H)
Antenna Discharge Unit  (NEC SECTION 810-20)
Grounding
Conductors
(NEC SECTION
810-21)
Power Lines: An outside antenna system should not be located in the vicinity of overhead power lines or other electric light or power circuits, or where it can fall into such power lines or circuits. When installing an outside antenna system, extreme care should be taken to keep from touching such power lines or circuits as contact with them might be fatal.
Use
Cleaning: Unplug this video product from the wall outlet before cleaning. Do not use liquid cleaners or aerosol cleaners. Use a damp cloth for cleaning.
Object and Liquid Entry: Never push objects of any kind into this video product through openings as they may touch dangerous voltage points or short out parts that could result in a fi re or electric shock. Never spill liquid of any kind on the video product (excluding waterproof products).
Lightning: For added protection for this video product receiver during a lightning storm, or when it is left unattended and unused for long periods of time, unplug it from the wall outlet and disconnect the antenna or cable system. This will prevent damage to the video product due to lightning and power-line surges.
Service
Servicing: Do not attempt to service this video product yourself as opening or removing covers may expose you to dangerous voltage or other hazards. Refer all servicing to qualifi ed service personnel.
Damage Requiring Service: Unplug this video product from the wall outlet and refer servicing to qualifi ed service personnel under the following conditions:
•When the power-supply cord or plug is damaged.
•If liquid has been spilled, or objects have fallen into the video product.
•If the video product has been exposed to rain or water (excluding waterproof products).
•If the video product has been dropped or the cabinet has been damaged.
If the video product does not operate normally follow the operating instructions. Adjust only those controls that are covered by the operating instructions as an improper adjustment of other controls may result in damage and will often require extensive work by a qualifi ed technician to restore the video product to its normal operation.
When the video product exhibits a distinct change in performance—this indicates a need for service.
Replacement Parts: When replacement parts are required, be sure the service technician has used replacement parts specifi ed by the manufacturer or have the same characteristics as the original part. Unauthorized substitutions may result in fi re, electric shock or other hazards.
Safety Check: Upon completion of any service or repairs to this video product, ask the service technician to perform safety checks to determine that the video product is in proper operating condition.
iii

For Your Safety
|
Be sure to read these notes before use |
|
|
|
|
|
WARNING |
|||
|
|
|
|
|
|
|
|
|
|
|
|
|
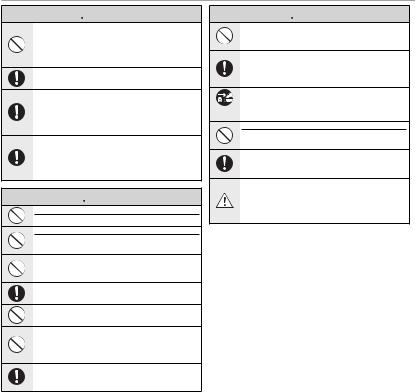
Safety Notes |
|
|
|
|
|
Do not use the camera in the bathroom or shower (excluding water- |
||
|
|
|
|
|
|
|
||||
• Make sure that you use your camera correctly. Read these safety |
|
|
|
|
||||||
|
|
|
|
|||||||
Do not use in |
proof products). This can cause a fi re or electric shock. |
|||||||||
notes and your Owner’s Manual carefully before use. |
||||||||||
the bathroom or |
|
|||||||||
• After reading these safety notes, store them in a safe place. |
|
shower |
|
|||||||
|
|
|
|
|
|
|
|
|
Never attempt to change or take apart the camera (never open |
|
|
|
About the Icons |
|
|
|
|
|
|||
|
|
|
|
|
|
|
|
|
the case). Failure to observe this precaution can cause fi re or |
|
The icons shown below are used in this document to indicate the |
|
Do not |
||||||||
|
electric shock. |
|||||||||
severity of the injury or damage that can result if the information |
disassemble |
|||||||||
|
||||||||||
indicated by the icon is ignored and the product is used incorrectly |
|
|
|
|
Should the case break open as the result of a fall or other accident, |
|||||
|
|
|
|
do not touch the exposed parts. Failure to observe this precau- |
||||||
as a result. |
|
|
|
|
|
|
|
|
||
|
|
|
|
|
|
|
|
tion could result in electric shock or in injury from touching the |
||
|
|
|
|
|
|
|
|
|
||
|
|
This icon indicates that death or serious injury can result if the |
|
Do not touch |
damaged parts. Remove the battery immediately, taking care |
|||||
|
|
information is ignored. |
|
internal parts |
to avoid injury or electric shock, and take the product to the |
|||||
WARNING |
|
|
|
|
|
|
point of purchase for consultation. |
|||
|
|
This icon indicates that personal injury or material damage can |
|
|
|
|
|
Do not change, heat or unduly twist or pull the connection cord and |
||
|
|
|
|
|
|
|
do not place heavy objects on the connection cord. These actions |
|||
CAUTION |
|
result if the information is ignored. |
|
|
|
|
|
could damage the cord and cause a fi re or electric shock. If the |
||
|
|
|
|
|
|
|
|
|||
|
|
|
|
|
|
|
|
cord is damaged, contact your FUJIFILM dealer. |
||
The icons shown below are used to indicate the nature of the instruc- |
|
|
|
|
||||||
|
|
|
|
Do not place the camera on an unstable surface. This can cause the |
||||||
tions which are to be observed. |
|
|
|
|
||||||
|
|
|
|
camera to fall or tip over and cause injury. |
||||||
|
|
|
|
|
|
|
|
|
|
|
|
|
Triangular icons tell you that this information requires atten- |
|
|
|
|
|
Never attempt to take pictures while in motion. Do not use the |
||
|
|
tion (“Important”). |
|
|
|
|
|
camera while you are walking or driving a vehicle. This can re- |
||
|
|
Circular icons with a diagonal bar tell you that the action indi- |
|
|
|
|
|
sult in you falling down or being involved in a tra c accident. |
||
|
|
cated is prohibited (“Prohibited”). |
|
|
|
|
|
Do not touch any metal parts of the camera during a thunderstorm. |
||
|
|
|
|
|
|
|
This can cause an electric shock due to induced current from |
|||
|
|
|
|
|
|
|
|
|
||
|
|
Filled circles with an exclamation mark indicate an action that |
|
|
|
|
|
|||
|
|
|
|
|
|
|
the lightning discharge. |
|||
|
|
must be performed (“Required”). |
|
|
|
|
|
|||
|
|
|
|
|
|
|
Do not use the battery except as specified. Load the battery as |
|||
|
|
|
|
|
|
|
|
|
||
|
|
|
|
|
|
|
|
|
shown by the indicator. |
|
|
|
WARNING |
|
|
|
|
|
|
||
|
|
|
|
|
|
|
Do not heat, change or take apart the battery. Do not drop or subject |
|||
|
|
If a problem arises, turn the camera off, remove the battery, and |
|
|
|
|
|
|
the battery to impacts. Do not store the battery with metallic prod- |
|
|
|
disconnect and unplug the AC power adapter. Continued use of |
|
|
|
|
|
ucts. Any of these actions can cause the battery to burst or leak |
||
|
|
the camera when it is emitting smoke, is emitting any unusual |
|
|
|
|
|
and cause fi re or injury as a result. |
||
Unplug from |
|
odor, or is in any other abnormal state can cause a fi re or elec- |
|
|
|
|
|
Use only the battery or AC power adapters specified for use with this |
||
power socket |
|
tric shock. Contact your FUJIFILM dealer. |
|
|
|
|
|
camera. Do not use voltages other than the power supply voltage |
||
|
|
Do not allow water or foreign objects to enter the camera. If water |
|
|
|
|
|
shown. The use of other power sources can cause a fi re. |
||
|
|
or foreign objects get inside the camera, turn the camera o , |
|
|
|
|
|
If the battery leaks and fluid gets in contact with your eyes, skin or |
||
|
|
remove the battery, and disconnect and unplug the AC power |
|
|
|
|
|
clothing, flush the affected area with clean water and seek medical |
||
|
|
adapter. Continued use of the camera can cause a fi re or elec- |
|
|
|
|
|
attention or call an emergency number right away. |
||
|
|
tric shock. Contact your FUJIFILM dealer. |
|
|
|
|
|
|
||
iv
For Your Safety
 WARNING
Do not use the charger to charge batteries other than those specified here. The supplied battery charger is for use only with the type of battery supplied with the camera. Using the charger to charge conventional batteries or other types of rechargeable batteries can cause the battery to leak fl uid, overheat or burst.
Do not use in the presence of flammable objects, explosive gases, or dust.
When carrying the battery, install it in a digital camera or keep it in the hard case. When storing the battery, keep it in the hard case. When discarding, cover the battery terminals with insulation tape.
Contact with other metallic objects or batteries could cause the battery to ignite or burst.
Keep memory cards out of the reach of small children. Because memory cards are small, they can be swallowed by children. Be sure to store memory cards out of the reach of small children. If a child swallows a memory card, seek medical attention or call an emergency number.
 CAUTION
Do not use this camera in locations affected by oil fumes or steams.
This can cause a fi re or electric shock.
Do not use this camera in locations affected by humidity or dust (excluding waterproof products). This can cause a fi re or electric shock.
Do not leave this camera in places subject to extremely high temperatures. Do not leave the camera in locations such as a sealed vehicle or in direct sunlight. This can cause a fi re.
Keep out of the reach of small children. This product could cause injury in the hands of a child.
Do not place heavy objects on the camera. This can cause the heavy object to tip over or fall and cause injury.
Do not move the camera while the AC power adapter is still connected. Do not pull on the connection cord to disconnect the AC power adapter. This can damage the power cord or cables and cause a fi re or electric shock.
Do not use the AC power adapter when the plug is damaged or the plug socket connection is loose. This could cause a fi re or electric shock.
 CAUTION
Do not cover or wrap the camera or the AC power adapter in a cloth or blanket. This can cause heat to build up and distort the casing or cause a fi re.
When you are cleaning the camera or you do not plan to use the camera for an extended period, remove the battery and disconnect and unplug the AC power adapter. Failure to do so can cause a fi re or electric shock.
When charging ends, unplug the charger from the power socket.
Leaving the charger plugged into the power socket can cause
Unplug from a fi re. power socket
Using a flash too close to a person’s eyes may temporarily affect the
eyesight. Take particular care when photographing infants and young children.
When a memory card is removed, the card could come out of the slot too quickly. Use your finger to hold it and gently release the card.
Injury could result to those struck by the ejected card.
Request regular internal testing and cleaning for your camera.
Build-up of dust in your camera can cause a fi re or electric shock. Contact your FUJIFILM dealer to request internal cleaning every two years. Please note that this service is not free of charge.
v

For Your Safety
The Battery and Power Supply
Note: Check the type of battery used in your camera and read the appropriate sections.
The following describes the proper use of batteries and how to prolong their life. Incorrect use can shorten battery life or cause leakage, overheating, fi re, or explosion.
Li-ion Batteries
Read this section if your camera uses a rechargeable Li-ion battery.
The battery is not charged at shipment. Charge the battery before use. Keep the battery in its case when not in use.
■ Notes on the Battery
The battery gradually loses its charge when not in use. Charge the battery one or two days before use.
Battery life can be extended by turning the camera o when not in use.
Battery capacity decreases at low temperatures; a depleted battery may not function at when cold. Keep a fully charged spare battery in a warm place and exchange as necessary, or keep the battery in your pocket or other warm place and insert it in the camera only when shooting. Do not place the battery in direct contact with hand warmers or other heating devices.
■ Charging the Battery
Charge the battery in the supplied battery charger. Charging times will increase at ambient temperatures below +10 °C (+50 °F) or above +35 °C (+95 °F). Do not attempt to charge the battery at temperatures above 40 °C (+104 °F); at temperatures below 0 °C (+32 °F), the battery will not charge.
Do not attempt to recharge a fully charged battery. The battery does not however need to be fully discharged before charging.
The battery may be warm to the touch immediately after charging or use. This is normal.
■ Battery Life
At normal temperatures, the battery can be recharged about 300 times. A noticeable decrease in the length of time the battery will hold a charge indicates that it has reached the end of its service life and should be replaced.
■ Storage
Performance may be impaired if the battery is left unused for extended periods when fully charged. Run the battery fl at before storing it.
If the camera will not be used for an extended period, remove the battery and store it in a dry place with an ambient temperature of from +15 °C to +25 °C (+59 °F to +77 °F). Do not store in locations exposed to extremes of temperature.
■ Cautions: Handling the Battery
•Do not transport or store with metal objects such as necklaces or hairpins.
•Do not expose to fl ame or heat.
•Do not disassemble or modify.
•Use with designated chargers only.
•Do not drop or subject to strong physical shocks.
•Do not expose to water.
•Keep the terminals clean.
•The battery and camera body may become warm to the touch after extended use. This is normal.
AAAlkaline/Rechargeable NiMH Batteries
Read this section if your camera uses AA alkaline or rechargeable AA NiMH batteries. Information on compatible battery types may be found elsewhere in the camera manual.
■ Cautions: Handling the Batteries
•Do not expose to water, fl ame, or heat, or store in warm or humid conditions.
•Do not transport or store with metal objects such as necklaces or hairpins.
•Do not disassemble or modify the batteries or battery casing.
•Do not subject to strong physical shocks.
•Do not use batteries that are leaking, deformed, or discolored.
•Keep out of reach of infants and small children.
•Insert in the correct orientation.
vi

For Your Safety
•Do not mix old and new batteries, batteries with di erent charge levels, or batteries of di erent types.
•If the camera will not be used for an extended period, remove the batteries. Note that the camera clock will be reset.
•The batteries may be warm to the touch immediately after use. Turn the camera o and allow the batteries to cool before handling.
•Battery capacity tends to decrease at low temperatures. Keep spare batteries in a pocket or other warm place and exchange as necessary. Cold batteries may recover some of their charge when warmed.
•Fingerprints and other stains on the battery terminals can impair battery performance. Thoroughly clean the terminals with a soft, dry cloth before inserting them in the camera.
If the batteries leak, clean the battery compartment thoroughly before inserting new batteries.
If fl uid from the battery comes into contact with skin or clothing, fl ush the a ected area with water. If fluid enters your eyes, immediately flush the affected area with water and seek medical attention. Do not rub your eyes. Failure to observe this precaution could result in permanent visual impairment.
■ NiMH Batteries
The capacity of Ni-MH batteries may be temporarily reduced when new, after long periods of disuse, or if they are repeatedly recharged before being fully discharged. This is normal and does not indicate a malfunction. Capacity can be increased by repeatedly discharging the batteries using the discharge option in the camera setup menu and recharging them using a battery charger.
QCAUTION: Do not use the discharge option with alkaline batteries.
The camera draws a small amount of current even when o . Ni-MH batteries that have been left in the camera for an extended period may be drawn down to the point that they no longer hold a charge. Battery performance may also drop if the batteries are run down in a device such as a fl ashlight. Use the discharge option in the camera setup menu to discharge Ni-MH batteries. Batteries that no longer hold a charge even after repeatedly being discharged and recharged have reached the end of their service life and must be replaced.
Ni-MH batteries can be recharged in a battery charger (sold separately). Batteries may become warm to the touch after charging. Refer to the instructions provided with the charger for more information. Use the charger with compatible batteries only.
Ni-MH batteries gradually lose their charge when not in use.
■ Disposal
Dispose of used batteries in accord with local regulations.
AC Power Adapters (Available Separately)
This section applies to all camera models. Use only FUJIFILM AC power adapters designated for use with this camera. Other adapters could damage the camera.
•The AC power adapter is for indoor use only.
•Be sure the DC plug is securely connected to the camera.
•Turn the camera o before disconnecting the adapter. Disconnect the adapter by the plug, not the cable.
•Do not use with other devices.
•Do not disassemble.
•Do not expose to high heat and humidity.
•Do not subject to strong physical shocks.
•The adapter may hum or become hot to the touch during use. This is normal.
•If the adapter causes radio interference, reorient or relocate the receiving antenna.
vii

For Your Safety
Using the Camera
Do not aim the camera at extremely bright light sources, such as the sun in a cloudless sky. Failure to observe this precaution could damage the camera image sensor.
Take Test Shots
Before taking photographs on important occasions (such as at weddings or before taking the camera on a trip), take a test shot and view the result in the LCD monitor to ensure that the camera is functioning normally. FUJIFILM Corporation can not accept liability for damages or lost profi ts incurred as a result of product malfunction.
Notes on Copyright
Unless intended solely for personal use, images recorded using your digital camera system cannot be used in ways that infringe copyright laws without the consent of the owner. Note that some restrictions apply to the photographing of stage performances, entertainments, and exhibits, even when intended purely for personal use. Users are also asked to note that the transfer of memory cards containing images or data protected under copyright laws is only permissible within the restrictions imposed by those copyright laws.
Handling
To ensure that images are recorded correctly, do not subject the camera to impact or physical shocks while images are being recorded.
Liquid Crystal
In the event that the LCD monitor is damaged, care should be taken to avoid contact with liquid crystal. Take the urgent action indicated should any of the following situations arise:
•If liquid crystal comes in contact with your skin, clean the area with a cloth and then wash thoroughly with soap and running water.
•If liquid crystal enters your eyes, fl ush the affected eye with clean water for at least 15 minutes and then seek medical assistance.
•If liquid crystal is swallowed, rinse your mouth thoroughly with water. Drink large quantities of water and induce vomiting, then seek medical assistance.
Although the display is manufactured using extremely high-precision technology, it may contain pixels that are always lit or that do not light. This is not a malfunction, and images recorded with the product are una ected.
Trademark Information
xD-Picture Card and E are trademarks of FUJIFILM Corporation. The typefaces included herein are solely developed by Dyna-
Comware Taiwan Inc. Macintosh, QuickTime, and Mac OS are trademarks of Apple Inc. in the U.S.A. and other countries. Windows 7, Windows Vista, and the Windows logo are trademarks of the Microsoft group of companies. Adobe and Adobe Reader are either trademarks or registered trademarks of Adobe Systems Incorporated in the U.S.A. and/ or other countries. The SDHC and SDXC logos are trademarks of SD-3C, LLC. The HDMI logo is a trademark. YouTube is a trademark of Google Inc. All other trade names mentioned in this manual are the trademarks or registered trademarks of their respective owners.
Electrical Interference
This camera may interfere with hospital or aviation equipment. Consult with hospital or airline sta before using the camera in a hospital or on an aircraft.
Color Television Systems
NTSC (National Television System Committee) is a color television telecasting specifi cation adopted mainly in the U.S.A., Canada, and Japan. PAL (Phases Alternation by Line) is a color television system adopted mainly in European countries and China.
Exif Print (Exif Version 2.3)
Exif Print is a newly revised digital camera fi le format in which information stored with photographs is used for optimal color reproduction during printing.
IMPORTANT NOTICE:
Read Before Using the Software
Direct or indirect export, in whole or in part, of licensed software without the permission of the applicable governing bodies is prohibited.
viii

For Your Safety
IMPORTANT: Read this section before using the toponyms included in this product.
Toponym Data License Agreement
Personal Use Only. You agree to use this Data together with this digital camera for the solely personal, non-commercial purposes for which you were licensed, and not for service bureau, time-sharing or other similar purposes. Accordingly, but subject to the restrictions set forth in the following paragraphs, you may copy this Data only as necessary for your personal use to (i) view it, and (ii) save it, provided that you do not remove any copyright notices that appear and do not modify the Data in any way. You agree not to otherwise reproduce, copy, modify, decompile, disassemble or reverse engineer any portion of this Data, and may not transfer or distribute it in any form, for any purpose, except to the extent permitted by mandatory laws. Multi-disc sets may only be transferred or sold as a complete set as provided by FUJIFILM Corporation and not as a subset thereof.
Restrictions. Except where you have been specifi cally licensed to do so by FUJIFILM Corporation, and without limiting the preceding paragraph, you may not (a) use this Data with any products, systems, or applications installed or otherwise connected to or in communication with vehicles, capable of vehicle navigation, positioning, dispatch, real time route guidance, fl eet management or similar applications; or
(b) with or in communication with any positioning devices or any mobile or wireless-connected electronic or computer devices, including without limitation cellular phones, palmtop and handheld computers, pagers, and personal digital assistants or PDAs.
Warning. The Data may contain inaccurate or incomplete information due to the passage of time, changing circumstances, sources used and the nature of collecting comprehensive geographic data, any of which may lead to incorrect results.
No Warranty. This Data is provided to you “as is,” and you agree to use it at your own risk. FUJIFILM Corporation and its licensors (and their licensors and suppliers) make no guarantees, representations or warranties of any kind, express or implied, arising by law or otherwise, including but not limited to, content, quality, accuracy, completeness, e ectiveness, reliability, fi tness for a particular purpose, usefulness, use or results to be obtained from this Data, or that the Data or server will be uninterrupted or error-free.
Disclaimer of Warranty: FUJIFILM Corporation AND ITS LICENSORS (INCLUDING THEIR LICENSORS AND SUPPLIERS) DISCLAIM ANY WARRANTIES, EXPRESS OR IMPLIED, OF QUALITY, PERFORMANCE, MERCHANTABILITY, FITNESS FOR A PARTICULAR PURPOSE OR NONINFRINGEMENT. Some States, Territories and Countries do not allow certain warranty exclusions, so to that extent the above exclusion may not apply to you.
Disclaimer of Liability: FUJIFILM Corporation AND ITS LICENSORS (INCLUDING THEIR LICENSORS AND SUPPLIERS) SHALL NOT BE LIABLE TO YOU: IN RESPECT OF ANY CLAIM, DEMAND OR ACTION, IRRESPECTIVE OF THE NATURE OF THE CAUSE OF THE CLAIM, DEMAND OR ACTION ALLEGING ANY LOSS, INJURY OR DAMAGES, DIRECT OR INDIRECT, WHICH MAY RESULT FROM THE USE OR POSSESSION OF THE INFORMATION; OR FOR ANY LOSS OF PROFIT, REVENUE, CONTRACTS OR SAVINGS, OR ANY OTHER DIRECT, INDIRECT, INCIDENTAL, SPECIAL OR CONSEQUENTIAL DAMAGES ARISING OUT OF YOUR USE OF OR INABILITY TO USE THIS INFORMATION, ANY DEFECT IN THE INFORMATION, OR THE BREACH OF THESE TERMS OR CONDITIONS, WHETHER IN AN ACTION IN CONTRACT OR TORT OR BASED ON A WARRANTY, EVEN IF FUJIFILM Corporation OR ITS LICENSORS HAVE BEEN ADVISED OF THE POSSIBILITY OF SUCH DAMAGES. Some States, Territories and Countries do not allow certain liability exclusions or damages limitations, so to that extent the above may not apply to you.
Export Control. You agree not to export from anywhere any part of the Data provided to you or any direct product thereof except in compliance with, and with all licenses and approvals required under, applicable export laws, rules and regulations.
Entire Agreement. These terms and conditions constitute the entire agreement between FUJIFILM Corporation (and its licensors, including their licensors and suppliers) and you pertaining to the subject matter hereof, and supersedes in their entirety any and all written or oral agreements previously existing between us with respect to such subject matter.
ix

For Your Safety
Governing Law. The above terms and conditions shall be governed by the laws of the State of Illinois, Netherlands, without giving e ect to
(i) its confl ict of laws provisions, or (ii) the United Nations Convention for Contracts for the International Sale of Goods, which is explicitly excluded. You agree to submit to the jurisdiction of the State of Illinois, The Netherlands for any and all disputes, claims and actions arising from or in connection with the Data provided to you hereunder.
Geodetics. The geodetic system used by this device to record latitude and longitude is WGS 84.
Copyright. The map data included in this device are protected under copyright law and except for personal use may not be employed without the permission of the copyright holder.
Navigation. This device can not be used for purposes of navigation.
Licensed Software Copyright Holders
© 2010 NAVTEQ All rights reserved.
This service uses POI (Points Of Interest) of ZENRIN CO., LTD. “POWERED BY ZENRIN” is a trademark of ZENRIN CO., LTD. © 2010 ZENRIN CO., LTD. All rights reserved.
© Her Majesty the Queen in Right of Canada, © Queen’s Printer for Ontario, © Canada Post Corporation, GeoBase®, © Department of Natural Resources Canada, ZIP+4®, © United States Postal Service® 2010. the USPS®.
Australia |
Copyright. Based on data provided under |
|
license from PSMA Australia Limited |
|
(www.psma.com.au). |
Austria |
“© Bundesamt für Eichund Vermes- |
|
sungswesen” |
Croatia, Cyprus, |
“© EuroGeographics” |
Estonia, Latvia, |
|
Lithuania, Moldova, |
|
Poland, Slovenia and/ |
|
or Ukraine |
|
France |
The following notice must appear on all |
|
copies of the Data, and may also appear |
|
on packaging: “source: © IGN France – BD |
|
TOPO®” |
Germany |
“Die Grundlagendaten wurden mit |
|
Genehmigung der zuständigen Behörden |
|
entnommen”or “Die Grundlagendaten |
|
wurden mit Genehmigung der zustaendi- |
|
gen Behoerden entnommen.” |
Great Britain |
“Based upon Crown Copyright material.” |
Greece |
“Copyright Geomatics Ltd.” |
Hungary |
“Copyright © 2003; Top-Map Ltd.” |
Italy |
“La Banca Dati Italiana è stata prodotta |
|
usando quale riferimento anche cartografi a |
|
numerica ed al tratto prodotta e fornita |
|
dalla Regione Toscana.” |
Norway |
“Copyright © 2000; Norwegian Mapping |
|
Authority” |
Portugal |
“Source: IgeoE – Portugal” |
Spain |
“Información geográfi ca propiedad del |
|
CNIG” |
Sweden |
“Based upon electronic data Ó National |
|
Land Survey Sweden.” |
Switzerland |
“Topografi sche Grundlage: Ó Bundesamt für |
|
Landestopographie.” |
x
For Your Safety
■ Governing Law
POI information in Japan: The above terms and conditions shall be governed by the laws of Japan, without giving e ect to (i) its confl ict of laws provisions, or (ii) the United Nations Convention for Contracts for the International Sale of Goods, which is explicitly excluded. You agree to submit to the exclusive jurisdiction of the Tokyo District Court in the fi rst instance for any and all disputes, claims and actions arising from or in connection with the Data provided to you hereunder.
POI information outside Japan: The above terms and conditions shall be governed by the laws of the State of Illinois, without giving e ect to
(i) its confl ict of laws provisions, or (ii) the United Nations Convention for Contracts for the International Sale of Goods, which is explicitly excluded. You agree to submit to the jurisdiction of the State of Illinois for any and all disputes, claims and actions arising from or in connection with the Data provided to you hereunder.
Government End Users: If the Data is being acquired by or on behalf of the United States government or any other entity seeking or applying rights similar to those customarily claimed by the United States government, this Data is a“commercial item”as that term is defi ned at 48 C.F.R. (“FAR”) 2.101, is licensed in accordance with these End-User Terms, and each copy of Data delivered or otherwise furnished shall be marked and embedded as appropriate with the following “Notice of Use,”and shall be treated in accordance with such Notice:
NOTICE OF USE
CONTRACTOR (MANUFACTURER/ SUPPLIER) NAME: NAVTEQ
CONTRACTOR (MANUFACTURER/SUPPLIER) ADDRESS: 425 West Randolph
Street, Chicago, Illinois 60606
This Data is a commercial item as defi ned in FAR 2.101 and is subject to these End-User Terms under which this Data was provided.
© 2010 NAVTEQ – All rights reserved.
If the Contracting O cer, federal government agency, or any federal o cial refuses to use the legend provided herein, the Contracting O cer, federal government agency, or any federal o cial must notify NAVTEQ prior to seeking additional or alternative rights in the Data.
xi

 About This Manual
Before using the camera, read this manual and the warnings in “For Your Safety” (Pii). For information on specifi c topics, consult the sources below.
Table of Contents ...........................Pxvi
The “Table of Contents” gives an overview of the entire manual. The principal camera operations are listed here.
Warning Messages and Displays ... P110
Find out what’s behind that fl ashing icon or error message in the display.
Troubleshooting .......................... |
P103 |
Having a specifi c problem with the camera? Find the answer here.
 Memory Cards
Pictures can be stored in the camera’s internal memory or on optional SD, SDHC, and SDXC memory cards (P14), referred to in this manual as “memory cards.”
xii
 Frequently-Used Buttons
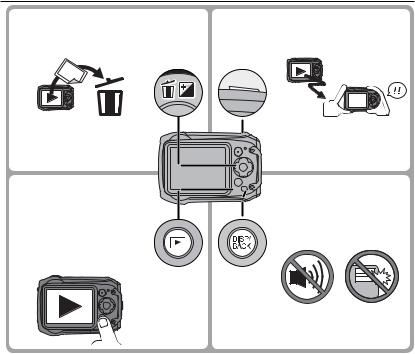
■ Deleting Pictures |
■ Taking Pictures During Playback |
yTo delete a picture, display it full frame and press the selector up (b).
yTo return instantly to shooting mode, press the shutter button halfway.
■Turning the Camera on in Playback Mode
yWhen the camera is off, playback can be started by pressing the abutton for about a second.
Shoot
View
■Silent Mode
yPress and hold the DISP/ BACK button to disable camera lights and sounds.
xiii

 Product Features and Precautions for Use
■ Water, Dust, and Shock Resistance
Q The camera complies with JIS Class 8 water resistance and JIS Class 6 (IP68) dust resistance standards, and has passed FUJIFILM drop tests (drop height: 2.0 m/6.5 ft.; impact surface: plywood, thickness 5 cm/2.0 in.) compliant with MIL-STD 810F Method 516.5: Shock. These results were obtained through in-house testing and are not a blanket guarantee of water resistance or invulnerability to damage or destruction. The accessories supplied with the camera are not water resistant.
■ Before Use
Q The front surface of the camera lens is protected by a sheet of glass. Foreign matter on the glass will appear in photographs; keep the glass clean at all times.
QBe sure that the battery-chamber is fully latched. The presence of water, mud, or sand in the camera could cause malfunction.
Q Do not open or close the battery-chamber with wet hands or near water, for example while on or by a body of water.
Q Be sure the camera is completely dry before inserting or removing batteries or memory cards or connecting the USB or A/V cable.
Q The camera does not fl oat. Be sure to attach the strap and keep it around your wrist when using the camera.
■ During Use
Q Restrict underwater use to depths of 10 m (32 ft.) or less and periods shorter than 120 minutes. Q Do not open or close the battery-chamber cover while under water.
Q Do not use in hot springs or heated pools.
Q Do not dive into water with the camera or otherwise subject it to excessive force.
QIf the camera is left on the sand, its temperature may exceed operating limits and sand may get into the speaker or microphone.
QSunscreen, suntan lotion, or other oily substances may discolor the camera body and should be removed with a damp cloth.
QThe camera may lose water resistance if subjected to excessive force or vibration. Consult your retailer or a FUJIFILM-authorized repair technician.
xiv

Product Features and Precautions for Use
■ After Use
QRemove any foreign matter from the water-resistant seal and adjacent surfaces. Foreign matter could damage the seal, lowering water resistance.
QAfter using the camera underwater or in locations where foreign matter might adhere to the camera body, rinse the camera under the tap or leave it in a basin of fresh water for two to three minutes.
QLiquid soaps, detergents, alcohol, and other cleansers may affect water resistance and should never be used.
QAfter use, remove water droplets and foreign matter with a dry cloth, fi rmly latch the batterychamber cover, and soak the camera in fresh water for about ten minutes. Dry the camera thoroughly after removing it from the water.
■ Storage and Maintenance
Q Do not store at temperatures below 0 °C (32 °F) or above 40 °C (104 °F).
Q To ensure continued water resistance, it is recommended that you have the water-resistant seal replaced about once a year (a fee is charged for this service). Contact your retailer or a FUJIFILM-authorized repair technician for more information.
■ Cold Climates
QBattery performance drops at low temperatures, reducing the number of pictures that can be taken. Insulate the camera to keep it warm or place it in your clothing.
Q Use an NP-50A battery.
Q Display response may slow at low temperatures. This is not a malfunction.
xv

 Table of Contents
For Your Safety .................................................................. |
ii |
IMPORTANT SAFETY INSTRUCTIONS.................................. |
ii |
Safety Notes.................................................................... |
iv |
About This Manual .......................................................... |
xii |
Frequently-Used Buttons .............................................. |
xiii |
Product Features and Precautions for Use.................... |
xiv |
Before You Begin |
|
Symbols and Conventions................................................. |
1 |
Supplied Accessories......................................................... |
1 |
Parts of the Camera .......................................................... |
2 |
Camera Displays............................................................... |
4 |
Shooting ........................................................................ |
4 |
Playback......................................................................... |
5 |
First Steps |
|
Charging the Battery ........................................................ |
7 |
Inserting the Battery and a Memory Card....................... |
9 |
Compatible Memory Cards ............................................. |
14 |
Turning the Camera on and Off ...................................... |
16 |
Shooting Mode .............................................................. |
16 |
Playback Mode............................................................... |
16 |
Basic Setup ...................................................................... |
18 |
Basic Photography and Playback |
|
Taking Pictures in Q(Scene Recognition) Mode...... |
19 |
Viewing Pictures ............................................................. |
23 |
More on Photography |
|
Shooting Mode................................................................ |
24 |
Choosing a Shooting Mode ............................................ |
24 |
Shooting Mode Options ................................................. |
25 |
jPRO LOW-LIGHT.................................................... |
27 |
kD-RANGE PRIORITY ............................................... |
28 |
rMOTION PANORAMA 360....................................... |
29 |
Recording GPS Data with Pictures (Only XP150/160) ... |
31 |
The GPS Menu................................................................ |
32 |
GPS Tracking................................................................... |
34 |
bIntelligent Face Detection....................................... |
36 |
Focus Lock........................................................................ |
37 |
dExposure Compensation.......................................... |
39 |
FMacro Mode (Close-ups) ........................................... |
40 |
NUsing the Flash (Intelligent Flash) ............................ |
41 |
hUsing the Self-Timer ................................................. |
43 |
More on Playback |
|
Playback Options............................................................. |
44 |
IFavorites: Rating Pictures ......................................... |
44 |
Playback Zoom............................................................... |
45 |
Multi-Frame Playback.................................................... |
46 |
ADeleting Pictures...................................................... |
47 |
bImage Search............................................................ |
48 |
kPhotoBook Assist...................................................... |
49 |
Creating a PhotoBook..................................................... |
49 |
Viewing Photobooks ...................................................... |
50 |
Editing and Deleting Photobooks................................... |
50 |
Viewing Panoramas ........................................................ |
51 |
xvi

Table of Contents
Viewing GPS Data (Only XP150/160).............................. |
52 |
The GPS Menu................................................................ |
53 |
Photo Navigation ........................................................... |
54 |
Copying GPS Data to Other Images................................. |
55 |
Viewing the GPS Track.................................................... |
56 |
Deleting Track Logs ........................................................ |
57 |
Movies |
|
Recording Movies............................................................ |
58 |
Movie Frame Size ........................................................... |
59 |
Viewing Movies ............................................................... |
60 |
Connections |
|
Viewing Pictures on TV ................................................... |
61 |
Viewing Pictures on High-Definition TVs....................... |
62 |
Printing Pictures via USB................................................ |
63 |
Printing the DPOF Print Order......................................... |
65 |
Viewing Pictures on a Computer.................................... |
67 |
Windows: Installing MyFinePix Studio ........................... |
67 |
Macintosh: Installing FinePixViewer............................... |
69 |
Connecting the Camera.................................................. |
71 |
Menus |
|
Using the Menus: Shooting Mode.................................. |
74 |
Using the Shooting Menu............................................... |
74 |
Shooting Menu Options ................................................. |
74 |
ASHOOTING MODE.................................................... |
74 |
NISO........................................................................ |
74 |
OIMAGE SIZE............................................................ |
75 |
TIMAGE QUALITY ..................................................... |
76 |
PFINEPIX COLOR ....................................................... |
76 |
DWHITE BALANCE .................................................... |
77 |
RCONTINUOUS ......................................................... |
78 |
bFACE DETECTION..................................................... |
78 |
FAF MODE............................................................... |
79 |
FMOVIE AF MODE .................................................... |
79 |
WMOVIE MODE......................................................... |
79 |
qLED ILLUMINATOR................................................... |
80 |
Using the Menus: Playback Mode .................................. |
81 |
Using the Playback Menu............................................... |
81 |
Playback Menu Options.................................................. |
81 |
kPHOTOBOOK ASSIST................................................ |
81 |
bIMAGE SEARCH ...................................................... |
81 |
AERASE ................................................................... |
81 |
cEDIT...................................................................... |
82 |
nMOVIE EDIT............................................................ |
83 |
jMARK FOR UPLOAD TO............................................ |
84 |
ISLIDE SHOW .......................................................... |
85 |
BRED EYE REMOVAL ................................................. |
86 |
DPROTECT................................................................ |
86 |
GCROP..................................................................... |
87 |
ORESIZE................................................................... |
87 |
CIMAGE ROTATE ....................................................... |
88 |
ECOPY..................................................................... |
88 |
KPRINT ORDER (DPOF).............................................. |
89 |
JDISP ASPECT.......................................................... |
89 |
xvii

Table of Contents
..............................................................The Setup Menu |
90 |
|
Technical Notes |
|
....................................................Using the Setup Menu |
90 |
|
Optional Accessories ....................................................... |
99 |
Setup Menu Options ...................................................... |
91 |
|
Accessories from FUJIFILM............................................ |
100 |
FDATE/TIME............................................................. |
91 |
|
Caring for the Camera................................................... |
101 |
NTIME DIFFERENCE ................................................... |
91 |
|
Storage and Use ........................................................... |
101 |
La...................................................... |
91 |
|
Condensation.............................................................. |
101 |
oSILENT MODE......................................................... |
91 |
|
Cleaning....................................................................... |
102 |
RRESET.................................................................... |
92 |
|
Traveling ...................................................................... |
102 |
KFORMAT ................................................................ |
92 |
|
|
|
AIMAGE DISP. ........................................................... |
92 |
|
Troubleshooting |
|
BFRAME NO. ............................................................ |
93 |
|
Problems and Solutions................................................ |
103 |
GOPERATION VOL...................................................... |
94 |
|
Warning Messages and Displays .................................. |
110 |
HSHUTTER VOLUME .................................................. |
94 |
|
|
|
Appendix |
|
|||
eSOUND.................................................................. |
94 |
|
|
|
|
Tips and Tricks |
114 |
||
IPLAYBACK VOLUME |
94 |
|
||
|
Internal Memory/Memory Card Capacity |
117 |
||
JLCD BRIGHTNESS |
94 |
|
||
|
FinePix XP150/XP160 |
117 |
||
ELCD MODE |
95 |
|
||
|
FinePix XP100/XP110 |
118 |
||
MAUTO POWER OFF |
95 |
|
||
|
Specifications |
119 |
||
LDUAL IS MODE |
95 |
|
||
|
|
|
||
BRED EYE REMOVAL ................................................. |
96 |
|
|
|
DDIGITAL ZOOM ....................................................... |
96 |
|
|
|
pMOVIE ZOOM TYPE ................................................. |
97 |
|
|
|
tSAVE ORIGINAL IMAGE............................................ |
97 |
|
|
|
mAUTOROTATE PB (XP150/XP160 Only) ...................... |
97 |
|
|
|
cGUIDANCE DISPLAY ................................................ |
97 |
|
|
|
QVIDEO SYSTEM ....................................................... |
97 |
|
|
|
UDATE STAMP .......................................................... |
98 |
|
|
|
RDEMONSTRATION (XP150/XP160 Only).................... |
98 |
|
|
|
|
|
|
|
|
xviii
Before You Begin
 Symbols and Conventions
The following symbols are used in this manual:
Q: This information should be read before use to ensure correct operation. R: Additional information that may be helpful when using the camera. P: Other pages in this manual on which related information may be found.
Menus and other text in the LCD monitor are shown in bold. In the illustrations in this manual, displays may be simplifi ed for explanatory purposes.
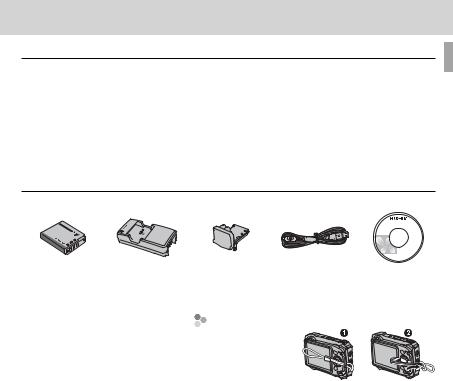
 Supplied Accessories
The following items are included with the camera:
|
|
|
|
|
|
|
|
|
|
|
|
|
|
|
|
|
|
|
|
|
|
|
|
|
|
|
NP-50A recharge- |
BC-50A battery |
Plug adapter |
|
USB cable |
CD-ROM |
|||
able battery |
charger |
|
|
|
|
(contains this |
||
|
|
|
|
|
|
manual) |
||
|
|
|
|
|
|
|
|
|
|
Attaching the Strap |
|
• Strap |
Attach the strap as |
|
shown. |
||
• User Guide |
||
|
|
* Shape of adapter varies with region of sale.
1

 Parts of the Camera
For more information, refer to the page listed to the right of each item.
Selector button |
|
Move cursor up |
|
d(exposure compensation) button (P39) |
MENU/OK button |
b(delete) button (Pxiii) |
|
Move cursor left |
Move cursor right |
F(macro) button (P40) |
N(fl ash) button (P41) |
Move cursor down
h(self-timer) button (P43)
* The illustrations in this manual have been simplifi ed for explanatory purposes.
2 |
Before You Begin |
|
|
|
|
|
|
Parts of the Camera |
|
|
|
|
Zoom control |
20, 45 |
|
Indicator lamp (see below) |
|
|
|
1 |
13 |
|
|
|
||||
|
2 |
..............................................................Shutter button |
21 |
14 |
..........................................................................Latch |
9, 12 |
|
|
|
3 |
.............................................................ON/OFF button |
16 |
15 |
.................................................................Safety lock |
9, 12 |
|
|
|
4 |
.............................................................................Flash |
41 |
16 |
....................................................................Strap eyelet |
1 |
|
|
|
5 |
...................................GPS button (XP150/XP160 only) |
31 |
17 |
.....................................DISP (display)/BACK button |
6, 18 |
|
|
|
|
..................m(brightness) button (XP100/XP110 only) |
6 |
|
.............................................o(silent mode) button* |
xiii |
|
|
|
6 |
............................................................Self-timer lamp |
43 |
18 |
...................................................a(playback) button |
23 |
|
|
|
|
.............................................................LED illuminator |
80 |
19 |
Tripod mount |
|
|
|
|
7 |
....................Built-in GPS antenna (XP150/XP160 only) |
31 |
20 |
.............................................................Battery chamber |
9 |
|
|
|
8 |
Lens/protective glass |
|
21 |
...............................................USB multi-connector |
63, 71 |
|
|
|
9 |
.........................................................................Speaker |
60 |
22 |
..........................................................Memory card slot |
11 |
|
|
|
10 |
..................................................................Microphone |
58 |
23 |
..................................................Micro HDMI connector |
62 |
|
|
|
11 |
....................................................................LCD monitor |
4 |
24 |
............................................................Battery latch |
10, 13 |
|
|
|
12 |
........................................t(movie recording) button |
58 |
|
|
|
|
|
*Press and hold the DISP/BACK button until ois displayed.
 The Indicator Lamp
The indicator lamp shows camera status as follows:
Indicator lamp |
Camera status |
|
|
Glows green |
Focus locked. |
|
|
Blinks green |
Blur, focus, or exposure warning. Picture can be taken. |
|
|
Blinks green and orange |
Recording pictures. Additional pictures can be taken. |
|
|
Glows orange |
Recording pictures. No additional pictures can be taken at this time. |
|
|
Blinks orange |
Flash charging; fl ash will not fi re when picture is taken. |
|
|
Blinks red |
Lens or memory error. |
|
|
|
|
||
|
|
|
|
Before You Begin |
3 |

Parts of the Camera
Camera Displays
The following types of indicator may be displayed during shooting and playback. Indicators vary with camera settings.
■ Shooting |
|
|
|
|
|
|
|
|
|
8 |
Movie mode.................................................................. 59 |
|
P |
|
9 |
9 |
Number of available frames........................................ 117 |
|
|
10 |
Sensitivity..................................................................... 74 |
||
|
|
|
800 |
||
|
|
|
N |
11 |
Image size and quality.............................................75, 76 |
|
|
|
|
12 |
Temperature warning ................................................. 111 |
|
|
|
|
13 |
FINEPIX color ................................................................ 76 |
|
|
|
|
14 |
White balance............................................................... 77 |
|
12/31/2050 |
10:00 AM |
15 |
Battery level ................................................................... 5 |
|
|
250 |
F4.5 |
-12 3 |
16 |
Dual IS mode ................................................................ 95 |
|
|
|
|
17 |
GPS signal strength (XP150/XP160 only)...................... 31 |
1 |
Shooting mode............................................................. 24 |
18 |
Exposure compensation................................................ 39 |
||
2 |
Intelligent Face Detection indicator .............................. 36 |
19 |
Date and time............................................................... 18 |
||
3 |
Continuous shooting mode........................................... 78 |
20 |
Blur warning..........................................................42, 110 |
||
4 |
Silent mode indicator ................................................3, 91 |
21 |
Focus warning .......................................................21, 110 |
||
5 |
Date stamp ................................................................... 98 |
22 |
Self-timer indicator ...................................................... 43 |
||
6 |
Focus frame .................................................................. 37 |
23 |
Macro (close-up) mode................................................. 40 |
||
7 |
Internal memory indicator* |
24 |
Flash mode ................................................................... 41 |
||
*a: indicates that no memory card is inserted and that pictures will be stored in the camera’s internal memory (P11). |
|||||
4 |
Before You Begin |
Parts of the Camera
■ Playback
100-0001 |
400 |
4:3N |
YouTube |
2050. 12. 31 |
10:00 AM |
1/250 F4.5 |
-12 3 |
1 |
Playback mode indicator.......................................... |
23, 44 |
2 |
Intelligent Face Detection indicator ......................... |
36, 86 |
3 |
Red-eye removal indicator............................................ |
86 |
4 |
Portrait enhancer.......................................................... |
25 |
5 |
Edit ............................................................................... |
82 |
6 |
Gift image..................................................................... |
44 |
7 |
Frame number.............................................................. |
93 |
8 |
GPS data (XP150/XP160 only)....................................... |
52 |
9 |
Silent mode indicator ................................................ |
3, 91 |
10 |
Mark for upload to........................................................ |
84 |
11 |
Photobook assist........................................................... |
49 |
12 |
Favorites ....................................................................... |
44 |
13 |
DPOF print indicator ..................................................... |
65 |
14 |
Protected image ........................................................... |
86 |
 Battery Level
Battery level is shown as follows:
Indicator |
Description |
D(white) Battery partially discharged.
C(white) Battery more than half discharged.
B(red) Low battery. Charge as soon as possible.
A(blinks red) Battery exhausted. Turn camera off and charge battery.
Before You Begin |
5 |

Parts of the Camera
 Hiding and Viewing Indicators
Press DISP/BACK to cycle through shooting and playback indicators as follows:
•Shooting: Indicators displayed/indicators hidden/best framing/HD framing/ GPS infomation (XP150/XP160 only; P32)
•Playback: Indicators displayed/indicators hidden/Ifavorites/GPS information (XP150/XP160 only; P52)
 The m(Brightness) Button (XP100/XP110 Only)
Press the m button to temporarily increase monitor 
 brightness when shooting outdoors or in bright ambi-


 ent light. Normal brightness is restored when a picture


is taken.
6 |
Before You Begin |
First Steps
 Charging the Battery
The battery is not charged at shipment. Charge the battery before use.
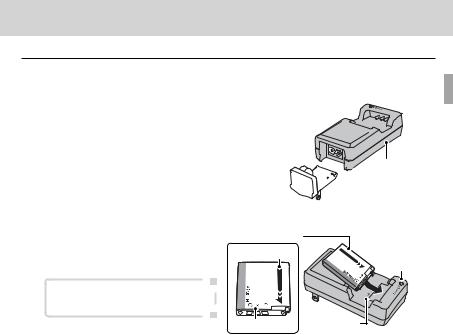
1Attach the plug adapter.
Attach the plug adapter as shown, making sure that it is fully inserted and clicks into place on the charger terminals.
Q The plug adapter is exclusively for use with the supplied battery charger. Do not use it with other devices.
2 Place the battery in the supplied battery charger.
Insert the battery in the orien- |
Battery |
tation indicated by the DFC |
Arrow |
labels. |
|


 Battery charger
  Plug adapter
Charge lamp
The camera uses an NP-50A rechargeable battery.
DFClabel |
DFClabel |
7

Charging the Battery
3Plug the charger in.
Plug the charger into an indoor power outlet. The charging indicator will light.
 The Charging Indicator
The charging indicator shows battery charge status as follows:
|
Charging indicator |
Battery status |
Action |
|
|
|
|
|
Off |
Battery not inserted. |
Insert the battery. |
|
|
|
|
On (green) |
Battery fully charged. |
Remove the battery. |
|
|
|
|
On (orange) |
Battery charging. |
— |
|
|
|
|
Blinks (orange) |
Battery fault. |
Unplug the charger and remove the battery. |
|
|
|
|
|
|
|||
|
|
|
|
|
|
|
4Charge the battery.
Remove the battery when charging is complete. See the specifi cations (P123) for charging times (note that charging times increase at low temperatures).
Q Unplug the charger when it is not in use.
8 |
First Steps |

 Inserting the Battery and a Memory Card
Although the camera can store pictures in internal memory, optional SD, SDHC, and SDXC memory cards (sold separately) can be used to store additional pictures. After charging the battery, insert the battery and memory card as described below.
1 Open the battery-chamber cover.
Release the latch (q) and safety lock (w) |
|
|
|
and open the battery-chamber cover (e). |
w |
q |
e |
R Be sure the camera is off before opening the |
|
|
|
battery-chamber cover. |
|
|
|
Q Do not open the battery-chamber cover when the camera is on. Failure to observe this precaution could result in damage to image fi les
or memory cards.
Q Do not use excessive force when handling the battery-chamber cover.
QRemove water droplets and other foreign matter with a dry cloth before opening the battery-chamber cover.
First Steps |
9 |

Inserting the Battery and a Memory Card
2 Insert the battery. |
|
Insert the battery with the terminal fi rst and |
|
in the orientation shown by the label inside |
Battery latch |
the battery chamber, keeping the battery |
|
latch pressed to one side. Confi rm that the |
|
battery is securely latched. |
|
Q Insert the battery in the correct orientation. |
|
Do NOT use force or attempt to insert the bat- |
|
tery upside down or backwards. The battery |
|
will slide in easily in the correct orientation. |
Label |
10 |
First Steps |

Inserting the Battery and a Memory Card
3Insert the memory card.
Holding the memory card in the orientation shown at right, slide it in until it clicks into place at the back of the slot.
Q Be sure card is in the correct orientation; do not insert at an angle or use force. If the memory card is not correctly inserted or no memory card is inserted, awill appear in the LCD monitor and internal memory will be used for recording and playback.
Q SD/SDHC/SDXC memory cards can be locked, making it impossible to format the card or to record or delete images. Before inserting an SD/SDHC/SDXC memory card, slide the writeprotect switch to the unlocked position.
Click
Write-protect switch
First Steps |
11 |
Inserting the Battery and a Memory Card
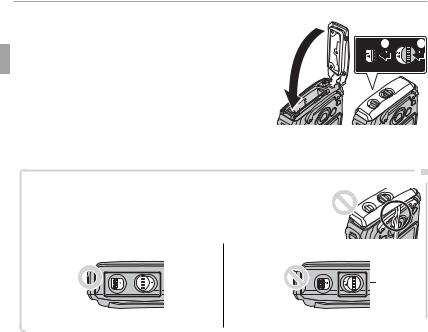
4Close and latch the battery-chamber cover.
Close the cover (q) and then close the latch (w) and safety lock (e).
w e
Q Before closing the cover, confi rm that there is q no dust, sand, or other foreign matter on the water-resistant seal or adjacent surfaces.
Q When closing the battery-chamber cover, do not subject it to excessive horizontal forces.
Failure to observe this precaution could cause the water-resistant seal to become misaligned, allowing water into the camera.
 Confirming That the Cover Is Latched
Make sure that the strap is not caught in the cover and that both the latch and safety lock are closed.
■ Correct |
|
|
|
|
|
|
|
|
|
|
|
|
|
■ Incorrect |
||
|
|
|
|
|
|
|
|
|
|
|
|
|
|
|
|
|
|
|
|
|
|
|
|
|
|
|
|
|
|
|
|
|
|
|
|
|
|
|
|
|
|
|
|
|
|
|
|
|
|
|
The yellow sticker is not visible. |
The yellow sticker is visible. |
|
|
||
|
|
|
12 |
First Steps |
 Loading...