


REG94BL4

CONTENTS
BUILT-INOVEN
Record in the space provided
below the Model No. and Serial
No. of this appliance. These
numbers are found on the serial
plate located inside the oven
door along the lower left corner
of the inner trim.
Model No.
Serial No.
Record these numbers for future
reference.
IMPORTANT:
Keep a copy of your bil! of sale. The
date on the bill establishes the warranty
period should service be required.
Where appropriate, place the bill of sale
in an envelope and tape it to the back or
side of the appliance. If service is per-
formed, it is in your best interest to
obtain and keep all receipts.
Before using the oven 2
Important safeguards 3-5
Energy-saving ideas - 5
General operating instructions 6-7
Using the oven 8-13
Baking 14-15
Roasting 16
Braising 17
Broiling 17-19
Cleaning 20
Self-cleaning instructions 21-25
Adjusting oven temperature 25
Avoid service checklist 26-27
If you need service 27
Warranty 28
PLEASE DO
THIS NOW!
The self-addressed PRODUCT
REGISTRATION CARD should
be filled in completely; signed, and
returned.
This information _411register
your product and help us to serve
you quickly in the future if the
occasion should demand.
BEFOREUSINGTHEOVEN
Read the Important Safeguards and all instructions before
using the appliance.
Make sure the oven is properly installed, grounded and
properly connected to a 240 or 208 volt electric supply by a
qualified technician.
Remove all tape and plastic packaging wrap from the trim
before the oven is used. If an5' glue remains, touch the residue with
the sticky side of tape already removed. Or, use a solution of
warm water and mild detergent with a nylon scrubber.
© 1988 White Consolidated industries, Inc.
All rights reserved.
IMPORTANTSAFEGUARDS
DO
Be safety conscious. The preparation of food in an oven or
on a range requires temperatures that could cause severe
burns. Before using this new appliance, carefully read and
follow the safety instructions below.
°
Destroy the carton and plastic bags after the oven is
unpacked. Children might use them for play. Cartons cov-
ered with rugs, bedspreads or plastic sheets can become
airtight chambers. Remove all staples from the carton.
Staples can cause severe cuts and destroy finishes if they
come in contact with other appliances or furniture.
2. Remove the door from any unused oven if it is to be
stored or discarded.
+
.
.
.
.
Have the oven installed and grounded in accordance with
local codes by a qualified technician to prevent any shock
hazard and assure stability during operation. Installation
instructions are included in the literature pack. Ask your
dealer to recommend a qualified technician and an authorized
repair service.
Know how to disconnect power to the oven at the circuit
breaker or fuse box in an emergency or when servicing is
required. Have the technician show you and label the
proper switch or fuse at the electrical disconnect box.
Wear proper apparel when operating the oven. Loose-
fitting or hanging garments should never be worn while
using the appliance.
Use dry potholders. Wet or damp potholders on hot surfaces
could result in burns from steam. Do not let the potholder
touch hot heating elements. Do not use a towel or other
bulky cloth instead of a potholder.
Always place an oven rack in the desired location while
the oven is cool. See "Arranging Oven Racks" under
Oven Cooking. If a rack must be moved when the oven is
hot, use a dry potholder and grasp the rack in the center,
and do not let the potholder contact the hot heating ele-
ment in the oven.
8. When heating fat or grease, watch it closely. It may catch
fire if allowed to become too hot.
9. Stand to the side of the oven when opening the oven
door. Slowly open the door to allow hot air or steam to
escape before removing or replacing food.
IMPORTANTSAFEGUARDS
(continued)
DO
DONOT
WARNING: Do not allow children
to climb or play on or around the
appliance. If not properly installed,
the weight of a child on an open oven
door may cause the unit to pull out
of the wall, resulting in serious burns
or other injury.
10. Keep the oven vent unobstructed. It is located on the top of
the control panel trim. Touching the surfaces in this area
when the oven is being operated may cause severe burns.
11. Clean the oven regularly to keep all parts free of grease
which couM catch fire.
12. Before self-cleaning the oven, remove the broiler pan and
utensils, and clean only the parts of the oven listed in this
Owner's Guide.
13.
Cured or frozen meats and most fruits and vegetables can
be cooked automatically with the oven TIMED, but foods
of a highly perishable nature, such as milk, eggs, fish,
poultry or pork, should not be put in the oven before
cooking unless they are chilled in the refrigerator first and
do not stand more than one hour before cooking starts.
°
°
Never leave children alone or unattended in lhe area where
an appliance is in use. They should never be allowed to sit
or stand on any part of the appliance. As children grow,
teach them the proper, safe use of all appliances.
CAUTION: Do not store items of interest to children in
the cabinets above an oven--children climbing on the
oven to reach the items could be seriously injured.
3. Never use the oven to warm or heat the room.
.
DO NOT TOUCH HEATING ELEMENTS OR
INTERIOR SURFACES OF THE OVEN. Oven heating
elements may be hot even though they are dark in color.
Interior surfaces of an oven become hot enough to cause
burns. Other surfaces of the appliance may become hot
enough to cause burns--these include the oven vent
openings and surfaces near these openings, oven doors
and windows.
5. Do not let clothing or other flammable materials contact
heating elements or interior surfaces of the oven until they
have had sufficient time to cool.
6. Do not store flammable materials in or near the oven.
o
Do not use aluminum foil to line the oven bottom,
racks or broiler pan except as instructed & this Owner's
Guide. Improper use of aluminum foil may result in a
shock or fire hazard.
,
.
Do not heat unopened food containers. Build-up of
pressure may cause the container to burst and result in
injury.
Do not use water on grease fires. Smother the fire with a
pan lid, or use baking soda, a dry chemical or foam-type
extinguisher.
DONOT
10. Do not dean the door gasket. The door gasket is essential
for a good seal. Care shonld be taken not to rub, damage
or move the gasket.
11. Do not use oven cleaners. No commercial oven cleaner
or oven liner protective coating of any kind should be used
in or around any part of a self-clean oven.
12. Do not repair or replace any part of the appliance unless it
is specifically recommended in this Owner's Guide. To
prevent personal injury and damage to the oven, servicing
should be done oniy by a qualified technician.
13. Never modify or alter the construction of the oven such as
removal of panels, wire covers, or any other permanent
part of the product.
NOTE: The instructions appearing in this Owner's Guide
are not meant to cover every possible condition and situ-
ation that may occur. Common sense and caution must
be practiced when installing, operating and maintaining
any appliance.
SAVETHESEINSTRUCTIONS
ENERGY-SAVINGIDEAS
Turn the oven OFF immediately after use. Develop the habit
of turning the controls to OFF before removing foods from
the oven.
Allow food to thaw before cooking. Thawed food requires
less cooking energy than frozen food.
Before basting, adding vegetables or checking the internal
temperature of a roast, remove the food from the oven and
close the oven door. Prepare food as needed; then return to
the oven.
Preheat the oven only when recommended in a recipe. Put roasts
and casseroles into a cold oven and then turn the oven on.
Glance through the window in the oven door to check on
foods. Opening the oven door often to check on foods wastes
electricity.
Use the oven to prepare complete meals. For instance, start a
roast, add vegetables when the meat is half-cooked, and then
warm rolls or dessert after the main dishes are cooked.
Set the oven to self-clean after a baking or broiling operation.
The oven will already be hot and need less time to reach the
high cleaning temperature. See "Self-Cleaning Instructions".
GENERALOPERATING
INSTRUCTIONS
_ET OVEN
ON
THE OVEN ON/OFF switch
MUST be in the OVEN ON posi-
tion haorder to program the oven.
The switch should only be turned to
the OVEN OFF position when the
oven will not be operated ibr an
exended period.
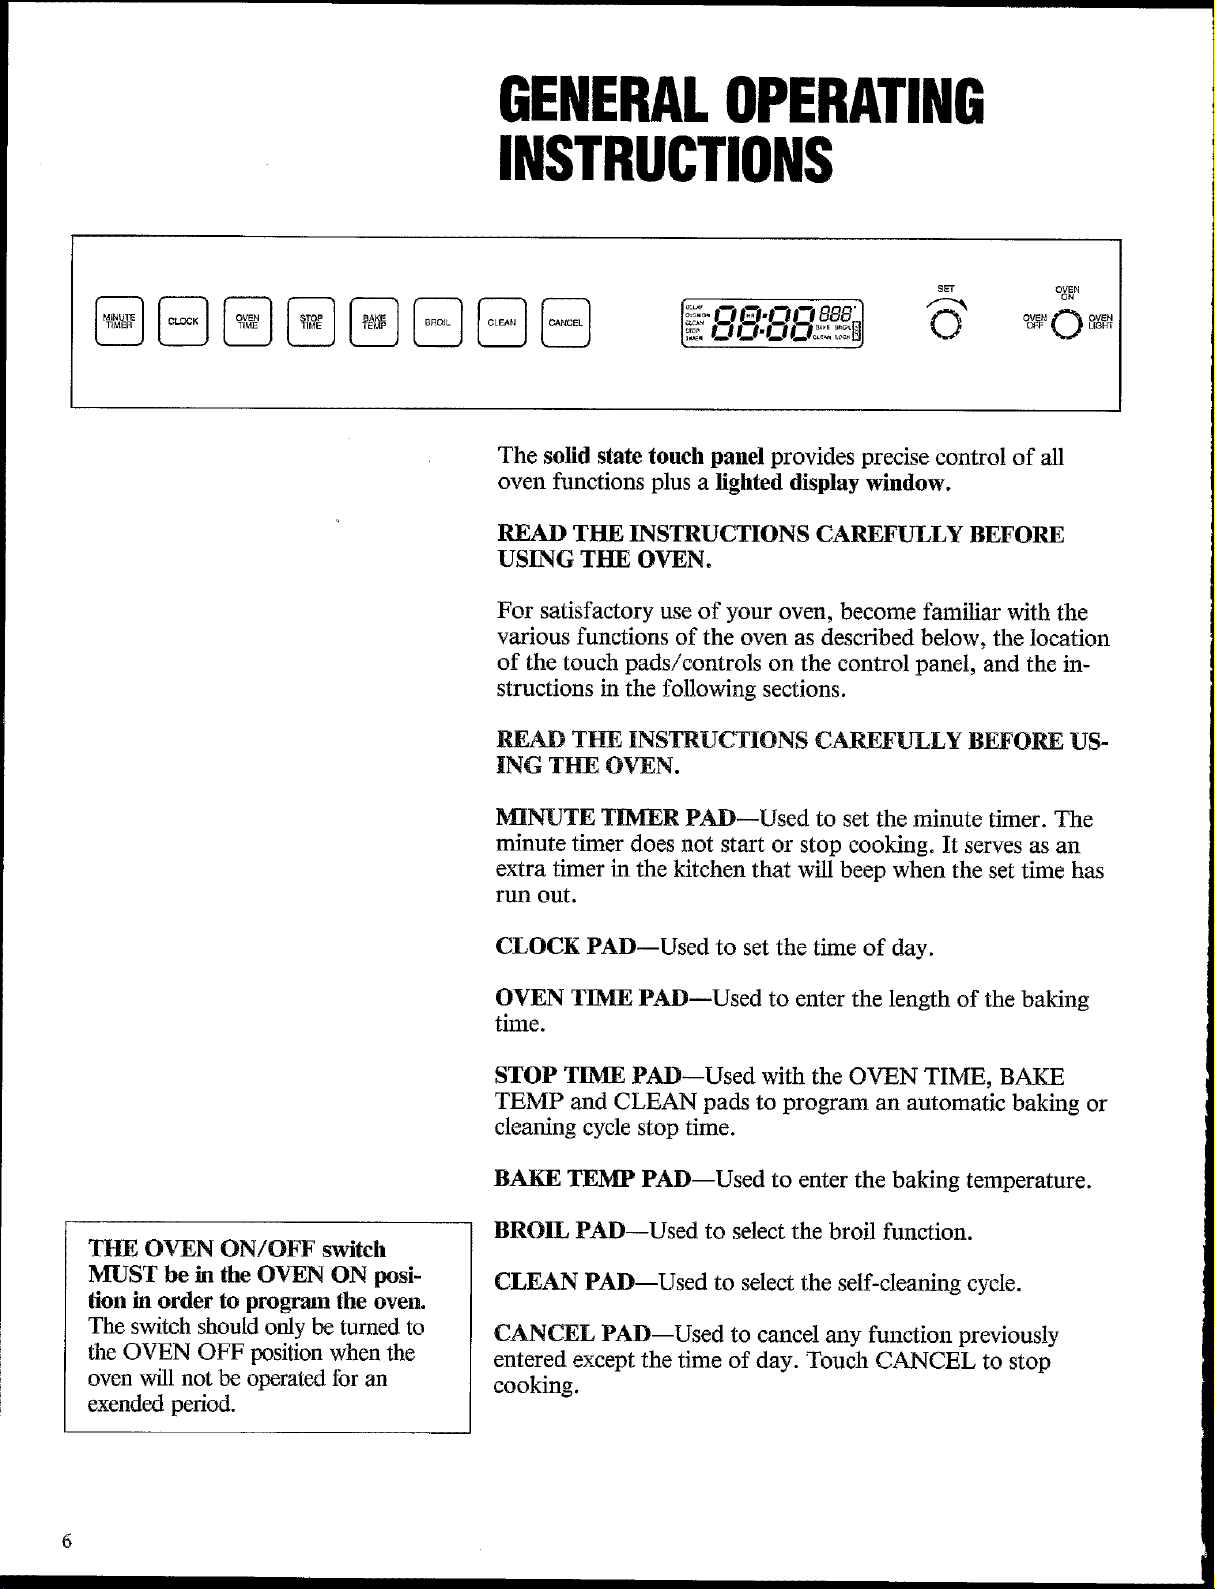
The solid state touch panel provides precise control of all
oven functions plus a lighted display window.
READ THE INSTRUCTIONS CAREFULLY BEFORE
USING THE OVEN.
For satisfactory use of your oven, become familiar with the
various functions of the oven as described below, the location
of the touch pads/controls on the control panel, and the in-
structions in the following sections.
READ THE INSTRUCTIONS CAREFULLY BEFORE US-
ING THE OV-EN.
MINUTE TIMER PADmUsed to set the minute timer. The
minute timer does not start or stop cooking. It serves as an
extra timer in the kitchen that will beep when the set time has
run out.
CLOCK PAD--Used to set the time of day.
OVEN TIME PAD--Used to enter the length of the baking
time.
STOP TIME PAD--Used with the OVEN TIME, BAKE
TEMP and CLEAN pads to program an automatic baking or
cleaning cycle stop time.
BAKE TEMP PAD--Used to enter the baking temperature.
BROIL PAD--Used to select the broil function.
CLEAN PAD--Used to select the self-cleaning cycle.
CANCEL PAD--Used to cancel any function previously
entered except the time of day. Touch CANCEL to stop
cooking.

OVEN
ON
OVEN 0
OFF
OVEN
LIGHT
SET KNOB--Used along with the function pads to select
oven temperature, cooking time, stop time (when program-
ming an automatic stop time), time of day, clean time and the
minute timer. After touching one of the function pads, turn
the knob in a clockwise direction until the desired time or
temperature appears in the display.
OVEN ON/OFF and OVEN LIGHT SWITCH--Used to
turn the oven light and power to the oven on and off.
(The OVEN ON/OFF switch can be used as a power safety
switch to shut off power to the oven when leaving the home
unattended for extended periods of time.) The switch MUST
be in the OVEN ON position in order to program the
oven. The switch should only be turned to the OVEN OFF
position when the oven will not be operated for an extended
period.
The oven can be programmed to:
• Bake conventionally
• Time bake with automatic on and off times
• Broil
• Self-clean
All functions are entered by first touching the appropriate
function pad, then turning the SET knob to select the time
and/or temperature.
If you touch the wrong pad, touch the CANCEL pad. This
will erase all information previously entered except the time of
day.
At the end of any cooking function, touch CANCEL to clear
the display.
For a silent control panel:
When choosing a function, a beep will be heard each time a
pad is touched. If desired, the controls can be programmed
for silent operation. Touch and hold the CANCEL pad. The
control will beep twice. This will block the controls from
sounding when a pad is touched. To return the sound, touch
and hold the CANCEL pad again until one beep is heard.
NOTE: This oven is equipped with a state of the art electronic
oven controller. Among its many features is a full time oven
circuit diagnostics system. The controller constantly monitors
its internal circuitry as well as several crucial oven circuits, to
insure they are all operating correctly. If at any time one of
these systems fail, the controller will immediately shut down
operation; beeping and flashing an error code of -FI- thru
-F10-, in the display window. If this condition should arise,
simply push the CANCEL pad and contact your local author-
ized service agent. 7
USINGTHEOVEN
SETTINGOVEN
CONTROLS
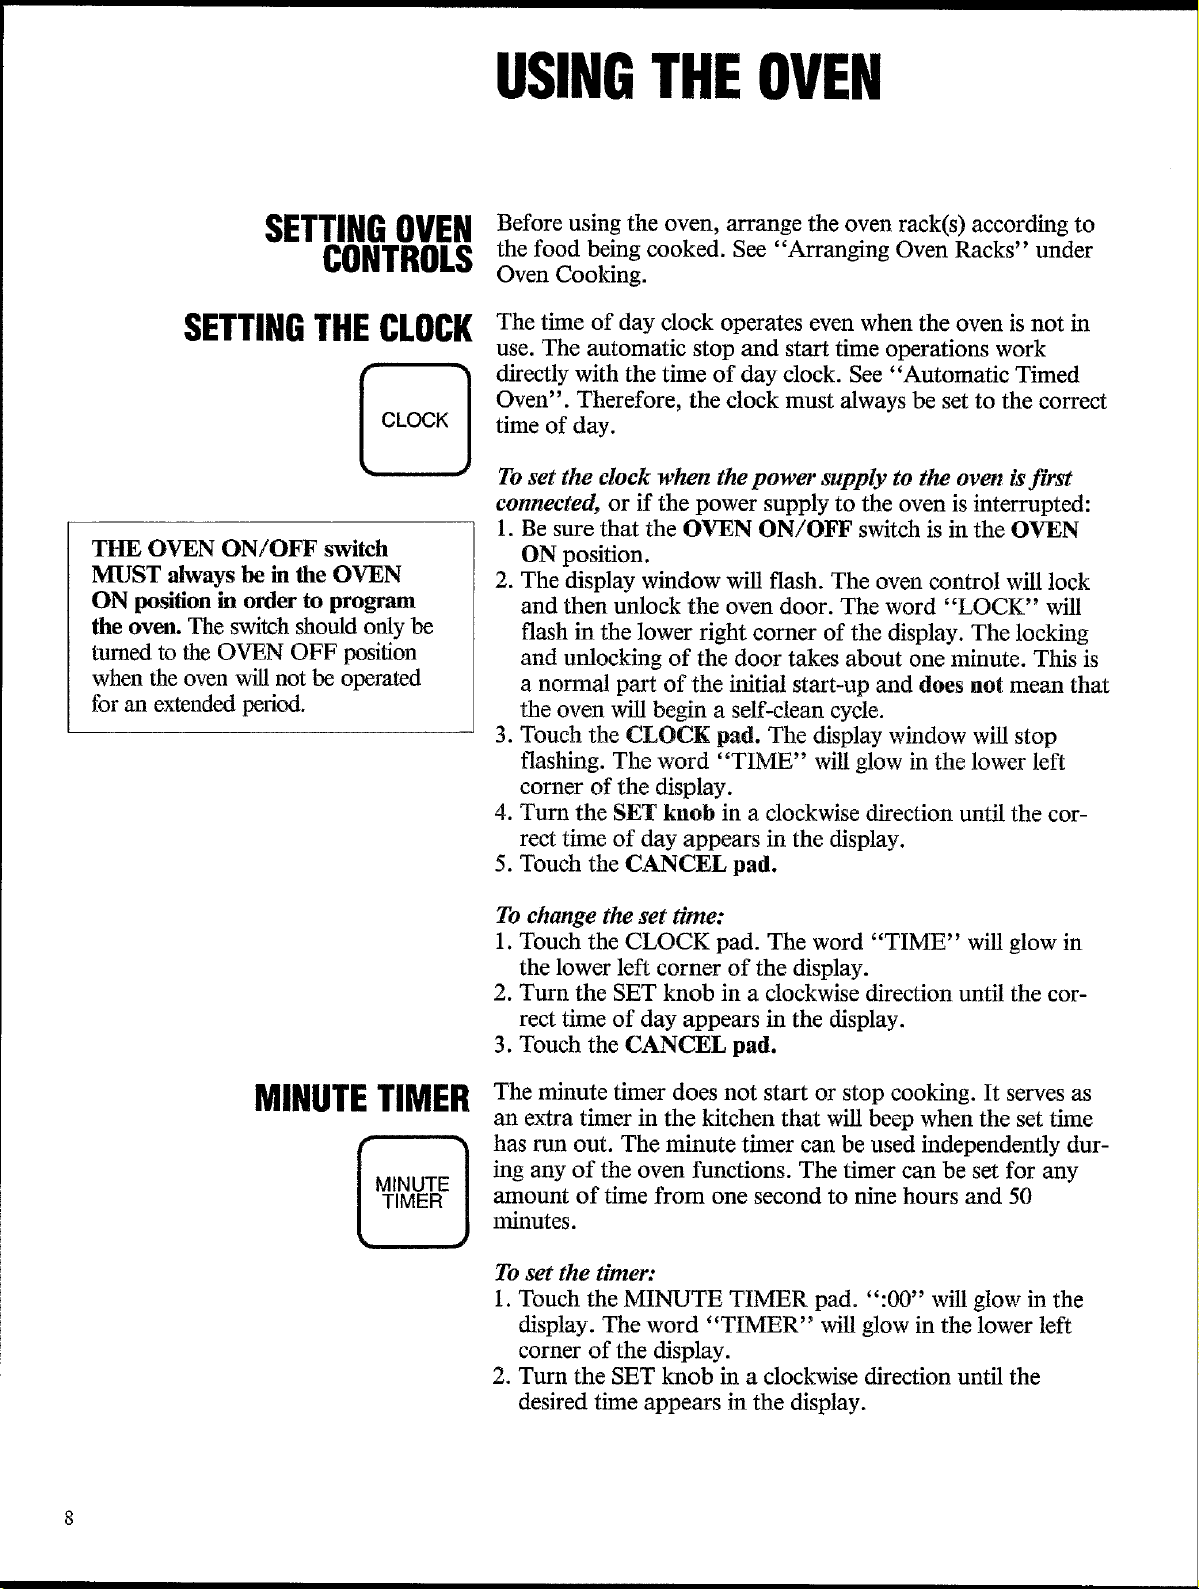
SETTINGTHECLOCK
I CLOCK I
THE OVEN ON/OFF switch
MUST always be in the OVEN
ON position in order to program
the oven. The switch should only be
turned to the OVEN OFF position
when the oven will not be operated
for an extended period.
MINUTETIMER
I MINUTE
TIMER
Before using the oven, arrange the oven rack(s) according to
the food being cooked. See "Arranging Oven Racks" under
Oven Cooking.
The time of day clock operates even when the oven is not in
use. The automatic stop and start time operations work
directly with the time of day clock. See "Automatic Timed
Oven". Therefore, the clock must always be set to the correct
time of day.
To set the clock when the power supply to the oven is first
connected, or if the power supply to the oven is interrupted:
1. Be sure that the OVEN ON/OFF switch is in the OVEN
ON position.
2. The display window will flash. The oven control wiU lock
and then unlock the oven door. The word "LOCK" will
flash in the lower right comer of the display. The locking
and unlocking of the door takes about one minute. This is
a normal part of the initial start-up and does not mean that
the oven will begin a self-clean cycle.
3. Touch the CLOCK pad. The display window will stop
flashing. The word "TIME" will glow in the lower left
comer of the display.
4. Turn the SET knob in a clockwise direction until the cor-
rect time of day- appears in the display.
5. Touch the CANCEL pad.
To change the set time:
1. Touch the CLOCK pad. The word "TIME" will glow in
the lower left corner of the display.
2. Turn the SET knob in a clockwise direction until the cor-
rect time of day appears in the display.
3. Touch the CANCEL pad.
The minute timer does not start or stop cooking. It serves as
an extra timer in the kitchen that will beep when the set time
has run out. The minute timer can be used independently dur-
ing any of the oven functions. The timer can be set for any
amount of time from one second to nine hours and 50
minutes.
To set the timer:
1. Touch the MINUTE TIMER pad. ":00" will glow in the
display. The word "TIMER" will glow in the lower left
corner of the display.
2. Turn the SET knob in a clockwise direction until the
desired time appears in the display.
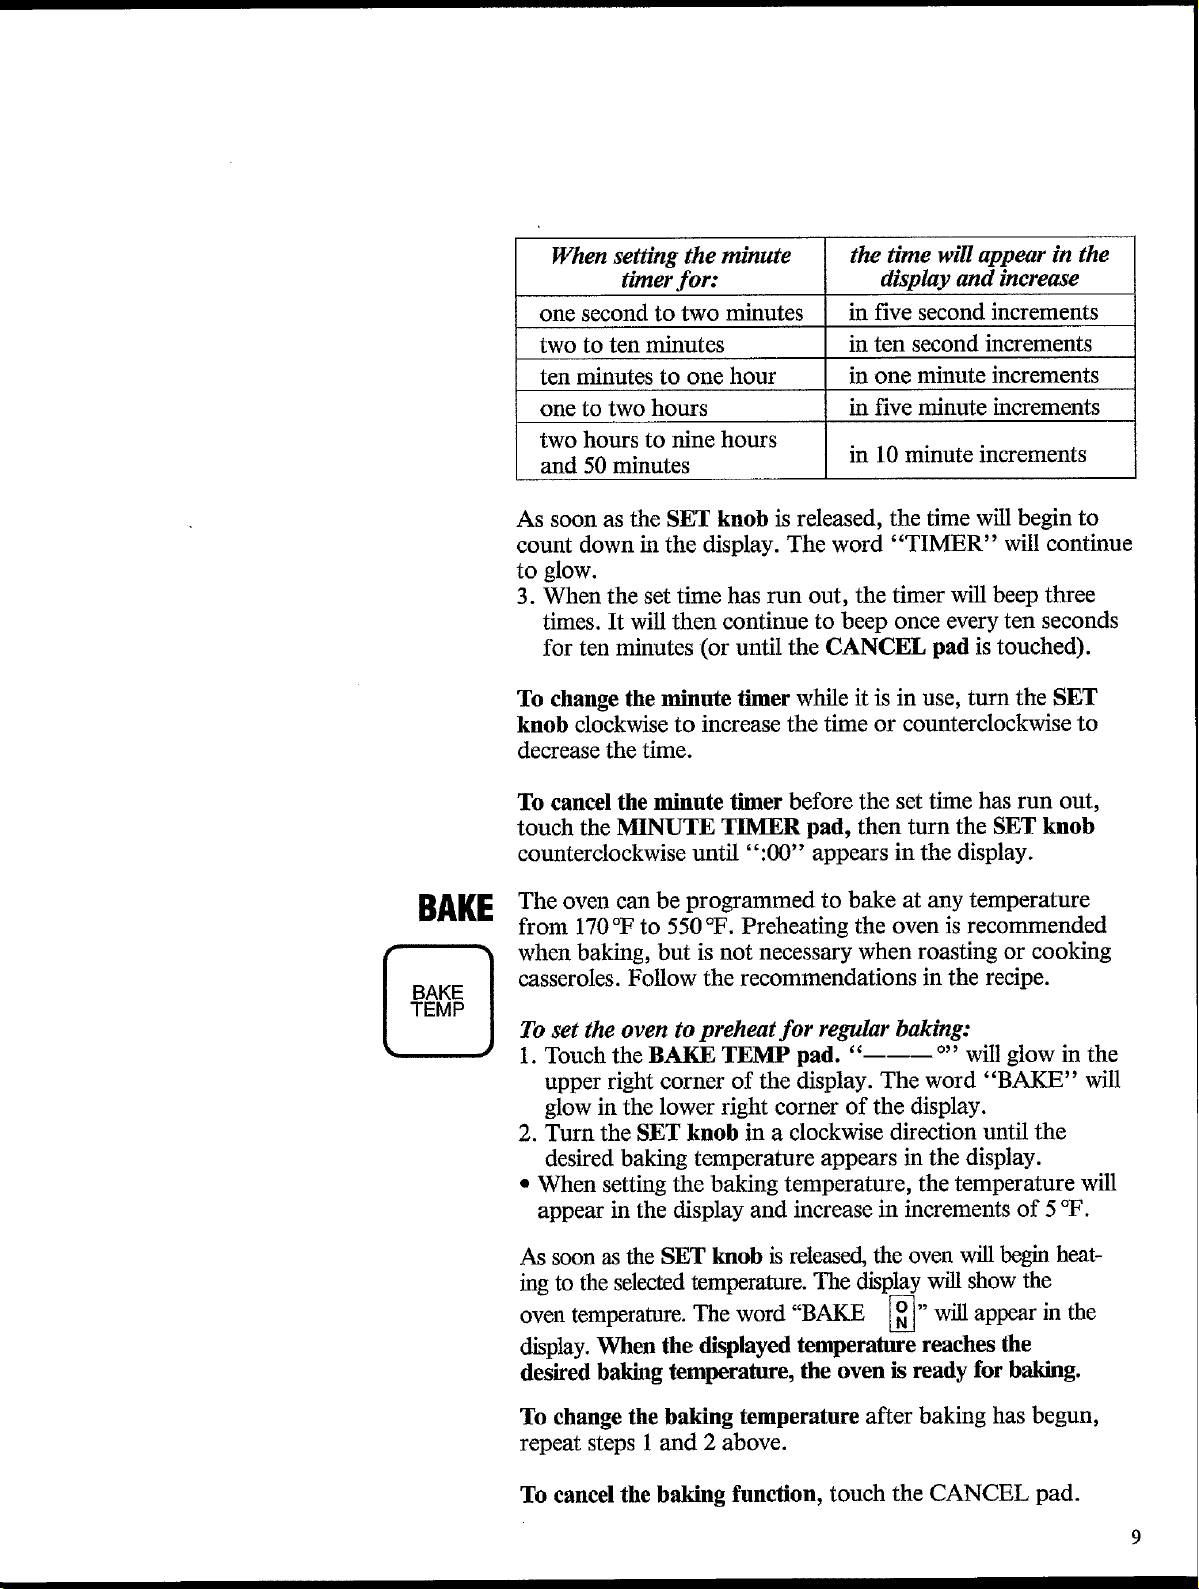
When setting the minute the time will appear in the
timer for: display and increase
one second to two minutes in five second increments
two to ten minutes in ten second increments
ten minutes to one hour in one minute increments
one to two hours in five minute increments
two hours to nine hours
and 50 minutes in 10 minute increments
As soon as the SET knob is released, the time will begin to
count down in the display. The word "TIMER" will continue
to glow.
3. When the set time has run out, the timer will beep three
times. It will then continue to beep once every ten seconds
for ten minutes (or until the CANCEL pad is touched).
To change the minute timer while it is in use, turn the SET
knob clockwise to increase the time or counterclockwise to
decrease the time.
BAKE
BAKE
TEMP
To cancel the minute timer before the set time has run out,
touch the MINUTE TIMER pad, then turn the SET knob
counterclockwise until ":00" appears in the display.
The oven can be programmed to bake at any temperature
from 170°F to 550 °F. Preheating the oven is recommended
when baking, but is not necessary when roasting or cooking
casseroles. Follow the reconamendations in the recipe.
To set the oven to preheat for regular baking:
1. Touch the BAKE TEMP pad. " o,, will glow in the
upper right corner of the display. The word "BAKE" will
glow in the lower right corner of the display.
2. Turn the SET knob in a clockwise direction until the
desired baking temperature appears in the display.
• When setting the baking temperature, the temperature will
appear in the display and increase in increments of 5 °F.
As soon as the SET knob is released, the oven will begin heat-
ing to the selected temperature. The display will show the
The word "BAKE _" will appear in theoven
temperature.
display. When the displayed temperature reaches the
desired baking temperature, the oven is ready for baking.
To change the baking temperature after baking has begun,
repeat steps 1 and 2 above.
To cancel the baking function, touch the CANCEL pad.
 Loading...