


Household Beverage Cooler
Record Serial/Model Numbers ………………....2
Important Safety Instructions ……….………….2
First Steps …………………………….……………3
General Operation ………………………………..6
Helpful Hints ………………………….……………7
Energy Saving Tips ..……………..………………8
Beverage Cooler Features ………………………8
Cleaning and Maintenance ……………….……..8
Warranty …………………………………….….…10
Troubleshooting Guide ………………………...11
P/N 297017400 (Oct 2004)

This Use and Care Manual provides specific operating instructions for your model. Use your beverage cooler only as instructed in this manual. These instructions are not meant to cover every possible condition and situation that may occur. Common sense and caution must be practiced when installing, operating, and maintaining any appliance.
Record the model and serial numbers in the space provided below. The model and serial number plate is located on the upper left wall inside the beverage cooler.
•Destroy or safely discard carton, plastic bags, and any exterior wrapping material immediately after the beverage cooler is unpacked. Children should never use these items to play. Cartons covered with rugs, bedspreads, plastic sheets or stretch wrap may become airtight chambers, and can quickly cause suffocation.
•Remove all staples from the carton. Staples can cause severe cuts, and destroy finishes if they come in contact with other appliances or furniture.
•An empty, discarded ice box, refrigerator, beverage cooler, or freezer is a very dangerous attraction to children.
•Remove and discard any spacers used to secure the shelves during shipping. Small objects are a choke hazard to children.
Versión en español
Si desea obtener una copia en español de este Manual del Usuario, sívase escribir a la dirección que se incluye a continuación. Solicite la P/N 297025100.
Spanish Owner’s Guide
Electrolux Home Products
P.O. Box 212378
Augusta, GA 30917
READ ALL INSTRUCTIONS BEFORE USING THIS BEVERAGE COOLER.
Proper Disposal of Your
Refrigerator/Freezer/Beverage Cooler
 Risk of child entrapment. Child entrapment and suffocation are not problems of the past. Junked or abandoned refrigerators, freezers or beverage coolers are still dangerous – even if they will sit for “just a few days.” If you are getting rid of your old freezer, refrigerator or beverage cooler, please follow the instructions below to help prevent accidents.
BEFORE YOU THROW AWAY YOUR OLD
REFRIGERATOR/FREEZER/BEVERAGE
COOLER:
These guidelines must be followed to ensure that safety mechanisms in the design of this beverage cooler will operate properly.
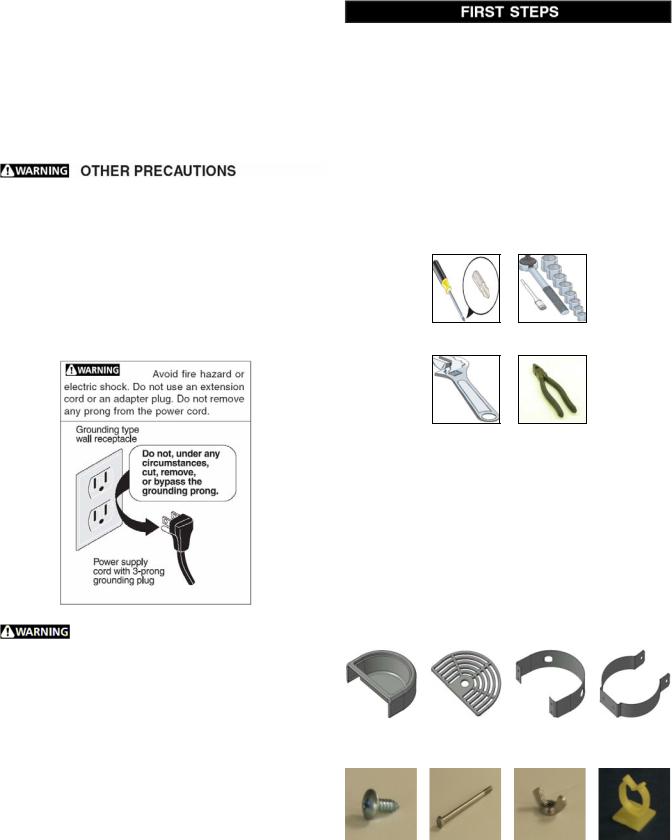
•Beverage Cooler must be plugged into its own 115 Volt, 60 Hz., AC only electrical outlet. The power cord of the appliance is equipped with a three-prong grounding plug for your protection against shock hazards. It must be plugged directly into a properly grounded three-prong receptacle. The receptacle must be installed in accordance with local codes and ordinances. Consult a qualified technician. DO NOT use an extension cord or adapter plug.
2
•If voltage varies by 10% or more, performance of your beverage cooler may be affected. Operating beverage cooler with insufficient power can damage the compressor.
•To prevent the beverage cooler from being turned off accidentally, do not plug unit into an outlet controlled by a wall switch or pull cord. It is recommended that a separate circuit serving only your beverage cooler be provided.
•Do not pinch, knot, or bend the cord in any manner.
•DO NOT use this appliance outside. It is designed for indoor use only.
•NEVER unplug the beverage cooler by pulling on the cord. Always grip the plug firmly, and pull straight out from the receptacle.
•To avoid electrical shock, unplug the beverage cooler before cleaning.
NOTE: Turning the temperature control to “OFF” turns off the compressor, but does not disconnect the power to other electrical components.
This Use and Care Manual provides specific assembly, operating and maintenance instructions for your model. Use the beverage cooler only as instructed in this Use and Care Manual. Before starting the beverage cooler, follow these important first steps.
PARTS AND ACCESSORIES
Your beverage cooler comes with a box that contains all the parts and accessories needed for your beverage cooler. Check to make sure that you have received the box containing all of the components listed below. You will need the following tools to assemble the beverage cooler.
PHILLIPS™ SOCKET
SCREWDRIVER WRENCH
CO2 CANISTER SAFE HANDLING
•CO2 canisters must be handled with extreme care. They contain potentially hazardous high pressure compressed gas.
•ALWAYS connect CO2 gas canisters to a pressure regulator.
•NEVER drop or throw the CO2 canister.
•NEVER connect gas canister directly to keg.
•ALWAYS keep CO2 canisters in a cool place (70º or less) and away from heat.
•In case of CO2 leakage, ventilate and evacuate the area immediately.
•ALWAYS keep canister secured in an upright position.
•Check the Department of Transportation (D.O.T.) test date on the canister neck and do not use if older than 5 years.
•Return outdated canister to your gas supplier for one that is within the time window.
3
|
|
|
ADJUSTABLE |
|
PLIERS |
||
|
|
|
WRENCH |
|
|
|
|
DRIP TRAY AND MOUNTING HARDWARE BOX |
|||||||
(1) |
Drip Tray |
|
|
|
1 piece |
||
(2) |
Drip Tray Cover |
|
|
|
1 piece |
||
(3) |
Drip Tray Bracket |
|
|
|
1 piece |
||
(4) |
CO2 Canister Bracket |
|
|
|
1 piece |
||
(5) |
Mounting Screws |
|
|
|
6 pieces |
||
(6) |
4” Long Carriage Bolt |
|
|
|
1 piece |
||
(7) |
Wing Nut |
|
|
|
1 piece |
||
(8) |
Hose Routing Clips |
|
|
|
2 pieces |
||
|
|
|
|
|
|
|
|
|
|
|
|
|
|
|
|
(1) DRIP TRAY |
(2) DRIP TRAY |
|
(3) DRIP TRAY |
|
(4) CO2 CANISTER |
|
|
|
COVER |
|
BRACKET |
|
BRACKET |
|
|
|
|
|
|
|
|
|
|
|
|
|
|
(5) MOUNTING |
(6) 4” LONG |
(7) WING NUT |
(8) HOSE |
SCREW |
CARRIAGE BOLT |
|
ROUTING CLIP |
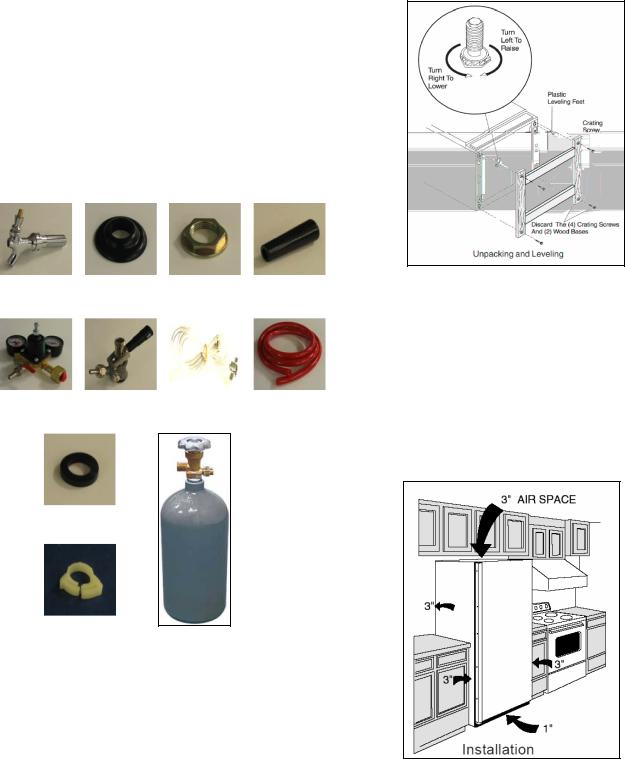
BEVERAGE DELIVERY KIT BOX |
|
||||||
(9) Faucet and Shank Assembly |
1 piece |
||||||
(10) |
Plastic Collar |
1 piece |
|||||
(11) |
Shank Nut |
1 piece |
|||||
(12) |
Faucet Knob |
1 piece |
|||||
(13) |
Regulator |
1 piece |
|||||
(14) |
Keg Coupler |
1 piece |
|||||
(15) |
Clear Hose (Delivery Line) |
1 piece |
|||||
(16) |
Red Hose (Gas Line) |
1 piece |
|||||
(17) |
Rubber Washer (Black) |
2 pieces |
|||||
(18) |
Plastic Hose Clamp (White) |
2 pieces |
|||||
(19) |
CO2 Canister (Empty) |
1 piece |
|||||
|
|
|
|
|
|
|
|
|
|
|
|
|
|
|
|
(9) FAUCET & |
|
(10) PLASTIC |
|
(11) SHANK NUT |
|
(12) FAUCET |
SHANK ASS’Y. |
|
COLLAR |
|
|
|
KNOB |
|
|
|
|
|
|
|
|
|
|
|
|
|
|
(13) REGULATOR |
(14) KEG |
(15) CLEAR HOSE |
(16) RED HOSE |
||
|
|
COUPLER |
(DELIVERY LINE) |
(GAS LINE) |
|
|
|
|
|
|
|
|
|
|
|
|
|
(17) RUBBER |
(19) CO2 |
WASHER |
CANISTER |
|
|
|
|
(18) HOSE
CLAMP
LEVELING
The beverage cooler must have all bottom corners resting firmly on a solid floor. The floor must be strong enough to support a fully loaded beverage cooler. NOTE: It is Very Important for your beverage cooler to be level in order to function properly. If the beverage cooler is not leveled during installation, the door may be misaligned and not close or seal properly, causing cooling, frost, or moisture problems.
To Level Your Beverage Cooler:
Carefully tip the unit onto its back. Remove and discard the wood skid from the bottom using a 3/8” socket wrench. After discarding crating screws and wood skid, use a carpenter’s level to level the beverage cooler from front to back. Adjust the plastic leveling feet in front, ½ bubble higher, so that the door closes easily when left halfway open.
INSTALLATION – GENERAL INSTRUCTIONS
•Choose a place that is near a grounded electrical outlet. DO NOT use an extension cord or an adapter plug.
•For the most efficient operation, the beverage cooler should be located where surrounding temperatures will not drop below 10ºF (-12ºC) or exceed 110ºF (43ºC).
•Allow space around the unit for good air circulation. Leave a 3 inch (75 mm) space on all sides of the beverage cooler for adequate air circulation.
NOTE: The exterior walls of the beverage cooler may become quite warm as the compressor works to transfer heat from the inside. Temperatures as much as 30ºF warmer than the room temperature can be expected. For this reason it is particularly important in hotter climates to allow enough space for air circulation around your beverage cooler.
4
 Loading...