


Operating Guide
Room Air Conditioner with remote control
XQ05 | XQ06 | XQ08 | XQ10 | XQ12
|
|
|
|
|
Exhaust |
PM |
|
SUPER HIGH |
EFFICIENCY |
|
|
|
|
|
Power |
|
|
|
|
|
On/Off |
|
|
|
|
Cool |
|
|
|
Fan |
Mode |
MoneySav |
er |
|
|
|
|
|
|||
Speed |
|
Fan Only |
|
|
|
|
|
Clock |
|
|
|
Timer |
Set |
Start |
|
|
|
On/Off |
Hour |
Stop |
Temp/Hour |
Vent shut |
|
|
|
|
|||
|
|
TEMPERATURE |
|
||
|
|
Cooler |
Warmer |
||
|
|
|
|||
|
Cool |
POWER |
|
||
|
|
|
|||
|
Fan |
Fan |
|
|
|
Only |
Money |
||||
Speed |
|||||
|
TIMER |
Saver |
|
||
On/Off |
OPERATION |
® |
|||
Start |
|
|
|||
|
|
Stop |
Set Hr. |
|
|
|
|
|
|
||
Please register your air conditioner
Model information can be found on the nameplate. It is located on the front of the unit, on the left side directly below the controls. If the front is on the unit, remove the two screws on each end (at bottom). Facing the unit, lift the bottom of the front toward you and slip it off. Please complete and mail the owner registration card furnished with this product, or register on-line at www.friedrich.com (USA only). For your future convenience, record the model information here.
MODEL NUMBER
SERIAL NUMBER
PURCHASE DATE
920-115-05 (11-04)

920-115-05 (11-04)
Congratulations!
You have purchased the very latest in room air conditioner technology. Your new Friedrich high efficiency room air conditioner will give you many years of dependable service. Many extra features have been built into your Friedrich air conditioner to assure quiet operation, the best circulation of cool, dry air, functional controls, and the most economical operation.
Table of Contents |
|
Before Operating Your Unit ............................................................................................................................................................ |
2 |
To Start Unit .................................................................................................................................................................................... |
4 |
To Set Mode of Operation ............................................................................................................................................................... |
4 |
MoneySaver® Feature ...................................................................................................................................................................... |
4 |
To Adjust Temperature ................................................................................................................................................................... |
5 |
To Adjust Fan Speed........................................................................................................................................................................ |
5 |
To Activate Smart Fan ..................................................................................................................................................................... |
5 |
To Set Hour Clock............................................................................................................................................................................ |
5 |
To Set The Timer ............................................................................................................................................................................. |
5 |
Automatic Component Protection................................................................................................................................................... |
5 |
How to Use the Remote Control ..................................................................................................................................................... |
6 |
Removing and Cleaning the Filter/ Exhaust Control ..................................................................................................................... |
7 |
Troubleshooting Tips ....................................................................................................................................................................... |
8 |
Warranty........................................................................................................................................................................................... |
9 |
WARNING: Before operating your unit |
|
Make sure the wiring is adequate for your unit.
If you have fuses, they should be of the time delay type. Before you install or relocate this unit, be sure that the amperage rating of the circuit breaker or time delay fuse does not exceed the amp rating listed in Figure 1.
DO NOT use an extension cord.
The cord provided will carry the proper amount of electrical power to the unit; an extension cord will not.
Make sure that the receptacle is compatible with the air conditioner cord plug provided.
This insures proper grounding. If you have a two prong receptacle you will need to have the circuit replaced by a certified electrician with grounded circuit that meets all national and local codes and ordinances. Under no circumstances should you remove the ground prong from the plug. You must use the three prong plug furnished with the air conditioner.
2
920-115-05 (11-04)
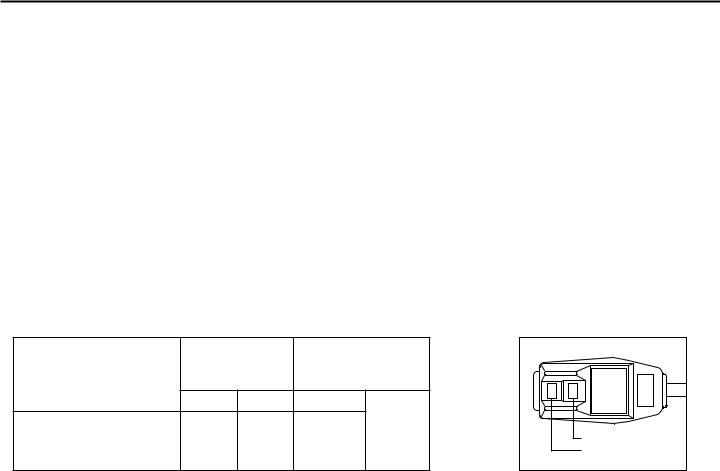
Test the power cord
All Friedrich room air conditioners are shipped from the factory with a Leakage Current Detection Interrupter (LCDI) equipped power cord. The LCDI device meets the UL and NEC requirements for cord connected air conditioners effective August 2004.
To test your power supply cord:
1.Plug power supply cord into a grounded 3 prong outlet.
2.Press RESET (See Figure 2).
3.Press TEST (listen for click; Reset button trips and pops out).
4.Press and release RESET (listen for click; Reset button latches and remains in). The power supply cord is ready for operation.
NOTE: LCDI device is not intended to be used as a switch.
Once plugged in the unit will operate normally without the need to reset the LCDI device.
If the device fails to trip when tested or if the power supply cord is damaged it must be replaced with a new supply cord from the manufacturer. We recommend you contact our Technical Assistance Line at (800) 541-6645 ext. 662. To expedite service, please have your model and serial number available.
|
CIRCUIT RATING |
|
|
||
MODEL |
OR TIME DELAY |
PLUG FACE |
|
||
FUSE |
|
|
|||
|
RESET |
TEST |
|||
|
AMP |
VOLT |
|||
|
NEMA NO. |
|
|||
XQ05 • XQ06 • XQ08 |
15 |
125 |
5-15P |
Test Button |
|
XQ10 • XQ12 |
|||||
|
|
|
Reset Button |
||
Figure 1 |
Figure 2 |
For the best cooling performance and highest energy efficiency
Keep the filter clean
Make sure that your air conditioner is always in top performing condition by cleaning the filter regularly. Instructions for removing and cleaning the filter can be found on page 7.
Insulation
Good insulation will be a big help in maintaining desirable comfort levels. Doors should have weather stripping. Be sure to caulk around doors and windows.
Provide good air flow
Make sure the airflow to and from the unit is clear. Your air conditioner puts the conditioned air out at the top of the unit, and takes in unconditioned air at the bottom. Airflow is critical to good operation. It is just as important on the outside of the building that the airflow around the unit exterior is not blocked.
Proper installation of seal gasket
Make sure the seal gasket has been installed properly to minimize noise and improve efficiency. If the seal gasket has not been installed, please refer to your installation instruction manual.
Unit placement
If your air conditioner can be placed in a window or wall that is shaded by a tree or another building, the unit will operate even more efficiently. Using drapes or blinds on the sunny side of the dwelling will also add to your unit’s efficiency.
3

920-115-05 (11-04)
How to operate your friedrich room air conditioner
6
5
To start unit
If your air conditioner is installed and plugged into a proper receptacle, it is ready to go. The first time the unit is started, the compressor will delay for three minutes. See Automatic Component Protection, Page 5.
1Touch the POWER ON/OFF button once. The unit
will automatically be in COOL with the temperature set at 75°F (24°C) and the fan speed at F1, the sleep setting.
To set mode of operation
When you first turn the unit on, it will be in the COOL mode (light on,) with constant fan.
2Touch the MODE button once to activate the MoneySaver® (light on.)
MoneySaver® is a feature that cycles the fan with the compressor so that the fan does not run all the time. This saves
4
TSM23891 |
7 |

920-115-05 (11-04)
How to operate your Friedrich room air conditioner (continued)
To adjust temperature |
To set the timer |
4Use the MODE button to select either the COOL or MoneySaver® function
5COOLER – Touch the downward-pointing triangle with the minus symbol, (  ) to lower the room air temperature.
6WARMER – Touch the upward-pointing triangle with the plus symbol (  ) to raise the room air temperature.
7Press both the  and
and  at the same time to switch the temperature from Fahrenheit (°F) to Celsius (°C).
Repeat step 7 to switch from °C back to °F.
To adjust fan speed
8Touch the FAN SPEED button to see the current setting. Touch it again to change speed. F1 is the lowest setting (SLEEP SETTING / LOW,) F2 is MEDIUM, and F3 is HIGH.
To activate Smart Fan
9There is a fourth option, SF, when selecting the fan speed. This is the SMART FAN function. SMART FAN DOES NOT OPERATE IN CONJUCTION WITH THE FAN ONLY MODE.
Smart Fan will adjust the fan speed automatically to maintain the desired comfort level. For example, if the outside doors in your home are opened for an extended period of time, or more people enter a room, Smart Fan may adjust to a higher fan speed to compensate for the increased heat load. This keeps you from having to adjust the fan speed on your own.
NOTE: Set the HOUR CLOCK before attempting to set timer functions.
You can set the START and STOP times a minimum of one hour apart, and a maximum of twenty-three hours apart.
11After setting the time, press the SET HOUR button
once (Start light on.) Use the two triangle-shaped buttons ( and
and  ) to select the time that the unit will START.
12After selecting the START time, press the SET HOUR
button once. (Stop Light on.) Use the two triangleshaped buttons ( and
and  ) to select the time that the unit will STOP. After selecting the stopping time, press the SET HOUR button once.
13Press the TIMER ON / OFF button (light turns on) to activate the timer function. To deactivate this function, press the TIMER ON / OFF button once again (light turns off.) Once the on and off times have been selected, they will remain in memory and cycle daily until changed.
NOTE: If the unit is unplugged or the power is interrupted, the HOUR must be reset or the TIMER ON / OFF will not function when desired.
Automatic component protection
Your unit is equipped with Automatic Component Protection.
To protect the compressor of the unit, there is a three minute delay if you turn the unit off or if power is interrupted. The fan will not be affected. Also, if you switch from COOL mode to FAN ONLY, and switch back to COOL mode, there is a three minute delay before the compressor comes back on.
To set the hour clock
10Touch the SET HOUR button to see the current setting.
The number that is displayed is the approximate time
(hour only). Use the two triangle-shaped buttons ( and
and  ) to change the settings. BE SURE TO SET A.M. AND P.M. ACCORDINGLY. (P.M. is indicated by a red light in the upper left corner of the display.)
5

920-115-05 (11-04)
How to use the remote control
Figure 4 |
|
|
|
|
6 |
Temperature |
|
5 |
|
|
|
|
||
Cooler |
Warmer |
1 |
||
2 |
POWER |
|
7 |
|
Cool |
|
|
||
|
|
|
|
|
3 |
|
|
|
4 |
Fan |
|
Fan |
Money |
|
Only |
Speed |
Saver® |
10 |
|
9 |
Timer Operation |
|
||
On/Off |
Start |
Stop |
Set Hr. |
|
11 |
|
|
|
8 |
To start unit
1POWER - Press the POWER button once. The unit will automatically start in the mode and fan speed it was last left on.
To set mode of operation
2COOL - Press the COOL button to automatically switch the operating mode to COOL.
3FAN ONLY - Press the FAN ONLY button if you want to run the fan only. You may want to use this feature in conjunction with the EXHAUST if you want to exhaust stale air. (The EXHAUST feature is located on the upper right side of the electronic control center on the air conditioner). See page 4, Figure 3.
4MoneySaver® - Press the MoneySaver® button to activate the MoneySaver® feature. MoneySaver® is the feature that cycles the fan with the compressor so that the fan does not run all the time.
To adjust temperature
5WARMER - Press the TEMP  button to raise the temperature setting.
6COOLER - Press the TEMP  button to lower the temperature setting.
To adjust fan speed
7FAN SPEED - Press the FAN SPEED button to see the current setting. Press again to change the fan speed. F1 is the lowest setting (SLEEP / LOW), F2 is MEDIUM, F3 is HIGH, and SF is the SMART FAN setting.
To set the hour clock
8SET HOUR CLOCK - Press SET HOUR once to see the current clock setting. Continue pressing the button until you arrive at the current time (Hour only). Minutes are not shown on the display. Make sure that the A.M. / P.M. setting is correct.
To set the timer
NOTE: You can set the START and STOP times a minimum of one hour apart, and a maximum of 23 hours apart.
9TIMER START - Press START to view the current start time for cooling. Continue pressing the START button until you arrive at the start time you desire. The start time for cooling will then be set.
10TIMER STOP - Press the STOP button. Continue pressing the STOP button until you arrive at the stop time you desire. The stop time for cooling will then be set.
11TIMER ON / OFF - Press the TIMER ON / OFF button to activate (light on) or deactivate (light off) the timer. Once the on and off times have been selected, they will remain in memory and cycle daily until changed.
NOTE: If the unit is unplugged or the power is interrupted, the SET HOUR function must be reset or the TIMER ON / OFF function will not work.
Additional RC1 wireless remote controls can be purchased from your Friedrich dealer.
6

920-115-05 (11-04)
Removing and cleaning the filter/ Exhaust feature
To remove filter
Simply turn the unit off and pull the filter frame up and towards you (See Figure 5). Clean with warm water and a mild detergent, rinse, dry, and replace by sliding the filter back into position behind the front panel.
Exhaust control
By placing the lever in the EXHAUST (Figure 6) position, stale air and smoke can be exhausted from the room. This feature should be used in conjunction with the FAN ONLY feature to expedite the flow of air to the outside. For normal cooling, the vent should be in the VENT SHUT position for maximum performance.
Figure 6
7
STF

920-115-05 (11-04)
Troubleshooting Tips
Power failure
If you have a power failure, the unit's auto-restart feature will resume operation in the selected mode prior to the power failure
Won't cool?
If your air conditioner operates, but won’t cool; check to see if the controls are properly set. Check the filter and clean thoroughly if needed. Check to see if the vent door is closed. Check to see if the chassis seal gasket is installed (refer to installation instructions). Lastly, you can reset the circuit board by pressing the “MODE” button and the “TEMPERATURE DOWN” button at the same time. The LEDs (small red lights) for Hour, Start and Stop will begin blinking. Once this occurs, turn the unit off by pressing the On/Off button once and then unplug the unit. Finally, plug the unit back in and turn it on by pressing the On/Off button once. All settings revert back to the factory default settings.
Won't run?
Make sure the power cord is plugged in all the way. Check for a bad fuse, tripped breaker or tripped LCDI Device. Refer to page 3 for LCDI reset instructions and to confirm proper fuse size. Lastly, you can reset the circuit board by pressing the “MODE” button and the “TEMPERATURE DOWN” button at the same time. The LEDs (small red lights) for Hour, Start and Stop will begin blinking. Once this occurs, turn the unit off by pressing the On/Off button once and then unplug the unit. Finally, plug the unit back in and turn it on by pressing the On/Off button once. All settings revert back to the factory default settings.
This is a warm weather appliance
Your air conditioner is designed to cool in warm weather when the outside temperature is above 60°F (16°C), so it won't cool a room if it is already cool outside.
Condensation is normal
Air conditioners actually pump heat and humidity from your room to the outside air. Humidity becomes water, and your air conditioner will use most of the water to keep the outside coil cool. If there is excessive humidity, there may be excess water that will drip outside. This is normal operation.
Frosting
This usually occurs because of insufficient airflow across the coils, a dirty filter, cool damp weather, or all of these. Set unit to Fan Only and the frost will disappear. Setting the thermostat a little warmer will probably prevent the frosting from recurring.
Noises
All air conditioners make some noise. We build them to operate as quietly as possible. An air conditioner mounted in a wall is quieter than one mounted in a window. It is important to ensure that the chassis seal gasket is properly installed (refer to installation instructions).
Cleaning your air conditioner
The decorative front and the cabinet can be cleaned with warm water and a mild liquid detergent. The indoor coil can be vacuumed with a dusting attachment if it appears to be dirty. The outdoor coil can be gently sprayed with a hose if you can get to it. If not, you might call your dealer for a more thorough cleaning when needed. The air filter should be inspected weekly and cleaned if needed by vacuuming with a dust attachment or by cleaning in the sink using warm water and a mild dishwashing detergent. Dry thoroughly before reinstalling the filter.
8

920-115-05 (11-04)
Friedrich Air Conditioning Company
P.O. Box 1540
San Antonio, TX 78295
210.357.4400
www.friedrich.com
ROOM AIR CONDITIONERS
LIMITED WARRANTY
FIRST YEAR
ANY PART: If any part supplied by FRIEDRICH fails because of a defect in workmanship or material within twelve months from date of original purchase, FRIEDRICH will repair the product at no charge, provided room air conditioner is reasonably accessible for service. Any additional labor cost for removing inaccessible units and/or charges for mileage related to travel by a Service Agency that exceeds 25 miles one way will be the responsibility of the owner. This remedy is expressly agreed to be the exclusive remedy within twelve months from the date of the original purchase.
SECOND THROUGH FIFTH YEAR
SEALED REFRIGERANT SYSTEM: If the Sealed Refrigeration System (defined for this purpose as the compressor, condenser coil, evaporator coil, reversing valve, check valve, capillary, filter drier, and all interconnecting tubing) supplied by FRIEDRICH in your Room Air Conditioner fails because of a defect in workmanship or material within sixty months from date of purchase, FRIEDRICH will pay a labor allowance and parts necessary to repair the Sealed Refrigeration System; PROVIDED FRIEDRICH will not pay the cost of diagnosis of the problem, removal, freight charges, and transportation of the air conditioner to and from the Service Agency, and the reinstallation charges associated with repair of the Sealed Refrigeration System. All such cost will be the sole responsibility of the owner. This remedy is expressly agreed to be the exclusive remedy within sixty months from the date of the original purchase.
APPLICABILITY AND LIMITATIONS: This warranty is applicable only to units retained within the Fifty States of the U.S.A., District of Columbia, and Canada. This warranty is not applicable to:
1.Air filters or fuses.
2.Products on which the model and serial numbers have been removed.
3.Products which have defects or damage which results from improper installation, wiring, electrical current characteristics, or maintenance; or caused by accident, misuse or abuse, fire, flood, alterations and/or misapplication of the product and/or units installed in a corrosive atmosphere, default or delay in performance caused by war, government restrictions or restraints, strikes, material shortages beyond the control of FRIEDRICH, or acts of God.
OBTAINING WARRANTY PERFORMANCE: Service will be provided by the FRIEDRICH Authorized Dealer or Service Organization in your area. They are listed in the Yellow Pages. If assistance is required in obtaining warranty performance, write to: Room Air Conditioner Service Manager, Friedrich Air Conditioning Co., P.O. Box 1540, San Antonio, TX 78295-1540.
LIMITATIONS: THIS WARRANTY IS GIVEN IN LIEU OF ALL OTHER WARRANTIES. Anything in the warranty notwithstanding, ANY IMPLIED WARRANTIES OF FITNESS FOR PARTICULAR PURPOSE AND/OR MERCHANTABILITY SHALL BE LIMITED TO THE DURATION OF THIS EXPRESS WARRANTY. MANUFACTURER EXPRESSLY DISCLAIMS AND EXCLUDES ANY LIABILITY FOR CONSEQUENTIAL OR INCIDENTAL DAMAGE FOR BREACH OF ANY EXPRESSED OR IMPLIED WARRANTY.
NOTE: Some states do not allow limitations on how long an implied warranty lasts, or do not allow the limitation or exclusion of consequential or incidental damages, so the foregoing exclusions and limitations may not apply to you.
OTHER: This warranty gives you specific legal rights, and you may also have other rights which vary from state to state.
PROOF OF PURCHASE: Owner must provide proof of purchase in order to receive any warranty related services.
All service calls for explaining the operation of this product will be the sole responsibility of the consumer.
All warranty service must be provided by an Authorized FRIEDRICH Service Agency, unless authorized by FRIEDRICH prior to repairs being made.
(10-04)
9
 Loading...