


816 SHARK TIDE™ INSTRUCTIONS
FEATURES:
•CURRENT TIME (HR., MIN., & SEC.)
•DAY/DATE/MONTH/YEAR
•INDICATES PRESENT TIME, TIDE HEIGHT AND DIRECTION
•MOVEABLE CURSOR INDICATES HOURLY TIDE AND DIRECTION FOR PRESENT DAY
•FUTURE TIDE MODE INDICATES TIDE HEIGHT AND DIRECTION FOR 15 YEARS
•CHOOSE FROM FIFTEEN PREPROGRAMMED ZONES.
•CHOOSE FROM 128 PREPROGRAMMED BEACHES WITHIN THE FIFTEEN ZONES
•PROGRAM YOUR LOCAL BEACH BREAK IF NOT INCLUDED AMONG THE 128 PREPROGRAMMED BEACHES
•MULTIPLE COUNTDOWN TIMERS
•CHRONOGRAPH WITH SPLIT TIMES
•FOUR DAILY OR ONE TIME ALARMS AND HOURLY CHIME
•DUAL TIME AND OPTIONAL 24HR. TIME
•WATER-RESISTANT TO 300 FEET
•NIGHT VISION™ ELECTROLUMINESCENT BACKLIGHTING
KEY REFERENCES
HOW TO SET TIME 1, DATE, 24HOUR FORMAT, AND BEACH LOCATION
From TIME 1 mode, press and hold the LIGHT/SET button for approximately two seconds; the seconds digits will flash.
Pressing the START button will reset the seconds digits to 0. If seconds are 30 or greater, one will be added to the minutes digits.
To set hours digits, press MODE button; hours digits will flash. To advance hours digits, press START button; to retard hours digits press STOP/RESET button; hold for rapid advnce.
To set minutes digits, press MODE button; minutes digits will flash. To advance minutes digits, press START button; to retard minutes digits, press STOP/RESET button; hold for rapid advnce.
Continuing through the time and date setting mode, the setting sequence is seconds, hours, minutes, year, month, date, and 12/24hour mode.
After 12/24-hour mode is selected, press MODE button; “SET TIDE?” will appear. Press MODE button, and one of the six zone options will appear: Caribbean, East USA, Hawaii, Japan, Mexico, or West USA. Press START button to select your choice of zone.
To set your choice of location or beach break, press MODE button; press START button to select location or beach break of choice.
Press MODE button; if you have selected the Caribbean, Mexico, West USA, or East USA, then DST ON or DST OFF will appear on the display. DST is an abbreviation for daylight savings time. Note: All of the western and eastern coastal states in USA observe DST, however, neither Hawaii nor Japan observe Daylight Savings Time. Note: The DST feature only needs to be activated once by pressing START button; it will adjust automatically thereafter. However, you will still need to adjust the time of day at daylight savings time changes. The DST flag will appear on the display when the DST feature is in the “ON” position.
Press MODE button; “USER OPT” will appear on the display. If your favorite location or beach break is not one of the pre-programmed locations, you may wish to add it. To do this, you will need to know the time difference between the high tide at your favorite beach and the high tide (for the same day) at
the closest pre-programmed beach. This time difference information is usually illustrated on tide calendars or local tide charts, and is indicated for example as (+ or -) 10, 20 or 30 minutes between two beach locations. For example, suppose your favorite beach break is Malibu, which is not pre-programmed in the watch, and your local tide calendar indicates that Malibu tides are (+10) minutes, compared to Los Angeles tides. After entering Malibu as your favorite beach, you would enter (+10) as your offset.
To program your location or beach break, press START button. Press START button again to enter the first letter, then press MODE button to advance to the second letter. If you advance any letter too far, simply press STOP/RESET button to back up. You may enter a total of up to twelve letters.
After entering the last letter of the name of your beach, press MODE button continuously, until the words “NO OFFSET” appear. Press
START button to enter your desired offset. Press LIGHT/SET button to return to TIME 1 mode.
At any time, while in TIME 1 mode, press START button; current tide conditions will appear on the top half of the display.
HOW TO SET AND OPERATE CURRENT TIDE
Press MODE button until “TIDE” appears. Current date will be displayed on the lower half, current daily tide will be displayed on the upper half.
Press START button; and cursor will scroll across tide graph, indicating high, low, rising and falling tide conditions for any hour of the current day.
You may also set tide zone, location, DST, or user option from this mode by pressing and holding LIGHT/SET button for two seconds. Then follow the sequence as outlined in “HOW TO SET TIME 1, DATE, 24-HOUR FORMAT, AND BEACH LOCATION.”
The above graph shows how to read the tide graph.
HOW TO SET AND OPERATE FUTURE TIDE
In this mode you may enter any future date for the next 15 years, to access future tide information for any selected location or beach break. If you desire future tide information for a location other than your previously selected beach, you will need to go back to either TIME
1 mode or TIDE mode, and enter that new location.
Press MODE button until “FUTURE
TIDE” appears. Future date will be displayed on the lower half, future tide graph and hourly time will be displayed on the upper half.
Press and hold LIGHT/SET button for two seconds; year digits will flash. To advance flashing year digits, press START button. Press MODE button; months digits will flash. To advance months digits, press START button. Press MODE button; date digits will flash. To advance date digits, press START button. When future date setting is complete, press LIGHT/SET button. Press START button; cursor will scroll across tide graph, indicating tide conditions for any hour of the day on the future date selected. Note: Hourly time is indicated beneath “FT” on the upper half of display.
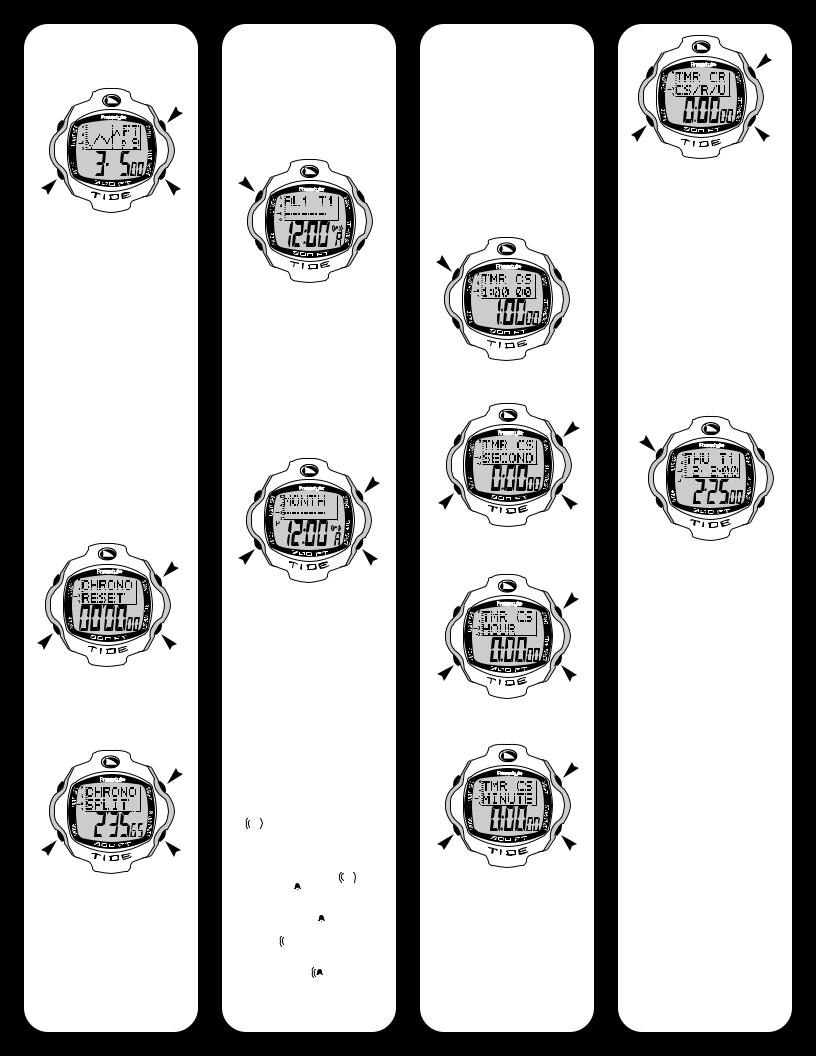
HOW TO OPERATE CHRONOGRAPH/STOPWATCH
Press MODE button until “CHRONO” appears. “CHRONO RESET” will be displayed on the upper half; chronograph time on the lower half. Reset the chronograph to zero by pressing STOP/RESET button. Press START button to start chronograph.
Press START button to view split time. Split time is the time elapsed since the start of the chronograph. Chronograph will continue to count while split time is displayed. Each press of START button will display a split time.
To stop chronograph, press STOP/RESET button. Reset the chronograph to zero by pressing the STOP/RESET button.
HOW TO SET AND OPERATE THE ALARMS
Press MODE button until “ALARM” appears. There are four different alarms, which can be set as daily
repeating alarms, or one time only reminder alarms. To set a one time alarm, you must set a specific date. To set a daily repeating alarm, date position must be set to “-----”.
Additionally, the four different alarms may be set to reference either “TIME-1” or dual time “TIME-2.” Pressing STOP/RESET button will toggle between the four
different alarms.
Press and hold LIGHT/SET button to enter alarm setting mode. The hours digits will flash. Press START button to advance the flashing hours digits; hold for rapid advance. Press MODE button; minutes digits will flash. Press START button to advance minutes digits. Press MODE button; months digits will flash; to set a one time only reminder alarm, you must set a date. Press START button to advance months digits. To set this alarm as a daily repeating alarm, enter (--) instead of specific months digits.
Press MODE button; date digits will flash. To set a one time only reminder alarm, press START button to advance date digits. To set this alarm as a daily repeating alarm, enter (--) instead of specific date digits. Press MODE button; “T1” or “T2” will flash. Press STOP/RESET button to indicate if this alarm is in reference to “TIME-1”, or dual time “TIME-2”. Press LIGHT/SET button when alarm 1 setting is complete. Press STOP/RESET button to advance to alarm 2, 3 or 4. To set any of these alarms, follow setting sequence for alarm 1 as detailed above.
Once any of the alarm times are set, the alarm is automatically activated (armed), and is indicated as “  ” on the display. To arm or disarm any of the four alarms while in alarm mode, press STOP/RESET button to select alarm. Once selected, press START button to arm or disarm the alarm “
  ” and/or hourly chime “ ”. The setting sequence is:
Hourly chime on: “ ”
Alarm on: “  ”
”
Both alarm and
hourly chime on: “  ”
”
Both alarm and
hourly chime off: no symbol
HOW TO OPERATE THE
COUNTDOWN TIMER
Press MODE button until “TIMER” appears. During the setting process you can select from three different countdown timer functions. Countdown/stop (CS): timer counts down from a preset time to zero and stops. Countdown/repeat (CR): timer counts down from a preset time to zero, resets and repeats. Countdown/count up (CU): timer counts down from a preset time to zero and begins to count up.
Press and hold LIGHT/SET button to enter the countdown timer setting mode.
The seconds digits will flash. Press START button to advance seconds digits.
Press MODE button; hours digits will flash. Press START button to advance the hour digits.
Press MODE button; minutes digits will flash; press START button to advance minutes digits.
Press MODE button; CR, CS or CU will flash. Press START button to select which countdown timer you wish to use.
When countdown time setting is complete, press LIGHT/SET button to exit the setting mode. To start timer, press START button. To stop timer, press STOP/RESET button. To reset timer, press LIGHT/SET button.
HOW TO SET DUAL TIME
Press MODE button until “TIME-2” appears. To set dual time, press and hold LIGHT/SET button; seconds digits will flash. Press START button to reset the seconds digits to zero. Continue through the setting sequence as done in “TIME- 1”, setting by cycling between MODE button and START button. When dual time setting is complete, press LIGHT/SET button to exit the setting mode.
CARE AND MAINTENCE
1.Back case cover should only be removed by an authorized watch repair specialist.
2.Always rinse your watch in fresh water after immersion in salt or chlorinated water.
3.Do not expose watch or band to chemicals such as gasoline, aerosol sprays, paint or solvents.
4.Periodically clean with a soft cloth and fresh water.
NOTE: Extreme electrostatic discharge can cause the LCD to ‘freeze up’. In this event you could reset the watch by pressing all 4 buttons together for 5 seconds.
TIDE LOCATIONS
WEST USA
SAN DIEGO,CA
LA JOLLA, CA
SAN CLEMENTE, CA
NEWPORT BAY, CA CABRILLO BEACH, CA
LOS ANGELES HARBOR, CA SANTA MONICA, CA MALIBU, CA
VENTURA, CA
RINCON, CA
SANTA BARBARA, CA GAVIOTA, CA
POINT ARGUELLO, CA MORRO BEACH, CA CARMEL COVE, CA
MONTEREY BAY, CA
MOSS LANDING, CA SANTA CRUZ, CA OCEAN BEACH, CA
 Loading...