


Instructions for use and installation
Built-in multi-function oven with 6 cooking modes
Kullanım ve montaj talimatları
6 programlı çok fonksiyonlu ankastreıfrın
GL 62 M XS
GL 66 M XS
GL 66 M NT XS

Contents
Introduction ............................................................................................... |
1 |
Switching on the first time ......................................................................... |
1 |
Suggestions................................................................................................. |
1 |
A close look................................................................................................ |
2 |
Use............................................................................................................. |
3 |
Timer Instruction ....................................................................................... |
4-7 |
Cooking table............................................................................................. |
8 |
Cleaning and maintaining the oven............................................................. |
9 |
Service........................................................................................................ |
11 |
Safety warnings .......................................................................................... |
11 |
Installation .................................................................................................. |
13 |
Installation instructions............................................................................... |
14 |
Connection to power mains ...................................................................... |
14 |
Technical data............................................................................................. |
15 |
Introduction
Thank you for choosing a Franke product.
Before using the appliance, please read the warnings and instructions in this manual. This will make it easier to operate and also prolong its service life. Keep this booklet for further reference.
Switching on the first time
When using the oven for the first time, run it empty with the temperature knob set to maximum and the door open for at least 40 minutes – make sure the room is well ventilated during this procedure.
The odour produced during this procedure is produced by the evaporation of the substance used to protect the oven during the period between manufacture and installation. The oven can be used normally once this first procedure has been completed.
Suggestions
When cooking food, do not place it in the oven when the oven is cold; rather, allow it to reach the set temperature before placing the food in it.
During cooking, never place pans or containers directly on the oven floor; place them on the provided grills or drip trays in one of the five provided shelves; Failure to observe this precaution can damage the oven's internal enamelling.
Do not cover the walls of the oven with aluminium foil, especially in the lower part of the cooking compartment.
Any repairs must be done by Franke authorised service centre.
In case of need, contact our local service centre and use only original spare parts.
Your Franke oven uses a special enamel which is easy to keep clean; make sure to clean it frequently to avoid baking on dirt and cooking residue.
Self-cleaning panes (if any) can be cleaned with soap and water (see cleaning instructions). Note: - before switching on the oven, read the Timer Instructions.
-if the oven is equipped with an automatic cooking or switching off programmer, select the “manual” option indicated by the symbol to use the oven manually  .
.
1
A close look
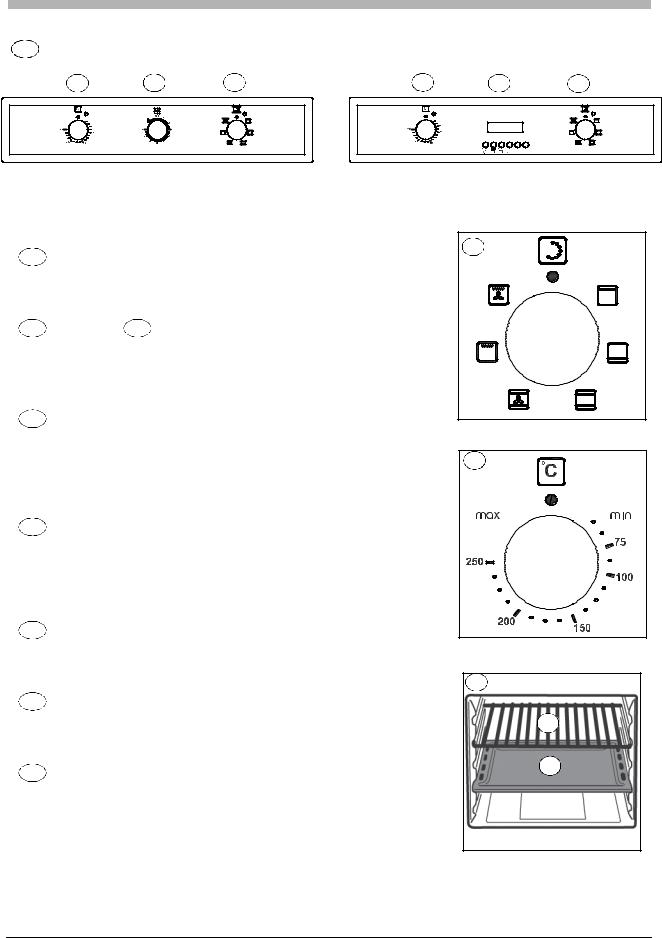
A Control Panel
F |
C |
B |
A |
|
E |
F |
D |
B |
A |
|
E |
GL62M XS |
GL66M XS - GL66M NT XS |
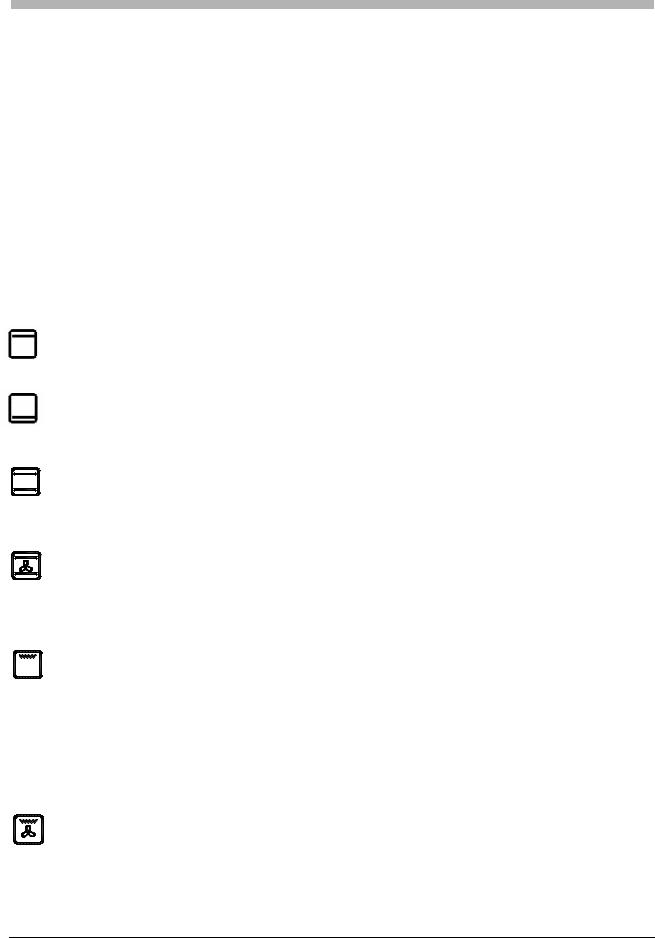
B Program selector knob
Selects the mode of operation of the oven depending on the type of cooking desired. When the knob is set to a program, the oven's internal light lights up to show that the oven is on.
C Timer / D Programmer
Franke ovens have a variety of methods of monitoring and controlling cooking times, consult pag.4 for specific detailed instructions; after you have identified the type of control provided by your oven, you will find full instructions on how to use it
E Thermostat indicator light
Highlighted by the symbol  this indicates that the electrical heating elements are on. The indicator light turns off when the set temperature has been reached, and turns back on again when the heating elements are switched on again. Use this light to check that the oven is at the correct temperature before inserting the food.
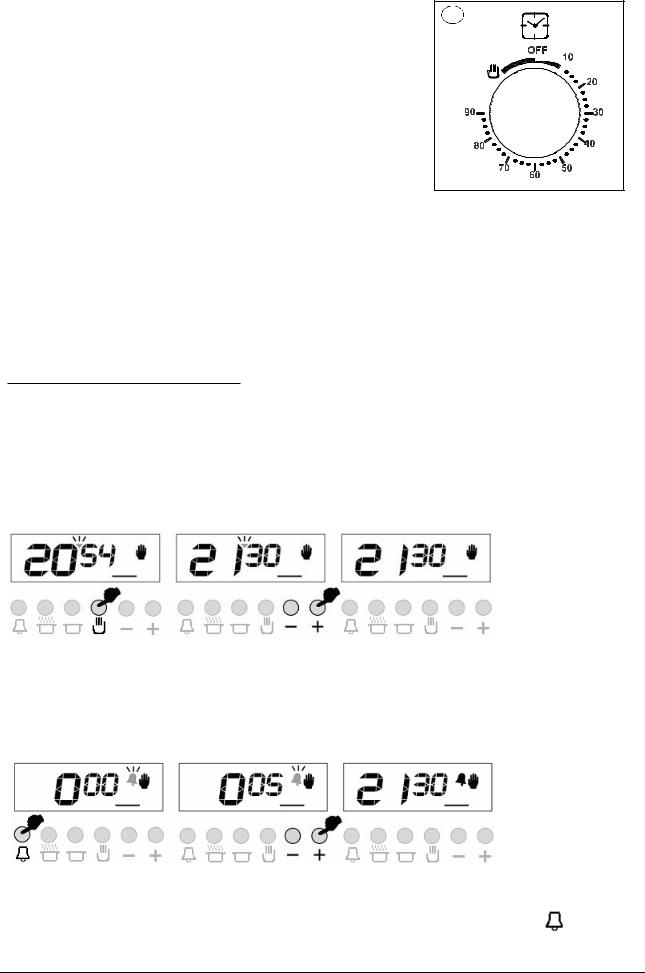
F Temperature regulator knob (Thermostat)
Sets the temperature required for the type of food being cooked, and ensures that it is kept constant throughout the cooking cycle. To select the temperature, turn the knob clockwise so that the index mark indicates the temperature in question. Maximum temperature is around 260°C.
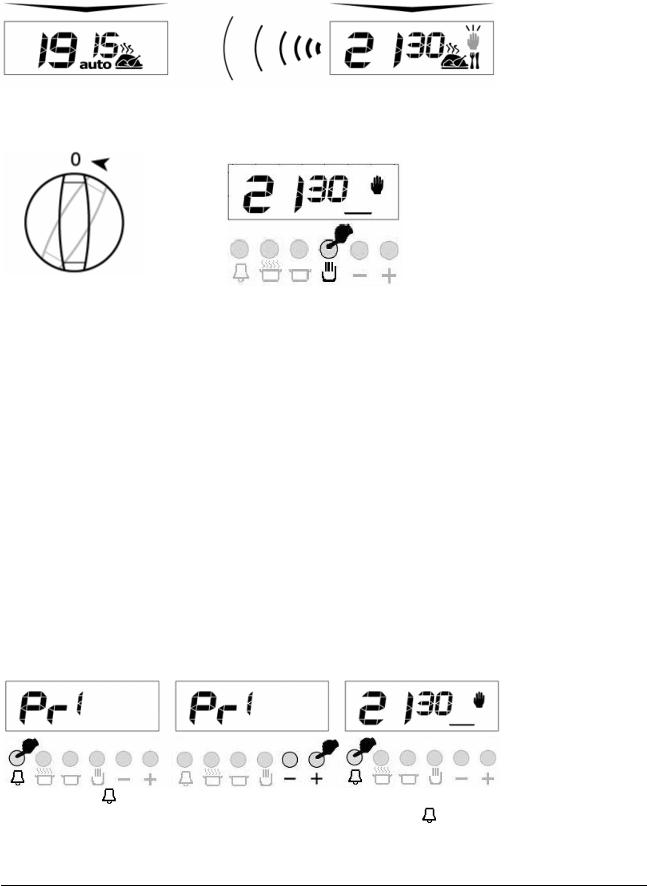
G Drip tray and grille guides
Used for locating the grilles and drip trays in the five available positions (1 to 5 starting from the bottom); the cooking table indicates
which position gives best results for each type of cooking.
H Drip tray
Normally used for collecting juice from roasts or for cooking food directly; the drip tray can be removed from the oven if not required. The drip trays are constructed in AA enamelled food safe steel.
I Grid
Used for supporting pans, pastry moulds, and any containers other than the provided drip trays, and especially for cooking with the meat and fish grill and fan grill functions, toasting bread, etc.
B |
F |
G
I
H
2
Use
This oven combines the advantages of traditional “static” natural convection ovens with those of modern “fan ovens”. It is an extremely versatile appliance which allows for easy and safe selection of 5 different cooking methods. Use knobs (B) and (F) on the control panel to select the program and temperature. For best results from your Franke oven, consult the cooking table pag. 19.
Cooling fan
In order to reduce the temperature at the front of the oven, the control panel and side panels, Franke ovens are equipped with a cooling fan which automatically turns on when the oven is hot. When the fan is running, you will notice hot air blowing from the front of the oven between the front panel and the oven door; Franke has made sure that the air jet does not disturb the kitchen environment and that noise is kept to a minimum.
To protect the surrounding kitchen units, the fan keeps running after cooking until the oven has cooled down.
Cooking programmes
Top Element only
Select termostat tempereture from between 50°C to 250 °C for keeping cooked food warm or gently reheating.
Bottom Element only
Select the desired tempereture between 50°C to 250 °C. Suitable for very slow cooking and warming up of food.
Natural static cooking
Set the thermostat knob (F) to between 50°C and Max (250°C).
The heat source is both above the food (roof heating element) and below it (floor heating
element). This is the traditional cooking method which results in uniform cooking on a single shelf.
Fan cooking
Set the thermostat knob (F) to between 50°C and Max (250°C).
This turns on the top (roof) element, the bottom (floor) element and the fan.
The resulting constant, even heat cooks and browns the food uniformly. With this mode, you can also cook various dishes at the same time, on up to a maximum of 2 different rack heights.
Grill
The thermostat knob (F) should normally be set to Max (250°C), although a lower temperature can be set, in which case grilling will be slower.
The grill heating element at the top of the oven turns on. In this case the fast surface cooking due to infrared radiation keeps the interior of the meat tender; the grill can also be used quickly toasting up to 9 slices of bread. Franke ovens, for safety reasons, are intended to grill food with the oven door completely closed.
Warning: the grill heating element is very hot when in use; take care not to touch it accidentally when handling the food; Franke has designed the opening of the oven compartment in such a way as to protect your hands.
Fan grill cooking
The thermostat knob (F) should normally be set to Max (250°C), although a
lower temperature can be set, in which case grilling will be slower.
The grill heating element at the top of the oven turns on, as well as the fan. This combines unidirectional heating with fan driven distribution of the air throughout the oven. It thus prevents burning the surface of the food and increases penetration of the heat. This function gives excellent results for mixed meat and vegetable kebabs, sausages, pork ribs and lamb chops, devilled chicken, quail with sage, pork fillets, etc...
3
Defrost: When the termostat is in off position, perform the oven in upper+bottom+fan position or gril+fan position
End Cooking Timer Knob
The end cooking timer is a practical device that turns the oven off automatically at a set time, ranging from one to 90 minutes. To use the end cooking timer, the ringer must be wound up by turning knob (C) almost one full turn clockwise; now turn back to the time setting you require (align the index mark on the front panel with the corresponding number on the knob). When the cooking time has expired, in addition to the timer ringing, the oven is automatically turned off.
N.B. The oven will stay hot at around the set temperature for a considerable period of time after it has been switched off; to avoid overcooking or burning the food, remove it from the oven immediately.
C |
Warning: to use the oven in manual mode, i.e. without using the end cooking timer, you should align the symbol on the knob with the reference mark on the control panel. When the oven is turned off, the end cooking timer can be used just like a normal minute minder.
The electronic cooking timer
TIME OF DAY ADJUSTMENT
You can adjust the displayed time only if no automatic cooking program is in progress (there is just the time and the hand icon on the screen). Press the 
triangle between the hours and minutes will start to flash, use the  or
or  adjustment. Long presses of those buttons will enable fast adjustments.
1) Switch into time |
2) Adjust the time using |
3) Screen will be |
adjustment mode. |
the + or – buttons. |
stabilized in 5 seconds. |
ADJUSTING THE BUZZER ALARM
With this feature, you can program after how much elapsed time you should be warned by a buzzer sound.
1) Switch into buzzer alarm mode.
2) Give in the period of time to be counted down
3) After a few seconds screen will return to clock mode
Note: Once programmed, the remaining time can be seen by pressing the |
button |
once |
|
4

CANCELLING THE BUZZER SOUND
1) Buzzer will sound after the programmed |
2) Press the |
button to cancel. |
amount of time elapses. |
|
|
AUTOMATIC COOKING PROGRAM
If you want to start cooking immediately, you just have to give in the cooking time.
Example: We placed our food into the oven and want it to be cooked for 2 hours and 15 minutes.
1) Current time is 18:30.
2) Switch into cooking time |
3) Adjust the cooking time using |
mode. |
the + or – buttons. |
4) After a few seconds, the screen |
Now, you have programmed your |
will indicate that cooking has |
oven to cook the food for 2 hours |
started and show the current time |
and 15 minutes. Please do not |
|
forget to bring the function and/or |
|
temperature knobs of your oven to |
|
appropriate positions. |
Note: You may cancel the automatic cooking mode any time by pressing the |
button. |
In the above example, cooking immediately started after giving in the cooking period. By
pressing the  button, you can see the ready time, ie. the time when the food will be ready to serve, and if you want, you can also change it. In the example below, the ready time will be changed to 21:30.
1) Displayed is the ready time 18:30+2:15=20:45.
2) Set it to the desired time by using the + or – buttons.
3) In a few seconds, screen switches to clock mode.
5
We now have programmed our oven to get the food ready at 21:30. Since the cooking time was preprogrammed as 2 hours 15 minutes, your oven will start cooking at 19:15, so that the food is ready at 21:30.
Screen just when cooking starts |
Screen just when cooking ends |
When automatic cooking is completed, a buzzer alarm is heared and will sound, if not stopped, for 7 minutes.
1) Switch your oven OFF
2) Reset the timer.
Note: Your oven will be inoperative until you reset the timer.
In the example shown, cooking time has been progr ammed first, the ready time was calculated automatically and was editted by us. It is also poss ible first to program the ready time, in that cas e the cooking time will be calculated automatically and should be editted thereafter.
During the automatic cooking program, the backlight color of the screen will be green before and red during cooking.
IN CASE MAINS POWER LOSS
Mains power interrupts will switch your oven into OFF mode. In that case the hand icon on the screen will flash and 12:00 will be displayed. Any cooking program will also be
cancelled. Press the  button to get your oven operative, press once again to the
  button switch to adjust the clock (See TIME OF DAY ADJUSTMENT)
Note: If you will not use your oven right now, be sure that it is in OFF position.
FLASHING HAND ICON INDICATES THAT YOUR OVEN IS INOPERATIVE AND YOU SHOULD PRESS THE  BUTTON TO RESET
BUZZER VOLUME ADJUSTMENT
1) Long press the |
button |
2) Using the + or – buttons, |
3) Save your selection by |
|
for 5 sec, you will hear the |
you may adjust the volume |
pressing the |
button. |
|
current tone. |
|
(3 steps available). |
|
|
6

BUZZER TONE ADJUSTMENT
Press the  button for 5 seconds ( till you see ‘pr 1’ on the screen). Press the
  button to decrease buzzer volume
Press the  button to increase buzzer volume (default is already high) Press the
  button to record the last heard tone.
CREATING YOUR BACKLIGHT COLOUR
Press the  button for 5 seconds (till display indicates 'r xx' , where xx is a number between 00 and 100 indicating the red content)
Press the or
or button to change the red colour content on the display between 00 and 100
You may press  button to switch to green and blue and make the same colour content adjustment via
  or
or  as in red.
When desired colour is obtained, press the  button for 5 seconds to record it.
Note: To exit without recording press the |
button . |
AUTO BACKLIGHT COLOUR CHANGE in AUTO MODE ON/OFF
Press the button for 5 seconds ( till display indicates ON or OFF). Backlight colour change option toggles from ON to OFF or vice versa.
If this option is ON, backlight colour is red during cooking, green as waiting the cooking time in auto mode. If this option is OFF, backlight colour doesn't change at auto mode.
BACKLIGHT ON/OFF
Press the  button 5 second (till display indicates ON or OFF). Backlight option toggles from ON to OFF or vice versa.
If this option is ON, backlight is always ON. If this option is OFF, backlight is OFF at manual status. Backlight will be turned on for 15 seconds when a valid button is pressed.
CLICK ON/OFF
Press the  button for 5 seconds (till display indicates ON or OFF). Click option toggles from ON to OFF or vice versa.
If this option is ON, click is heard when a button is pressed. If this option is OFF, no click tone is produced.
RETURN to DEFAULT SETTINGS
Press the button for  10 seconds (until ‘pr d’ appears on the display ).
Defaults :
Buzzer : high tone
Backlight colour : 0% red, 50% green, 100% blue ( light blue tone )
Backlight colour changing at auto mode : ON
Backlight |
: ON |
.Click tone |
: ON |
7
Cooking table
|
|
|
|
|
|
|
|
|
|
|
|
|
|
Setting the |
Type of food |
Weight |
Shelf |
Pre- |
Setting the |
Cooking |
selector |
|
(Kg) |
position |
heatingtime |
C° |
duration |
knob |
|
|
|
(min.) |
thermostat |
(min.) |
|
|
|
|
|
knob |
|
|
|
|
|
|
|
|
Natural |
Lamb |
1 |
3 |
9.5 |
180 |
95-100 |
static |
Roast Pork |
1 |
3 |
9.5 |
180 |
70-80 |
cooking |
Roast Veal |
1 |
3 |
10.5 |
200 |
140-150 |
|
Omelette |
1 |
2 |
10.5 |
200 |
25-30 |
|
Fruit |
1 |
3 |
9.5 |
180 |
25-30 |
|
Hake-Sea bream-Turbot |
1 |
3 |
9.5 |
180 |
20-25 |
|
Ordinary bread |
1 |
2-4 cont. |
9.5 |
175 |
25-30 |
|
Pies |
1 |
2 |
10.5 |
200 |
35-40 |
|
Freshwater fish |
1 |
3 |
10.5 |
200 |
30 |
|
Polenta with sauce |
1 |
2 |
9.5 |
180 |
25-30 |
|
Soft Fruit Pies |
0.5 |
4 |
9.5 |
180 |
25-30 |
|
Ricotta Cakes |
1 |
2 |
9.5 |
180 |
25-30 |
|
Plain Cakes |
0.5 |
4 |
9.5 |
180 |
60 |
|
Vegetables |
0.5 |
2 |
9.5 |
180 |
35-40 |
|
|
|
|
|
|
|
Fan cooking |
Saddle of pork |
1 |
3 |
9 |
180 |
75-80 |
|
Roast Veal |
1 |
2 |
10 |
200 |
80 |
|
Baked rabbit |
1 |
2 |
9.5 |
190 |
55-65 |
|
Crescia Marchigiana |
1 |
2 |
10 |
200 |
25-30 |
|
(quick flat bread) |
0.5 |
3 |
10 |
200 |
25 |
|
Omelettes |
0.5 |
3 |
10 |
200 |
20-25 |
|
Baked Lobsters |
1 |
2-4 cont. |
7.5 |
150 |
25-30 |
|
Hake-Sea Bream-Trout |
1 |
2-4 cont. |
9 |
180 |
25-30 |
|
Ordinary Bread |
1 |
3 |
9 |
180 |
20-25 |
|
Potato Bread |
1 |
2 |
10 |
200 |
30-35 |
|
Yellow Saffron Bread |
0.5 |
2 |
8.5 |
170 |
25-30 |
|
Freshwater fish |
1 |
2-4 cont. |
10 |
200 |
25-30 |
|
Baked Vegetable Dishes |
1 |
2 |
9 |
175 |
20 |
|
Tuna |
1.5 |
2 |
9 |
175 |
30-35 |
|
Fruit Pies |
1 |
3-5 cont. |
9 |
180 |
30-35 |
|
Savoury Pies |
1 |
3-5 cont. |
9 |
180 |
40 |
|
Baked Vegetables |
|
|
|
|
|
|
|
|
|
|
|
|
Grill |
Chicken Wings |
1 |
4-5 cont. |
7 |
Max |
25-30 |
|
Chops |
0.8 |
3 |
7 |
Max |
20-25 |
|
Scallops |
0.5 |
3 or 4 |
7 |
Max |
14-16 |
|
Roast Potatoes |
1 |
3 |
7 |
Max |
20-25 |
|
Freshwater fish |
1 |
3 or 4 |
7 |
Max |
25-30 |
|
Tomatoes au Gratin |
0.5 |
2 or 3 |
7 |
Max |
20 |
|
Eel kebabs |
0.5 |
3 |
7 |
Max |
20-25 |
|
Turkey kebabs |
0.5 |
4 |
7 |
Max |
20-25 |
|
|
|
|
|
|
|
Fan grill |
Chicken legs |
1 |
4 or 5 |
11 |
220 |
20-25 |
cooking |
Pork Ribs |
0.5 |
4 |
15 |
Max |
40-45 |
|
Guinea Fowl |
1.2 |
4 |
15 |
Max |
30-35 |
|
Sea bream en papillote |
1 |
3 |
8.5 |
200 |
20 |
|
Chicken |
1.5 |
3 |
15 |
Max |
35-40 |
|
Quails |
0.8 |
4 |
15 |
Max |
30-35 |
|
Sausages |
1 |
4 |
15 |
Max |
20-25 |
|
Vegetables |
1 |
4 or 5 |
15 |
Max |
10-15 |
|
|
|
|
|
|
|
Note: the instructions in the table below result from cooking tests carried out by a team of professional chefs. They are only given as a guideline and can be changed according to personal tastes.
8

Cleaning and maintaining the oven
Important
Before maintaining the oven, always remove the power plug from its mains socket or switch off power with the master power switch.
–The stainless steel and enamelled parts of the oven will stay as good as new if regularly cleaned with water or special detergents, make sure to dry them carefully after cleaning.
–Never use scouring pads, steel wool, muriatic acid or other products which could scratch or mark the surface. Do not use steam cleaners.
–Stains on the base of the oven, due to various cooking products (sauces, sugar, egg white and fats) are always produced by spills and splashes. Splashes occur during cooking and the result of cooking at too high a temperature, while spills are due to the use of insufficiently capacious cooking vessels or an incorrect estimate of increases in volume during cooking. These two problems can be solved by using cooking vessels with high borders or by using the provided drip tray. As regards cleaning the lower part of the oven, clean off any stains when the oven is still slightly warm; the longer you delay cleaning them off, the harder it is to remove them.
Cleaning the oven door
–The oven door must be cleaned, both inside and out, when the oven is completely cold using hot water. Do not use abrasive cloths. Clean the glass with special detergent.
–Clean the enamelled surfaces, and the oven interior, with hot water and non-abrasive detergent.
Replacing the oven light
Franke ovens are equipped with a circular lamp positioned on the top left at the back of the compartment.
Replace the oven light as follows:
-Switch off power to the appliance with the master power switch used in connecting the oven to the mains supply, or by removing the plug from the mains socket, if it can be reached.
-Unscrew the glass cover (A).
-Unscrew the bulb and replace with a high temperature resistant bulb (300°C) of the following type:
Voltage: 220/230V - 50Hz
Power: 15W
Fitting: (E14) small
-Refit the glass cover (A) and reconnect the power supply.
A
9
 Loading...