


|
|
Clothes washer |
Installation instructions |
WH60F60W*, WH70F60W* |
and User guide |
& WH80F60W* models |
|
NZ AU SG
Contents |
|
|
|
1 |
|
|
||
Safety and warnings |
2 |
|
Installation instructions |
4 |
|
Initial preparations for washing |
8 |
|
Selecting a programme and operating your machine |
10 |
|
Care and cleaning |
17 |
|
Troubleshooting |
20 |
|
Specifications |
21 |
|
Manufacturer’s Warranty |
22 |
|
Customer Care |
24 |
|
Important!
SAVE THESE INSTRUCTIONS
The models shown in this User Guide may not be available in all markets and are subject to change at any time. For current details about model and specification availability in your country, please visit our local website listed on the back cover or contact your local Fisher & Paykel dealer.

2 Safety and warnings
General safety
■■Never place your machine on a carpet covered floor. A lack of airflow from beneath your machine may cause electrical parts to overheat.
■■Secure the drain hose into the standpipe or tub to prevent any water leakage and to allow machine to discharge water as required. Ensure that the inlet and drain hoses are not folded, squashed, or broken when the appliance is pushed into place after it is installed or cleaned.
■■There may be some water in your machine when you receive it. This is from the quality control process and is normal. It is not harmful to your machine.
■■Clean the outside of the appliance with a soft cloth. Do not use abrasive detergents.
■■Never force open the door or use it as a step.
■■Your clothes washer is designed to continue operation in the event of a power interruption.
The cycle will resume once the power is restored. To cancel a programme, refer to the ‘Cancelling the programme’ section.
■■If damaged, the power cable should be replaced with an identical one obtained from a Fisher & Paykel Authorised Repairer. The power cable may only be replaced by a qualified technician, in order to avoid a hazard.
■■This appliance is not intended for use by persons (including children) with reduced physical, sensory or mental capabilities, or lack of experience and knowledge, unless they have been given supervision or instruction concerning use of the washer by a person responsible for their safety.
■■Young children should be supervised to ensure that they do not play with the appliance or climb inside the drum.
■■Keep the packaging materials out of reach of children.
First use
■■Be sure to read the Safety Warnings and Installation Instructions in this guide before first use.
■■Ensure that the cold water inlet hose has been correctly connected when installing your machine.
■■To remove any residues from the manufacturing process, we recommend running the machine through an initial Cottons 90º cycle with a half-load amount of detergent (without adding laundry).
Intended use
■■This product has been designed for home use.
■■The appliance may only be used for the washing and rinsing of textiles that are marked accordingly.

Safety and warnings 3
Safety instructions
■■You must remove the safety bolts (on the back panel) and the packing reinforcement (underneath the machine) before use.
■■This appliance must be connected to an earthed outlet protected by a fuse of suitable capacity.
■■Never open the loading door or remove the filter while there is still water in the drum.
■■Unplug the machine when it is not in use.
■■Never touch the plug with wet hands.
■■Do not operate the machine if the power cord or plug is damaged.
■■For malfunctions that cannot be solved by information in the operating manual: 1 Turn off the machine.
2 Unplug the appliance at the wall socket.
3 Turn off the water taps.
4 Contact a Fisher & Paykel Authorised Repairer.
If there are children in your house...
■■Keep children away from the machine when it is operating.
■■Do not let children tamper with the machine.
■■Close the loading door when you leave the area where the machine is located.

4 Installation instructions
Remove the packaging
■■Remove the packaging reinforcement underneath the product by tilting the machine and pulling the extruding ribbon. Not doing so may cause damage to your floor during normal operation of the machine.
Removing the transit safety bolts
■■The clothes washer is fitted with transit safety bolts at the rear to avoid any possible damage to the interior during transportation.
Important!
The transit bolts MUST be removed prior to operation of the machine. Failure to remove these will result in damage to the machine.
■■To remove the bolts:
1 Loosen all the bolts with a spanner until they rotate freely (“C”). 2 Remove the transit bolts by turning them gently.
3 Fit the bolthole covers (supplied in the bag with the operation manual) into the holes on the rear panel (“P”).
Fig.1 Removing the transit safety bolts
■■Please keep these transit safety bolts in a safe place to reuse before transporting the machine in the future.
■■Never transport the machine without the transportation safety bolts properly fixed in place.
Positioning the machine
■■Move the machine into position without lifting by the top panel.
■■Install the machine on a solid and level floor surface, preferably in a corner of the room.

|
|
|
Installation instructions |
|
|
5 |
|
|
|
|
Adjusting the feet
■■In order for quiet and stable operation, the machine should be placed properly and levelled on its feet.
■■If the machine is unstable:
1 Loosen the plastic lock nut.
2 Screw or unscrew the adjustable foot until the machine stands firmly level. 3 Tighten the lock nut for stability.
Lock nut
Adjustable foot
Fig.2 Levelling foot adjustment
Note: adjust lock nuts by hand. Do not use any tools to loosen or tighten the lock nuts, as they can be damaged.
Connecting to the water supply
Important!
This washer connects to the cold water supply only.
Cold water should not exceed 35ºC.
■■Exceeding this temperature may cause the machine to fault or result in damage to the machine.
Water supply requirements
Inlet water pressure: Max. 1Mpa (145 psi) Min. 0.1MPa (14.5 psi).
Inlet water flow rate: Max. 80 litres/min. Min. 10 litres/min.
6 Installation instructions
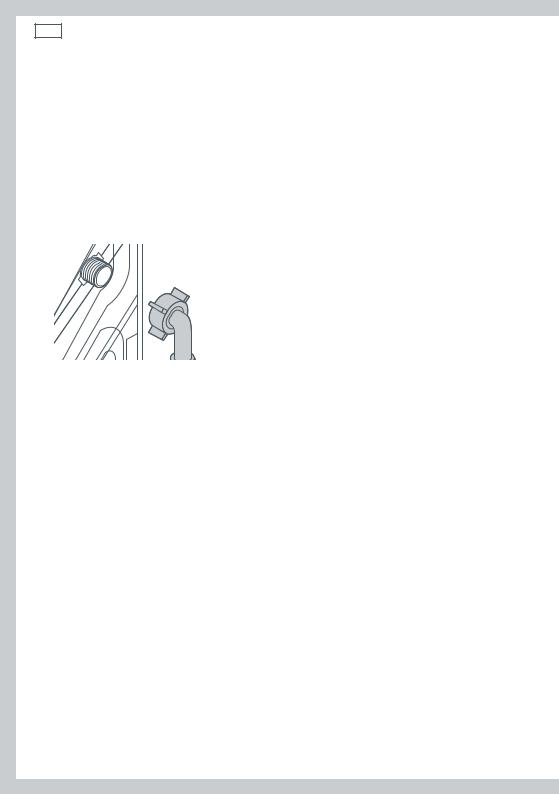
Inlet hoses
Important!
The appliance must be connected to the cold water mains using the new hose supplied. Old hoses should not be reused.
■■Connecting the hose:
1 Connect the straight end of the inlet hose to the tap. There are washers fitted to both ends. 2 Connect the elbow end of the inlet hose to the inlet valve on the back of the machine.
The cold inlet valve is marked in blue.
Fig.3 Connection of the inlet hose to the machine
|
|
|
Installation instructions |
|
|
7 |
|
|
|
|
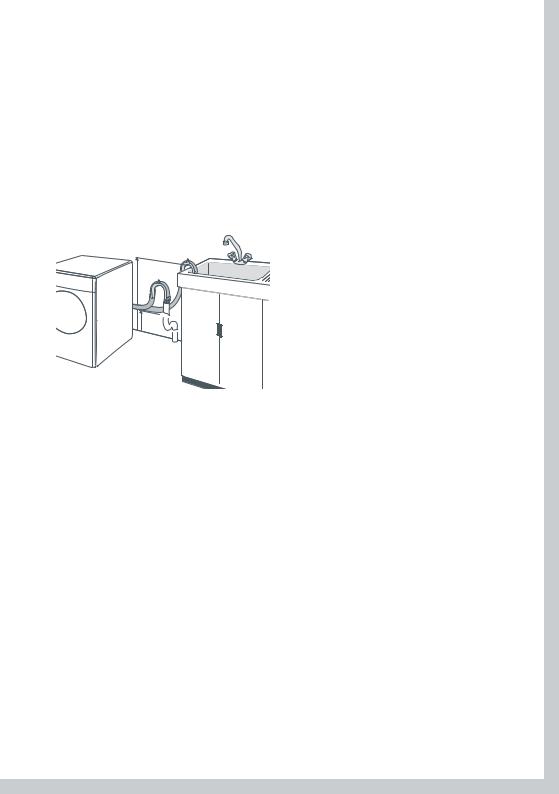
Connecting to the drain
■■The water drain hose should be placed either at the side of a basin or tub, or connected directly to the wastewater standpipe.
■■The elbow/guide, supplied with the machine, should be fitted to the drain hose before being connected directly into the tub or wastewater standpipe.
■■The drain hose should not be sharply bent.
■■The drain hose needs to be kept at an elevated height of at least 400 mm with a maximum height of 1 m. If the hose is placed at the floor level, or close to the floor (less than 400 mm above the ground), water discharge becomes more difficult and the laundry may come out wet.
max. 100 cm
min.
 40cm
40cm
Fig.4 Drain hose set up
■■The drain hose should extend a maximum of 20 mm past the end of the elbow/guide.
■■The drain hose can be trimmed to length.
■■The maximum length of an extended drain hose is 3.2 m.
Electrical connection
■■Connect the appliance to an earthed outlet protected by a fuse of suitable capacity.
■■Connection should comply with national regulations.
■■The voltage and the allowed fuse protection are stated in the ‘Specifications’ section.
Important!
■■If you are using an extension cord or a portable electrical outlet device (eg multi-socket outlet box), ensure that it is positioned so that it does not come into contact with water or moisture.
■■A damaged power cable must be replaced by the manufacturer, its service agent or similarly qualified persons in order to avoid a hazard. The appliance must not be operated until it is repaired, as there is risk of electric shock.
■■Do not operate this machine if it has been damaged in during transport. Contact your
Fisher & Paykel Dealer or Fisher & Paykel Authorised Repairer.
 Loading...