


INSTALLATION INSTRUCTIONS
USER GUIDE
WashSmart™ Eco, WashSmart™ and
QuickSmart™ Washers
WA1060E, WA8560E, WA8060E, WA7560E, WA7060E, WA8560G, WA8060G, WA7060G and WA7060M models
NZ AU SG ROW

CONTENTS
Introduction |
3 |
Safety and warnings |
4 |
Installation instructions |
5 |
Before you do your first wash |
11 |
Getting started quickly – WashSmart™ Eco washer |
12 |
Getting started quickly – WashSmart™ washer |
14 |
Getting started quickly – QuickSmart™ washer |
16 |
Washer controls |
18 |
Washer safety features |
19 |
Eco-Active™ wash – WashSmart™ Eco washer only |
20 |
Sorting |
21 |
Loading |
22 |
Detergent |
23 |
Fabric softener |
24 |
Wash cycles – WashSmart™ Eco washer |
25 |
Wash cycles – WashSmart™ washer |
26 |
Wash cycles – QuickSmart™ washer |
27 |
Wash options |
28 |
Customising wash cycles |
33 |
Changing pre-set options |
34 |
Caring for your washer |
41 |
Before you call for service |
43 |
Fault codes |
45 |
Troubleshooting |
46 |
Manufacturer’s Warranty |
50 |
Customer Care |
52 |
IMPORTANT!
SAVE THESE INSTRUCTIONS
The models shown in this user guide may not be available in all markets and are subject to change at any time. For current details about model and specification availability in your country, please go to our website www.fisherpaykel.com or contact your local Fisher & Paykel dealer.
Registration
Register your product with us so we can provide you with the best service possible.
To register your product visit our website: www.fisherpaykel.com
1
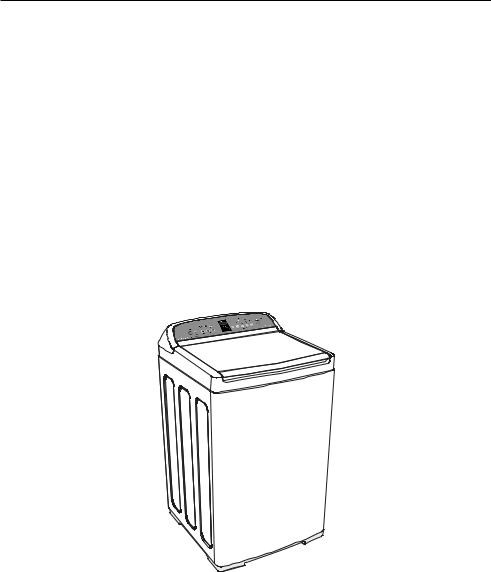
INTRODUCTION
Welcome to your Fisher & Paykel clothes washer
Thank you for buying a Fisher & Paykel washer. We are proud of this washer and trust it will serve you well for many years.
At Fisher & Paykel we aim to provide innovative products that are simple to use, ergonomic and kind to the environment. Thousands of tonnes of washing and over 80 years of laundry experience have been programmed into your washer to help give you the best possible performance.
Your washer has numerous wash cycles and options so you can perform every wash task with ease and spend less time in the laundry. With the ability to select the most efficient water level for each load, your Fisher & Paykel washer makes it kinder on your wallet and the environment.
Please take the time to read these instructions carefully before you begin using your washer. Following the advice in this user guide will ensure you get the performance you expect from your washer and that you get the best possible wash results.
We hope you enjoy your new washer. We have certainly enjoyed designing it for you.
3

SAFETY AND WARNINGS
!WARNING!
Electric Shock Hazard
If you are using an extension cord or a portable electrical outlet device (eg multi-socket outlet box), ensure that it is positioned so that it does not come into contact with water or moisture.
Failure to do so may result in death or electrical shock.
IMPORTANT SAFETY INSTRUCTIONS
WARNING! When using this appliance always exercise basic safety precautions including the following:
●●This clothes washer is not intended for use by persons (including children) with reduced physical, sensory, or mental capabilities, or lack of experience and knowledge, unless they are supervised or given instructions on how to use the clothes washer by someone responsible for their safety, and they understand the hazards involved.
●●The clothes washer should only be used for washing and rinsing of textiles where this is indicated on the care label.
●●Keep children away from the clothes washer while it is in operation.
●●Children should be supervised to ensure that they do not play with the appliance.
●●Cleaning and user maintenance shall not be completed by children without supervision.
●●The only user removable parts of the clothes washer are the inlet hoses and agitator. No other parts are designed to be removed by anyone other than a Fisher & Paykel trained and supported service technician.
●●The lid will be locked for stages of the cycle for safety reasons.
●●Never force open the lid.
●●When disposing of the clothes washer, it is recommended that the lid is taped down to avoid children getting trapped inside, and that the electrical cable is cut off close to the clothes washer.
●●Do not add gasoline, dry-cleaning solvents, or other flammable or explosive substances to the wash water. These substances give off vapours that could ignite or explode.
●●Do not wash articles that have been previously cleaned in, washed in, soaked in, or spotted with gasoline, dry-cleaning solvents, or other flammable or explosive substances as they give off vapours that could ignite or explode.
4

INSTALLATION INSTRUCTIONS
Product and minimum clearance dimensions
H |
AD
B |
C |
F |
G |
PRODUCT DIMENSIONS
AOverall height of product † (to highest point on console)
BOverall width of product
CDepth of product
DHeight of product to top of lid † (closed)
EHeight of lid open † (measured from bottom of product)
Standpipe height
MINIMUM CLEARANCES
FMinimum cavity width
GMinimum depth clearance (including inlet hoses, drain hose and bowed front)
HMinimum clearance to either side or wall #
†Includes adjustable mounted feet and the range of movement.
#Applies either side.
AE
WA**60*
mm
1045 – 1075
600
600
950 – 980
1350 – 1385
min. 850 – 1200
mm
640
660
20
|
|
WA7060* |
|
WA7560* |
|
WA8060* |
|
WA8560* |
|
WA1060E |
|
|
|
|
|
|
|
|
|
|
|
Maximum capacity (kg) |
7.0 |
7.5 |
8.0 |
8.5 |
10.0 |
|||||
|
|
|
|
|
|
|
|
|
|
|
Note: maximum capacity may differ according to market, and the associated standards.
5
INSTALLATION INSTRUCTIONS
Unpacking
To ensure the best performance from your new washer please follow the instructions below.
Removing the packaging
1 Remove the outer packaging.
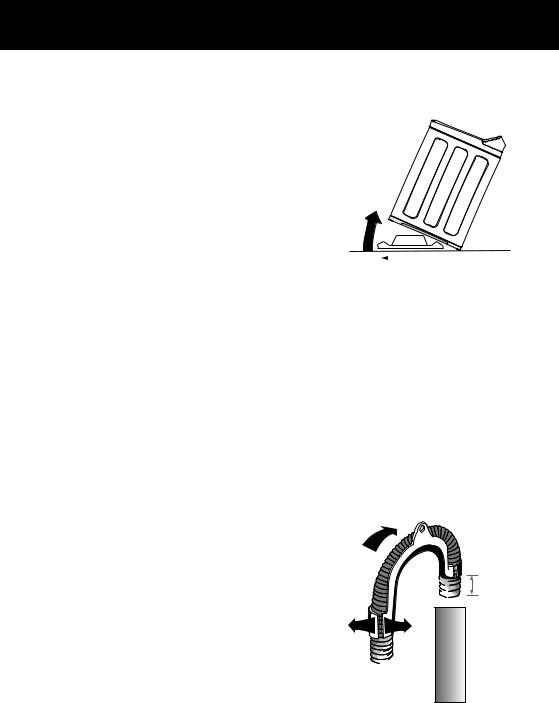
2Tilt the washer backwards and walk it off the base packer one foot at a time (ensure the lid is still taped down).
3Remove the base packer from under the washer by tilting the washer backwards and pulling the packer out the front.
4Remove the tape, lift the lid and remove the bowl packer from the bowl.
5 |
Remove the hoses and accessories. |
|
|
|
|
|
|
||
6 |
Keep the base packer and bowl packer in case |
Tilt washer backwards to remove packer |
||
|
they are required for future transit. |
|
|
|
IMPORTANT!
Please ensure that the base packer has been removed BEFORE OPERATING your washer.
Location
IMPORTANT!
Install the washer on a solid and level floor surface ensuring it has at least 20 mm clearance on each side. The washer must not be installed on any textured floor coverings (eg carpets, rugs).
In your washer you will find:
●●1 hose guide.
●●2 inlet hoses.
Drain hose
1Carefully pull the drain hose out from the back of the washer by pulling the exposed part of the hose downward and outward.
2To guide the drain hose over the tub or standpipe the hose guide MUST be fitted to the drain hose.
IMPORTANT!
To prevent siphoning the drain hose should not extend more than 20 mm from the end of the guide. The height of the standpipe or tub should be between 850 – 1200 mm. The drain hose can be trimmed to length.
3Place the drain hose in the tub or standpipe. Do not fit the hose to a drain spigot. Drainage must not be airtight in order to prevent siphoning.
Pull hose |
|
|
through |
|
(20 mm) |
guide |
|
|
|
850 – 1200 mm |
maximum |
|
|
|
Flex hose |
Standpipe |
|
guide apart |
|
|
Fitting the drain hose guide
6

INSTALLATION INSTRUCTIONS
Electrical connection
●●This appliance must be supplied with a 220 – 240 V, 50 Hz, sinusoidal, 10 A electrical supply.
●●Check the power cord for damage, making sure it is not squashed or twisted.
●●A damaged power cord must be replaced by a Fisher & Paykel trained and supported service technician, in order to avoid a hazard.
●●The appliance must not be operated until it is repaired, as there is a risk of electric shock.
Draining
●●Regularly check that your standpipe or tub is free from lint or other obstructions, which may affect how your washer works or may cause flooding.
●●In multi-storey apartments or any upper floor, the washer should be installed on a floor equipped with a drain.
●●Draining must comply with local by-laws.
Water supply
IMPORTANT!
Your cold water should not exceed 35°C and your hot water should not exceed 65°C. Temperatures above these may cause the washer to fault or cause damage to the washer.
●●If you have an uncontrolled water heating source (eg a wet back or solar heating system) you should fit a tempering valve. This will ensure the hot water temperature remains within safe limits.
●●Contact your registered plumber to select and install the tempering valve.
●●Inlet water static pressure: Max. 1 MPa (150 psi) Min. 34 KPa (5 psi)
●●Inlet water flow rate at tap: Min. 6 litres/min
IMPORTANT!
●●This appliance must be installed in accordance with the installation instructions before use.
●●Provide accessibility to the plug or incorporate a switch in the fixed wiring in accordance with the wiring rules to allow disconnection of the appliance from the supply after installation.
●●Do not operate this washer if it has been damaged during transport. Contact your Fisher & Paykel dealer or Fisher & Paykel trained and supported service technician.
7

INSTALLATION INSTRUCTIONS
Inlet hoses
IMPORTANT!
WARNING: Failure to adhere to the following instructions may result in a flood and damage to property.
●●New hose sets provided with the washer shall be used to connect the washer to the water supply.
●●Old hose sets should not be used.
●●We recommend replacing the inlet hoses every 5 years.
●●Hoses should be checked from time to time and replaced if any wear, cuts, bulges, kinks or leaks are found.
Straight |
Elbow |
(Tap) end |
(Washer) end |
Inlet hose ends
1Connect the straight ends of the inlet hoses to the taps (there are washers fitted in both ends). Connect the red connector hose to Hot, and the white connector hose to Cold.
2Connect the elbow ends of the inlet hoses to the corresponding washer inlet valves. Inlet valves are marked on the back of the washer. Ensure the Hot valve is connected to the hot tap and the Cold valve is connected to the cold tap.
H = Hot |
C = Cold |
Cold water supply only:
If you only have a cold water supply, a blanking cap MUST be connected to the Hot inlet valve. The cap prevents water leaking out of the hot valve. The cap is available from your Fisher & Paykel dealer or Fisher & Paykel trained and supported service technician, Part No. 388491P. This appliance incorporates backflow protection complying with AS3500.1. No further backflow protection is required for connection to the water supply.
Note: your washer does not have an internal heater to heat water.
Should you wish to use cold water only for all wash cycles, refer to ‘Customising wash cycles’ on how to program your washer to remember your wash preferences.
8
INSTALLATION INSTRUCTIONS
Levelling instructions
It is IMPORTANT to level the washer to ensure good spin performance.
A spirit level is provided with your washer. Use this to level your washer, always placing it on a clean, flat surface. The washer is level when the bubble sits in the centre, within the two lines.
Your washer is equipped with self-locking feet at the front to ensure they do not move once you have levelled your washer. To adjust the feet, tilt the washer back and twist to move them up or down.
Note: after levelling, the corners of the washer should be clear of the floor and the washer must not rock in any direction.
1Move the washer to its final position using the top corners to manoeuvre the product into place (do not push on the centre front of the washer). We recommend a minimum clearance of 20 mm each side and 40 mm at the rear of the washer.
2Open the lid, place the spirit level at the centre front of the top deck forward of the lid lock slot. Level the washer from side to side by winding up or down the front feet (Fig.1).
3With the lid closed, tilt the washer forward away from the wall approximately 100 mm (Fig.2), the self-adjusting feet will release. Gently lower the washer back down.
Spirit
level
Fig.1 Levelling side to side
 100 mm
4Open the lid, place the spirit level at either the right hand or left hand side of the top deck. Level the washer from front to back using the front feet only (Fig.3), winding both feet in or out equally. Tilt the washer forward again and lower back down (Fig.2).
5Re-check the washer is level. Move the spirit level around to all positions once more, checking the washer is level in all areas. Repeat step 4 if necessary. Check the washer does not rock from side to side, front to back, or corner to corner.
IMPORTANT!
●●Keep your spirit level for the next time you move or reposition your washer.
●●If moving or transporting your washer in the future, ensure you tape the lid down beforehand.
Wall
Floor
Fig.2 Tilt washer forward
Spirit
level
Fig.3 Levelling from front to back
9

INSTALLATION INSTRUCTIONS
Completing your installation
●●Turn on the water and check all hose connections for leaks. Make sure there are no kinks in the hoses. Check the hose connections for leaks again after 24 hours.
●●Uncoil power cord, remove and discard the plastic pin cover, and plug into wall socket.
●●Connect the appliance to an earthed outlet protected by a fuse of suitable capacity.
IMPORTANT!
Do not touch or operate the washer with wet hands or with bare feet.
Installation test cycle
Your washer must be correctly installed before use. Check the installation and operation of the washer using the following procedure:
1Touch ‘POWER’  to activate your washer.
2Touch both the  and ‘Options’ buttons at the same time, and hold for three seconds.
3Touch 
 to start the installation test cycle. The display will show


 and the lid will lock.
4The washer will beep to signal the end of the installation test cycle. If there are no faults found, the washer will automatically turn off at the end of the installation test cycle. Any faults will be displayed on the screen (refer to the back of this user guide to help identify faults). If you need further assistance, please contact a Fisher & Paykel trained and supported service technician or our Customer Care Centre. Refer to ‘Customer Care’ section for contact details.
Note: WA7060M QuickSmart™ washer only – a manual check of the inlet hose connections will be required as the installation test cycle will not verify if the hot and cold inlet hoses are connected the correct way around.
ACCESSORIES AND SPARE PARTS
Available from your Fisher & Paykel dealer or a Fisher & Paykel trained and supported service technician.
Blanking Cap |
Part No. 388491P |
|
|
Hose Inlet Long (2 m) |
Part No. 422680P |
|
|
Hose Inlet Large Bore |
Part No. 426123P |
|
|
Drain Hose Extension |
Part No. 425627P |
|
|
Power Cord |
If the power cord of your clothes washer is damaged it is |
|
highly recommended that it is replaced by a Fisher & Paykel |
|
trained and supported service technician in order to avoid a |
|
hazard, as it is not a standard power cord. |
|
|
10

BEFORE YOU DO YOUR FIRST WASH
You owe it to yourself and your washer to have your washer installed correctly.
Before you start, it is a good idea to go through the following checklist:
1Has the base packer been removed? Refer to page 6.
2Is the drain hose threaded through the ‘U bend’ (with no more than 20 mm extended) and hooked into your tub or standpipe? Refer to page 6.
3Is the hot hose connected to the Hot valve marked ‘H’? Is the cold hose connected to the Cold valve marked ‘C’? Refer to page 8.
4Is the washer correctly levelled, feet are extended and cabinet corners are clear of the floor? Refer to page 9.
5Have you performed the installation test cycle? Refer to page 10.
WashSmart™ washer and QuickSmart™ washer capacities
The table below outlines what is included in a 7 kg, 7.5 kg, 8 kg and 8.5 kg wash load (in accordance with AS/NZS 2040.1:2005).
WASH LOAD |
|
7 kg |
|
7.5 kg |
|
8 kg |
|
8.5 kg |
Sheets (double) |
2 |
3 |
3 |
3 |
||||
|
|
|
|
|
|
|
|
|
Bath towels |
6 |
4 |
4 |
5 |
||||
|
|
|
|
|
|
|
|
|
Tablecloths |
2 |
2 |
3 |
3 |
||||
|
|
|
|
|
|
|
|
|
Shirts |
3 |
4 |
5 |
5 |
||||
|
|
|
|
|
|
|
|
|
T-Shirts |
4 |
5 |
5 |
5 |
||||
|
|
|
|
|
|
|
|
|
Pillowcases |
4 |
4 |
5 |
6 |
||||
|
|
|
|
|
|
|
|
|
Shorts |
7 |
6 |
5 |
6 |
||||
|
|
|
|
|
|
|
|
|
Washcloths |
6 |
8 |
8 |
6 |
||||
|
|
|
|
|
|
|
|
|
Handkerchiefs |
4 |
8 |
6 |
8 |
||||
|
|
|
|
|
|
|
|
|
Note: the above load composition is indicative only. We recommend for everyday use that you separate out your sheets and towels and wash them separately on the ‘Regular’ cycle.
Note: the WA1060E model has a different capacity based on country standards. Refer to the serial plate on the back of the product.
11
GETTING STARTED QUICKLY – WASHSMART™ ECO WASHER
Before you start
●●It is important to sort your clothes, particularly separating white/light colours from dark colours, as well as separating out sheets and towels. Refer to the ‘Sorting’ and ‘Loading’ sections.
●●Wash new, highly coloured and dark coloured items separately to prevent dye transfer onto other items.
●●Sort lint givers and lint collectors (refer to the ‘Sorting’ section).
●●Close bra clasps, do up zippers and check pockets.
●●Place your clothes directly into the wash bowl.
●●Place the load evenly around the agitator (refer to ‘Sorting’ and ‘Loading’ sections).
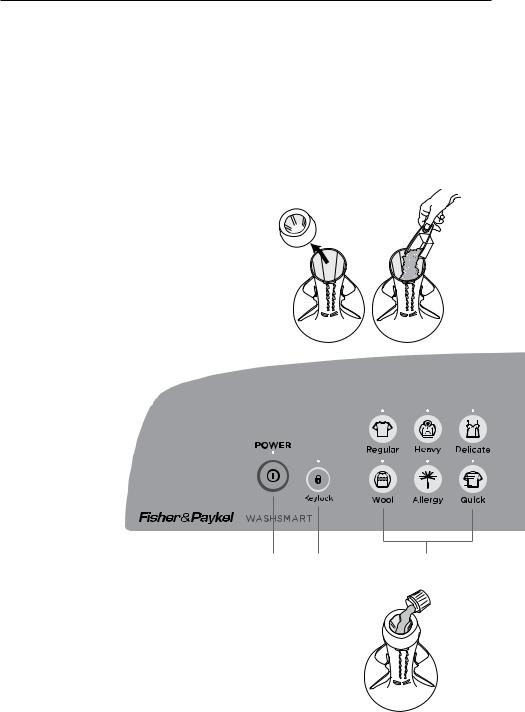
●●Remove fabric softener dispenser cup.
Detergent
●● |
Follow the manufacturer’s instructions on |
|
|
|
the detergent package. |
●● |
Use the size of the load as a guide to the |
|
|
|
amount of detergent to use (refer to the |
|
‘Detergent’ section). |
●● |
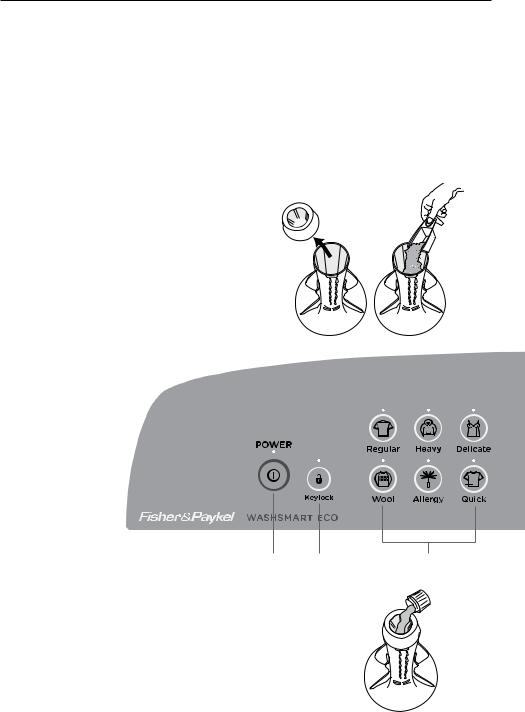
Pour the detergent down the centre of the |
|
|
|
agitator stem. |
●● |
Replace the fabric softener dispenser cup |
|
|
|
(this stops small articles falling down the |
|
centre of the agitator). |
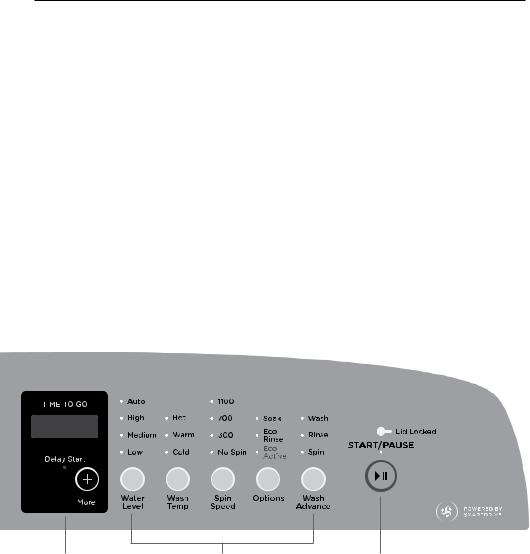
WashSmart™ Eco washer control panel
1 |
5 |
2 |
Fabric softener
If you wish to use fabric softener, place it in the fabric softener dispenser cup on the top of the agitator (refer to the ‘Fabric Softener’ section).
IMPORTANT!
Fabric softener must not be used if you have selected the ‘Quick’ cycle or the ‘Eco Rinse’ option (refer to the
‘Fabric softener’ section).
12
GETTING STARTED QUICKLY – WASHSMART™ ECO WASHER
Using your washer
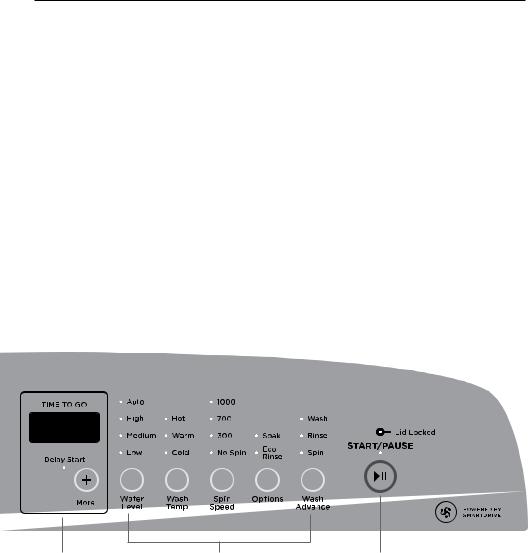
The buttons require only a gentle touch to activate.
1Touch ‘POWER’  to activate your WashSmart™ Eco washer.
2Select your desired wash cycle by gently touching the wash cycle button of your choice (refer to ‘Wash cycles’ section).
3Choose your wash options, eg you may want a ‘Warm’ wash temperature and a ‘Slow’ spin speed (refer to the ‘Wash options’ section).
4Touch 
 to start the cycle. The washer will start to fill with water and select the correct wash action for your load.
For best fabric and colour care, remove your clothes as soon as the cycle has finished.
5Use ‘Keylock’ mode to lock the buttons on the display, which prevents them from being activated accidently by a washing basket or little fingers (refer to the ‘Washer controls’ section).
6‘Delay Start’ allows you to delay the start of your wash by 5 mins up to 18 hours (refer to the ‘Wash options’ section).
6 |
3 |
4 |
If you wish to stop your WashSmart™ Eco washer
●●Touch 
 .
.
During a spray rinse or spin, there will be a slight delay while the bowl slows to a stop and the lid is unlocked.
IMPORTANT!
Failure to follow the advice in this guide may result in damage to your garments, and
your expectations of wash performance may not be met.
13
GETTING STARTED QUICKLY – WASHSMART™ WASHER
Before you start
●●It is important to sort your clothes, particularly separating white/light colours from dark colours, as well as separating out sheets and towels. Refer to the ‘Sorting’ and ‘Loading’ sections.
●●Wash new, highly coloured and dark coloured items separately to prevent dye transfer onto other items.
●●Sort lint givers and lint collectors (refer to the ‘Sorting’ section).
●●Close bra clasps, do up zippers and check pockets.
●●Place your clothes directly into the wash bowl.
●●Place the load evenly around the agitator (refer to ‘Sorting’ and ‘Loading’ sections).
●●Remove fabric softener dispenser cup.
Detergent
●● |
Follow the manufacturer’s instructions on |
|
|
|
the detergent package. |
●● |
Use the size of the load as a guide to the |
|
|
|
amount of detergent to use (refer to the |
|
‘Detergent’ section). |
●● |
Pour the detergent down the centre of the |
|
|
|
agitator stem. |
●● |
Replace the fabric softener dispenser cup |
|
|
|
(this stops small articles falling down the |
|
centre of the agitator). |
WashSmart™ washer |
|
|
|
control panel |
1 |
5 |
2 |
|
Fabric softener
If you wish to use fabric softener, place it in the fabric softener dispenser cup on the top of the agitator (refer to the ‘Fabric Softener’ section).
IMPORTANT!
Fabric softener must not be used if you have selected the ‘Quick’ cycle or the ‘Eco Rinse’ option (refer to the
‘Fabric softener’ section).
14
GETTING STARTED QUICKLY – WASHSMART™ WASHER
Using your washer
The buttons require only a gentle touch to activate.
1Touch ‘POWER’  to activate your WashSmart™ washer.
2Select your desired wash cycle by gently touching the wash cycle button of your choice (refer to ‘Wash cycles’ section).
3Choose your wash options, eg you may want a ‘Warm’ wash temperature and a ‘Slow’ spin speed (refer to the ‘Wash options’ section).
4Touch 
 to start the cycle. The washer will start to fill with water and select the correct wash action for your load.
For best fabric and colour care, remove your clothes as soon as the cycle has finished.
5Use ‘Keylock’ mode to lock the buttons on the display, which prevents them from being activated accidently by a washing basket or little fingers (refer to the ‘Washer controls’ section).
6‘Delay Start’ allows you to delay the start of your wash by 5 mins up to 18 hours (refer to the ‘Wash options’ section).
6 |
3 |
4 |
If you wish to stop your WashSmart™ washer
●●Touch 
 .
.
During a spray rinse or spin, there will be a slight delay while the bowl slows to a stop and the lid is unlocked.
IMPORTANT!
Failure to follow the advice in this guide may result in damage to your garments, and
your expectations of wash performance may not be met.
15
 Loading...