


&
autowasher use & care

|
|
|
|
PRODUCT |
(For you to record). |
||
INFORMATION |
It is important to keep this manual in a safe place. |
||
|
Date of Purchase: ________________________________ |
||
|
Purchaser: ______________________________________ |
||
|
Dealer/Retailer: __________________________________ |
||
|
Branch/Location: __________________________ |
||
|
Country: __________________________________ |
||
|
Model Number: __________________________________ |
||
|
Serial Number: __________________________________ |
||
|
N.B. To find information on model numbers and |
||
|
serial numbers, look on the back of the |
||
|
machine in the top right hand corner. |
||
|
|
|
|
|
|
|
|
INTELLIGENCE WORKING FOR YOU 1
INTELLIGENCE
WORKING FOR YOU
Over 65 years of laundry experience has led to the development of the world’s most advanced wash systems, The Smart Drive.
Unlike conventional machines, Smart Drive autowashers use intelligence to adapt the wash action and water levels to save on water and electricity use; making it kinder on your wallet and the environment.
•Intelligent Electronics: A powerful microprocessor controls every aspect of the Smart Drive, allowing it to continually monitor and respond to each wash.
It contains over 10,000 lines of instructions in its ’brain’ - the result of many years of testing and
fine-tuning, to give you the best possible performance.
• Direct Drive Motor: Our revolutionary direct drive motor is capable of infinite wash actions, continuously adjusting its speed to the movement of your clothes, removing dirt while caring for the fabric, delivering the ultimate wash.
• Reliability: The Smart Drive has no mechanical brake, pulleys or gears, which means fewer moving parts and greater reliability.
• Energy Conservation: The unique wash action means a typical load uses only the same amount of electricity as a 100-watt light bulb left on for an hour.
• Saves Time: With a top spin speed of 1000rpm, Smart Drive reduces clothes drying time by up to 30%. The EXCELLENCE model has a time saver option available which enables you to wash lightly soiled items in half an hour or less.

2 CONTENTS |
00 |
1. GETTING STARTED
• Before you do your first wash |
3 |
|
• |
Model Variations |
4 |
• Using Your Smart Drive |
5 |
|
2. LIDLOCK |
7 |
|
3. WASH CYCLES AND OPTIONS |
|
|
• The Wash Cycle and Options |
8 |
|
• Selecting the Wash Options |
|
|
|
and advancing the cycle |
9 |
• |
Water Levels |
10 |
• |
Spin Hold |
11 |
• |
Time Saver |
11 |
• |
Delay Start |
11 |
• |
Soak |
12 |
• |
Nappy Sanitisers/Bleach |
12 |
• |
Water Saver |
12 |
• |
Washing Bulky Items |
13 |
• |
Washing Woollens |
13 |
• |
Favourite Cycle |
14 |
• Customising the Wash Cycle |
15 |
|
4. CHANGING PRE-SET OPTIONS |
|
|
• |
Option Adjustment Mode |
16 |
• |
Wash Temperatures |
18 |
• |
Rinse Options |
18 |
• |
Controlled Cold |
19 |
• End of Cycle Beeps |
19 |
|
• |
Water Saver |
19 |
• Auto Water Fill Level |
19 |
|
• Out of Balance Recovery |
|
|
|
Routine |
20 |
5. BEFORE YOU WASH
• |
Detergent |
22 |
• |
Fabric Softener |
23 |
• |
Scrud |
23 |
6. MACHINE INFORMATION
• |
Specifications |
20 |
• Caring for Your Smart Drive |
24 |
|
• |
Products That Might |
|
|
Damage Your Smart Drive |
25 |
• Smart Drive Sounds and Beeps |
25 |
|
• |
Automatic Lint System |
25 |
7. PROBLEM SOLVING
• |
Saving Water |
26 |
• |
Wash Problems |
28 |
• |
Operating Problems |
29 |
• If Your Smart Drive Beeps |
|
|
|
for Help |
30 |
• Before you call for Service |
|
|
|
or Assistance |
32 |
• |
Manufacturers Warranty |
33 |
8. INSTALLING YOUR SMART DRIVE
• |
Unpacking |
1A |
• |
Drain Hose |
1A |
• |
Inlet Hoses |
2A |
• |
Levelling |
2A |
• |
Installation Environment |
3A |
Please Note: All diagrams feature the EXCELLENCE button shape unless otherwise stated. The use of the button is the same for all Smart Drive models.
• |
Sorting |
21 |
• |
Loading |
21 |

BEFORE YOU DO YOUR FIRST WASH 3
BEFORE YOU DO YOUR FIRST WASH
Thank you for buying a Fisher & Paykel Smart Drive washing machine. We are very proud of this washer and trust it will serve you well for many years.
You owe it to yourself and your Smart Drive to have it installed correctly by an authorised service agent.
Before you start, it is a good idea to go through the following checklist:
1.Has the basepacker been removed?
2.Is the hot hose connected to the hot valve marked ‘H’? Is the cold hose connected to the cold valve marked ‘C’?
3.Is the drain hose threaded through the ‘U bend‘ (with no more than 20mm extended) and on to your standpipe?
4.Are the rubber inserts secured into the feet on the base of your machine? and is the machine levelled?
Refer to Installation Instructions, Section 8.
If you have bought a PRIDE model it is a good idea to check the warm fill temperature. (Refer to page 18).

4 MODEL VARIATIONS
Wash Options |
Wash Options |
Cycles |
Wash Cycles |
Wash |
|
|
USING YOUR SMART DRIVE 5 |
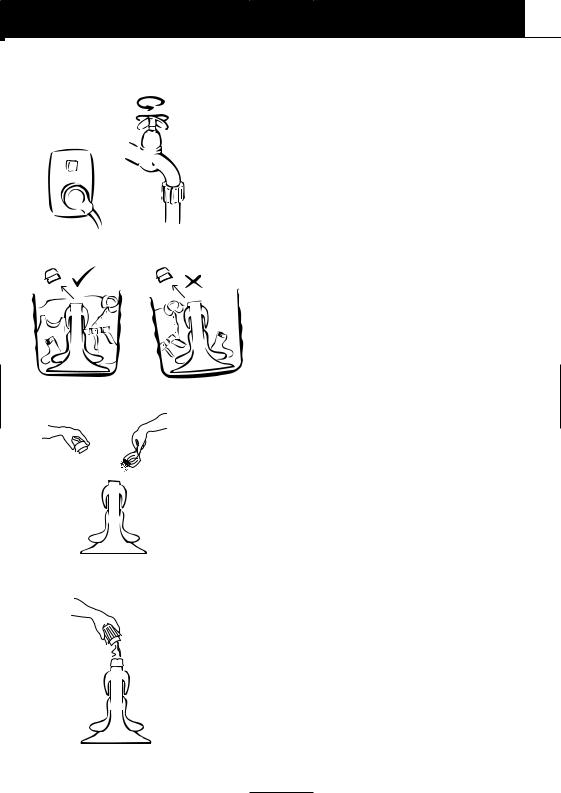
POWER AND WATER |
1. Turn on the power and water supplies. |
LOADING |
2. |
• |
Remove fabric softener dispenser. |
|
|
• |
Place the load evenly around the |
|
|
|
agitator. (Refer to Sorting and Loading |
|
|
|
pages 21). |
DETERGENT 3. • Use the mark on the agitator, nearest to the top of the clothes, as a guide to the correct amount of detergent to
use.
• Pour the detergent down the centre of the agitator stem. Replace the fabric softener dispenser (this stops small articles falling down the centre of the agitator). (Refer to Detergent page 22).
FABRIC SOFTENER 4. • If you wish to use fabric softener, place it in the dispenser on the top of the agitator.
• Fabric softener must not be used if
you have selected the Water Saver
option.
(Refer to Fabric Softener page 23).
6 USING YOUR SMART DRIVE |
7 |
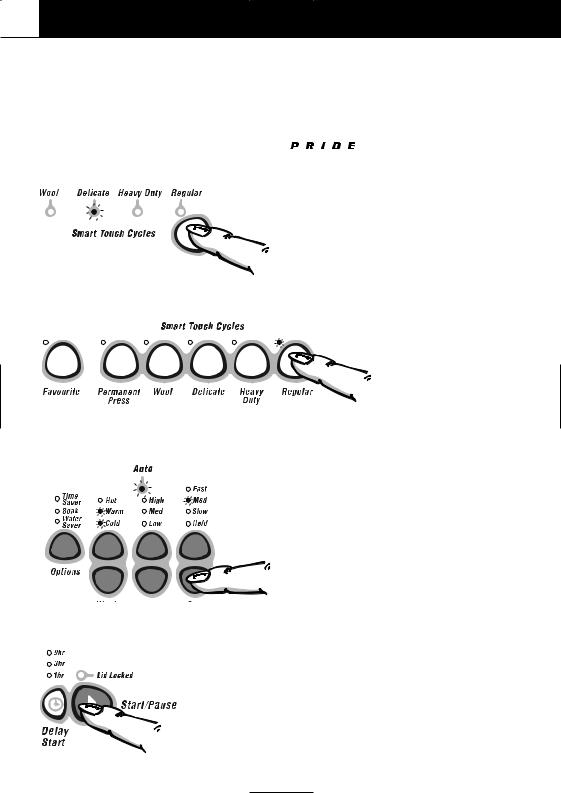
POWER BUTTON |
5. |
Press POWER to turn the machine on. |
|
SELECT WASH CYCLE |
6. |
For |
Models |
Select the cycle you want by pressing the Cycle Button located below the Regular option. Scroll through the cycles until the one you want is lit.
For 


 Models
Press the desired wash cycle button.
WASH OPTIONS
START
7.Select the WASH TEMPERATURE and other wash options. (Refer to pages 9-11).
8.Press START/PAUSE to start the machine.
To stop your Smart Drive during the cycle
-Press START/PAUSE
-If it is during spray rinse or spin there is a slight delay while the bowl is coasted to a stop and the lid is unlocked.
LIDLOCK 7
LIDLOCK
If the lid is left open, the machine will be unable to lock and the cycle will be halted. The machine will play a tune and the lidlock light will flash until the lid is closed and START/PAUSE is pressed.
DO NOT put anything down the slot in the top deck of your machine.
DO NOT try to disable the lidlock.
Your Smart Drive has a lidlock, which locks when your machine is spinning. This ensures the lid cannot be opened during hazardous parts of the cycle, providing added safety for you and your family.
The lidlock light (above the START/PAUSE button) comes on when the lid is locked to tell you when you cannot open the lid. In short it means you can open the lid while your Smart Drive is filling, agitating, and draining, but not while it is spinning.
•When the Lidlock light is on, the lid is locked.
•When the Lidlock light is off, the lid is not locked and the lid can be opened.
•If the Lidlock light is flashing the Lidlock is in process of locking or unlocking, (i.e. while the machine coasts down or START/PAUSE has been pressed). During this stage the lid still cannot be lifted.
The lidlock remains unlocked for the majority of the cycle allowing you to add clothes, dissolve detergent or to add fabric softener (if you do not want to use the Automatic Fabric Softener Dispenser).
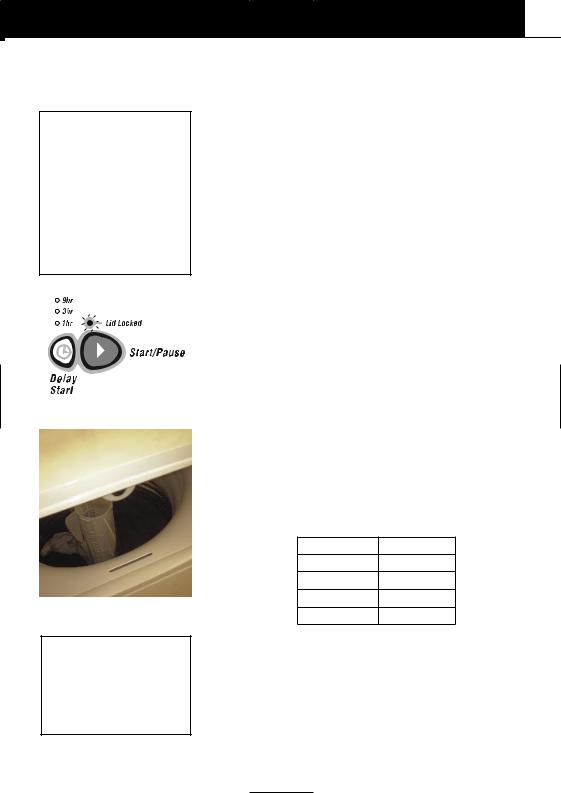
The chart below shows the stages when the lid is locked.
Fill |
Unlocked |
Agitate |
Unlocked |
Spray Rinse |
Locked |
Deep Rinse |
Unlocked |
Spin |
Locked |
Keep children away from the machine, especially when you are using hot water, as the lid can be opened during fill and agitate.

8 THE WASH CYCLES & OPTIONS
DEFAULT SETTINGS
|
REGULAR |
HEAVY |
DELICATE |
PERMANENT |
WOOL |
|
|
DUTY |
|
PRESS |
|
|
|
|
|
|
|
Wash Time |
12 min |
15 min |
6 min |
9 min |
6 min |
|
|
|
|
|
|
Wash Action |
Regular |
Heavy Duty |
Delicate |
Regular |
Delicate |
|
|
|
|
|
|
Wash Temp |
Warm-cold |
Warm |
Warm-cold |
Warm-cold |
Warm-cold |
|
|
|
|
|
|
Rinse |
Spray rinse |
Spray rinse |
2 cold |
2 cold |
Spray rinse |
|
+ cold |
+ cold |
deep |
deep |
+ warm-cold |
|
deep rinse |
deep rinse |
rinses |
rinses |
deep rinse |
|
|
|
|
|
|
Spin Speed |
Fast |
Fast |
Slow |
Slow |
Medium |
|
|
|
|
|
|
Spin Time |
6 min |
6 min |
4 min |
2 min |
6 min |
|
|
|
|
|
|
Cycle Times* |
|
|
|
|
|
700 Series |
45 |
48 |
42 |
43 |
37 |
600 Series |
42 |
45 |
37 |
38 |
35 |
500 Series |
41 |
44 |
35 |
36 |
33 |
|
|
|
|
|
|
Time Saver* |
|
|
|
|
|
700 Series |
32 |
34 |
32 |
33 |
27 |
600 Series |
29 |
31 |
28 |
29 |
25 |
500 Series |
27 |
29 |
25 |
26 |
23 |
|
|
|
|
|
|
*Approximate times (minutes) for a high water level load on EXCELLENCE models.
Cycle times are dependent on your household water pressure.
 Warm on PRIDE models.
MODEL VARIATIONS
EXCELLENCE models - Fully featured, with all 5 wash cycles and a favourite cycle. PRIDE models - Regular, Heavy Duty, Delicate and Wool cycles.
•Regular cycle (with the Water Saver option if available) has been designed for normally soiled, everyday washing eg sheets, towels, T-shirts.
•Heavy Duty cycle is for heavily soiled durable garments eg overalls, jeans, tea towels.
•Delicate cycle uses a slow, gentle agitation designed to care for your most delicate garments eg lingerie, blouses.
•Permanent Press cycle is for garments that crease easily eg business shirts.
•Wool cycle is for machine washable woollens.
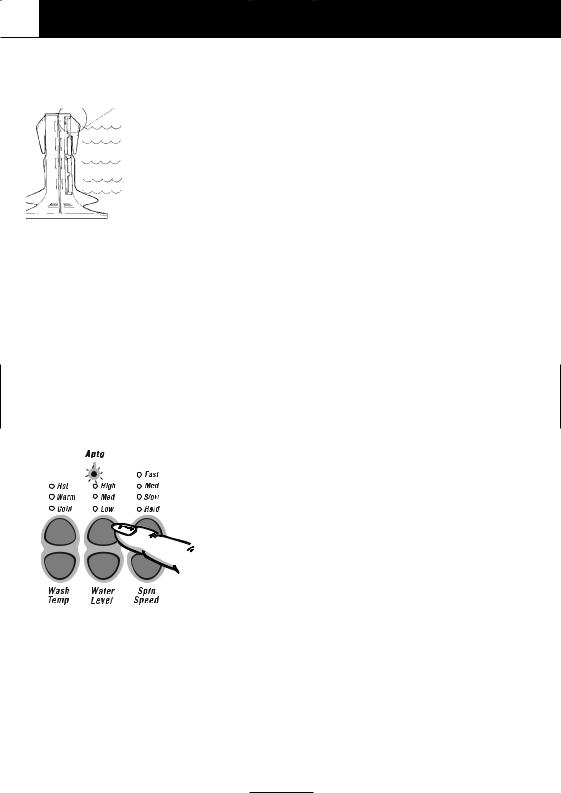
SELECTING THE WASH OPTIONS & ADVANCING THE CYCLE 9
TO SELECT THE WASH OPTIONS
-


models only
THE WASH PROGRESS LIGHTS
TO ADVANCE THE WASH CYCLE
1.Select the wash cycle, temperature, water level and spin speed (Refer to Page 6).
2.Press the OPTIONS button if you want to choose Timer Saver, Soak or Water Saver.
3.Press START/PAUSE (See page 11 and 12).
The Wash Progress lights show all the tasks your Smart Drive will do during the wash cycle. As each task is completed a light goes out, so you can tell at a glance how far the cycle has to go.
1 Press POWER.
2.Press the button with the ‘two arrows’ repeatedly to advance the cycle, to the desired position.
3.Press START/PAUSE.
Note: Each wash progress light equals 3 minutes of agitation.
CLOTHES CARE SAFEGUARDS
To avoid accidentally damaging your clothes there are a few options that your Smart Drive will not accept. For example, you cannot select a hot wash on Delicate, Permanent Press or Wool cycles.
10 WATER LEVELS
MANUAL WATER LEVEL SELECTION
High
Med/high
Medium
Med/low
Low
Actual level of water
The agitator has 5 levels marked on its stem that can be used to help you select the correct water level. Select the correct water level by using the mark nearest to the top of the load.
•The levels marked on the agitator do not correspond exactly to the level of the water. They indicate the level of dry clothes suitable for the water level.
•Your Smart Drive may occasionally add water during agitation. This is to maintain the water level due to the release of air trapped in the garments.
•The medium/high and medium/low settings are available on the EXCELLENCE models only.
•Out of balance loads, tangling or splash-over can be caused by selecting a water level that is too high.
AUTO WATER LEVEL
-


models only
Note: If you feel the Auto Water Level does not fill to the correct level, you can adjust the level the machine selects.
(Refer to Option Adjustment instructions pages 19 and 22).
Your Smart Drive can automatically select the appropriate water level for the load.
1.Place your clothes in the machine.
2.Select the wash cycle (Select AUTO if not automatically selected).
3.Press START/PAUSE.
During fill the machine will pause occasionally to sense the water level. The machine will check if the water level is correct by using a series of 2 different agitate strokes. A slow stroke to sense the load and an agitate stroke to mix the load. (This may take over a minute.) If it detects that the water level is not high enough, it will fill with more water and
check the level.
•When washing an unusual load, eg large bulky garments or pillows, we recommend you manually select the water level and select the Delicate cycle.
•Manually select the water level if there is already water in the bowl.
 Loading...