


DW820 and DW920 models
Dishwasher
Installation instructions and User guide NZ & AU
Contents
Installation instructions |
2 |
Introduction |
6 |
Quick operating instructions |
7 |
Control panel |
8 |
Loading the dishwasher |
11 |
Detergent |
13 |
Rinse aid |
14 |
Wash programmes |
15 |
Changing the preset options |
16 |
Australian/New Zealand Standard AS2007.1 |
17 |
Care guide |
18 |
Care and cleaning |
19 |
Problem solving |
20 |
Fault codes |
22 |
Manufacturer’s warranty |
23 |
Customer care |
24 |
Important!
Please note, some models shown in this book are not available in all markets. It is important that the Installation instructions/User Guide should be retained with the appliance for future reference. Should the appliance be sold or transferred to another owner, always ensure that the Installation instructions/User Guide is left with the appliance in order that the new owner can familiarise themselves with the appliance and the relevant warnings.
1

INSTALLATION INSTRUCTIONS
Installation instructions
Before you start
These instructions are intended as a guide only. It is the responsibility of the
Plumber and Electrician to ensure that each installation complies with the Government Regulations and Local Government ByLaws.
Lifting & Removing the Dishwasher
We recommend two people should move the dishwasher, with one person standing on each side. Always lift from the step at the lower rear of the dishwasher. Hold the dishwasher level by placing your other hand at the top of the door on the front.
Never Lift From the Door Handle
Do not lift from the decorative panel on the front of the dishwasher. Always be careful with the hoses and the power cord at the back of the dishwasher. Careful handling will prevent damage and malfunction from squashing, kinking or cuts.
This dishwasher must not be connected to an under sink high pressure “push through” type hot water system, as damage to the system will result. If in doubt as to the suitability of your system, consult your Plumber.
The dishwasher should not be connected to a hot water system where the temperature exceeds 75°C, or where there is no temperature control, i.e. a wet back system, unless the system is fitted with a suitable tempering valve.
While installing the dishwasher, check the drain hose is not restricted or kinked.
Do not remove the insulation blanket from the rear of the product. This is not part of the packaging. It provides sound and heat insulation.
Plumbing
Drainage
The recommended method of installation for a Fisher & Paykel DW920 and DW820 Dishwasher is shown in Diagrams 1, 2 & 3 on Page 5. The diagrams are designed to eliminate problems that often occur with combined sink-dishwasher waste systems.
The standpipe must have a minimum inside diameter of 38mm and stand 750mm above the floor. A drain hose support is provided to hold the drain hose in place in the standpipe (see Diagrams 1 and 2). It is not recommended that the drain hose or drain pipe be connected directly to a waste disposal unit (see Diagram 2).
When connecting the drain hose to a sink trap with a drain hose spigot, it is important that the drain hose is supported to the height of the bench (see Diagram 3). Ensure the drain spigot has a minimum hole size of 15mm and that it has been drilled out.
Water Valve Connections
Both Fisher & Paykel Dishwasher Models DW920 and DW820 have single valve water connections. We recommend a cold water connection to give the best wash performance and energy efficiency.
Water Supply
The dishwasher inlet hose must be connected to an accessible water tap. The water supply to the dishwasher should be through a 15mm minimum domestic water pipe. The inlet hose connects to the water supply tap using a 20mm BSP male thread. The tap must have an adequate sealing face for the flat washer supplied, to ensure the hose connections
are water tight. Hose coupling must
be tightened a further half turn after seal
contact.
MAX Ø20mm MIN Ø15mm
2
To Change the Setup for a hot or cold water supply
This is only required on a Fisher & Paykel DW920 model.
1Press the POWER button to turn the Dishwasher off.
2Hold the ECO button for 15 seconds and the dishwasher will beep. On the time Display, “H” or “C” will be displayed. “H” represents Hot water connection and “C” represents Cold water connection.
3Press the START/PAUSE button to toggle between “H” and “C”. Once the appropriate option is chosen.
4Press the POWER button. This will save the option you have chosen.
The hot water supply should ideally be at a temperature of 60-65°C at the point of entry to the dishwasher and must not exceed 75°C.
The water pressure to the dishwasher shall be no less than 30kPa (4.3psi) and no more than 960kPa (140psi).
Note: DW920 is set up for connection to cold water when it leaves the factory.
Installation
Once installed, the dishwasher’s rear levelling feet must be anchored to the floor to prevent the dishwasher from tilting forward when the baskets are being loaded with dishes. Two anchor plates, with screws, are provided for this purpose. A template and instructions for locating the correct position of the anchor plates is printed on the top cardboard spacer of the external packaging of the product.
Built-In Installation
Where the dishwasher is installed in an under bench situation, ensure that bare wood surrounding the dishwasher is sealed with an oil based paint or moisture-proof polyurethane to prevent possible steam damage.
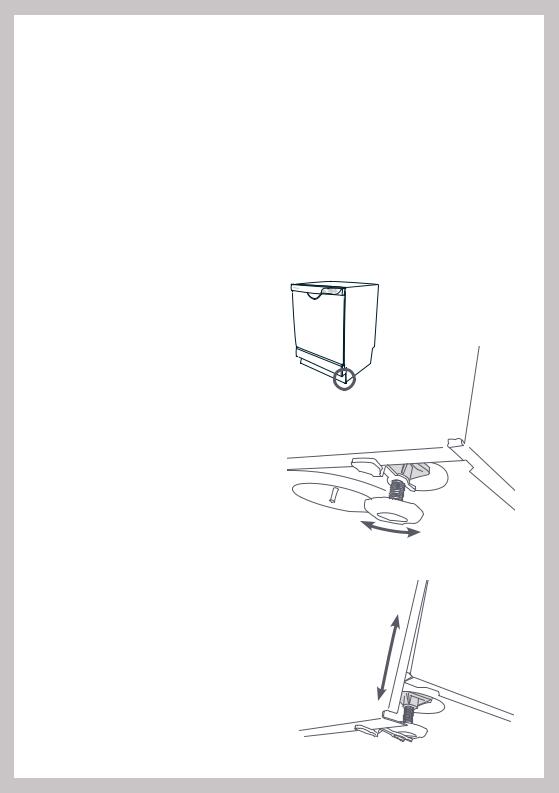
Levelling
Before sliding the dishwasher into position, adjust the levelling feet to ensure that the dishwasher is level at the required height.
Check that the door opens and closes without striking the side of the cabinet. If necessary, readjust the levelling feet slightly (see Figure A).
IMPORTANT!
If the door strikes the side of the cabinet, a poor door seal may result in the product leaking.
Once the required height is obtained, slide the service panel down to cover the feet (see Figure B).
Figure A: Adjusting the levelling feet
Adjust height
Figure B: Fitting the service panel
INSTALLATION INSTRUCTIONS
3
INSTALLATION INSTRUCTIONS
Depth (C) 560mm
Height (A) 825-875mm
Width (B) 600mm
Door open (D) 595mm
Electrical
A 3 Pin 10 Amp switched outlet is required. The switch must be located in a readily accessible position with the product installed.
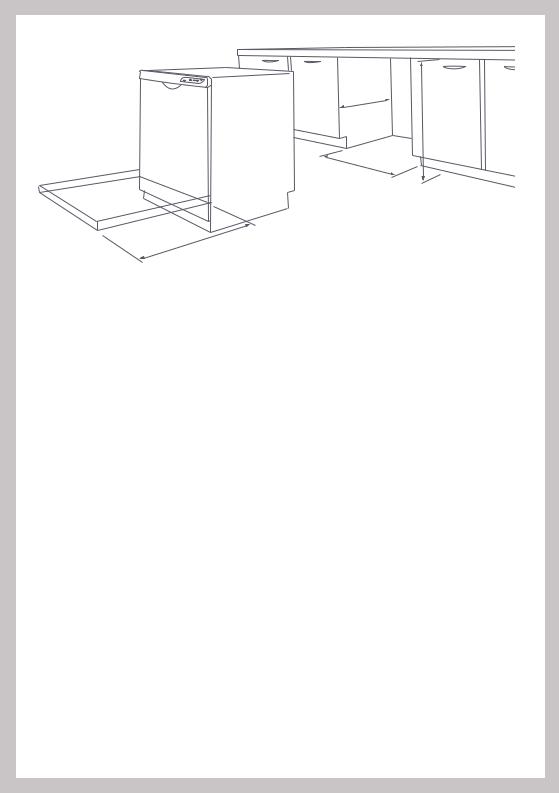
Joinery dimensions (DW820 & DW920)
Height |
A - 830mm MIN |
Width |
B - 600mm |
Depth |
C - 560mm |
Door Open |
D - 595mm |
Note
Ensure underside of bench is sealed with an oil based paint or moisture-proof polyurethane to prevent possible steam damage.
Specifications
Product Size
Height |
825-875mm |
Width |
595mm |
Depth |
555mm |
Electrical |
230-240 vAC |
Drying |
Residual Heat / 1500 Watt Element |
Water Pressure |
Minimum 30 kPa (4.3 psi) |
|
Maximum 960 kPa (140 psi) |
Water Temperature |
Cold water recommended. |
|
Hot ideally 60-65°C (must not exceed 75°C) |
Place Setting |
12 |
4

Plumbing and drainage options
*Standpipe Ø38mm 750mm MIN above floor
Waste
* Water
Water
Waste
200mm MIN
Switched power socket |
Hose supplied |
Diagram 1: Dishwasher
|
*Standpipe Ø38mm |
Waste |
750mm MIN above floor |
disposal unit |
|
|
Waste |
* Water note:
Connection of drain
Waste hose direct to the waste
200mm MIN |
disposal unit is NOT |
|
recommended. |
||
|
Switched power socket |
Hose supplied |
Diagram 2: Dishwasher & waste disposal unit
Vent
Waste
Water
200mm MIN
Switched power socket |
Hose supplied |
note:
Where standard hose is not long enough, a service person can fit an extra length, 3
metre, drain hose (part no. 521287).
Diagram 3: Dishwasher using sink trap with dishwasher drain hose spigot
INSTALLATION INSTRUCTIONS
5

Introduction
Fisher & Paykel strongly recommend that you read the information contained in this User Guide before using the dishwasher.
After your Dishwasher has been installed, please check that:
1The Dishwasher has been installed in accordance with installation instructions.
2There are no water leaks from the hose connections which can be seen under the Dishwasher or at the tap.
First use
Before you start, check the following:
The power cord is plugged in and the switch is on.
The inlet hose is connected and the tap is turned on.
The drain hose is installed correctly.
We recommend a cold water connection to achieve the best wash performance and lowest overall energy consumption. A hot fill connection should be used if faster times are desired or if an alternative hot water supply such as night rate electricity, solar heating or wetback is desired.
Accessories
Cutlery Basket
Removable Basket Insert
Floor Mounting Kit
Safety instructions
Household appliances are not intended to be played with by children. Children or persons with a disability that may limit their ability to use the appliance, should have a competent person instruct them in its use. This person should be satisfied that they can then use the appliance without danger to themselves or their surroundings.
If the supply cord is damaged, it must be replaced by a Fisher & Paykel Dealer or Authorised Service Centre or a similarly qualified electrical tradesperson in order to avoid a hazard.
6
Quick operating instructions
Load the dishes into the dishwasher
Remove any large scraps of food from dishes. Ensure the dishwasher is not overcrowded when loading as this may lead to poor wash performance.
Check spray arms can rotate
Ensure there are no items blocking the spray arm path.
Fill the detergent and rinse aid dispenser
Follow the wash programme chart for recommended quantities of detergent and ensure there is adequate rinse aid for the wash.
Select the wash programme
Close the dishwasher door. Press the WASH button to select the desired wash.
Eco function (optional)
If you would like the wash programme to use less energy and time, press the ECO button.
Start the dishwasher
Press the START/PAUSE button to start the Dishwasher. To pause in mid cycle or to restart the Dishwasher. Press the START/PAUSE button.
End of wash programme
At the end of the wash programme, the dishwasher will automatically stop and beep five times indicating the end of the programme.
Note:
If a power failure occurs and the Dishwasher is in the middle of a wash programme, it will stop. Once the power is restored, the dishwasher will restart that part of the wash sub cycle again and continue on with the wash programme. Extra detergent may be required, if the dishwasher was disrupted in the main part of the programme.
7
 Loading...