


Installation instructions and user guide
Ice & Water refrigerator
E402B, E442B, E522B, RF610A, RF540A, RF201A models
NZ AU GB AE HK SG IE
Contents |
|
1 |
|
|
|
Introduction |
2 |
|
Safety and warnings |
3 |
|
Installation instructions |
5 |
|
Before you start using your Ice & Water refrigerator |
15 |
|
All about the display |
16 |
|
Using your water dispenser |
18 |
|
Using your ice maker |
19 |
|
Using the display options |
21 |
|
Measured Fill |
21 |
|
Freezer Chill and Bottle Chill |
22 |
|
The temperature of your refrigerator and freezer |
23 |
|
Settings/User warnings |
24 |
|
Active Smart™ special features |
26 |
|
Water filter |
28 |
|
Measured Fill Calibration |
30 |
|
Active Smart™ maintenance |
31 |
|
Cleaning and caring for your refrigerator |
32 |
|
On vacation/holiday |
35 |
|
Refrigerator sounds |
36 |
|
Storing food in your refrigerator |
37 |
|
Storing food in your freezer |
38 |
|
Troubleshooting |
40 |
|
Manufacturers warranty |
44 |
|
Customer care |
45 |
|
Filter performance data sheet |
47 |
|
Important!
SAVE THESE INSTRUCTIONS
The models shown in this user guide may not be available in all markets and are subject to change at any time. For current details about model and specification availability in your country, please go to our website www.fisherpaykel.com or contact your local Fisher & Paykel dealer.
2 Introduction
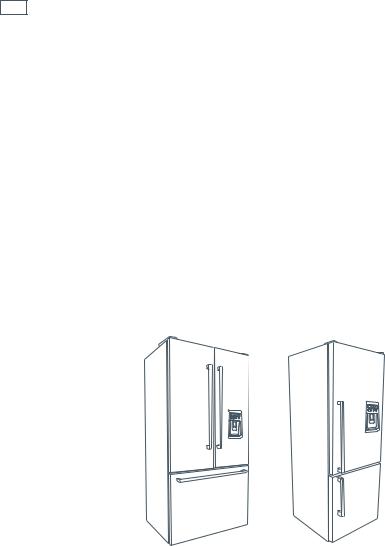
Thank you for buying a Fisher & Paykel Active Smart™ refrigerator with automatic ice dispensing and chilled water through the door.
At Fisher & Paykel we are very proud of this refrigerator. We feel we have achieved water dispensing through the door without compromising storage space or access in the refrigerator. During our testing we have enjoyed the health benefits of having cool filtered water so accessible, while minimising the number of door openings.
Thousands of hours of food care research and 70 years of refrigeration experience has been programmed into your refrigerator to give you the best possible performance.
We hope you enjoy your new refrigerator.
Fig.1 Ice & Water Refrigerators
Important!
It is important that this User Guide should be retained with your Ice & Water refrigerator for future reference. Should the appliance be sold or transferred to another owner, please ensure that the User Guide is left with the appliance. This will ensure that the new owner can familiarise themselves with the information and warnings contained within the Guide.

Safety and warnings 3
 WARNING!
Electric Shock Hazard
Read and follow the SAFETY AND WARNINGS outlined in this User Guide before operating this appliance.
Failure to do so can result in death, electric shock, fire or injury to persons.
Use this appliance only for its intended purpose as described in this User Guide.
Important safety precautions
Warning
When using this appliance always exercise basic safety precautions including the following:
Danger
This appliance is not intended for use by children or infirmed persons without supervision. This is especially important when using the freezer drawer compartment. Young children should be supervised to ensure they do not play with the appliance.
Risk of child entrapment. Before you throw away your old refrigerator or freezer:
–Take off the doors
–Leave the shelves in place so that children may not easily climb inside.
Disposal
Extreme care must be taken when disposing of your old appliance to avoid hazards. The refrigerant gas must be safely removed and for the safety of young children, remove doors. Your Fisher & Paykel Appliances Authorised Service Centre will be able to give advice on environmentally friendly methods of disposing of your old refrigerator or freezer.
Electrical
This appliance must be properly installed in accordance with the installation instructions before it is used.
Never unplug your refrigerator or freezer by pulling on the power cord. Always grip the plug firmly and pull straight out from the outlet.
Do not plug in any other appliance at the same power point as your refrigerator or freezer or use extension cords or double adapters.
Repair or replace immediately all electric service cords that have become frayed or otherwise damaged. Do not use a cord that shows cracks or abrasion along its length or at either the plug or appliance end.
If the power supply cord is damaged, it must only be replaced by your Fisher & Paykel Appliances Authorised Service Centre because special purpose tools are required.

4 Safety and warnings
When moving your appliance away from the wall, be careful not to roll over or damage the power cord.
Unplug your refrigerator or freezer before cleaning or replacing the lightbulb.
Storing food and drinks
Never store volatile or flammable materials in your refrigerator or freezer as they may explode. Never freeze liquids in glass containers. Liquid expands during freezing, which may cause the container to explode.
Never freeze carbonated drinks. They may explode.
Do not consume food if it is too cold. Food removed from the freezer compartment may be cold enough to cause damage when brought into contact with bare skin eg frozen ice cubes.
Power failure – food safety
Do not refreeze frozen foods that have thawed completely. Follow the recommendations below if you discover food in your freezer has thawed:
1)Ice crystals still visible – food may be refrozen but should be stored for a shorter period than recommended.
2)Thawed but refrigerator cold – refreezing generally not recommended. Fruits and some cooked food can be refrozen but use as soon as possible. Meat, fish, poultry – use immediately or cook then refreeze. Vegetables – discard as they usually go limp and soggy.
3)Thawed but warmer than 4˚C (38˚F). Red meat can be cooked immediately and refrozen but use as soon as possible. Discard all other frozen foods.
Do not refreeze frozen foods that have thawed completely. The food may be dangerous to eat.
Cleaning
Many commercially available cleaning products contain solvents which may attack plastic components of your refrigerator or freezer and cause them to crack. Please refer to the cleaning care section of this booklet for further advice.
|
|
|
Installation instructions |
|
|
5 |
|
|
|
|
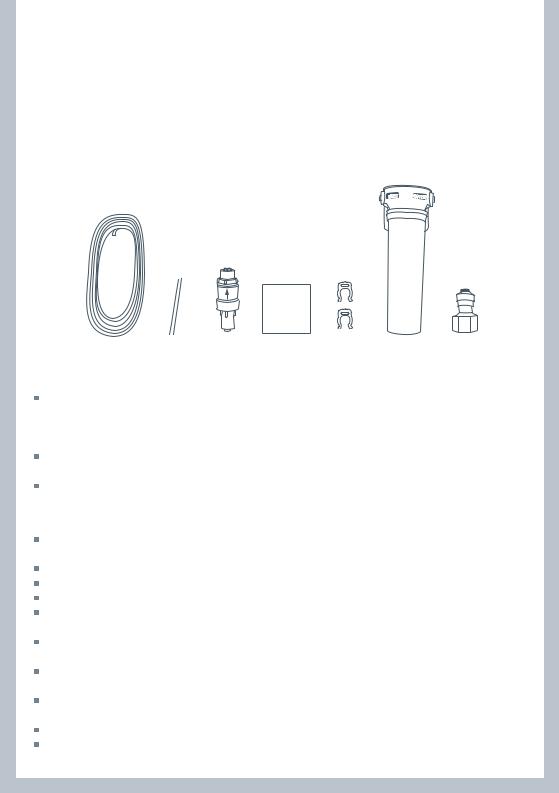
Contents of filter kit
1 4 m (13 ft) white 6 mm (¼”) tubing
21 x 200 mm (8”) blue tubing
3 1 x pressure reducing valve (PRV)
4 1 x double sided foam
52 x locking keys
61 x water filter cartridge and head
7 1 x tap connection – 15 mm (½”) BSP
1 |
2 |
3 |
4 |
5 |
6 |
7 |
Fig.2 Water connection kit
Important!
It is imperative the pressure reducing valve (PRV) is fitted prior to the filter. This valve ensures the water will not flow back into the mains from the refrigerator water system. If the PRV is not fitted to the connection line your Ice & Water refrigerator features may not function in some circumstances.
It is recommended that an authorised plumber in your state or town is used to install the water connection.
The new tubings supplied with the machine are to be used, old tubings should not be used.
Installation precautions/warning
DO NOT use with water that is microbiologically unsafe or of unknown quality without adequate disinfection before or after the system.
WARNING – connect to potable water supply only.
DO NOT install on line pressure above 900 kPa (130 psi) or below 150 kPa (22 psi). DO NOT use on hot water supply (38°C [100°F max.]).
DO NOT install near electrical wires or water pipes that will be in the path of drilling when selecting the location of filter system.
DO NOT mount filter in such a position so that it will be struck by other items, such as wastebaskets, etc.
DO NOT install the filter in direct sunlight as prolonged exposure to light can weaken plastic components.
DO NOT install in a location that is susceptible to freezing temperatures as damage to the housing could occur.
DO NOT screw filter to fridge.
AVOID contamination of pipes during installation.
6 Installation instructions
Installation instructions:
1 Ensure that refrigerator is not plugged into a power supply.
2Locate isolation tap for water connection – cold water feed only (dishwasher or sink mixer taps) – if you can’t find the connection tap, contact an authorised plumber in your state or town to fit your water connection.
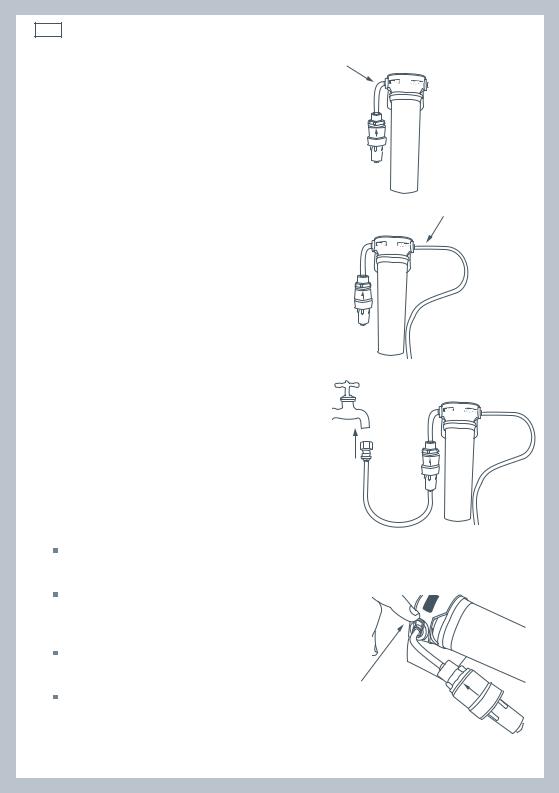
3Connect the 200 mm (8”) blue tubing to the outlet of the PRV (blue collet) and the inlet connection of the water filter cartridge as shown in Diagram 1. Gently pull on both ends to ensure it is locked.
4Connect the white 6 mm (¼”) tubing to the outlet of the water filter cartridge as shown in Diagram 2. Gently pull to ensure it is locked.
5Measure the required length of tubing to run from the PRV to the water connection point.
6 Cut the tubing making sure the ends are square and clean.
7Connect the tubing to the tap connection and the base of the PRV (white collet) and then to the tap as shown in Diagram 3. Please note that the tap connection supplied
should fit most installation situations. If your tap requires a different fitting, please contact an authorised plumber
in your state or town to purchase the correct fitting.
8Connect one locking key to each side of the water filter cartridge in between the cartridge and the locking collet as shown in Diagram 4.
9To flush the water filter and check for leaks, aim the end of the tubing into a bucket, turn isolating tap on and run at least 3 litres (3 qt) of water through. Once complete, turn isolating tap off.
10Locate desired position for water filter noting carefully the following points:
It is recommended to fit the filter in a vertical orientation with the water filter head at the top. This will minimise water leakage when replacing cartridge. Ensure the filter is in a convenient location to access every 6 months for replacement. We suggest that
this location is beside the water filter supply tap in the cupboard beside the refrigerator.
A minimum clearance of 64 mm (2 ½”) from the bottom of the filter cartridge is required to perform cartridge removal.
Do not screw filter to fridge.
Diagram 1
Fig.3 PRV connection
Diagram 2
Fig.4 Waterline connection
Diagram 3
Fig.5 Tap connection
INLET
Diagram 4
Fig.6 Locking key
|
|
|
Installation instructions |
|
|
7 |
|
|
|
|
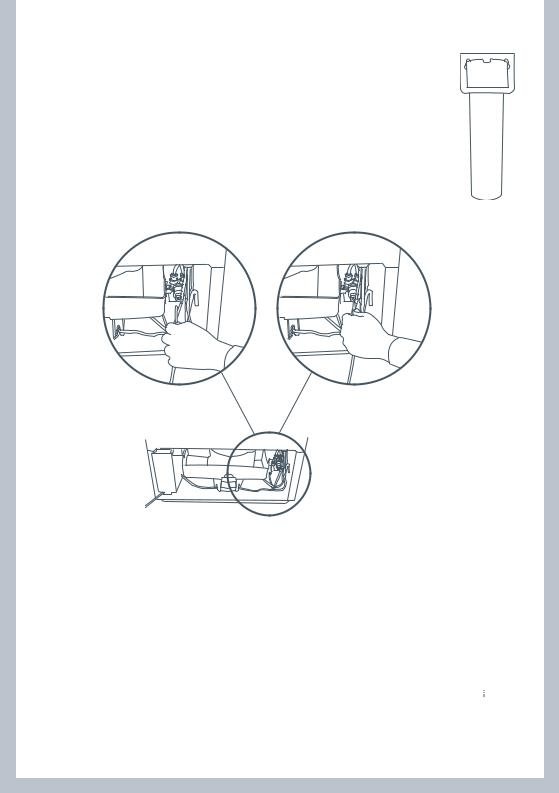
11Attach double sided foam to the back of the water filter head as shown in Diagram 5. Write the date to be replaced on the filter (date installed + 6 months). Remove double sided foam backing and attach filter to the desired position as located in step 10 (refer to previous page).
12Run the 6 mm (¼”) tubing to back of the fridge ensuring there is enough tubing to pull out the refrigerator for service.
13Connect tubing into the water (solenoid) valve located on the right hand side of the unit (compressor) compartment as shown in Diagram 7. Beware of hot pipes.
14Pull gently on tubing to ensure it is locked in as shown in Diagram 8.
15 The completed installation should look like Diagram 9 on page 8.
Diagram 5
Fig.7 Double sided foam attachment
Diagram 7 |
Diagram 8 |
Fig.8 Waterline connection to refrigerator
Diagram 6
16Turn isolating tap on and check that all connections are dry and free of drips. If not, please alert the plumber.
17Coil water line tubing behind the fridge. Push your refrigerator into place being careful not to kink or squash the water line running into the water (solenoid) valve.
18Read pages 9 – 14 carefully, and then turn refrigerator on.
19The first time you require water out of the dispenser, there will be a delay while the water reservoir fills up. As this is happening, the  symbol will flash. Once the reservoir is full, this symbol will stop flashing.
20Run a further 3 litres (3 qt) through the system, stopping intermittently to ensure the reservoir is flushed out. Failure to do this will result in excessive dripping from your dispenser.
21Press  until the Ice menu is highlighted then press
  to turn on the ice maker. Press

 together to force a cycle. The ice tray will flip. Force another cycle. The ice tray will flip and spill the water into the ice bin. Empty water and replace bin.
22You are now ready to enjoy chilled water and ice dispensing from your Active Smart™ refrigerator. Please note that once installation is complete a few drips may appear out of the dispenser over the next few days as the remaining trapped air is cleared.

8 Installation instructions
Important!
All connections must be checked for leaks.
If unsure of connection process and/or leaks then contact your local plumber to install and check the system for you.
Ensure white 6 mm (¼”) tubing is routed away from sharp objects, sharp corners (beware of kinking tube as this will stop water flow), clear of the refrigerator unit compartment and not in a location where it can be squashed.
Ensure all push-fit connections are firmly pushed into place. The tube should push in 20 mm (¾”) before reaching the stop.
If tubing is removed at any point, re-cut the end and re-insert. Tubing must be fully inserted to avoid leaks.
To remove tube from connection points, turn off the isolating tap, push in the collet and gently pull tubing at the same time.
Fig.9 Connection to water supply
Diagram 9
System tested and certified by NSF International against NSF/ANSI Standard 53 for the reduction of Asbestos, Atrazine, Benzene, Cyst, Carbofuran, Lead, Lindane, Mercury, P-Dichlorobenzene, Toxaphene & Turbidity; against Standard NSF/ANSI 42 for the reduction of Chlorine Taste and Odour and Nominal Particulate Class I to a capacity of 2,838 Litres (750 gallons).
|
|
|
Installation instructions |
|
|
9 |
|
|
|
|
 WARNING!
Electric Shock Hazard
Read and follow the SAFETY AND WARNINGS outlined in this User Guide before operating this appliance, pages 3 – 4.
Failure to do so can result in death, electric shock, fire or injury to persons.
Please follow the steps for installation to ensure your appliance operates correctly.
1. Power
The appliance must be installed so the plug is accessible.
To ensure that the appliance is not accidentally switched off, connect your refrigerator or freezer to its own power point. Do not plug in any other appliance at this power point or use extension cords and double adaptors, as the combined weight of both power cords can pull the double adaptor from a wall outlet socket.
For power requirements, refer to the information on the serial plate located at the front bottom right-hand side of the refrigerator when the door is open.
It is essential that the appliance be properly grounded (earthed).
2. Location
Your refrigerator or freezer should not be located in direct sunlight or next to any heat generating appliance such as a cooktop, oven or dishwasher.
10 Installation instructions
|
|
|
E402B, E442B, E522B |
|
|
|
|
|
|
|
|
RF610A/RF540A/RF201A |
|
|||||||||||||||||||
|
|
|
|
|
|
|
|
|
|
|
|
|
|
|
|
|
|
|
|
|
|
|
|
|
|
|
|
|
|
|
|
|
|
|
|
|
|
|
|
|
|
|
|
|
|
|
|
|
|
|
|
|
|
|
|
|
|
|
|
|
|
|
|
|
|
|
|
|
|
|
|
|
|
|
|
|
|
|
|
|
|
|
|
|
|
|
|
|
|
|
|
|
|
|
|
|
|
|
|
|
|
|
|
|
|
|
|
|
|
|
|
|
|
|
|
|
|
|
|
|
|
|
|
|
|
|
|
|
|
|
|
|
|
|
|
|
|
|
|
|
|
|
|
|
|
|
|
|
|
|
|
|
|
|
|
|
|
|
|
|
|
|
|
|
|
|
|
|
|
|
|
|
|
|
|
|
|
|
|
|
|
|
|
|
|
|
|
|
|
|
|
|
|
|
|
|
|
|
|
|
|
|
|
|
|
|
|
|
|
|
|
|
|
|
|
|
|
|
|
|
|
|
|
|
|
|
|
|
|
|
|
|
|
|
|
|
|
|
|
|
|
|
|
|
|
|
|
|
|
|
|
|
|
|
|
|
|
|
|
|
|
|
|
|
|
|
|
|
|
|
|
|
|
|
|
|
|
|
|
|
|
|
|
|
|
|
|
|
|
|
|
|
|
|
|
|
|
|
|
|
|
|
|
|
|
|
|
|
|
|
|
|
|
|
|
|
|
|
|
|
|
|
|
|
|
|
|
|
|
|
|
|
|
|
|
|
|
|
|
|
|
|
|
|
|
|
|
|
|
|
|
|
|
|
|
|
|
|
|
|
|
|
|
|
|
|
|
|
|
|
|
|
|
|
|
|
|
|
|
|
|
|
|
|
|
|
|
|
|
|
|
|
|
|
|
|
|
|
|
|
|
|
|
|
|
|
|
|
|
|
|
|
|
|
|
|
|
|
|
|
|
|
|
|
|
|
|
|
|
|
|
|
|
|
|
|
|
|
|
|
|
|
|
|
|
|
|
|
|
|
|
|
|
|
|
|
|
|
|
|
|
|
|
|
|
|
|
|
|
|
|
|
|
|
|
|
|
|
|
|
|
|
|
|
|
|
|
|
|
|
|
|
|
|
|
|
|
|
|
|
|
|
|
|
|
|
|
|
|
|
|
|
|
|
|
|
|
|
|
|
|
|
|
|
|
|
|
|
|
|
|
|
|
|
|
|
|
|
|
|
|
|
|
|
|
|
|
|
|
|
|
|
|
|
|
|
|
|
|
|
Flush with refrigerator chassis – full door rotation |
Flush with refrigerator chassis – full door rotation |
||||||||||||||||||||||||||||||||
|
|
|
|
|
|
|
|
|
|
|
|
|
|
|
|
|
|
|
|
|
|
|
|
|
|
|
|
|
|
|
|
|
|
|
|
|
|
|
|
|
|
|
|
|
|
|
|
|
|
|
|
|
|
|
|
|
|
|
|
|
|
|
|
|
|
|
|
|
|
|
|
|
|
|
|
|
|
|
|
|
|
|
|
|
|
|
|
|
|
|
|
|
|
|
|
|
|
|
|
|
|
|
|
|
|
|
|
|
|
|
|
|
|
|
|
|
|
|
|
|
|
|
|
|
|
|
|
|
|
|
|
|
|
|
|
|
|
|
|
|
|
|
|
|
|
|
|
|
|
|
|
|
|
|
|
|
|
|
|
|
|
|
|
|
|
|
|
|
|
|
|
|
|
|
|
|
|
|
|
|
|
|
|
|
|
|
|
|
|
|
|
|
|
|
|
|
|
|
|
|
|
|
|
|
|
|
|
|
|
|
|
|
|
|
|
|
|
|
|
|
|
|
|
|
|
|
|
|
|
|
|
|
|
|
|
|
|
|
|
|
|
|
|
|
|
|
|
|
|
|
|
|
|
|
|
|
|
|
|
|
|
|
|
|
|
|
|
|
|
|
|
Flush with refrigerator door – 90˚ door rotation |
Flush with refrigerator door – 90˚ door rotation |
|||||||||||||||||||||||||||||||||
|
|
|
|
|
|
|
|
|
|
|
|
|
|
|
|
|
|
|
|
|
|
|
|
|
|
|
|
|
|
|
|
|
|
|
|
|
|
|
|
|
|
|
|
|
|
|
|
|
|
|
|
|
|
|
|
|
|
|
|
|
|
|
|
|
|
|
|
|
|
|
|
|
|
|
|
|
|
|
|
|
|
|
|
|
|
|
|
|
|
|
|
|
|
|
|
|
|
|
|
|
|
|
|
|
|
|
|
|
|
|
|
|
|
|
|
|
|
|
|
|
|
|
|
|
|
|
|
|
|
|
|
|
|
|
|
|
|
|
|
|
|
|
|
|
|
|
|
|
|
|
|
|
|
|
|
|
|
|
|
|
|
|
|
|
|
|
|
|
|
|
|
|
|
|
|
|
|
|
|
|
|
|
|
|
|
|
|
|
|
|
|
|
|
|
|
|
|
|
|
|
|
|
|
|
|
|
|
|
|
|
|
|
|
|
|
|
|
|
|
|
|
|
|
|
|
|
|
|
|
|
|
|
|
|
|
|
|
|
|
|
|
|
|
|
|
|
|
|
|
|
|
|
|
|
|
|
|
|
|
|
|
|
|
|
|
|
|
|
|
|
|
|
|
|
|
|
|
|
|
|
|
|
|
|
|
|
|
|
|
|
|
|
|
|
|
|
|
|
|
|
|
|
|
|
|
|
|
|
|
|
|
|
|
|
Flush with refrigerator door – full door rotation |
Flush with refrigerator door – full door rotation |
||||||||||||||||||||||||||||||||||||||
|
|
|
|
|
|
|
|
|
|
|
|
|
|
|
|
|
|
|
|
|
|
|
|
|
|
|
|
|
|
|
|
|
|
|
|
|
|
|
|
|
|
|
|
|
|
|
|
|
|
|
|
|
|
|
|
|
|
|
|
|
|
|
|
|
|
|
|
|
|
|
|
|
|
|
|
|
|
|
|
|
|
|
|
|
|
|
|
|
|
|
|
|
|
|
|
|
|
|
|
|
|
|
|
|
|
|
|
|
|
|
|
|
|
|
|
|
|
|
|
|
|
|
|
|
|
|
|
|
|
|
|
|
|
|
|
|
|
|
|
|
|
|
|
|
|
|
|
|
|
|
|
|
|
|
|
|
|
|
|
|
|
|
|
|
|
|
|
|
|
|
|
|
|
|
|
|
|
|
|
|
|
|
|
|
|
|
|
|
|
|
|
|
|
|
|
|
|
|
|
|
|
|
|
|
|
|
|
|
|
|
|
|
|
|
|
|
|
|
|
|
|
|
|
|
|
|
|
|
|
|
|
|
|
|
|
|
|
|
|
|
|
|
|
|
|
|
|
|
|
|
|
|
|
|
|
|
|
|
|
|
|
|
|
|
|
|
|
|
|
|
|
|
|
|
|
|
|
|
|
|
|
|
|
|
|
|
|
|
|
|
|
|
|
|
|
|
|
|
|
|
|
|
|
|
|
|
|
|
|
|
|
|
|
|
|
|
|
|
|
|
|
|
|
|
|
|
|
|
|
|
|
|
|
|
|
|
|
|
|
|
|
|
|
|
|
|
|
|
|
|
|
|
|
|
|
|
|
|
|
|
|
|
|
|
|
|
|
|
|
|
|
|
|
|
|
|
|
|
|
|
|
|
|
|
|
|
|
|
|
|
|
|
|
|
|
|
|
|
|
|
|
|
|
|
|
|
|
|
|
|
|
|
|
|
|
|
|
|
|
|
|
|
|
|
|
|
|
|
|
|
|
|
|
|
|
|
|
|
|
|
|
|
|
|
|
|
|
|
|
|
|
|
|
|
|
|
|
|
|
|
|
|
|
|
|
|
|
|
|
|
|
|
|
|
|
|
|
|
|
|
|
|
|
|
|
|
|
|
|
|
|
|
|
|
|
|
|
|
|
|
|
|
|
|
|
|
|
|
|
|
|
|
|
|
|
|
|
|
|

Installation instructions 11
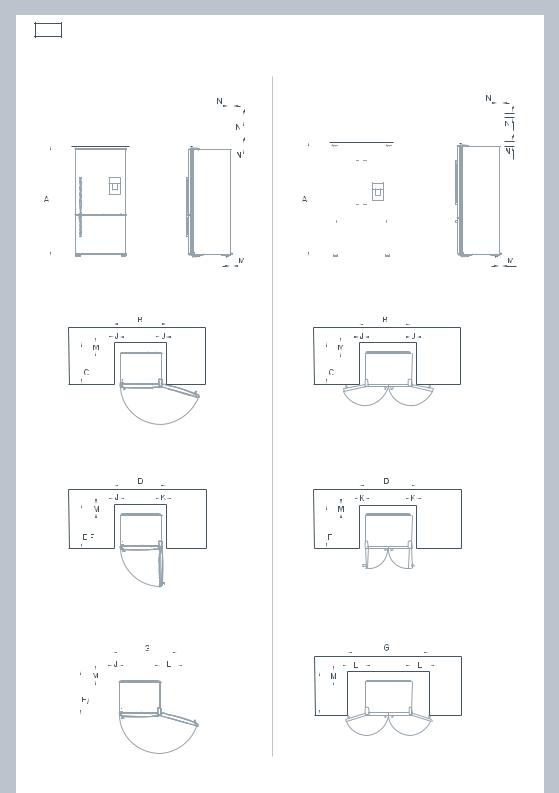
3. Ventilation and installation
To ensure adequate ventilation for your refrigerator see recommended cabinetry dimensions below.
The appliance is intended to be placed against a wall with a free distance not exceeding 75 mm.
|
Cabinetry dimensions (mm) (including |
|
|
|
|
RF610A |
||
|
|
E402B |
E442B |
E522B |
RF540A |
|||
|
minimum air clearances) |
|
||||||
|
|
|
|
|
RF201A |
|||
|
|
|
|
|
|
|
||
|
A |
inside height |
|
1745 |
1745 |
1745 |
1810 |
|
|
|
Flush with refrigerator chassis – full door rotation |
|
|
|
|
||
|
B |
inside width |
|
675 |
|
|
|
|
|
|
720 |
830 |
940 |
|
|||
|
C |
inside depth |
|
620 |
|
|
|
|
|
|
620 |
620 |
620 |
|
|||
|
|
Flush with refrigerator door – 90° door rotation |
|
|
|
|
||
|
D |
inside width |
|
680 |
|
|
|
|
|
|
725 |
835 |
950 |
|
|||
|
E |
inside depth flush to curved door |
|
– |
|
|
– |
|
|
|
675 |
675 |
|||||
|
F |
inside depth flush to flat door |
|
690 |
|
|
|
|
|
|
690 |
690 |
690 |
|
|||
|
|
Flush with refrigerator door – full door rotation |
|
|
|
|
||
|
G |
inside width |
|
795 |
|
|
|
|
|
|
840 |
950 |
1180 |
|
|||
|
H |
inside depth flush to curved door |
|
675 |
|
|
– |
|
|
|
675 |
675 |
|||||
|
I |
inside depth flush to flat door |
|
690 |
|
|
|
|
|
|
690 |
690 |
690 |
|
|||
|
|
Minimum clearances |
|
|
|
|
|
|
|
J |
side clearance |
|
20 |
|
|
|
|
|
|
20 |
20 |
20 |
|
|||
|
K |
side clearance – hinge side flush with |
|
25 |
25 |
25 |
25 |
|
|
|
|
||||||
|
|
door – 90° rotation |
|
|
||||
|
|
|
|
|
|
|
|
|
|
L |
side clearance – hinge side flush with |
|
140 |
140 |
140 |
140 |
|
|
|
|
||||||
|
|
door – full rotation |
|
|
||||
|
|
|
|
|
|
|
|
|
|
M |
rear clearance (incl. evaporator tray) |
|
|
|
|
|
|
|
|
30 |
30 |
30 |
30 |
|
||
|
N |
vent |
|
|
|
|
|
|
|
|
50 |
50 |
50 |
50 |
|
||
|
|
|
|
|
|
|
|
|
|
|
|
|
|
|
|
|
|
12Installation instructions
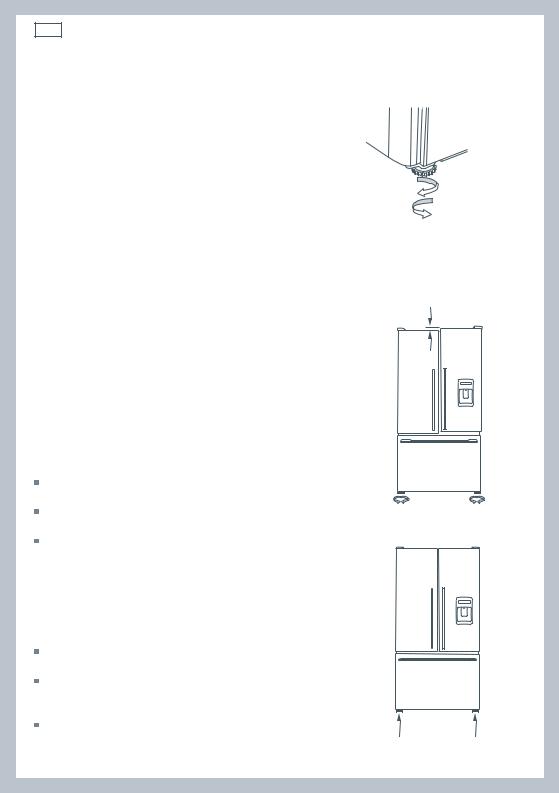
4.Installation
Your Fisher & Paykel Active Smart™ refrigerator is fitted with front and rear rollers, designed for
moving the product in the forwards and backwards direction.
Avoid moving the product in a sideways direction |
Raise the front of |
|
the refrigerator |
||
as this may damage the rollers or the floor covering/ |
||
Lower the front |
||
surface. |
of the refrigerator |
|
A Your refrigerator will arrive with the front feet |
Fig.10 Refrigerator feet |
|
wound up making moving the product into its final |
|
|
location a simple task. |
|
BRoll the refrigerator into its final position making
sure there is the correct air gap between the product and surrounding cabinetry. See minimum
clearance in cabinetry dimensions table (refer to page 11).
(RF610A, RF540A, RF201A only)
CAdjust the front feet down until the refrigerator is leaning backward with the front approximately 10 mm higher than the back. This will ensure a good door closing action. (Refer to Fig.10).
D Aligning your refrigerator with cabinetry. |
|
Align the sides of the refrigerator with the cabinetry by |
|
adjusting the hinge side front foot. |
|
Adjust the handle side foot until it touches the floor and |
Fig.11 Uneven door alignment |
takes a small amount of weight. |
|
Once the refrigerator is in place and aligned with |
|
cupboards/alcove push gently on the front top and check if |
|
the product is rocking or stable. |
|
5. Levelling of refrigerator door (RF610A, RF540A, RF201A only)
For uneven surfaces, front feet can be used to align the 2
doors.
If left hand door is too low, then unscrew the left hand foot to lift up the cabinet until the two doors top edges are aligned.
If right hand door is higher, then process the same way with right hand foot.
Fig.12 Even door alignment
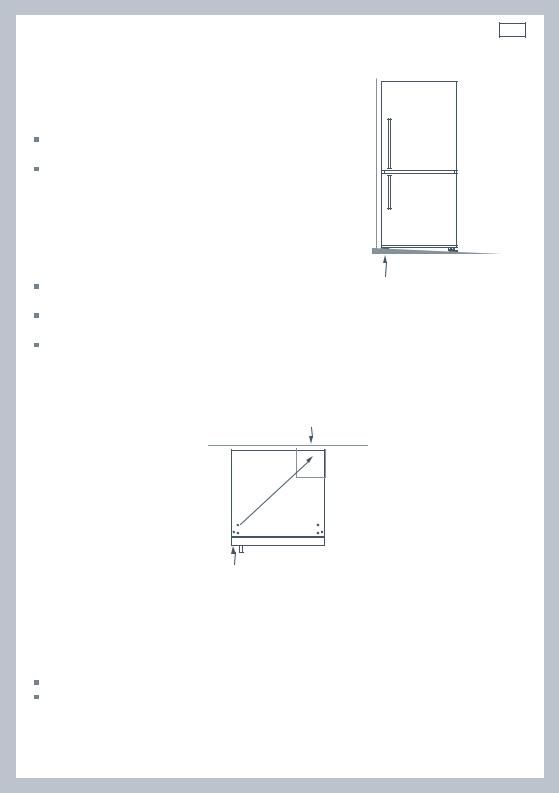
Installation instructions 13
6. What to do if your product is unstable
EGently push the refrigerator back until the rear rollers contact floor.
Measure the gap under the front foot, which has come off the floor.
Obtain some solid packing material (hardwood, plastic etc) which fits firmly into the gap under the foot.
Note: Do not use metallic materials that may corrode and stain or damage floor coverings.
FWind both front feet up and roll the product out of position.
Place the packing material in the location diagonally opposite the front roller that lifts off the floor.
Make sure the packing material stays in place when the product is pushed back into position.
Ideally, the packing material is large enough to rest against the back wall so as to prevent it moving when the cabinet is pushed into position.
Example only
Un-level floor
This foot lifts off the floor when top front is gently pushed back
Fig 13.Unstable refrigerator
Packing material goes under rear roller diagonally opposite front foot that lifts
Wall behind refrigerator
If this foot lifts off the floor when pushing gently on the top front of the refrigerator
Fig.14 Stabilizing your refrigerator
GRoll the refrigerator back into position and adjust front feet as per step D. (Check alignment and door closing action are satisfactory).
Make small adjustments to front feet where necessary.
Check that the product is stable (all 4 feet are on the floor). If not return to step E and repeat steps F and G.

14 Installation instructions
Before placing food in the fresh food or freezer compartments
Remove all packaging. Ensure that all transit clips are removed from the refrigerator. These are small rubber stops located at the back of the shelves.
Allow the refrigerator and freezer to run empty for 2 – 3 hours to allow each compartment to cool to the appropriate temperature.
Clean the inside of the appliance with warm water and a little liquid detergent to remove manufacturing and transportation dust.
The appliance may have an odour on its initial operation, but this will go when the refrigerator and freezer have cooled sufficiently.
Energy efficiency
Do not cover your appliances with any material that will prevent air from flowing around the cabinet sides.
Do not leave the door open for any longer than is necessary.
Allow good clearances in front of the air ducts within the cabinet for maximum cold air distribution.
Moving or storing your refrigerator
If your refrigerator or freezer is turned off for any reason, wait 10 minutes before turning it back on. This will allow the refrigeration system pressures to equalise before restarting.
Moving your refrigerator
Turn off the appliance and unplug from the power point. Remove all food. Turn the adjustable feet to the right as far as they will turn (refer to page 12).
Ease the refrigerator out of its position. Tuck the power cord away and tape the doors closed. Tape the shelves in place. If the cabinet needs to be placed at an angle or laid down, carefully lay it on its side (the right hand side when viewed from the front).
Relocate and install. If the appliance has been left on its side for any length of time, leave it standing upright for at least 10 minutes before turning on.
Storing your refrigerator or freezer
When storing your cleaned appliance, leave the door(s) open. This allows air to circulate and prevents the build up of bacteria and moulds.
Before using again, clean well using a mixture of warm water and baking soda (add 1 teaspoon of baking soda to each 500 ml of water). Rinse with clean water.
Holiday time
We recommend you leave your refrigerator or freezer operating while you are on holiday.
 Loading...