


Installation instructions and User guide
Dishwasher
DW60 ‘classic range’ models
NZ AU SG
Contents |
|
1 |
|
|
|
Safety and warnings |
2 |
|
Installation instructions |
4 |
|
Introducing your dishwasher |
8 |
|
Using your dishwasher |
9 |
|
Wash programme chart |
12 |
|
Caring for your dinnerware |
14 |
|
Dishwasher standards test |
15 |
|
Loading |
16 |
|
Detergent |
18 |
|
Rinse aid |
19 |
|
Care and cleaning |
20 |
|
Fault codes |
22 |
|
Troubleshooting |
23 |
|
Warranty and service |
26 |
|
Important!
SAVE THESE INSTRUCTIONS
The models shown in this user guide may not be available in all markets and are subject to change at any time. For current details about model and specification availability in your country, please go to our website www.fisherpaykel.com or contact your local Fisher & Paykel dealer.

2 Safety and warnings
Important safety precautions
For your safety, follow basic precautions when using your dishwasher, including the following:
Please read all instructions before operating your dishwasher.
The information in this user guide must be followed to minimise the risk of fire or explosion, or to prevent property damage, personal injury or loss of life.
Operational
Use the dishwasher only for its intended function as described in this user guide.
Dishwasher detergents are alkaline. They can be dangerous if swallowed. Avoid contact with skin and eyes, and keep children and infirm persons away from the dishwasher when the door is open. Use only detergents or rinse aid recommended for use in a domestic dishwasher and keep them out of reach of children. Check that the detergent dispenser is empty after the completion of each wash programme.
When loading items to be washed, place sharp items where they are not likely to damage the dishwasher and load sharp knives with the handles up to reduce the risk of cut type injuries. Do not tamper with the controls of your dishwasher.
Do not abuse, sit on, or stand on the door or dish rack of your dishwasher. Do not place any heavy objects on the door when it is open. The dishwasher could tip forward.
To reduce the risk of injury, do not allow children to play in or on the dishwasher.
Under certain conditions hydrogen gas may be produced in a hot water heater system that has not been used for two weeks or more. HYDROGEN GAS IS EXPLOSIVE. If the hot water system has not been used for such a period, then before using the dishwasher, turn on all hot water taps and let the water flow from each for several minutes. This will release any accumulated hydrogen gas. As hydrogen gas is flammable, do not smoke or use an open flame during this time.
Remove the door to the washing compartment when removing an old dishwasher from service or discarding it.
Open the door very carefully if the dishwasher is in operation. There is a risk of being sprayed with hot water. Do not open the door fully until the spray arm has stopped rotating.
The door should not be left in the open position as this could present a tripping hazard.
When disconnecting the dishwasher pull by the plug rather than the cord or junction of cord to avoid damage.
This dishwasher is not intended for use by young children or infirm persons unless they have been adequately supervised by a responsible person to ensure that they can use the dishwasher safely. Young children should be supervised to ensure that they do not play with the dishwasher.
The water inside the dishwasher is not suitable for drinking.
This dishwasher is designed for washing normal household utensils. Items that are contaminated by petrol, paint, steel or iron debris, or corrosive, acidic or alkaline chemicals are not to be washed in this dishwasher.
If the dishwasher is not being used for long periods of time, turn the electricity and water supply to the dishwasher off.

Safety and warnings 3
Installation
This dishwasher must be installed and positioned in accordance with the ‘Installation instructions’ before it is used.
Installation and service should be performed by a qualified technician.
If the power supply cord is damaged, it must be replaced by the manufacturer or Authorised Service Centre or a similarly qualified person in order to avoid a hazard.
Ensure the dishwasher is placed between cabinetry. Failure to do so may result in an unstable product, which may cause damage or injury.
Do not operate this dishwasher if it is damaged, malfunctioning, partially disassembled or has missing or broken parts, including a damaged power supply cord or plug.
Do not store or use petrol or other flammable vapours and liquids in the vicinity of the dishwasher.
Connect to a properly rated, protected and sized power supply circuit to avoid electrical overload. Make sure that the power supply cord is positioned where it will not be stepped on, tripped over, or otherwise subjected to damage or stress.
Do not install or store the dishwasher where it will be exposed to temperatures below freezing or exposed to the weather.
Do not use an extension cord or portable electrical outlet device (eg multi-socket outlet box) to connect the dishwasher to the power supply.
Maintenance
Do not repair or replace any part of the dishwasher or attempt any servicing unless specifically recommended in this user guide. We recommend that you call a Fisher & Paykel Authorised Service Agent.
Keep the floor around your dishwasher clean and dry to reduce the possibility of slipping. Keep the area around and underneath your dishwasher free from the accumulation of combustible materials, such as lint, paper, rags and chemicals.
When cleaning the underside of the filter, take care on the sharp outer edge to avoid the risk of cut type injuries.
If the dishwasher is not operating properly or maintenance must be performed, disconnect the dishwasher from the power supply.

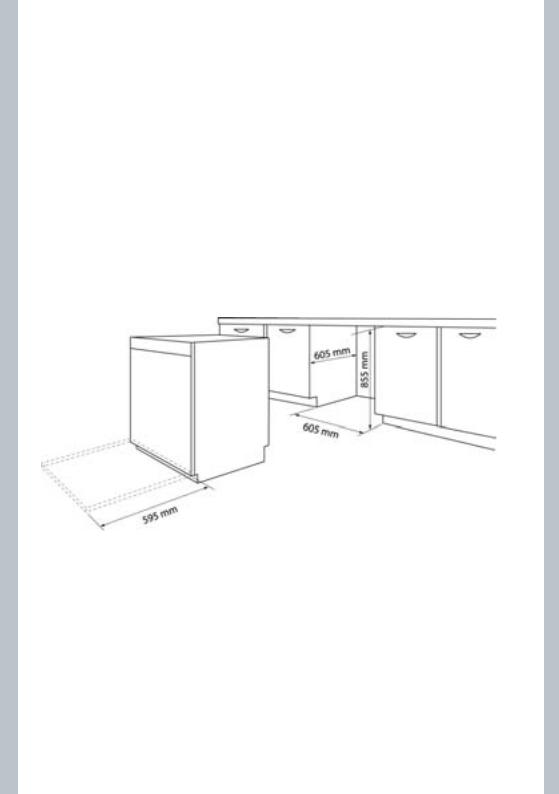
4 Installation instructions
Before you start
These instructions are intended as a guide only. It is the responsibility of the plumber and electrician to ensure that each installation complies with the Government and local government by-laws.
Check packaging and dishwasher immediately for signs of transport damage. If the appliance is damaged, do not put into use but contact your Fisher & Paykel Authorised Service Centre or dealer.
The dishwasher must not be connected to the electrical supply while installation is being carried out. Ensure all domestic wiring is properly earthed.
Never lift from the door handle.
Do not lift from the decorative panel on the front of the dishwasher. Always be careful with the hoses and the power cord at the back of the dishwasher. Careful handling will prevent damage and malfunction from squashing, kinking or cuts.
The dishwasher should not be connected to a hot water system where the temperature exceeds 60ºC, or where there is no temperature control, eg wetback system unless the system is fitted with a suitable tempering valve.
The dishwasher must not be connected to an under sink high pressure “push through” type hot water system, as damage to the system will result.
Ensure the bare wood surrounding the dishwasher is sealed with an oil-based paint or moistureproof polyurethane to prevent possible steam damage.
While installing a dishwasher, check the drain hose is not restricted or kinked.
Levelling
Before sliding the dishwasher into position, adjust the feet to ensure that the dishwasher is level at the required height. Check that the door opens and closes freely without resistance to adjacent cabinetry. If necessary adjust the levelling feet slightly. The dishwasher should not be inclined more than 2º. If the dishwasher is level it will help to ensure optimum performance.

|
|
|
Installation instructions |
|
|
5 |
|
|
|
|
Plumbing
Drainage
The recommended method of installation is shown in diagrams 1,2 and 3. The diagrams are designed to eliminate problems that occur with combined sink – dishwasher waste systems.
The standpipe must have a minimum diameter of 38 mm and stand 750mm above the floor. A drain hose support is provided to hold the drain hose in place in the standpipe (See diagrams 1 and 2). It is not recommended that the drain hose or drain pipe be connected directly to a waste disposal unit (see diagram 2).
When connecting the drain hose to a sink trap with a drain hose spigot, it is important that the drain hose is supported to the height of the bench (see diagram 3). Ensure the drain spigot has a minimum hole size of 15 mm and that it has been drilled out.
*
|
|
|
Switched power socket |
Hose supplied |
|
Diagram 1: Dishwasher
*
|
|
|
Switched power socket |
Hose supplied |
|
Diagram 2: Dishwasher & waste disposal unit
 Waste
Waste
 Water
Water
 Waste
Waste
200 mm MIN
Waste disposal unit
 Waste
Waste
 Water
Water
 Waste
Waste
200 mm MIN
*Standpipe Ø38 mm
750 mm MIN above floor
*Standpipe Ø38 mm
750 mm MIN above floor
note:
Connection of drain hose direct to the waste disposal unit is NOT recommended.
Vent
 Waste
Waste
Hose supplied |
Water |
200 mm MIN
Switched power socket
Diagram 3: Dishwasher using sink trap with dishwasher drain hose spigot

6 Installation instructions
Water inlet connections
The dishwashers all have a single valve water connections. We recommend a cold water connection to give the best wash performance and energy efficiency.
Important!
The appliance should be connected to the water main using a new hose set. Old hose sets should not be used. If the length of the water inlet hose is not long enough to make a proper connection, it must be replaced. This hose can be purchased from a Fisher & Paykel dealer or authorised service centre.
Water supply
The dishwasher inlet hose must be connected to an accessible water tap. The water supply to the dishwasher should be through a 3/4” bsp connector, making sure it is tightly fastened. The hose coupling must be tightened a further half turn after seal contact
If the water pipes have not been used for an extended period of time, let the water run to make sure that the water is clear and free of impurities. If this precaution is not taken, there is a risk the water inlet will get blocked and damage the appliance.
Anti-flood protection
This dishwasher has an anti-flood protection which will stop the water flowing in the event of a damaged hose or a leak within the machine.
Positioning your dishwasher
Position the appliance in the desired location. The inlet water and drain hoses can be positioned to the right or left to assist proper installation.
Built under or built in appliances should be installed under a continuous surface, which is attached to adjacent cupboards, in order to ensure that the appliance is stable.
The dishwasher may be installed with the top panel removed.
Electrical Connection
Ensure the voltage and frequency values for the current in your home corresponds to those on the rating plate (located on the stainless steel inner door of your dishwasher), and that the electrical system is correct for the maximum voltage on the rating plate. Insert the plug into an
electrical socket which is earthed properly (the earthing of the appliance is a safety requirement mandated by law).
|
|
|
Installation instructions |
|
|
7 |
|
|
|
|
If the electrical socket to which the appliance must be connected is not appropriate for the plug, replace the whole cable, rather than using adaptors as they could cause overheating and burns.
Important!
The dishwasher plug must be accessible even when the appliance is installed as a built-in unit so that maintenance can be done safely.
If a fault occurs
If the dishwasher malfunctions, turn off the water supply to the appliance and disconnect the plug from the wall socket. Refer to the Troubleshooting section. If you cannot solve the problem, contact a Fisher & Paykel Authorised Service Centre.
Specifications
Model details
Model |
Colour |
DW60CSW1 / DW60CDW2 |
White |
DW60CSX1 / DW60CDX2 |
Stainless steel |
Technical Data |
|
Width |
600 mm |
Depth |
600 mm |
Height |
850 mm |
Capacity |
12 standard place settings |
Mains water pressure |
0.03 – 1 MPa (4.35 - 145 psi) |
Power voltage |
220-240 V - 50 Hz |
Maximum current intensity |
10 A |
Total absorbed power |
1950 W |
|
|
|
|
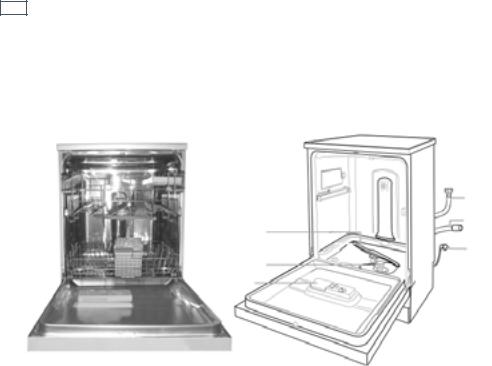
8 Introducing your dishwasher
Dishwasher interior
a |
|
|
|
|
|
g |
|
|
|
|
|
||
|
|
|
|
|
|
|
b |
|
|
|
|
|
h |
|
|
|
|
|
||
|
|
|
|
|
j |
d |
c |
|
|
|
|
i |
|
|
|
|
|
|
||
|
|
|
|
|
e |
|
|
|
|
|
|
||
|
|
|
|
|
|
f |
Fig. 1 Dishwasher interior
a Upper rack
b Top spray arm
cLower rack
d Bottom spray arm e Washing filter
f Detergent and rinse aid dispenser g Water inlet hose
h Drain hose
i Power supply cord
jCutlery basket
 Loading...