


Indoor/Outdoor Analog Wired Cameras with 7” LCD Monitor and Built-In DVR
Model HS-4700-S
USER'S MANUAL

©2010 Lehigh Consumer Products, LLC
All rights reserved. Distributed by Lehigh Consumer Products, LLC, Macungie, PA 18062. Due to continuing product development, the product inside the packaging may look slightly different than the one on the package.
Lehigh Consumer Products, LLC is a subsidiary of Jarden Corporation (NYSE: JAH). To obtain warranty service, contact the Consumer Affairs Division at 1-800-323-9005, Monday through Friday, 7:30 a.m. - 5:00 p.m., Central Standard Time.
Made in China
M08-0244-000

Table of Contents
Safety ............................................................................................................................... |
1 |
Safety Precautions ........................................................................................................................... |
1 |
FCC Compliance ............................................................................................................................. |
1 |
Disposal ........................................................................................................................................... |
2 |
Getting to Know Your HS-4700-S System ..................................................................... |
3 |
Check Package Contents.................................................................................................................. |
3 |
About the DVR ................................................................................................................................ |
4 |
Front Panel Controls ................................................................................................................ |
4 |
Rear Panel Interface................................................................................................................. |
5 |
About the Remote Control............................................................................................................... |
5 |
About the Cameras .......................................................................................................................... |
6 |
Setting Up Your HS-4700-S System............................................................................... |
7 |
Installing and Connecting the Cameras ........................................................................................... |
7 |
Connecting the DVR........................................................................................................................ |
9 |
Operating Menus........................................................................................................... |
10 |
Start Up.......................................................................................................................................... |
10 |
Main Menu .................................................................................................................................... |
10 |
HDD – Hard Disk Management .................................................................................................... |
11 |
Record Menu ................................................................................................................................. |
12 |
Record Parameters (RecPara) ................................................................................................ |
13 |
Schedule Record .................................................................................................................... |
14 |
Manual Record....................................................................................................................... |
15 |
Playback and Search ...................................................................................................................... |
16 |
Search Results........................................................................................................................ |
17 |
Playback................................................................................................................................. |
18 |
Motion Menu ................................................................................................................................. |
19 |
Motion Related ...................................................................................................................... |
19 |
Motion Schedule .................................................................................................................... |
20 |
PTZ (option) .................................................................................................................................. |
21 |
PTZ Control (option) ..................................................................................................................... |
22 |
Search Logs ................................................................................................................................... |
23 |
System Menu ................................................................................................................................. |
24 |
Configure ............................................................................................................................... |
24 |
Modify Password ................................................................................................................... |
25 |
Date & Time........................................................................................................................... |
26 |
Default ................................................................................................................................... |
27 |
Reset....................................................................................................................................... |
27 |
System Variation .................................................................................................................... |
28 |

|
Table of Contents |
|
Model HS-4700-S User's Manual |
DVR Client...................................................................................................................... |
29 |
Installation ..................................................................................................................................... |
29 |
Record Searching........................................................................................................................... |
29 |
Playback Control.................................................................................................................... |
30 |
Update............................................................................................................................................ |
31 |
Input the Upgrade File ........................................................................................................... |
31 |
System Upgrades ................................................................................................................... |
32 |
Delete System Files from HDD..................................................................................................... |
32 |
Select Backup File ......................................................................................................................... |
33 |
Troubleshooting ............................................................................................................ |
34 |
Technical Information ................................................................................................... |
36 |
General........................................................................................................................................... |
36 |
Camera........................................................................................................................................... |
36 |
DVR and Video.............................................................................................................................. |
37 |
Warranty......................................................................................................................... |
38 |
Product Limited Warranty.............................................................................................................. |
38 |
Warranty Exclusions ...................................................................................................................... |
38 |
Obtaining Service .......................................................................................................................... |
39 |

Safety
SAFETY PRECAUTIONS
Do not drop, puncture, or disassemble the camera or monitor.
Never tug on the power adapter. Use the plug to remove it from the wall.
Do not expose the camera or monitor to high temperatures.
Use the device with care. Avoid pressing hard on the camera body.
Do not crush or damage the power cable.
FCC COMPLIANCE
This device complies with Part 15 of the FCC Rules. Operation is subjected to the following two conditions: (1) this device may cause harmful interference, and (2) this device must accept any interference received, including interference that may cause undesired operation.
This equipment has been tested and found to comply with limits for a Class B digital device, pursuant to Part 15 of the FCC Rules. These limits are designed to provide reasonable protection against harmful interference in residential installations. This equipment generates, uses, and can radiate radio frequency energy and, if not installed and used in accordance with the instructions, may cause harmful interference to radio communications.
However, there is no guarantee that interference will not occur with a particular installation. If this equipment does cause interference to radio or television equipment reception, which can be determined by turning the equipment off and on, the user is encouraged to try to correct the interference by the following measures:
Reorient or relocate the receiving antenna.
Increase the separation between the equipment and the receiver.
Connect the equipment into an outlet on a circuit different from that to which the received is connected.
Consult the dealer or an experience radio/TV technician for help.
Notice: Changes or modifications to the product could void the user's authority to operate the product.
1

Safety
Model HS-4700-S User's Manual
DISPOSAL
These symbols indicate that it is prohibited to dispose of these batteries in the household waste. You can take spent batteries that can no longer be charged to the designated collection points in your community.
2

Getting to Know
Your HS-4700-S System
Congratulations on purchasing your First Alert Security Camera product. First Alert has been helping families and businesses stay safe for over 50 years. By having a First Alert Security Camera, you’re taking the first step in protecting your home or business from damage or theft. We’re watching, even when you’re not.
CHECK PACKAGE CONTENTS
After unpacking the carton, check the contents for damage. Contact your supplier or dealer immediately if any part is missing or damaged. Your Model HS-4700-S security system consists of:
7” LCD monitor with 320GB MJPEG DVR system (1)
Wired indoor/outdoor cameras (4)
Camera stands (4)
Mounting kits (4)
60 ft BNC cable (4)
Remote control (1)
Mouse (1)
USB cable (1)
Power supply (1)
Installation CD (1)
User's manual (1)
3

Getting to Know Your System
Model HS-4700-S User's Manual
ABOUT THE DVR
The Model HS-4700-S security system has a 7” LCD monitor with built-in 320GB MJPEG DVR. The features of the front and rear panels follow.
FRONT PANEL CONTROLS
1
2 |
4 |
3 |
6 |
5 |
7 |
8
9
14
|
10 11 |
12 13 |
|
|
1 |
Channel switch buttons (4) |
8 |
Arrow buttons (4) |
|
2 |
Four-screen display button |
9 |
ENTER button |
|
3 |
Manual record button |
|
10 |
Power indicator |
4 |
Menu button |
|
11 |
Run indicator |
5 |
PTZ control button* |
|
12 |
Record status indicator |
6 |
Play button |
|
13 |
USB status indicator |
7 |
ESC button |
|
14 |
LCD power switch |
* Cameras supplied with HS-4700-S system are not equipped with PTZ feature.
4
Getting to Know Your System
Model HS-4700-S User's Manual
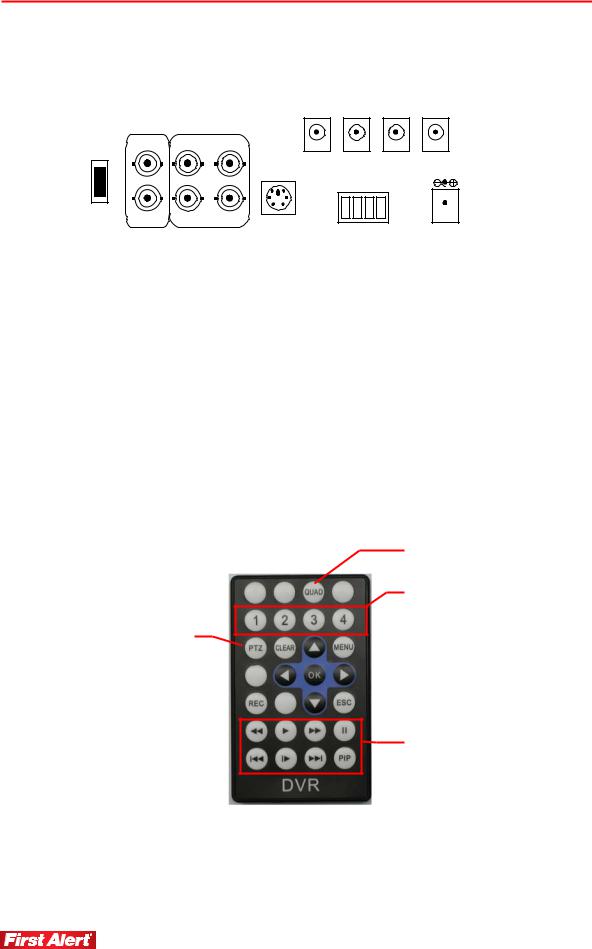
REAR PANEL INTERFACE
VOUT-1 |
VIN-2 |
VIN-4 |
|
|
|
U |
|
|
DC1 |
DC2 |
DC3 |
S |
|
|
|
|
|
B |
|
|
|
|
|
P |
|
|
|
|
|
C |
|
|
|
|
|
VOUT-2 |
VIN-1 |
VIN-3 |
PS2 |
485R+ -485T 485T+ |
-485R |
|
|
|
|
DC
DC4 OUT

 GND DC12V
USB PC |
USB connection to PC |
PS2 |
Serial port to PC for mouse |
485T / 485R |
PTZ connector* |
VOUT1, 2 |
Video output connector |
VIN-1, 2, 3, 4 |
Camera video input |
DC1, 2, 3, 4 |
DC 12V output power for cameras |
DC 12V |
DC input power to DVR system |
ABOUT THE REMOTE CONTROL
PTZ menu select*
clear  arrow select buttons (4)
record 
quad-screen select
camera select (1–4)
 menu select
 enter (select)
 escape
video play controls
 picture-in-picture (separate from video play)
* Cameras supplied with HS-4700-S system are not equipped with PTZ feature.
5

Getting to Know Your System
Model HS-4700-S User's Manual
ABOUT THE CAMERAS
The Model HS-4700-S security system includes four wired indoor/outdoor color CMOS security cameras, camera stands, mounting kits, and 60 feet of BNC cables.
IR LEDs
camera lens 
 camera stand
mounting bracket 
6
Setting Up
Your HS-4700-S System
This chapter provides instructions on installing and connecting the cameras supplied with the system and connecting the DVR.
INSTALLING AND CONNECTING THE CAMERAS
Here are some general safety and installation tips when installing the cameras:
Do not attempt to open a camera. There are no user-serviceable parts inside. Refer servicing to qualified service personnel.
When using power tools wear safety goggles. Before drilling holes through a wall or ceiling, check for hidden electricity cables and water pipes.
When installing a camera on an external wall, pass the power cable through the wall as close as possible to the camera to reduce the chance of tampering. After drilling any hole though an external wall for cable, make sure the hole is sealed around the cable.
1Select the position for the camera and install a mounting bracket (supplied).
Screws and anchors are supplied. Use an appropriate screw type for the mounting surface.
2Screw the camera onto the bracket. Tighten the lock nut to secure the camera on the bracket.
lock nut
thumb bolt 
 camera mounting bracket
3Adjust camera to the proper view angle. Make sure the lens is upright relative to your subject. Tighten the thumb bolt.
7
Setting Up Your System
Model HS-4700-S User's Manual
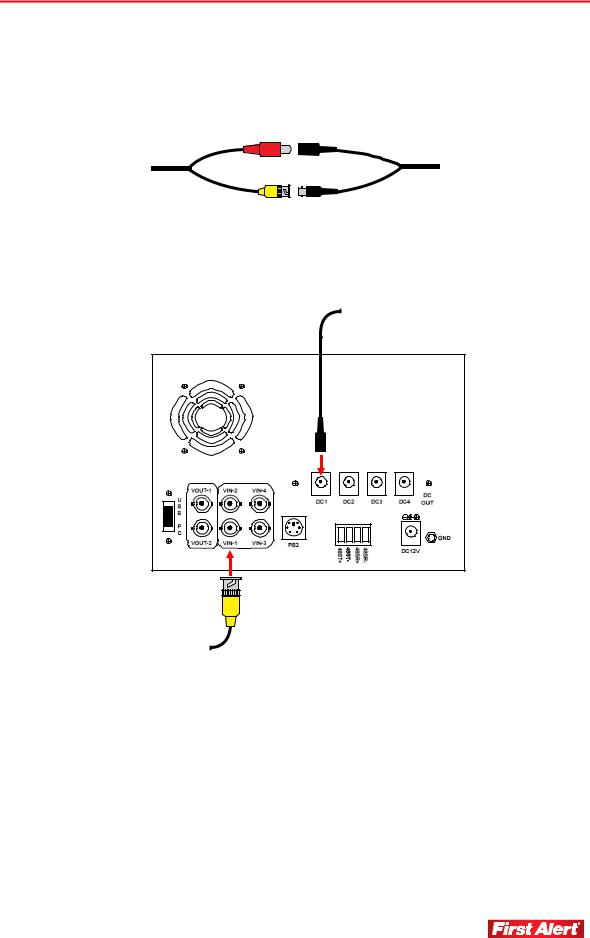
4Connect the camera power and video connectors to the corresponding connectors on the BNC cable (supplied).
The connectors on the cables are not weather resistant and should be sheltered from moisture, rain and sunlight.
power supply
BNC cable
video cable
5Connect the power cable from the camera to the DC1 connector on the rear of the DVR. Connect the video cable to the VIN1 connector. Repeat connection for all four cameras.
to camera power
to camera video
8
Setting Up Your System
Model HS-4700-S User's Manual
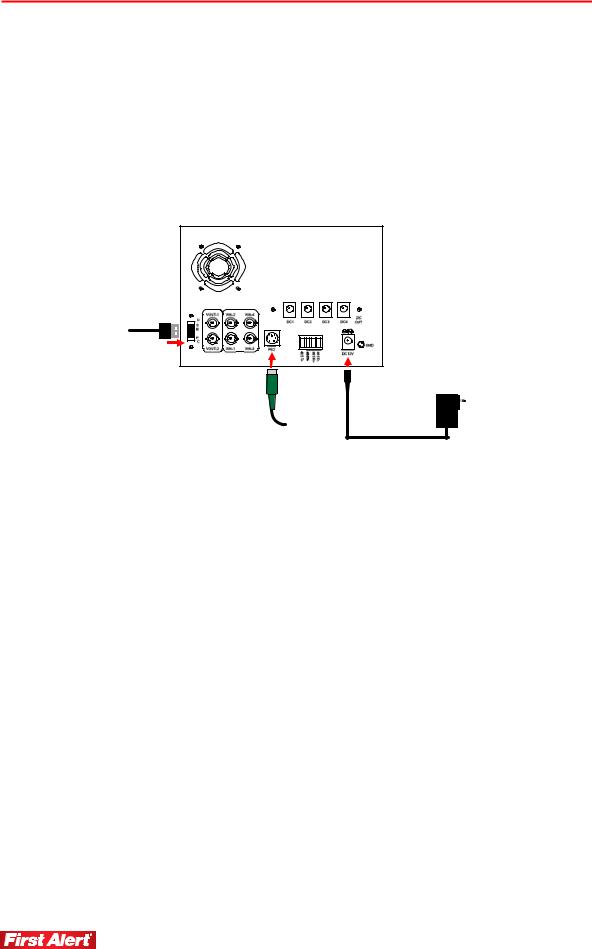
CONNECTING THE DVR
1Connect the mouse to the PS2 port on the DVR prior to plugging in DVR power supply.
2Connect the cable of the power supply adapter to the DC 12V connector on the DVR.
3Plug the power supply into an electrical outlet. The DVR automatically powers on when plugged in.
to computer USB port
to electrical power receptacle
to mouse
4(optional) Attach a ground wire from the GND connector on the DVR to an appropriate ground (e.g., mounting screw on the receptacle cover plate).
5Press the LCD Power button on the front of the DVR to turn on display. This button only controls the display, not the DVR unit.
The POWER indicator light on the front panel will light. When system initialization (boot up) is complete, the image from each active camera will display on the quad-screen monitor. The RUN indicator will flash when the system is operating in normal mode.
Note: Be sure to connect all components to the monitor prior to plugging in unit.
6(optional) The DVR can be connected to an external display (i.e. television or computer monitor) to view live video feed via the Video Out connection. Though the DVR screen is programmed to shut off after 30 minutes to protect the display from overheating, the video feed will continue without interruption if connected to an external display.
9
 Loading...