

Fire Sense 60803 Owner's Manual

Owner’s Manual
Model: 60803
READ & SAVE these instructions
Carefully read and review before attempting to
assemble, install, operate, or maintain this product.
Observe all safety instructions and information.
FAILURE TO FOLLOW WARNINGS AND
OPERATIONAL INSTRUCTIONS
CONTAINED IN THIS MANUAL CAN
RESULT IN SEVERE PROPERTY DAMAGE
AND OR PERSONAL INJURY.
***For Residential Use Only***
***Important Notice***
Do not return to place of purchase!!
Please contact our Toll Free Hotline at
1-866-985-7877 for customer
service and warranty issues.
SAVE THESE INSTRUCTIONS
Distributed by:
W e ll T raveled Living
Amelia Island, FL 32034
Web: www.wtliving.com
Email: cservice@welltraveled.net
Safety Guidelines
Read this manual carefully to become knowledgeable about your heater and how to use it properly.
To help recognize this information, observe the following symbols.
Indicates a potentially hazardous situation which, if
not avoided, WILL result in serious injury or death.
Indicates a potentially hazardous situation, if not
avoided, COULD result in serious injury or death.
Indicates a potentially hazardous situation which, if
not avoided, MAY cause moderate injury or damage to
Indicates important information that if not followed,
may cause damage to the equipment.
the equipment.
1
.
Risk of Fire. There is always a risk of fire when working with a heater. Keep it away from
flammable liquids and any material that could easily catch fire.
2.
Risk of Fire. If the heater falls, this unit might start a fire.
3.
Hot or Burn Hazard. This unit may be hot at any time during its u se es pecially around the head
and heating element.
4.
Electrical Hazard. Disconnect all electric pow er before wor king on the unit. There i s a chance
of electric shock if you work on this unit with it still plugged into the wall.
5.
Electric Shock. This unit uses electricity to operate. Do not use this heat er around water or if the
cord has been damaged.
• Improper treatment of the heater can damage it and also shorten its life span.
• To prevent electrical shock follow electr ica l plug requ ire ments on page 11 of this manual.
2
This appliance MUST be grounded.
* When using outdoors, we recommend using a certified GFI (Ground Fault Interrupt)
outlet to protect against electrical shock.
* All installations must be in accordance with I.E.E. safety regulations or the equivalent.
* Avoid the use of an extension cord with this appliance.
* Do not place any objects such as furniture, papers, clothing or curtains closer than 3 feet
to the front and sides of the heater.
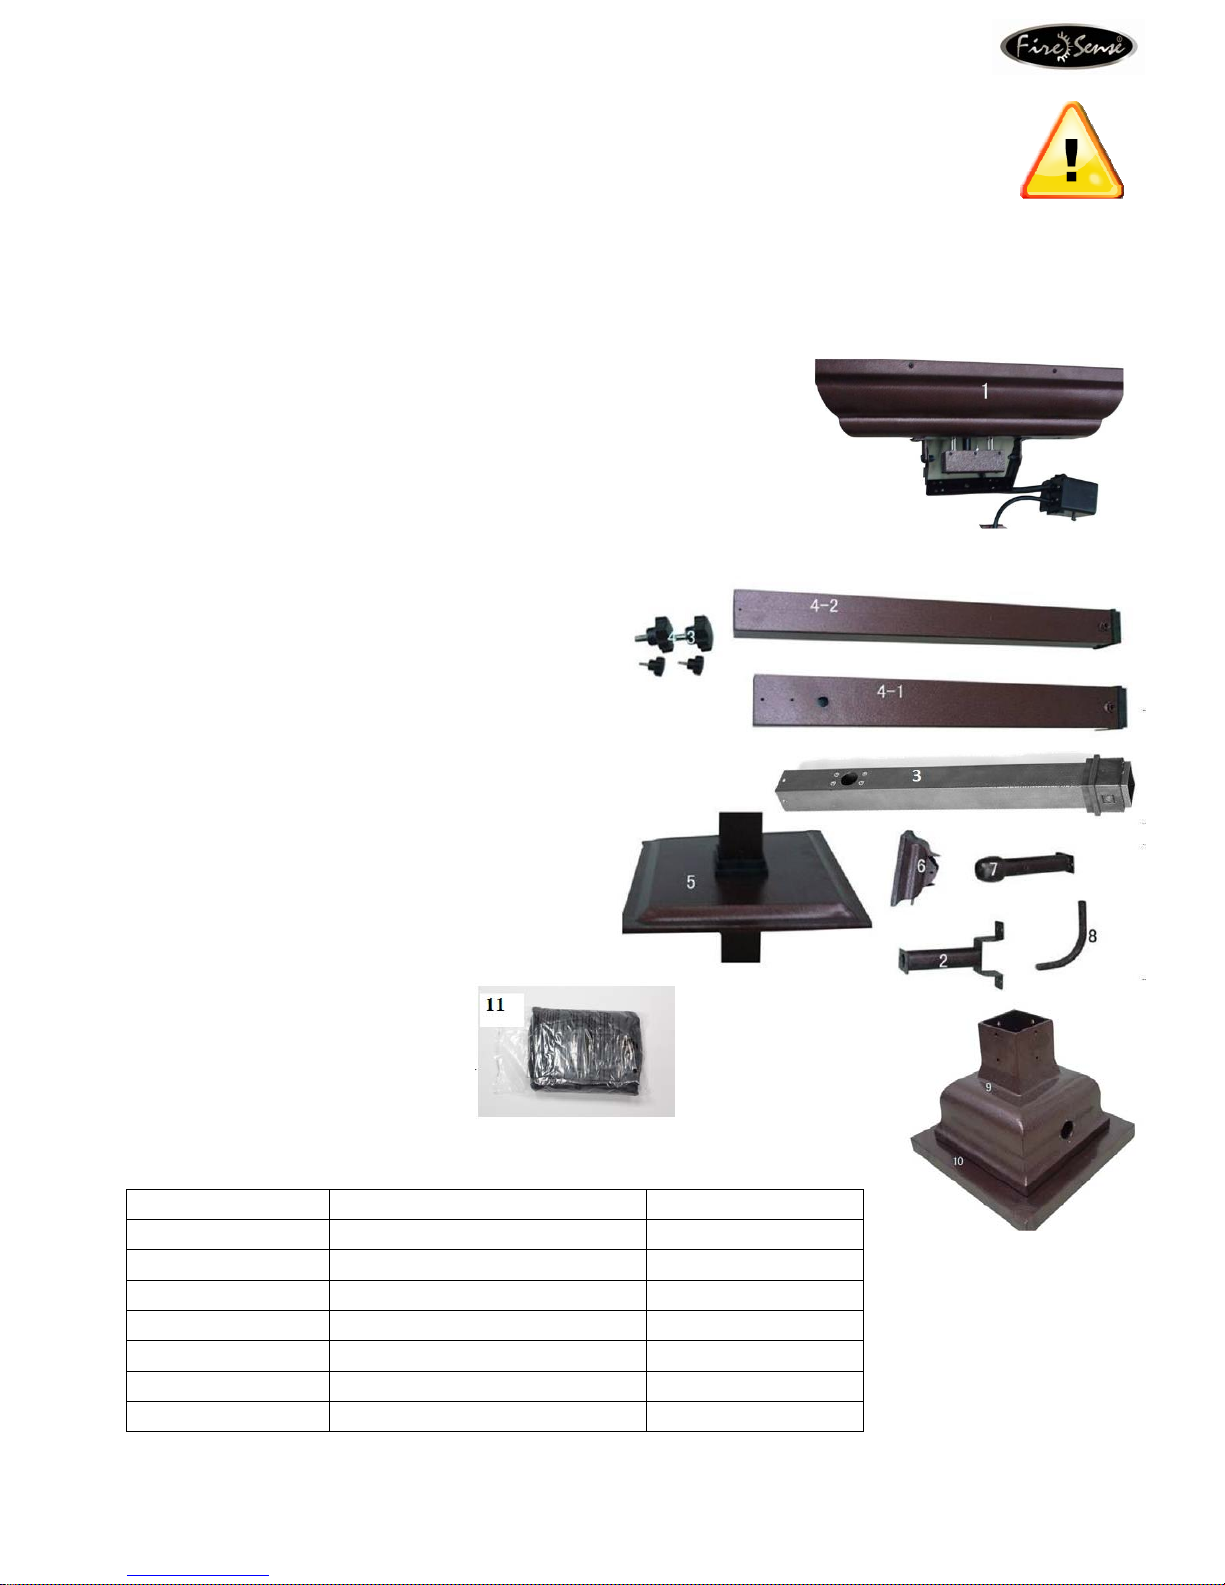
PARTS LIST
1- IR Head unit w/Protective Shield with:
* Tilt Switch (safety cut off)
* On/Off Switch (PULL for ON, PUSH for OFF)
* Angle Adjustment Bar
* 1500 Watt quartz halogen bulb
* Swivel Bracket
* 15.5 foot, 14 AWG grounded electrical cord
2 – Mounting Bracket – attaches head unit to
telescopic pole
3 – Upper support tube section for telescopic body
4 – Telescopic Body – includes 2 sections (4-1 and
4-2) with 2 easy release clamp collars (4-3)
to allow for easy adjustment
5 – Adjustable table
6 – Top cover finishing piece
7 – Rounded end bracket
8 – L-shaped bracket
9 – Support Collar for telescopic body
10 – Base assembly with wheel assembly
11 – Protective vinyl cover (for use ONLY when
heater has completely cooled)
ALSO INCLUDED (not pictured):
Hardware packet :
Letter Name Quantity
A
B
C
D
E
F
G
M6*12 Oval Head Screw 24 pieces
M4 Flat Washer 2 pieces
M4*10 Round Head Screw 3 pieces
M8*22 Hexagon Screw 4 pieces
M8 Flat Washer 4 pieces
M6*20 Oval Head Screw 2 pieces
M8*16 Hexagon Screw 3 pieces
3
CAUTION!

Important Instructions
1. Read all instructions before using this heater.
2. This heater is hot when in use. To avoid burns,
do not let bare skin touch hot surfaces. Keep
combustible materials, such as furniture,
pillows, bedding, papers cloths, and curtains at
least 3 feet (0.9m) from the front, sides and
rear of the heater.
3. DO NOT leave heater unattended. Extreme
caution is necessary when any heater is used
by, or near, children or disabled persons, and
whenever the heater is left operating and
unattended.
4. Always unplug heater when not in use.
5. Do not operate any heater with a damaged cord
or plug, if the heater malfunctions, or has been
dropped or damaged in any manner. Return
heater to authorized service facility for repairs.
6. Heater can be used indoors or outdoors.
Operate a minimum of 3 feet (0.9m) fr om
people or objects.
7. Never operate heater near water or where it
can be knocked over.
8. Do not run cord under carpeting. Do not cover
cord with throw rugs, runners, or similar
coverings. Arrange cord away from traffic area
and where it will not be tripped over.
9. To disconnect heater, switch to OFF position
(push in switch located on head unit) and then
remove plug from electrical outlet.
10. Connect to properly grounded outlets only.
11. Do not insert or allow foreign objects to enter
any ventilation or exhaust opening; doing so
may cause an electrical shock or fire, or may
damage the heater.
12. To prevent a possible fire, do not block air
intakes or exhaust in any manner. Do not use on
soft surfaces, like a bed, where openings may
become blocked.
13. A heater has hot and sparking parts inside. Do
not use it in areas where gasoline, paint, or
flammable liquids are used or stored.
14. Use this h eater only as des cribed i n this man ual.
Any other use not recommended by the
manufacturer may cause fire, electrical shock,
or injury to persons.
15. Avoid the use of an extension cord because the
extension cord may overheat and cause a risk
of fire. However, if you must use an extension
cord, use either a 12 gauge or 14 gauge wire
which is rated not less than 1900 watts. The
recommended length for a 14 gauge is 0-50
feet but if you must use a longer cord, use a 12
gauge NO LONGER than 100 feet.
16. This unit comes equipped with a Safety Tilt
Switch mechanism. Power will shut off
automatically should the unit be accidentally
knocked over or tilted past 15 degrees. To
reset, unplug the unit from wall outlet,
reposition on a flat, level surface and plug in
again.
17. SAVE THESE INSTRUCTIONS for future
reference.
4

Assembling Your Heater
Before beginning assembly, be sure to read and familiarize yourself with the overall assembly process and
instructions in this manual. It may be helpful to have someone assist you with the assembly. You will need the
following tools (NOT INCLUDED):
** #2 or #3 Philips Screwdriver (or standa rd slotted screwdriver)
** Adjustable Wrench
Make sure you complete assembly on a clean, level, preferably carpeted location. A flat piece of cardboard will also
work for assembly. Unpack and identify all components listed on page 3 of this manual and lay them out on the
carpeted floor or piece of cardboard and then follow the steps below:
STEP 1
Loosen and remove the top 2 Tapping screws on each side of the head unit (Part 1) and attach the angle adjustment
handle (included with Part 1) as shown in Figure 1.
Tighten the screws.
FIGURE 1
STEP 2
Using Mounting bracket (Part 2), thread entire electrical cord through the Mounting bracket as shown in Figure 2.
FIGURE 2
5
 Loading...