


F I A T F R E E M O N T
O W N E R H A N D B O O K

WHY CHOOSE
GENUINE PARTS
As we have conceived, designed and built your vehicle, we really know every little detail and component inside out. At our authorized dealerships, you will find technicians personally trained by us who can offer you quality and professional service for all types of servicing and maintenance.They are always on hand for periodic maintenance, seasonal services and for practical expert advice.
By using Genuine Parts, over time you will retain the features of reliability, comfort and performance, which are the very reasons you chose your new vehicle in the first place.
Always ask for Genuine Parts — these are the components that we use to build our automobiles and we recommend you use them too because they are the result of our constant commitment to the research and development of ever more innovative technology. For these reasons, put your trust in Genuine Parts: the only parts specially designed for your vehicle.
SAFETY: |
ENVIRONMENT: PARTICULATE SERVICING: |
COMFORT: SERVICING:AIR CONDITIONING: |
PERFORMANCE:SUSPENSION:WIPERS: |
ACCESSORIES: SPARK PLUGS: INJECTORS: |
BRAKE SYSTEM: |
AIR CONDITIONING: |
SUSPENSION:WIPERS: |
SPARK PLUGS: INJECTORS: BATTERIES: |
LUGGAGE RACKS:WHEELS |

HOW TO RECOGNISE
GENUINE PARTS
All our Genuine Parts undergo rigorous testing, both in design and build stages, by specialists who check the use of cutting-edge materials and test their reliability.
This guarantees performance and safety in the long term for both you and the passengers in your automobile.
Always insist on a Genuine Part and check that it has been used.

Dear Customer,
Thank you for choosing Fiat and congratulations on your choice of a Fiat Freemont.
We have written this handbook to help you get to know all your car and use it in the best possible way.
You should read it right through before taking to the road for the first time.
You will find information, tips and important warnings regarding the driving of your car to help you get the most from the technological features of your Fiat.
Carefully read the warnings and indications marked with the following symbols:
personal safety;
car safety;
environmental protection.
The enclosed warranty booklet lists the services that Fiat offers to its customers:
•the Warranty Certificate with terms and conditions for maintaining its validity
•the range of additional services available to Fiat customers.
Enjoy the read. Happy motoring!
This Owner Handbook describes all versions of the Fiat Freemont;
please consider only the information relevant to your version, engine and configuration.

KNOWING YOUR VEHICLE
INTRODUCTION
Congratulations on selecting your new FIAT vehicle. Be assured that it represents precision workmanship, distinctive styling, and high quality - all essentials that are traditional to our vehicles.
Before you start to drive this vehicle, read this Owner's Manual and all the supplements. Be sure you are familiar with all vehicle controls, particularly those used for braking, steering, and transmission shifting. Learn how your vehicle handles on different road surfaces. Your driving skills will improve with experience, but as in driving any vehicle, take it easy as you begin. Always observe local laws wherever you drive.
NOTE: After reviewing the owner information, it should be stored in the vehicle for convenient referencing and remain with the vehicle when sold.
Failure to operate this vehicle correctly may result in loss of control or a collision.
Operating this vehicle at excessive speeds or while intoxicated may result in loss of control, collision with other vehicles or objects, going off the road, or overturning; any of which may lead to serious injury or death. Also, failure to use seat belts subjects the driver and passengers to a greater risk of injury or death.
To keep your vehicle running at its best, have your vehicle serviced at recommended intervals by an authorized dealer who has the qualified personnel, special tools, and equipment to perform all service.
The manufacturer and its distributors are vitally interested in your complete satisfaction with this vehicle. If you encounter a service or warranty problem, which is not resolved to your satisfaction, discuss the matter with your dealer's management.
Your authorized dealer will be happy to assist you with any questions about your vehicle.
KNOWING YOUR VEHICLE
SAFETY
STARTING
AND
DRIVING
WARNING LIGHTS AND MESSAGES
IN AN EMERGENCY
SERVICING AND CARE
TECHNICAL SPECIFICATIONS
CONTENTS
1

KNOWING YOUR VEHICLE
SAFETY
STARTING
AND
DRIVING
WARNING LIGHTS AND MESSAGES
IN AN EMERGENCY
SERVICING AND CARE
TECHNICAL SPECIFICATIONS
CONTENTS
IMPORTANT NOTICE
ALL MATERIAL CONTAINED IN THIS PUBLICATION IS BASED ON THE LATEST INFORMATION AVAILABLE AT TIME OF PUBLICATION APPROVAL. THE RIGHT IS RESERVED TO PUBLISH REVISIONS AT ANY TIME.
This Owner's Manual has been prepared with the assistance of service and engineering specialists to acquaint you with the operation and maintenance of your new vehicle. It is supplemented by a Warranty Information Booklet and various customer-oriented documents. You are urged to read these publications carefully. Following the instructions and recommendations in this Owner's Manual will help assure safe and enjoyable operation of your vehicle.
After you have read the Owner’s Manual, it should be stored in the vehicle for convenient reference and remain with the vehicle when sold.
The manufacturer reserves the right to make changes in design and specifications, and/or to make additions to or improvements in its products without imposing any obligations upon itself to install them on products previously manufactured.
The Owner's Manual illustrates and describes the features that are standard or available as extra cost options. Therefore, some of the equipment and accessories in this publication may not appear on your vehicle.
NOTE: Be sure to read the Owner's Manual first before driving your vehicle and before attaching or installing parts/accessories or making other modifications to the vehicle.
In view of the many replacement parts and accessories from various manufacturers available on the market, the manufacturer cannot be certain that the driving safety of your vehicle will not be impaired by the attachment or installation of such parts. Even if such parts are officially-approved (for example, by a general operating permit for the part or by constructing the part in an officially approved design), or if an individual operating permit was issued for the vehicle after the attachment or installation of such parts, it cannot be implicitly assumed that the driving safety of your vehicle is unimpaired. Therefore, neither experts nor official agencies are liable. Therefore the manufacturer only assumes responsibility when parts, which are expressly authorized or recommended by the manufacturer, are attached or installed at an authorized dealer. The same applies when modifications to the original condition are subsequently made on the manufacturer's vehicles.
2

Your warranties do not cover any part that the manufacturer did not supply. Nor do they cover the cost of any repairs or adjustments that might be caused or needed because of the installation or use of nonmanufacturer parts, components, equipment, materials, or additives. Nor do your warranties cover the costs of repairing damage or conditions caused by any changes to your vehicle that do not comply with the manufacturers specifications.
Original parts and accessories and other products approved by the manufacturer, including qualified advice, are available at your authorized dealer.
When it comes to service, remember that your authorized dealer knows your vehicle best, has the factorytrained technicians and genuine parts, and is interested in your satisfaction.
Copyright © 2011 FIAT Automobiles S.p.A.
KNOWING YOUR VEHICLE
SAFETY
STARTING
AND
DRIVING
WARNING LIGHTS AND MESSAGES
IN AN EMERGENCY
SERVICING AND CARE
TECHNICAL SPECIFICATIONS
CONTENTS
3

KNOWING YOUR VEHICLE
SAFETY
STARTING
AND
DRIVING
WARNING LIGHTS AND MESSAGES
IN AN EMERGENCY
SERVICING AND CARE
TECHNICAL SPECIFICATIONS
CONTENTS
HOW TO USE THIS MANUAL
Consult the Table of Contents to determine which section contains the information you desire.
Since the specification of your vehicle depends on the items of equipment ordered, certain descriptions and illustrations may differ from your vehicle's equipment.
The detailed index at the back of this Owner's Manual contains a complete listing of all subjects.
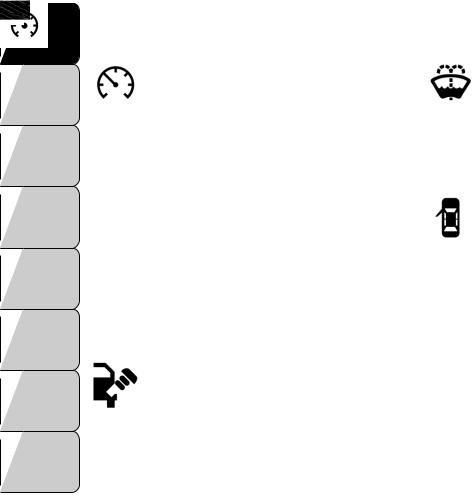
Consult the following table for a description of the symbols that may be used on your vehicle or throughout this Owner's Manual: (fig. 1)
4 (fig. 1)
VEHICLE MODIFICATIONS/
ALTERATIONS
WARNING!
Any modifications or alterations to this vehicle could seriously affect its roadworthiness and safety and may lead to a accident
resulting in serious injury or death.
KNOWING YOUR VEHICLE
SAFETY
STARTING
AND
DRIVING
WARNING LIGHTS AND MESSAGES
IN AN EMERGENCY
SERVICING AND CARE
TECHNICAL SPECIFICATIONS
CONTENTS
5
KNOWING YOUR VEHICLE
SAFETY
STARTING
AND
DRIVING
WARNING LIGHTS AND MESSAGES
IN AN EMERGENCY
SERVICING AND CARE
TECHNICAL SPECIFICATIONS
CONTENTS
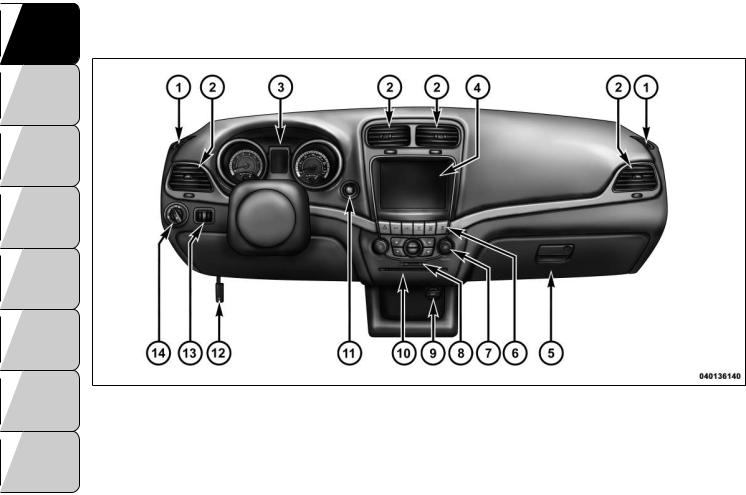
INSTRUMENT PANEL FEATURES (fig. 2)
(fig. 2) |
|
|
|
|
|
1 |
— Side Window Demist Outlet |
6 |
— Switch Bank |
11 |
— Engine Start/Stop Button |
2 |
— Air Outlet |
7 |
— Uconnect Touch™ Hard |
12 |
— Hood Release Lever |
|
|
Controls |
|
|
|
3 |
— Instrument Cluster |
8 |
— SD Memory Card Slot |
13 |
— Dimmer Controls |
4 |
— Uconnect Touch™ System |
9 |
— Power Outlet |
14 |
— Headlight Switch |
5 |
— Glove Compartment |
10 — CD/DVD Slot |
|
|
|
6
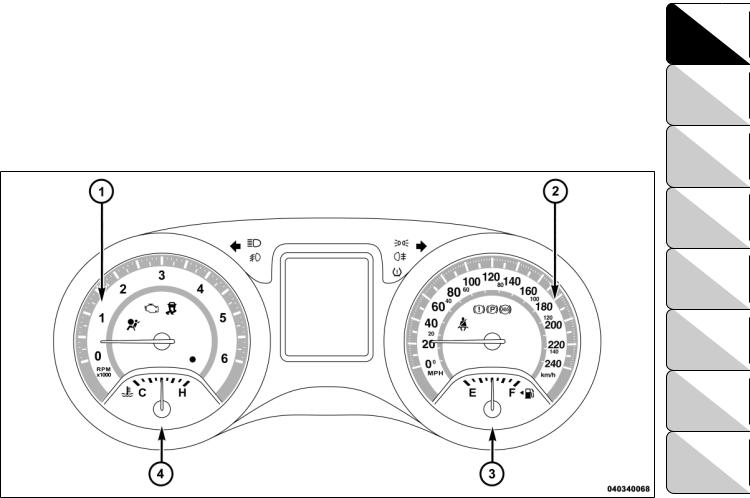
INSTRUMENTS (fig. 3)
1. Tachometer
This gauge measures engine revolutions per minute (RPM x 1000). Before the pointer reaches the red area, ease up on the accelerator to prevent engine damage.
2. Speedometer
Shows the vehicle speed.
3. Fuel Gauge
The fuel gauge shows the level of fuel in the tank when ignition switch is in the ON/RUN position.
4. Coolant Temperature Gauge
The temperature gauge indicates engine coolant temperature. Any reading within the normal range indicates that the cooling system is operating satisfactorily.
KNOWING YOUR VEHICLE
SAFETY
STARTING
AND
DRIVING
WARNING LIGHTS AND MESSAGES
IN AN EMERGENCY
SERVICING AND CARE
TECHNICAL SPECIFICATIONS
CONTENTS
(fig. 3) |
7 |

KNOWING YOUR VEHICLE
SAFETY
STARTING
AND
DRIVING
WARNING LIGHTS AND MESSAGES
IN AN EMERGENCY
SERVICING AND CARE
TECHNICAL SPECIFICATIONS
CONTENTS
The gauge pointer will likely indicate a high temperature when driving in hot weather, up mountain grades, in heavy traffic, or when towing a trailer. If the pointer rises to the “H” mark, safely pull over and stop the vehicle. If the Air Conditioning A/C system is on, turn it off. Also, shift the transmission into NEUTRAL and idle the vehicle. If the needle remains on the “H” mark, turn the engine OFF immediately and call for service. (Refer to “If Your Engine Overheats” in “In An Emergency” for further information).
Do not leave your vehicle unattended with the engine running,as you would not be able to react to the temperature indi-
cator light if the engine overheats.
A WORD ABOUT YOUR KEYS
Your vehicle uses a keyless ignition system. This system consists of a Key Fob with Remote Keyless Entry (RKE) transmitter and a Keyless Ignition Node (KIN).
Keyless Enter-N-Go Feature
This vehicle is equipped with the Keyless Enter-N-Go feature, refer to “Starting Procedure” in “Starting And Driving” for further information.
KEYLESS IGNITION NODE (KIN)
This feature allows the driver to operate the ignition switch with the push of a button, as long as the Remote Keyless Entry (RKE) transmitter is in the passenger compartment.
The Keyless Ignition Node (KIN) has four operating positions, three of which are labeled and will illuminate when in position. The three positions are OFF, ACC, and ON/RUN. The fourth position is START, during start RUN will illuminate.
NOTE: In case the ignition switch does not change with the push of a button, the RKE transmitter (Key Fob) may have a low or dead battery. In this situation a back up method can be used to operate the ignition switch. Put the nose side (side opposite of the emergency key) of the Key Fob against the ENGINE START/ STOP button and push to operate the ignition switch. (fig. 4)
8
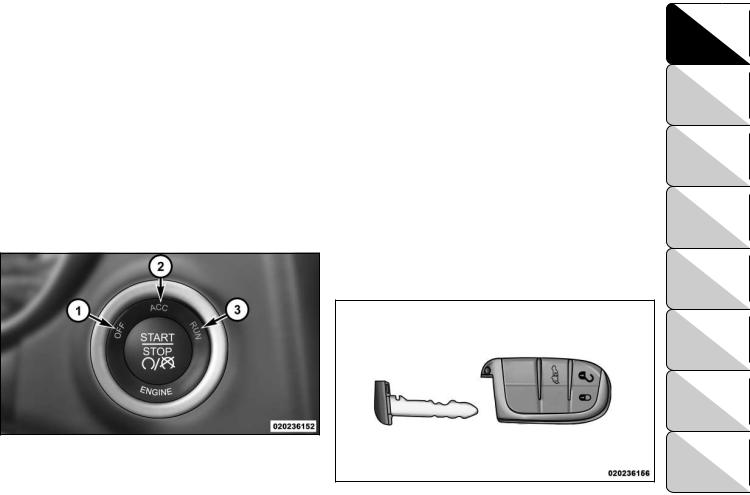
KEY FOB
The Key Fob also contains the Remote Keyless Entry (RKE) transmitter and an emergency key, which stores in the rear of the Key Fob.
The emergency key allows for entry into the vehicle should the battery in the vehicle or the Key Fob go dead. The emergency key is also for locking the glove box. You can keep the emergency key with you when valet parking.
To remove the emergency key, slide the mechanical latch on the side of the Key Fob sideways with your thumb and then pull the key out with your other hand. (fig. 5)
(fig. 4)
Keyless Ignition Node (KIN)
1 — OFF
2 — ACC (ACCESSORY)
3 — ON/RUN
NOTE: You can insert the double-sided emergency |
|
key into the lock cylinders with either side up. |
KNOWING |
IGNITION OR ACCESSORY ON MESSAGE |
YOUR |
VEHICLE |
|
Opening the driver's door when the ignition is in ACC |
|
or ON (engine not running), a chime will sound to |
|
remind you to cycle the ignition to OFF. In addition to |
SAFETY |
the chime, the ignition or accessory on message will |
|
display in the cluster. |
|
NOTE: With the Uconnect Touch™ system, the power window switches, radio, power sunroof (if equipped), and power outlets will remain active for up to 10 minutes after the ignition is cycled to the OFF position. Opening either front door will cancel this feature. The time for this feature is programmable. Refer to “Uconnect Touch™ Settings” in “Knowing Your Vehicle” for further information.
STARTING
AND
DRIVING
WARNING LIGHTS AND MESSAGES
IN AN EMERGENCY
SERVICING AND CARE
TECHNICAL SPECIFICATIONS
CONTENTS
(fig. 5)
Emergency Key Removal |
9 |
KNOWING YOUR VEHICLE
SAFETY
STARTING
AND
DRIVING
WARNING LIGHTS AND MESSAGES
IN AN EMERGENCY
SERVICING AND CARE
TECHNICAL SPECIFICATIONS
CONTENTS
WARNING!
• Before exiting a vehicle, always apply the parking brake, shift the transmission into PARK, and remove the key fob from the
ignition. When leaving the vehicle, always lock your vehicle.
•Never leave children alone in a vehicle, or with access to an unlocked vehicle.
•Allowing children to be in a vehicle unattended is dangerous for a number of reasons. A child or others could be seriously or fatally injured. Children should be warned not to touch the parking brake, brake pedal or the shift lever.
•Do not leave the key fob in or near the vehicle, and do not leave Keyless Enter-N-Go in the ACC or ON/RUN mode. A child could operate power windows, other controls, or move the vehicle.
•Do not leave children or animals inside parked vehicles in hot weather. Interior heat build-up may cause serious injury or death.
An unlocked car is an invitation to thieves.Always remove the Key Fob from vehicle, cycle the ignition OFF and lock
all doors when leaving the vehicle unattended.
SENTRY KEY®
The Sentry Key® Immobilizer system prevents unauthorized vehicle operation by disabling the engine. The system does not need to be armed or activated. Operation is automatic, regardless of whether the vehicle is locked or unlocked.
The system uses a Key Fob with Remote Keyless Entry (RKE) transmitter, a Keyless Ignition Node (KIN) and a RF receiver to prevent unauthorized vehicle operation. Therefore, only Key Fobs that are programmed to the vehicle can be used to start and operate the vehicle.
After cycling the ignition to the ON/RUN position, the Vehicle Security Light will turn on for three seconds for a bulb check. If the light remains on after the bulb check, it indicates that there is a problem with the electronics. In addition, if the light begins to flash after the bulb check, it indicates that someone used an invalid Key Fob to start the engine. Either of these conditions will result in the engine being shut off after two seconds.
If the Vehicle Security Light turns on during normal vehicle operation (vehicle running for longer than 10 seconds), it indicates that there is a fault in the electronics. Should this occur, have the vehicle serviced as soon as possible by an authorized dealer.
10

The Sentry Key® Immobilizer system is not compatible with some after-market remote starting systems. Use of these
systems may result in vehicle starting problems and loss of security protection.
All of the Key Fobs provided with your new vehicle have been programmed to the vehicle electronics.
REPLACEMENT KEYS
NOTE: Only Key Fobs that are programmed to the vehicle electronics can be used to start and operate the vehicle. Once a Key Fob is programmed to a vehicle, it cannot be programmed to any other vehicle.
Always remove the Key Fobs from the vehicle and lock all doors when leaving the vehicle unattended.
At the time of purchase, the original owner is provided with a four-digit Personal Identification Number (PIN). Keep the PIN in a secure location. This number is required for authorized dealer replacement of Key Fobs. Duplication of Key Fobs may be performed at an authorized dealer, this procedure consists of programming a blank Key Fob to the vehicle electronics. A blank Key Fob is one that has never been programmed.
NOTE: When having the Sentry Key® Immobilizer system serviced, bring all vehicle Key Fobs with you to the authorized dealer.
CUSTOMER KEY PROGRAMMING
Programming Key Fobs or RKE transmitters may be performed at an authorized dealer.
GENERAL INFORMATION
The Sentry Key® Immobilizer system will be used in the following European countries, which apply Directive 1999/5/EC: Austria, Belgium, Czech Republic, Denmark, Finland, France, Germany, Greece, Hungary, Ireland, Italy, Luxembourg, Netherlands, Norway, Poland, Portugal, Romania, Russian Federation, Slovenia, Spain, Sweden, Switzerland, Yugoslavia, and United Kingdom.
Operation is subject to the following conditions:
•This device may not cause harmful interference.
•This device must accept any interference that may be received, including interference that may cause undesired operation.
KNOWING YOUR VEHICLE
SAFETY
STARTING
AND
DRIVING
WARNING LIGHTS AND MESSAGES
IN AN EMERGENCY
SERVICING AND CARE
TECHNICAL SPECIFICATIONS
CONTENTS
11
KNOWING YOUR VEHICLE
SAFETY
STARTING
AND
DRIVING
WARNING LIGHTS AND MESSAGES
IN AN EMERGENCY
SERVICING AND CARE
TECHNICAL SPECIFICATIONS
CONTENTS
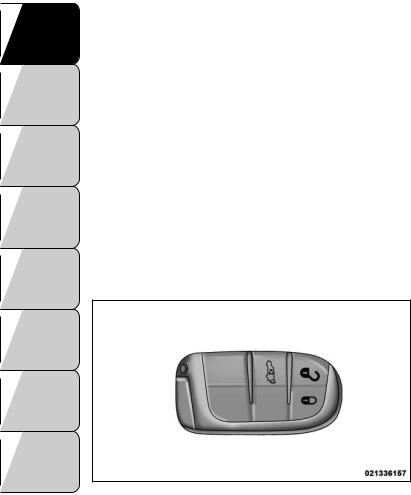
REMOTE KEYLESS ENTRY (RKE)
The RKE system allows you to lock or unlock the doors and liftgate from distances up to approximately 10 m using a hand-held Key Fob with RKE transmitter. The RKE transmitter does not need to be pointed at the vehicle to activate the system.
NOTE: Driving at speeds 8 km/h and above disables the system from responding to all RKE transmitter buttons for all RKE transmitters. (fig. 6)
TO UNLOCK THE DOORS AND LIFTGATE
Press and release the UNLOCK button on the RKE transmitter once to unlock the driver's door or twice within five seconds to unlock all doors and liftgate. The turn signal lights will flash to acknowledge the unlock signal. The illuminated entry system will also turn on.
12 |
(fig. 6) |
Key Fob With RKE Transmitter |
If the vehicle is equipped with Passive Entry, refer to “Keyless Enter-N-Go — If Equipped” under “Knowing Your Vehicle” for further information.
Remote Key Unlock, Driver Door/All Doors 1st Press
This feature lets you program the system to unlock either the driver's door or all doors on the first press of the UNLOCK button on the RKE transmitter. To change the current setting, refer to “Uconnect Touch™ Settings” in “Knowing Your Vehicle” for further information.
Flash Headlights With Lock
This feature will cause the turn signal lights to flash when the doors are locked or unlocked with the RKE transmitter. This feature can be turned on or turned off. To change the current setting, refer to “Uconnect Touch™ Settings” in “Knowing Your Vehicle” for further information.
Turn Headlights On With Remote Key Unlock
This feature activates the headlights for up to 90 seconds when the doors are unlocked with the RKE transmitter. The time for this feature is programmable on vehicles equipped through Uconnect Touch™. To change the current setting, refer to “Uconnect Touch™ Settings” in “Knowing Your Vehicle” for further information.
TO LOCK THE DOORS AND LIFTGATE
Press and release the LOCK button on the RKE transmitter to lock all doors and liftgate. The turn signal lights will flash to acknowledge the signal.
If the vehicle is equipped with Passive Entry, refer to “Keyless Enter-N-Go — If Equipped” under “Knowing Your Vehicle” for further information.
REMOTE OPEN WINDOW FEATURE
This feature allows you to remotely lower both front door windows at the same time. To use this feature, press and release the UNLOCK button on the RKE transmitter and then immediately press and hold the UNLOCK button until the windows lower to the level desired or until they lower completely.
PROGRAMMING ADDITIONAL TRANSMITTERS
Programming Key Fobs or RKE transmitters may be performed at an authorized dealer.
TRANSMITTER BATTERY REPLACEMENT
The recommended replacement battery is one CR2032 battery.
NOTE:
•Perchlorate Material — special handling may apply.
•Used batteries are harmful to the environment. You can dispose of them either in the correct containers as specified by law or by taking them to a FIAT Dealership, which will deal with their disposal.
•Do not touch the battery terminals that are on the back housing or the printed circuit board.
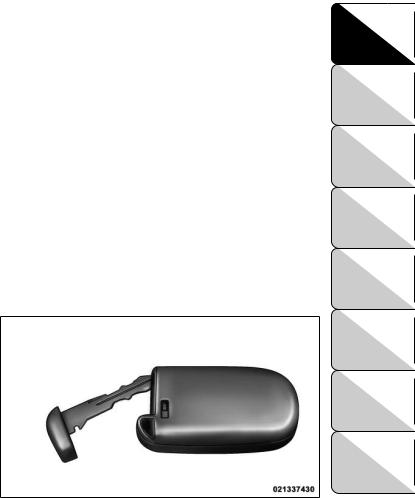
1.Remove the emergency key by sliding the mechanical latch on the back of the RKE transmitter sideways with your thumb and then pull the key out with your other hand.
2.Insert the tip of the emergency key or a #2 flat blade screwdriver into the slot and gently pry the two halves of the RKE transmitter apart. Make sure not to damage the seal during removal. (fig. 7)
3.Remove the battery by turning the back cover over (battery facing downward) and tapping it lightly on a solid surface such as a table or similar, then replace the battery. When replacing the battery, match the + sign on the battery to the + sign on the inside of the battery clip, located on the back cover. Avoid touching the new battery with your fingers. Skin oils may cause battery deterioration. If you touch a battery, clean it with rubbing alcohol.
4.To assemble the RKE transmitter case, snap the two halves together.
KNOWING YOUR VEHICLE
SAFETY
STARTING
AND
DRIVING
WARNING LIGHTS AND MESSAGES
IN AN EMERGENCY
SERVICING AND CARE
TECHNICAL SPECIFICATIONS
CONTENTS
(fig. 7) |
13 |

KNOWING YOUR VEHICLE
SAFETY
STARTING
AND
DRIVING
WARNING LIGHTS AND MESSAGES
IN AN EMERGENCY
SERVICING AND CARE
TECHNICAL SPECIFICATIONS
CONTENTS
GENERAL INFORMATION
Transmitter and receivers operate on a carrier frequency of 434 MHz as required by EEC regulations. These devices must be certified to conform to specific regulations in each individual country. Two sets of regulations are involved: ETS (European Telecommunication Standard) 300–220, which most countries use, and German BZT federal regulation 225Z125, which is based on ETC 300–220 but has additional unique requirements. Other defined requirements are noted in ANNEX VI of COMMISSION DIRECTIVE 95/56/EC. Operation is subject to the following conditions:
•This device may not cause harmful interference.
•This device must accept any interference received, including interference that may cause undesired operation.
If your RKE transmitter fails to operate from a normal distance, check for these two conditions:
1.A weak battery in the transmitter. The expected life of the battery is a minimum of three years.
2.Closeness to a radio transmitter such as a radio station tower, airport transmitter, and some mobile or CB radios.
VEHICLE SECURITY ALARM — IF EQUIPPED
The Vehicle Security Alarm (VSA) system monitors the vehicle doors, hood, and liftgate for unauthorized entry and the ignition switch for unauthorized operation. If something triggers the alarm, the system will prevent the vehicle from starting, sound the horn intermittently, flash the headlights and taillights, and flash the Vehicle Security Light in the instrument cluster.
REARMING OF THE SYSTEM
If something triggers the alarm, and no action is taken to disarm it, the system will turn off the horn after approximately 29 seconds, turn off all of the visual signals after one minute, and then the system will rearm itself.
TO ARM THE SYSTEM
Follow these steps to arm the theft alarm:
1.Remove the key from the ignition system (refer to "Starting Procedures" in "Starting And Driving" for further information).
• For vehicles equipped with Keyless Enter-N-Go, make sure the vehicle ignition system is "OFF".
• For vehicles not equipped with Keyless Enter-N-Go, make sure the vehicle ignition system is "OFF" and the key is physically removed from the ignition.
2.Perform one of the following methods to lock the vehicle:
14
• Press LOCK on the interior power door lock switch with the driver and/or passenger door open.
•Press the LOCK button on the exterior Passive Entry Door Handle with a valid Key Fob available in the same exterior zone (refer to "Keyless Enter-N-Go" in "Knowing Your Vehicle" for further information).
•Press the LOCK button on the Remote Keyless Entry (RKE) transmitter.
3. If any doors are open, close them.
TO DISARM THE SYSTEM
The Vehicle Security Alarm can be disarmed using any of the following methods:
•Press the UNLOCK button on the Remote Keyless Entry (RKE) transmitter.
•Grasp the Passive Entry Unlock Door Handle (if equipped, refer to "Keyless Enter-N-Go" in "Knowing Your Vehicle" for further information).
•Cycle the vehicle ignition system out of the OFF position.
•For vehicles equipped with Keyless Enter-N-Go, press the Keyless Enter-N-Go Start/Stop button (requires at least one valid Key Fob in the vehicle).
•For vehicles not equipped with Keyless Enter-N- Go, insert a valid key into the ignition switch and turn the key to the ON position.
NOTE:
•The driver's door key cylinder and the liftgate button on the RKE transmitter cannot arm or disarm the Vehicle Security Alarm.
•The Vehicle Security Alarm remains armed during power liftgate entry. Pressing the liftgate button will not disarm the Vehicle Security Alarm. If someone enters the vehicle through the liftgate and opens any door the alarm will sound.
•When the Vehicle Security Alarm is armed, the interior power door lock switches will not unlock the doors.
The Vehicle Security Alarm is designed to protect your vehicle; however, you can create conditions where the system will give you a false alarm. If one of the previously described arming sequences has occurred, the Vehicle Security Alarm will arm regardless of whether you are in the vehicle or not. If you remain in the vehicle and open a door, the alarm will sound. If this occurs, disarm the Vehicle Security Alarm.
If the Vehicle Security Alarm is armed and the battery becomes disconnected, the Vehicle Security Alarm will remain armed when the battery is reconnected; the exterior lights will flash, the horn will sound. If this occurs, disarm the Vehicle Security Alarm.
SECURITY SYSTEM MANUAL OVERRIDE
The Vehicle Security Alarm will not arm if you lock the doors using the manual door lock plunger.
KNOWING YOUR VEHICLE
SAFETY
STARTING
AND
DRIVING
WARNING LIGHTS AND MESSAGES
IN AN EMERGENCY
SERVICING AND CARE
TECHNICAL SPECIFICATIONS
CONTENTS
15

KNOWING YOUR VEHICLE
SAFETY
STARTING
AND
DRIVING
WARNING LIGHTS AND MESSAGES
IN AN EMERGENCY
SERVICING AND CARE
TECHNICAL SPECIFICATIONS
CONTENTS
PREMIUM SECURITY SYSTEM — IF EQUIPPED
The Premium Security system monitors the doors, hood latch, and liftgate for unauthorized entry and the ignition switch for unauthorized operation. The system also includes a dual function intrusion sensor and vehicle tilt sensor. The intrusion sensor monitors the vehicle interior for motion. The vehicle tilt sensor monitors the vehicle for any tilting actions (tow away, tire removal, ferry transport, etc). A siren with battery backup which senses interruptions of power and communications is also included.
In the event that something triggers the security system, the siren will sound for 29 seconds and the headlights will turn on and the turn signal and side repeater lights will flash for an additional 34 seconds. The system will repeat this sequence for up to 8 security violations in any mode (door ajar, motion, hood ajar, etc.) before having to rearm the system. At the end of any particular trigger event, the lights will continue to flash for 26 seconds.
To Arm The System
Follow these steps to arm the theft alarm:
1.Remove the key from the ignition system (refer to "Starting Procedures" in "Starting And Operating" for further information).
• For vehicles equipped with Keyless Enter-N-Go, make sure the vehicle ignition system is "OFF".
• For vehicles not equipped with Keyless Enter-N-Go, make sure the vehicle ignition system is "OFF" and the key is physically removed from the ignition.
2.Perform one of the following methods to lock the vehicle:
• Press LOCK on the interior power door lock switch with the driver and/or passenger door open.
•Press the LOCK button on the exterior Passive Entry Door Handle with a valid Key Fob available in the same exterior zone (refer to "Keyless Enter-N-Go" in "Things To Know Before Starting Your Vehicle" for further information).
•Press the LOCK button on the Remote Keyless Entry (RKE) transmitter.
3. If any doors are open, close them.
To Disarm The System
The Vehicle Security Alarm can be disarmed using any of the following methods:
•Press the UNLOCK button on the Remote Keyless Entry (RKE) transmitter.
•Grasp the Passive Entry Unlock Door Handle with a valid key fob available in the same exterior zone (if equipped, refer to "Keyless Enter-N-Go" in "Things To Know Before Starting Your Vehicle" for further information).
•Cycle the vehicle ignition system out of the OFF position.
16

•For vehicles equipped with Keyless Enter-N-Go, press the Keyless Enter-N-Go Start/Stop button (requires at least one valid Key Fob in the vehicle).
•For vehicles not equipped with Keyless Enter-N- Go, insert a valid key into the ignition switch and turn the key to the ON position.
NOTE:
•The driver's door key cylinder and the liftgate button on the RKE transmitter cannot arm or disarm the Vehicle Security Alarm.
•When the Vehicle Security Alarm is armed, the interior power door lock switches will not unlock the doors.
The Vehicle Security Alarm is designed to protect your vehicle; however, you can create conditions where the system will give you a false alarm. If one of the previously described arming sequences has occurred, the Vehicle Security Alarm will arm regardless of whether you are in the vehicle or not. If you remain in the vehicle and open a door, the alarm will sound. If this occurs, disarm the Vehicle Security Alarm.
If the Vehicle Security Alarm is armed and the battery becomes disconnected, the Vehicle Security Alarm will remain armed when the battery is reconnected; the exterior lights will flash, the horn will sound. If this occurs, disarm the Vehicle Security Alarm.
STEERING WHEEL LOCK — IF EQUIPPED
Your vehicle may be equipped with a passive electronic steering wheel lock. This lock prevents steering the vehicle without the ignition key. The steering wheel lock has six positions (one every 60 degrees). If the steering wheel is moved to one of these six position with the key in the off positions, the steering wheel will lock.
TO MANUALLY LOCK THE STEERING WHEEL
With the engine running, rotate the steering wheel one-half revolution, turn off the engine and remove the key. Turn the steering wheel slightly in either direction until the lock engages.
TO RELEASE THE STEERING WHEEL LOCK
Cycle the ignition and start the engine.
NOTE: If you turned the wheel to the right to engage the lock, you must turn the wheel slightly to the right to disengage it. If you turned the wheel to the left to engage the lock, turn the wheel slightly to the left to disengage it.
KNOWING YOUR VEHICLE
SAFETY
STARTING
AND
DRIVING
WARNING LIGHTS AND MESSAGES
IN AN EMERGENCY
SERVICING AND CARE
TECHNICAL SPECIFICATIONS
CONTENTS
Security System Manual Override |
|
The system will not arm if you lock the doors using the |
|
manual door lock plunger. |
17 |
KNOWING YOUR VEHICLE
SAFETY
STARTING
AND
DRIVING
WARNING LIGHTS AND MESSAGES
IN AN EMERGENCY
SERVICING AND CARE
TECHNICAL SPECIFICATIONS
CONTENTS
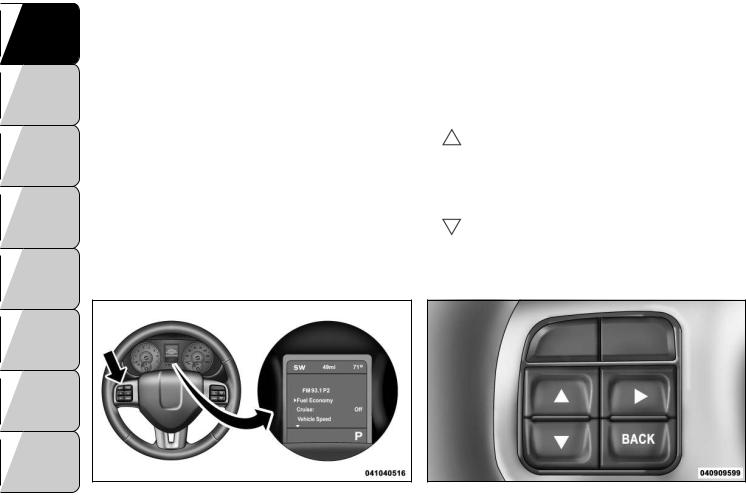
ELECTRONIC VEHICLE INFORMATION CENTER (EVIC)
The Electronic Vehicle Information Center (EVIC) features a driver-interactive display that is located in the instrument cluster. (fig. 8)
This system allows the driver to select a variety of useful information by pressing the switches mounted on the steering wheel. The EVIC consists of the following:
•Radio Info
•Fuel Economy
•Vehicle Speed
•Trip Info
•Tire Pressure
•Vehicle Information
•Warning Message Displays
•Turn Menu OFF
The system allows the driver to select information by pressing the following buttons mounted on the steering wheel: (fig. 9)
UP Button
Press and release the UP button to scroll upward through the main menus (Fuel Economy, Vehicle Info, Tire PSI, Cruise, Messages, Units) and sub-menus.
DOWN Button
Press and release the DOWN button to scroll downward through the main menus and sub-menus.
18 |
(fig. 8) |
(fig. 9) |
Electronic Vehicle Information Center (EVIC) |
EVIC Steering Wheel Buttons |

SELECT Button
Press and release the SELECT button for access to main menus or sub-menus. Press and hold the SELECT button for two seconds to reset features.
BACK Button
Press the BACK button to scroll back to a previous menu or sub-menu.
ELECTRONIC VEHICLE INFORMATION CENTER (EVIC) DISPLAYS
When the appropriate conditions exist, the EVIC displays the following messages:
•Turn Signal On (with a continuous warning chime if the vehicle is driven more than 1.6 km with either turn signal on)
•Left Front Turn Signal Light Out (with a single chime)
•Left Rear Turn Signal Light Out (with a single chime)
•Right Front Turn Signal Light Out (with a single chime)
•Right Rear Turn Signal Light Out (with a single chime)
•RKE Battery Low (with a single chime)
•Personal Settings Not Available – Vehicle Not in PARK
•Left/Right Front Door Ajar (one or more doors open, with a single chime if speed is above 1.6 km/h)
•Left/Right Rear Door Ajar (one or more doors open, with a single chime if speed is above 1.6 km/h)
•Door(s) Ajar (with a single chime if vehicle is in motion)
•Liftgate Ajar (with a single chime)
•Low Washer Fluid (with a single chime)
•Ignition or Accessory On
•Vehicle Not in Park
•Key Left Vehicle
•Key Not Detected
•Low Tire Pressure
•Service Tire Pressure
•ECO (Fuel Saver Indicator) — if equipped
•Channel # Transmit
•Channel # Training
•Channel # Trained
•Clearing Channels
•Channels Cleared
•Did Not Train
•Check Gascap (refer to “Adding Fuel” in “Technical Specifications”)
•Oil Change Required (with a single chime)
EVIC WHITE TELLTALE LIGHTS
This area will show reconfigurable white caution telltales. These telltales include:
• Shift Lever Status
The shift lever status “P,R,N,D,L,5,4,3,2,1” are displayed indicating the shift lever position. Telltales “5,4,3,2,1” indicate the Autostick™ feature has been engaged and the gear selected is displayed. For further
KNOWING YOUR VEHICLE
SAFETY
STARTING
AND
DRIVING
WARNING LIGHTS AND MESSAGES
IN AN EMERGENCY
SERVICING
AND
CARE
TECHNICAL SPECIFICATIONS
CONTENTS
19
|
information on Autostick™, refer to “Starting And |
KNOWING |
Driving.” |
YOUR |
• Electronic Speed Control ON |
VEHICLE |
|
|
This light will turn on when the electronic |
|
speed control is ON. For further informa- |
SAFETY |
tion, refer to “Electronic Speed Control” in |
|
“Knowing Your Vehicle.” |
STARTING
AND
DRIVING
WARNING LIGHTS AND MESSAGES
IN AN EMERGENCY
SERVICING
AND
CARE
TECHNICAL SPECIFICATIONS
CONTENTS
20
• Electronic Speed Control SET
This light will turn on when the electronic speed control is SET. For further information, refer to “Electronic Speed Control” in “Knowing Your Vehicle.”
EVIC AMBER TELLTALE LIGHTS
This area will show reconfigurable amber caution telltales. These telltales include:
• Low Fuel Light
When the fuel level reaches approximately 11.0 L this light will turn on, and remain on until fuel is added.
• Loose Gascap Indicator
If the vehicle diagnostic system determines that the fuel filler cap is loose, improperly installed, or damaged, a loose gascap indicator will display in the telltale display area.
Tighten the fuel filler cap properly and press the SELECT button to turn off the message. If the problem continues, the message will appear the next time the vehicle is started.
A loose, improperly installed, or damaged fuel filler cap may also turn on the Malfunction Indicator Light (MIL).
• Windshield Washer Fluid Low Indicator
This light will turn on to indicate the windshield washer fluid is low.
EVIC RED TELLTALE LIGHTS
This area will show reconfigurable red telltales. These telltales include:
• Door Ajar
This light will turn on to indicate that one or more doors may be ajar.
• Oil Pressure Warning Light
 This light indicates low engine oil pressure. If the light turns on while driving, stop the vehicle and shut off the engine as soon as possible. A chime will
sound for four minutes when this light turns on.
Do not operate the vehicle until the cause is corrected. This light does not show how much oil is in the engine. The engine oil level must be checked under the hood.
• Charging System Light
This light shows the status of the electrical charging system. The light should come on when the ignition is first cycled ON and remain on briefly as
a bulb check. If the light stays on or comes on while driving, turn off some of the vehicle's non-essential electrical devices or increase engine speed (if at idle). If
the charging system light remains on, it means that the vehicle is experiencing a problem with the charging system. Obtain SERVICE IMMEDIATELY. See an authorized dealer.
If jump starting is required, refer to “Jump Starting Procedures” in “In An Emergency”.
• Electronic Throttle Control (ETC) Light
This light informs you of a problem with the Electronic Throttle Control (ETC) system. The light will come on when the ignition is first turned ON and remain on briefly as a
bulb check. If the light does not come on during starting, have the system checked by an authorized dealer.
If a problem is detected, the light will come on while the engine is running. Cycle the ignition key when the vehicle has completely stopped and the shift lever is placed in the PARK position. The light should turn off.
If the light remains lit with the engine running, your vehicle will usually be drivable. However, see an authorized dealer for service as soon as possible. If the light is flashing when the engine is running, immediate service is required. You may experience reduced performance, an elevated/rough idle or engine stall and your vehicle may require towing.
• Engine Temperature Warning Light
This light warns of an overheated engine condition. As temperatures rise and the gauge approaches H, this indicator will illuminate and a
single chime will sound after reaching a set threshold. Further overheating will cause the temperature gauge to pass H, the indicator will continuously flash and a continuous chime will occur until the engine is allowed to cool.
If the light turns on while driving, safely pull over and stop the vehicle. If the A/C system is on, turn it off. Also, shift the transmission into NEUTRAL and idle the vehicle. If the temperature reading does not return to normal, turn the engine off immediately and call for service.
• Transmission Temperature Warning Light
This light indicates that the transmission fluid temperature is running hot. This may occur with severe usage, such as trailer towing. If this light turns on, safely pull over and stop
the vehicle. Then, shift the transmission into NEUTRAL and run the engine at idle or faster until the light turns off.
Continuous driving with theTransmission Temperature Warning Light illuminated will eventually cause severe transmission
damage or transmission failure.
KNOWING YOUR VEHICLE
SAFETY
STARTING
AND
DRIVING
WARNING LIGHTS AND MESSAGES
IN AN EMERGENCY
SERVICING AND CARE
TECHNICAL SPECIFICATIONS
CONTENTS
21
KNOWING YOUR VEHICLE
SAFETY
STARTING
AND
DRIVING
WARNING LIGHTS AND MESSAGES
IN AN EMERGENCY
SERVICING AND CARE
TECHNICAL SPECIFICATIONS
CONTENTS
WARNING!
If theTransmissionTemperatureWarning Light is illuminated and you continue operating the vehicle, in some circumstances you could cause the fluid to boil over,come in contact with hot engine or exhaust components and
cause a fire.
OIL CHANGE REQUIRED
Your vehicle is equipped with an engine oil change indicator system. The “Oil Change Required” message will flash in the EVIC display for approximately 10 seconds after a single chime has sounded to indicate the next scheduled oil change interval. The engine oil change indicator system is duty cycle based, which means the engine oil change interval may fluctuate dependent upon your personal driving style.
Unless reset, this message will continue to display each time you cycle the ignition to the ON/RUN position. To turn off the message temporarily, press and release the MENU button. To reset the oil change indicator system (after performing the scheduled maintenance), perform the following procedure:
1.Without pressing the brake pedal, push the ENGINE START/STOP button and cycle the ignition to the ON/RUN position (Do not start the engine.)
2.Fully depress the accelerator pedal, slowly, three times within 10 seconds.
3.Without pressing the brake pedal, push the ENGINE START/STOP button once to return the ignition to the OFF/LOCK position.
NOTE: If the indicator message illuminates when you start the vehicle, the oil change indicator system did not reset. If necessary, repeat this procedure.
FUEL ECONOMY
Press and release the UP or DOWN button until “Fuel Economy” displays highlighted in the EVIC and press the SELECT button. The following Fuel Economy functions will display in the EVIC:
•Average Fuel Economy/Fuel Saver Mode
•Distance To Empty (DTE)
•Miles Per Gallon (MPG)
Average Fuel Economy / ECO Fuel Saver Mode — If Equipped
Shows the average fuel economy since the last reset. When the fuel economy is reset, the display will read “RESET” or show dashes for two seconds. Then, the history information will be erased, and the averaging will continue from the last fuel average reading before the reset.
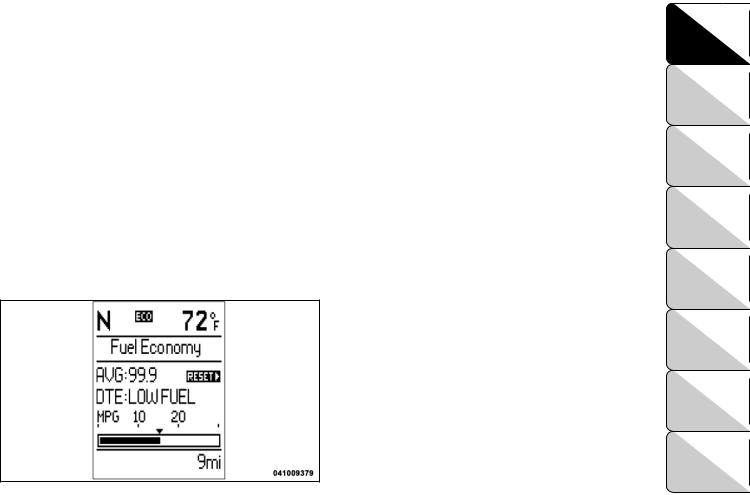
The ECO indicator will illuminate in the EVIC display. This ECO indicator will appear when you are driving in a fuel efficient manner and can be used to modify driving habits in order to increase fuel economy. (fig. 10)
22
Distance To Empty (DTE)
Shows the estimated distance that can be traveled with the fuel remaining in the tank. This estimated distance is determined by a weighted average of the instantaneous and average fuel economy, according to the current fuel tank level. DTE cannot be reset through the SELECT button.
NOTE: Significant changes in driving style or vehicle loading will greatly affect the actual drivable distance of the vehicle, regardless of the DTE displayed value.
When the DTE value is less than 48 km estimated driving distance, the DTE display will change to a “LOW FUEL” message. This display will continue until the vehicle runs out of fuel. Adding a significant amount of fuel to the vehicle will turn off the “LOW FUEL” message and a new DTE value will display.
(fig. 10)
Fuel Saver Mode — On
VEHICLE SPEED
Press and release the UP or DOWN button until “Vehicle Speed” displays highlighted in the EVIC and press the SELECT button. Press the SELECT button to display the current speed in mph or km/h. Pressing the SELECT button a second time will toggle the unit of measure between mph or km/h.
NOTE: Changing the unit of measure in the Vehicle Speed menu will not change the unit of measure in the EVIC.
TRIP INFO
Press and release the UP or DOWN button until “Trip Info” displays highlighted in the EVIC and press the SELECT button. Press and release the UP/DOWN buttons until one of the following Trip functions displays in the EVIC:
•Trip A
•Trip B
•Elapsed Time
Press the UP/DOWN buttons to cycle through all the Trip Computer functions.
The Trip Functions mode displays the following information:
Trip A
Shows the total distance traveled for Trip A since the last reset.
KNOWING YOUR VEHICLE
SAFETY
STARTING
AND
DRIVING
WARNING LIGHTS AND MESSAGES
IN AN EMERGENCY
SERVICING AND CARE
TECHNICAL SPECIFICATIONS
CONTENTS
23

KNOWING YOUR VEHICLE
SAFETY
STARTING
AND
DRIVING
WARNING LIGHTS AND MESSAGES
IN AN EMERGENCY
SERVICING AND CARE
TECHNICAL SPECIFICATIONS
CONTENTS
Trip B
Shows the total distance traveled for Trip B since the last reset.
Elapsed Time
Shows the total elapsed time of travel since the last reset when the ignition is in the ACC position. Elapsed time will increment when the ignition is in the ON/ RUN position.
To Reset The Display
Reset will only occur while a resettable function is being displayed. Press and release the SELECT button once to clear the resettable function being displayed. To reset all resettable functions, press and hold the SELECT button for two seconds. The current display will reset along with other functions.
VEHICLE INFO (CUSTOMER
INFORMATION FEATURES)
Press and release the UP or DOWN button until “Vehicle Info” displays in the EVIC and press the SELECT button. Press the UP and DOWN button to scroll through the available information displays.
• Coolant Temp
Displays the actual coolant temperature.
• Oil Temperature
Displays the actual oil temperature.
• Oil Pressure
Displays the actual oil pressure.
• Trans Temperature
Displays the actual transmission temperature.
• Engine Hours
Displays the number of hours of engine operation.
24
 Loading...