


LEX 2 150/3 LEX 2 150/7 LEX 2 185/7
464 111_001
Instruction manual |
Eccentric sander |
Page 2 - 6 |
|
IMPORTANT: Read and understand all instructions |
|
before using. |
|
Guide d’utilisation
IMPORTANT:
Page 7 - 11 Lire et comprendre toutes
instructions avant de démarrer les travaux.
Ponceuse excentrique les
Manual de instrucciones |
Lijadora excéntrica |
|
Página 12 - 16 |
Lea y comprende todas las |
|
IMPORTANTE: |
|
|
instrucciones antes de usar. |
|
|

GENERAL SAFETY RULES
Read and understand all instructions. Failure to follow all instructions listed below may result in electric shock, fire and/ or serious personal injury.
SAVE THESE INSTRUCTIONS
Work area
1 Keep your work area clean and well lit.
Cluttered benches and dark areas invite accidents.
2 Keep bystanders, children, and visitors away while operating a tool. Distractions can cause you to lose control.
Personal safety
3 Stay alert, watch what you are doing and use common sense when operating a tool. Do not use while tired or under the influence of drugs, alcohol, or medication.
A moment of inattention while operating tools may result in serious personal injury.
4 Dress properly. Do not wear loose clothing or jewelry. Contain long hair. Keep your hair, clothing, and gloves away from moving parts. Loose clothes, jewellery, or long hair can get caught in moving parts.
5 Avoid accidental starts. Before connecting the air supply make sure that the tool is switched off. Carrying tools with your finger on the switch or plugging in tools that have the switch on invites accidents.
6 Remove adjusting keys or tools before turning the tool on. A wrench or key that is left attached to a rotating part of the tool may result in personal injury.
7 Do not overreach. Stand on both feet and keep proper footing and balance at all times. Proper footing and balance enables better control of the tool in unexpected situations.
8 Use safety equipment. Always wear eye protection. Dust mask, non-skid safety shoes, hard hat, or hearing protection must be used for appropriate conditions.
Tool use and care
9 Do not abuse the hose. Never carry or pull the tool by the hose. Keep hose away from heat, sharp edges or moving parts. Replace damaged hoses immediately.
Damaged hoses increase the risk of accidents.
10 Use clamps or other suitable means to secure and support the workpiece to a stable platform. Holding the work by hand or against your body is unstable and may lead to loss of control.
11 Do not force tool. Use the correct tool for your application. The correct tool will do the job better and safer at the rate for which it is designed.
12 Do not use tool if switch does not turn it on or off. Any tool that cannot be controlled with the switch is dangerous and must be repaired.
13 Disconnect the compressed-air hose from the tool before making any adjustments, changing accessories, or storing the tool. Such preventive safety measures reduce the risk of starting the tool accidentally.
14 Store idle tools out of reach of children and other untrained persons. Tools are dangerous in the hands of untrained users.
15 Maintain tools with care. Keep cutting tools sharp and clean. Properly maintained tools with sharp cutting edges are less likely to bind and are easier to control.
16 Check for misalignment or binding of moving parts, breakage of parts, and any other condition that may affect the tool’s operation. If damaged, have the tool serviced before using. Many accidents are caused by poorly maintained tools.
17 Use only accessories that are recommendedbythemanufacturerforyour model. Accessories that may be suitable for one tool may become hazardous when used on another tool.
Service
18 Tool service may be performed only by qualified repair personnel. Service or maintenance performed by unqualified personnel could result in a risk of injury.
19 Whenservicingatool,useonlyidentical replacement parts. Follow instructions in theMaintenancesectionofthismanual. Use of unauthorized parts or failure to follow the Maintenance instructions may create a risk of injury.
2
|
|
|
• arsenic and chromium from chemically-treated |
|
|
|
|||
Various dust |
created by power sanding, sawing, |
|
lumber. |
|
grinding, drilling and other construction activities |
|
The risk from these exposures varies, depending |
||
contains chemicals known (to the State of |
|
on how often you do this type of work. |
||
California) to cause cancer, birth defects or other |
|
To reduce your exposure to these chemicals: |
||
reproductive harm. Some examples of these |
|
Work in a well ventilated area, |
||
chemicals are: |
|
and work with approved safety |
||
• lead from lead-based paints, |
|
equipment, such as dust masks |
||
• crystalline silica from bricks and cement and |
|
that are specially designed to |
||
other masonry products, and |
|
filter out microscopic particles. |
|
|
Technical data |
|
|
|
|
|
|
|
|
|
|
||
Sanding pad diameter: |
- LEX 2 150 |
|
|
150 mm / 6” |
||||||||
Drive |
|
|
- LEX 2 185 |
|
|
185 mm / 7” |
||||||
|
|
|
|
|
|
Compressed-air vane motor |
||||||
Operating pressure (flow pressure) |
|
|
87 psi |
|||||||||
No load speed |
|
|
|
|
|
4,000 - 8,000 rpm |
||||||
Orbits per minute |
- LEX 2 150/3 |
|
|
8,000 - 16,000 opm |
||||||||
Sanding stroke: |
|
|
3 mm |
|||||||||
|
|
|
- LEX 2 150/7, LEX 2 185/7 |
7 mm |
||||||||
Air consumption at nominal load |
|
|
14 cfm |
|||||||||
Weight: |
|
- LEX 2 150 |
|
|
1.3 kg / 2.8 lbs |
|||||||
|
|
|
- LEX 2 185 |
|
|
1.4 kg / 3 lbs |
||||||
Symbols |
|
|
|
Damage that occurs as a result of incorrect |
||||||||
n0 |
no load speed (revolutions) |
|
compressed-air treatment is excluded from |
|||||||||
rpm |
revolutions per minute |
warranty claims. |
||||||||||
opm |
orbits per minute |
|
|
We recommend a service unit with a 3/8" |
||||||||
|
|
connector for up to two Festool pneumatic tools. |
||||||||||
Use for intended purpose |
|
The compressor used to supply the compressed |
||||||||||
As specified, the machines are designed for |
|
air should supply at 20 cfm and an operating |
||||||||||
sanding wood, plastic, metal, stone, composite, |
pressure of 87 psi. The diameter of the piping |
|||||||||||
paintwork, filler and similar materials. Material |
system must be sufficiently large (at least 9 mm |
|||||||||||
containing asbestos must not be processed with |
/ 1/2”). |
|
|
|
|
|
|
|||||
these tools. |
|
|
|
IAS 2 hose connector |
||||||||
|
|
The user is liable for any damage |
The eccentric sander is a pneumatic tool for |
|||||||||
and injury resulting from incorrect usage! |
connection to the Festool IAS 2 system. |
|||||||||||
|
|
|
|
|
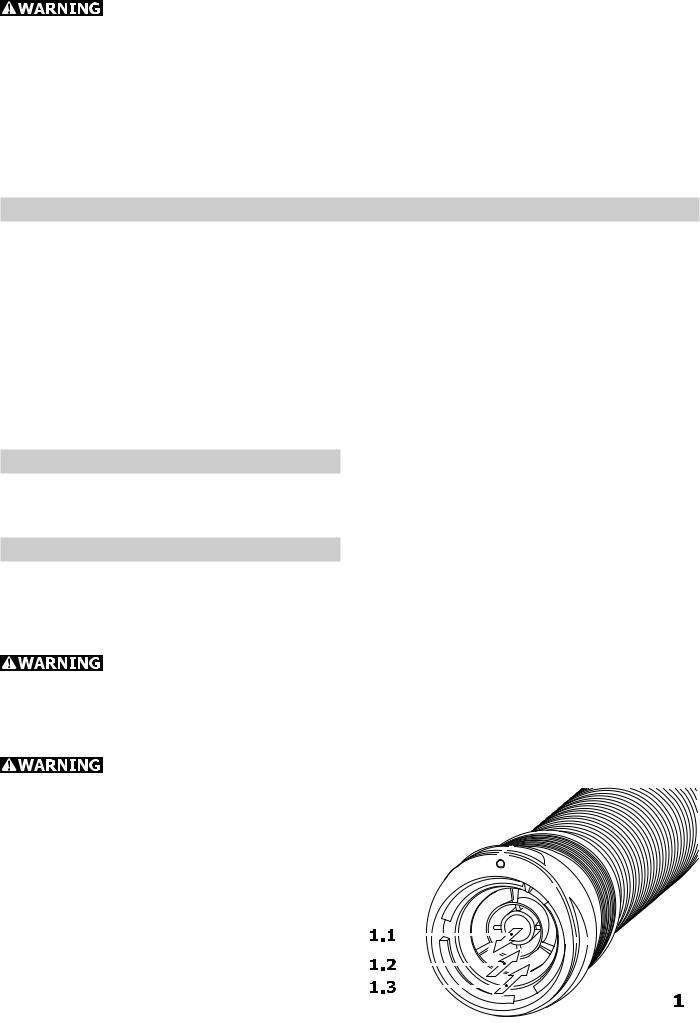
This hose system combines three functions in |
|||||||
Functional description |
|
|||||||||||
|
one hose: |
|
|
|
|
|
|
|||||
|
|
- Compressed air supply (1.1) |
||||||||||
Connection and start-up |
||||||||||||
|
|
Make sure that the pneumatic |
- Exhaust air extraction (1.2) |
|||||||||
tool is switched off when you connect the |
- Dust extraction (1.3) |
|||||||||||
compressed-air supply. |
|
|
|
|
|
|
|
|
|
|
||
Compressed-air treatment |
|
|
|
|
|
|
|
|
||||
The Festool service unit should always be used |
|
|
|
|
|
|
|
|
||||
to ensure that Festool pneumatic tools function |
|
|
|
|
|
|
|
|
||||
|
|
|
|
|
|
|
|
|||||
correctly. Consisting of a filter, control unit, |
|
|
|
|
|
|
|
|
||||
condensation drain and lubricator, the service |
|
|
|
|
|
|
|
|
||||
unit cleans and lubricates the compressed air |
|
|
|
|
|
|
|
|
||||
and keeps it free of condensation. |
|
|
|
|
|
|
|
|
||||
For thios tool, the lubricator should be set so |
|
|
|
|
|
|
|
|
||||
that a drop is applied to the compressed air |
|
|
|
|
|
|
|
|
||||
|
|
|
|
|
|
|
|
|||||
approx. every 7-10 minutes. |
|
|
|
|
|
|
|
|
||||
|
|
|
|
|
|
|
|
|||||
|
|
|
|
|
|
|
|
|
|
|
|
|
3

Connection and disconnection – see Fig. 2. IAS 2 connecting system – see accompanying instruction sheet.
Starting
Pressing the lever (3.1) switches on the pneumatic tool. Releasing the lever switches the tool off again.
Tool settings
Always disconnect the tool from the compressed air supply before doing any work on the tool.
Speed adjustment
You can regulate the sanding speed steplessly between 4,000 and 8,000 rpm using the adjusting wheel (3.2). This enables you to optimize the speed to suit the material.
Suction unit
Sanding dust is extracted through the extraction channels in the sanding pad and taken di-rectly to the material removal point. To ensure optimized dust extraction, we recommend using a Festool dust extractor with automatic switch- on/switch-off device for compressed-air tools.
In order to prevent damage to the pneumatic motor, dust extraction must be allowed to run through the pneumatic tool when it is at standstill.
Sanding pads
Sanding pads have different weights depending on their diameter. Using a sanding pads of the incorrect size will cause excessive vibration of the tool.
Only use sanding pads with an undamaged burr layer.
Sanding pads are available in three degrees of hardness to suit the type of application:
- Hard:high edge strength, for removing coarse
material from surfaces and for sanding edges.
- Soft: universal for coarse and fine sanding, with elastic structure for even and curved surfaces.
- Super soft: high elasticity, for smooth fine sanding of moulded parts, curves, radii. Do not use on edges.
Assembly - see Fig. 4. Make sure the positivefit supports on the sanding pad (4.1) are flush with the ones on the tool (4.2).
Abrasive
Self-adhesive abrasives, such as Stickfix sandpaper, and sanding cloths can be affixed to the Stickfix sanding pads.
To affix the abrasive, simply press it onto the sanding pad and remove it after use.
The abrasive must be centered on the pad and the holes aligned with those on
4 the sanding pad.
Maintenance and care
Always disconnect the tool from the compressed air supply before doing any work on the tool.
Any maintenance or repair work requiring the motor housing to be opened may only be carried out by an authorized service workshop.
Vanes
We recommend that the vanes on the motor be replaced after approx. 500 operating hours.
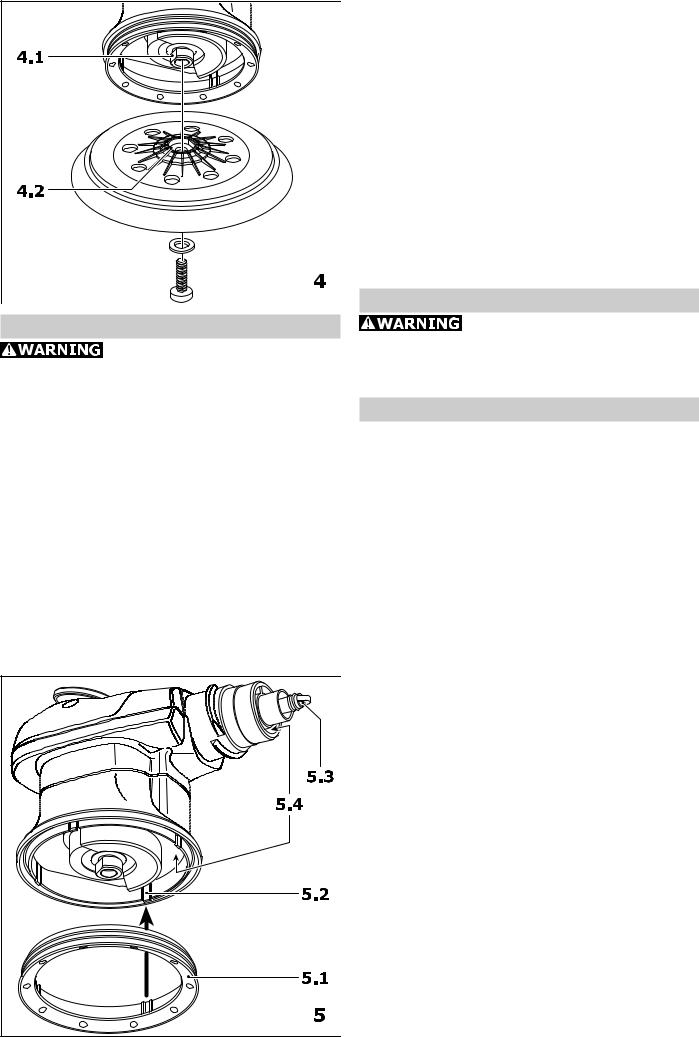
Sanding pad brake
The collar (5.1) makes contact with the sanding pad, thus preventing uncontrolled vibration of the sanding pad. This collar wears out over time and must be replaced should brake fading occur. The sanding pad must be removed for this. You can then remove the collar from the snap-on fastener (5.2) and replace it with a new one.
5 |
Lubrication
If the tool has not been used for an extended period, such as a weekend, introduce 1 or 2 drops of lubricating oil into the compressed-air supply (5.3) on the tool prior to use.
Replacing the silencer
The silencer on the IAS 2 connecting piece must be replaced at regular intervals to maintain the power of the pneumatic tool.
Cleaning the extraction channels
We recommend that the extraction channels in the tool (5.4) be cleaned once a week using a small pipe-cleaner brush or a cloth (especially when sanding resin filler).
Accessories, tools
For safety reasons, only use original Festool accessories and tools! Accessory and tool order numbers can be found in your Festool catalog.
Warranty
Conditions of 1+2 Warranty
You are entitled to a free extended warranty (1 year + 2 years = 3 years) for your Festool power tool. Festool shall be responsible for all shipping costs during the first year of the warranty. During the second and third year of the warranty the customer is responsible for shipping the tool to Festool. Festool will pay for return shipping to the customer using UPS Ground Service. All warranty service is valid 3 years from the date of purchase on your receipt or invoice.
Festool Limited Warranty
This warranty is valid on the pre-condition that the tool is used and operated in compliance with these Festool operating instructions. Festool warrants, only to the original consumer purchaser, that the specified tool will be free from defects in materials and workmanship for a term of one year from the date of procurement. Festool makes no other warranty, express or implied, for Festool portable power tools. No agent, representative, distributor, dealer or employee of Festool has the authority to increase or otherwise change the obligations or limitations of this warranty. The obligations of Festool in its sole discretion under this warranty shall be limited to the repair or replacement of any Festool portable power tool that is found to be defective as packaged with this User Manual.
Excluded from coverage under this warranty are: normal wear and tear; damages caused by misuse, abuse or neglect; damage caused by anything other than defects in material and workmanship. This warranty does not apply to
 Loading...