


OWNER’S MANUAL MANUAL DE INSTRUCCIONES MODE D’EMPLOI
MANUALE UTENTE BEDIENUNGSHANDBUCH
MANUAL DO PROPRIETÁRIO

HOT ROD DEVILLE™ IV and HOT ROD DELUXE™ IV
Working guitarists everywhere prize Hot Rod amps for their great volume, reliability, responsiveness to effects pedals, and affordability. The Hot Rod Deluxe IV is a scorching 40-watt 1x12” tube combo decked out with power and performance to spare, great features and a classic look.
The Hot Rod DeVille is the standard for gigging guitarists worldwide and the ideal amp for crafting your own signature sound. The Hot Rod DeVille IV combo delivers the goods and then some, with 60 watts of tube power driving a scorching pair of 12” speakers, hot-rodded performance to spare, great features and a classic look.
Features include:
•Modified preamp circuitry for increased note definition in the overdrive channels
•Spring Reverb smoothness mod
•Celestion® 12” A-TYPE speakers
•Steel-reinforced strap handle
•Ivory pointer knobs
•Improved control panel texture and graphics
•Lightly aged silver grille cloth
•Pine cabinet for weight reduction
•Cover and two-button footswitch
ENGLISH
CONTROL PANEL
INPUTS |
VOLUME |
DRIVE |
TREBLE |
BASS |
MIDDLE |
MASTER |
REVERB |
PRESENCE |
PREAMP |
POWER |
FOOT |
ON |
ON |
6 7 |
6 7 |
6 7 |
6 7 |
6 7 |
6 7 |
6 7 |
6 7 |
||||||
1 |
2 |
|
|
|
|
|
|
|
OUT |
AMP IN |
SWITCH |
|
|
|
|
|
|
|
|
|
|
|
|
|
|
||
|
3 |
3 |
3 |
3 |
3 |
3 |
3 |
3 |
|
|
|
|
|
NORMAL |
1 |
12 |
MORE |
1 |
12 |
1 |
12 |
1 |
12 |
1 |
12 |
CHANNEL |
1 |
12 |
1 |
12 |
1 |
12 |
STANDBY |
OFF |
BRIGHT |
|
|
DRIVE |
|
|
|
|
|
|
|
|
SELECT |
|
|
|
|
|
|
A.INPUT 1: Normal sensitivity input ideal for use with most guitars. Either input jack can be used with any type of guitar depending on the tonal character you prefer. Experiment and use the input that sounds best to you.
B.INPUT 2: Lower sensitivity input (-6dB) provides cleaner response with high-output and pre-amplified guitars. You can use input 1 and Input 2 simultaneously with two guitars or a guitar and a microphone, for example. Input sensitivities become equal when used simultaneously.
C.NORMAL/BRIGHT: Press in to boost high-frequency tones of NORMAL channel.
D.VOLUME: Adjusts volume of NORMAL channel.
E.MORE DRIVE: Press in to boost gain and distortion of the DRIVE channel.
F.DRIVE: Increase DRIVE setting to produce more distortion and sustain. Use lower DRIVE settings to produce cleaner sounds.
G.CHANNEL INDICATOR: NORMAL channel (off), DRIVE channel (yellow), MORE DRIVE channel (red).
H.TREBLE: Adjusts high-frequency tone.
I.BASS: Adjusts low-frequency tone.
J.MIDDLE: Adjusts mid-frequency tone.
K.CHANNEL SELECT: NORMAL channel (out), DRIVE channel (in).
L.MASTER: Use to adjust loudness of the DRIVE and MORE DRIVE channels in conjunction with DRIVE (F).
M.REVERB: Adjusts level of the reverb effect.
N.PRESENCE: Adjusts tone at a point in the signal path after the preamp circuitry to provide unique ultra highfrequency tone shaping.
O.PREAMP OUT/POWER AMP IN: Multi-functional input/output jacks that can be used in a variety of configurations:
Effects Loop: Connect PREAMP OUT to the input of your effects device and connect effects output to the POWER AMP IN jack.
Multiple Hot Rod Amps: Connect PREAMP OUT on primary unit to POWER AMP IN on auxiliary unit. The primary unit is used to control all auxiliary units, except
2
for REVERB and PRESENCE, which remain active on each auxiliary unit.
Recording/Sound Reinforcement: Connect PREAMP OUT to input jack of sound equipment.
Use instrument (shielded) cables with TS (tip-sleeve) plugs for connections. Both PREAMP OUT and POWER AMP IN jacks are located before Reverb and Presence in signal path.
P.FOOTSWITCH: Connect included footswitch here to enable remote selection of NORMAL/DRIVE/MORE DRIVE channels. CHANNEL SELECT (K) button on control panel is disabled when footswitch is connected. Speaker cable (unshielded) is superior to instrument cable (shielded) for connecting footswitch.
Q.POWER INDICATOR: Illuminates when unit is on. Unscrew red jewel to access bulb (type T47) for replacement.
R.STANDBY: Use STANDBY instead of switching power off during short breaks to avoid having to wait for tubes to warm up when you want to start playing again. Also, keep amplifier on STANDBY for first 30 seconds when you first switch power on to give tubes a gentle warm up cycle. Using STANDBY will extend lifespan of amplifier’s tubes by reducing shock of heat-up / cool- down cycle on tube filaments.
S.POWER: Turns amplifier on and off.
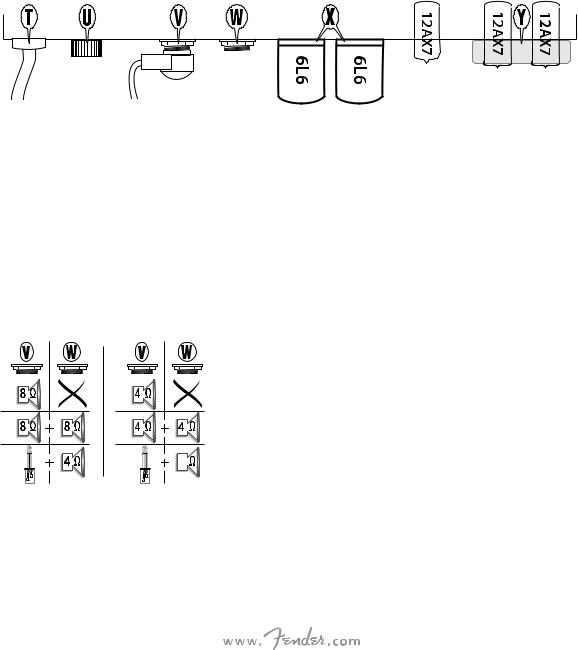
CHASSIS REAR VIEW
T.POWER CORD: Connect to a grounded outlet in accordance with the voltage and frequency ratings specified on the rear panel of your amplifier.
U.FUSE: The fuse protects the unit from electrical faults. Replace fuses only with the type and rating specified on the fuse holder. If the unit repeatedly blows fuses, have the unit tested at an authorized Fender Service Center.
V.MAIN SPEAKER JACK: One of the following speaker configurations (internal or external) must always be connected when the unit is ON to prevent damage to the amplifier:
Deluxe IV |
|
DeVille IV |
1. |
1. |
|
2. |
2. |
|
3.* |
3.* |
2 |
*Insert an open plug (without speakers connected) into Main Speaker jack (V) for configuration three.
W.EXTERNAL SPEAKER JACK: This jack is wired in parallel with the main speaker jack and must only be used with a speaker load or an open plug connected to the main speaker jack, as shown above in the MAIN SPEAKER JACK diagram.
ENGLISH
X.TUBES: Your new Fender amplifier comes equipped with the highest quality tubes available, sourced from various manufacturers worldwide. Because of occasional
irregularities in supply, the specific tube type used in each amplifier is subject to change without notice.
When replacing output tubes, please note the specific tube markings on the original tubes factory supplied with your amplifier. For example, 6L6 output tube types used by Fender include, but are not limited to: 6L6GC; 6L6WXT; 6L6C; 6L6GE; etc. The installation of a different type may require significant adjustment by a qualified technician to avoid reduction in performance and tube life.
Additionally, Fender tests and sorts many of our output tubes based on their measured performance. The sorted tubes are marked with a label on the base with coarse ratings of blue, white and red plus fine ratings of 1-10.
If your amp came supplied with, for example, a pair of matched GT-6L6-GE power tubes ranked at white-6, then any pair of GT-6L6-GE power tubes marked with a course rating of white will be a good replacement. If the tube replacements are marked as white-6, they will be a perfect direct replacement.
If you have questions or concerns, contact your Fender dealer or authorized service center.
Y.PREAMP TUBE STABILIZER: A vibration-absorbing stabilizer is installed around the preamp tubes to minimize the tube microphonics that normally develop over
time. The stabilizer can be used with all preamp tubes compatible with your Hot Rod amplifier.
3

ENGLISH
|
SPECIFICATIONS |
|
|
HOT ROD DEVILLE IV |
HOT ROD DELUXE IV |
TYPE |
PR 1123 |
PR 1110 |
POWER REQUIREMENT/POWER OUTPUT |
180W/60W into 4Ω or 2Ω at 5% THD |
180W/40W into 4Ω or 2Ω at 5% THD |
INPUT 1/INPUT 2 IMPEDANCES |
1MΩ/136kΩ |
1MΩ/136kΩ |
PREAMP OUTPUT IMPEDANCE |
1.5kΩ max |
1.5kΩ max |
POWER AMP INPUT IMPEDANCE/SENSITIVITY |
200 mV for clipping/54kΩ |
200 mV for clipping/54kΩ |
TUBES |
3 – 7025/12AX7A/ECC83 |
3 – 7025/12AX7A/ECC83 |
|
2 – 6L6GC |
2 – 6L6GC |
FUSE |
F3AL 250V fuse (100V-120V) |
F3AL 250V fuse (100V-120V) |
|
F1.6AL 250V fuse (220V-240V) |
F1.6AL 250V fuse (220V-240V) |
SPEAKERS |
2 12” 8Ω Celestion® A-TYPE |
1 12” 8Ω Celestion® A-TYPE |
FOOTSWITCH |
2 button gain/channel (079606) |
2 button gain/channel (079606) |
HEIGHT |
21” (53.3 cm) |
18.75” (47.6 cm) |
WIDTH |
24.25” (61.6 cm) |
23.5” (59.7 cm) |
DEPTH |
10.75” (27.3 cm) |
10.5” (26.7 cm) |
WEIGHT |
55.75 lbs. (25.28 kg) |
41.65 lbs. (18.89 kg) |
Product specifications are subject to change without notice.
4

HOT ROD DEVILLE™ IV y HOT ROD DELUXE™ IV
El Hot Rod DeVille es el amplificador standard para guitarristas de directo de todo el Mundo y resulta perfecto para crear su propio sonido personal. El combo Hot Rod DeVille IV hará todo eso y más gracias a sus 60 watios de potencia a válvulas que dan señal a una impresionante pareja de altavoces 12”, con un rendimiento a toda prueba, increíbles funciones y un aspecto clásico.
Los guitarristas profesionales adoran los amplificadores Hot Rod por su potente volumen, fiabilidad, respuesta a los pedales de efectos y accesibilidad. El Hot Rod Deluxe IV es un impresionante combo a válvulas de 40 watios y 1x12” que le ofrece potencia y rendimiento para dar y vender, increíbles funciones y un aspecto clásico.
Entres sus características principales están:
•Circuito previo modificado para una mejor definición de las notas en los canales saturados
•Reverb de muelles con una modulación suave
•Altavoces Celestion® A-TYPE de 12”
•Asa reforzada en acero
•Mandos con puntero de ébano
•Panel de control con tacto y gráficos mejorados
•Parrilla de tela plateada ligeramente envejecida
•Recinto acústico en madera de pino para un menor peso
•Tapa y pedalera de dos botones
PANEL DE CONTROL
INPUTS |
VOLUME |
DRIVE |
TREBLE |
BASS |
MIDDLE |
MASTER |
REVERB |
PRESENCE |
PREAMP |
POWER |
FOOT |
ON |
ON |
6 7 |
6 7 |
6 7 |
6 7 |
6 7 |
6 7 |
6 7 |
6 7 |
||||||
1 |
2 |
|
|
|
|
|
|
|
OUT |
AMP IN |
SWITCH |
|
|
|
|
|
|
|
|
|
|
|
|
|
|
||
|
3 |
3 |
3 |
3 |
3 |
3 |
3 |
3 |
|
|
|
|
|
NORMAL |
1 |
12 |
MORE |
1 |
12 |
1 |
12 |
1 |
12 |
1 |
12 |
CHANNEL |
1 |
12 |
1 |
12 |
1 |
12 |
STANDBY |
OFF |
BRIGHT |
|
|
DRIVE |
|
|
|
|
|
|
|
|
SELECT |
|
|
|
|
|
|
||
|
|
|
|
|
|
|
|
|
|
|
|
|
|
|
|
|
|
ESPAÑOL
A.INPUT 1: Una entrada de sensibilidad normal, perfecta para la mayoría de guitarras. Puede usar cualquiera de las entradas con cualquier tipo de guitarra, dependiendo del carácter que quiera para el sonido. Haga distintas pruebas hasta conseguir el sonido que más le guste.
B.INPUT 2: Una entrada de menor sensibilidad (-6 dB) que le ofrece una respuesta más limpia con guitarras de salida alta y pre-amplificadas. Puede usar simultáneamente las tomas Input 1 e Input 2 con dos guitarras o con una guitarra y un micrófono, por ejemplo. Las sensibilidades de entrada se igualan cuando use ambas tomas a la vez.
C.NORMAL/BRIGHT: Pulse este interruptor para realzar las frecuencias agudas del canal NORMAL.
D.VOLUME: Ajusta el volumen del canal NORMAL.
E.MORE DRIVE: Púlselo para realzar la ganancia y la distorsión del canal saturado o DRIVE.
F.DRIVE: Aumente el ajuste de este mando DRIVE para producir una mayor distorsión y sustain. Use valores más bajos si quiere sonidos más limpios.
G.INDICADOR DE CANAL: Canal NORMAL (apagado), Canal DRIVE (amarillo), Canal MÁS DRIVE (rojo).
H.TREBLE: Ajusta la respuesta de altas frecuencias.
I.BASS: Ajusta el tono de los graves.
J.MIDDLE: Ajusta las frecuencias medias.
K.CHANNEL SELECT: Canal NORMAL (pulsado), canal DRIVE (no pulsado).
L.MASTER: Ajuste con esto el volumen de los canales DRIVE y MÁS DRIVE junto con el mando DRIVE (F).
M.REVERB: Esto ajusta el nivel del efecto reverb.
N.PRESENCE: Ajusta el tono en un punto de la ruta de señal tras el circuito de preamp para ofrecerle un exclusivo modelado de súper agudos.
O.PREAMP OUT/POWER AMP IN: Tomas de entrada/ salida multifunción que puede usar en distintas configuraciones:
Bucle de efectos: Conecte PREAMP OUT a la entrada de su dispositivo de efectos y la salida del mismo a la toma POWER AMP IN.
Varios amplificadores Hot Rod: Conecte la toma PREAMP OUT de la primera unidad al POWER AMP IN de la segunda. La primera unidad controla a las siguientes, salvo para REVERB y PRESENCE que seguirán controladas de forma individual.
5
Grabación o refuerzo de sonido: Conecte PREAMP OUT a la toma de entrada de su equipo de sonido.
Utilice cables de instrumento (blindados) con clavijas TS (punta-lateral) para las conexiones. Tanto PREAMP OUT como POWER AMP IN están colocadas antes de Reverb y Presence en la ruta de señal.
P.FOOTSWITCH: Conecte aquí el pedal incluido para seleccionar a distancia el canal NORMAL/DRIVE/MÁS DRIVE. El botón CHANNEL SELECT (K) del panel de control quedará desactivado cuando este pedal esté conectado. Para conectar el pedal es mejor usar un cable de altavoz (sin blindaje) que uno de instrumento (blindado).
Q.INDICADOR DE ENCENDIDO: Se ilumina cuando la unidad esté encendida. Desenrosque la tulipa roja para acceder a la bombilla (de tipo T47) si debe sustituirla.
R.STANDBY: Utilice este interruptor en lugar de apagar el aparato durante las pausas para evitar tener que esperar a que las válvulas se calienten cuando vuelva a tocar.
Además, mantenga el amplificador en este estado los 30 primeros segundos tras el encendido para que se realice un calentamiento completo de las válvulas. El uso de este modo alargará la duración de las válvulas del amplificador al reducir el efecto de encendidos/ apagados sobre los filamentos de las mismas.
S.INTERRUPTOR POWER: Le permite encender/apagar la unidad.
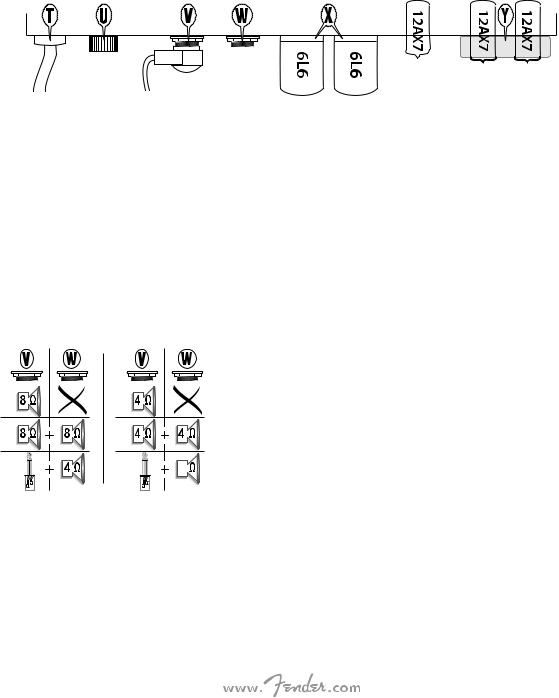
PANEL TRASERO
ESPAÑOL |
T. |
CABLE DE CORRIENTE: Conéctelo a una salida de |
|
|
corriente con toma de tierra del voltaje y amperaje |
||
|
especificados en el panel trasero del amplificador. |
||
|
U. |
FUSIBLE: Protege la unidad contra las averías eléctricas. |
|
|
|
Sustitúyalo por otro de idénticas especificaciones |
|
|
|
(mostradas en el receptáculo). Si el fusible salta |
|
|
|
continuamente, haga que el servicio oficial Fender® más |
|
|
|
cercano revise la unidad. |
|
|
V. |
CONECTOR DE ALTAVOZ PRINCIPAL: Siempre que |
|
|
|
la unidad esté encendida debe conectar una de las |
|
|
|
siguientes configuraciones de altavoz (interna o externa) |
|
|
|
para evitar daños en el amplificador: |
|
|
|
Deluxe IV |
DeVille IV |
1. |
1. |
|
2. |
2. |
|
3.* |
3.* |
2 |
*Introduzca una clavija abierta (no conectada a ningún altavoz) para la configuración (3).
W.CLAVIJA DE ALTAVOZ EXTERNO: Esta toma está cableada en paralelo con el conector de altavoz principal y solo debe usarlo con una carga de altavoz o una clavija abierta conectada a la salida de altavoz principal, tal como hemos mostrado en el diagrama anterior.
X.TUBES: Su nuevo amplificador Fender está equipado con válvulas de la mejor calidad posibles, procedentes de
distintos fabricantes de todo el Mundo. Debido a problemas puntuales en el suministro, el tipo de válvula concreto usado está sujeto a modificaciones sin previo aviso.
A la hora de sustituir las válvulas de salida, tome nota de las marcas específicas de las válvulas que vengan de fábrica en su amplificador. Por ejemplo, los tipos de válvula de salida 6L6 usados por Fender incluyen (pero sin limitación alguna): 6L6GC; 6L6WXT; 6L6C;
6L6GE; etc. La instalación de un tipo de válvula diferente puede requerir distintos ajustes por parte de un
técnico especialista de cara a evitar una reducción del rendimiento y duración de la válvula.
Además, la empresa Fender se encarga de comprobar y calificar muchas de nuestras válvulas de salida en base a su rendimiento. Esta calificación viene representada por un código de colores (AZUL, BLANCO y ROJO) para los valores más amplios y un valor más preciso del 1 al 10 indicado en la base de la válvula. Si su amplificador incluye, por ejemplo, un par de válvulas de potencia emparejadas GT-6L6-GE marcadas como BLANCO-6, entonces cualquier par de válvulas de potencia GT-6L6-GE que dispongan de la misma calificación amplia BLANCO serán un buen recambio. Si
las válvulas de recambio son del tipo BLANCO-6 serán el componente de sustitución ideal.
Si tiene cualquier duda, póngase en contacto con su distribuidor o servicio técnico oficial Fender.
Y.ESTABILIZADOR DE VALVULA DE PREVIO: Un estabilizador de absorción de vibraciones está instalado alrededor de las válvulas del previo para reducir al mínimo la "microfonía" de la válvula que se suele producir al cabo del tiempo. Este estabilizador puede ser usado con todas las válvulas de previo compatibles con su amplificador Hot Rod.
6

ESPECIFICACIONES TÉCNICAS
|
HOT ROD DEVILLE IV |
HOT ROD DELUXE IV |
TIPO |
PR 1123 |
PR 1110 |
CONSUMO/POTENCIA DE SALIDA |
180/60 W a 4 ó 2Ω a 5% THD |
180/40 W a 4 ó 2Ω a 5% THD |
IMPEDANCIA INPUT 1/INPUT 2 |
1 MΩ/136 kΩ |
1 MΩ/136 kΩ |
IMPEDANCIA SALIDA PREVIO |
1.5 kΩ máx. |
1.5 kΩ máx. |
IMPEDANCIA/SENSIBILIDAD ENTR. ETAPA POTENCIA |
200 mV para saturación/54 kΩ |
200 mV para saturación/54 kΩ |
VALVULAS |
3 – 7025/12AX7A/ECC83 |
3 – 7025/12AX7A/ECC83 |
|
2 – 6L6GC |
2 – 6L6GC |
FUSIBLE |
F3 AL 250 V fusible (100-120V) |
F3 AL 250 V fusible (100-120V) |
|
F1.6 AL 250 V fusible (220-240V) |
F1.6 AL 250 V fusible (220-240V) |
ALTAVOCES |
2 Celestion® A-TYPE 12” 8Ω |
1 Celestion® A-TYPE 12” 8Ω |
PEDAL |
2 botones gain/channel (079606) |
2 botones gain/channel (079606) |
ALTURA |
53.3 cm (21”) |
47.6 cm (18.75”) |
ANCHURA |
61.6 cm (24.25”) |
59.7 cm (23.5”) |
PROFUNDIDAD |
27.3 cm (10.75”) |
26.7 cm (10.5”) |
PESO |
25.28 kg (55.75 lbs.) |
18.89 kg (41.65 lbs.) |
Las especificaciones de este producto están sujetas a cambios sin previo aviso.
ESPAÑOL
7

HOT ROD DEVILLE™ IV et HOT ROD DELUXE™ IV
Le Hot Rod DeVille est un standard des scènes du monde entier, considéré par beaucoup comme le point de départ idéal pour trouver votre propre son. Le Hot Rod DeVille IV est un ampli combo à lampes au look vintage développant une puissance de 60 watts, doté de 2 haut-parleurs de 12” et proposant des caractéristiques exceptionnelles.
Les amplis Hot Rod sont plébiscités par les guitaristes du monde entier pour leur puissance importante, leur fiabilité, leur compatibilité avec les pédales d’effets et leur prix abordable. Le Hot Rod Deluxe IV est un ampli combo à lampes de 40 watts doté d’un haut-parleur de 12”, très puissant, polyvalent et au look vintage.
Caractéristiques:
•Circuit de préamplification modifié pour une définition accrue sur les canaux d’overdrive
•Reverb à ressort au son plus doux
•Haut-parleur Celestion® A-TYPE de 12”
•Poignée avec renforts en acier
•Potentiomètres à pointeur couleur ivoire
•Texture et graphismes du panneau de réglages améliorés
•Protection du haut-parleur en tissus à l’aspect vieilli
•Baffle en pin pour un poids réduit
•Housse de protection et pédalier à 2 contacteurs inclus
FRANÇAIS
RÉGLAGES
INPUTS |
VOLUME |
DRIVE |
TREBLE |
BASS |
MIDDLE |
MASTER |
REVERB |
PRESENCE |
PREAMP |
POWER |
FOOT |
ON |
ON |
6 7 |
6 7 |
6 7 |
6 7 |
6 7 |
6 7 |
6 7 |
6 7 |
||||||
1 |
2 |
|
|
|
|
|
|
|
OUT |
AMP IN |
SWITCH |
|
|
|
|
|
|
|
|
|
|
|
|
|
|
||
|
3 |
3 |
3 |
3 |
3 |
3 |
3 |
3 |
|
|
|
|
|
NORMAL |
1 |
12 |
MORE |
1 |
12 |
1 |
12 |
1 |
12 |
1 |
12 |
CHANNEL |
1 |
12 |
1 |
12 |
1 |
12 |
STANDBY |
OFF |
BRIGHT |
|
|
DRIVE |
|
|
|
|
|
|
|
|
SELECT |
|
|
|
|
|
|
||
|
|
|
|
|
|
|
|
|
|
|
|
|
|
|
|
|
|
A.INPUT 1: Entrée à sensibilité normale, idéale pour la plupart des guitares. Vous pouvez utiliser les deux entrées avec n’importe quel type de guitare, selon le son que vous recherchez. Essayez les deux entrées et choisissez.
B.INPUT 2: Entrée à sensibilité plus faible (-6 dB) pour une réponse plus claire pour les guitares actives et/ou à niveau de sortie élevé. Vous pouvez utiliser les entrées Input 1 et 2 avec deux guitares ou une guitare et un micro, par exemple. Les sensibilités d’entrées deviennent alors identiques.
C.NORMAL/BRIGHT: Enfoncez la touche pour accentuer les hautes fréquences du canal NORMAL.
D.VOLUME: Volume du canal NORMAL.
E.MORE DRIVE: Enfoncez la touche pour augmenter le gain et la saturation du canal DRIVE.
F.DRIVE: Montez le DRIVE pour augmenter la saturation et le Sustain. Une valeur plus faible permet de conserver de la clarté au son.
G.TÉMOIN DE CANAL: Canal NORMAL (éteint), Canal DRIVE (jaune), Canal MORE DRIVE (rouge).
H.TREBLE: Règle les hautes fréquences.
I.BASS: Règle les basses fréquences.
J.MIDDLE: Règle les fréquences médiums.
K.CHANNEL SELECT: Canal NORMAL (relâchez), canal DRIVE (enfoncez).
L.MASTER: Détermine le niveau général des canaux DRIVE et MORE DRIVE (avec le réglage DRIVE (F).
M.REVERB: Détermine le niveau de la réverbération.
N.PRESENCE: Modifie le niveau des très hautes fréquences du signal post circuit de preamp.
O.PREAMP OUT/POWER AMP IN: Jacks d’entrée/sortie polyvalents pouvant être utilisés de différentes façons:
Boucle d’effets: Connectez la sortie PREAMP OUT à l’entrée de l’effet et reliez la sortie de l’effet à l’entrée Jack POWER AMP IN.
Plusieurs amplis Hot Rod: Connectez la sortie PREAMP OUT de l’ampli maître à l’entrée POWER AMP IN de l’ampli esclave. L’ampli maître contrôle les amplis esclaves, sauf les réglages REVERB et PRESENCE qui se règlent sur chaque ampli.
8
 Loading...